


DFG 26B1
EN English
Operating instructions
DISHWASHER - Contents
Operating instructions, 1
Precautions and advice, 2-3
Product Data, 10
Assistance, 12
Installation, 13-14
Description of the appliance, 15
Refined salt and rinse aid, 16
Loading the racks, 17-18
Detergent and dishwasher use, 19
Wash cycles, 20
Special wash cycles and options, 21
Care and maintenance, 22
Troubleshooting, 23
DE Deutsch
Gebrauchsanleitung
GESCHIRRSPÜLER – Inhaltsverzeichnis
Gebrauchsanleitung, 1 Vorsichtsmaßnahmen und Hinweise, 3-4 Produktdatenblatt, 10
Kundendienst, 12
Installation, 24-25
Beschreibung Ihres Geschirrspülers, 26 Regeneriersalz und Klarspüler, 27 Beladen der Körbe, 28-29
Spülmittel und Verwendung des Geschirrspülers, 30 Programme, 31
Sonderprogramme und Optionen, 32 Reinigung und Pflege, 33
Störungen und Abhilfe, 34
CS Čeština
Návod k použití
MYČKA NÁDOBÍ -Obsah
Návod k použití, 1 Opatření a rady, 4-5 Informační list výrobku, 11 Servisní služba, 12 Instalace, 35-36
Popis zařízení, 37 Regenerační sůl a Leštidlo, 38 Plnění košů, 39-40
Mycí prostředek a použití myčky, 41 Programy, 42
Speciální programy a Volitelné funkce, 43 Údržba a péče, 44
Poruchy a způsob jejich odstranění, 45
RU Русский
Руководство по эксплуатации
ПОСУДОМОЕЧНАЯ МАШИНА - Оглавление
Руководство по эксплуатации, 1 Меры предосторожности и рекомендации, 5-6-7 Установка, 46-47
Техническая спецификация изделия, 48 Описание изделия, 49 Регенерирующая соль и Ополаскиватель, 50 Загрузка корзин, 51-52
Моющее средство и использование посудомоечной машины, 53 Программы, 54
Специальные программы и Допольнительные, 55 функции Техническое обслуживание и уход, 56 Неисправности и методы их устранения, 57 Сервисное обслуживание, 58
UA Українська
Довідник користувача
ПОСУДОМИЙНА МАШИНА - Зміст
Довідник користувача, 1 Запобіжні заходи та поради, 7-8 Допомога, 12 Встановлення, 59-60 Опис приладу, 61
Регенераційна сіль і ополіскувач, 62 Як завантажити короби, 63-64
Миючий засіб і використання посудомийної машини, 65 Програми, 66 Спеціальні програми й опції, 67 Догляд та очищення, 68
Несправності та засоби їх усунення, 69
KZ Қазақша
Пайдалану нұсқаулығы
ЫДЫС ЖУУ МАШИНАСЫ - Мазмұны
Пайдалану нұсқаулығы, 1 Сақтық шаралары мен кеңес, 8-9 Көмек, 12 Орнату, 71-72
Өнім парақшасы, 73 Құрылғы сипаттамасы, 74
Тазаланған тұз және шаюға көмекші зат, 75 Тартпаларға жүктеу, 76-77 Жуғыш зат пен ыдыс жуу машинасын қолдану, 78 Жуу циклдары, 79
Арнайы жуу циклдары мен опциялары, 80 Күтім және техникалық қызмет көрсету, 81 Ақаулықтарды жою, 82

EN Precautions and advice
 This appliance was designed and manufacturedincompliancewithinternational safety standards. The following information has been provided for safety reasons and should be read carefully.
Keep this instruction manual in a safe place for future reference. If the appliance is sold, given away or moved, make sure the manual is kept with the machine.
Read the instructions carefully, as they include important information on safe installation, use and maintenance.
This appliance was designed for domestic use or similar applications, for example:
- farmhouses;
- use by guests in hotels, motels and other residential settings;
- bed & breakfasts.
Remove the appliance from all packaging and make sure it was not damaged during transportation. If it was damaged, contact the retailer and do not proceed any further with the installation process.
General safety
• This appliance should not be operated by children younger than 8 years, people with reduced physical, sensory or mental capacities, or inexperienced people who are not familiar with the product, unless they are given close supervision or instructions on how to use it safely and are made aware by a responsible person of the dangers its use might entail.
• Children must not play with the appliance.
• It is the user's responsibility to clean and maintain the appliance. Children should never clean or maintain it unless they are given supervision.
• The appliance was designed for domestic use inside the home and is not intended for commercial or industrial use.
• The appliance must be used to wash domestic crockery in accordance with the instructions in this manual.
• The appliance must not be installed outdoors, even in covered areas. It is extremely dangerous to leave the machine exposed to rain and storms.
• Do not touch the appliance when barefoot.
• When unplugging the appliance always pull the plug from the mains socket. Do not
pull on the cable.
• The water supply tap must be shut off and the plug should be removed from the electrical socket at the end of every cycle and before cleaning the appliance or carrying out any maintenance work.
• The maximum number of place settings is shown in the product sheet.
• If the appliance breaks down, do not under any circumstances touch the internal parts in an attempt to perform the repair work yourself.
• Do not lean or sit on the open door: this may cause the appliance to overturn.
• The door should not be left open as it may create a dangerous obstacle.
• Keep detergent and rinse aid out of reach of children.
• The packaging material should not be used
as a toy.
• Knives and other utensils with sharp edges must be placed either with the points/blades facing downwards in the cutlery basket or horizontally on the tip-up compartments or in the tray/third basket, if available.
• Connect the appliance to the water mains using the new supply hose provided with the appliance. Do not re-use the old hose.
• Install the back side of a free-standing dishwasher against a wall.
Disposal
• To dispose of any packaging materials, follow local legislation so that the packagings may be reused.
• The European Directive 2012/19/EU relating to Waste Electrical and Electronic Equipment (WEEE) states that household appliances should not be disposed of using the normal solid urban waste cycle.
Exhausted appliances should be collected separately in order to optimise the cost of reusing and recycling the materials inside the machine, while preventing potential damage to the atmosphere and public health. The crossed-out dustbin symbol shown on all products reminds the owners of their obligations regarding separated waste collection.
For further information relating to the correct disposal of household appliances, owners may contact the relevant public authority or the local appliance dealer.
2

Saving energy and respecting the environment
Saving water and energy
• Only begin a wash cycle when the dishwasher is full. While waiting for the dishwasher to be filled, prevent unpleasant odours with the Soak cycle (if available, see
Wash Cycles).
• Select a wash cycle that is suited to the type
of crockery and to the soil level using the
Table of Wash Cycles:
- For dishes with a normal soil level, use the Eco wash cycle, which guarantees low energy and water consumption levels.
- If the load is smaller than usual activate
the Half Load option (see Special wash cycles
and options, if available).
• If your electricity supply contract gives details of electricity-saving time bands, run the wash cycles when electricity prices are lower. The Delayed Start option can help you organise the wash cycles accordingly
(see Special wash cycles and options, if available).
DE VorsichtsmaßnahmenHinweise und
 Das Gerät wurde nach den strengsten internationalen Sicherheitsvorschriften konzipiert und hergestellt. Nachstehende Hinweise werden aus Sicherheitsgründen angegeben und sollten aufmerksam gelesen werden.
Bewahren Sie diese Bedienungsanleitung sorgfältig auf, damit Sie sie jederzeit zu Rate ziehen können. Im Falle eines Verkaufs, einer
Übergabe oder eines Umzugs muss sie dem
Gerät stets beiliegen.
Lesen Sie die folgenden Hinweise aufmerksam durch, denn sie liefern wichtige Informationen hinsichtlich der Installation, des Gebrauchs und der Sicherheit.
Dieses Gerät wurde für den Hausgebrauch oder ähnliche Anwendungen konzipiert, zum Beispiel:
- Bauernhäuser
- Nutzung durch Kunden in Hotels, Motels und anderen Wohnbereichen
- Frühstückspensionen
Nehmen Sie das Verpackungsmaterial ab und prüfen Sie Ihr Gerät auf eventuelle Transportschäden. Schließen Sie das Gerät im Falle einer Beschädigung bitte nicht an, sondern fordern Sie den Kundendienst an.
Allgemeine Sicherheit
• Dieses Haushaltsgerät darf von Kindern ab acht Jahren und von Personen mit eingeschränkten körperlichen, s e n s o r i s c h e n o d e r g e i s t i g e n
Fähigkeiten oder ohne Erfahrung und der notwendigen Kenntnis verwendet werden, vorausgesetzt, sie werden streng von einer verantwortungsbewussten Person überwacht oder sie haben eine ausreichende Einweisung in die sichere
Nutzung des Geräts erhalten und die damit verbundenen Gefahren verstanden.
• Kinder dürfen nicht mit dem Gerät spielen.
• Die Reinigung und die Wartung des
Geräts müssen vom Benutzer ausgeführt werden. Diese Arbeiten dürfen nicht von unbeaufsichtigten Kindern ausgeführt werden.
• DiesesGerätistfürdennichtprofessionellen
Einsatz in privaten Haushalten bestimmt.
• Das Gerät darf nur zum Spülen von
Haushaltsgeschirr und gemäß den Anleitungen dieses Handbuchs verwendet werden.
• Das Gerät darf nicht im Freien aufgestellt werden, auch nicht, wenn es sich um einen geschützten Platz handelt. Es ist äußerst gefährlich, das Gerät Regen und Gewittern auszusetzen.
• Berühren Sie den Geschirrspüler nicht, wenn Sie barfuß sind.
• Ziehen Sie den Netzstecker nicht am
Netzkabel aus der Steckdose, sondern nur am Netzstecker selbst.
• Vor Reinigungsund Wartungsarbeiten mussamEndejedesZyklusderWasserhahn zugedreht und der Netzstecker aus der Steckdose gezogen werden.
• Die höchstzulässige Anzahl an Gedecken ist auf dem Produktdatenblatt angegeben.
• Versuchen Sie bei etwaigen Störungen keinesfalls, Innenteile selbst zu reparieren.
• Stützen Sie sich und setzen Sie sich nicht auf die offen stehende Gerätetür; das Gerät könnte umkippen.
• Die Gerätetür sollte nicht offen gelassen werden, da man darüber stolpern könnte.
• Bewahren Sie das Spülmittel und den
Klarspüler außerhalb der Reichweite von Kindern auf.
• Verpackungsmaterial ist kein Spielzeug für
Kinder.
• Messer und anderes Besteck mit scharfen
Kanten müssen mit der Spitze/Klinge nach unten in den Besteckkorb gegeben oder
3

horizontal auf die Klappfächer oder auf das Tablett/den dritten Korb gelegt werden, sofern dies bei Ihrem Modell vorhanden ist.
• Das Gerät wird mit dem neuen
Versorgungsschlauch an das Wassernetz angeschlossen und der alte Schlauch darf nicht mehr verwendet werden.
Handelt es sich bei der Spülmaschine um ein frei stehendes Gerät, muss die Rückseite an eine Wand gestellt werden.
Entsorgung
• Befolgen Sie die lokalen Vorschriften;
Verpackungsmaterialkannwiederverwertet werden.
• DieeuropäischeRichtlinie2012/19/EGüber Elektround Elektronik-Altgeräte (WEEE) sieht vor, dass Haushaltsgerätenicht mit dem normalen Hausmüll entsorgt werden dürfen. Die Altgeräte müssen getrennt gesammelt werden, um die Rückführung und das Recycling der Materialen zu optimieren, aus denen die Geräte hergestellt sind, und um mögliche Belastungen der Gesundheit und der Umwelt zu verhindern. Das
Mülleimersymbol ist auf allen Produkten dargestellt, um an die Verpflichtung zur getrennten Abfallsammlung zu erinnern.
Für weitere Informationen hinsichtlich der ordnungsgemäßen Entsorgung von
Haushaltsgeräten wenden Sie sich bitte an Ihren Händler oder an die zuständige kommunale Stelle.
Energie sparen und Umwelt schonen
Wasser und Strom sparen
• Setzen Sie den Geschirrspüler nur bei voller Ladung in Betrieb. Um in der Zwischenzeit, d. h. bis das Gerät ganz gefüllt ist, die Bildung unangenehmer Gerüche zu vermeiden, setzen Sie den Einweichzyklus
in Gang (sofern verfügbar – siehe Spülprogramme).
• Wählen Sie ein für das zu spülende
Geschirr und den Verschmutzungsgrad geeignetes Programm. Ziehen Sie hierzu die Programmtabelle zu Rate:
- Verwenden Sie für normal verschmutztes Geschirr das umweltfreundliche
Sparprogramm Eco, das einen niedrigen
Wasser-undStromverbrauchgewährleistet. - Aktivieren Sie bei geringfügiger Beschickung die Option Halbe Füllung
(sofern verfügbar – siehe Sonderprogramme und Optionen).
•Sieht Ihr Stromliefervertrag Billigstromzeiten vor, empfiehlt sich, das Gerät in diesen
Zeiten in Betrieb zu setzen. Die Option
Verzögerter Start kann dabei helfen, die Spülgänge entsprechend zu organisieren
(sofern verfügbar – siehe Sonderprogramme und Optionen).
CS Opatření a rady
 Zařízení bylo navrženo a vyrobeno v souladu s platnými mezinárodními bezpečnostnímipředpisy.Tatoupozornění jsou uváděna z bezpečnostních důvodů a je třeba si je pozorně přečíst.
Je velmi důležité tento návod uschovat, aby jej bylo možné kdykoli dle potřeby konzultovat. V případě prodeje, darování nebo přestěhování zařízení se ujistěte, že návod zůstane uložen v jeho blízkosti.
Pozorně si přečtěte uvedené pokyny: Obsahují důležité informace o instalaci, použití a bezpečnosti.
Toto zařízení bylo navrženo pro použití v domácnosti nebo pro podobné aplikace, jako například:
- hospodářská stavení;
- použití zákazníky v hotelu, motelu nebo jiných prostředích rezidenčního typu;
- penziony typu „bed and breakfast“.
Po rozbalení zařízení zkontroluje, zda běhempřepravynedošlokjehopoškození. V případě, žeje poškozeno,jenezapojujte a obraťte se na prodejce.
Základní bezpečnostní pokyny
• Tento elektrospotřebič mohou používat dětivevěkuod8letaosobysesníženými fyzickými, senzorickými nebo duševními schopnostmineboosobybezzkušeností nebo potřebné znalosti, když jsou pod dozorem odpovědné osoby, případně poté, co jim byly poskytnuty pokyny týkající se bezpečného použití zařízení a pochopení souvisejících nebezpečí.
• Děti si nesmí hrát se zařízením.
• Čištění a údržbu zařízení musí provádět uživatel. Nesmí je provádět děti bez dozoru.
• Totozařízeníbylonavrženovýhradněpro
neprofesionální použití v domácnosti.
• Zařízení musí být používání na mytí
4

nádobí v domácnosti podle pokynů uvedených v tomto návodu.
• Zařízenínesmíbýtnainstalovánovenku, a to ani v případě, že by se jednalo o místo chráněné před nepřízní počasí, protože je velmi nebezpečné vystavit jej působení deště a bouří.
• Nedotýkejte se myčky nádobí bosýma nohama.
• Nevytahujte zástrčku ze zásuvky elektrického rozvodu tahem za kabel, ale uchopením za zástrčku.
• Na konci každého cyklu a před provedením operací čištění a údržby je třeba zavřít kohoutek přívodu vody a odpojit zástrčku ze zásuvky elektrického rozvodu.
• Maximální počet jídelních souprav je uveden v technickém listu výrobku.
• Přivýskytuporuchysevžádnémpřípadě nepokoušejte o opravu vnitřních částí zařízení.
• Neopírejte se o otevřená dvířka a nesedejte si na ně: zařízení by se mohlo převrátit.
• Dvířka nesmí zůstat v otevřené poloze, protožebymohlapředstavovatnebezpečí zakopnutí.
• Udržujtemycíprostředekaleštidlomimo
dosah dětí.
• Obaly nejsou hračky pro děti!
• Nože a nástroje s ostrými hroty musí být umístěny do košíku na příbory s hroty/ ostřími obrácenými směrem dolů nebo do vodorovné polohy na sklopné držáky nebo na tác/do třetího koše u modelů, jejichž je součástí.
• Zařízení musí být připojeno k rozvodu vody novou přívodní hadicí a stará přívodníhadicenesmíbýtznovupoužita. Když se jedná o volně instalovatelnou myčku nádobí, její zadní strana musí být umístěna ke stěně.
Likvidace
• Likvidace obalových materiálů: Při jejich odstraňování postupujte v souladu s místním předpisy a dbejte na možnou recyklaci.
• Evropskásměrnice2012/19/EUoodpadu tvořeném elektrickými a elektronickými zařízeními (RAEE) předpokládá, že elektrospotřebiče nesmí být likvidovány v rámci běžného pevného městského odpadu. Vyřazená zařízení musí být sesbírána zvlášť za účelem zvýšení
počtu recyklovaných a znovu použitých materiálů, ze kterých jsou složena, a za účelemzabráněnímožnýmublíženímna zdraví a škodám na životním prostředí. Symbolem je přeškrtnutý koš, který je uveden na všech výrobcích s cílem připomenout povinnosti spojené se separovaným sběrem.
Podrobnější informace týkající se správného způsobu vyřazení elektrospotřebičů z provozu mohou jejich držitelé získat tak, že se obrátí na navrženou veřejnou instituci nebo na prodejce.
Jak ušetřit a brát ohled na životní prostředí
Šetření vodou a energií
• Uvádějte myčku nádobí do chodu pouze tehdy, když je naplněna. Během čekání na naplnění zařízení zabraňte vzniku nepříjemného zápachu použitím cyklu
Namáčení (je-li součástí - viz Programy).
• Zvolte program vhodný pro druh nádobí a stupeň znečištění; podívejte se do Tabulky programů:
- pro běžně znečištěné nádobí použijte program Eko, který zaručuje nízkou spotřebu energie a vody.
- při menším množství nádobí použijte volitelnou funkci Poloviční náplň (je-li
součástí-vizSpeciálníprogramyaVolitelnéfunkce).
• V případě, že vaše smlouva na dodávku elektrickéenergiepředpokládápoužívání časových pásem pro šetření elektrickou energií, provádějte mytí v časových pásmech se sníženou sazbou. Volitelná funkce Odložený start může napomoci organizaci mycích cyklů uvedeným
způsobem (je-li součástí -viz Speciální programy a Volitelné funkce).
RU Меры предосторожности и рекомендации
 Изделие спроектировано и изготовлено в соответствии с международными нормативамипобезопасности.Настоящие инструкции составлены в целях вашей безопасности и должны быть внимательно прочитаны.
Важно сохранить данное руководство для его последующих консультации. В случае продажи,передачиилипереездапроверьте, чтобы данное техническое руководство
5

сопровождало изделие.
Необходимо внимательно прочитать настоящие инструкции: в них содержатся важныесведенияобустановкеизделия,его эксплуатации и безопасности.
Данное изделие предназначено для бытового или другого аналогичного использования, например:
- в агротуристических усадьбах; - для использования проживающими в
гостинице, мотеле и в других временных местах проживания; - в гостиницах типа «номер с завтраком».
Снимите упаковку с изделия и проверьте, чтобы на нем не было повреждений, нанесенных при транспортировке. При обнаружении повреждений не подсоединяйте машину, а обратиться к продавцу.
Общие требования к безопасности
• Данный бытовой электроприбор может быть использован детьми не младше 8 лет и лицами с ограниченными физическими сенсорными или умственными способностями или не обладающими достаточным опытом или знанием о работе подобного прибора, под наблюдением или после обучения безопасному пользованию прибором и усвоения связанных с ним опасностей.
• Неразрешайтедетямигратьсприбором.
• Чистка и уход за прибором должны выполнятьсяпользователем.Непоручать чистку и уход детям без контроля.
• Данное изделие предназначается для непрофессионального использования в домашних условиях.
• Изделие предназначено для мытья посудывдомашнихусловиях,можетбыть использовано только в соответствии с инструкциями, приведенными в данном техническом руководстве.
• Запрещается устанавливать изделие на улице, даже под навесом, так как воздействие на него дождя и грозы является чрезвычайно опасным.
• Неприкасайтеськпосудомоечноймашине с босыми ногами.
• Не тяните за сетевой кабель для отсоединения вилки изделия из сетевой розетки, возьмитесь за штепсельную вилку рукой.
• Необходимо перекрыть водопроводный
кран и вынуть штепсельную вилку из сетевой розетки в конце каждого цикла и перед началом чистки и технического обслуживания.
• Максимальное количество столовых приборов указывается в технической спецификации изделия.
• В случае неисправности категорически запрещается открывать внутренние механизмы изделия с целью их самостоятельного ремонта.
• Не опирайтесь и не садитесь на открытуюдверцумашины:машинаможет опрокинуться.
• Не держите дверцу открытой, так как об нее можно случайно споткнуться.
• Храните моющие средства и ополаскиватель вдали от детей.
• Не разрешайте детям играть с упаковочными материалами.
• Ножи и кухонные принадлежность с заостренными краями необходимо укладыватьострымконцом/лезвиемвниз в корзине для столовых приборов или в горизонтальном положении на откидных полках или в лоток/третью корзину в моделях, где предусмотрен.
• Прибор должен быть подсоединен к водопроводу посредством новой трубы подачи,неиспользоватьстаруютрубудля подачи. Если посудомоечная машина не встраивается в мебельный элемент, ее задняя панель должна быть обращена к стене.
Утилизация
• Утилизация упаковочных материалов: соблюдайте местные нормативы по утилизации упаковочных материалов.
• СогласноЕвропейскойДирективе2012/19/ СЕкасательноутилизацииэлектронныхи электрическихэлектроприборов(WEEE), электроприборынемогутутилизироваться вместе с обычным городским мусором. Выведенные из строя приборы должны собиратьсяотдельнодляоптимизацииих утилизацииирекуперациисоставляющих ихматериалов,атакжедлябезопасности окружающейсредыиздоровьячеловека. Символ зачеркнутая мусорная корзинка, имеющийся на всех приборах, служит напоминанием об их отдельной утилизации.
За более подробной информацией о правильной утилизации бытовых электроприборов пользователи
6

могут обратиться в специальную государственную организацию или в магазин.
Энергосбережение и охрана окружающей среды
Экономия воды и электроэнергии
• Используйте посудомоечную машину только с полной загрузкой. В ожидании полного заполнения машины избежать образования неприятных запахов можно с помощью цикла Ополаскивание (где
доступен - см.Программы).
• Выбирайтепрограммумойки,подходящую для данного типа посуды и степени загрязнения в соответствии с Таблицей программ:
- для нормально грязной посудыиспользуйте программу Есо, обеспечивающую низкий расход электроэнергии и воды.
- если машина загружена не полностью, включите дополнительную функцию Половина загрузки (где доступна, см.
Специальные программы и Дополнительные
функции).
• Если ваш контракт с поставщиком электроэнергии предусматривает разные часовые тарифы для экономии электроэнергии, пользуйтесь машиной во время с льготным тарифом. Дополнительная функция Запуск с задержкой поможет оптимально организовать мойку (где доступна,
см.Специальные программы и Дополнительные функции).
UA Запобіжнізаходитапоради
 Посудомийна машина розроблена і вироблена відповідно до міжнародних стандартів безпеки. Це попередження надаються задля вашої безпеки: уважно ознайомтеся з ними.
Збережіть цю брошуру, щоб мати нагоду звернутися до неї у будь-який момент. У разі продажу, передачi iншiй особi або переїзду переконайтеся в тому, що вона залишається разом з виробом.
Уважно вивчіть інструкції: в них міститься важлива інформація щодо встановлення, використання та безпеки.
Цей прилад призначений для побутового
абоаналогічногопризначення,наприклад: - у великих сільських будівлях; - використання з боку клієнтів у готелях,
мотелях і інших готельних структурах; - у пансіонах зі сніданками.
Звільніть прилад від упаковки і переконайтеся у відсутності пошкоджень внаслідок перевезення. За наявностi пошкодженьневиконуйтенiякихпiдключень та негайно зверніться до постачальника.
Загальна безпека
• Цей електропобутовий прилад може використовуватися дітьми віком старше 8 років і особами з обмеженими фізичними, сенсорними чи розумовими можливостями або з браком досвіду та необхідних знань, коли користування відбувається під уважним наглядом або за вказівками щодо безпечного використання приладу від осіб, відповідальних за їхню безпеку.
• Дітинеповиннігратисязелектропобутовим приладом.
• Очищення і догляд за приладом поглядаєтьсянакористувача.Ціоперації не повинні виконуватися дітьми без нагляду.
• Приладпризначенийдлянепрофесійного використання всередині житлових приміщень.
• Прилад має використовуватися для миттяпосудутастоловихприборiв,згідно інструкціям, вказаним у цій брошурі.
• Забороняється встановлювати прилад поза приміщенням, навіть в захищених мiсцях, тому що дуже небезпечно піддавати його впливу дощу і грози.
• Не торкайтеся посудомийної машини голими ногами.
• Невиймайтевилкузрозетки,потягнувши за кабель, тягніть тільки за саму вилку.
• Післякожногоциклуіпершнiжрозпочати очищення або технiчне обслуговування, закрийте водопровiдний кран та виймiть штепсельну вилку з розетки.
• Максимальнакількістьприборіввказана у паспорті виробу.
• Якщо машина не працює через несправностi, у жодному випадку не робітьспробсамостійновиконатиремонт внутрішніх механізмів.
• Не обпирайтеся і не сідайте на відкриті дверцята: прилад може перекинутися.
• Не тримайте дверцята широко вiдкритими, щоб не спiткнутися.
7

•Зберiгайте миючий засiб та ополiскувач в недосяжних для дiтей мiсцях.
•Забороняйтедiтямгратисязупаковками.
•Ножі і прибори з гострими краями необхідно розташовувати вістрями і ріжучими кромками вниз у кошику для столових приборів або покладати їх горизонтально на відкідні елементи або у піднос/третій кошик, якщо останні передбачені у придбаній вами моделі.
•Необхідно під’єднати прилад до водопровідної мережі за допомогою нової заливної труби. Стару заливну трубу більше не використовувати.
Якщо посудомийна машина має вільну схему монтажу, важливо, щоб її задня стінка була встановлена щільно до стіни приміщення.
Утилiзацiя
• Утилізація пакувальних матеріалів: дотримуйтесь місцевих норм, так як упаковка може використовуватися повторно.
Європейська директива 2012/19/EU з відходів від електричної й електронної апаратури (WEEE), передбачає, що побутові електроприлади не можуть перероблятися у звичайному порядку для твердих міських відходів. Зняті з експлуатації побутові прилади мають бути зібрані окремо для оптимізації ступеню відновлення й повторного використання матеріалів, що входять до їхнього складу і з метою усунення потенційної шкоди для здоров’я та середовища.Символзакресленогобака, зображеній на всіх виробах, нагадує про необхідність окремої утилізації.
Для подальшої інформації щодо правильної утилізації побутової техніки, їхні власники можуть звернутися до вiдповiдних мiських служб або до постачальника.
Охорона і дбайливе відношення до довкілля
Як заощадити воду та електроенергiю
• Запускайте посудомийну машину тiльки при повному завантаженнi. Пiд час очiкування повного заповнення машини ви можете забезпечити уникнення неприємних запахiв, завдяки циклу
Замочування (де він передбаченийдив.
Програми).
• Залежно від ступеню забруднення і типу
посуду виберiть придатну програму з Таблицi програм:
- для миття звичайно забрудненого начиння використовуйте програму Еко, яка забезпечує низькi затрати енергiї та води.
- при неповному завантаженнi cкористуйтеся опцiєю Половинного
завантаження (де вона передбачена - див.
Спеціальні програми й опції).
• Якщо у вашому договорi на постачання електричної енергiї передбаченi годиннi пояси для заощадження енергії, виконуйтециклиуперiодизазниженими тарифами. Опція Відстроченого пуску можедопомогтиорганізуватимиттявразі
такихвимог(евонапередбачена-див.Спеціальні програми й опції).
KZ Сақтық шаралары мен кеңес
 Бұл құрылғы халықаралық қауіпсіздік стандарттарынасайөңделіпшығарылған. Төмендегі ақпарат қауіпсіздік мақсатында берілген,сондықтанонымұқиятоқыпшығу қажет.
Бұлнұсқаулықтыкейінқарауүшінжоғалып қалмайтындай бір жерге сақтап қойыңыз. Құрылғы сатылса, тегін берілсе немесе жылжытылса,нұсқаулықмашинаменбірге болатынын қамтамасыз етіңіз.
Нұсқауларды мұқият оқып шығыңыз, себебі олардың ішінде қауіпсіз түрде орнату, қолдану және техникалық қызмет көрсетутуралымаңыздыақпаратберілген.
Бұл құрылғы үйде немесе соған ұқсас жағдайда қолдануға арналған, мысалы: - фермадағы үйлер; - қонақ үйлеріндегі, мотельдердегі және
басқа да қонақ күту орындарындағы қонақтардың пайдалануы үшін; - кіші қонақ үйлерінде.
Құрылғыны барлық орамасынан босатыңыз және ол тасымалдау кезінде зақымдалмағанын тексеріңіз. Ол зақымдалған болса, сатушыға хабарласыңыз және орнату үдерісін тоқтатыңыз.
Жалпы қауіпсіздік
• Құрылғыны қауіпсіз түрде қолдану
8

бойыншажауаптыадамнұсқаубермеген нежақсылапбақыламағаняоғанқатысты қауіптертуралыхабарламағанжағдайда, 8 жасқа толмаған балалар, физикалық, сезімталдықжәнепсихикалыққабілеттері төмен адамдар немесе өнімнен хабары жоқ тәжірибесіз адамдар құрылғыны қолданбауы тиіс.
• Балаларға құрылғымен ойнауға болмайды.
• Құрылғыны тазалау және оған күтім көрсету пайдаланушының жауапкершілігіне жатады. Балалар бақылаусыз құрылғыны тазаламауы не оған күтім көрсетпеуі керек.
• Құрылғы үйде қолдануға арналған, оны коммерциялықнемесеөндірістіктұрғыда қолдануға болмайды.
• Құрылғы үйдегі ыдыс-аяқты осы нұсқаулықтағы нұсқауларға сәйкес жуу үшін қолданылуға арналған.
• Жабықжерболсада,құрылғынысыртта қолданбауқажет.Құрылғыныжауынмен найзағай астында қалдыру өте қауіпті
• Жалаң аяқ болған кезде құрылғыға тимеңіз.
• Құрылғыны токтан ажыратқан кезде, розеткадан әрдайым айырынан ұстап тартыңыз. Кабелінен ұстап тартпаңыз.
• Құрылғынытазаламаснемесекезкелген қызмет көрсету жұмысын орындамас бұрынжәнеәрциклданкейінсушүмегін жабу және айырды розеткадан ағыту керек.
• Орын параметрлерінің ең көп саны өнім парағында көрсетілген.
• Құрылғыбұзылыпқалса,ешбіржағдайда өз бетіңізбен жөндеу мақсатында ішкі бөліктерге тиюші болмаңыз.
• Ашық тұрған есікке сүйенбеңіз немесе оғанотырмаңыз:бұлқұрылғыныаударып түсуі мүмкін.
• Есіктіашыққалдырыпкетугеболмайды, себебіолқауіптікедергіболыптабылады.
• Жуғыш зат пен шаюға көмекші затты балалардан аулақ ұстаңыз.
• Орама материалын ойыншық ретінде қолдануға болмайды.
• Өткір жиектері бар пышақтар мен басқа құралдардың ұштарын/жүздерін төмен қаратып ыдыс-аяқ себетіне салынуы керек немесе көлденеңінен қайырмалы бөліктерге, я болмаса тартпаға/үшінші себетке (бар болса) қою керек.
• Құрылғыны бірге берілген жаңа құбыршекпенсужелісінежалғаңыз.Ескі
құбыршекті қолданбаңыз. Бекітілмеген ыдыс жуу машинасының артын қабырғаға орнатыңыз.
Қоқысқа тастау
• Қаптау материалдарын тастағанда оларды қайта пайдалану мүмкін болуы үшін, жергілікті заңдарды сақтаңыз.
• Электр және электроникалық құралдардың қалдықтарына (WEEE) қатысты2012/19/EUЕуропазаңнамасына сәйкес үй құрылғылары қалыпты толық қалалық қалдық айналымын пайдаланыпжойылмауытиіс.Қоршаған орта мен халық денсаулығына тиетін зиянның алдын ала отырып, жарамсыз құрылғылар қайта пайдалану мен машина ішіндегі материалдарды өңдеу құныноңтайландырумақсатындабөлек жиналуы керек. Барлық өнімдердегі сызылған қоқыс жәшігінің таңбасы өнім иелерінің бөлектелген қоқыс жинауға қатысты міндетін еске салады.
Үй құрылғыларын тиісті түрде қоқысқа тастау туралы қосымша ақпарат алу үшін ие адамдар тиісті мекемеге немесе жергілікті құрылғы сатушысына хабарласуы мүмкін.
Қуатты үнемдеу және қоршаған ортаны құрметтеу
Су мен қуатты үнемдеу
• Ыдысжуумашинасытолғанкездеғанажуу циклынбастаңыз.Ыдысжуумашинасының толуын күтіптұрғанда жағымсыз иістердің
алдын алыңыз (бар болса, «Жуу циклдары»
бөлімін қараңыз).
• «Жуу циклдары» кестесін пайдалана отырып, ыдыс-аяқ түріне және ластану дәрежесінеқолайлыжууциклынтаңдаңыз: - Орташа ластанған ыдыстар үшін Эко жуу циклын пайдаланыңыз, ол қуат пен судың төмен деңгейі қолданылатынын қамтамасыз етеді.
-Жүктемеәдеттегіденазболса,Жартылай
жүктеу опциясын («Арнайы жуу циклдары мен
опциялары» бөлімін қараңыз (бар болса)).
• Егер ток жеткізу келісім-шартында токты үнемдеуге арналған уақыт аралықтары болса, төмен баға қолданылатын кезде жуу циклдарын орындаңыз. КЕШІКТІРІП БАСТАУ опциясы жуу циклдарын тиісті түрде реттеуге көмектесе алады(«Арнайы
жуу циклдары мен опциялары» бөлімін қараңыз (бар болса)).
9

EN Product Data (product fiche)
Product Fiche
Brand |
INDESIT |
Model |
DFG 26B1 |
Rated capacity in standard place settings (1) |
13 |
Energy efficiency class on a scale from A+++ (low consumption) to D (high consumption) |
A+ |
Energy consumption per year in kWh (2) |
295.0 |
Energy consumption of the standard cleaning cycle in kWh |
1.04 |
Power consumption of the off-mode in W |
0.5 |
Power consumption of the left-on mode in W |
5.0 |
Water consumption per year in litres (3) |
3080.0 |
Drying efficacy class on a scale from G (low efficacy) to A (high efficacy) |
A |
Programme time for standard cleaning cycle in minutes |
138 |
The duration of the left-on mode in minutes |
12 |
Noise in dB(A) Re 1pW |
49 |
Built-in model |
No |
NOTES
1) The information on the label and fiche relates to the standard cleaning cycle, this programme is suitable to clean normally soiled tableware and it is the most efficient programme in terms of combined energy and water consumption. The standard cleaning cycle corresponds to the Eco cycle.
2) Based on 280 standard cleaning cycles using cold water fill and the consumption of the low power modes. Actual energy consumption depends on how the appliance is used.
3) Based on 280 standard cleaning cycles. Actual water consumption depends on how the appliance is used.
DE Datenblatt
Datenblatt
Marke |
INDESIT |
Modell |
DFG 26B1 |
Nennkapazität in Standardgedecken für den Standardreinigungszyklus (1) |
13 |
Energieeffizienzklasse (A+++ niedriger Verbrauch) bis D (hoher Verbrauch) |
A+ |
Energieverbrauch pro Jahr in kWh (2) |
295.0 |
Energieverbrauch Standardreinigungszyklus in kWh |
1.04 |
Gewichtete Leistungsaufnahme im Aus-Zustand in W |
0.5 |
Gewichtete Leistungsaufnahme im unausgeschalteten Zustand in W |
5.0 |
Wasserverbrauch pro Jahr in Liter (3) |
3080.0 |
Trocknungseffizienzklasse (A höchste Effizienz) bis G (geringste Effizienz) |
A |
Programmdauer des Standardreinigungszyklus in Minuten |
138 |
Dauer des unausgeschalteten Zustands nach Programmende |
12 |
Luftschallemissionen dB(A) re 1pW |
49 |
Einbaugerät |
Nein |
1) Angabe auf Grundlage von 280 Standardreingungszyklen bei Kaltwasserbefüllung und dem Verbrauch der Betriebsarten mit geringer Leistungsaufnahme. Der tatsächliche Energieverbrauch hängt von der Art der Nutzung des Geräts ab.
2) Die Angaben beziehen sich auf den Standardreinigungszyklus. Dieses Programm eignet sich zur Reingung von normal verschmutztem Geschirr und ist am effizientesten in Bezug auf den kombinierten Energieund Wasserverbrauch. Der
Standardreingungszyklus entspricht dem Eco Zyklus.
3) Angabe auf Grundlage von 280 Standardreingungszyklen. Der tatsächliche Energieverbrauch hängt von der Art der Nutzung des Geräts ab.
10
CS Informační list výrobku
Informační list výrobku
Značka |
INDESIT |
Model |
DFG 26B1 |
Kapacita počtu standardních sad nádobí (1) |
13 |
Třída energetické účinnosti na stupnici A+++ (nejnižší spotřeba) až D (vysoká spotřeba) |
A+ |
Roční spotřeba energie v kWh (2) |
295.0 |
Spotřeba energie standardního mycího cyklu v kWh |
1.04 |
Spotřeba energie ve vypnutém stavu ve W |
0.5 |
Spotřeba energie v režimu ponechání v zapnutém stavu ve W |
5.0 |
Roční spotřeba vody v litrech za rok (3) |
3080.0 |
Třída účinnosti sušení na stupnici od G (minimální účinnost) až po A (maximální účinnost) |
A |
Délka programu při standardním mycím cyklu v minutách |
138 |
Délka režimu ponechání v zapnutém stavu v minutách |
12 |
Emise hluku v dB(A) re 1 pW |
49 |
Vestavný spotřebič |
Ne |
1) Informace uvedené na štítku a v informačním listu se vztahují na standardní mycí cyklus. Tento program je vhodný pro mytí běžně znečištěného nádobí. Jedná se o nejúčinnější program z hlediska kombinované spotřeby energie a vody. Standardní mycí cyklus koresponduje s cyklem Eco.
2) Na základě 280 standardních mycích cyklů při použití studené vody a spotřeby v režimu nízké spotřeby energie. Skutečná spotřeba energie závisí na tom, jak je spotřebič používán.
3) Na základě 280 standardních mycích cyklů. Skutečná spotřeba vody závisí na tom, jak je spotřebič používán.
11

EN Assistance
Before contacting Assistance:
•Check whether the problem can be resolved using the
Troubleshooting guide (see Troubleshooting).
•Restart the programme to check whether the problem has ceased to exist.
•If the problem persists, contact the Authorised Technical
Assistance Service.
 Never use the services of unauthorised technicians. Please have the following information to hand:
•The type of malfunction.
•The appliance model (Mod.).
•The serial number (S/N).
This information can be found on the appliance data plate
(see Description of the appliance).
UA Допомога
Перш ніж звернутися у Сервісний центр:
•Перевірте, чи можна самостійно вирішити проблему (див. “Несправності ізасоби їх усунення”).
•Запустіть програму повторно, щоб перевірити чи усунено несправність.
•У противному випадку зверніться до уповноваженого сервісного центру.
 Звертайтеся виключно до уповноважених фахівців.
Cлiд повiдомити:
•тип несправності;
•Модель машини (Mod.);
•Серійний номер (S/N).
Ця інформація міститься на табличці з характеристиками, прикріпленій до приладу.
(див.Опис приладу).
DE Kundendienst
Bevor Sie den Kundendienst anfordern:
•sollten einige Kontrollen vorab selbst durchgeführt werden
(siehe Störungen und Abhilfe).
•Starten Sie das Programm erneut, um sicherzustellen, dass die Störung behoben wurde.
•Ist dies nicht der Fall, wenden Sie sich bitte an den autorisierten
Kundendienst.
 Beauftragen Sie bitte niemals unbefugtes Personal.
Geben Sie bitte Folgendes an:
•die Art der Störung
•das Gerätemodell (Mod.)
•die Seriennummer (S/N).
Diese Informationen können Sie auf dem am Gerät befindlichen Typenschild ablesen (siehe Beschreibung Ihres Geschirrspülers).
CS Servisní služba
Před přivoláním servisní služby:
•Zkontrolujte, zda nejste schopni poruchu odstranit sami (viz Poruchy a způsob jejich odstranění).
•Znovu uveďte do chodu mycí program s cílem ověřit, zda byla porucha odstraněna.
•V případě negativního výsledku se obraťte na Autorizovanou servisní službu.
 Nikdyseneobracejtesžádostíopomocnaneautorizované techniky.
Při hlášení poruchy uveďte:
•druh poruchy;
•model zařízení (Mod.);
•výrobní číslo (S/N).
Tyto informace jsou uvedeny na štítku s jmenovitými údaji, umístěném na zařízení. (viz Popis zařízení).
KZ Көмек
Көмек қызметіне хабарласпас бұрын:
•Проблеманы Ақаулықтарды жою нұсқаулығын қолдана отырып шешуге болатынын, не болмайтынын тексеріңіз
(«Ақаулықтарды жою» бөлімін қараңыз).
•Бағдарламаны қайта іске қосыңыз да, проблема кеткенін тексеріңіз.
•Проблемашешілмесе,Куәландырылғантехникалықкөмек беру қызметіне хабарласыңыз.
 Куәландырылмаған мамандарға қызмет көрсеткізбеңіз.
Келесі мәліметтерді оңай жерде ұстаңыз:
•Проблеманың түрі
•Құрылғының моделі (Мод.).
•Сериялық нөмірі (С/н).
Бұл ақпаратты құрылғының деректер тілімшесінде табуға болатын («Құрылғының сипаттамасы» бөлімін қараңыз).
12
Installation
 If the appliance must be moved at any time, keep it in an upright position; if absolutely necessary, it may be tilted onto its back.
Connecting the water supply
 Adaptation of the water supply for installation should only be performed by a qualified technician.
The water inlet and outlet hoses may be positioned towards the right or the left in order to achieve the best possible installation.
Make sure the dishwasher does not bend or squash the hoses.
Connecting the water inlet hose
•To a 3/4” cold or hot water connection point (max. 60°C).
•Run the water until it is perfectly clear.
•Screw the inlet hose tightly into position and turn off the tap.
 If the inlet hose is not long enough, contact a specialist store or an authorised technician (see Assistance).
 The water pressure must be within the values indicated in the Technical Data table - otherwise the dishwasher may be function properly.
 Make sure the hose is not bent or compressed.
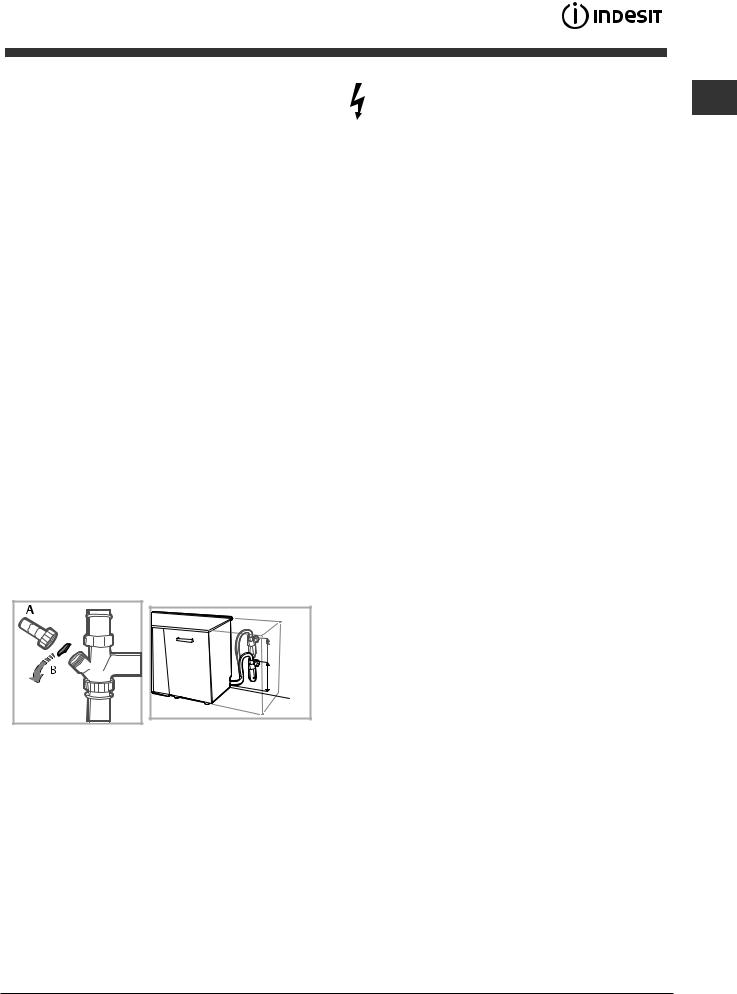
Connecting the water outlet hose
Connect the outlet hose to a drain duct with a minimum diameter of 2 cm. (A)
The outlet hose connection must be at a height ranging from 40 to 80 cm from the floor or surface where the dishwasher rests.
MAX 80 cm |
MIN 40 cm |
Before connecting the water outlet hose to the sink drain, remove the plastic plug (B).
Anti-flooding protection
To ensure floods do not occur, the dishwasher:
- is provided with a special system which blocks the water supply in the event of anomalies or leaks from inside the appliance.
Some models are also equipped with the supplementary safety device New Acqua Stop*, which guarantees antiflooding protection even in the event of a supply hose rupture.
WARNING: HAZARDOUS VOLTAGE!
EN
Under no circumstances should the water inlet hose be cut as it contains live electrical parts.
Electrical connection
Before inserting the plug into the electrical socket, make sure that:
•The socket is earthed and complies with current regulations;
•the socket can withstand the maximum load of the appliance as shown on the data plate located on the inside of the door
(see chapter Description of the appliance);
•The power supply voltage falls within the values indicated on the data plate on the inside of the door.
•The socket is compatible with the plug of the appliance. If this is not the case, ask an authorised technician to replace the plug (see Assistance). Do not use extension cables or multiple sockets.
 Once the appliance has been installed, the power supply cable and the electrical socket should be easily accessible.
 The cable should not be bent or compressed.
 If the power supply cable is damaged, have it replaced by the manufacturer or its authorised Technical Assistance Service in order to prevent all potential hazards. (See Assistance)
 The Company shall not be held responsible for any incidents, if these regulations are not observed.
Positioning and levelling
1.Position the dishwasher on a level sturdy floor. If the floor is uneven, the front feet of the appliance may be adjusted until it reaches a horizontal position. If the appliance is levelled correctly, it will be more stable and much less likely to move or cause vibrations and noise while it is operating.
2.Before recessing the dishwasher, stick the adhesive transparent strip* under the wooden shelf in order to protect it from any condensation which may form.
3.Place the dishwasher so that its sides or back panel are in contact with the adjacent cabinets or the wall. This appliance
can also be recessed under a single worktop* (see the Assembly instruction sheet).
4*. To adjust the height of the rear foot, turn the red hexagonal bushing on the lower central part at the front of the dishwasher using a hexagonal spanner with an opening of 8 mm. Turn the spanner in a clockwise direction to increase the height and in an anticlockwise direction to decrease it. (see Building-in instruction sheet attached to the documentation)
* Only available in selected models.
13

EN |
|
Advice regarding the first wash cycle |
||||
|
After the installation, remove the stoppers from the racks and |
|||||
|
|
|||||
|
|
the retaining elastic elements from the upper rack (if any). |
||||
|
||||||
|
|
Water softener settings |
||||
|
|
Before starting the first wash cycle, set the hardness lev- |
||||
|
|
el of the water from the mains supply. (see chapter Rinse |
||||
|
|
aid and refined salt). |
|
|||
|
|
First load the softener tank with water, then introduce about |
||||
|
|
1 kg of salt. It is perfectly normal for water to flow out. |
||||
|
|
As soon as this procedure is complete, run a wash cycle. |
||||
|
|
Only use salt that has been specifically designed for dish- |
||||
|
|
washers. |
|
|||
|
|
After the salt has been poured into the machine, the LOW |
||||
|
|
SALT indicator light* switches off. |
||||
|
|
|
If the salt container is not filled, the water softener and the |
|||
|
|
|
||||
|
|
|
||||
|
|
heating element may be damaged as a result. |
||||
|
|
|
|
|
|
|
|
|
Technical data |
|
|||
|
|
Dimensions |
width 60 cm |
|||
|
|
height 85 cm |
||||
|
|
|
|
|
|
depth 60 cm |
|
|
Capacity |
13 standard place-settings |
|||
|
|
Water supply pressure |
0,05 ÷ 1MPa (0.5 ÷ 10 bar) |
|||
|
|
7,25 psi – 145 psi |
||||
|
|
Power supply voltage |
See appliance data plate |
|||
|
|
|
|
|
|
|
|
|
Total absorbed power |
See appliance data plate |
|||
|
|
|
|
|
|
|
|
|
Fuse |
See appliance data plate |
|||
|
|
|
|
|
|
This dishwasher conforms to the |
|
|
|
|
|
|
following European Community |
|
|
|
|
|
|
Directives: |
|
|
|
|
|
|
-2006/95/EC (Low Voltage) |
|
|
|
|
|
|
-2004/108/EC (Electromagnetic |
|
|
|
|
|
|
Compatibility) |
|
|
|
|
|
|
-2009/125/EC (Comm. Reg. |
|
|
|
|
|
|
1016/2010) (Ecodesign) |
|
|
|
|
|
|
-97/17/EC (Labelling) |
|
|
|
|
|
|
-2012/19/ CE Waste Electrical |
|
|
|
|
|
|
and Electronic Equipment (WEEE) |
|
|
|
|
|
|
|
The machine has a buzzer/set of tones (depending on the dishwasher model) to inform the user that a command has been implemented: power on, cycle end etc.
The symbols/indicator lights/LEDs on the control panel/ display may vary in colour and may have a flashing or fixed light (depending on the dishwasher model).
The display* provides useful information concerning the type of wash cycle, drying/wash-cycle phase, remaining time, temperature etc.
14

Description of the appliance
Overall view |
EN |
|
1. Upper rack
2.Upper spray arm
3.Tip-up dispensers
4. Rack height adjuster
5. Lower rack
6. Lower spray arm
7.Washing filter
8.Salt dispenser
9. Detergent and rinse-aid dispenser
10. Data plate
11. Control panel***
Control panel
|
|
|
|
|
|
|
Delayed Start button |
|||||
Half load button and indicator light |
|
and indicator light |
||||||||||
Cycle select knob |
|
|
|
|
|
Start/Pause button and |
||||||
|
|
|
|
|
||||||||
|
|
|
|
|
indicator light |
|||||||
|
|
|
|
|
|
|
|
|
||||
ON/OFF/Reset button |
|
|
|
|
|
|
|
|
|
|
|
|
|
|
|
|
|
|
|
|
|
|
|
||
|
|
|
|
|
|
|
|
|||||
|
|
|
|
|
|
|
|
|
|
|
|
|
|
|
|
|
|
|
|
|
|
|
|
|
|
|
|
|
|
|
|
|
|
|
|
|
|
|
|
|
|
|
|
|
|
|
|
|
|
|
|
|
|
|
|
|
|
|
|
|
|
|
|
|
|
|
|
|
|
|
|
|
|
|
|
|
|
|
|
|
|
|
|
|
|
|
|
|
|
|
Indicator light Washing and Delayed Start 3h. |
|
|
|
Indicator light Low Salt |
|
|
|
||
Indicator light Drying and Delayed Start 6h. |
|
Indicator light |
||
Indicator light Wash Cycle End and Delayed Start 9h. |
Low Rinse Aid |
|||
|
|
|||
***Only in completely built-in models. * Only available in selected models.
The number and type of wash cycles and options may vary depending on the dishwasher model.
15

Refined Salt and Rinse Aid
EN |
|
|
Only use products which have been specifically designed |
|
|
||
|
for dishwashers. Do not use table salt or industrial salt. |
||
|
|
||
|
|
Follow the instructions given on the packaging. |
|
 If you are using a multi-function product, we recommend that you add salt in any case, especially if the water is hard or very hard. (Follow the instructions given on the packaging.)
 If you do not add salt or rinse aid, the LOW SALT* and LOW RINSE AID* indicator lights will remain lit.
Measuring out the refined salt
The use of salt prevents the formation of LIMESCALE on the dishes and on the machine’s functional components.
•It is important that the salt dispenser be never empty.
•It is important to set the water hardness.
The salt dispenser is located in the lower part of the dishwasher (see Description) and should be filled:
•When the LOW RINSE AID indicator light in the control panel is lit*;
•When the green float* on the cap of the salt dispenser is no longer visible.
•See autonomy in the water hardness table.
1. Remove the lower rack and unscrew the
container cap (anticlockwise).
2. Only the first time you do this: fill the water
dispenser up to the edge.
3. Position the funnel (see figure)and fill the salt container right up to its edge (approximately 1
kg); it is not unusual for a little water to leak out.
4. Remove the funnel and wipe any salt residue away from the opening; rinse the cap under running water and then screw it on. It is advisable to perform this procedure every time you add salt to the container.
Make sure the cap is screwed on tightly, so that no detergent can get into the container during the wash cycle (this could damage the water softener beyond repair).
 Whenever you need to add salt, we recommend carrying out the procedure before the washing cycle is started.
Setting the water hardness
For perfect water softener operation, it is essential that the adjustment be based on the water hardness in your house. Ask your local water supplier for this information. The factory setting is for medium water hardness.
•Switch the dishwasher on using the On/Off button. 
•Switch it off using the On/Off button 
•Hold down the START/PAUSE button 
 for 5 seconds.
•Switch it on using the On/Off button 
•The salt indicator light flashes (as many times as the current selection.)
•Set the knob to the desired hardness level number (see Table on water hardness.)
•Switch it off using the On/Off button 
•Setting is complete!
Water Hardness Table |
|
Average autonomy |
|||
|
salt dispenser with 1 |
||||
|
|
|
|
|
wash cycle per day |
level |
°dH |
°fH |
mmol/l |
months |
|
1 |
0 |
- 6 |
0 - 10 |
0 - 1 |
7 months |
2 |
6 - 11 |
11 - 20 |
1.1 - 2 |
5 months |
|
3 |
12 |
- 17 |
21 - 30 |
2.1 - 3 |
3 months |
4 |
17 |
- 34 |
31 - 60 |
3.1 - 6 |
2 months |
5* |
34 |
- 50 |
61 - 90 |
6.1 - 9 |
2/3 weeks |
For values between 0°f and 10°f, we do not recommend the use of salt. A setting of 5 may increase cycle duration.
(°dH = hardness measured in German degrees - °f = hardness measured in French degrees – mmol/l = millimoles per litre)
Measuring out the rinse aid
Rinse aid makes dish DRYING easier. The rinse aid dispenser should be filled:
•When the LOW RINSE AID indicator light on the panel/display is lit *;
•When the dark optical indicator* on the dispenser door “D” becomes transparent.
A |
M X |
1.Open the dispenser “D” by pressing and pulling up the tab on the lid;
2.Carefully introduce the rinse aid as far as the maximum reference notch in the filling space - avoid spilling it. If this happens, clean the spill immediately with a dry cloth.
3.Press the lid down until you hear a click to close it.
NEVER pour the rinse aid directly into the tub.
Adjusting the amount of rinse aid
If you are not completely satisfied with the drying results, you may want to adjust the quantity of rinse aid used.
•Switch the dishwasher on using the On/Off button. 
•Switch it off using the On/Off button 
•Press the START/PAUSE button 
 three times
•Switch it on using the On/Off button 
•Everything is off
•Set the knob to the level number of rinse aid quantity to be supplied.
•Switch it off using the On/Off button 
•Setting is complete!
If the rinse aid level is set to ZERO (ECO), no rinse aid will be supplied. The LOW RINSE AID indicator light will not be lit if you run out of rinse aid.
A maximum of 4 levels can be set according to the dishwasher model. The factory setting is for a medium level.
•If you see bluish streaks on the dishes, set a low number (1-2).
•If there are drops of water or limescale marks on the dishes, set a high number (3-4).
16

Loading the racks
Tips
Before loading the racks, remove all food residues from the crockery and empty liquids from glasses and containers. No preventive rinsing is needed under running water.
Arrange the crockery so that it is held in place firmly and does not tip over; and arrange the containers with the openings facing downwards and the concave/convex parts placed obliquely, thus allowing the water to reach every surface and flow freely.
Make sure that the lids, handles, trays and frying pans do not prevent the spray arms from rotating. Place any small items in the cutlery basket.
Since plastic dishes and non-stick frying pans usually retain more water drops, their drying will be not so good as that of ceramic or stainless-steel dishes.
Lightweight items such as plastic containers should be placed in the upper rack and arranged so that they cannot move.
After loading the appliance, make sure that the spray arms can rotate freely.
Lower rack
The lower rack can hold pans, lids, dishes, salad bowls, cutlery etc. Large plates and lids should ideally be placed at the sides.
Several dishwasher models are fitted with tip-up sectors*. |
EN |
|||||||||
They can be used in a vertical position when arranging dishes |
||||||||||
|
||||||||||
or in a horizontal position (lower) to load pans and salad bowls |
|
|||||||||
easily. |
|
|||||||||
|
|
|
|
|
|
|
|
|
|
|
|
|
|
|
|
|
|
|
|
|
|
|
|
|
|
|
|
|
|
|
|
|
|
|
|
|
|
|
|
|
|
|
|
Cutlery basket
The modular basket can slide to optimise the space inside the lower rack. It is equipped with top grilles for improved cutlery arrangement.
 Knives and other utensils with sharp edges must be placed in the cutlery basket with the points facing downwards or they must be positioned horizontally in the tip-up compartments on the upper rack
Very soiled dishes and pans should be placed in the lower rack because in this sector the water sprays are stronger and allow a higher washing performance.
* Only available in selected models.
Upper rack
Load this rack with delicate and lightweight crockery such as glasses, cups, saucers and shallow salad bowls.
Several dishwasher models are fitted with tip-up sectors*. They can be used in a vertical position when arranging tea/ dessert saucers or in a lower position to load bowls and food containers.
17

EN |
Tip-up compartments with adjustable position |
|
The side tip-up compartments can be positioned at three different |
||
|
||
|
heights to optimize the arrangement of the crockery inside the |
|
|
rack. |
|
|
Wine glasses can be placed safely in |
|
|
the tip-up compartments by inserting |
|
|
the stem of each glass into the |
|
|
corresponding slot. |
|
|
For optimum drying results incline |
|
|
the tip-up compartments more. To |
|
|
change the inclination, pull up the |
|
|
tip-up compartment, slide it slightly |
|
|
and position it as you wish. |
Cutlery tray*
Some dishwasher models are fitted with a sliding tray which can be used to hold serving utensils or small cups. For optimum washing performance avoid positioning bulky crockery directly below the tray. The cutlery tray can be removed (see Figure).
*Only available in selected models with different numbers and positions.
The upper rack can be adjusted for height based on requirements: high position to place bulky crockery in the lower rack and low position to make the most of the tip-up compartments/sectors by creating more space upwards.
Adjusting the height of the upper rack
In order to make it easier to arrange the crockery, the upper rack may be moved to a higher or lower position.
The height of the upper rack should be adjusted WHEN THE RACK IS EMPTY.
NEVER raise or lower the rack on one side only.
If the rack is equipped with a Lift-Up device* (see figure), lift it up by holding its sides. To restore the lower position, press the levers (A) at the sides of the rack and follow the rack down.
Unsuitable crockery
•Wooden crockery and cutlery.
•Delicate decorated glasses, artistic handicraft and antique crockery. Their decorations are not resistant.
•Parts in synthetic material which do not withstand high temperatures.
•Copper and tin crockery.
•Crockery soiled with ash, wax, lubricating grease or ink.
The colours of glass decorations and aluminium/silver pieces can change and fade during the washing process. Some types of glass (e.g. crystal objects) can become opaque after a number
of wash cycles too.
Damage to glass and crockery
Caused by:
•Type of glass and glass production process.
•Chemical composition of detergent.
•Water temperature of rinse cycle.
Tips:
•Only use glasses and porcelain guaranteed by the manufacturer as dishwasher safe.
•Use a delicate detergent suitable for crockery.
•Collect glasses and cutlery from the dishwasher as soon as the wash cycle is over.
18

Detergent and dishwasher use
Measuring out the detergent
Good washing results also depend on the correct amount of detergent being used. Exceeding the stated amount does not result in a more effective wash and increases environmental pollution.
The amount can be adjusted to the soil level.
In the case of normally soiled items, use approximately either 35g (powder detergent) or 35ml (liquid detergent). If tablets are used, one tablet will be enough.
If the crockery is only lightly soiled or if it has been rinsed with water before being placed in the dishwasher, reduce the amount of detergent used accordingly.
For good washing results also follow the instructions shown on the detergent box.
For further questions please ask the detergent producers. To open the detergent dispenser use the opening device “A”.
Introduce the detergent into the dry dispenser “B” only. Place the amount of detergent for pre-washing directly inside the tub.
1.When measuring out the detergent refer to the Table of wash cycles to add the proper quantity. Compartment B comprises a level showing the maximum quantity of liquid or powder detergent that can be added to each cycle.
2.Remove detergent residues from the edges of the dispenser and close the cover until it clicks.
3.Close the lid of the detergent dispenser by pulling it up until the closing device is secured in place.
The detergent dispenser automatically opens up at the right time according to the wash cycle.
If all-in-one detergents are used, we recommend using the TABS option, because it adjusts the cycle so that the best washing and drying results are always achieved.
 Only use detergent which has been specifically designed for dishwashers.
DO NOT USE washing up liquid.
Using excessive detergent may result in foam residues remaining in the machine after the cycle has ended.
To achieve the best washing and drying results, the combined use of detergent, rinse aid liquid and refined salt is required.
We recommend using detergents that do not contain phosphates or chlorine, as these products are harmful to the environment.
* Only available in selected models.
Starting the dishwasher |
EN |
|
1. Press the ON/OFF button: all the indicator lights on the control |
||
|
||
panel will light up for a few seconds. |
|
|
2. Open the door and pour in a suitable amount of detergent (see |
|
|
Measuring out the detergent). |
|
|
3. Load the racks (see Loading the racks) and shut the door. |
|
|
4. Select the wash cycle by turning the WASH CYCLE SELECT |
|
|
knob clockwise: align the notch on the knob with the number or |
|
|
symbol representing the desired wash cycle. The START/PAUSE |
|
|
indicator light will flash. |
|
|
5. Select the wash options* (see Special Wash Cycles and Options). |
|
|
6. Start the cycle by pressing the START button; the indicator |
|
|
light will stop flashing and stay lit in a fixed manner. The indicator |
|
|
light corresponding to the wash phase will switch on, signalling |
|
|
that the wash cycle has begun. |
|
|
7. At the end of the wash cycle the END indicator light will switch |
|
|
on (fixed light). Switch off the appliance by pressing the ON/ |
|
|
OFF button. |
|
|
8. Wait for a few minutes before removing the crockery in order |
|
|
to avoid burns. Unload the racks, beginning with the lower level. |
|
 The machine will switch off automatically during long periods of inactivity in order to minimise electricity consumption.
 AUTO WASH CYCLES*: some models of dishwasher are equipped with a special sensor which can be used to assess the level of soiling and automatically select the most efficient and economic wash cycle accordingly. The duration of the auto wash cycles may vary due to the operation of the sensor.
Changing a wash cycle in progress
If a mistake was made in the wash cycle selection process, it is possible to change the cycle provided that it has only just begun: once the wash cycle has started, in order to change the wash cycle switch off the machine by pressing and holding the ON/ OFF/Reset button. Switch it back on using the same button and select the desired wash cycle and options.
Adding extra crockery
Press the Start/Pause button and open the door, taking care to avoid the escaping steam, and place the crockery inside the dishwasher. Press the Start/Pause button: The cycle will start again after a long beep has been emitted.
 If the delayed start has been set, at the end of the countdown the wash cycle will not start. It will stay in Pause mode.
 Press the Start/Pause button to pause the machine; the wash cycle is stopped.
At this stage it is not possible to change the wash cycle.
Accidental interruptions
If the door is opened during the wash cycle or there is a power cut, the cycle stops. It starts again from the point at which it was interrupted once the door has been shut or the electricity supply is restored.
19

Wash cycles
Wash-cycle data is measured under laboratory conditions according to European Standard EN 50242.
EN Based on the different conditions of use, the wash-cycle duration and data can change.
 The number and type of wash cycles and options may vary depending on the dishwasher model.
|
|
|
|
Wash cycle |
|
Approximate |
Water |
Energy |
|
|
|
|
which |
|
duration of wash |
||
|
Wash cycle |
Options |
consumption |
consumption |
||||
|
include |
cycles |
||||||
|
|
|
|
|
(l/cycle) |
(kWh/cycle) |
||
|
|
|
|
drying |
|
h:min. |
||
|
|
|
|
|
|
|
||
1. |
Eco |
Yes |
Delayed start – Half Load |
02:18’ |
11 |
1,04 |
||
|
|
|
|
|
|
|
|
|
2. Auto Intensive |
Yes |
Delayed start – Half Load |
02:30’ |
16,5 |
1,65 |
|||
|
|
|
|
|
|
|
|
|
3. Auto Normal |
Yes |
Delayed start – Half Load |
02:00’ |
16,0 |
1,3 |
|||
|
|
|
|
|
|
|
|
|
4. |
Delicate |
Yes |
Delayed start – Half Load |
01:30’ |
12 |
1,1 |
||
|
|
|
|
|
|
|
|
|
|
|
|
|
|
|
|
||
5. |
Rapid 40’ |
|
|
No |
Delayed start |
00:40’ |
9,0 |
0,9 |
|
|
|
|
|
|
|
|
|
|
|
|
|
|
|
|
|
|
6. |
Soak |
No |
Delayed start – Half Load |
00:10’ |
4 |
0,01 |
||
|
|
|
|
|
|
|
|
|
Instructions on wash-cycle selection and detergent dosage
1.The ECO wash cycle is the standard cycle to which the energy label data refers. It can be used to wash crockery with a normal soil level and is the most efficient cycle in terms of energy and water consumption for this type of crockery.
27gr/ml + 6 gr/ml** – 1 Tab (**Quantity of pre-washing detergent)
2.Heavily soiled dishes and pans (not to be used for delicate items). 30 gr/ml – 1 Tab
3.Normally soiled pans and dishes. 27 gr/ml + 6 gr/ml** – 1 Tab
4.Cycle for delicate items, which are more sensitive to high temperatures 30 gr/ml – 1 Tab
5.Fast cycle to be used for slightly dirty dishes (ideal for 2 place settings) 25 gr/ml – 1 Tab
6.Pre-wash while awaiting completion of the load with the dishes from the next meal. No detergent.
Standby consumption: Left-on mode consumption: 5 W - Off mode consumption: 0.5 W.
20
Special wash cycles and Options
Notes:
Optimum performance levels when using the “"Rapid 40’” cycle can be achieved by respecting the specified number of place settings.
To reduce consumption even further, only run the dishwasher when it is full.
Note for Test Laboratories: for information on comparative EN testing conditions, please send an email to the following address: assistenza_en_lvs@indesitcompany.com
Wash options*
The OPTIONS may only be set, changed or reset after the wash cycle has been selected and before the Start/Pause button has been pressed.
Only the options which are compatible with the type of wash cycle set may be selected. If an option is not compatible with the selected wash cycle (see Table of wash cycles), the corresponding symbol/LED flashes rapidly 3 times.
If an option is selected which is not compatible with another previously-selected option, it will flash 3 times and go off, while the most recently selected option will remain active.
To deselect an option which has been set by mistake, press the corresponding button again.
Half load |
EN |
|
If there are not many dishes to be washed, a half |
||
|
||
load cycle may be used in order to save water, electricity and |
|
|
detergent. Select the wash cycle and press the HALF LOAD |
|
|
button; the indicator light will go on. |
|
Press the HALF LOAD button again to deselect this option.
Remember to halve the amount of detergent.
Delayed start
It is possible to delay the start time of the wash cycle by 3, 6 or 9 hours:
1:After selecting the desired wash cycle and any other options, press the DELAYED START button. the indicator light will go on.
2: Select the desired delay time by pressing the Delayed
Start button repeatedly. The wash phase (3 hours), drying phase (6 hours) and end (9 hours) indicator lights will go on in succession.
If the Delayed Start button is pressed again, the option is deselected and the indicator light goes off.
3. After the selection process, the countdown will begin if the Start/Pause button is pressed. The selected delay-period indicator light flashes and the Start/Pause button stops flashing (fixed light).
3. Once this time has elapsed, the DELAYED START indicator light goes off and the wash cycle begins.
The Delayed Start function cannot be set once a wash cycle has started.
* Only available in selected models.
21
Care and maintenance
EN
Shutting off the water and electricity |
|
supplies |
|
• |
Turn off the water tap after every wash cycle to avoid leaks. |
• |
Always unplug the appliance when cleaning it and when |
|
performing maintenance work. |
Cleaning the dishwasher |
|
• |
The external surfaces of the machine and the control panel |
|
can be cleaned using a non-abrasive cloth which has been |
|
dampened with water. Do not use solvents or abrasive |
|
products. |
• |
Any marks on the inside of the appliance may be removed |
|
using a cloth dampened with water and a little vinegar. |
Preventing unpleasant odours |
|
• |
Always keep the door of the appliance ajar in order to avoid |
|
moisture from forming and being trapped inside the machine. |
• |
Clean the seals around the door and detergent dispensers |
|
regularly using a damp sponge. This will avoid food becoming |
|
trapped in the seals, which is the main cause behind the |
|
formation of unpleasant odours. |
Cleaning the spray arms |
|
Food residue may become encrusted onto the spray arms |
|
and block the holes used to spray the water. It is therefore |
|
recommended that you check the arms from time to time and |
|
clean them with a small non-metallic brush. |
|
The two spray arms may both be removed. |
|
|
To remove the upper spray arm, |
|
turn the plastic locking ring in an |
|
anti-clockwise direction. The upper |
|
spray arm should be replaced so |
|
that the side with the greater number |
|
of holes is facing upwards. |
The lower spray arm can be |
removed by pressing on the side |
tabs and pulling it upwards. |
Cleaning the water inlet hose |
If the water hoses are new or have not been used for an extended period of time, let the water run to make sure it is clear and free of impurities before performing the necessary connections. If this precaution is not taken, the water inlet could become blocked and damage the dishwasher.
 Clean the water inlet filter at the tap outlet regularly.
-Turn off the water tap.
-Unscrew the end of the water inlet hose, remove the filter and clean it carefully under running water.
-Re-place the filter and screw the water hose back into position.
Cleaning the filters
The filter assembly consists of three filters which remove food residues from the washing water and then recirculate the water. They must be cleaned if you wish to achieve the best results in every wash.
 Clean the filters regularly.
 The dishwasher must not be used without filters or if the filter is loose.
• After several washes, check the filter assembly and if necessary clean it thoroughly under running water, using a non-metallic brush and following the instructions below:
1.Turn the cylindrical filter C in an anti-clockwise direction and pull it out (fig. 1).
2.Remove the cup filter B by exerting a slight pressure on the side flaps (fig. 2);
3.Slide out the stainless-steel plate filter A. (fig. 3).
4.Inspect the trap and remove any food residues. NEVER
REMOVE the wash-cycle pump protection (black detail) (fig.4).
After cleaning the filters, re-place the filter assembly and fix it in position correctly; this is essential for maintaining the efficient operation of the dishwasher.
Leaving the machine unused for extended periods
•Disconnect the appliance from the electricity supply and shut off the water tap.
•Leave the door of the appliance ajar.
•When you return, run a wash cycle when the dishwasher is empty.
* Only available in selected models.
22

Troubleshooting
|
|
|
|
|
Whenever the appliance fails to work, check for a solution from the following list before calling for Assistance. |
|
|||
EN |
||||
|
|
|
||
|
|
|
|
|
|
|
|
|
|
Problem: |
Possible causes / Solutions: |
|
|
|
The dishwasher does not start |
• The water supply tap is not turned on. |
|
|
|
or cannot be controlled. |
• Switch off the appliance by pressing the ON/OFF button, switch it back on after approximately |
|
|
|
|
one minute and reset the wash cycle. |
|
|
|
|
• The appliance has not been plugged in properly or another electricity socket should be used. |
|
|
|
|
• The dishwasher door has not been closed properly. |
|
|
|
The door won’t close. |
• Make sure that the racks were inserted all the way. |
|
|
|
• The lock was released. Strongly push the door until a “clacking” noise is heard. |
|
|
||
|
|
|
||
No water drain out of the |
• The wash cycle has not finished yet. |
|
|
|
dishwasher. |
• The water drain hose is bent (see Installation). |
|
|
|
|
• The drain duct is clogged up. |
|
|
|
|
• The filter is clogged up with food residues. |
|
|
|
|
• Check the height of the drain hose. |
|
|
|
The dishwasher makes |
• The dishes are rattling against each other or against the spray arms. Place the dishes |
|
|
|
excessive noise. |
properly and make sure the spray arms can rotate freely. |
|
|
|
|
• Too much foam: the detergent has not been measured out correctly or it is not suitable for use |
|
|
|
|
in dishwashers. (See Detergent and dishwasher use.) Do not prewash the dishes by hand. |
|
|
|
The dishes and glasses are |
• No refined salt. |
|
|
|
covered in a white film or |
• Water hardness adjustment is not suitable: increase the relevant values. (See Refined salt |
|
|
|
limescale deposits. |
and rinse aid.) |
|
|
|
|
• The salt and rinse-aid dispenser cap has not been closed properly. |
|
|
|
|
• The rinse aid has been used up or the dosage is too low. |
|
|
|
The dishes and glasses are |
• The rinse aid dosage is too high. |
|
|
|
streaked or have a bluish |
|
|
|
|
tinge. |
|
|
|
|
The crockery has not been |
• A wash cycle without a drying programme has been selected. |
|
|
|
dried properly. |
• The rinse aid has been used up. (See Refined salt and rinse aid.) |
|
|
|
|
• The rinse aid dispenser setting is not suitable. |
|
|
|
|
• The crockery is made from non-stick material or plastic; the presence of water drops is |
|
|
|
|
normal. |
|
|
|
The dishes are not clean. |
• The crockery has not been arranged properly. |
|
|
|
|
• The spray arms cannot rotate freely, being hindered by the dishes. |
|
|
|
|
• The wash cycle is too gentle (see Wash Cycles). |
|
|
|
|
• Too much foam: the detergent has not been measured out correctly or it is not suitable for use |
|
|
|
|
in dishwashers. (See Detergent and dishwasher use.) |
|
|
|
|
• The lid on the rinse aid compartment has not been closed correctly. |
|
|
|
|
• The filter is dirty or clogged up (see Care and maintenance.) |
|
|
|
|
• The refined salt level is low (see Rinse aid and salt). |
|
|
|
|
• Make sure that the height of the dishes is compatible with the rack adjustment. |
|
|
|
|
• The holes in the sprayer arms are clogged up. (See Care and maintenance.) |
|
|
|
The dishwasher won’t load |
• There is no water in the mains supply or the tap is shut off. |
|
|
|
any water. |
• The water inlet hose is bent (see Installation). |
|
|
|
It is bocked with flashing lights. |
• The filters are clogged up: they need cleaning. (See Care and maintenance.) |
|
|
|
• The drain duct is clogged up: it needs cleaning. |
|
|
||
|
• After checking and cleaning, switch the dishwasher on and off and start a new wash cycle. |
|
|
|
|
• If the problem persists, turn off the water tap, remove the plug and call the Service Centre. |
|
|
|
* Only available in selected models.
23

Installation
DE |
|
|
Im Falle eines Umzugs sollte das Gerät möglichst in |
|
|
||
|
vertikaler Position transportiert werden, falls erforderlich, |
||
|
|
||
|
|
neigen Sie das Gerät zur Rückseite hin. |
|
Wasseranschlüsse
 Die Anpassung der Elektround Wasseranlagen zur Installation des Gerätes darf nur durch Fachpersonal erfolgen.
Der Wasserzulaufschlauch und der Wasserablaufschlauch können sowohl nach rechts als auch nach links ausgerichtet werden, wodurch eine optimale Installation gewährleistet wird. Die Schläuche dürfen nicht geknickt oder von der Spülmaschine gequetscht werden.
Anschluss des Zulaufschlauchs
•An einen 3/4”-Wasseranschluss für kaltes oder warmes
Wasser (max. 60°C).
•Das Wasser laufen lassen, bis es klar ist.
•Den Zulaufschlauch fest anschließen und den Wasserhahn
öffnen.
 Sollte der Zulaufschlauch nicht lang genug sein, dann wenden Sie sich bitte an einen Fachhändler oder an einen autorisierten Techniker (siehe Kundendienst).
 Der Wasserleitungsdruck muss innerhalb der in der Tabelle der technischen Daten angegebenen Werte liegen, da sonst der Geschirrspüler mglicherweise nicht richtig funktioniert.
 Der Schlauch darf nicht eingeklemmt oder abgeknickt werden.
Anschluss des Ablaufschlauchs
Schließen Sie den Ablaufschlauch an eine Ablaufleitung mit
Mindestdurchmesser von 2 cm an. (A)
Der Anschluss des Ablaufschlauchs muss sich in einer Höhe von 40 bis 80 cm vom Boden oder von der Standfläche der
Spülmaschine befinden.
MAX 80 cm |
MIN 40 cm |
Vor dem Anschließen des Ablaufschlauchs an den Siphon des Spülbeckens den Plastikdeckel (B) abnehmen.
Schutz vor Überschwemmungen
Um Überschwemmungen auszuschließen, wurde der
Geschirrspüler:
- mit einem System versehen, dank dessen der Wasserzulauf bei Anomalien oder internem Wasserverlust unterbrochen wird.
Einige Modelle sind auch mit einem zusätzlichen New Acqua Stop* Sicherheitssystem ausgestattet, das auch bei Schlauchdefekten vor Überschwemmung schützt.
ACHTUNG: GEFÄHRLICHE SPANNUNG!
Der Versorgungsschlauch darf auf keinen Fall abgeschnitten werden: er enthält nämlich Strom führende Teile.
Elektroanschluss
Vor Einfügen des Netzsteckers in die Steckdose ist sicherzustellen, dass:
•die Netzsteckdose geerdet ist und den gesetzlichen
Bestimmungen entspricht;
•die Netzsteckdose die auf dem Typenschild (befindlich auf der Innentür) angegebene max. Leistungsaufnahme des Gerätes trägt
(siehe Beschreibung Ihres Geschirrspülers);
•die Versorgungsspannung den auf dem Typenschild (auf der Innentür) vermerkten Werten entspricht;
•die Steckdose mit dem Netzstecker kompatibel ist.
Andernfalls muss der Netzstecker von einem autorisierten Techniker ausgetauscht werden (siehe Kundendienst); verwenden Sie bitte keine Verlängerungen oder Vielfachstecker.
 Der Netzstecker, das Netzkabel und die Steckdose sollten bei installiertem Gerät leicht zugänglich sein.
 Das Netzkabel darf nicht gebogen oder eingeklemmt werden.
 Sollte das Speisekabel beschädigt sein, muss es vom Hersteller oder seiner technischen Kundendienststelle ausgetauscht werden, um Unfallrisiken vorzubeugen. (Siehe Kundendienst)
 Der Hersteller übernimmt keinerlei Haftung, sollten diese Vorschriften nicht genau beachtet werden.
Positionierung und Nivellierung
1.Stellen Sie den Geschirrspüler auf einem ebenen und festen
Boden auf. Gleichen Sie eventuelle Unregelmäßigkeiten durch Anziehen oder Losschrauben der vorderen Stellfüße aus, bis das Gerät eben ausgerichtet ist. Mit einer präzisen Nivellierung verleiht Stabilität und vermeidet Vibrationen und
Betriebsgeräusche.
2.Bringen Sie vor dem Einbau des Geschirrspülers den transparenten Klebestreifen* unter der Arbeitsplatte an, um sie vor eventuellem Kondenswasser zu schützen.
3.Stellen Sie das Gerät so auf, dass es mit den Seitenteilen oder mit der Rückwand an den anliegenden Möbeln oder an der Wand anlehnt. Das Gerät kann auch unter einer
durchlaufenden Arbeitsplatte eingebaut werden* (siehe Montageanleitung).
* Nur bei einigen Modellen.
24

4*. Regulieren Sie den hinteren Stellfuß durch Einwirken mittels eines 8 mm-Sechskantschlüssels auf die rote
Sechskantbuchse (befindlich unter der Frontseitenmitte des Geschirrspülers). Durch Drehen nach rechts wird die Höhe erhöht, durch Drehen nach links wird sie herabgesetzt. (Siehe der Dokumentation beiliegendes Anleitungsblatt)
Hinweise zur ersten Inbetriebnahme
Nach Abschluss der Installation die Puffer an den Körben und die Rückhaltegummis vom oberen Korb (wenn vorhanden) entfernen.
Einstellungen Wasserenthärter
Vor dem ersten Start muss die Wasserhärte des Wassers aus dem Netz eingestellt werden. (siehe Kapitel Klarspüler und Regeneriersalz)
Wenn der Wasserenthärtebehälter das erste Mal befüllt wird, muss zunächst Wasser eingefüllt werden. Dann erst etwa 1 kg Salz hinzufügen. Es ist normal, dass bei diesem
Vorgang Wasser aus dem Behälter austritt.
Den ersten Spülgang sofort danach starten. Verwenden Sie bitte nur Spezialssalz für Geschirrspüler.
Nach dem Einfüllen des Salzes erlischt die SALZNACHFÜLLANZEIGE*.
 DasNichtfüllendesSalzbehälterskanneineBeschädigung des Wasserenthärters und des Heizwiderstandes bewirken.
Das Gerät ist mit akustischen Signalen/Tönen ausgestattet
(je nach Geschirrspülermodell), die den eingegebenen Befehl DE anzeigen: Start, Zyklusende, etc..
Die Leuchtsymbole/Kontrollanzeigen/LED-Anzeigen auf dem Bedienfeld/Display, können unterschiedliche Farben aufweisen, blinken oder Dauerlicht anzeigen. (je nach Geschirrspülermodell).
Das Display* zeigt nützliche Informationen zum eingestellten Zyklus, Spül-/Trockenphase, Restzeit, Temperatur, etc. an.
Technische Daten
Abmessungen |
Breite 60 cm |
|||
Höhe 85 cm |
||||
|
|
|
Tiefe 60 cm |
|
Fassungsvermögen |
13 Maßgedecke |
|||
Wasserversorgungsdruck |
0,05 ÷ 1MPa (0,5 ÷10 bar) |
|||
7,25 – 145 psi |
||||
|
|
|
||
Versorgungsspannung |
Siehe Typenschild |
|||
Maximale Leistungsaufnahme |
Siehe Typenschild |
|||
|
|
|
|
|
Schmelzsicherung |
Siehe Typenschild |
|||
|
|
|
Dieses Gerät entspricht |
|
|
|
|
folgenden EG-Richtlinien: |
|
|
|
|
- 2006/95/EWG |
|
|
|
|
(Niederspannung); |
|
|
|
|
- 2004/108/EWG |
|
|
|
|
(elektromagnetische |
|
|
|
|
Verträglichkeit) |
|
|
|
|
-2009/125/EG (Comm. Reg. |
|
|
|
|
1016/2010) (Ecodesign) |
|
|
|
|
-97/17/EC (Etikettierung) |
|
|
|
|
||
|
|
|
||
|
|
|
-2012/19/EU |
|
* Nur bei einigen Modellen.
25

Beschreibung Ihres
Geschirrspülers
DE Geräteansicht
1. |
Geschirrspüler-Oberkorb |
2. |
Oberer Sprüharm |
3. |
Hochklappbare Ablagen |
4. |
Einstellung der Korbhöhe |
5. |
Geschirrspüler-Unterkorb |
6. |
Unterer Sprüharm |
7. |
Spülsiebe |
8. |
Salzbehälter |
9. |
Spülmittelkammern und Klarspülerbehälter |
10. |
Typenschild |
11. |
Schalterblende*** |
Schalterblende
Taste und Anzeigeleuchte Halbe |
|
|
|
|
|
|||||
|
|
|
|
Füllung* |
|
Taste und Anzeigeleuchte Startzeitvorwahl |
||||
|
|
|
|
|
|
|
|
|
Taste und Anzeigeleuchte |
|
|
|
|
|
|
|
|
|
|
||
|
|
|
|
|
|
|
|
|
||
Programmwählerknopf |
|
|
|
|
|
|
Start/Pause |
|||
|
|
|
|
|
|
|||||
|
|
|
|
|
|
|
||||
Taste On-Off/Reset |
|
|
|
|
|
|
|
|
|
|
|
|
|
|
|
|
|
|
|
||
|
|
|
|
|
|
|
|
|
|
|
|
|
|
|
|
|
|
|
|
|
|
|
|
|
|
|
|
|
|
|
|
|
|
|
|
|
|
|
|
|
|
|
|
|
|
|
|
|
|
|
|
|
|
|
|
|
|
|
|
|
|
|
|
|
|
Anzeigeleuchte Spülen und Startzeitvorwahl 3h. |
|
|
|
|
|
|
|
|
|
|
|
|
|
|
|
|
|
|
|
|
|
|
Salznachfüllanzeige |
Anzeigeleuchte Trocknen und Startzeitvorwahl 6h. |
|
|
Klarspülernachfüllanzeige |
||
Anzeigeleuchte Programmende und Startzeitvorwahl 9h. |
|
||||
|
|
|
|||
*** Nur bei komplett integrierten Modellen * Nur bei einigen Modellen.
Die Anzahl und die Art der Spülprogramme und -optionen sind abhängig vom jeweiligen Geschirrspülermodell.
26
 Loading...