


574395-002.book Page iii Sunday, September 20, 2009 11:32 AM
Contents
Chapter 1: What’s next?
Getting to know your computer . . . . . . . . . . . . . . . . . . . . . . . . . . . . . . . . . . . . . . . . . . . . . 1 Connecting to the Internet. . . . . . . . . . . . . . . . . . . . . . . . . . . . . . . . . . . . . . . . . . . . . . . . . . 2 Protecting your computer from viruses . . . . . . . . . . . . . . . . . . . . . . . . . . . . . . . . . . . . . . . 2 Locating the electronic manuals . . . . . . . . . . . . . . . . . . . . . . . . . . . . . . . . . . . . . . . . . . . . . 2 Finding more information. . . . . . . . . . . . . . . . . . . . . . . . . . . . . . . . . . . . . . . . . . . . . . . . . . 3
Chapter 2: Using HP QuickWeb (select models only)
Setting up HP QuickWeb for the first time. . . . . . . . . . . . . . . . . . . . . . . . . . . . . . . . . . . . . 6 Starting Microsoft Windows. . . . . . . . . . . . . . . . . . . . . . . . . . . . . . . . . . . . . . . . . . . . . . . . 7 Identifying the QuickWeb control buttons . . . . . . . . . . . . . . . . . . . . . . . . . . . . . . . . . . . . . 7 Identifying the LaunchBar icons. . . . . . . . . . . . . . . . . . . . . . . . . . . . . . . . . . . . . . . . . 7 Identifying the notification icons . . . . . . . . . . . . . . . . . . . . . . . . . . . . . . . . . . . . . . . . 8 Using the Settings panel . . . . . . . . . . . . . . . . . . . . . . . . . . . . . . . . . . . . . . . . . . . . . . . . . . . 9 Configuring the network. . . . . . . . . . . . . . . . . . . . . . . . . . . . . . . . . . . . . . . . . . . . . . . . . . 10 Playing music . . . . . . . . . . . . . . . . . . . . . . . . . . . . . . . . . . . . . . . . . . . . . . . . . . . . . . . . . . 10 Browsing photos . . . . . . . . . . . . . . . . . . . . . . . . . . . . . . . . . . . . . . . . . . . . . . . . . . . . . . . . 10 Creating instant messages with Chat . . . . . . . . . . . . . . . . . . . . . . . . . . . . . . . . . . . . . . . . 11 Making Internet phone calls with Skype (select models only). . . . . . . . . . . . . . . . . . . . . 11 Disabling and enabling HP QuickWeb. . . . . . . . . . . . . . . . . . . . . . . . . . . . . . . . . . . . . . . 11
Chapter 3: Connecting to the Internet
Choosing the type of Internet access . . . . . . . . . . . . . . . . . . . . . . . . . . . . . . . . . . . . . . . . 13 Choosing an ISP . . . . . . . . . . . . . . . . . . . . . . . . . . . . . . . . . . . . . . . . . . . . . . . . . . . . . . . . 13 Using the Windows New Connection Wizard . . . . . . . . . . . . . . . . . . . . . . . . . . . . . . . . . 13 Using HP Connection Manager software (select models only) . . . . . . . . . . . . . . . . . . . . 14 Using HP Wireless Assistant software (select models only) . . . . . . . . . . . . . . . . . . . . . . 14 Connecting to an existing wireless network . . . . . . . . . . . . . . . . . . . . . . . . . . . . . . . . . . . 14 Setting up a new wireless network . . . . . . . . . . . . . . . . . . . . . . . . . . . . . . . . . . . . . . . . . . 15
Step 1: Purchase high-speed Internet service . . . . . . . . . . . . . . . . . . . . . . . . . . . . . . 15 Step 2: Purchase and install a wireless router. . . . . . . . . . . . . . . . . . . . . . . . . . . . . . 16 Step 3: Configure the computer to connect to the wireless network . . . . . . . . . . . . 16 Connecting to a wired network. . . . . . . . . . . . . . . . . . . . . . . . . . . . . . . . . . . . . . . . . . . . . 17
Chapter 4: Using software
Identifying the Windows desktop shortcuts . . . . . . . . . . . . . . . . . . . . . . . . . . . . . . . . . . . 19 Identifying the software on the computer . . . . . . . . . . . . . . . . . . . . . . . . . . . . . . . . . . . . . 20 Updating the software installed on the computer . . . . . . . . . . . . . . . . . . . . . . . . . . . . . . . 20 Installing software from the Internet . . . . . . . . . . . . . . . . . . . . . . . . . . . . . . . . . . . . . . . . 20 Installing software from a CD or DVD (select models only) . . . . . . . . . . . . . . . . . . . . . . 20 Creating (burning) a CD or DVD (select models only) . . . . . . . . . . . . . . . . . . . . . . . . . . 21
|
|
Notebook Essentials |
|
|
|
iii |
|
|
|
|
|
|
|
|
|
|
|
|
|
|
|
|
|
|
|
|
|
|
|
|
|
|
|
|
|
|
|
|
|

574395-002.book Page iv Sunday, September 20, 2009 11:32 AM
Contents
Chapter 5: Keeping your computer safe
Protecting the computer from viruses. . . . . . . . . . . . . . . . . . . . . . . . . . . . . . . . . . . . . . . . 23 Using Windows Security Center . . . . . . . . . . . . . . . . . . . . . . . . . . . . . . . . . . . . . . . 23 Protecting your system files . . . . . . . . . . . . . . . . . . . . . . . . . . . . . . . . . . . . . . . . . . . . . . . 23 Protecting your privacy . . . . . . . . . . . . . . . . . . . . . . . . . . . . . . . . . . . . . . . . . . . . . . . . . . 23 Protecting the computer from power surges. . . . . . . . . . . . . . . . . . . . . . . . . . . . . . . . . . . 24 Using the computer safely . . . . . . . . . . . . . . . . . . . . . . . . . . . . . . . . . . . . . . . . . . . . . . . . 24
Chapter 6: Backup and recovery
Backing up your information . . . . . . . . . . . . . . . . . . . . . . . . . . . . . . . . . . . . . . . . . . . . . . 25 Creating a copy of the hard drive . . . . . . . . . . . . . . . . . . . . . . . . . . . . . . . . . . . . . . . 25 Performing a recovery . . . . . . . . . . . . . . . . . . . . . . . . . . . . . . . . . . . . . . . . . . . . . . . . . . . 26 Using the Disaster Recovery utility . . . . . . . . . . . . . . . . . . . . . . . . . . . . . . . . . . . . . 26 Using the Instant Restore utility . . . . . . . . . . . . . . . . . . . . . . . . . . . . . . . . . . . . . . . . 27
Appendix A: Routine care
Cleaning the display . . . . . . . . . . . . . . . . . . . . . . . . . . . . . . . . . . . . . . . . . . . . . . . . . . . . . 29 Cleaning the TouchPad and keyboard . . . . . . . . . . . . . . . . . . . . . . . . . . . . . . . . . . . . . . . 29 Traveling and shipping . . . . . . . . . . . . . . . . . . . . . . . . . . . . . . . . . . . . . . . . . . . . . . . . . . . 29
Appendix B: Problem meets solution
Troubleshooting resources . . . . . . . . . . . . . . . . . . . . . . . . . . . . . . . . . . . . . . . . . . . . . . . . 31 Quick troubleshooting . . . . . . . . . . . . . . . . . . . . . . . . . . . . . . . . . . . . . . . . . . . . . . . . . . . 31 The computer is unable to start up . . . . . . . . . . . . . . . . . . . . . . . . . . . . . . . . . . . . . . 31 The computer screen is blank . . . . . . . . . . . . . . . . . . . . . . . . . . . . . . . . . . . . . . . . . . 31 Software is functioning abnormally . . . . . . . . . . . . . . . . . . . . . . . . . . . . . . . . . . . . . 32 The computer is on but is not responding . . . . . . . . . . . . . . . . . . . . . . . . . . . . . . . . 32 The computer is unusually warm . . . . . . . . . . . . . . . . . . . . . . . . . . . . . . . . . . . . . . . 32 An external device is not working . . . . . . . . . . . . . . . . . . . . . . . . . . . . . . . . . . . . . . 32 The wireless network connection is not working . . . . . . . . . . . . . . . . . . . . . . . . . . . 33 Printer driver installation fails . . . . . . . . . . . . . . . . . . . . . . . . . . . . . . . . . . . . . . . . . 33
Appendix C: Specifications
Operating environment. . . . . . . . . . . . . . . . . . . . . . . . . . . . . . . . . . . . . . . . . . . . . . . . . . . 35 Input power. . . . . . . . . . . . . . . . . . . . . . . . . . . . . . . . . . . . . . . . . . . . . . . . . . . . . . . . . . . . 35
Index
|
|
iv |
|
|
Notebook Essentials |
|
|
||
|
|
|
|
|
|
|
|
|
|
|
|
|
|
|
|
|
|
|
|
|
|
|
|
|
|
|
|
|
|
574395-002.book Page 1 Sunday, September 20, 2009 11:32 AM
Chapter 1: What’s next?
After you set up and register your computer, there are important next steps to take before you begin using it. First, read this chapter completely, because it explains what to do and where to find additional information. For example, this guide provides specific instructions for connecting to wired and wireless networks. You will also find practical information to help you protect and maintain the computer. Then, read the specific chapters for additional information.
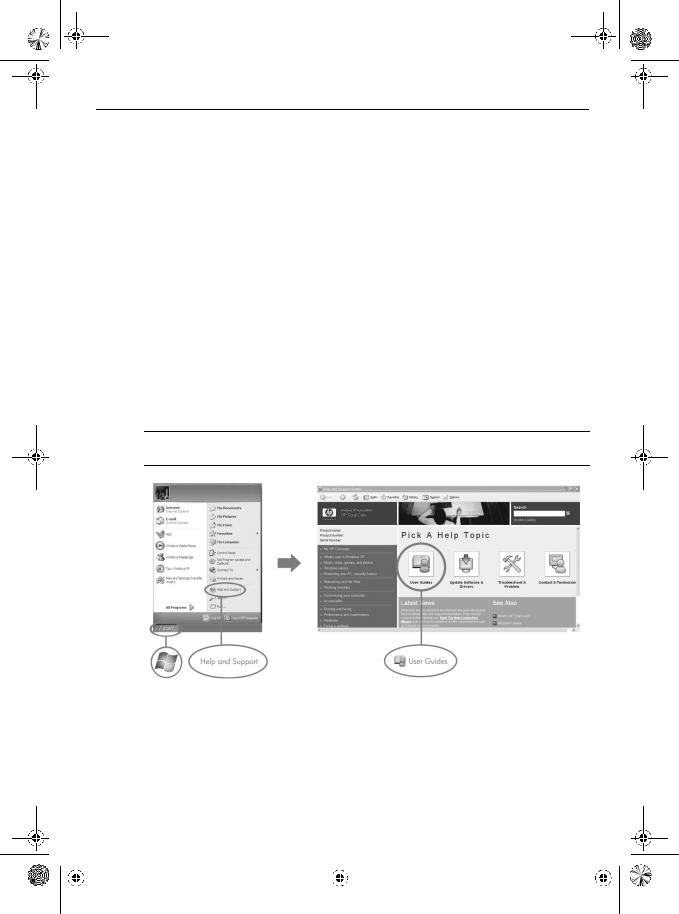
For help in identifying specific components of the computer, refer to the user guide. Click
Start, click Help and Support, and then click User Guides.
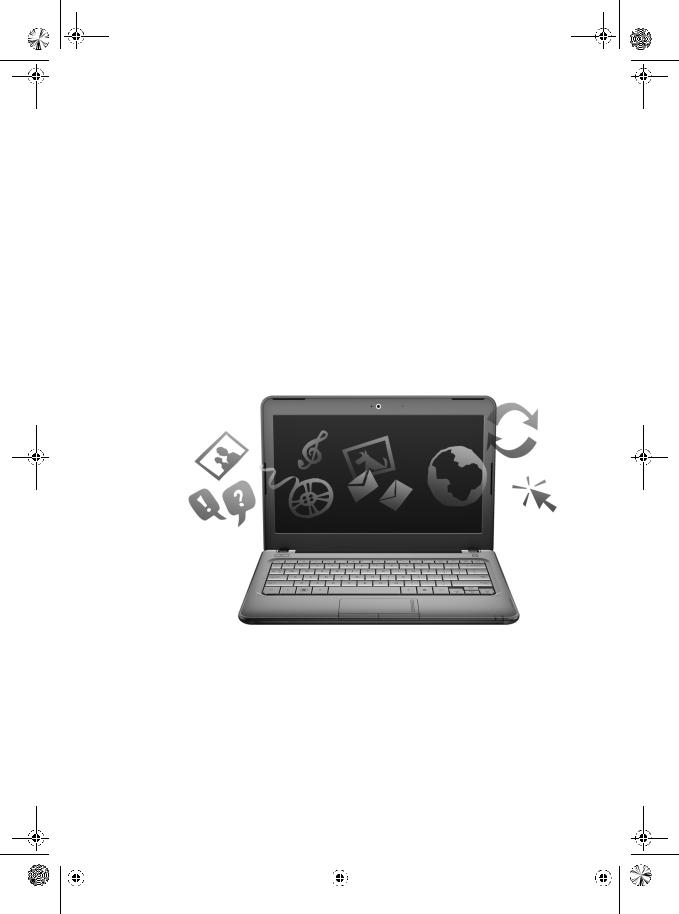
Getting to know your computer
The following list highlights the entertainment features of your computer and explains where to get additional information for each feature.
■Play a video or view photos—Your computer comes with preinstalled multimedia software, including Windows® Media Player (select models only), which turns your computer into a mobile entertainment center. For details, refer to Chapter 3, “Using software.”
■Listen to music—Your computer includes integrated speakers. For more information on using the integrated speakers and setting up optional external audio devices, refer to the user guide in Help and Support.
■Take a picture—An integrated webcam takes photos. For more information on the webcam, refer to the user guide in Help and Support.
■Chat with friends—You can use Instant Messenger to chat with friends or colleagues while you are connected to the Internet.
|
|
Notebook Essentials |
1 |
|
|
||||
|
|
|
|
|
|
|
|
|
|
|
|
|
|
|
|
|
|
|
|
|
|
|
|
|
|
|
|
|
|
574395-002.book Page 2 Sunday, September 20, 2009 11:32 AM
Chapter 1: What’s next?
Connecting to the Internet
After you set up your computer, you can connect to a wireless or wired network so that you can connect to the Internet and send and receive e-mail. Refer to Chapter 2, “Connecting to the Internet,” for more information.
Protecting your computer from viruses
After you have connected to the Internet, manage your computer’s defenses with Windows Security Center. HP also recommends that you always update the antivirus software. Antivirus software helps protect your computer from damage caused by viruses. Refer to Chapter 4, “Keeping your computer safe,” for more information.
Locating the electronic manuals
For detailed information about your computer, such as information about power management, drives, memory, security, and other features, click Start, click Help and Support, and then click User Guides. You do not need to connect to the Internet to access the user guides in Help and Support.
The desktop of your computer may look slightly different from the illustration in this section.
|
|
2 |
|
|
|
Notebook Essentials |
|
|
|
|
|
|
|
|
|
|
|
|
|
|
|
|
|
|
|
|
|
|
|
|
|
|
|
|
|
|
|
|
|

574395-002.book Page 3 Sunday, September 20, 2009 11:32 AM
Chapter 1: What’s next?
Finding more information
In addition to the user guide, Help and Support also provides information about the operating system, drivers, troubleshooting tools, and technical support. To access Help and Support, click Start, and then click Help and Support. For countryor region-specific support, go to http://www.hp.com/support, select your country or region, and follow the on-screen instructions.
ÅWARNING: To reduce the risk of serious injury, read the Safety & Comfort Guide. It describes proper workstation setup and proper posture, health, and work habits for computer users. The Safety & Comfort Guide also provides important electrical and mechanical safety information. The Safety & Comfort Guide contains information for both HP and Compaq computers. To access this document, click Start, click Help and Support, and then click User Guides. The Safety & Comfort Guide is also available on the Web at http://www.hp.com/ergo.
For more safety and regulatory information, and for battery disposal information, refer to the
Regulatory, Safety and Environmental Notices. To access the notices, click Start, click Help and Support, and then click User Guides.
|
|
Notebook Essentials |
3 |
|
|
||||
|
|
|
|
|
|
|
|
|
|
|
|
|
|
|
|
|
|
|
|
|
|
|
|
|
|
|
|
|
|

574395-002.book Page 4 Sunday, September 20, 2009 11:32 AM

574395-002.book Page 5 Sunday, September 20, 2009 11:32 AM
Chapter 2: Using HP QuickWeb
(select models only)
HP QuickWeb is an optional, instant-on environment that is separate from your Windows operating system. QuickWeb allows you to rapidly access a Web browser, and other communication and multimedia programs, without the need to start Windows. QuickWeb is ready to go within seconds of pressing the power button. QuickWeb includes the following features:
■Web browser—Search and browse the Internet, and create links to your favorite Web sites.
■Chat—Chat with friends on multiple instant messaging programs, such as Google Talk, Windows Live Messenger, Yahoo! Messenger, and other providers.
■Skype (select models only)—Skype is a voice over Internet protocol (VoIP) that lets you communicate free of charge with other Skype users. With Skype, you can have a conference call or a video chat with one or more people at a time. You can also make long-distance phone calls to land lines.
■Web e-mail—View and send e-mail using Yahoo, Gmail, and other Web e-mail providers.
■Web calendar—Display, edit, and organize your schedule using your favorite online calendar program.
■Music Player—Listen to your favorite music and create playlists.
■Photo Viewer—Browse through photos, create albums, and view slide shows.
|
|
Notebook Essentials |
5 |
|
|
||||
|
|
|
|
|
|
|
|
|
|
|
|
|
|
|
|
|
|
|
|
|
|
|
|
|
|
|
|
|
|
574395-002.book Page 6 Sunday, September 20, 2009 11:32 AM
Chapter 2: Using HP QuickWeb (select models only)
Setting up HP QuickWeb for the first time
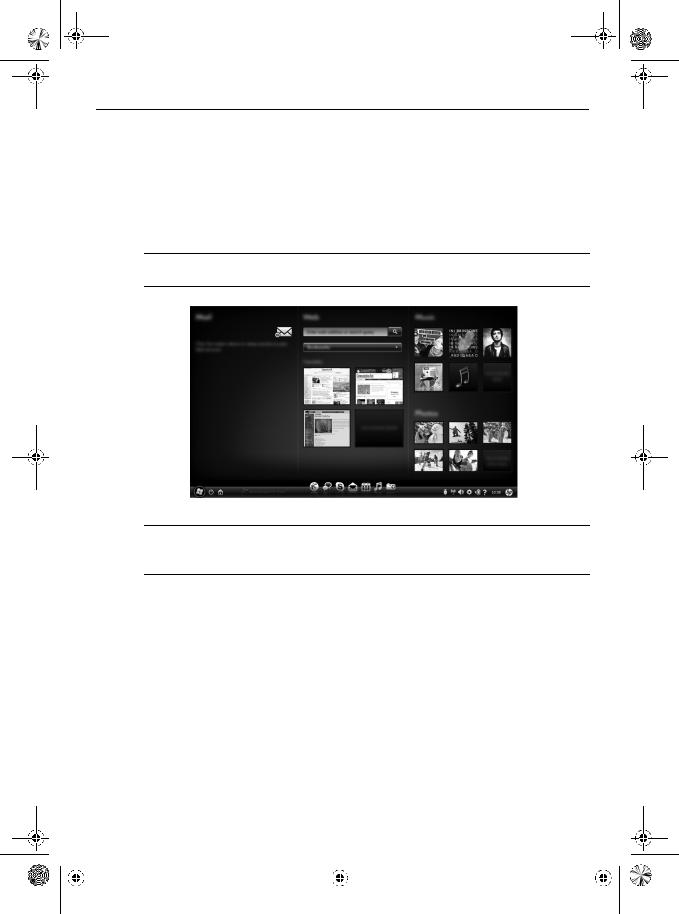
The first time you turn on your computer after completing the Windows setup process, the QuickWeb setup screens appear. Follow the on-screen instructions to activate QuickWeb. At the end of the setup process, you are given the choice to start Windows or to continue to QuickWeb for the current session. If you select the option to start QuickWeb, the QuickWeb Home screen appears. Click an icon on the QuickWeb Home screen to launch a program.
The QuickWeb Home screen may look slightly different from the illustration in this section.
The following section assumes that you have completed the QuickWeb setup process and enabled QuickWeb. For more information, refer to the HP QuickWeb software
Help.
QuickWeb allows you to access a Web browser and other communication and multimedia programs within seconds, without starting Windows. To start QuickWeb when the computer
is turned off:
1.Turn on your computer. The HP QuickWeb Home screen appears.
2.Click an icon on the QuickWeb Home screen to launch a program.
|
|
6 |
|
|
|
Notebook Essentials |
|
|
|
|
|
|
|
|
|
|
|
|
|
|
|
|
|
|
|
|
|
|
|
|
|
|
|
|
|
|
|
|
|

574395-002.book Page 7 Sunday, September 20, 2009 11:32 AM
Chapter 2: Using HP QuickWeb (select models only)
Starting Microsoft Windows
If QuickWeb has been activated, it starts every time you turn on your computer. To start Microsoft® Windows®, you must click the Windows Start icon in the QuickWeb
Home screen.
To start Microsoft Windows:
1.Turn on your computer. The HP QuickWeb Home screen appears.
2.Click the Windows Start icon on the far left of the QuickWeb Home screen.
3.A dialog box appears, asking if you are sure you want to start Windows. Click Yes.
Clicking on the Make Windows your default Power On experience in this dialog box disables QuickWeb. To reenable QuickWeb, refer to the section “Disabling and
enabling HP QuickWeb,” later in this chapter.
Identifying the QuickWeb control buttons
The following table shows and describes the QuickWeb control buttons.
Icon Description
Launches the Windows operating system.
Shuts the computer down.
Returns to the Home screen
Identifying the LaunchBar icons
The following table shows and describes HP QuickWeb icons.
Icon Description
Launches the Web browser. You can bookmark your favorite Web sites and view Web pages.
Launches the Chat application. This is compatible with Google Talk, Windows Live Messenger, Yahoo! Messenger, and other providers.
(Continued)
|
|
Notebook Essentials |
7 |
|
|
||||
|
|
|
|
|
|
|
|
|
|
|
|
|
|
|
|
|
|
|
|
|
|
|
|
|
|
|
|
|
|

574395-002.book Page 8 Sunday, September 20, 2009 11:32 AM
Chapter 2: Using HP QuickWeb (select models only)
Icon Description
Launches Skype (select models only). This is a voice over Internet protocol (VoIP) that lets you communicate free of charge with other Skype users.
Launches Web e-mail so you can view your Web-based e-mail programs, such as Gmail, Hotmail, Yahoo, and other Web e-mail providers.
Launches the Web calendar so you can schedule and manage your activities using your favorite online calendar application.
Launches Music Player. Select and play music stored on your hard drive or external drives. Supports .mp3 files.
Launches Photo Viewer. Browse photos stored on your hard drive or external drive. Supports .bmp, .gif, .jpg, and .png file types.
Identifying the notification icons
The following table shows and describes the notification icons:
Icon Description
Indicates that a USB drive is present. If a USB drive is inserted, the File Manager window containing a USB icon appears. Click the USB icon to open the File Manager window. Right-click the USB icon to open a menu to safely eject the device.
Indicates that the network is connected. Click the Network icon to open the Network dialog box.
Indicates that the network is disconnected.
Controls volume for speakers and the microphone. Click the Volume Control icon to open the Volume Control dialog box.
(Continued)
|
|
8 |
|
|
|
Notebook Essentials |
|
|
|
|
|
|
|
|
|
|
|
|
|
|
|
|
|
|
|
|
|
|
|
|
|
|
|
|
|
|
|
|
|
574395-002.book Page 9 Sunday, September 20, 2009 11:32 AM
Chapter 2: Using HP QuickWeb (select models only)
Icon Description
Controls power settings:
When the computer is connected to AC power, the icon appears with an AC power cord.
When the computer is running on battery power, the icon appears as only a battery.
The state of charge is indicated by the color of the Battery icon:
Green: charged
Yellow: low
Red: critical low
Click the Battery icon to display a menu to control power settings and to see information about battery capacity.
Launches the Settings panel. Use the Settings panel to modify QuickWeb settings such as date and time. Refer to the following section, “Using the Settings panel” for more information.
Displays the QuickWeb software Help.
Using the Settings panel
1.After turning on the computer, click the Settings icon. The Settings panel selection box is displayed.
2.Click the icon that corresponds to the system setting you want to modify. Choose from any of the following:
Date and Time
Input Language
Language and Keyboard
Network
Environment Settings
Screen Settings
Volume Control
Applications
For more information on changing settings in the Settings panel, refer to the HP QuickWeb software Help.
|
|
Notebook Essentials |
9 |
|
|
||||
|
|
|
|
|
|
|
|
|
|
|
|
|
|
|
|
|
|
|
|
|
|
|
|
|
|
|
|
|
|

574395-002.book Page 10 Sunday, September 20, 2009 11:32 AM
Chapter 2: Using HP QuickWeb (select models only)
Configuring the network
QuickWeb can be configured to set up a wireless connection by using the HP QuickWeb Configuration Tool. To access this tool, click the Settings icon, click Network, and then select the Enable Wi-Fi check box. For more information on setting up a wireless connection using HP QuickWeb and Windows, refer to Chapter 3, “Connecting to the Internet,” and to the HP QuickWeb software Help.
Playing music
To play music:
1.Click the Music icon on the LaunchBar. Music Player is displayed.
2.On the left side of the Music Player window, navigate to the directory that contains your music files. The directory can be on either your hard drive or an external drive.
3.Click a music file you want to play from the list on the right side of the window.
4.When you are finished making your music selection, click the Play icon at the bottom right of the window.
Browsing photos
To view photos:
1.Click the Photos icon on the LaunchBar. Photo Viewer is displayed.
2.On the left side of the Photo Viewer window, navigate to the directory that contains your photos. The directory can be on either your hard drive or an external drive. The right side of the Photo Viewer window displays thumbnail views of all the photos in the selected directory.
3.Double-click the thumbnail of the photo you want to view.
The photo thumbnail views appear at the bottom right of the Photo Viewer window. A larger view of the selected photo appears above the thumbnails.
4.Navigate the thumbnail views by pressing the right arrow key or left arrow key, or by clicking the next thumbnail image you want to see enlarged.
|
|
10 |
|
|
Notebook Essentials |
|
|
||
|
|
|
|
|
|
|
|
|
|
|
|
|
|
|
|
|
|
|
|
|
|
|
|
|
|
|
|
|
|
 Loading...