


Presario Mobile Internet PC
Beyond Setup Guide
800 Series
Notice
© 2001 Compaq Computer Corporation
COMPAQ and the Compaq logo Registered in U.S. Patent and Trademark Office.
Microsoft and Windows are trademarks of Microsoft Corporation.
Intel, SpeedStep, and Pentium are trademarks of Intel Corporation.
All other product names mentioned herein may be trademarks or registered trademarks of their respective companies.
Compaq shall not be liable for technical or editorial errors or omissions contained herein. The information in this document is subject to change without notice.
The information in this publication is subject to change without notice and is provided “AS IS” WITHOUT WARRANTY OF ANY KIND. THE ENTIRE RISK ARISING OUT OF THE USE OF THIS INFORMATION REMAINS WITH RECIPIENT. IN NO EVENT SHALL COMPAQ BE LIABLE FOR ANY DIRECT, CONSEQUENTIAL, INCIDENTAL, SPECIAL, PUNITIVE OR OTHER DAMAGES WHATSOEVER (INCLUDING, WITHOUT LIMITATION, DAMAGES FOR LOSS OF BUSINESS PROFITS, BUSINESS INTERRUPTION OR LOSS OF BUSINESS INFORMATION), EVEN IF COMPAQ HAS BEEN ADVISED OF THE POSSIBILITY OF SUCH DAMAGES. THE FOREGOING SHALL APPLY REGARDLESS OF THE NEGLIGENCE OR OTHER FAULT OF EITHER PARTY AND REGARDLESS OF WHETHER SUCH LIABILITY SOUNDS IN CONTRACT, NEGLIGENCE, TORT, OR ANY OTHER THEORY OF LEGAL LIABILITY, AND NOTWITHSTANDING ANY FAILURE OF ESSENTIAL PURPOSE OF ANY LIMITED REMEDY.
The limited warranties for Compaq products are exclusively set forth in the documentation accompanying such products. Nothing herein should be construed as constituting a further or additional warranty.
Compaq Presario Mobile Internet PC 800 Series
First Edition (January 2001)
Part Number 209713-371

CONTENTS
Chapter 1 Introduction . . . . . . . . . . . . . . . . . . . . . . . . . . . . . . 1-1
Where Can I Find Information? . . . . . . . . . . . . . . . . . . . 1-2
Printed Documents . . . . . . . . . . . . . . . . . . . . . . . . . 1-2
Symbols and Graphics . . . . . . . . . . . . . . . . . . . . . . . . . . 1-4
Symbols . . . . . . . . . . . . . . . . . . . . . . . . . . . . . . . . . . 1-4
Graphics . . . . . . . . . . . . . . . . . . . . . . . . . . . . . . . . . . 1-4
Safety . . . . . . . . . . . . . . . . . . . . . . . . . . . . . . . . . . . . . . . 1-5
Disconnecting Your Notebook
from the Power Source . . . . . . . . . . . . . . . . . . . . . . 1-5
Chapter 2 Your Notebook at a Glance . . . . . . . . . . . . . . . . . . 2-1
Front of Your Presario Notebook . . . . . . . . . . . . . . . . . . 2-2
Components on Front . . . . . . . . . . . . . . . . . . . . . . . 2-2
Lower Front Panel. . . . . . . . . . . . . . . . . . . . . . . . . . . 2-3
Internet Zone Buttons and Lights . . . . . . . . . . . . . . . 2-3
Function Keys . . . . . . . . . . . . . . . . . . . . . . . . . . . . . 2-5
PRESARIO MOBILE INTERNET PC BEYOND SETUP GUIDE |
CONTENTS-I |
800 SERIES |
|
Left Panel . . . . . . . . . . . . . . . . . . . . . . . . . . . . . . . . . . . 2-6
Components on Left Side . . . . . . . . . . . . . . . . . . . . 2-6
Diskette, and CD, DVD, or CD-RW
Drive for Left Side . . . . . . . . . . . . . . . . . . . . . . . . . . 2-6 Right Panel . . . . . . . . . . . . . . . . . . . . . . . . . . . . . . . . . . 2-7 Components on Right Side . . . . . . . . . . . . . . . . . . . 2-7 Back Panel . . . . . . . . . . . . . . . . . . . . . . . . . . . . . . . . . . . 2-8 Components on Back . . . . . . . . . . . . . . . . . . . . . . . 2-8 Underside . . . . . . . . . . . . . . . . . . . . . . . . . . . . . . . . . . . 2-9 Components on Underside . . . . . . . . . . . . . . . . . . . 2-9
Chapter 3 Using Your Notebook . . . . . . . . . . . . . . . . . . . . . . . 3-1
Power On! . . . . . . . . . . . . . . . . . . . . . . . . . . . . . . . . . . . 3-2
Plugging and Unplugging AC Power . . . . . . . . . . . . 3-2
Turning Your Notebook On and Off . . . . . . . . . . . . . 3-3
Using Battery Power . . . . . . . . . . . . . . . . . . . . . . . . 3-4
Optimizing Processor Speed . . . . . . . . . . . . . . . . . . 3-5
TouchPad . . . . . . . . . . . . . . . . . . . . . . . . . . . . . . . . . . . 3-6
Using the TouchPad Instead of a Mouse . . . . . . . . 3-6
Tapping and Double-Tapping . . . . . . . . . . . . . . . . . 3-7
Edge Motion . . . . . . . . . . . . . . . . . . . . . . . . . . . . . . 3-8
Display Options . . . . . . . . . . . . . . . . . . . . . . . . . . . . . . . 3-9
Changing Resolution . . . . . . . . . . . . . . . . . . . . . . . . 3-9
Adjusting Brightness . . . . . . . . . . . . . . . . . . . . . . . 3-10
Internet Zone Buttons . . . . . . . . . . . . . . . . . . . . . . . . . 3-11
Reprogramming the Internet Zone Buttons . . . . . . 3-11
Disabling the Internet Zone Buttons . . . . . . . . . . . 3-11
CONTENTS-II |
PRESARIO MOBILE INTERNET PC BEYOND SETUP GUIDE |
|
800 SERIES |
Storage Drives . . . . . . . . . . . . . . . . . . . . . . . . . . . . . . . 3-12
Identifying Your Storage Drives . . . . . . . . . . . . . . . 3-12
Using the Diskette Drive . . . . . . . . . . . . . . . . . . . . 3-13
Communication Feature . . . . . . . . . . . . . . . . . . . . . . . 3-14
Using the Modem . . . . . . . . . . . . . . . . . . . . . . . . . 3-14
Using the LAN . . . . . . . . . . . . . . . . . . . . . . . . . . . . 3-15
Infrared Feature . . . . . . . . . . . . . . . . . . . . . . . . . . . . . . 3-16
Connecting an IR Device . . . . . . . . . . . . . . . . . . . . 3-16
Security . . . . . . . . . . . . . . . . . . . . . . . . . . . . . . . . . . . . 3-17
Using the Security Slot . . . . . . . . . . . . . . . . . . . . . 3-17
Power-On Password . . . . . . . . . . . . . . . . . . . . . . . 3-17
Chapter 4 Common Tasks . . . . . . . . . . . . . . . . . . . . . . . . . . . .4-1
Anti-Virus Software . . . . . . . . . . . . . . . . . . . . . . . . . . . . 4-2
Using Anti-Virus Software . . . . . . . . . . . . . . . . . . . . 4-2
Recognizing a Computer Virus . . . . . . . . . . . . . . . . 4-3
Removing a Virus . . . . . . . . . . . . . . . . . . . . . . . . . . 4-3
Software and Hardware . . . . . . . . . . . . . . . . . . . . . . . . . 4-4
Adding and Removing Software . . . . . . . . . . . . . . . 4-4
Attaching Hardware Devices . . . . . . . . . . . . . . . . . . 4-6
Chapter 5 Using the CD or DVD Drive . . . . . . . . . . . . . . . . . . .5-1
CD or DVD Drive . . . . . . . . . . . . . . . . . . . . . . . . . . . . . . 5-2 Connecting the CD or DVD Drive . . . . . . . . . . . . . . 5-2 Inserting a Disc . . . . . . . . . . . . . . . . . . . . . . . . . . . . 5-2 Removing a Disc . . . . . . . . . . . . . . . . . . . . . . . . . . . 5-3 Manually Ejecting a Disc . . . . . . . . . . . . . . . . . . . . . 5-4
PRESARIO MOBILE INTERNET PC BEYOND SETUP GUIDE |
CONTENTS-III |
800 SERIES |
|
Audio CDs and Video Discs . . . . . . . . . . . . . . . . . . . . . 5-5
Playing Audio CDs . . . . . . . . . . . . . . . . . . . . . . . . . . 5-5
Playing Non-DVD Video Discs . . . . . . . . . . . . . . . . 5-6
DVDs . . . . . . . . . . . . . . . . . . . . . . . . . . . . . . . . . . . . . . . 5-7
Using the DVD Player . . . . . . . . . . . . . . . . . . . . . . . 5-7
Using "Regionalized" DVDs . . . . . . . . . . . . . . . . . 5-11
Video Display Options . . . . . . . . . . . . . . . . . . . . . . . . . 5-13
Showing and Hiding the DVD Panel . . . . . . . . . . . 5-13
Zooming the View . . . . . . . . . . . . . . . . . . . . . . . . . 5-13
CD-RW Basics . . . . . . . . . . . . . . . . . . . . . . . . . . . . . . 5-14
Installing Adaptec Easy CD CreatorTM 4 . . . . . . . . 5-14
Using Adaptec Easy CD Creator 4 . . . . . . . . . . . . 5-16
Preventing Buffer Underrun Errors . . . . . . . . . . . . 5-19
Accessing Easy CD Creator 4 User Information . . 5-20
Chapter 6 Let's Go Surfing . . . . . . . . . . . . . . . . . . . . . . . . . . . 6-1
Basic Concepts . . . . . . . . . . . . . . . . . . . . . . . . . . . . . . . 6-2 What is Internet? . . . . . . . . . . . . . . . . . . . . . . . . . . . 6-2 What is the World Wide Web? . . . . . . . . . . . . . . . . . 6-3 Browsers . . . . . . . . . . . . . . . . . . . . . . . . . . . . . . . . . . . . 6-7 What is a Browser? . . . . . . . . . . . . . . . . . . . . . . . . . 6-7 Using Microsoft Internet Explorer . . . . . . . . . . . . . . 6-7 Search Engines . . . . . . . . . . . . . . . . . . . . . . . . . . . . . . . 6-9 Choosing a Search Engine . . . . . . . . . . . . . . . . . . . 6-9 Using a Search Engine . . . . . . . . . . . . . . . . . . . . . 6-10 Searching on the Web . . . . . . . . . . . . . . . . . . . . . . 6-11 Accessing Files from the Internet . . . . . . . . . . . . . 6-12
CONTENTS-IV |
PRESARIO MOBILE INTERNET PC BEYOND SETUP GUIDE |
|
800 SERIES |
Chapter 7 Caring for Your Battery . . . . . . . . . . . . . . . . . . . . . .7-1
Battery Care . . . . . . . . . . . . . . . . . . . . . . . . . . . . . . . . . 7-2 Using the Battery . . . . . . . . . . . . . . . . . . . . . . . . . . . 7-2 Storing the Battery . . . . . . . . . . . . . . . . . . . . . . . . . . 7-2 Recycling the Battery . . . . . . . . . . . . . . . . . . . . . . . . 7-3 Battery Calibration . . . . . . . . . . . . . . . . . . . . . . . . . . . . . 7-4 Calibrating the Battery . . . . . . . . . . . . . . . . . . . . . . . 7-4 Maximizing Battery Operating Time . . . . . . . . . . . . . 7-6 Fixing a Low-Battery Condition . . . . . . . . . . . . . . . . 7-7 Power Management . . . . . . . . . . . . . . . . . . . . . . . . . . . 7-9 Saving Energy . . . . . . . . . . . . . . . . . . . . . . . . . . . . . 7-9 What is Power Management? . . . . . . . . . . . . . . . . . 7-9
Chapter 8 Service and Support. . . . . . . . . . . . . . . . . . . . . . . . .8-1
Preventive Maintenance . . . . . . . . . . . . . . . . . . . . . . . . 8-2 Cleaning Your Notebook's Exterior . . . . . . . . . . . . . 8-2 Cleaning the Keyboard . . . . . . . . . . . . . . . . . . . . . . 8-2 Cleaning the Display Screen . . . . . . . . . . . . . . . . . . 8-3 Cleaning the TouchPad . . . . . . . . . . . . . . . . . . . . . . 8-3 Caring for Your Presario Notebook . . . . . . . . . . . . . 8-4
Backup Utilities . . . . . . . . . . . . . . . . . . . . . . . . . . . . . . . 8-5
Using Backup Devices . . . . . . . . . . . . . . . . . . . . . . . 8-5
Hard Disk Errors . . . . . . . . . . . . . . . . . . . . . . . . . . . . . . 8-6
Using ScanDisk . . . . . . . . . . . . . . . . . . . . . . . . . . . . 8-6
Using Disk Cleanup . . . . . . . . . . . . . . . . . . . . . . . . . 8-6
Deleting Stored Files . . . . . . . . . . . . . . . . . . . . . . . . 8-7
Defragmenting Your Hard Disk . . . . . . . . . . . . . . . . 8-7
PRESARIO MOBILE INTERNET PC BEYOND SETUP GUIDE |
CONTENTS-V |
800 SERIES |
|
Hard Disk Space Management . . . . . . . . . . . . . . . . . . . 8-8
Checking the Hard Disk Space . . . . . . . . . . . . . . . . 8-8
Deleting Unnecessary Files . . . . . . . . . . . . . . . . . . . 8-8
Using the Recycling Bin . . . . . . . . . . . . . . . . . . . . . . 8-9
System Support . . . . . . . . . . . . . . . . . . . . . . . . . . . . . . 8-10
Compaq Diagnostics . . . . . . . . . . . . . . . . . . . . . . . 8-10
System Record . . . . . . . . . . . . . . . . . . . . . . . . . . . 8-12
Internet Support . . . . . . . . . . . . . . . . . . . . . . . . . . . 8-13
Chapter 9 Solutions . . . . . . . . . . . . . . . . . . . . . . . . . . . . . . . . . 9-1
Basic Solutions . . . . . . . . . . . . . . . . . . . . . . . . . . . . . . . 9-2 Helpful Hints . . . . . . . . . . . . . . . . . . . . . . . . . . . . . . 9-2 Finding Solutions Quickly . . . . . . . . . . . . . . . . . . . . 9-2 Frequently Asked Questions . . . . . . . . . . . . . . . . . . . . . 9-3 General Questions . . . . . . . . . . . . . . . . . . . . . . . . . . 9-3 Display Questions . . . . . . . . . . . . . . . . . . . . . . . . . . 9-4 Questions about Sound . . . . . . . . . . . . . . . . . . . . . . 9-5 Questions about Movies . . . . . . . . . . . . . . . . . . . . . 9-6 Questions about Peripherals . . . . . . . . . . . . . . . . . . 9-6 Questions about Upgrades . . . . . . . . . . . . . . . . . . . 9-6 Error Messages . . . . . . . . . . . . . . . . . . . . . . . . . . . . 9-7
CONTENTS-VI |
PRESARIO MOBILE INTERNET PC BEYOND SETUP GUIDE |
|
800 SERIES |
Solution Tables . . . . . . . . . . . . . . . . . . . . . . . . . . . . . . . 9-9
Audio and Video . . . . . . . . . . . . . . . . . . . . . . . . . . . 9-9
Battery and Power . . . . . . . . . . . . . . . . . . . . . . . . . 9-11
Mass-Storage . . . . . . . . . . . . . . . . . . . . . . . . . . . . 9-15
Game and Internet . . . . . . . . . . . . . . . . . . . . . . . . . 9-19
Keyboard and TouchPad . . . . . . . . . . . . . . . . . . . . 9-21
Memory and PC Card . . . . . . . . . . . . . . . . . . . . . . 9-24
Glossary
Index
PRESARIO MOBILE INTERNET PC BEYOND SETUP GUIDE |
CONTENTS-VII |
800 SERIES |
|
CONTENTS-VIII |
PRESARIO MOBILE INTERNET PC BEYOND SETUP GUIDE |
|
800 SERIES |
Introduction 1
In This Chapter
Where Can I Find
Information?, 1-2
Symbols and Graphics, 1-4
Safety, 1-5
Congratulations! As the owner of a new Presario Notebook computer, you have joined the world-wide community of mobile computer users. Once your Notebook is set up and connected to the Internet, you can explore vast regions of information, entertainment, and services online.
The Beyond Setup Guide is designed for both experienced computer users and beginners. This easy-to-scan guide helps you find the information you want as quickly as possible. It’s also designed to familiarize you with the following:
•Features you’ll want to try during the first few days or weeks
•Keeping your Notebook running smoothly
•Solving common problems as they occur
PRESARIO MOBILE INTERNET PC BEYOND SETUP GUIDE |
INTRODUCTION 1-1 |
800 SERIES |
|

Where Can
I Find
Information?
This section describes the documentation that came in the box with your new Notebook.
The Compaq Web site is available worldwide. As you explore the Internet, stop at the following address for information about products, services, and special offers:
www.compaq.com
Printed Documents
Your new Presario Notebook computer came with printed documents containing helpful reference information.
If you have access to the Internet, you can also view these and other documents on the Compaq Web site at www.compaq.com/mypresario.
Note: Additional documents to those described here may vary per region.
Beyond Setup Guide
This easy-to-scan guide explains how to set up your Notebook and get acquainted with its features. It also introduces:
•Common computer tasks
•The Internet
•Notebook maintenance
•Solutions for computer problems
1-2 INTRODUCTION |
PRESARIO MOBILE INTERNET PC BEYOND SETUP GUIDE |
|
800 SERIES |

Safety and Comfort Guide
This document explains how to protect your equipment from damage, protect yourself from injury, and ensure your comfort while using your Notebook.
Warranty Certificate
The warranty details the Compaq commitment to service during the warranty period. Keep the warranty certificate in a safe place for future reference.
Presario Operating System Manual
The Presario Operating System Manual explains how to communicate with your Notebook using the Microsoft® Windows® operating system. It also introduces:
•File Management, which covers creating, saving, deleting, renaming, and moving files
•Customizing the Windows desktop
•Using the Windows online Help
Note: The illustrations shown and the features described in this document may differ slightly from your Presario Notebook computer.
PRESARIO MOBILE INTERNET PC BEYOND SETUP GUIDE |
INTRODUCTION 1-3 |
800 SERIES |
|
Symbols and
Graphics
Symbols
The following words and symbols have special meaning in this guide and in the electronic documentation:
Important information that may help you to solve a problem.
Helpful hints that make using your Notebook easier and faster.
Another document or another page in this document that has related information.
Failure to follow directions may result in bodily harm or loss of life.
Failure to follow directions
ÄCaution: may result in equipment damage or data loss.
Graphics
The illustrations shown and the features described in this document may differ slightly from your Presario Notebook computer.
1-4 INTRODUCTION |
PRESARIO MOBILE INTERNET PC BEYOND SETUP GUIDE |
|
800 SERIES |

Safety
To reduce the risk of electric shock and damage to the equipment, read the Safety and Comfort document.
To protect your equipment from power surges, plug all power cords into a high-quality surge protector. If you have a dedicated telephone line for the modem, buy a surge protector with a telephone jack.
After your Notebook is safely disconnected from
AC power and the phone line, you can run your Notebook on battery power.
Disconnecting Your Notebook from the Power Source
To shut down your Notebook properly, complete the following steps:
1.Close all open programs.
2.On the Windows taskbar, click Start, then click Shut Down … The Shut down Windows dialog box is displayed.
3.Select the Shut down option.
Note: If the Notebook does not turn off automatically, then press and hold the Power button until it shuts down.
4.Unplug the power cord from the wall outlet and unplug the modem line from the wall jack.
Protecting Your Notebook During an Electrical Storm
During an electrical storm, you should take the following precautions to protect your Notebook from damage. You should immediately disconnect your Notebook from the power source.
•If you are not using a surge protector, unplug all power cords from the wall outlets.
•Disconnect your Notebook from the wall outlets.
•Turn off the power button on all surge protectors.
•If a telephone line from your Notebook is plugged directly into the wall jack (without going through a surge protector), unplug the line from the wall jack.
PRESARIO MOBILE INTERNET PC BEYOND SETUP GUIDE |
INTRODUCTION 1-5 |
800 SERIES |
|

Your
Notebook 2
at a Glance
In This Chapter
Front of Your Presario
Notebook, 2-2
Left Panel, 2-6
Right Panel, 2-7
Back Panel, 2-8
Underside, 2-9
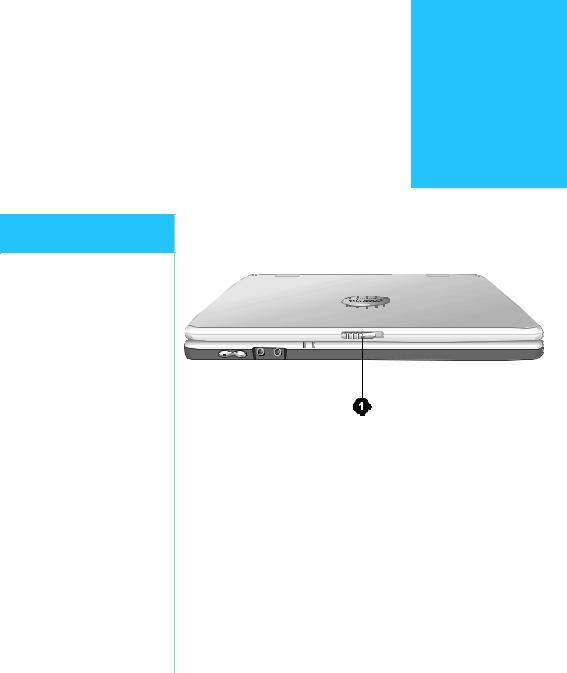
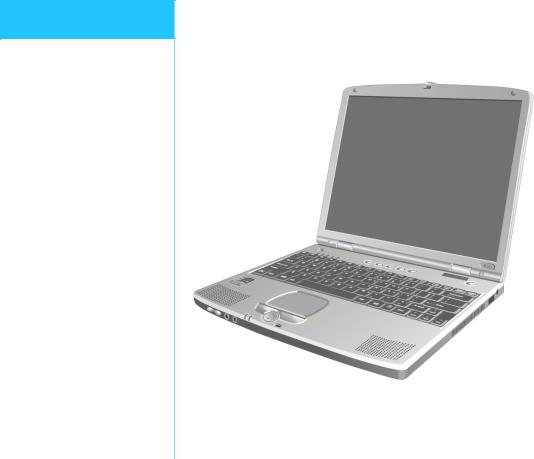
Before you begin using your new Presario Notebook, you’ll want to look at some of the basic components.
To open your new Notebook, slide the 1 Display Release Latch and gently lift the lid up.
PRESARIO MOBILE INTERNET PC BEYOND SETUP GUIDE |
YOUR NOTEBOOK AT A GLANCE 2-1 |
800 SERIES |
|
Front of
Your Presario
Notebook
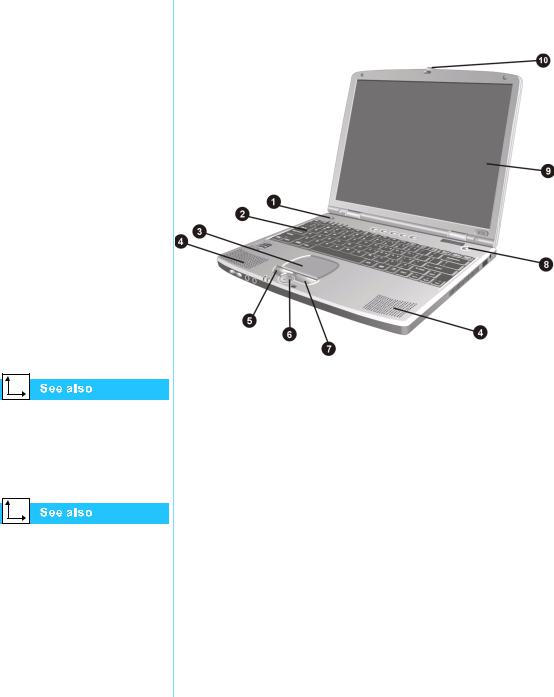
Open the front of your Notebook and take a look at these components:
•Common Features
•Internet Zone Buttons and Lights
•Battery and AC Power Lights
•Function Keys
“Turning Your Notebook On and Off” later in this guide to learn more about how to start and shut down your Notebook.
“TouchPad” later in this guide for more information on using the TouchPad.
Components on Front
1 |
Microphone |
6 |
Scroll Button |
2 |
Keyboard |
7 |
Right TouchPad Button |
3 |
TouchPad |
8 |
Power Button |
4 |
Speakers |
9 |
Display |
5 |
Left TouchPad Button |
- Display Release Latch |
|
2-2 YOUR NOTEBOOK AT A GLANCE |
PRESARIO MOBILE INTERNET PC BEYOND SETUP GUIDE |
|
800 SERIES |

Lower Front Panel
1 |
Volume Down Button |
4 |
Headphone Jack |
||||||||
2 |
Volume Up Button |
5 |
AC Adapter Light |
||||||||
3 |
Microphone Jack |
6 |
Battery Charging Light |
||||||||
|
|
|
|
|
|
|
|
|
|
|
|
|
|
|
|
|
|
|
|
|
|
|
|
|
|
|
|
|
|
|
|
|
|
|
|
|
|
|
|
|
|
|
|
|
|
|
|
“Reprogramming the Internet |
Internet Zone Buttons and Lights |
|
Zone Buttons” later in this |
||
|
||
guide to learn how to |
|
|
program these buttons |
|
|
to suit your needs. |
|
|
|
|
|
|
|
1 |
Network Status Light |
6 |
Digital Audio Button |
||
2 |
Harddisk Light |
7 |
Instant Internet Access Button |
||
3 |
Num Lock Light |
8 |
My Presario Button |
||
4 |
Caps Lock Light |
9 |
Retail Central Button |
||
5 |
Scroll Lock Light |
- Instant E-Mail Button |
|||
PRESARIO MOBILE INTERNET PC BEYOND SETUP GUIDE |
|
|
YOUR NOTEBOOK AT A GLANCE 2-3 |
||
800 SERIES |
|
|
|
|
|

Note: Before using these buttons, you must have access to the Internet.
Button |
Button Description |
Default Button Action |
|
|
|
M |
Digital Audio |
Launches Windows Media Player |
|
|
to play MP3 music. |
∆ |
Instant Internet Access |
Provides your daily start point to |
|
|
the Internet. It connects you to a |
|
|
personalized Web page filled with |
|
|
local weather, news, sports, and |
|
|
financial information. |
|
|
|
À |
My Presario |
Connects instantly to Compaq for |
|
|
product information, helpful hints, |
|
|
performance updates, service, |
|
|
and more. |
|
|
|
B |
Retail Central |
Provides instant connection to |
|
|
your Notebook store and a variety |
|
|
of leading consumer companies. |
|
|
|
ƒ |
Instant E-mail |
Provides you with one-touch |
|
|
access for sending and reading |
|
|
your e-mail. |
|
|
|
2-4 YOUR NOTEBOOK AT A GLANCE |
PRESARIO MOBILE INTERNET PC BEYOND SETUP GUIDE |
|
800 SERIES |
Function Keys
The following keys have already been assigned:
Button |
Description |
|
F1 |
User programmable favorite launch key |
|
|
|
|
F2 |
User programmable favorite launch key |
|
|
|
|
F3 |
Switches between the display and external monitor in the |
|
|
following order: |
|
|
• |
Display |
|
• |
External Monitor |
|
• Display and External Monitor |
|
|
|
|
F4 |
Sleep |
|
|
|
|
F5 |
Audio mute |
|
|
|
|
F6 |
Display on/off |
|
|
|
|
F7 |
Brightness control down |
|
|
|
|
F8 |
Brightness control up |
|
|
|
|
F9 |
CD or DVD play/pause |
|
|
|
|
F10 |
CD or DVD stop |
|
|
|
|
F11 |
CD or DVD previous track |
|
|
|
|
F12 |
CD or DVD next track |
|
|
|
|
PRESARIO MOBILE INTERNET PC BEYOND SETUP GUIDE |
YOUR NOTEBOOK AT A GLANCE 2-5 |
800 SERIES |
|

Left Panel
Take a look at the left side of your Notebook. This is where the USB ports, CD, DVD, or CD-RW drive port, modem and Ethernet ports, 1394 port and PC card slot are located.
PC Cards are credit card-sized removable options that expand the capability
of your Notebook.
“CD-RW Basics” later in
this guide for more information on CD-RW.
Components on Left Side
|
|
|
|
|
|
|
|
|
|
|
|
|
|
|
|
|
|
|
|
|
|
|
|
|
|
|
|
|
|
|
|
|
|
|
|
|
|
|
|
|
|
|
|
|
|
|
|
|
|
|
|
|
|
|
|
|
|
|
|
|
|
|
|
|
|
|
|
|
|
|
|
|
|
|
|
|
|
|
|
|
|
|
|
|
|
|
|
|
|
|
|
|
|
|
|
|
|
|
|
|
|
|
|
|
1 |
USB Port |
5 |
Ethernet Port |
|
|
|
|
|
|
|||||||||||
2 |
CD, DVD, or CD-RW Drive Port |
6 |
Modem Port |
|
|
|
|
|
|
|||||||||||
3 |
PC Card Slot (Type II) |
7 |
1394 Port |
|
|
|
|
|
|
|||||||||||
4 |
PC Card Eject Button |
|
|
|
|
|
|
|
|
|
|
|
|
|||||||
Diskette, and CD, DVD, or CD-RW Drive for Left Side
2-6 YOUR NOTEBOOK AT A GLANCE |
PRESARIO MOBILE INTERNET PC BEYOND SETUP GUIDE |
|
800 SERIES |
Right Panel |
Components on Right Side |
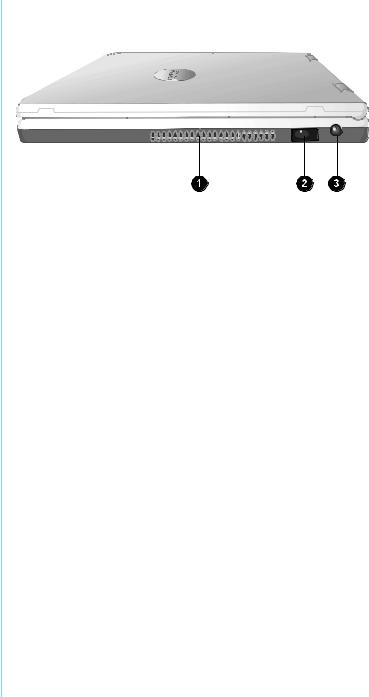
Take a look at the right side of your Notebook. This is where the AC adapter connector and IR port are located.
1 Air Vent |
3 AC Adapter Connector |
2 IR Port
PRESARIO MOBILE INTERNET PC BEYOND SETUP GUIDE |
YOUR NOTEBOOK AT A GLANCE 2-7 |
800 SERIES |
|
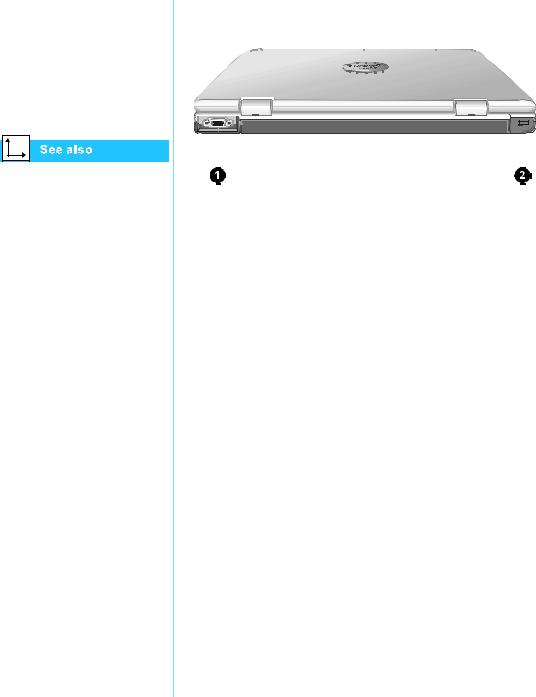
Back Panel
Take a look at the back of your Notebook. This is where you connect an external monitor.
“Attaching Hardware Devices” later in this guide for more information on attaching external devices.
Components on Back
|
|
|
|
|
|
|
|
|
|
|
|
|
|
|
|
|
|
1 External Monitor (VGA) Port |
2 Security Slot |
||||
2-8 YOUR NOTEBOOK AT A GLANCE |
PRESARIO MOBILE INTERNET PC BEYOND SETUP GUIDE |
|
800 SERIES |
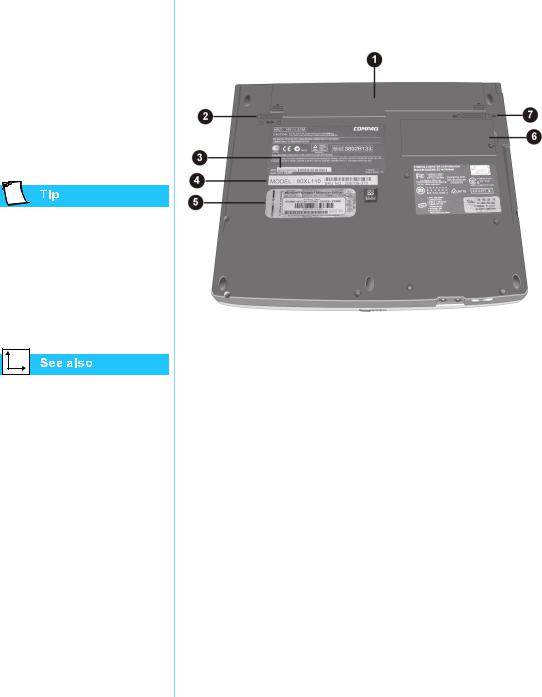
Underside
Here’s what’s on the underside of your Notebook. This is where the memory compartment and battery are located.
Before calling Compaq Customer Support you will need the serial number from the underside of
your Notebook.
“Inserting the Battery” later in this guide for more information about the Battery Release Switch.
Components on Underside
1 |
Battery |
5 |
Microsoft COA |
2 |
Battery Stopper |
6 |
Memory Compartment |
3 |
Serial Number |
7 |
Battery Release Switch |
4 |
Model Number |
|
|
PRESARIO MOBILE INTERNET PC BEYOND SETUP GUIDE |
YOUR NOTEBOOK AT A GLANCE 2-9 |
800 SERIES |
|

Using Your |
3 |
Notebook |
|
In This Chapter
Power On!, 3-2
TouchPad, 3-6
Display Options, 3-9
Internet Zone Buttons, 3-11
Storage Drives, 3-12
Communication Feature, 3-14
Infrared Feature, 3-16
Security, 3-17
Your Presario Notebook computer is designed for easy setup, use, and upgrading. In this chapter, you’ll become familiar with your Notebook features.
PRESARIO MOBILE INTERNET PC BEYOND SETUP GUIDE |
USING YOUR NOTEBOOK 3-1 |
800 SERIES |
|

Power On!
This section helps you get your Notebook set up and running.
•Plugging and Unplugging AC Power
•Turning Your Notebook On and Off
•Using Battery Power
The Easy Setup Poster and the “Government Approvals” section in the Safety and Comfort Guide for worldwide power cord information.
To reduce the risk of electrical shock, fire, or damage to the equipment, do not use converter kits sold for appliances to power your Notebook. Use only the Compaq adapter that came with your Notebook or a Compaq replacement part.
Plugging and Unplugging AC Power
Do’s
•Ensure that you can reach the electrical outlet easily.
•Unplug the AC adapter from the electrical outlet when you want to disconnect AC power from your Notebook.
•When unplugging from the electrical outlet, grasp the cord by the plug.
Don’ts
•Do not leave the AC adapter plugged into the electrical outlet when it is not connected to your Notebook.
•Do not place anything on power cords or cables. Arrange them so that no one accidentally steps on or trips over them.
Surge Protectors
Using surge protectors and line conditioners can substantially reduce the risk of electrical shock and aid in protecting your Notebook from power-source problems.
During a power surge, the voltage level of electricity coming into your Notebook can increase and cause data loss or system damage. Protect your Notebook and peripherals by connecting them to a surge suppressor, which absorbs voltage surges and prevents them from reaching your Notebook.
ÄCaution: High voltages can enter your Notebook through the phone line connected to the modem. To protect your Notebook during electrical storms, use a telephone line surge protector.
3-2 USING YOUR NOTEBOOK |
PRESARIO MOBILE INTERNET PC BEYOND SETUP GUIDE |
|
800 SERIES |
When a charged battery is in your Notebook, you can simply unplug it from AC power. Your Notebook automatically switches to battery power.
Hibernation is a state of no-power consumption. When your Notebook enters this mode, the contents of the memory are saved to the hard disk and your Notebook powers off.
Why Use AC Power When I’ve Got a Battery?
When you’re not on the go, you’ll want to use your Notebook’s AC adapter to supply power. This ensures that the battery is always charged.
When your Notebook does not have a charged battery, you should save your work and turn off your Notebook before unplugging it from the AC power supply.
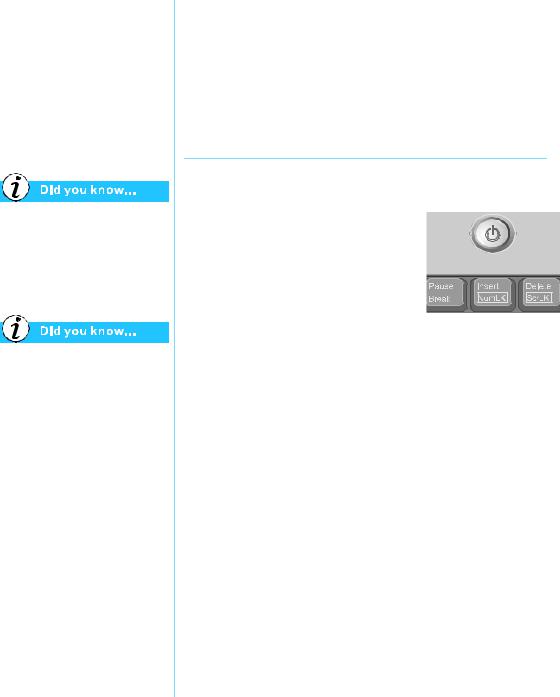
Turning Your Notebook On and Off
To turn on your Notebook, press the Power ª button, which is located at the top of the keyboard.
To turn off your Notebook properly, complete the following steps:
1.Save your work and exit all open programs.
2.Click the Start button, then click Shut Down, and select the
Shut down option.
3.Click the OK button. After a few seconds, your Notebook will turn off.
Note: If your Notebook is not responding, press and hold down the Power button until your Notebook shuts down.
Power Button Functionality
When your Notebook is on, pressing the Power ª button places your Notebook in Hibernation mode. The settings for the Power button are as follows:
•Press and release once to enter Hibernation mode
•Press and hold down to shut down your Notebook
Note: You should only press and hold down the Power ªbutton to shut down your Notebook if it is locked up or not responding. Compaq does not recommend that you turn off your Notebook using this method under normal circumstances. To turn off your Notebook properly, refer to the procedure above.
PRESARIO MOBILE INTERNET PC BEYOND SETUP GUIDE |
USING YOUR NOTEBOOK 3-3 |
800 SERIES |
|
Your Notebook contains a lithium-ion battery pack. Improper handling of the battery pack can result in fire and chemical burns. Do not disassemble, crush, puncture, short external contacts, dispose of in water or fire, or expose it to temperatures higher than 60 °C (140 °F). Replace only with the Compaq battery pack specified for your Notebook.
“Components on Underside” in Chapter 2 of this guide for help in locating the Battery Stopper and Battery
Release Switch.
“Caring For Your Battery” later in this guide.
Using Battery Power
Connecting and Removing the Battery
To connect the battery to your Notebook, place your Notebook upside down and position the battery so that the side with the label is turned down. Unlock the Battery Stopper first. Connect the battery to your Notebook until it snaps into place. Then lock the Battery Stopper.
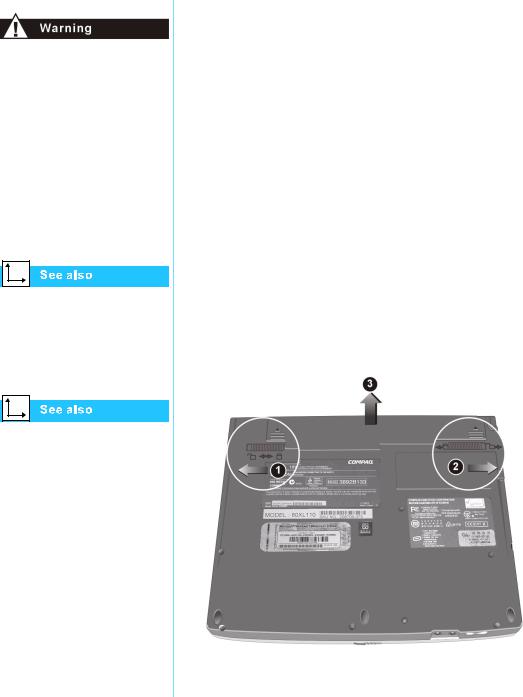
To remove the battery, complete the following steps:
1.Save your files.
2.If the AC adapter is not connected, turn off your Notebook.
3.Unlock the Battery Stopper.
4.Slide and hold the Battery Release Switch on the underside of your Notebook to the back.
5.Pull the battery out.
3-4 USING YOUR NOTEBOOK |
PRESARIO MOBILE INTERNET PC BEYOND SETUP GUIDE |
|
800 SERIES |
 Loading...