


Compaq Presario 2800AP
Table of contents
 Loading...
HP Compaq Presario 2800AP, Compaq Presario 2800AU, Compaq Presario 2800EA, Compaq Presario 2800SC, Compaq Presario 2800CA Software Guide
...
b
Software Guide
Compaq Notebook Series
Document Part Number: 266491-001
April 2002
This guide provides instructions for using optical drive software
to play, create, and copy to and from CDs and DVDs. Information
about power and security settings and updating software is also
provided. In addition, this guide explains how to use the
MultiBoot, Intelligent Manageability, Compaq Diagnostics, and
Computer Setup utilities to set preferences and to help detect,
solve, and prevent problems.

© 2002 Compaq Information Technologies Group, L.P.
Compaq, the Compaq logo, Evo, Presario, ROMPaq and SoftPaq are trademarks
of Compaq Information Technologies Group, L.P. in the U.S. and/or other
countries.
Microsoft and Windows are trademarks of Microsoft Corporation in the U.S.
and/or other countries.
Intel and Pentium are trademarks of Intel Corporation in the U.S. and/or other
countries.
All other product names mentioned herein may be trademarks of their respective
companies.
Compaq shall not be liable for technical or editorial errors or omissions
contained herein. The information is provided “as is” without warranty of any
kind and is subject to change without notice. The warranties for Compaq
products are set forth in the express limited warranty statements accompanying
such products. Nothing herein should be construed as constituting an additional
warranty.
Software Guide
First Edition April 2002
Reference Number: N800/2800
Document Part Number: 266491-001

Software Guide iii
Contents
1 CD and DVD Software
Using CDs and DVDs . . . . . . . . . . . . . . . . . . . . . . . . . . . 1–1
Avoiding Standby and Hibernation . . . . . . . . . . . . . . 1–1
Displaying Media Contents . . . . . . . . . . . . . . . . . . . . 1–1
Copyright Warning . . . . . . . . . . . . . . . . . . . . . . . . . . 1–3
Playing CDs with Windows Media Player. . . . . . . . . . . . 1–4
Playing an Audio CD. . . . . . . . . . . . . . . . . . . . . . . . . 1–4
Playing a Video CD. . . . . . . . . . . . . . . . . . . . . . . . . . 1–5
Using Notebook Media Keys . . . . . . . . . . . . . . . . . . 1–6
Accessing Windows Media Player Help . . . . . . . . . . 1–7
Playing DVDs with WinDVD . . . . . . . . . . . . . . . . . . . . . 1–8
Installing WinDVD . . . . . . . . . . . . . . . . . . . . . . . . . . 1–8
Accessing WinDVD Help . . . . . . . . . . . . . . . . . . . . . 1–9
Starting a DVD . . . . . . . . . . . . . . . . . . . . . . . . . . . . 1–10
Using DVD Region Settings . . . . . . . . . . . . . . . . . . 1–10
Creating and Copying CDs and DVDs . . . . . . . . . . . . . 1–12
Using Optional or Windows Software. . . . . . . . . . . 1–12
Understanding Easy CD Creator Features. . . . . . . . 1–12
Installing Easy CD Creator . . . . . . . . . . . . . . . . . . . . . . 1–13
Installing Easy CD Creator Software . . . . . . . . . . . 1–13
Enabling Auto Insert Notification . . . . . . . . . . . . . . 1–14
Preparing to Use Easy CD Creator. . . . . . . . . . . . . . . . . 1–15
Selecting Drive Locations . . . . . . . . . . . . . . . . . . . . 1–15
Selecting and Preparing Easy CD Creator Media . . 1–16
Selecting Easy CD Creator Settings . . . . . . . . . . . . 1–17
Accessing Easy CD Creator Help . . . . . . . . . . . . . . 1–19
Easy CD Creator Tips and Troubleshooting . . . . . . . . . 1–20
Playing CDs and DVDs. . . . . . . . . . . . . . . . . . . . . . 1–20

iv Software Guide
Contents
Using CD Copier . . . . . . . . . . . . . . . . . . . . . . . . . . . 1–20
Creating Media For Use in Other Systems . . . . . . . 1–20
Using Windows Media Player. . . . . . . . . . . . . . . . . 1–21
Responding to Buffer Underrun Errors . . . . . . . . . . 1–21
2 Power
Selecting a Power Source. . . . . . . . . . . . . . . . . . . . . . . . . 2–1
Understanding Standby and Hibernation . . . . . . . . . . . . . 2–2
Standby . . . . . . . . . . . . . . . . . . . . . . . . . . . . . . . . . . . 2–2
Hibernation . . . . . . . . . . . . . . . . . . . . . . . . . . . . . . . . 2–2
Choosing Standby, Hibernation or Shutdown . . . . . . . . . 2–3
When You Leave Your Work . . . . . . . . . . . . . . . . . . 2–3
When the Power Supply Is Uncertain . . . . . . . . . . . . 2–3
While Using Drive Media . . . . . . . . . . . . . . . . . . . . . 2–4
While Using Infrared . . . . . . . . . . . . . . . . . . . . . . . . . 2–4
Standby, Hibernation and Shutdown Procedures. . . . . . . 2–5
Identifying the Power Controls and Light . . . . . . . . . 2–5
Using the Default Power Procedures. . . . . . . . . . . . . 2–6
Setting Power Procedure Preferences . . . . . . . . . . . . 2–9
Using Emergency Shut Down Procedures. . . . . . . . 2–10
Setting Power Management Preferences . . . . . . . . . . . . 2–11
Accessing the Power Options Window . . . . . . . . . . 2–11
Displaying the Power Meter Icon . . . . . . . . . . . . . . 2–11
Setting or Changing a Power Scheme . . . . . . . . . . . 2–12
Using SpeedStep (Windows 2000 Professional Only). . 2–13
Choosing a Performance Mode . . . . . . . . . . . . . . . . 2–13
Setting SpeedStep Preferences . . . . . . . . . . . . . . . . 2–14
Finding More Battery Power Information . . . . . . . . . . . 2–16
3 Security
Security Features Quick Reference . . . . . . . . . . . . . . . . . 3–1
Setting Preferences in Computer Setup . . . . . . . . . . . . . . 3–2
Using Passwords . . . . . . . . . . . . . . . . . . . . . . . . . . . . . . . 3–2
Forgetting Passwords. . . . . . . . . . . . . . . . . . . . . . . . . 3–2
Combining Compaq and Windows Passwords . . . . . 3–3

Contents
Software Guide v
Using a Power-On Password . . . . . . . . . . . . . . . . . . . . . . 3–4
Entering Power-On Password Settings . . . . . . . . . . . 3–4
Entering a Power-On Password. . . . . . . . . . . . . . . . . 3–5
Using a Compaq Administrator Password . . . . . . . . . . . . 3–5
Entering Compaq Administrator Password Settings . 3–6
Entering a Compaq Administrator Password . . . . . . 3–7
Using DriveLock . . . . . . . . . . . . . . . . . . . . . . . . . . . . . . . 3–7
Protecting a Hard Drive with DriveLock . . . . . . . . . 3–8
Accessing a Protected Hard Drive. . . . . . . . . . . . . . . 3–9
Changing a DriveLock Password . . . . . . . . . . . . . . 3–10
Removing DriveLock Protection. . . . . . . . . . . . . . . 3–11
Disabling a Device . . . . . . . . . . . . . . . . . . . . . . . . . . . . . 3–12
Protecting System Information . . . . . . . . . . . . . . . . . . . 3–13
Selecting an Information Management Procedure . 3–13
Entering and Displaying System Information . . . . . 3–14
Connecting an Optional Cable Lock . . . . . . . . . . . . . . . 3–15
4 Intelligent Manageability
Understanding Intelligent Manageability. . . . . . . . . . . . . 4–1
Installing Intelligent Manageability . . . . . . . . . . . . . . . . . 4–2
Setting Up Insight Management Agents . . . . . . . . . . . . . 4–2
Using Fault Management Alerts . . . . . . . . . . . . . . . . . . . 4–2
Identifying a Fault Management Alert . . . . . . . . . . . 4–2
Setting Fault Management Alert Preferences . . . . . . 4–3
5 MultiBoot (Advanced Users Only)
Changing the Startup Sequence with MultiBoot . . . . . . . 5–1
Enabling Media and Devices for MultiBoot . . . . . . . . . . 5–2
Using the Default Search Sequence . . . . . . . . . . . . . . . . . 5–3
Planning Changes to the Startup Sequence . . . . . . . . . . . 5–4
Specifying MultiBoot Preferences . . . . . . . . . . . . . . . . . . 5–5
Setting a Continuing Startup Sequence . . . . . . . . . . . 5–5
Setting the MultiBoot Express Prompt . . . . . . . . . . . 5–6
Responding to the MultiBoot Express Prompt . . . . . 5–6

vi Software Guide
Contents
6 Software Updates and Restorations
Updating Software . . . . . . . . . . . . . . . . . . . . . . . . . . . . . . 6–1
Preparing for a Software Update . . . . . . . . . . . . . . . . . . . 6–2
Accessing Notebook Model Information . . . . . . . . . 6–2
Accessing ROM Version Information. . . . . . . . . . . . 6–2
Accessing Software Updates . . . . . . . . . . . . . . . . . . . . . . 6–4
Updating Software from the Internet . . . . . . . . . . . . . . . . 6–5
Downloading and Installing a System ROM Update 6–5
Downloading and Installing a KBC ROM Update . . 6–7
Downloading and Installing a Non-ROM SoftPaq . . 6–9
Restoring Software. . . . . . . . . . . . . . . . . . . . . . . . . . . . . 6–10
Installing a Retail Version of an Operating System. . . . 6–11
7 Setup and Diagnostic Utilities
Selecting Computer Setup or Compaq Diagnostics . . . . . 7–1
Using Computer Setup . . . . . . . . . . . . . . . . . . . . . . . . . . . 7–2
Computer Setup Procedures . . . . . . . . . . . . . . . . . . . 7–2
Restoring Computer Setup Defaults . . . . . . . . . . . . . 7–3
Selecting from the File Menu . . . . . . . . . . . . . . . . . . 7–4
Selecting from the Security Menu. . . . . . . . . . . . . . . 7–5
Selecting from the Tools Menu . . . . . . . . . . . . . . . . . 7–6
Selecting from the Advanced Menu . . . . . . . . . . . . . 7–6
Using Compaq Diagnostics . . . . . . . . . . . . . . . . . . . . . . . 7–8
Detecting Compaq Diagnostics . . . . . . . . . . . . . . . . . 7–8
Installing Compaq Diagnostics . . . . . . . . . . . . . . . . . 7–9
Using the Compaq Configuration Record Scan . . . 7–10
Using the Diagnostics Scan . . . . . . . . . . . . . . . . . . . 7–10
Index

Software Guide 1–1
1
CD and DVD Software
Using CDs and DVDs
Most of this section provides instructions for using optical drive
software. Before using any optical drive software, Compaq
recommends that you read the following general information
about using CDs and DVDs.
Avoiding Standby and Hibernation
Ä
CAUTION: To prevent possible video and audio degradation and
loss of audio or video playback functionality, do not initiate Standby
or Hibernation while using drive media.
If Standby or Hibernation is accidentally initiated while a drive
medium is in use:
1. Briefly press the power button to exit Standby or Hibernation.
2. Restart the notebook.
3. For more information about Standby and Hibernation, refer in
this guide to the “Power” section.
Displaying Media Contents
Autorun, sometimes called autoplay or auto insert notification, is
a feature of the operating system. Autorun displays the contents
of a drive medium on the screen whenever you insert the medium
into a drive and, if you are using an optical drive, close the tray.

1–2 Software Guide
CD and DVD Software
A drive medium is any storage device that can be inserted into a
drive; for example, a diskette, disk, CD, or DVD.
Autorun is enabled at the factory, but can be disabled.
Setting Autorun Preferences
Autorun is enabled or disabled through the operating system:
■
In Windows 2000 Professional:
1. Double-click the My Computer icon on the Desktop.
2. Select the Tools menu > Folder Options > File Types tab.
3. Scroll through the list of items in the Registered File
Types list, then select a file type; for example, Audio CD.
4. Select the Advanced button.
◆
If Play is displayed in boldface type, (Play), autorun
is enabled on the drive. If Play is displayed in
plain type, (Play), autorun is disabled.
◆
To change the autorun setting, select Play (or Play),
then select the Set Default button.
5. Select the OK button.
■
In Windows XP Home or Windows XP Professional,
double-click the My Computer icon on the Desktop,
right-click a drive, select Properties > AutoPlay tab, then
follow the instructions on the screen.
Cancelling Autorun on an Audio CD
To prevent an audio CD from opening when autorun is enabled,
press the
shift
key as you insert the CD.

CD and DVD Software
Software Guide 1–3
Displaying the Contents of a Medium
If autorun is disabled and the contents of a medium are not
displayed when you insert it, you can display the contents
manually:
1. Select Start > Run, then type:
explorer x:
(where X = the drive designation of the drive containing
the medium).
2. Press
enter.
✎
A drive designation is a letter of the alphabet that the notebook
uses to identify the drive. To display the drive designation of
every drive in the system, double-click the My Computer icon on
the desktop.
Copyright Warning
It is a criminal offense, under applicable copyright laws, to make
unauthorized copies of copyright-protected material, including
computer programs, films, broadcasts, and sound recordings.
This notebook should not be used for such purposes.

1–4 Software Guide
CD and DVD Software
Playing CDs with Windows Media Player
Instructions for playing CDs begin with inserting a drive into the
MultiBay, then inserting the CD into the drive. For insertion
instructions, refer on this CD to the Hardware Guide, “Drives”
section.
Playing an Audio CD
To play an audio CD:
1. Read “Using CDs and DVDs,” first in this section.
2. If an optical drive is not in the system, insert an optical drive
into the MultiBay of the notebook or an optional port
replicator.
3. Insert the audio CD into the drive, then close the tray. Wait
several seconds. Then:
❏
If autorun is enabled, the CD and Windows Media
Player open. Proceed to step 5.
❏
If the CD and Windows Media Player do not open,
proceed to step 4.
4. Open Windows Media Player from the Start button:
❏
In Windows 2000 Professional, select Start > Programs >
Windows Media Player.
❏
In Windows XP Home or Windows XP Professional,
select Start > All Programs > Windows Media Player.
5. Select the Play button to play the CD and the Stop button to
stop the CD.

CD and DVD Software
Software Guide 1–5
Playing a Video CD
1. Read “Using CDs and DVDs,” first in this section.
2. If an optical drive is not in the system, insert an optical drive
into the MultiBay of the notebook or the MultiBay of an
optional port replicator.
3. Insert the video CD into the drive, then close the tray. Wait
several seconds. Then:
❏
If autorun is enabled, the CD and Windows Media
Player open. Proceed to step 9.
❏
If the CD does not play, and Windows Media Player
does not open, proceed to step 4.
4. Open Windows Media Player from the Start button:
❏
In Windows 2000 Professional, select Start > Programs >
Windows Media Player.
❏
In Windows XP Home or Windows XP Professional,
select Start > All Programs > Windows Media Player.
5. On the Windows Media Player menu bar, select File > Open.
6. In the Browse or Look In field, double-click the drive
designation of the drive containing the CD.
✎
A drive designation is a letter of the alphabet that the notebook
uses to identify the drive. To display the drive designation of
every drive in the system, double-click the My Computer icon on
the desktop.
7. Select the folder containing the video file you want to play.
8. Select the video file, then select the Open button.
9. To stop playing the CD, select the Stop button.
1–6 Software Guide
CD and DVD Software
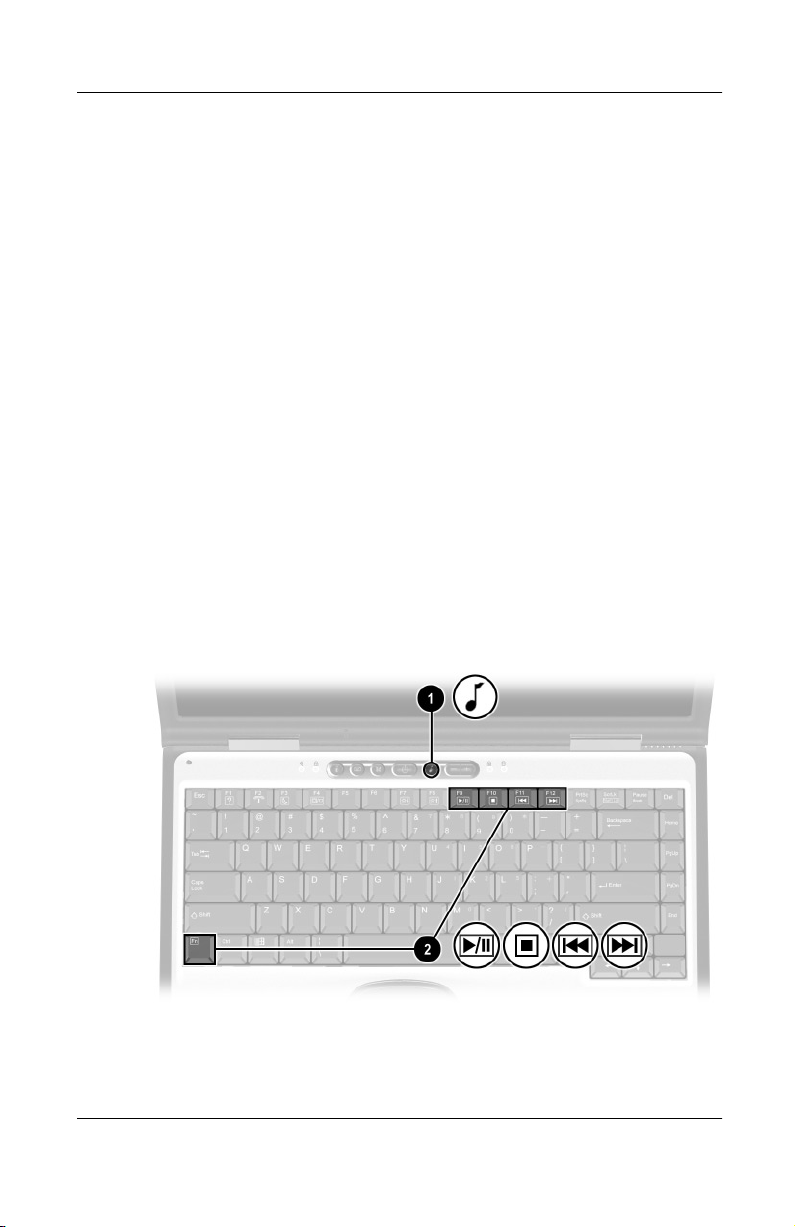
Using Notebook Media Keys
Many tasks that can be performed through the operating system
or in the Windows Media Player window can also be performed
from your keyboard. The following procedures use the Digital
Audio button
1
and the
Fn+F9
through
Fn+F12
hotkeys
2
.
■
To open Windows Media Player, press the Digital Audio
Easy Access button.
■
To play, pause, or resume an audio CD, press the
Fn+F9
hotkeys.
■
To stop an audio CD, press the
Fn+F10
hotkeys.
■
To play the previous track of an audio CD, press the
Fn+F11
hotkeys.
■
To play the next track of an audio CD, press the
Fn+F12
hotkeys.
For more information about using Easy Access keys or hotkeys,
refer on this CD to the Hardware Guide, “Pointing Devices and
Keyboard” section.
Identifying the Digital Audio Easy Access button, the
Fn
key,
and the
F9
through
F12
function keys

CD and DVD Software
Software Guide 1–7
Accessing Windows Media Player Help
The Windows Media Player application is a program within the
operating system. Instructions for using Windows Media Player
are included in the Windows Media Player Help file.
To access the Help file, open the Windows Media Player window,
then select Help on the menu bar.
To open Windows Media Player, use any 1 of the following
methods:
■
Insert a CD into the optical drive, then close the tray.
■
Press the Digital Audio Easy Access button.
■
Select the Windows Media Player icon on the taskbar.
or
■
Select the Start button, then:
❏
In Windows 2000 Professional, select Programs >
Windows Media Player.
❏
In Windows XP Home or Windows XP Professional,
select All Programs > Windows Media Player.

1–8 Software Guide
CD and DVD Software
Playing DVDs with WinDVD
InterVideo WinDVD is an application that enables you to play
DVD movies. WinDVD is preloaded on the notebook, but not
preinstalled.
Installing WinDVD
Although WinDVD can be installed by following the prompts that
appear on the screen the first time you insert a DVD, Compaq
recommends that you install WinDVD from the Setup Compaq
Software icon before inserting a DVD.
✎
Some DVDs contain third-party DVD player programs such as
PCFriendly. If you insert a DVD that contains a third-party player
program before you have installed WinDVD, you are prompted to
install that third-party player program and not WinDVD. If you
prefer to install WinDVD, decline the third-party player
installation, usually by pressing a No, Cancel, or Exit button, then
close the installation window.
To install WinDVD from the Setup Compaq Software icon:
■
In Windows XP Professional, select Start > Setup Compaq
Software icon. Select InterVideo WinDVD > Next button,
then follow the instructions on the screen.
■
In Windows 2000 Professional and Windows XP Home:
❏
If the Setup Compaq Software icon is on the desktop,
select the icon > InterVideo WinDVD > Next button, then
follow the instructions on the screen.

CD and DVD Software
Software Guide 1–9
❏
If the Setup Compaq Software icon is not on the Desktop,
select Start > Run. Then:
◆
In Windows 2000 Professional, on the command
line, type:
c:\cpqapps\setup.exe preload /s
The Setup Compaq Software icon is displayed on the
Desktop. Select the icon > InterVideo WinDVD >
Next button, then follow the instructions on the
screen.
◆
In Windows XP Home, on the command line, type:
c:\cpqapps\setup.exe preload programs /s
The Setup Compaq Software icon is displayed in
the All Programs menu. To access the Setup icon,
select Start > All Programs. To install WinDVD,
select the icon > InterVideo WinDVD > Next button,
then follow the instructions on the screen.
Accessing WinDVD Help
Instructions for using WinDVD are included in the WinDVD
Help file.
To access the Help file:
1. Open the WinDVD window by selecting the WinDVD Player
icon on the taskbar. Or:
❏
In Windows 2000 Professional, select Start > Programs >
InterVideo > InterVideo WinDVD > WinDVD.
❏
In Windows XP Home or Windows XP Professional,
select Start > All Programs > InterVideo WinDVD >
WinDVD.
2. Select the Help button. (The icon on the Help button is a
question mark.)

1–10 Software Guide
CD and DVD Software
Starting a DVD
In addition to the instructions in the WinDVD Player Help file,
the following information may be helpful:
■
Instructions for inserting a DVD drive into the MultiBay and
for inserting a DVD into the drive are on this CD, in the
Hardware Guide, “Drives” section.
■
General information about using DVDs, including important
instructions for avoiding Standby and Hibernation while
playing DVDs, is in “Using CDs and DVDs,” first in this
section.
■
If your system includes an optional port replicator, dock or
undock the notebook before starting a DVD (not while
playing a DVD).
■
For best playback quality, save your files and close all open
applications before playing a DVD.
■
After you insert a DVD, a short pause is normal before
autorun opens the DVD and WinDVD Player.
■
If the DVD displays a Playback Of Content From This
Region Is Not Permitted error message, stop the DVD,
change the region setting as described next in this section,
then restart the DVD.
Using DVD Region Settings
Most DVDs that contain copyrighted files also contain region
codes. The region codes help protect copyrights internationally.
You can play a DVD containing a region code only if the region
code on the DVD matches the region setting on your DVD drive.
If the region code on a DVD does not match the region setting on
your drive, a Playback Of Content From This Region Is Not
Permitted message displays when you insert the DVD. To play
the DVD, you must change the region setting on your DVD drive.

CD and DVD Software
Software Guide 1–11
Ä
CAUTION: The region setting on your DVD drive can be changed only
5times.
■
The region setting you select the fifth time becomes the
permanent region setting on the drive.
■
The number of allowable region changes remaining on the drive
is displayed in the Remaining Times Until Permanent field in the
WinDVD window. The number in the field includes the fifth and
permanent change.
The procedure for changing the region setting on a drive begins
with inserting a drive into the MultiBay, then inserting a DVD
into the drive. For insertion instructions, refer on this CD to the
Hardware Guide, “Drives” section.
To change the region setting on a drive:
1. Insert the DVD you want to play into the optical drive.
2. If the WinDVD window does not open after a short pause,
select the WinDVD Player icon on the taskbar. Or:
❏
In Windows 2000 Professional, select Start > Programs >
InterVideo > InterVideo WinDVD > WinDVD.
❏
In Windows XP Home or Windows XP Professional,
select Start > All Programs > InterVideo WinDVD >
WinDVD.
3. Select the Properties icon in the lower left corner of the
window.
4. Select the General tab.
5. Select the radio button for a region.
6. Select the OK button.

1–12 Software Guide
CD and DVD Software
Creating and Copying CDs and DVDs
This section provides procedures for creating and copying CDs
and DVDs with Easy CD Creator. If Easy CD Creator is included
with your notebook, the Easy CD Creator software is provided on
the Easy CD Creator Basic CD.
Using Optional or Windows Software
Easy CD Creator and similar software is available from most
software retailers. To use the optical disc copying features within
the operating system, refer to the operating system Help file. To
access the Help file, select Start > Help.
Understanding Easy CD Creator Features
Easy CD Creator is a transfer utility that enables you to create or
duplicate optical drive media.
Easy CD Creator includes 2 applications: DirectCD and Easy CD
Creator. The Easy CD Creator application includes CD Copier.
■
Use DirectCD with Windows Explorer to drag-and-drop data
files between your hard drive and a media or between your
hard drive and a network drive. DirectCD is often used to
back up data files or to share them with other people.
Although DirectCD can be used with most application data
files, including Microsoft Office data files, it cannot be used
with audio files such as MP3 files.
■
Use Easy CD Creator, which includes CD Copier, to copy
either data files such as Microsoft Office files, or audio files
such as MP3 files, to an optical drive medium.
❏
Use Easy CD Creator to copy individual audio files to a
medium; for example, to create a CD containing only
your favorites.
❏
Use CD Copier to duplicate an optical drive medium.

CD and DVD Software
Software Guide 1–13
Installing Easy CD Creator
If Easy CD Creator software is included with the notebook, it is
provided on a CD and is not preloaded or preinstalled.
The Easy CD Creator installation procedure begins with
inserting a drive into the notebook MultiBay, then inserting a
CD into the drive. For insertion instructions, refer to the
Hardware Guide, “Drives” section.
Installing Easy CD Creator Software
Ä
CAUTION: To prevent file corruption and damage to components:
■
Install the software from a drive inserted into the notebook
MultiBay (not the MultiBay in an optional port replicator).
■
Do not install the software while the notebook is running on
battery power or when the external power supply is uncertain.
To install Easy CD Creator software from a CD:
1. Insert an optical drive into the notebook MultiBay.
2. Connect the notebook to reliable external AC power using the
AC Adapter.
3. Save and close any open files or applications.
4. Insert the Easy CD Creator Basic CD into the optical drive,
then close the tray. If autorun is enabled, an installation menu
is displayed. If the installation menu does not display, select
Start > Run. Then type:
x:\setup.exe
(where X is your optical drive designation)
✎
A drive designation is a letter of the alphabet that the notebook
uses to identify the drive. To display the drive designation of
every drive in the system, double-click the My Computer icon on
the desktop.

1–14 Software Guide
CD and DVD Software
5. Select the OK button.
6. On the installation menu, Compaq recommends that you
select the Complete installation. To do so, select the
Complete button, then follow the instructions on the screen.
7. When installation is complete and you are prompted to restart
the notebook, select Yes.
Enabling Auto Insert Notification
When the notebook restarts after the installation is complete, you
may be prompted to enable Auto Insert Notification.
Auto Insert Notification is an operating system option that turns
the autorun feature on or off. Autorun runs a program on a data
medium or opens an audio or video medium as soon as the
medium is inserted into the drive and the drive tray is closed.
You cannot use DirectCD unless Auto Insert Notification is
enabled.
Compaq recommends that you enable Auto Insert Notification:
1. Select Yes at the Auto Insert Notification prompt.
2. Follow the instructions on the screen.
3. When the procedure displayed on the screen is complete,
restart the notebook.
Auto Insert Notification is enabled when the notebook restarts.

CD and DVD Software
Software Guide 1–15
Preparing to Use Easy CD Creator
Ä
CAUTION: To prevent loss of work and damage to an optical drive
medium:
■
Connect the notebook to a reliable external power source
before writing to a medium. Power loss, for example from a
failing battery pack, could corrupt the write process.
■
Before writing to a medium, close all open applications
(including screen savers and antivirus software) except Easy
CD Creator Basic.
■
Do not copy directly from a medium to another medium or from
a network drive to a medium. Instead, copy from a medium or a
network drive to your hard drive, then copy from your hard drive
the medium.
■
Do not type on the notebook keyboard or move the notebook
while the notebook is writing to a medium. The write process is
sensitive to vibration.
Selecting Drive Locations
If you plan to use an optional port replicator during a copying
procedure:
■
Insert the source drive (the drive that is to be copied from)
into the port replicator MultiBay.
■
Insert the destination drive (the drive that is to be copied to)
into the notebook MultiBay.
■
Do not copy directly from the source drive to the destination
drive. Instead, copy from the source drive to your hard drive.
Then copy from your hard drive to the destination drive.
If you plan to use a network drive during a copying procedure:
■
If you are using only 1 optical drive, insert the drive into the
notebook MultiBay.
■
Do not copy directly between the network drive and the
optical drive. Instead, copy from the network to your hard
drive, then from your hard drive to the optical drive. Or, copy
from the optical drive to your hard drive, then from your hard
drive to the network drive.

1–16 Software Guide
CD and DVD Software
Selecting and Preparing Easy CD Creator Media
Choosing Recording Media
Compaq recommends using high-quality media that correspond
to the maximum speed of the optical drive.
The notebook can write or copy to the following types of
recording media:
■
CD-Rs, which provide one-time, non-erasable recording.
■
CD-RWs, DVD-RAMs, and DVD/CD-RWs, which provide
erasable recording. (DVD/CD-RWs are not yet available in
all regions.)
Responding to the UDF Prompt
The first time you insert a CD-RW, DVD-RAM, or DVD/CD-RW
into an optical drive, you may be prompted to install Universal
Disk Format (UDF) Reader.
When UDF Reader is installed, a medium created with DirectCD
on your notebook can be used in another computer on which
DirectCD is not installed.
Compaq recommends that you install UDF Reader.
✎
Even if UDF Reader is installed on your notebook, a CD-R
created with DirectCD software can be used in a compatible
CD-ROM drive only if you select the Rearrange the Files option
as you create the CD-R.
Formatting Recording Media
You can purchase optical drive media that either are or are not
formatted for DirectCD.
■
To use DirectCD, use a medium formatted for DirectCD.
■
To use Easy CD Creator or CD Copier, do not use a medium
formatted for DirectCD.

CD and DVD Software
Software Guide 1–17
To erase DirectCD formatting from a rewritable medium so the
medium can be used with Easy CD Creator or CD Copier:
1. Insert the medium into an optical drive. (If you are prompted
to install UDF Reader, refer to “Responding to the UDF
Prompt” earlier in this section.)
2. Access the Easy CD Creator Basic Eraser:
❏
In Windows 2000 Professional, select Start > Programs >
Easy CD Creator Basic > CD-RW Eraser.
❏
In Windows XP Home or Windows XP Professional,
select Start > All Programs > Easy CD Creator Basic >
CD-RW Eraser.
3. Select the Erase button.
4. Select the OK button.
Selecting Easy CD Creator Settings
To use DirectCD, Easy CD Creator, or CD Copier, the settings
shown in the following table must be selected. These settings are
compatible; for example, the settings for DirectCD do not conflict
with the settings for CD Copier.
The Easy CD Creator software installs with all of these settings
selected. Before beginning any copying procedure, you may want
to confirm that these settings have not been changed.
Application Required Settings
DirectCD Enable Auto Insert Notification
Easy CD Creator Disable Disk-at-Once
and
Enable Track-at-Once
CD Copier Disable Disk-at-Once

1–18 Software Guide
CD and DVD Software
Enabling Auto Insert Notification
Auto Insert Notification settings are selected through the
operating system. To verify or change Auto Insert Notification
settings, refer in this guide to the “Using CDs and DVDs” section,
“Displaying Media Contents.”
Disabling Disk-at-Once
Disk-at-once settings are in Easy CD Copier. To select them:
1. Access CD Copier:
❏
In Windows 2000 Professional, select Start > Programs >
Roxio Easy CD Creator 5 > Applications > CD Copier.
❏
In Windows XP Home or XP Professional, select Start >
All Programs > Roxio Easy CD Creator 5 >
Applications > CD Copier.
2. Select the Advanced tab.
3. Clear the Disk-at-Once check box.
4. Select the Set as Default button.
Enabling Track-at-Once
Track-at-once settings are in Easy CD Creator. To select them:
1. Access Easy CD Creator:
❏
In Windows 2000 Professional, select Start > Programs >
Roxio Easy CD Creator 5 > Applications > Track at Once.
❏
In Windows XP Home or XP Professional, select Start >
All Programs > Roxio Easy CD Creator 5 >
Applications > Track at Once.
2. Select the Advanced tab > Create CD button.
3. Select the Track-at-Once check box.
4. Clear the Disk-at-Once check box.
5. Select the Set as Default button.

CD and DVD Software
Software Guide 1–19
Accessing Easy CD Creator Help
To access the procedures for using DirectCD, Easy CD Creator,
and CD Copier:
■
In Windows 2000 Professional, select Start > Programs >
Roxio Easy CD Creator 5 > Project Selector > Help radio
button.
■
In Windows XP Home or Windows XP Professional,
select Start > All Programs > Roxio Easy CD Creator 5 >
Project Selector > Help radio button.

1–20 Software Guide
CD and DVD Software
Easy CD Creator Tips and Troubleshooting
Playing CDs and DVDs
Do not initiate Standby or Hibernation while playing any
medium. For more information about this issue, refer to “Using
CDs and DVDs” > “Avoiding Standby and Hibernation,” earlier
in this section. For general information about Standby and
Hibernation, refer to the “Power” section of this guide.
Using CD Copier
When you use CD Copier to copy an entire medium to your hard
drive, select the Copy button immediately after selecting the Copy
to HDD First check box.
If there is a delay after you select the Copy to HDD First
check box, the Easy CD Creator software may clear the Copy to
HDD First check box and the medium may not be copied to the
hard drive.
Typical delays include opening or closing the drive tray, pausing
to close an open application, or changing other settings in the
Easy CD Creator software.
Creating Media For Use in Other Systems
A CD-R created with DirectCD can be read by a compatible
CD-ROM drive only if you select the Rearrange the Files option
as you create the CD-R.
A CD-RW, DVD-RAM, or DVD/CD-RW created with DirectCD
can be read by a computer that does not have DirectCD installed
only if you install UDF Reader on your notebook before creating
the medium.
If you did not install UDF Reader at the UDF prompt the first
time you inserted the medium into your notebook, reinsert the
medium, then install UDF Reader at the UDF prompt.

CD and DVD Software
Software Guide 1–21
Using Windows Media Player
If you are using Windows Media Player files to create a
medium, you may not be able to drag-and-drop the files using
Windows Explorer.
For more information about this problem, visit:
■
The Roxio Web site at
http://www.roxio.com
or
■
The Microsoft Web site at
http://www.microsoft.com
The language options at these Web sites vary and may be limited.
Responding to Buffer Underrun Errors
A buffer underrun error occurs when the flow of data to a drive or
medium is interrupted. In all cases, a buffer underrun error stops
the copying process. In some cases, a buffer underrun error may
permanently damage an optical medium.
Buffer underrun errors are often caused by:
■
Other applications, including screen savers and antivirus
software, that are open during a copying process.
■
A power interruption caused by a loose connection to
AC power or by an electrical storm.
■
Attempting a copying procedure while running the notebook
on a failing battery pack.
■
Attempting to copy directly between media or between a
medium and a network drive.
Occasionally, during a copying process that involves a network
drive, a buffer underrun error may occur because the temporary
files created during the process are being created on the hard
drive instead of the network drive. To change the location where
these temporary files are stored, select Tools from the Easy CD
Creator menu bar, select Options, then follow the instructions on
the screen.

Software Guide 2–1
2
Power
Selecting a Power Source
The notebook can run on internal power from a charged battery
pack or on external power. External power can be obtained from
an electrical outlet (using the AC Adapter), from a vehicle
cigarette lighter receptacle (using an optional Automobile Power
Adapter/Charger) or from the in-seat power supply available on
some commercial aircraft (using an optional Aircraft Power
Adapter). Select a power source that supports the way you plan to
use the notebook.
Task Power Source
Work in most software
applications.
■
Charged battery pack in the
notebook,
or
■
External power supplied through
one of the following devices:
❖
AC Adapter
❖
Optional port replicator
❖
Optional Aircraft Adapter
❖
Optional Automobile Power
Adapter/Charger
Charge or calibrate a battery
pack in the notebook.
External power supplied through:
■
AC Adapter
■
Optional Automobile Power
Adapter/Charger
Install or modify system
software,
or
Write to a CD or DVD.
External power supplied through the
AC Adapter.

2–2 Software Guide
Power
Understanding Standby and Hibernation
Standby and Hibernation are energy-saving features that conserve
power and reduce startup time. They can be initiated by you or by
the system.
Standby
Standby reduces power to system components that are not being
used. When Standby is initiated, your work is saved in random
access memory (RAM) and the screen is cleared. When you exit
Standby, your work returns to the screen where you left off.
Hibernation
Hibernation saves your work in RAM to a hibernation file on the
hard drive, then shuts down the notebook. When you exit
Hibernation, your work returns to the screen where you left off.
If a power-on password is set, the password must be entered to
exit Hibernation.
Hibernation is enabled at the factory, but can be disabled (usually,
to save space on the hard drive). Disabling Hibernation is not
recommended. When Hibernation is disabled, system-initiated
Hibernation cannot save your work if the notebook reaches a
critical low-battery condition while it is on or in Standby.
To verify that Hibernation is enabled:
■
In Windows 2000 Professional, select Start > Settings >
Control Panel. Double-click Power Options, select the
Hibernate tab, then be sure that the Enable Hibernate Support
check box is selected.
■
In Windows XP Home or Windows XP Professional, select
Start > Control Panel > Performance and Maintenance >
Power Options icon. Select the Hibernate tab, then be sure
that the Enable Hibernate Support check box is selected.

Power
Software Guide 2–3
Choosing Standby, Hibernation or
Shutdown
When You Leave Your Work
If you plan to resume shortly: Initiating Standby clears the screen,
uses less power than leaving the notebook on, and your work
returns instantly to the screen when you exit Standby. A fully
charged new battery pack can support Standby for up to 2 weeks.
A battery pack that has been frequently charged and discharged
will support Standby for less time.
If you plan to resume within 2 weeks: Initiating Hibernation
clears the screen, saves your work to the hard drive, and uses
much less power than Standby. Returning to work saved in
Hibernation takes longer than returning to work saved in Standby,
but is faster than returning to your place manually after restarting
the notebook. A fully charged battery pack supports Hibernation
indefinitely.
If the notebook will be disconnected from external power for
more than 2 weeks: Shutting down the notebook and removing
the battery pack extends the useful life of the battery pack.
Store the battery pack in a cool, dry place. For more battery pack
storage information, refer on this CD to the Hardware Guide,
“Storing a Battery Pack.”
When the Power Supply Is Uncertain
If power is interrupted while the notebook is in Standby, your
unsaved work is lost. If power is interrupted while the notebook
is in Hibernation, your unsaved work is protected.
Power may be interrupted if the notebook is running on external
power from an unreliable source or on battery power from a
failing battery pack. If you pause your work when the power
supply is uncertain, Compaq recommends that you initiate
Hibernation, shut down the notebook, or save your work, then
initiate Standby.
Loading...