

Page 1

Getting Started
HP Compaq Notebook PC
Document Part Number: 419434-001
January 2007
This guide explains how to set up your hardware and software,
and begin using the computer in Windows
Enhanced For Accessibility
®.
Page 2

© Copyright 2007 Hewlett-Packard Development Company , L.P.
Windows is a U.S. registered trademark of Microsoft Corporation.
Bluetooth is a trademark ow
Hewlett-Packard Company under license.
The information contained herein is subject to change without notice. The
only warranties for HP products and services are set forth in the e
warranty statements accompanying such products and services. Nothing
herein should be construed as constituting an additional warranty . HP shall
not be liable for technical or editorial errors or omissions contained herein.
ned by its proprietor and used by
xpress
Getting Started
HP Compaq Notebook PC
First Edition: January 2007
Document Part Number: 419434-001
Page 3

Contents
1 First-time setup
Identify required hardware . . . . . . . . . . . . . . . . . . . . . . . . 1–1
Set up the computer . . . . . . . . . . . . . . . . . . . . . . . . . . . . . 1–3
Step 1: Insert the battery . . . . . . . . . . . . . . . . . . . . . . 1–4
Step 2: Connect the computer to external power. . . . 1–5
Step 3: Turn on the computer . . . . . . . . . . . . . . . . . . 1–6
Step 4: Set up the software . . . . . . . . . . . . . . . . . . . . 1–8
Step 5: Create recovery discs (recommended) . . . . . 1–8
2 Next steps
Install additional hardware and software . . . . . . . . . . . . . 2–1
Identify and install hardware . . . . . . . . . . . . . . . . . . . 2–1
Locate and install software . . . . . . . . . . . . . . . . . . . . 2–2
Protect the computer . . . . . . . . . . . . . . . . . . . . . . . . . . . . 2–3
Protect the computer from viruses . . . . . . . . . . . . . . . 2–3
Protect your system files . . . . . . . . . . . . . . . . . . . . . . 2–3
Protect your privacy. . . . . . . . . . . . . . . . . . . . . . . . . . 2–4
Protect the computer from power surges . . . . . . . . . . 2–4
Use the computer safely . . . . . . . . . . . . . . . . . . . . . . 2–5
Connect to a computer network . . . . . . . . . . . . . . . . . . . . 2–7
Update your software . . . . . . . . . . . . . . . . . . . . . . . . . . . . 2–8
Locate the user guides . . . . . . . . . . . . . . . . . . . . . . . . . . . 2–8
Turn off the computer correctly . . . . . . . . . . . . . . . . . . . . 2–9
Getting Started iii
Page 4

Contents
3Troubleshooting
Troubleshooting resources . . . . . . . . . . . . . . . . . . . . . . . . 3–1
Quick troubleshooting . . . . . . . . . . . . . . . . . . . . . . . . . . . 3–2
The computer is unable to start up. . . . . . . . . . . . . . . 3–2
The computer screen is blank . . . . . . . . . . . . . . . . . . 3–3
Software is functioning abnormally . . . . . . . . . . . . . 3–4
The computer is turned on but not responding . . . . . 3–4
The computer is unusually warm. . . . . . . . . . . . . . . . 3–5
An external device is not working . . . . . . . . . . . . . . . 3–5
The home wireless network connection is
not working . . . . . . . . . . . . . . . . . . . . . . . . . . . . . . . . 3–6
Help and Support . . . . . . . . . . . . . . . . . . . . . . . . . . . . . . . 3–6
Customer Care . . . . . . . . . . . . . . . . . . . . . . . . . . . . . . . . . 3–7
Prepare to contact Customer Care . . . . . . . . . . . . . . . 3–7
Contact Customer Care by e-mail or telephone. . . . . 3–8
A Notebook tour
Top components . . . . . . . . . . . . . . . . . . . . . . . . . . . . . . . . A–2
Keys . . . . . . . . . . . . . . . . . . . . . . . . . . . . . . . . . . . . . . . . . A–3
Pointing devices . . . . . . . . . . . . . . . . . . . . . . . . . . . . . . . .
Front components. . . . . . . . . . . . .
Rear components . . . . . . . . . . . . . . . . . . . . . . . . . . . . . . . A–5
Right-side components. . . . . . . . . .
Left-side components . . . . . . . . . . . . . . . . . . . . . . . . . . . . A–7
Bottom components . . . . . . . . . . . . . . . . . . . . . . . . . . . . .
. . . . . . . . . . . . . . . . . . A–5
. . . . . . . . . . . . . . . . . A–6
A–4
A–8
B Connect to the Internet from your home
Choose an ISP . . . . . . . . . . . . . . . . . . . . . . . . . . . . . . . . . B–1
Use the New Connection Wizard . . . . . . . . . . . . . . . B–2
Choose the type of Internet connection . . . . . . . . . . . . . . B–3
Getting Started iv
Page 5

C Backup and recovery
Safeguard your data . . . . . . . . . . . . . . . . . . . . . . . . . . . . . C–1
Back up the system. . . . . . . . . . . . . . . . . . . . . . . . . . . . . . C–1
Back up specific files or folders . . . . . . . . . . . . . . . .
Back up the entire hard drive. . . . . . . . . . . . . . . . . . . C–3
Back up modifications made to the system . . . . . . . .
Schedule backups . . . . . . . . . . . . . . . . . . . . . . . . . . . C–5
Recover the system . . . . . . . . . . . . . . . . . . . . . . . . . . . . . C–5
Create recovery discs (highly recommended) . . . . . .
Perform a recovery . . . . . . . . . . . . . . . . . . . . . . . . . . C–8
D Specifications
Operating environment. . . . . . . . . . . . . . . . . . . . . . . . . . . D–1
Rated input power . . . . . . . . . . . . . . . . . . . . . . . . . . . . . . D–2
Index
Contents
C–2
C–4
C–6
Getting Started v
Page 6

First-time setup
Identify required hardware
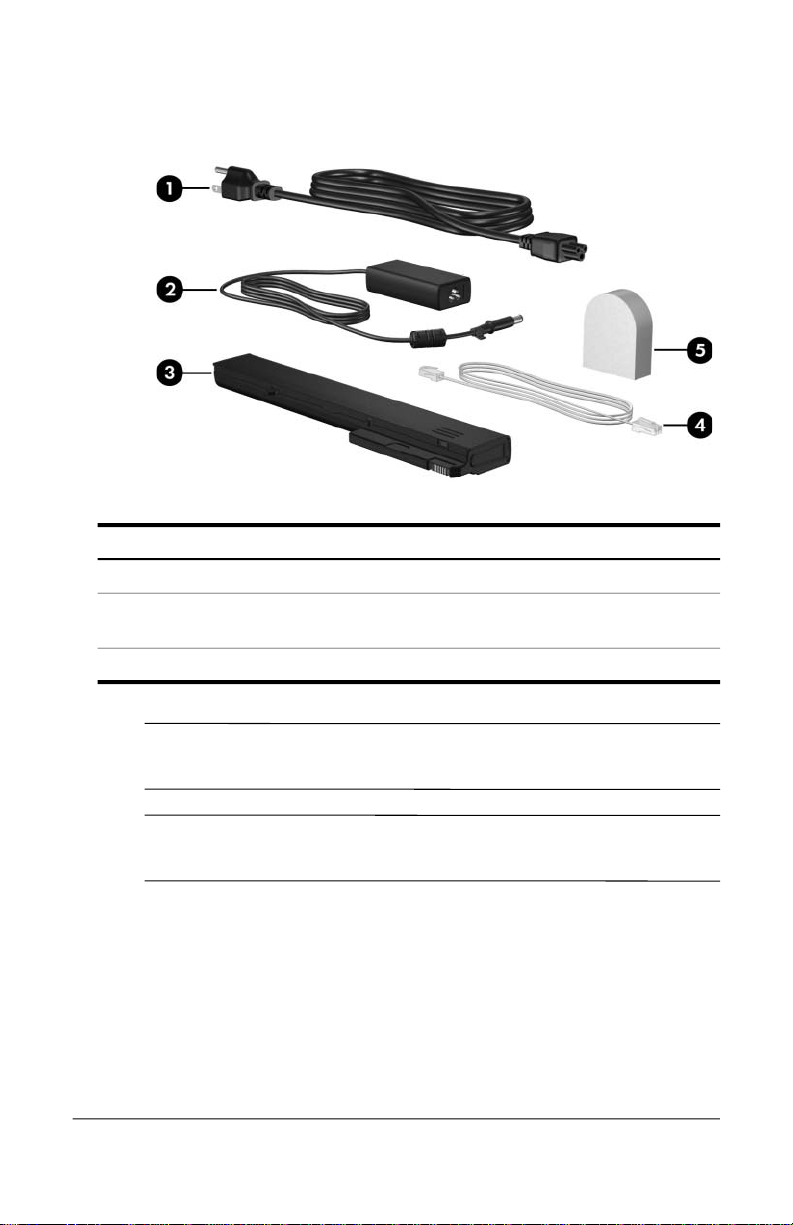
To set up the computer for the first time, you will need the
computer, AC adapter, power cord, and the primary battery.
Components included with the computer may vary by region
✎
and by model.
1
Getting Started 1–1
Page 7
First-time setup
Component
1 Power cord 4 Modem cable (optional for setup)
2 HP Smart AC Adapter 5 Country-specific modem adapter
(included by region as required)
3 Primary battery
Use only the included AC adapter or one approved for this
✎
computer.
Unless you use dial-up networking, the modem cable is
✎
optional for setup.
1–2 Getting Started
Page 8

Set up the computer
To set up the computer, you will
1. Insert the battery into the computer.
2. Connect the computer to external power.
The battery begins to charge.
✎
3. Turn on the computer.
4. Set up the software.
5. Create recovery discs (recommended).
Refer to Appendix C, “Backup and recovery,” for
✎
instructions.
CAUTION: To prevent file corruption and to ensure that the correct drivers
Ä
are installed:
■ Do not set up the computer for the first time while the computer is
docked in an optional docking device.
■ During the hardware and software setup procedures:
❏ Do not unplug the computer from external power.
❏ Do not shut down the computer or initiate Sleep or
Hibernation.
First-time setup
Getting Started 1–3
Page 9
First-time setup
Step 1: Insert the battery
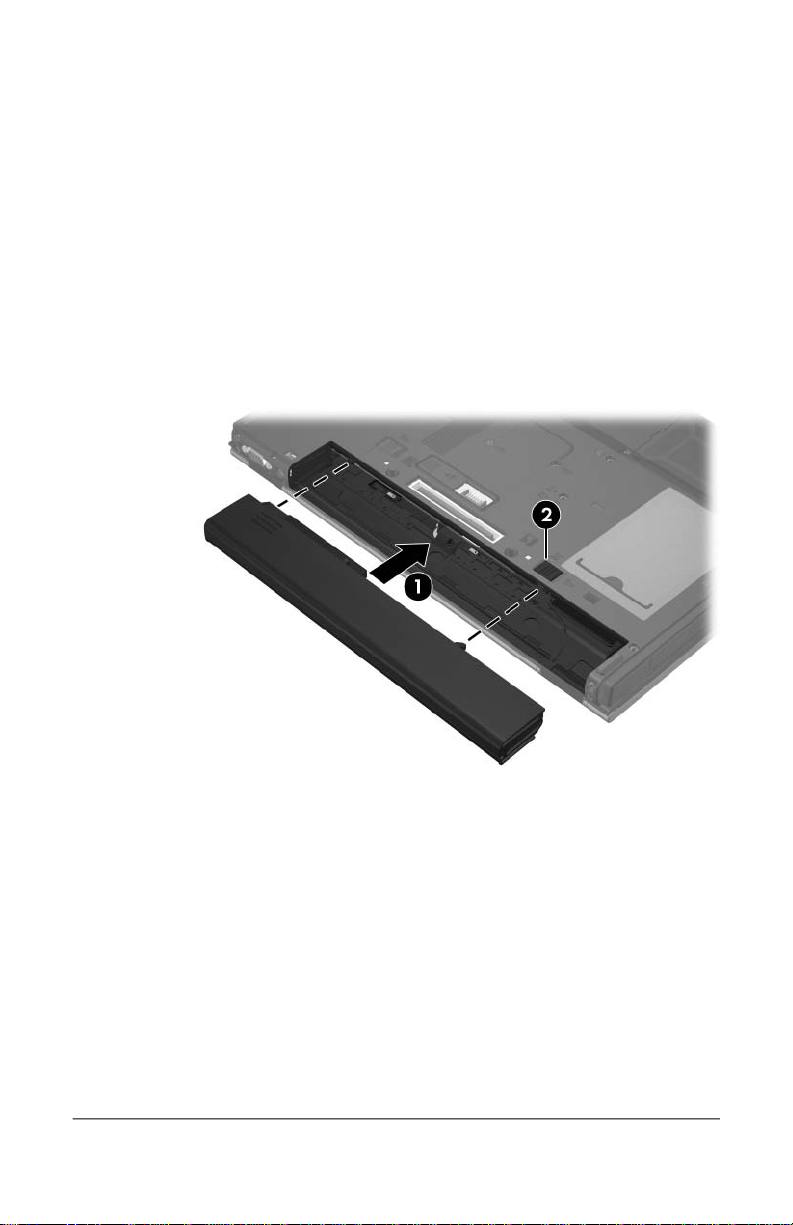
To insert a primary battery:
1. Turn the computer upside down on a flat surface, with the
battery bay towa
2. Slide the battery 1 into the battery bay until it is seated.
The battery release latch 2 automatically locks the battery
into place.
rd you.
1–4 Getting Started
Page 10
First-time setup
Step 2: Connect the computer to external power
Power cords and AC outlets vary in appearance by region and
✎
country.
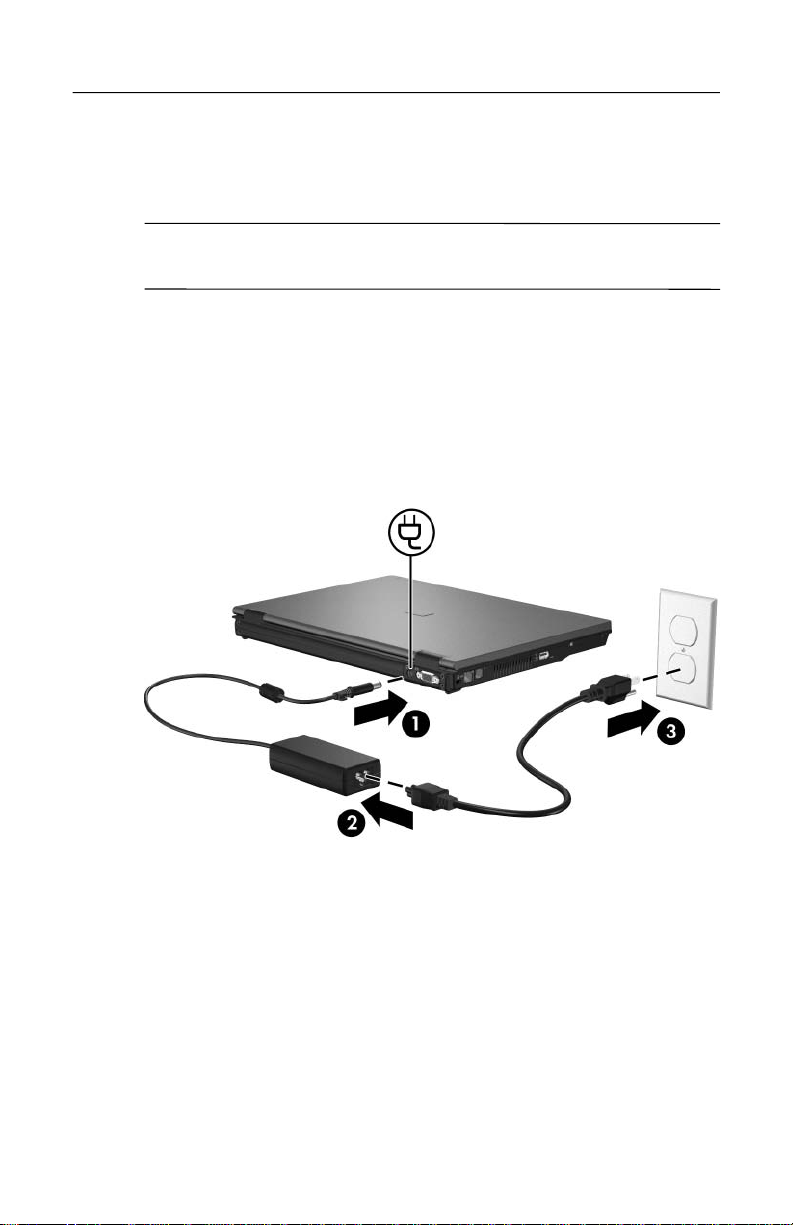
To connect the computer to external AC power:
1. Plug the AC adapter into the power connector 1 on the
computer.
2. Plug the power cord into the AC adapter 2.
3. Plug the other end of the power cord into an AC outlet 3.
Getting Started 1–5
Page 11
First-time setup
When the computer receives AC power, the battery begins to
charge and the battery light (on the front of the computer) is
turned on. When the battery is fully charged, the battery light
is turned off.
Leave the computer connected to external power until the battery
is fully charged and the battery light is turned off.
A partially charged new battery can run the computer after
✎
software setup is complete, but battery charge displays will not
be accurate until the new battery has been fully charged.
Step 3: Turn on the computer
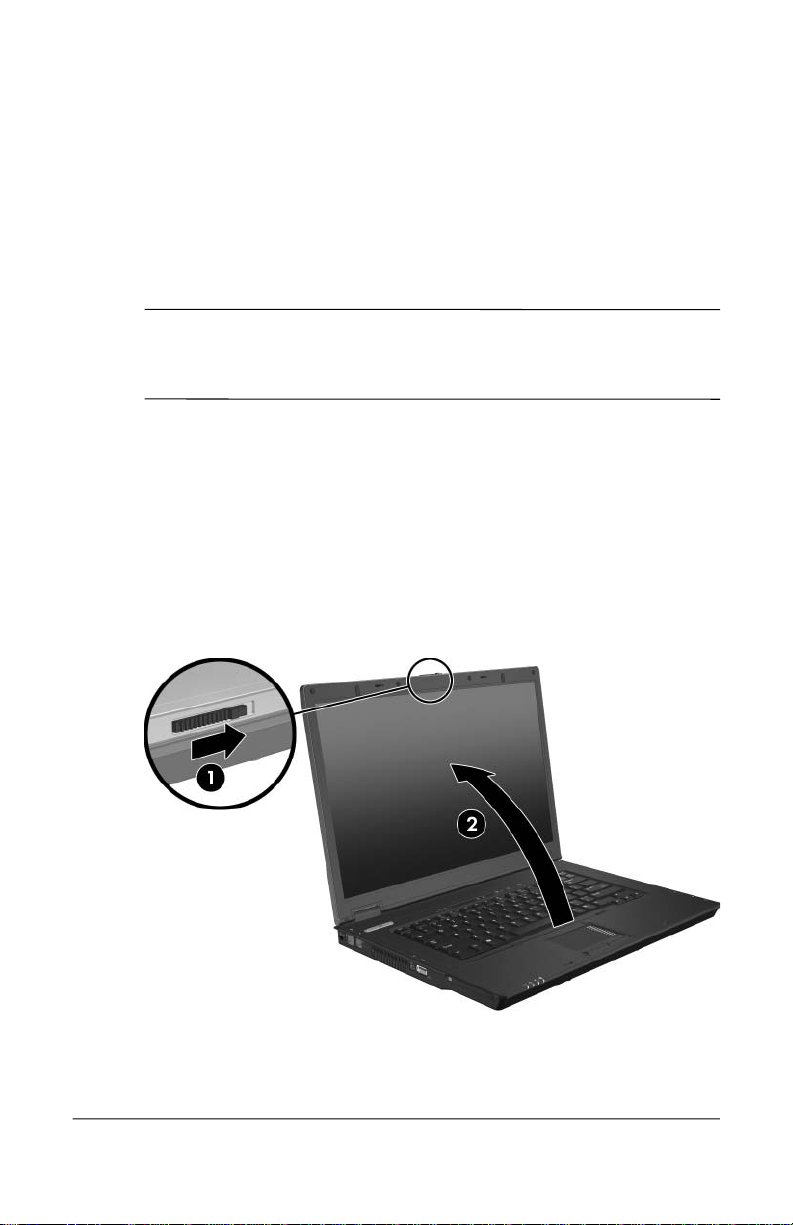
To open the computer:
1. Slide the display release latch 1 to the right to release the
display.
2. Raise the display 2.
1–6 Getting Started
Page 12
First-time setup
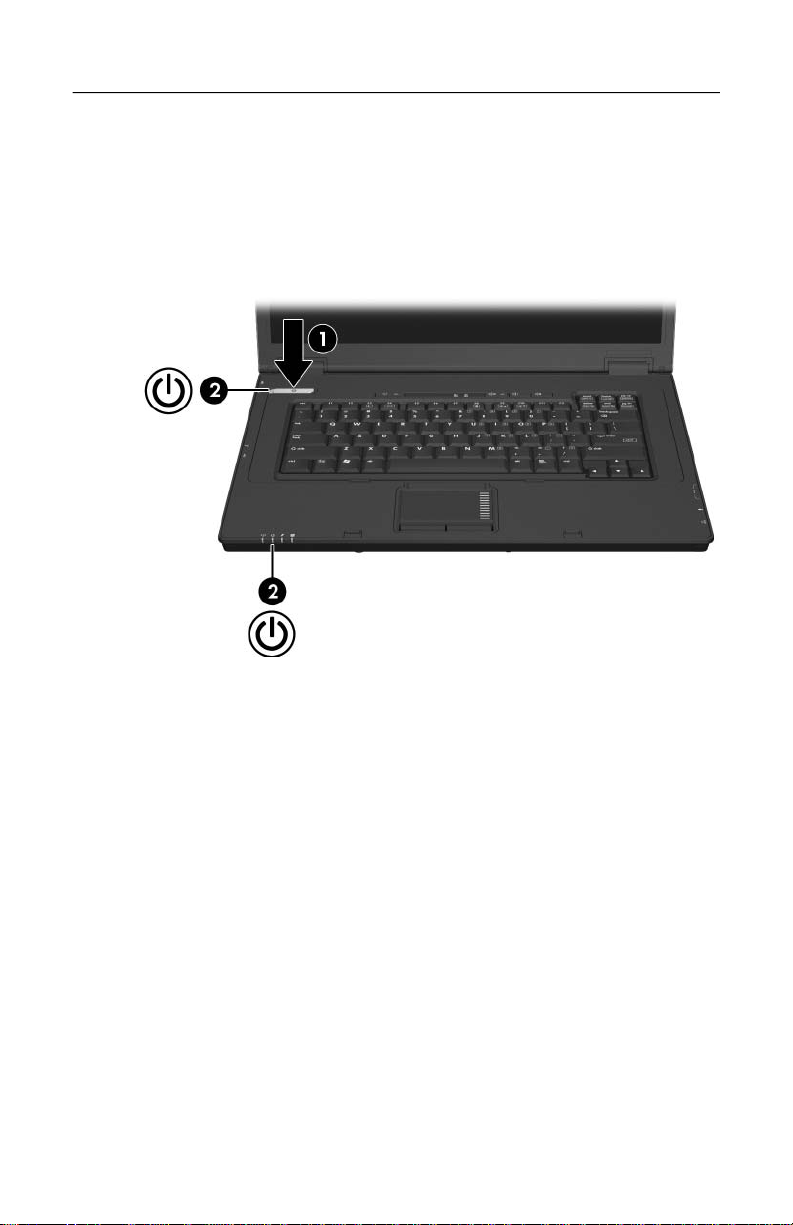
3. Press the power button 1.
The power light next to the power button and the power light
on the front of the computer 2 are turned on, and you are
prompted to begin software setup.
Getting Started 1–7
Page 13

First-time setup
Step 4: Set up the software
After the computer is turned on, it will go through a brief
software setup. Follow the on-screen instructions to set up the
software. Note the following:
■ After you respond to the setup prompt, you must complete
the entire setup process without interruption. Setup time
varies.
■ During software setup, the computer may pause periodically
for several minutes. These normal pauses are indicated by an
hourglass icon.
CAUTION: If you are prompted to select an operating system
Ä
language , choose carefully. On some models, the languages that you
do not choose are deleted from the system and cannot be restored
during software setup.
To register the operating system and the computer, you must
✎
be connected to the Internet. For more information about
connecting to the Internet, refer to Appendix B in this guide. If
you do not register during software setup, you can do so at any
time after softwa
re setup is complete.
Step 5: Create recovery discs (recommended)
After setting up the computer for the first time, you can create a
set of recovery discs of your full factory image using HP Backup
and Recovery Manager. The recovery discs are used to start up
(boot) the computer and restore the operating system and
software program to factory settings in case of system failure or
instability.
Refer to Appendix C, “Backup and recovery,” for detailed
instructions.
1–8 Getting Started
Page 14

Next steps
Install additional hardware and software
Identify and install hardware
To see a list of hardware installed on the computer:
1. Select Start > Computer > System properties.
2
2. In the left pane, click De
Windows includes the User Account Control feature to
✎
improve the security of your computer. You may be
prompted for your permission or password for tasks such as
installing applications, running utilities, or changing
Windows settings. Refer to Windows online Help for more
information.
You can also add hardware or modify your device configurations
using Device Manager.
To install additional hardware, such as an optional printer, follow
the instructions provided by the hardware manuf
the device and any required drivers.
Getting Started 2–1
vice Manager.
acturer to install
Page 15

Next steps
Locate and install software
The computer includes software that may be
■ Preinstalled on your hard drive. To see a list of the
ready-to-use software preinstalled on the computer:
1. Click Start > All Programs.
2. Double-click the program you want to open.
■ Provided on a CD or DVD. To install a software program
from a disc:
1. Insert the disc into your optical drive.
2. When the installation wizard opens, follow the on-screen
instructions.
3. Restart the computer if prompted to do so.
■ Preloaded software. This is software provided on the hard
drive, but not ready to use. To locate or install preloaded
software or drivers:
1. Select Start > All Programs > Software Setup.
2. Follow the on-screen instructions and select the check box
next to the softwa
For details about using software included with the computer,
✎
refer to the software manufacturer’ s instructions, which may be
provided on disc, as online Help files, or on the manufacturer’s
Web site.
2–2 Getting Started
re program or driver you wa
nt to install.
Page 16

Protect the computer
The information in this section is designed to protect the
computer from damage caused by a virus, a security breach,
a power surge, or unsafe operation.
Protect the computer from viruses
When you use the computer for e-mail, network, or Internet
access, you expose it to computer viruses that can disable the
operating system, applications, or utilities or cause them to
function abnormally.
Antivirus software can detect most viruses, destroy them, and in
most cases, repair any damage they have
ongoing protection against newly discovered viruses, antivirus
software must be kept up to date.
Norton Internet Security is preinstalled on the computer. For
information about using the Norton Internet Security software,
click Start > All Programs > Norton Internet Security.
caused. To provide
Next steps
or more information about computer viruses, type
F
Search field in Help and Support.
viruses in the
Protect your system files
The HP Backup and Recovery Manager provides several ways to
back up the system and to recover optimal system functionality.
Refer to Appendix C, “Backup and recovery,” for additional
information.
Getting Started 2–3
Page 17

Next steps
Protect your privacy
When you use the computer for e-mail, network, or Internet
access, it is possible for unauthorized persons to obtain
information about you or the computer.
To optimize the privacy protection features included with the
computer:
■ Keep the operating system and software updated. Many
software programs contain security enhancements.
■ Use a firewall. A firewall is software that monitors incoming
traffic on the computer. Some fire walls also monitor outgoing
traffic.
Protect the computer from power surges
To protect the computer from the power surges that may be
caused by an uncertain power supply or an electrical storm:
■ Plug the computer power cord into an optional, high-quality
surge protector. Surge protectors are available from most
computer or electronics retailers.
■ During an electrical storm, either run the computer on battery
power or shut down the computer and unplug the power cord.
■ If applicable to your location, provide surge protection on the
modem cable that connects the modem to a telephone line.
Telephone line surge protectors are available from most
computer or electronic retailers in some regions.
2–4 Getting Started
Page 18

Use the computer safely
WARNING: To reduce the risk of electric shock or damage to
Å
your equipment:
■ Plug the power cord into an AC outlet that is easily accessible
at all times.
■ Disconnect power from the computer by unplugging the power cord
from the AC outlet (not by unplugging the power cord from
the computer).
■ If provided with a 3-pin attachment plug on your power cord, plug
the cord into a grounded (earthed) 3-pin outlet. Do not disable the
power cord grounding pin, for example, by attaching a 2-pin
adapter. The grounding pin is an important safety feature.
WARNING: To reduce the risk of serious injury, read the Safety and
Å
Comfort Guide. It describes proper workstation setup and proper
posture, health, and work habits for computer users. The Safety and
Comfort Guide also provides important electrical and mechanical
safety information. This guide is available on the Web at
http://www.hp.com/ergo and in Help and Support. To access this
ument, selec
doc
t Start > Help and Support > User Guides.
Next steps
Getting Started 2–5
Page 19

Next steps
WARNING: To avoid potential discomfort or burns, do not
Å
block the air vents or place the computer on your lap for extended
periods. Also, do not allow the AC adapter to contact the skin for
extended periods during operation. The computer is designed to run
demanding applications at full power. As a result of increased power
consumption, it is normal for the computer to feel warm or hot when
used continuously. The computer and the AC adapter comply with the
user-accessible surface temperature limits defined by the International
Standard for Safety of Information Technology Equipment (IEC 60950).
WARNING: To reduce potential safety issues, only the AC adapter
Å
or battery provided with the computer, a replacement AC adapter or
battery provided by HP, or a compatible AC adapter or battery
purchased as an accessory from HP should be used with the computer.
For more safety and regulatory information, and for battery
disposal information, refer to Regulatory, Safety and
Environmental Notices located in Help and Support. To access
this document, select Start > Help and Support > User Guides.
2–6 Getting Started
Page 20

Connect to a computer network
The computer may have the following networking capabilities:
■ Local area network (LAN)
■ Wireless local area network (WLAN)
■ Bluetooth®
If you plan to connect the computer to a home office LAN or
WLAN, refer to Help and Support for information on networking.
If you need assistance to connect to a company LAN or WLAN,
contact your network administrator.
If the computer has a Bluetooth device, you can create a personal
area netw
devices, such as computers, telephones, printers, headsets,
speakers, and cameras. For information on using a Bluetooth
de
vice, refer to the Bluetooth online Help.
For information on connecting the computer to the Internet
✎
when you are not connected to a network, refer to Appendix B,
“Connect to the Internet from your home.”
ork (PAN) to connect to other Bluetooth-enabled
Next steps
Getting Started 2–7
Page 21

Next steps
Update your software
Most software, including the operating system, is updated
frequently by the manufacturer or provider. Important updates to
the software included with the computer may have been released
since the computer left the factory.
Some updates may affect the way the computer responds to
optional software or ex
security enhancements.
Update the operating system and other software provided on the
computer as soon as the computer is connected to the Internet.
To access update links for the operating system and other
software provided on the computer:
ternal devices. Many updates provide
» Select Start > Help and Support.
Locate the user guides
User guides, regulatory and safety notices, and other resources
that provide information about using the computer are available
through Help and Support (select Start > Help and Support >
User Guides), or on a User Guides disc included with some
models.
For more information about resources and support, refer to
Chapter 3, “Troubleshooting.”
2–8 Getting Started
Page 22

Turn off the computer correctly
Whenever possible, turn off the computer by using the standard
shutdown procedure:
1. Save your work and close all open applications.
2. Shut down the computer through the operating system by
clicking Start, clicking the arro
and then clicking Shut Down.
If you are unable to shut down the computer with these
procedures, try the following emer
sequence provided:
CAUTION: Emergency shutdown procedures result in the loss of
Ä
unsaved information.
■ Press ctrl+alt+delete. Then, in the lower-right corner of the
screen, click the Power button.
■ Press and hold the power button for at least 5 seconds.
■ Disconnect the computer from external power and remov e the
battery.
w next to the Lock button,
gency procedures in the
Next steps
Getting Started 2–9
Page 23

Troubleshooting
Troubleshooting resources
If you experience computer problems, follow the troubleshooting
steps below:
1. Refer to “Quick troubleshooting,” next in this chapter.
2. Access additional information about the computer and Web
site links through Help and Support. Select Start > Help and
Support.
Although many checkup and repair tools require an Internet
✎
connection, other tools can help you fix a problem when the
computer is offline.
3. Contact Customer Care for further assistance.
3
Getting Started 3–1
Page 24

Troubleshooting
Quick troubleshooting
The computer is unable to start up
To turn on the computer, press the power button. When the
computer is turned on, the power light is turned on.
If the computer and the power light are not turned on when you
press the power button, adequate po
the computer.
The suggestions below may help you determine why the
computer will not start up:
■ If the computer is plugged into an AC outlet, verify that the
AC outlet is providing adequate power by plugging another
electrical device into the outlet.
■ If the power light on the front of the computer is blinking
rapidly, replace the AC adapter with one having a higher
power rating, and then plug the adapter into an AC outlet.
Use only the included AC adapter or one approved for this
✎
computer.
wer may not be available to
■
If the computer is running on battery power or is plugged into
an external power source other than an AC outlet, plug the
computer into an AC outlet using the AC adapter. Be sure the
power cord and AC adapter connections are secure.
■ If the computer is running on battery power:
❏ Remove the primary battery and optional accessory
battery (if applicable) and plug the computer into an AC
outlet using the AC adapter. If the computer turns on, one
of the batteries may need to be replaced.
❏ If the battery light on the front of the computer is blinking,
the battery has reached a low battery lev el, which may not
allow the computer to start up. Plug the computer to an
AC outlet using the AC adapter to start the computer and
allow the battery to charge.
3–2 Getting Started
Page 25

The computer screen is blank
If the computer is on but the screen is blank, the computer may be
in the Sleep state or in Hibernation, may not be set to display the
image on the computer screen, or the display switch may not be
functioning properly.
Try the suggestions below to resolve the issue:
■ To exit Sleep or Hibernation, briefly press the power button.
Sleep and Hibernation are energy-saving features that can
turn off the display. Sleep and Hibernation can be initiated b
the system while the computer is on but not in use, or when
the computer has reached a low battery level. To change
these and other power settings, select Start > Control
Panel > System and Maintenance > Power Options.
■ To transfer the image to the computer screen, press fn+f4.
On most models, when an optional external display device,
such as a monitor, is connected to the computer, the image
can be displayed on the computer screen or the external
display, or on both devices simultaneously. When you press
fn+f4 repeatedly, the image alternates among the computer
display, one or more external display devices, and
simultaneous displays on all devices.
Troubleshooting
y
■ Press the display switch on the computer to confirm that it
moves freely.
The display switch is normally located on the upper-left
corner of the keyboard.
Getting Started 3–3
Page 26

Troubleshooting
Software is functioning abnormally
If the software becomes unresponsive or responds abnormally:
■ Restart the computer by clicking Start, click the arrow next
to the Lock button, and then clicking Restart.
If you cannot restart the computer using procedure, refer to
the next section, “The computer is turned on but not
responding.”
■ Run a virus scan. For information about using the antivirus
resources on the computer, refer to “Protect the computer
from viruses” in Chapter 2, “Next steps.”
The computer is turned on but not responding
If the computer is turned on, but not responding to software or
keyboard commands, turn off the computer b y using the standard
shutdown procedure:
1. Save your work and close all open applications.
2. Shut down the computer through the operating system by
clicking Start, clicking the arrow next to the Lock button,
and then clicking Shut Down.
If you are unable to shut down the computer with this procedure,
try the following emer
provided:
CAUTION: Emergency shutdown procedures result in the loss of
Ä
unsaved information.
1. Press ctrl+alt+delete. Then, in the lower-right corner of the
screen, click the Power button.
2. Press and hold the power button for at least 5 seconds.
3. Disconnect the computer from external power and remove
the battery.
3–4 Getting Started
gency procedures in the sequence
Page 27

The computer is unusually warm
It is normal for the computer to feel warm to the touch while it
is in use. But if the computer feels unusually warm, it may be
overheating because a vent is blocked.
If you suspect that the computer is overheating, allow the
computer to cool to room temperature. Then be sure to keep all
vents free from obstructions while you are using the computer
CAUTION: To prevent overheating, do not obstruct vents. Use the
Ä
computer only on a hard, flat surface. Do not allow another hard
surface, such as such as an adjoining printer, or a soft surface, such
as pillows or thick rugs or clothing, to block airflow.
The fan in the computer starts up automatically to cool internal
✎
components and prevent overheating. It is normal for the
internal fan to cycle on and off during routine operation.
An external device is not working
Troubleshooting
.
If an external device does not function as expected:
■ Turn on the device as instructed in the device user guide.
Some devices may not be powered b y the computer , and must
be turned on before the computer is turned on.
■ Be sure that
❏ All device connections are secure.
❏ The device is receiving electrical power.
❏ The device, especially if it is an older one, is compatible
with your operating system. For compatibility
information, refer to the device manufacturer’s Web site.
❏ The correct drivers are installed and updated. Drivers may
be available on a CD included with the device or on the
device manufacturer’s Web site. For more information
about updating drivers, select Start > Help and Support.
Getting Started 3–5
Page 28

Troubleshooting
The home wireless network connection is not working
If a home wireless network connection is not working as
expected:
■ Be sure that the wireless light on the computer is on. If the
light is off, press the wireless button to turn it on.
■ Be sure that the computer wireless antennae are free from
obstructions.
■ Be sure that the cable or DSL modem and its power cord are
properly connected, and the lights are on.
■ Be sure that the wireless router (access point) is properly
connected to its power adapter and the cable modem, and the
lights are on.
■ Disconnect and then reconnect all cables, and turn the power
off and then back on.
For information on setting up a home wireless network
✎
connection, refer to
(English only).
http://www.hp.com/go/techcenter/wireless
Help and Support
If the preceding questions and solutions did not address your
problem, access Help and Support by selecting Start > Help and
Support. In addition to providing information about your
operating system, Help and Support provides
■ Information about the computer, such as model and serial
number, installed software, hardware components, and
specifications.
■ Answers to questions about using the computer.
■ Product information to help you learn to use the computer
and operating system features.
3–6 Getting Started
Page 29

■ Updates for the operating system, device drivers, and
software provided on the computer.
■ Checkups for computer functionality.
■ Automated and interactive troubleshooting, repair solutions,
and system recovery procedures.
■ Links to community forums of IT experts.
Customer Care
If you are unable to find the help you need by using Help and
Support, you may need to contact Customer Care.
Prepare to contact Customer Care
For the fastest possible resolution of your problem, have the
computer and the following information available when you call
or e-mail:
■ Product name located on the display or keyboard.
Troubleshooting
■ Serial number (s/n) listed on the service tag.
❏ The service tag label is on the bottom of the computer.
❏ To display the service tag information on the computer
screen, select Start > Help and Support > System
Information.
■ Date the computer was purchased.
■ Conditions under which the problem occurred.
■ Error messages that have been displayed.
Getting Started 3–7
Page 30

Troubleshooting
■ The manufacturer and model of the printer or other
accessories connected to the computer.
■ Operating system version number and registration number.
To display the operating system version number and
registration number, select Start > Help and Support >
System Information. (On some models, the registration
number may be identified in the Operating System table as
the Product Id).
Contact Customer Care by e-mail or telephone
If the computer is connected to the Internet, select Start > Help
and Support to get help by e-mail or to access the Customer
Care telephone numbers.
3–8 Getting Started
Page 31

Notebook tour
Components included with the computer may vary by region
✎
and model. The illustrations in this appendix identify the
standard features included on most computer models.
A
Getting Started A–1
Page 32
Notebook tour
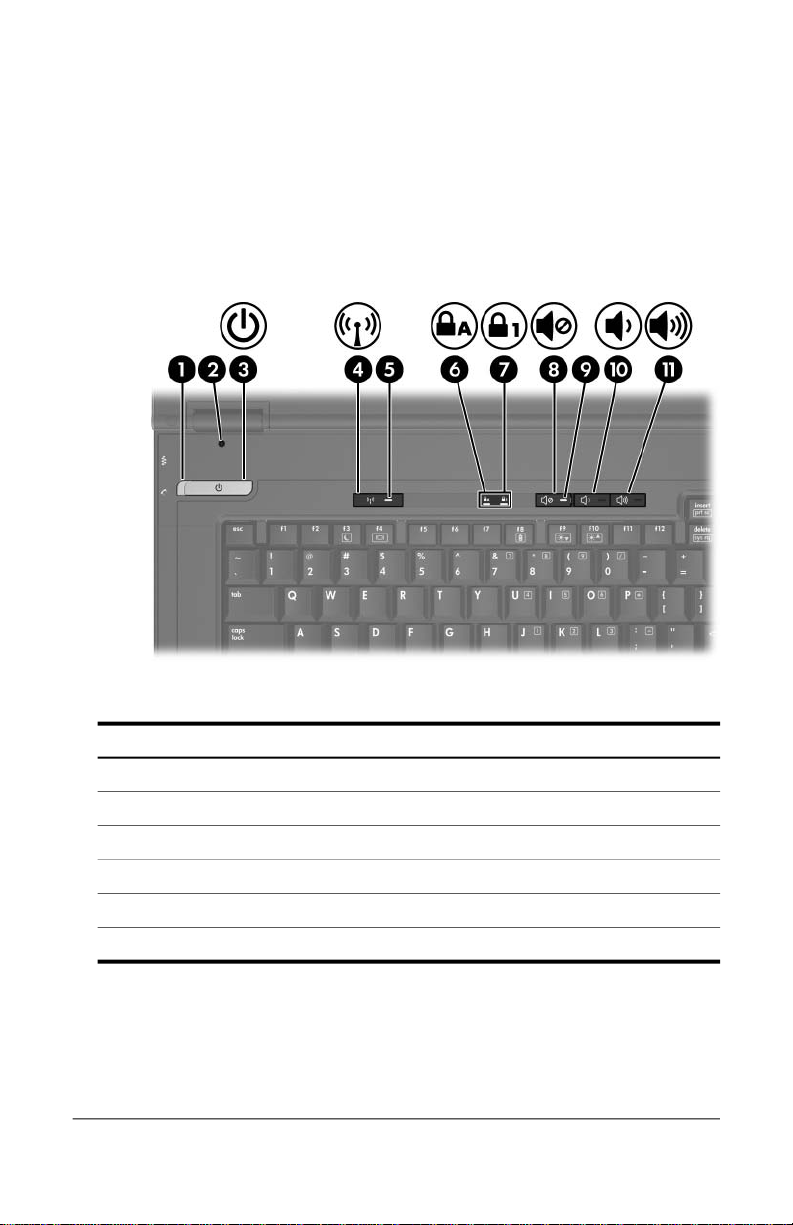
Top components
Component
1 Power light 7 Num lock light
2 Display switch 8 Volume mute button
3 Power button 9 Volume mute light
4 Wireless button - Volume down button
5 Wireless light q Volume up button
6 Caps lock light
A–2 Getting Started
Page 33
Keys
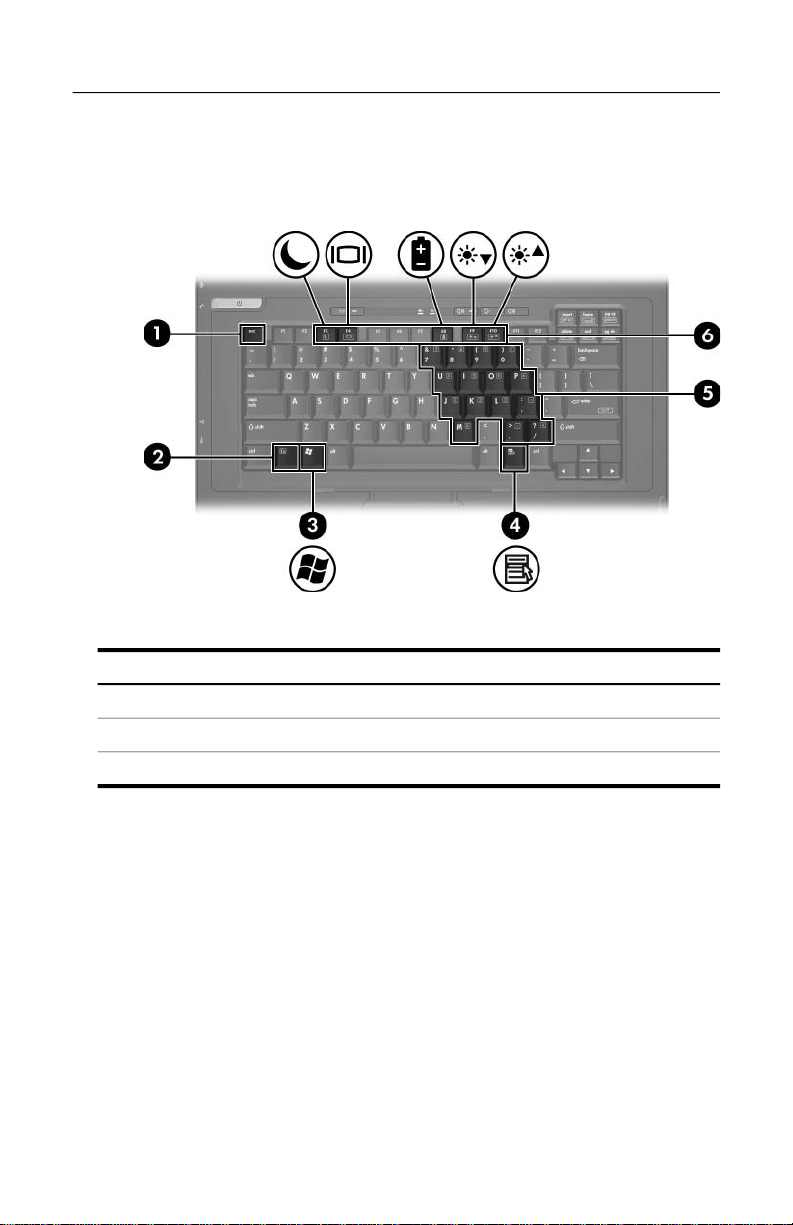
Notebook tour
Component
1 esc key 4 Windows applications key
2 fn key 5 Embedded numeric keypad
3 Windows logo key 6 Function keys
Getting Started A–3
Page 34
Notebook tour
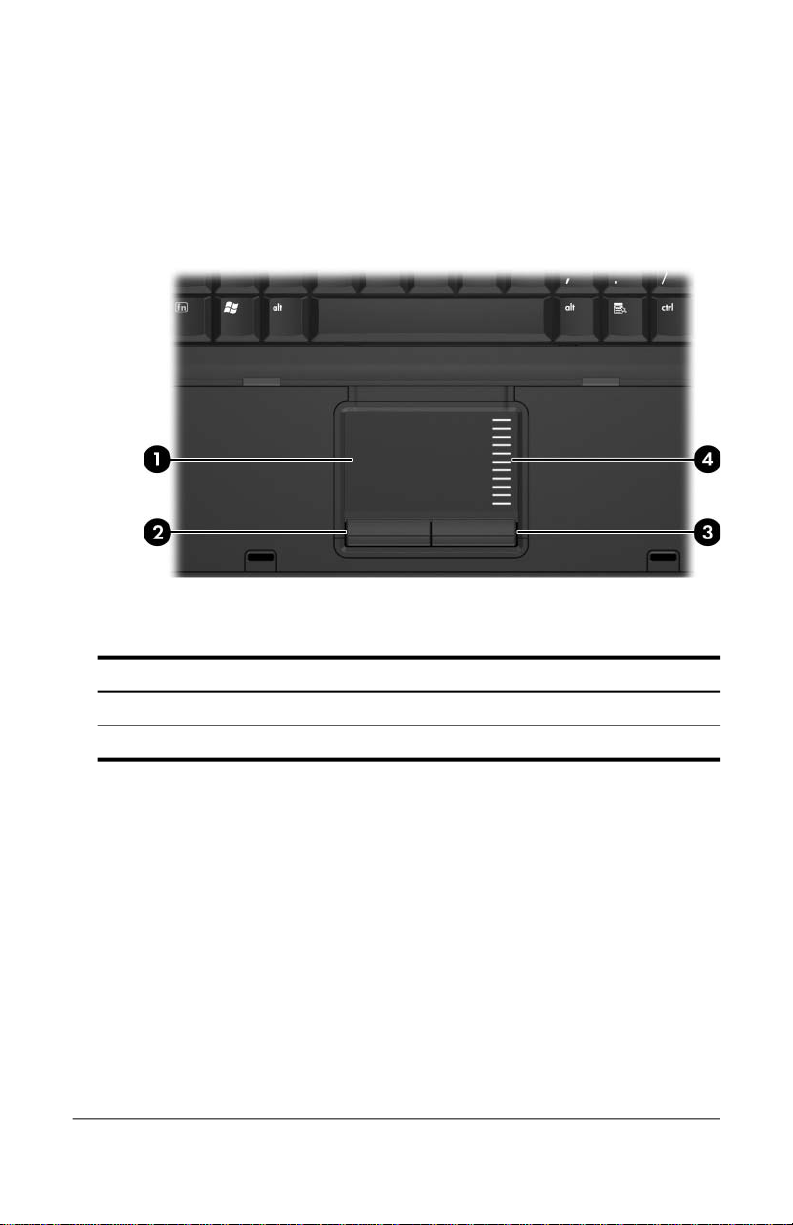
Pointing devices
Component
1 TouchPad 3 Right TouchPad button
2 Left TouchPad button 4 TouchPad scroll zone
A–4 Getting Started
Page 35
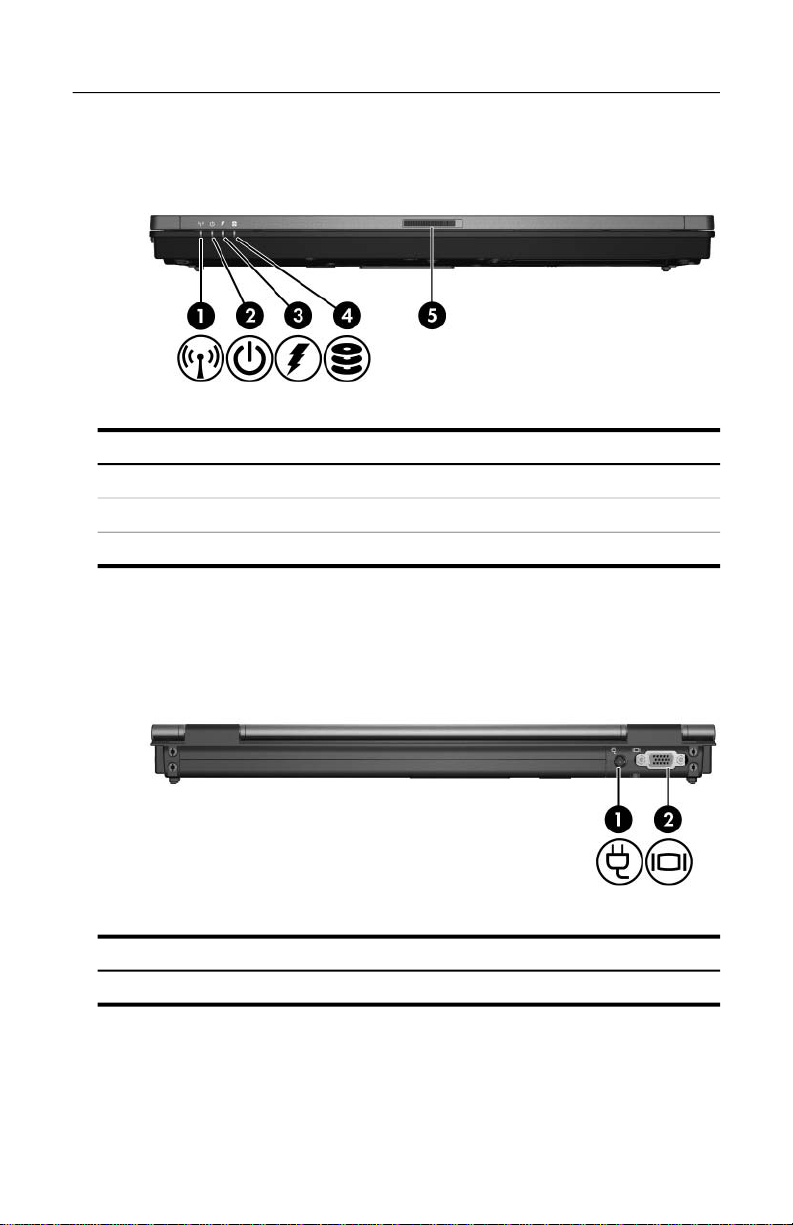
Front components
Component
1 Wireless light 4 Drive light
2 Power light 5 Display release latch
3 Battery light
Rear components
Notebook tour
Component
1 Power connector 2 External monitor port
Getting Started A–5
Page 36
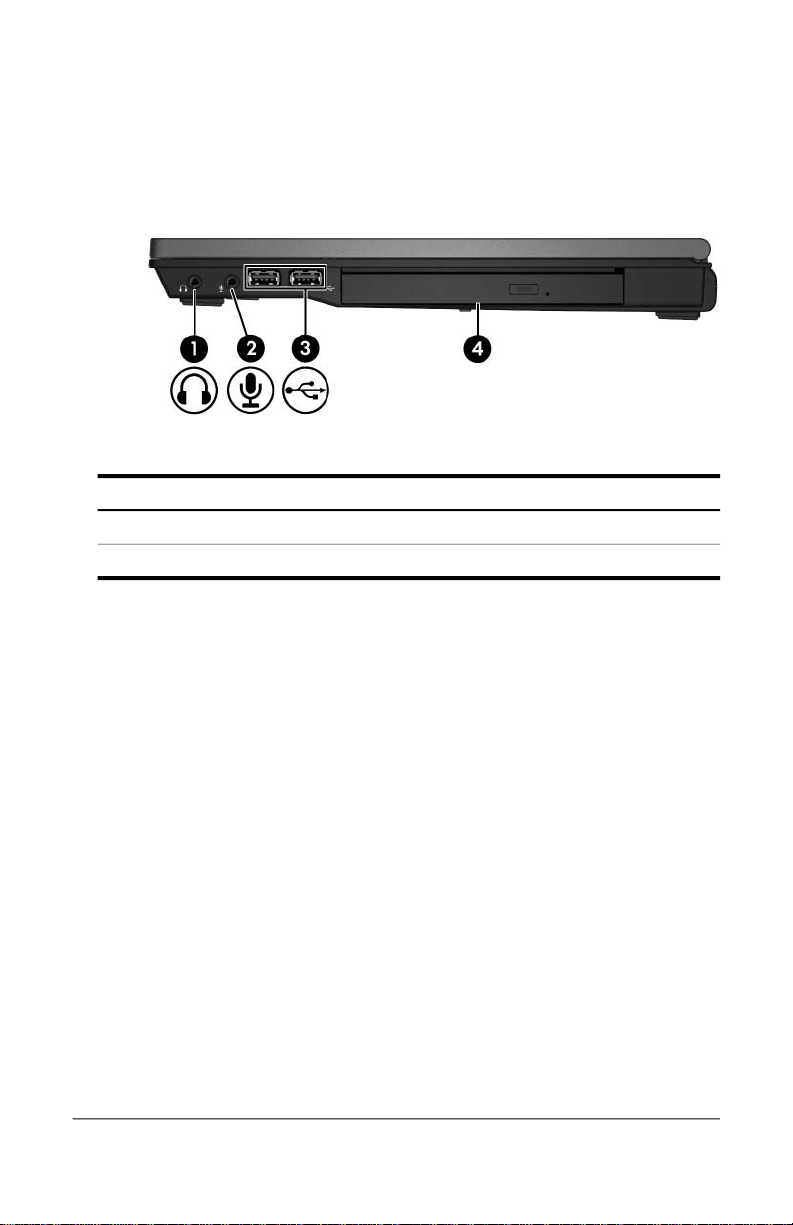
Notebook tour
Right-side components
Component
1 Audio-out (headphone) jack 3 USB ports (2)
2 Audio-in (microphone) jack 4 Optical drive
A–6 Getting Started
Page 37
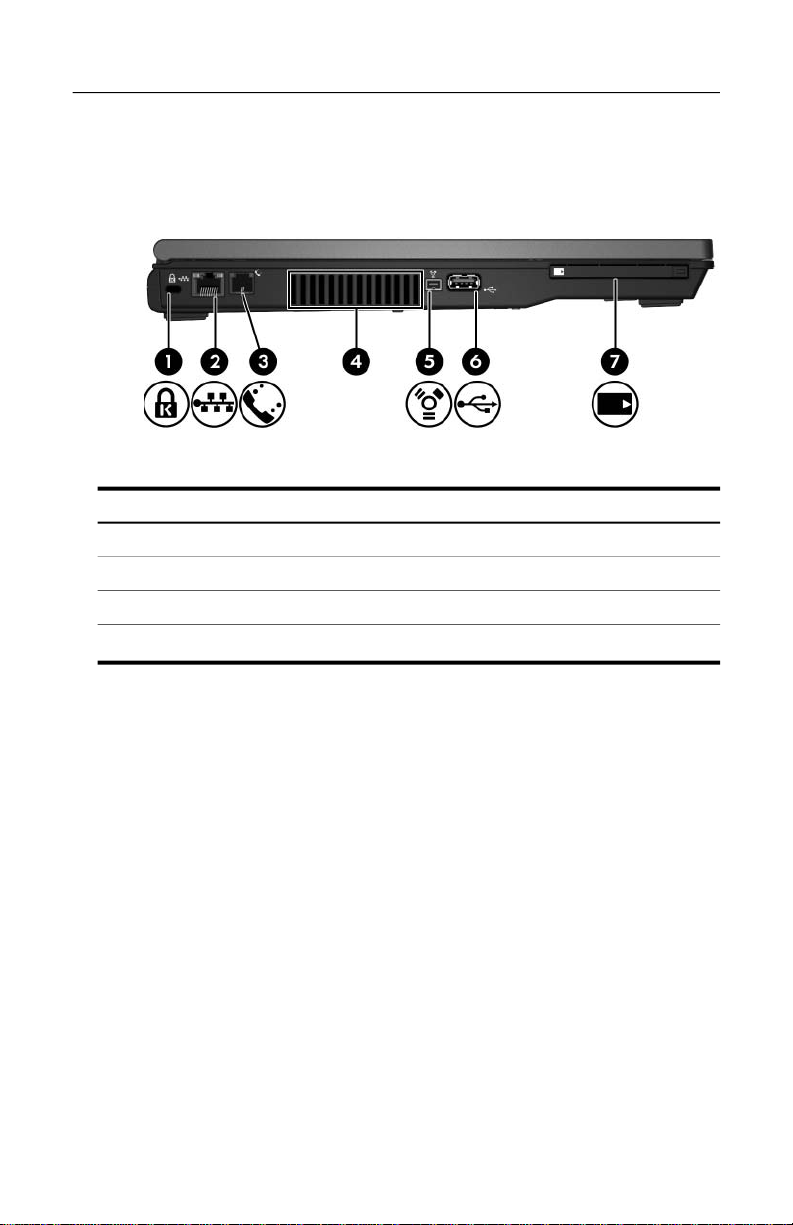
Left-side components
Component
1 Security cable slot 5 1394 port
2 RJ-45 (network) jack 6 USB port
3 RJ-11 (modem) jack 7 PC Card slot
4 Vent
Notebook tour
Getting Started A–7
Page 38
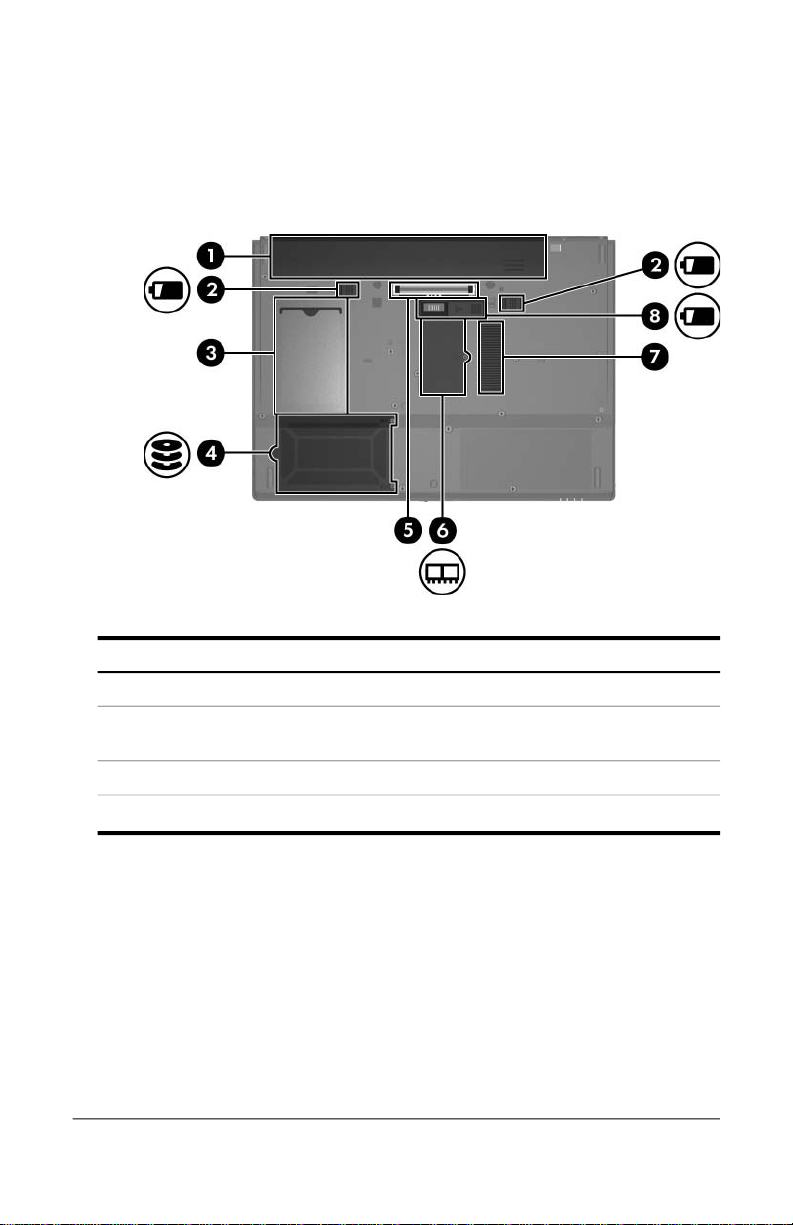
Notebook tour
Bottom components
Component
1 Primary battery bay 5 Docking connector
2 Primary battery release 6 Expansion memory module
latches (2) compartment
3 Business card holder 7 Vent
Hard drive bay 8 Accessory battery connector
4
A–8 Getting Started
Page 39

Connect to the Internet from
your home
The computer includes hardware and software that allows you
to connect to the Internet. Before you can access the Internet,
you must
■ Choose an Internet Service Provider (ISP).
■ Choose the type of Internet connection you want, such as
broadband, wireless, or dial-up, and connect the hardware.
Internet hardware and software features vary depending on the
✎
computer model and your location.
Choose an ISP
You must set up Internet service before you can connect to the
Internet. The computer includes the New Connection Wizard to
help you set up a new Internet account or configure the computer
to use an existing account.
B
Getting Started B–1
Page 40

Connect to the Internet from your home
Use the New Connection Wizard
You can use the New Connection Wizard to connect to the
Internet
■ If you already have an account with an ISP.
■ If you have a disc from an ISP.
■ If you do not have an Internet account and would like to
select an ISP from the list provided within the wizard.
■ If you have selected an unlisted ISP and the ISP has provided
you with such information as a specific IP address, POP3 and
SMTP settings.
To access the New Connection Wizard and instructions for using
the wizard:
» Select Start > Help and Support.
If you are prompted within the wizard to choose between
✎
enabling or disabling Windows Firewall, choose to enable the
firewall.
B–2 Getting Started
Page 41

Connect to the Internet from your home
Choose the type of Internet connection
There are 3 basic types of Internet connection:
■ Broadband High-speed Internet access is available through
❏ Cable modem
❏ Digital Subscriber Line (DSL)
❏ Satellite
❏ Other services
For broadband access, additional hardware and/or software
must be provided by your ISP.
■ Wireless For high-speed mobile Internet access, you can use
a wireless connection. A wireless network set up at home
requires a wireless router (purchased separately). To learn
about setting up wireless access (English only), visit
http://www.hp.com/go/techcenter/wireless.
■ Dial-up You can access the Internet by dialing into a service
provider using a modem cable connected to the RJ-11
(modem) jack.
Getting Started B–3
Page 42

Backup and recovery
HP Backup and Recovery Manager provides se veral ways to back
up the system and to recover optimal system functionality.
HP installed drivers, utilities, and programs can be copied to a
✎
CD or to a DVD using the HP Backup and Recovery Manager.
Formatted DVD±RW and D VD±R W double-layer discs are not
✎
compatible with HP Backup and Recovery Manager.
The computer must be connected to external power before you
✎
perform backup and recovery procedures.
Safeguard your data
C
To safeguard your documents, store personal files in the
Documents folder and periodically create a backup copy of the
folder.
Back up the system
Using HP Backup and Recovery Manager, you can
■ Back up specific files and folders.
■ Back up the entire hard drive.
Getting Started C–1
Page 43

Backup and recovery
■ Back up modifications since your last backup, using HP
system recovery points.
■ Schedule backups.
Back up specific files or folders
You can back up specific files or folders to the recovery partition
on the hard drive, to an optional external hard drive, or to discs.
This process will take several minutes, depending on the file
✎
size and the speed of the computer.
To back up specific files or folders:
1. Select Start > All Programs > HP Backup & Recovery >
HP Backup and Recovery Manager.
2. Click Next.
3. Click Back up to protect system settings and important
data f
iles, and then click Next.
4. Click Back up individual f
click Next.
The Backup W
5. Click Next.
6. Click Back up selected fi
(Recommended).
– or –
Click Advanced Backup (Experienced users) to access
anced filtering techniques.
adv
7. Click Next
8. Follow the on-screen instructions.
C–2 Getting Started
izard opens.
.
iles and folders, and then
les from most common locations
Page 44

Back up the entire hard drive
When you perform a complete backup of the hard drive, you are
saving the full factory image, including the Windows operating
system, software applications, and all personal files and folders.
A copy of the entire hard drive image can be stored on another
✎
hard drive, on a network drive, or on recovery discs that you
create.
This process may take over an hour, depending on your
✎
computer speed and the amount of data being stored.
To back up the entire hard drive:
1. Select Start > All Programs > HP Backup & Recovery >
HP Backup and Recovery Manager.
The HP Backup and Recovery Manager opens.
2. Click Next.
Backup and recovery
3. Click Backup to protect system and important data f
and then click Next.
4. Click Back up entire hard drive, and then click Next.
The “Back up entire hard disk” page opens.
5. Click Next
6. Select the location for the backup f
7. Select the Protect data access with passw
and then type your passw
boxes.
✎
8. Click Next.
9. Follow the on-screen instructions.
Getting Started C–3
.
iles, and then click Next.
ord check box,
ord in the Pass
This step is optional. If you do not want to password-protect
your data access, clear the Protect data access with
password check box.
word and Confirm
iles,
Page 45

Backup and recovery
Back up modifications made to the system
When you back up modifications made to the system, you are
creating system recovery points. This allows you to save a
snapshot of your hard drive at a specific point in time. You can
then recover back to that point if you want to reverse subsequent
changes made to your system.
The first system recovery point, a snapshot of the entire image,
✎
is automatically created the first time you perform a backup.
Subsequent recovery points make a copy of changes made after
that time.
HP recommends that you create recovery points
■ Before you add or extensively modify software or hardware.
■ Periodically, whenever the system is performing optimally.
Recovering to an earlier recovery point does not affect data
✎
files or e-mails created since that recovery point.
After you create a recovery point, you are prompted to schedule
subsequent recovery points. You can schedule recovery points for
a specific time or event in your system.
To create and schedule a system recovery point:
1. Select Start > All Programs > HP Backup & Recovery >
HP Backup and Reco
2. Click Next.
3. Click Back up to protect system settings and important
data files, and then click Next.
4. Click Create or manage Reco
click Next.
The “Recovery Point Manager” page opens.
5. Follo
C–4 Getting Started
w the on-screen instructions.
very Manager.
very Points, and then
Page 46

Schedule backups
To schedule backups:
1. Select Start > All Programs > HP Backup & Recovery >
HP Backup Scheduler.
The “Backup Scheduler” page opens.
2. Click Next.
Backup and recovery
3. Schedule recov
or monthly) or at specific events, such as at system start or
when you dock to an optional docking station (select models
only), by clicking one of the a
further define the settings.
A summary of your recovery point settings is displayed.
4. Follow the on-screen instructions.
ery points at specific interv
Recover the system
HP Backup and Recovery Manager analyzes the hard drive and
creates a dedicated hard drive recov ery partition on the hard dri v e
large enough to store a copy of the full factory image. You choose
whether you want to store that copy on the recovery partition, on
another drive, or on external recovery discs.
Before using HP Backup and Recovery Manager, try repairing
✎
the system by running Windows System Restore. For more
information, select Start > Help and Support, and then search
for “System Restore.”
als (daily, weekly,
vailable options. Click Next to
Getting Started C–5
Page 47

Backup and recovery
The HP Backup and Recovery Manager allows you to
■ Create recovery discs (highly recommended). The
recovery discs are used to start up (boot) the computer and to
restore the full factory image (operating system and software)
in case of system failure or instability.
If you do not have a CD or DVD burner, a copy of the
✎
entire hard drive image can be stored on another hard drive
or on a network drive.
■
Perform a r eco v ery. You can perform a full system reco v ery
or recover important files from a recovery partition on the
hard drive, from another drive, or from recovery discs that
you create.
Create recovery discs (highly recommended)
After setting up the computer for the first time, you can create a
set of recovery discs of the full factory image, using Recovery
Media Creator in the HP Backup and Recovery Manager. The
recovery discs are used to start up (boot) the computer and
recover the operating system and software to factory settings in
case of system failure or instability.
CAUTION: After you create the recovery discs, you can increase the
Ä
amount of space on the hard drive by deleting the recovery partition.
However, doing this is not recommended. If you delete this partition,
you will lose any information that is on the partition.
Only one set of recovery discs can be created for this computer.
✎
C–6 Getting Started
Page 48

Backup and recovery
Before creating recovery discs:
■ Obtain high quality CD-R, DVD-R, or DVD+R media.
Formatted DVD±RW and DVD±RW double-layer discs
✎
are not compatible with HP Backup and Recovery
Manager.
■
Number each disc before inserting it into the optical drive
of the computer.
■ If necessary, you can cancel Recovery Media Creator
before you have finished creating the recovery discs. The
next time you open Recovery Media Creator, you will be
prompted to continue the disc creation process where you
left off.
To create a set of recovery discs:
1. Select Start > All Programs > HP Backup & Recovery >
HP Backup and Reco
very Manager.
2. Click Next.
3. Click Create factory software recovery CDs or DVDs to
recov
er the system (highly recommended), and then
click Next.
The “Recovery Media Creator” page opens.
4. Click Next.
5. Click Write to CD/DVD, and then click Next.
6. Follow the on-screen instructions.
Getting Started C–7
Page 49

Backup and recovery
Perform a recovery
Performing a recovery from the recovery discs
To perform a recovery from the recovery discs:
1. Back up all personal files.
2. Insert the first recovery disc into the optical drive and restart
the computer
3. Follow the on-screen instructions.
Performing a recovery from the hard drive
There are 2 ways to initiate a recovery from the hard drive:
■ From within Windows.
■ From the recovery partition.
Initiating a recovery in Windows
To initiate a recovery in Windows:
1. Back up all personal files.
.
2. Select Start > All Pr
HP Backup and Recovery Manager.
3. Click Next.
4. Click Recover important files or the entire system, and
then click Next.
5. Click a recov
If you choose to recover the system, the computer restarts
✎
and recovery begins.
6. Follow the on-screen instructions.
C–8 Getting Started
ery option, and then click Next.
ograms > HP Backup & Recove
ry >
Page 50

Backup and recovery
Initiating a recovery from the hard drive
recovery partition
To initiate a recovery from the hard drive recovery partition:
1. Back up all personal files.
2. Restart the computer, and then press
f11 before the Windows
operating system loads.
3. Click a recovery option, and then click Next.
4. Follow the on-screen instructions.
Getting Started C–9
Page 51

Specifications
The following sections provide information on the computer
operating environment specifications and power specifications.
Operating environment
The operating environment information in the following table
may be helpful if you plan to use or transport the computer in
extreme environments.
Factor Metric U.S.
Temperature
Operating (not writing to optical disc) 0°C to 35°C 32°F to 95°F
Operating (writing to optical disc) 5°C to 35°C 41°F to 95°F
Nonoperating -20°C to 60°C
-4°F to 140°F
D
Relative humidity (noncondensing)
Operating 10% to 90% 10% to 90%
Nonoperating 5% to 95% 5% to 95%
Maximum altitude (unpressurized)
Operating (14.7 to 10.1 psia*) -15 m to 3,048 m -50 ft to 10,000 ft
Nonoperating (14.7 to 4.4 psia*) -15 m to 12,192 m -50 ft to 40,000 ft
*Pounds per square inch absolute (psia) is another unit of measurement for
altitude.
Getting Started D–1
Page 52

Specifications
Rated input power
The power information in this section may be helpful if you plan
to travel internationally with the computer.
The computer operates on DC power, which can be supplied by
an A
C or a DC power source. Although the computer can be
powered from a stand-alone DC power source, it should be
powered only with an A C adapter or a DC power source supplied
and approved by HP for use with this HP computer.
The computer is capable of accepting DC power within the
following specifications.
Input power Rating
Operating voltage 18.5 V dc @ 3.5 A - 65 W
Operating current 3.5 A
This product is designed for IT power systems in Norway with
phase-to-phase voltage not exceeding 240 V rms.
D–2 Getting Started
Page 53

Index
1394 port, identifying A–7
A
AC adapter
connecting 1–5
identifying 1–2
accessory battery connector,
identifying A–8
altitude specifications D–1
antivirus software 3–4
audio-out (headphone) jack,
identifying A–6
B
battery
charging 1–6
indentifying 1–2
inserting 1–4
battery bay, identifying A–8
battery light
identifying A–5
on, off 1–6
battery release latch A–8
bays
battery A–8
hard drive A–8
Bluetooth 2–7
business card holder A–8
buttons
power 1–7
volume down A–2
volume mute A–2
volume up A–2
wireless A–2
, A–2
C
cables and cords, power 3–2
caps lock light, identifying
A–2
compartments, expansion
memory module A–8
components
bottom A–8
front A–5
keys A–3
left-side A–7
pointing devices A–4
rear A–5
right-side A–6
top A–2
computer
turn off 2–9
turn on 1–6
computer viruses 3–4
connect the computer to
external power 1–5
Getting Started Index–1
Page 54

Index
connecting to a computer
network 2–7
connectors
accessory battery A–8
docking A–8
cord, power
connecting 1–5
Customer Care 3–7
D
data, safeguarding C–1
devices, external
troubleshooting 3–5
display release latch,
identifying A–5
display switch A–2
display, switching image 3–3
docking connector, identifying
A–8
drive light, identifying A–5
drive, optical A–6
E
embedded numeric keypad,
identifying A–3
environmental specifications
D–1
esc key, identifying A–3
expansion memory module
compartment, identifying
A–8
external devices
troubleshooting 3–5
external monitor port,
identifying A–5
F
firewalls 2–4
fn key, identifying A–3
function keys, identifying A–3
H
hard drive bay, identifying
A–8
Help and Support 3–6
Hibernation 3–3
HP Smart AC Adapter 1–2
humidity specifications D–1
I
IEC 60950 compliance 2–6
image, switching among
display devices 3–3
insert the battery 1–4
Internet access B–3
J
jacks
audio-in (microphone) A–6
audio-out (headphone) A–6
RJ-11 (modem) A–7
RJ-45 (network) A–7
K
keys
embedded numeric keypad
A–3
esc A–3
fn A–3
function A–3
Windows applications A–3
Windows logo A–3
Index–2 Getting Started
Page 55

Index
L
labels, service tag 3–7
LAN (local area network) 2–7
latches
battery release A–8
display release A–5
left TouchPad button,
identifying A–4
lights
battery 1–6
caps lock A–2
drive A–5
num lock A–2
power 1–7
volume mute A–2
wireless A–2
locate user guides 2–8
, A–2, A–5
, A–5
M
modem
setting up Internet service
B–3
surge protection 2–4
monitor, external 3–3
, 3–5
N
network, connecting computer
to 2–7
New Connection Wizard B–2
num lock light, identifying
A–2
O
operating environment
specifications D–1
operating system
displaying version number
3–8
optical drive, identifying A–6
overheating, computer 3–5
overheating, safety
considerations 2–6
P
PC Card slot, identifying A–7
ports
1394 A–7
external monitor A–5
USB A–6
power
running the computer on
battery 1–6
turning on computer 1–7
3–2
power button, identifying A–2
power connector 1–5
power connector, identifying
A–5
power cord
connecting 1–5
identifying 1–2
power lights
identifying A–2
on, off 1–7
power lights, identifying A–5
power surge 2–4
printer 3–5
Product Id 3–8
, A–7
,
, 3–2
Getting Started Index–3
Page 56

Index
R
rated input power
specifications D–2
registration number, operating
system 3–8
regulatory information notices
2–6
Regulatory, Safety and
nmental Notices 2–6
Enviro
right TouchPad button,
identifying A–4
RJ-11 jack (modem),
identifying A–7
RJ-45 (network) jack,
identifying A–7
S
Safety and Comfort Guide 2–5
security cable slot, identifying
A–7
serial number
See service tag 3–7
serial number, computer 3–7
service tag 3–7
set up the software 1–8
sleep 3–3
slots
PC Card A–7
security cable A–7
software updates 2–8
software, antivirus 2–3
specifications
operating environment D–1
rated input power D–2
T
temperature
safety considerations 2–6
specifications D–1
troubleshooting 3–5
TouchPad scroll zone,
identifying A–4
TouchPad, identifying A–4
traveling with computer
environmental
specifications D–2
troubleshooting
display problems 3–3
external device problems
3–5
Hibernation or Sleep
problems 3–3
overheating problems 3–5
resources 3–1
software problems 3–4
virus problems 3–4
wireless network problems
3–6
turn off computer 2–9
turn on computer 1–6
, 3–2
U
update, software 2–8
USB ports, identifying A–6
A–7
user guides 2–8
V
vents
identifying A–7
keeping free from
obstructions 3–5
, A–8
,
Index–4 Getting Started
Page 57

viruses
antivirus software 2–3
computer 3–4
volume down button,
identifying A–2
volume mute button,
identifying A–2
volume mute light, identifying
A–2
volume up button, identifying
A–2
W
Windows applications key,
identifying A–3
Windows logo key, identifying
A–3
wireless button, identifying
A–2
wireless light, identifying
, A–5
A–2
WLAN (wireless local area
network) 2–7
Index
Getting Started Index–5
 Loading...