


Compaq nx9420
Table of contents
 Loading...
Getting Started�
HP Compaq Notebook PC
Document Part Number: 394523-001�
March 2006
This guide explains how to set up your hardware and software,
and begin using the computer in Microsoft
Enhanced For Accessibility
® Windows®.

© Copyright 2006 Hewlett-Packard Development Company, L.P.
Microsoft and Windows are U.S. registered trademarks of Microsoft
Corporation. Bluetooth is a trademark owned by its proprietor and used by
Hewlett-Packard Company under license.
The information contained herein is subject to change without notice. The
only warranties for HP products and services are set forth in the express
warranty statements accompanying such products and services. Nothing
herein should be construed as constituting an additional warranty. HP shall
not be liable for technical or editorial errors or omissions contained herein.
Getting Started
HP Compaq Notebook PC
First Edition: March 2006
Document Part Number: 394523-001

Contents�
1 First-time setup
Identify hardware . . . . . . . . . . . . . . . . . . . . . . . . . . . . . . . 1–1
Computer hardware . . . . . . . . . . . . . . . . . . . . . . . . . . 1–1
Top components . . . . . . . . . . . . . . . . . . . . . . . . . . . . 1–2
Keys . . . . . . . . . . . . . . . . . . . . . . . . . . . . . . . . . . . . . . 1–3
Pointing devices. . . . . . . . . . . . . . . . . . . . . . . . . . . . . 1–4
Front components . . . . . . . . . . . . . . . . . . . . . . . . . . . 1–5
Rear components . . . . . . . . . . . . . . . . . . . . . . . . . . . . 1–5
Right-side components . . . . . . . . . . . . . . . . . . . . . . . 1–6
Left-side components . . . . . . . . . . . . . . . . . . . . . . . . 1–7
Bottom components . . . . . . . . . . . . . . . . . . . . . . . . . . 1–8
Set up the computer . . . . . . . . . . . . . . . . . . . . . . . . . . . . . 1–9
Step 1: Insert the battery pack . . . . . . . . . . . . . . . . . 1–10
Step 2: Connect the computer to external power. . . 1–11
Step 3: Turn on the computer . . . . . . . . . . . . . . . . . 1–13
Step 4: Set up the software . . . . . . . . . . . . . . . . . . . 1–15
Step 5: Create recovery discs (highly
recommended)
. . . . . . . . . . . . . . . . . . . . . . . . . . . . . 1–16
2 Next steps
Install additional hardware and software . . . . . . . . . . . . . 2–1
Protect the computer . . . . . . . . . . . . . . . . . . . . . . . . . . . . 2–1
Protect the computer from viruses. . . . . . . . . . . . . . . 2–1
Protect your system files . . . . . . . . . . . . . . . . . . . . . . 2–2
Protect your privacy. . . . . . . . . . . . . . . . . . . . . . . . . . 2–2
Getting Started iii

Contents
Protect the computer from power surges . . . . . . . . . . 2–3
Use the computer safely . . . . . . . . . . . . . . . . . . . . . . 2–3
Connect to a computer network . . . . . . . . . . . . . . . . . . . . 2–5
Update your software . . . . . . . . . . . . . . . . . . . . . . . . . . . . 2–6
Locate the user guides . . . . . . . . . . . . . . . . . . . . . . . . . . . 2–6
Turn off the computer correctly . . . . . . . . . . . . . . . . . . . . 2–7
3 Troubleshooting
Troubleshooting resources . . . . . . . . . . . . . . . . . . . . . . . . 3–1
Quick troubleshooting . . . . . . . . . . . . . . . . . . . . . . . . . . . 3–2
Is the computer unable to start up? . . . . . . . . . . . . . . 3–2
Is the computer screen blank? . . . . . . . . . . . . . . . . . . 3–3
Is software functioning abnormally? . . . . . . . . . . . . . 3–4
Is the computer turned on, but is not responding?. . . 3–5
Is the computer unusually warm? . . . . . . . . . . . . . . . 3–6
Is an external device not working? . . . . . . . . . . . . . . 3–7
Is the home wireless network connection not
working?
Help and Support Center . . . . . . . . . . . . . . . . . . . . . . . . . 3–9
Customer Care . . . . . . . . . . . . . . . . . . . . . . . . . . . . . . . . . 3–9
Preparing to contact Customer Care . . . . . . . . . . . . 3–10
Contacting Customer Care by e-mail or
telephone
. . . . . . . . . . . . . . . . . . . . . . . . . . . . . . . . . . 3–8
. . . . . . . . . . . . . . . . . . . . . . . . . . . . . . . . . 3–10
A Specifications
Operating environment. . . . . . . . . . . . . . . . . . . . . . . . . . . A–1
Rated input power . . . . . . . . . . . . . . . . . . . . . . . . . . . . . . A–2
B Backup and Recovery
Safeguarding your data . . . . . . . . . . . . . . . . . . . . . . . . . . B–1
Backing up your system . . . . . . . . . . . . . . . . . . . . . . . . . . B–1
Backing up specific files or folders . . . . . . . . . . . . . . B–2
Backing up your entire system . . . . . . . . . . . . . . . . . B–3
Backing up modifications made to your system . . . . B–4
Getting Started iv

Contents
Recovering your system . . . . . . . . . . . . . . . . . . . . . . . . . . B–5
Creating recovery discs . . . . . . . . . . . . . . . . . . . . . . . B–6
Performing a recovery . . . . . . . . . . . . . . . . . . . . . . . . B–7
C Connect to the Internet from your home
Choose an ISP . . . . . . . . . . . . . . . . . . . . . . . . . . . . . . . . . C–1
Using the New Connection Wizard . . . . . . . . . . . . . . C–1
Choose the type of Internet access . . . . . . . . . . . . . . . . . . C–2
Index
Getting Started v

Identify hardware
Computer hardware
1�
First-time setup�
Component
1 Power cord 3 Primary battery pack
2 AC adapter
Older AC adapters do not work with this computer.
✎
Getting Started 1–1
First-time setup
Top components
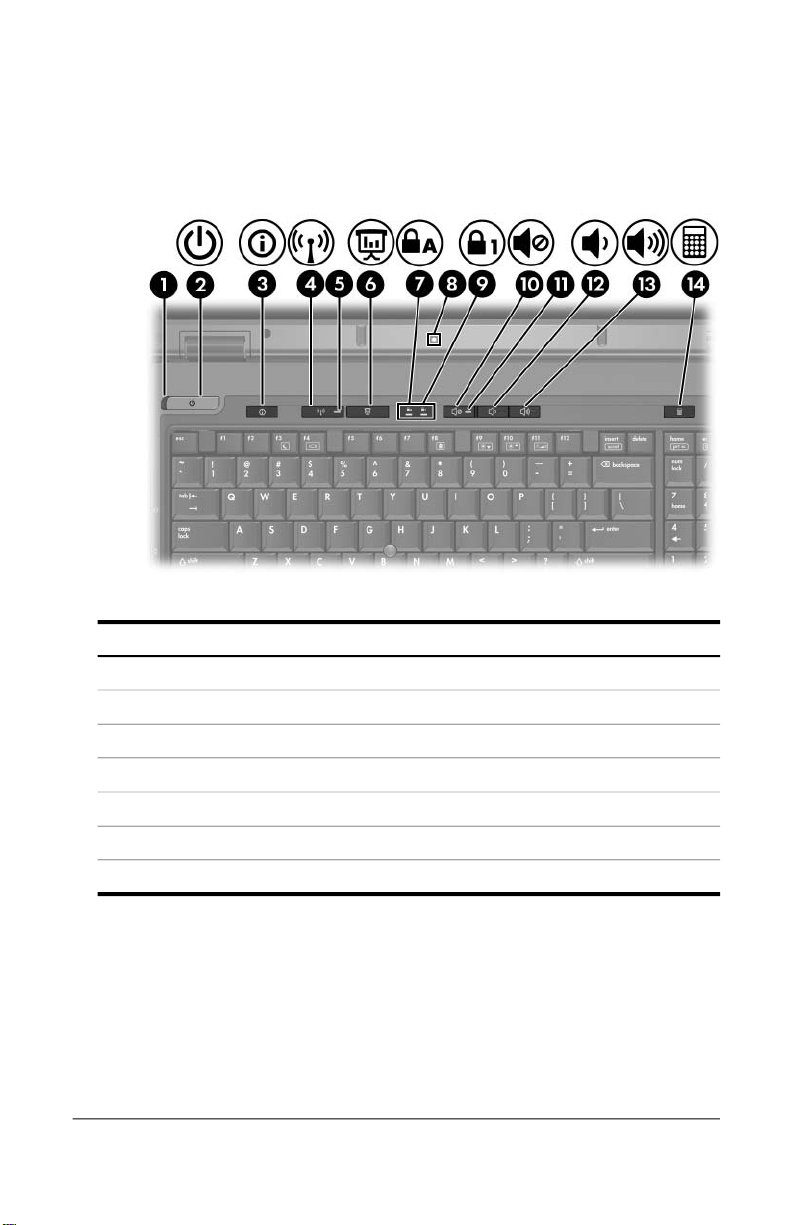
Component
1 Powe r li ght 8 Ambient light sensor
2 Powe r button 9 Num lock light
3 Info Center button - Volume mute button
4 Wireless button q Volume mute light
5 Wireless light w Volume down button
6 Presentation button = Volume up button
7 Caps lock light r Calculator button
1–2 Getting Started
Keys
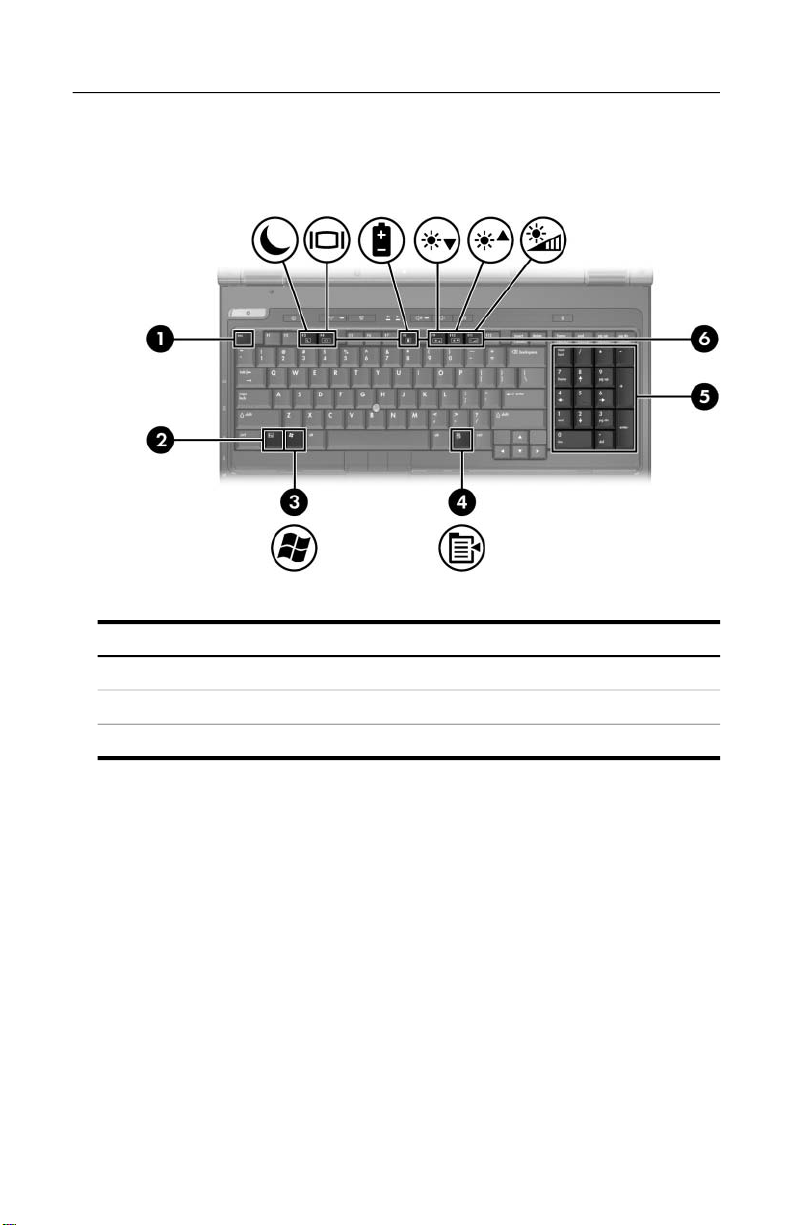
Component
First-time setup
1 esc key 4 Windows applications key
2 fn key 5 Integrated numeric keypad
3 Windows logo key 6 Function keys
Getting Started 1–3

First-time setup
Pointing devices and fingerprint reader
Component
1 Fingerprint reader 6 TouchPad scroll zone
(select models only)
2 Left pointing stick button 7 Right TouchPad button
(select models only)
3 Pointing stick 8 Center TouchPad button
(select models only) (select models only)
4 Center pointing stick button 9 Left TouchPad button
(select models only)
5 Right pointing stick button - TouchPad
(sleet models only)
1–4 Getting Started
Front components
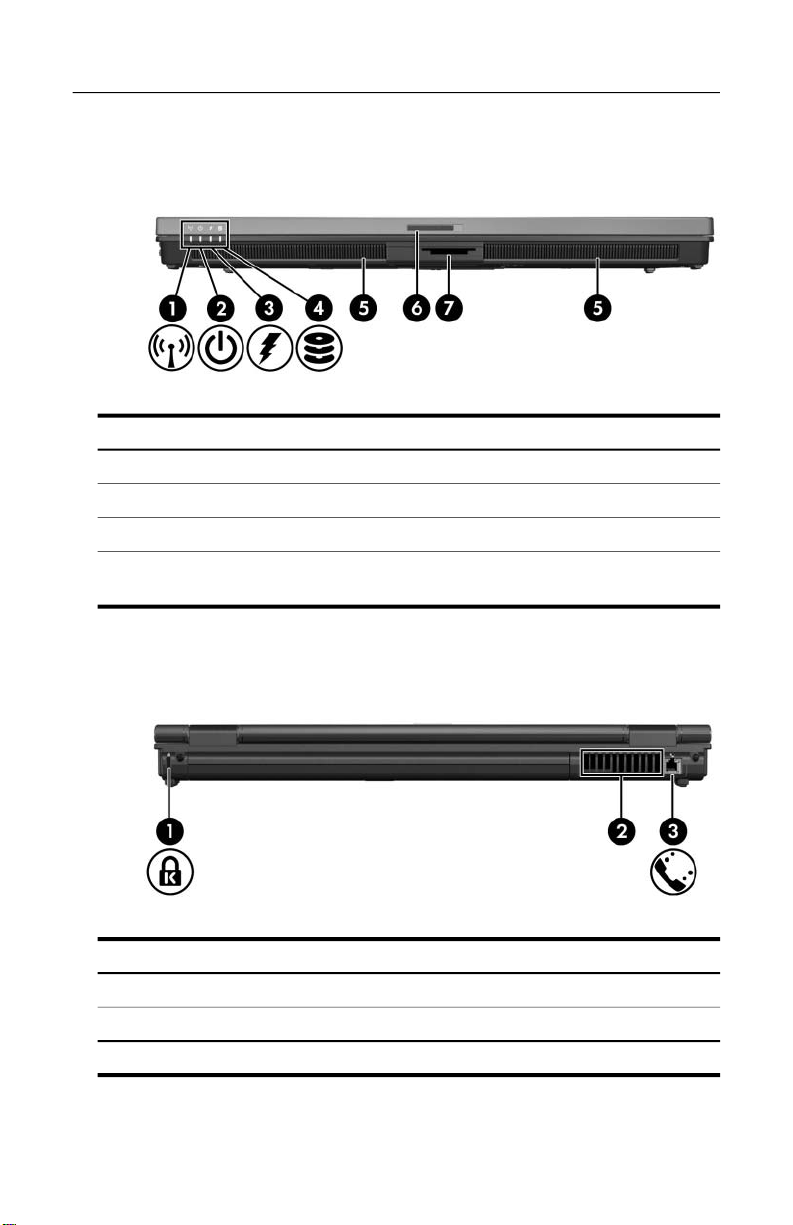
Component
1 Wireless light 5 Speakers (2)
2 Powe r li ght 6 Display release latch
3 Battery light 7 Digital Media Slot
4 IDE (Integrated Drive
Electronics) drive light
First-time setup
Rear components
Component
1 Security cable slot 3 RJ-11(modem) jack
2 Vent*
*Depending on computer model, vents vary in number and location.
Getting Started 1–5
First-time setup
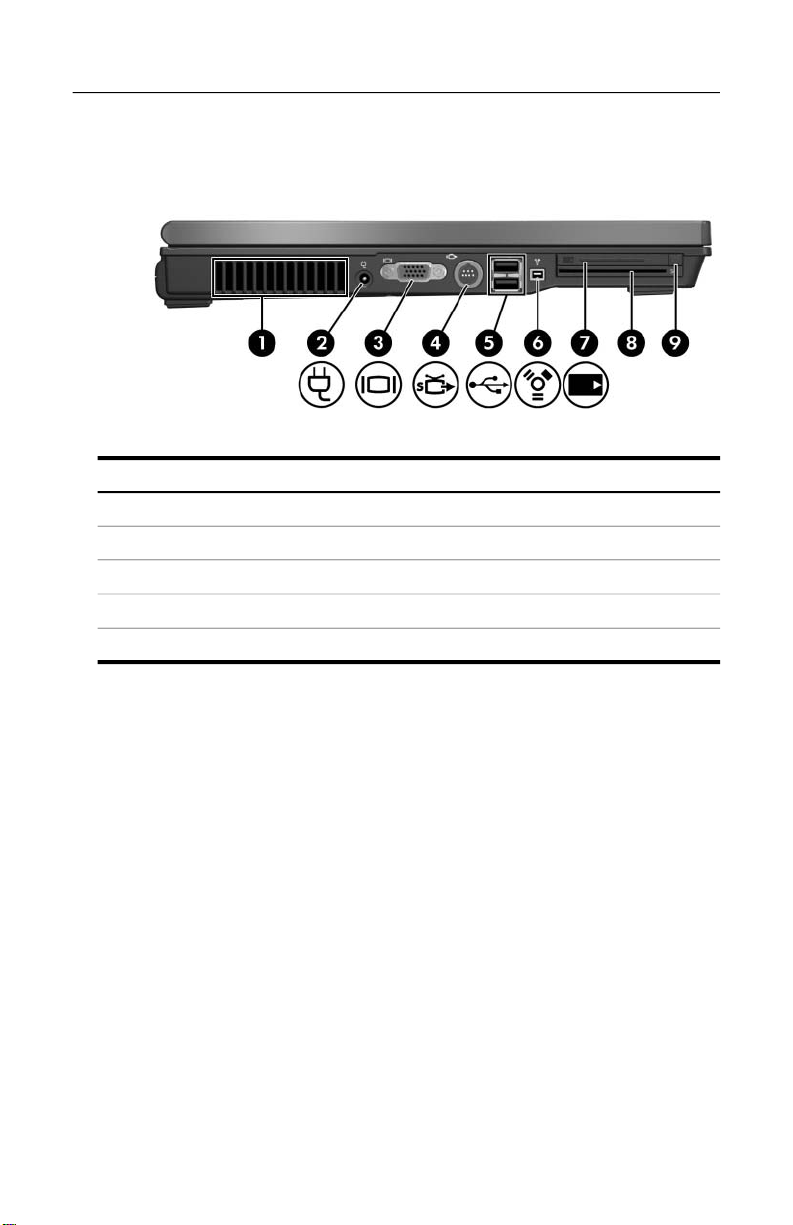
Right-side components
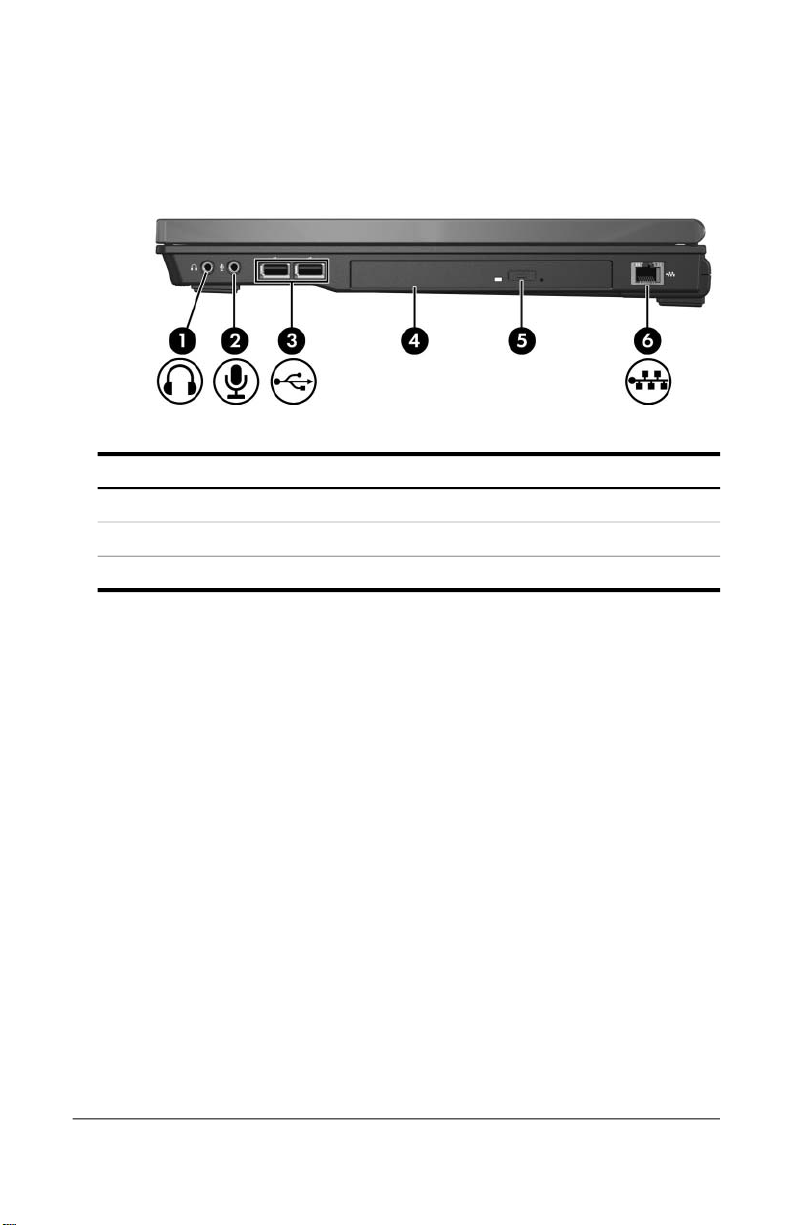
Component
1 Audio-out (headphone) jack 4 Optical drive
2 Audio-in (microphone) jack 5 Optical drive button
3 USB ports (2) 6 RJ-45 (network) jack
1–6 Getting Started
Left-side components
Component
1 Vent 6 1394 port
2 Power connector 7 PC Card slot
3 External monitor port 8 Smart card slot
4 S-Video-out jack 9 PC Card eject button
5 USB port (2)
First-time setup
Getting Started 1–7
First-time setup
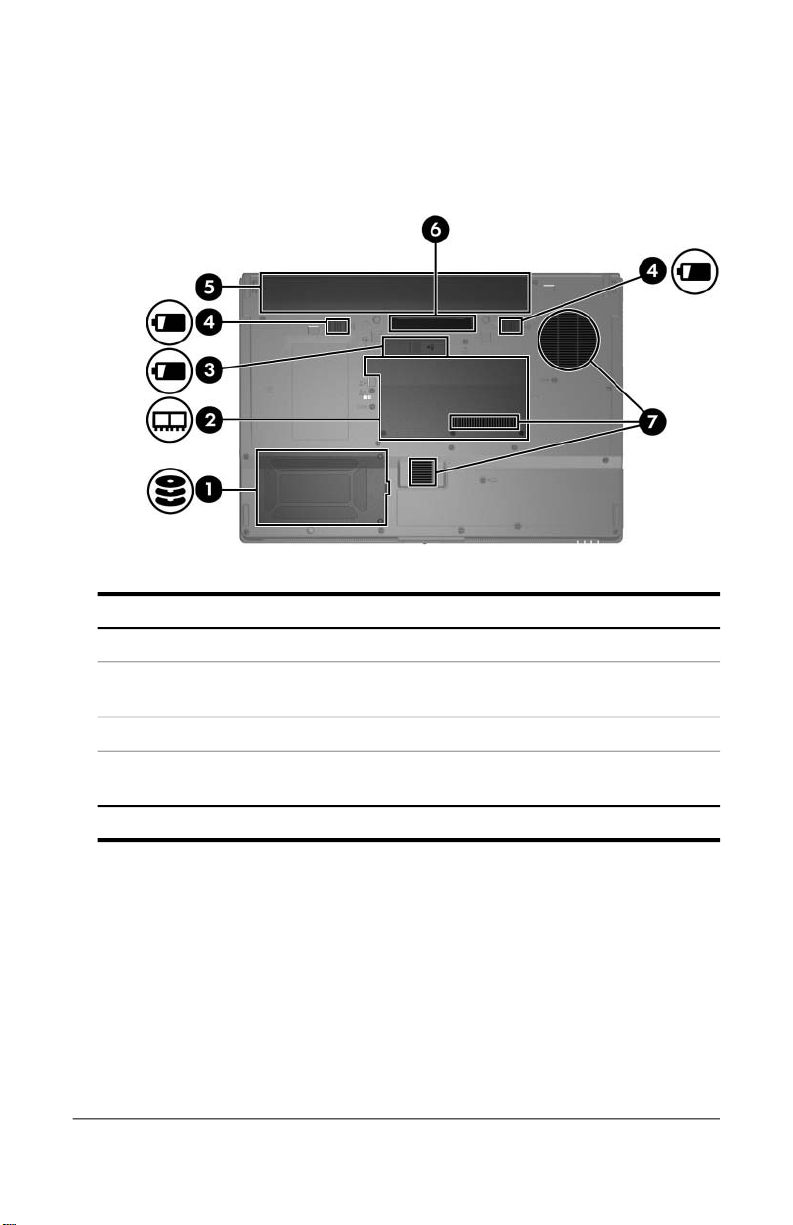
Bottom components
Component
1 Hard drive bay 5 Primary battery bay
2 Expansion memory module 6 Docking connector
and Mini Card compartment
3 Accessory battery connector 7 Vents*
4 Primary battery pack release
latches (2)
*Depending on computer model, vents vary in number and location.
1–8 Getting Started

Set up the computer�
CAUTION: To prevent file corruption and to ensure that the correct drivers
Ä
are installed:
■� Do not set up the computer for the first time while the computer is
docked in an optional docking device.
■� During the hardware and software setup procedures:
❏� Do not unplug the computer from external power.
❏� Do not shut down the computer or initiate standby or
hibernation.
When setting up the computer, you will
1. Insert the battery pack into the computer so that it can begin
to charge as soon as the computer is connected to external
power.
2. Connect the computer to external power.
3. Turn on the computer.
4. Set up the software.
First-time setup
Getting Started� 1–9
First-time setup
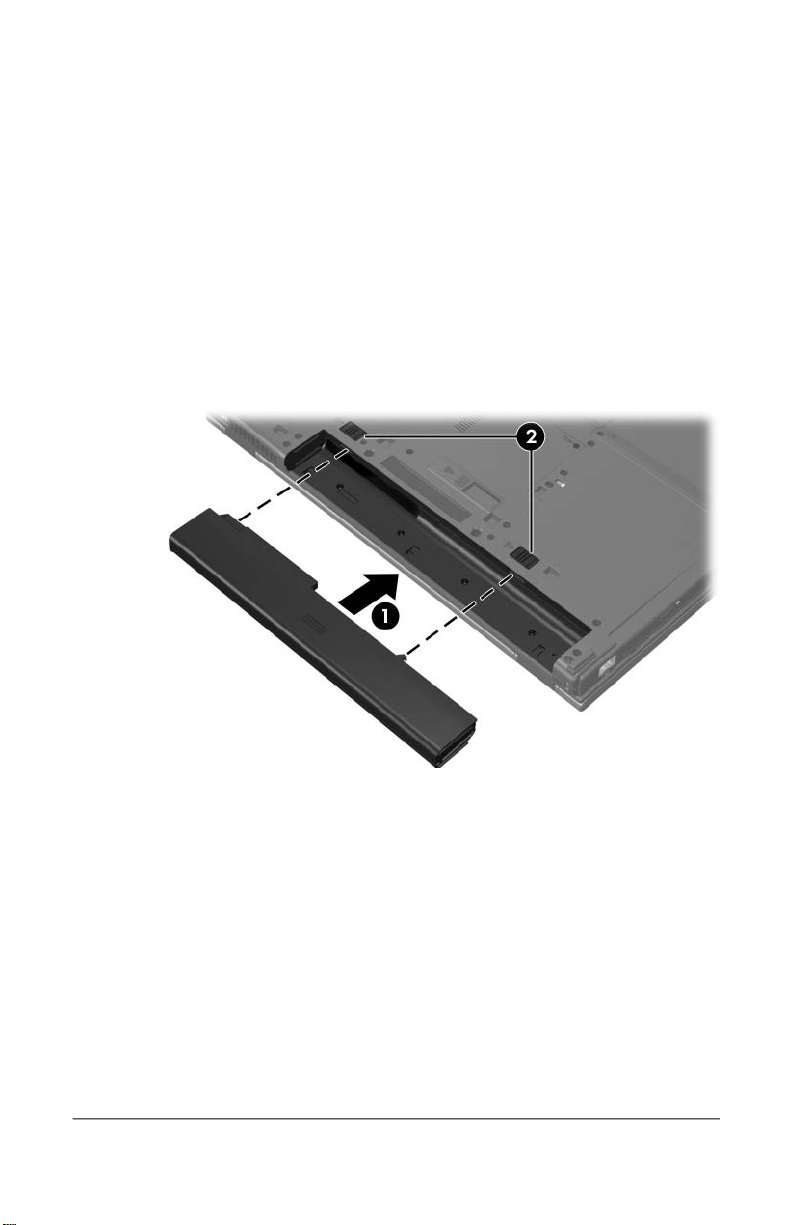
Step 1: Insert the battery pack
To insert a primary battery pack:
1. Turn the computer upside down on a flat surface, with the
battery bay toward you.
2. Slide the battery pack 1 into the battery bay until it is seated.
The battery pack release latches 2 automatically lock the
battery into place.
1–10 Getting Started
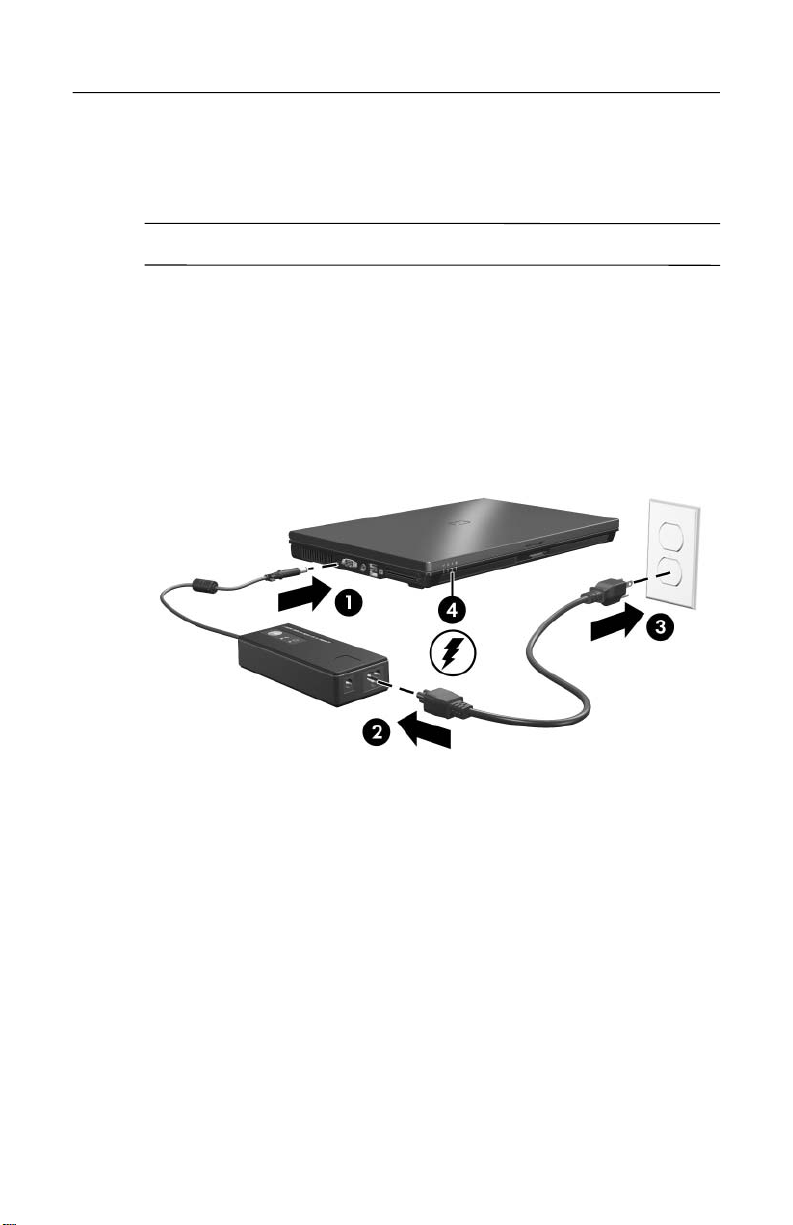
Step 2: Connect the computer to external power
An older AC adapter will not work with this computer.
✎
To connect the computer to external AC power:
1. Plug the AC adapter into the power connector 1 on the left
side of the computer.
2. Plug the power cord into the AC adapter 2.
3. Plug the other end of the power cord into an AC outlet 3.
First-time setup
When the computer receives AC power, the battery pack begins
to charge and the battery light (on the front of the computer)
is turned on. When the battery pack is fully charged, the battery
light is turned off.
It is recommended that you leave the computer connected to
external power until the battery pack is fully charged and the
battery light is turned off.
Getting Started 1–11

First-time setup
A partially charged new battery pack can run the computer
✎
after software setup is complete, but battery charge displays
will not be accurate until the new battery pack has been fully
charged.
Depending on the AC adapter connected, one of the following
pop-up messages may be displayed after turning on the computer:
■� “Smart AC adapter power output is too low for this
■� “For full performance, connect a higher capacity AC
computer.” Clicking the message will display the following
additional information:
“The output power of the HP Smart AC Adapter connected to
your computer is insufficient. Please connect a higher
capacity adapter.”
adapter.” Clicking the message will display the following
additional information:
“The HP Smart AC Adapter connected will power the
computer, but at reduced performance. Please connect a
higher capacity adapter for full performance.”
1–12� Getting Started
Loading...