


Hardware Reference Guide
Evo Workstation W6000
Document Part Number: 221473-002
September 2001
This guide is provided as a reference tool. The topics contained herein describe specific features and will assist you with installing additional components such as hard drives, memory, expansion boards, and processors.
Enhanced for accessibility.

© 2001 Compaq Computer Corporation
Compaq, the Compaq logo, Evo, and INSPECT are trademarks of Compaq
Information Technologies, L.P.
Microsoft, Windows, and Windows NT are trademarks of Microsoft
Corporation in the United States and other countries.
All other product names mentioned herein may be trademarks of their respective companies.
Compaq shall not be liable for technical or editorial errors or omissions contained herein. The information in this document is provided “as is” without warranty of any kind and is subject to change without notice. The warranties for Compaq products are set forth in the express limited warranty statements accompanying such products. Nothing herein should be construed as constituting an additional warranty.
WARNING: Text set off in this manner indicates that failure to follow directions could result in bodily harm or loss of life.
CAUTION: Text set off in this manner indicates that failure to follow directions could result in damage to equipment or loss of information.
Rack Stability
WARNING: To reduce the risk of personal injury or damage to the equipment, be sure that:
■ The leveling jacks are extended to the floor.
■ The full weight of the rack rests on the leveling jacks.
■ The stabilizing feet are attached to the rack in a single-rack installation.
■ The racks are coupled together in multiple-rack installations.
A rack may become unstable if more than one component is extended at a time, for any reason.
■ Extend only one component at a time.
Compaq Evo Workstation W6000
Hardware Reference Guide
Second Edition September 2001
Document Part Number: 221473-002

Contents
1 Product Features |
|
Standard Configuration Features ................................................................................... |
1–1 |
Front Panel Components................................................................................................ |
1–2 |
Rear Panel Components................................................................................................. |
1–3 |
System Board Components............................................................................................ |
1–4 |
Audio System................................................................................................................. |
1–5 |
Keyboard........................................................................................................................ |
1–6 |
Easy Access Software ............................................................................................. |
1–7 |
Windows Logo Key ................................................................................................ |
1–8 |
Special Mouse Functions ............................................................................................... |
1–9 |
Serial Number Location................................................................................................. |
1–9 |
Changing from a Minitower to a Desktop Configuration .............................................. |
1–9 |
Changing from a Desktop to a Minitower Configuration ............................................ |
1–13 |
2 Hardware Upgrades
Installation Sequence ..................................................................................................... |
2–1 |
Removing the Workstation Access Panel ...................................................................... |
2–3 |
Removing the Front Bezel ............................................................................................. |
2–4 |
Installing Additional Memory ....................................................................................... |
2–5 |
RIMM Socket Locations ......................................................................................... |
2–5 |
RIMM Installation................................................................................................... |
2–6 |
Installing Additional Drives........................................................................................... |
2–9 |
Drive Bay Components ........................................................................................... |
2–9 |
Preparing for Drive Installation............................................................................. |
2–12 |
Installing a Hard Drive .......................................................................................... |
2–15 |
Removing a Drive ................................................................................................. |
2–19 |
Compaq Evo Workstation W6000 Hardware Reference Guide |
iii |

Contents
Installing and Removing an Expansion Board ................................................................... |
2–22 |
Identifying the AGP and PCI Sockets ................................................................... |
2–22 |
Installing an Expansion Board .............................................................................. |
2–23 |
Removing an Expansion Board............................................................................. |
2–24 |
Installing an Additional Processor ............................................................................... |
2–25 |
Upgrading a Processor ................................................................................................. |
2–29 |
Preparing for a Processor Upgrade........................................................................ |
2–30 |
Removing an Existing Processor........................................................................... |
2–32 |
Installing a New Processor .................................................................................... |
2–35 |
ASpecifications
BHard Drive Installation
|
Using the Cable-Select Feature with Ultra ATA Devices ............................................. |
B–1 |
|
Guidelines for Installing Ultra ATA Devices ................................................................ |
B–2 |
|
SCSI Devices ................................................................................................................. |
B–3 |
|
Guidelines for Using SCSI Devices ........................................................................ |
B–3 |
|
Guidelines for Installing SCSI Devices................................................................... |
B–5 |
|
SCSI Controllers ............................................................................................................ |
B–6 |
|
SCSI Cables ................................................................................................................... |
B–6 |
|
Using a SCSI Cable................................................................................................. |
B–6 |
|
Using SCSISelect with SCSI Devices ........................................................................... |
B–7 |
C |
Battery Replacement |
|
|
Replacing the Battery..................................................................................................... |
C–1 |
D |
Security Lock Provisions |
|
|
Installing a Cable Lock ................................................................................................. |
D–1 |
E |
Electrostatic Discharge |
|
|
Preventing Electrostatic Damage................................................................................... |
E–1 |
|
Grounding Methods ....................................................................................................... |
E–2 |
iv |
Compaq Evo Workstation W6000 Hardware Reference Guide |

Contents
F Routine Computer Care and Shipping Preparation
Routine Computer Care ................................................................................................. |
F–1 |
CD-ROM Drive Precautions.......................................................................................... |
F–2 |
Operation................................................................................................................. |
F–2 |
Cleaning .................................................................................................................. |
F–2 |
Safety....................................................................................................................... |
F–2 |
Shipping Preparation...................................................................................................... |
F–3 |
Index |
|
Compaq Evo Workstation W6000 Hardware Reference Guide |
v |

1
Product Features
Standard Configuration Features
The Compaq Evo™ Workstation W6000 is a minitower system that can be easily converted to a desktop. Features may vary depending on your model. For a complete listing of the hardware and software installed in your workstation, run Compaq Diagnostics for Windows or the INSPECT utility (available on some models). Instructions for using these utilities are provided in the Troubleshooting Guide on the
Reference Library CD.
Compaq Evo Workstation W6000 Hardware Reference Guide |
1-1 |
Product Features
Front Panel Components
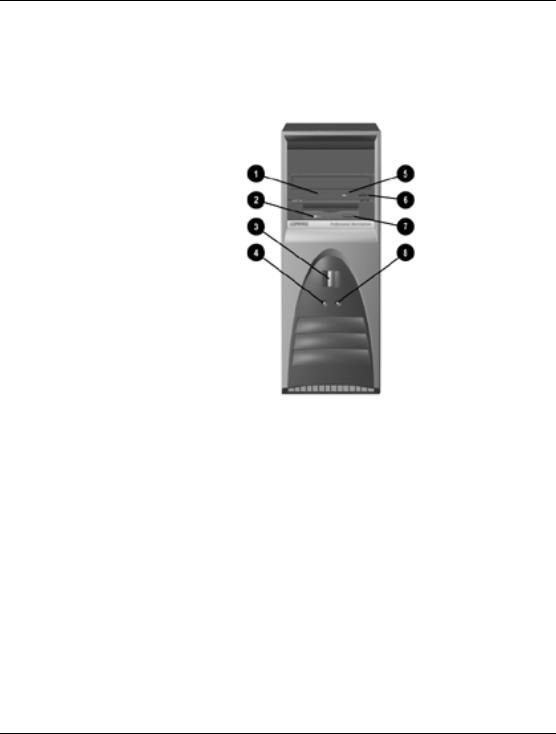
Front panel components
1CD-ROM drive activity light
2Diskette drive activity light
3Power button
4Power-on light
5CD-ROM emergency eject opening
6CD-ROM eject button
7Diskette drive eject button
8Hard drive activity light
1-2 |
Compaq Evo Workstation W6000 Hardware Reference Guide |
Product Features
Rear Panel Components
|
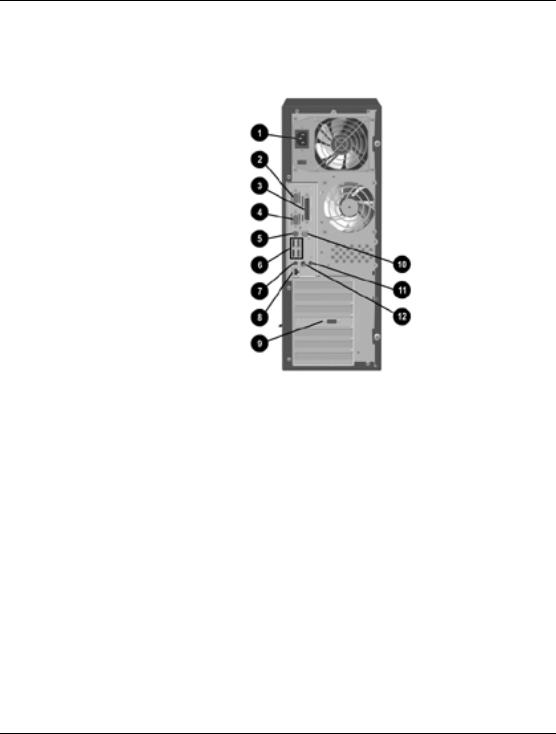
Rear panel components |
|
|
1 |
Power cord connector |
7 |
Microphone connector |
2 |
Serial connector (Serial A) |
8 |
Network Interface Card (NIC) |
|
|
|
connector |
3 |
Parallel connector |
9 |
VGA (AGP) video connector |
4 |
Serial connector (Serial B) |
- Mouse connector |
|
5 |
Keyboard connector |
q Line-in audio connector |
|
6 |
Four universal serial bus (USB) |
w Headphone/Line-out connector |
|
|
connectors |
|
|
Compaq Evo Workstation W6000 Hardware Reference Guide |
1-3 |
Product Features
System Board Components
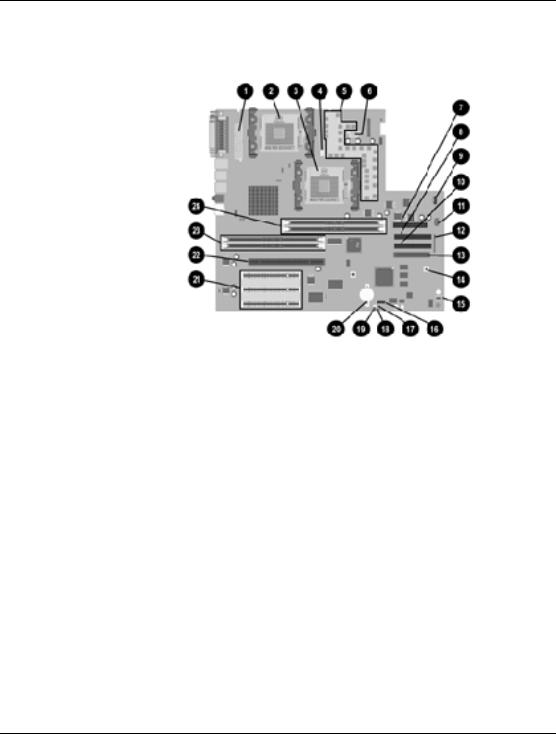
System board components
1 24-pin power supply connector
2 Secondary processor socket
3 Primary processor socket
4 Rear fan connector
5Embedded Voltage Regulator Module (VRM)
6 6-pin power supply connector
7 Diskette drive connector
8 Secondary Ultra ATA connector
9 CD-ROM audio connector
- Primary Ultra ATA connector q Auxiliary Audio connector
w Power switch connector
e Ultra 160 SCSI connector r CMOS reset switch
t Internal speaker connector
y Alert-on-LAN (AOL) connector u Wake-on-LAN (WOL) connector
i Power-on password enable jumper o Smart Cover sensor
p Battery
a Three 32-bit, 33-MHz PCI sockets s AGP Pro socket
d Channel A RIMM socket f Channel B RIMM socket
1-4 |
Compaq Evo Workstation W6000 Hardware Reference Guide |
Product Features
Audio System
Your workstation has an integrated audio solution that supports analog or digital external stereo speakers. The system is capable of autosensing the speaker type and outputting the correct signal. The autosensing is done by detecting if there is a mono jack plugged into the line-out connector.
If you are using a set of digital speakers that have a stereo jack, and you want the system to auto-switch to digital, you will need to use a stereo-to-mono adapter to get the autosensing to work. However, if you do not have a stereo-to-mono adapter present, then you can manually switch the audio signal from analog to digital. See “Solving Audio Problems” in the Troubleshooting Guide on the Reference Library CD for instructions on how to manually switch the audio signal for your operating system.
If you are using a headphone set that is mono, the system will attempt to switch to digital and you will experience “noise” or “silence.” This can be fixed by manually switching the signal to analog. See “Solving Audio Problems” in the Troubleshooting Guide on the Reference Library CD for instructions on how to manually switch the audio signal for your operating system.
If your analog speakers or headphones are not working, make sure you are not using a mono adapter with autosensing enabled.
Compaq Evo Workstation W6000 Hardware Reference Guide |
1-5 |

Product Features
Keyboard
Your workstation ships with an Easy Access Keyboard. The following figure identifies the location of keyboard lights and special function keys.
Easy Access Keyboard components
Easy Access Keyboard
Ref |
Component |
Function |
1 |
Ctrl key |
Used in combination with another key; its effect depends on |
|
|
the application software you are using. |
|
|
|
2 |
Windows Logo Key |
Used in combination with other keys to perform other |
|
|
functions (see “Windows Logo Key” later in this section). |
|
|
|
3 |
Alt key |
Used in combination with another key; its effect depends on |
|
|
the application software you are using. |
|
|
|
4 |
Application key* |
Used (like the right mouse button) to open pop-up menus in a |
|
|
Microsoft Office application; may perform other functions in |
|
|
other software applications. |
|
|
|
5 |
Easy Access keys |
Provides quick and easy access to favorite Web sites, |
|
|
applications, and services. |
*Available only in selected geographic regions.
1-6 |
Compaq Evo Workstation W6000 Hardware Reference Guide |

Product Features
Easy Access Keyboard (Continued)
Ref |
Component |
Function |
6 |
Editing keys |
Includes the following: Insert, Home, Page Up, Delete, End, and |
|
|
Page Dwn. |
|
|
Holding down Ctrl + Alt + Delete allows you to restart |
|
|
your computer. |
7 |
Num Lock light |
Indicates whether the Num Lock feature is on or off. |
|
|
|
8 |
Caps Lock light |
Indicates whether the Caps Lock feature is on or off. |
|
|
|
9 |
Scroll Lock light |
Indicates whether the Scroll Lock feature is on or off. |
*Available only in selected geographic regions.
Easy Access Software
Your Easy Access Keyboard Buttons are programmed to default assignments. The preinstalled Easy Access Software allows you to reprogram the Easy Access Buttons to reflect your personal preferences. The buttons can be reprogrammed to any program or service of your choice or to any Web site (URL).
Reprogramming the Easy Access Buttons
The Easy Access Keyboard icon is located on the Windows desktop status bar. Refer to the Readme-user.txt file for instructions about reprogramming the Easy Access Buttons.
Locking and Unlocking the Easy Access Buttons
The System Administrator can lock and unlock the Easy Access Buttons. Once locked, the buttons can only be reprogrammed by modifying the .bcf file. For administrative privileges, which require control of the Easy Access Button destinations, refer to the Readmeadmin.txt file.
Compaq Evo Workstation W6000 Hardware Reference Guide |
1-7 |

Product Features
Easy Access Paper Icon Insert
The paper icon insert functions as a visual aid in identifying the programmed destination of each Easy Access Button. Whenever you reprogram an Easy Access Button, use the Paper Insert Template document to select and print an icon that reflects the new button assignment. The Paper Insert Template.doc is installed, by default, under C:\Program files\Compaq\Easy Access Keyboard.
For proper alignment, the spacing around the icons may require adjustment.
Windows Logo Key
Use the Windows Logo Key in combination with other keys to perform certain functions available in the Windows operating systems.
Windows Logo Key + F1 |
Displays a pop-up menu for the selected object |
Windows Logo Key + Tab |
Activates the next Taskbar button |
Windows Logo Key + E |
Launches Explore My Computer |
Windows Logo Key + F |
Launches Find Document |
Windows Logo Key + Ctrl + F |
Launches Find Computer |
Windows Logo Key + M |
Minimizes all open applications |
Shift + Windows Logo Key + M |
Undoes Minimize All |
Windows Logo Key + R |
Displays the Run dialog box |
1-8 |
Compaq Evo Workstation W6000 Hardware Reference Guide |

Product Features
Special Mouse Functions
Most software applications support the use of a mouse. The functions assigned to each mouse button depend on the software applications you are using.
Serial Number Location
Each computer has a unique serial number located on the corner of the computer access panel and on the rear panel of the computer. Keep this number available for use when contacting Compaq customer service.
Changing from a Minitower to a Desktop Configuration
To change from a minitower to a desktop configuration:
1.Shut down the operating system properly, then turn off the workstation and any external devices.
2.Disconnect the power cord from the grounded AC outlet, then disconnect the network cable and any external devices from the system.
3.Remove the workstation access panel. See “Removing the Workstation Access Panel” in Chapter 2.
4.Remove the front bezel. See “Removing the Front Bezel” in Chapter 2.
5.Disconnect all power and data cables from the drives in the 5.25inch drive bays.
Compaq Evo Workstation W6000 Hardware Reference Guide |
1-9 |

Product Features
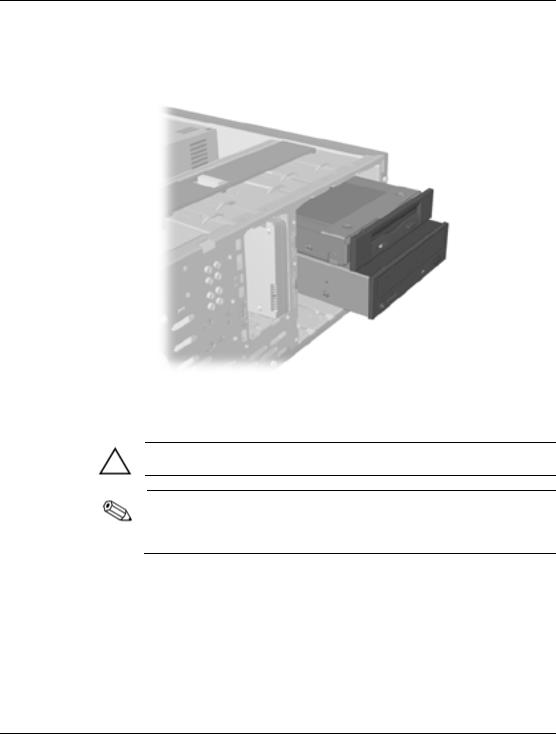
6. To release a drive from the 5.25-inch drive bay, slide the drivelock as shown. Carefully push the drive from the back of the unit until the drive casing can be grasped.
Releasing the drives with the drivelock
CAUTION: Do not hold the face plate while removing a drive. Only hold a drive by its casing.
7. While holding the drive casing, gently pull the drive out.
CAUTION: When removing a drive, do not pull the drive from the front of the drive bay. To prevent damage to the drive bezel, push the drive and drive casing from the rear for removal from the front of the drive bay.
1-10 |
Compaq Evo Workstation W6000 Hardware Reference Guide |
Product Features
8. After placing the workstation in the desktop position, gently slide the drives back into the bay.
Installing the drives
CAUTION: The use of unnecessary force when installing the drive may result in damage to the drive.
In the desktop configuration, always place the diskette drive in the bay nearest the top of the chassis (bay 3) to ensure proper drive clearance and access. When all of the drives are properly inserted, the drivelock will secure the drives in place.
9. Reconnect the power and data cables to the drives as labeled.
Compaq Evo Workstation W6000 Hardware Reference Guide |
1-11 |
Product Features
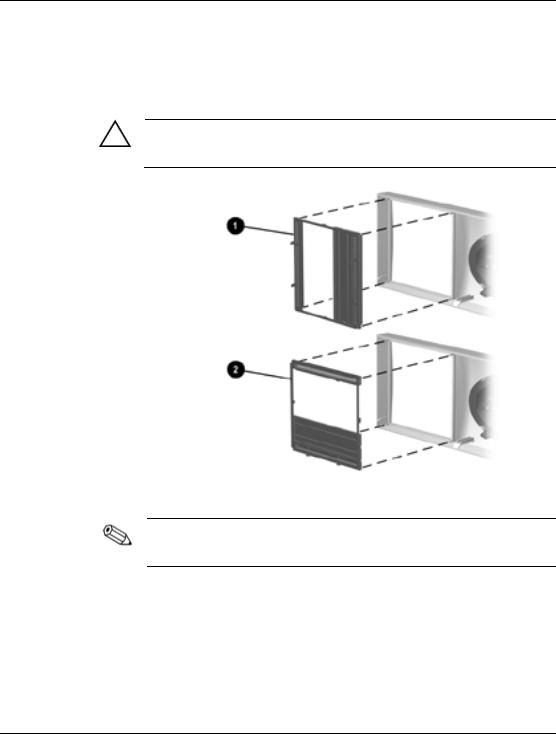
10. Remove the subpanel 1 as described in Removing the Bezel Blank” in Chapter 2, and reposition the subpanel 2 with the bezel blank in the proper orientation for the desktop configuration.
CAUTION: Hold the subpanel straight when you pull it away from the front bezel. Pulling the subpanel away at an angle could damage the pins that align it within the front bezel.
Changing from a minitower to a desktop configuration
When converting from a minitower to a desktop orientation, use the replacement subpanel that was shipped with your workstation to ensure that the Compaq logo is properly oriented.
11.Replace the subpanel, front bezel, and the workstation access panel. Be sure that the subpanel and front bezel align properly with the alignment tabs.
12.Reconnect the power cord to the grounded AC outlet, then reconnect the network cable and any external devices to the system.
1-12 |
Compaq Evo Workstation W6000 Hardware Reference Guide |

Product Features
Changing from a Desktop to a Minitower Configuration
To change from a desktop to a minitower configuration:
1.Shut down the operating system properly, then turn off the workstation and any external devices.
2.Disconnect the power cord from the grounded AC outlet, then disconnect the network cable and any external devices from the system.
3.Remove the workstation access panel. See “Removing the Workstation Access Panel” in Chapter 2.
4.Remove the front bezel. See “Removing the Front Bezel” in Chapter 2.
5.Disconnect all power and data cables from the drives in the 5.25inch drive bays.
Compaq Evo Workstation W6000 Hardware Reference Guide |
1-13 |
Product Features
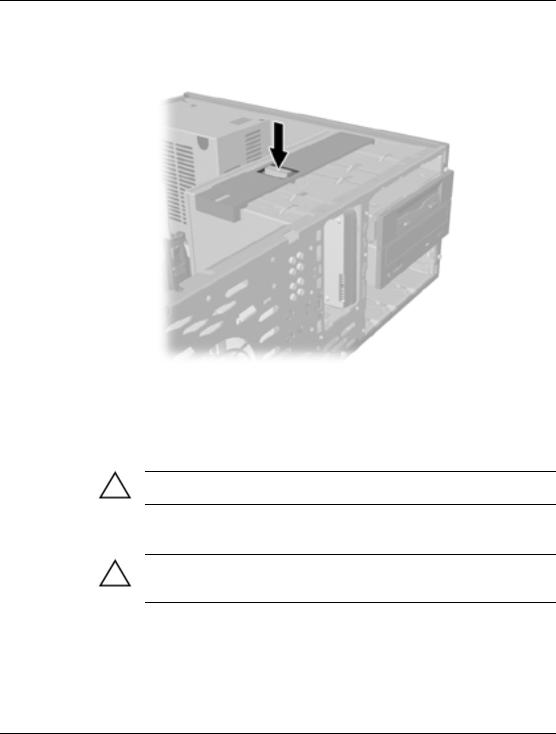
6. To release a drive from the 5.25-inch drive bay, press the drivelock as shown.
Releasing the drives with the drivelock
7. While pressing the drivelock button, push the drive from the back of the unit until the drive casing can be grasped.
CAUTION: Do not hold the face plate while removing a drive. Only hold a drive by its casing.
8. While holding the drive casing, gently pull the drives out.
CAUTION: When removing a drive, do not pull the drive from the front of the drive bay. To prevent damage to the drive bezel, push the drive and drive casing from the rear for removal from the front of the drive bay.
1-14 |
Compaq Evo Workstation W6000 Hardware Reference Guide |
Product Features
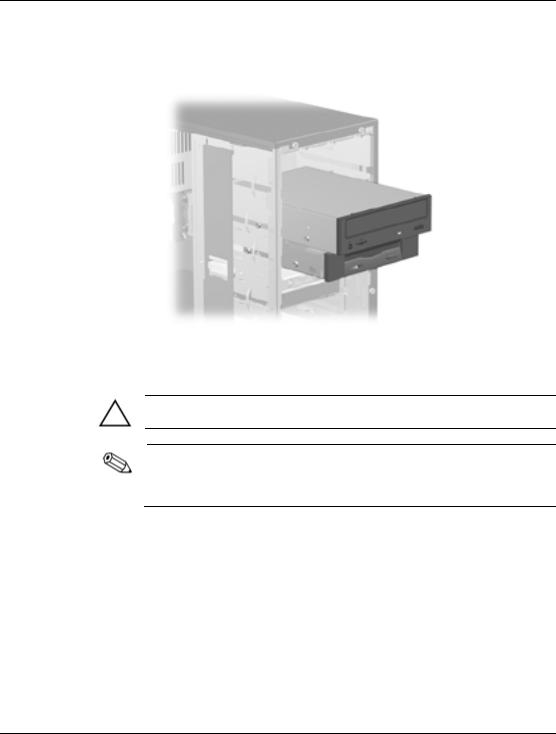
9. After placing the workstation in the minitower position, gently slide the drives back into the bay.
Installing the drives
CAUTION: The use of unnecessary force when installing the drives may damage the drives.
In the minitower configuration, always place the diskette drive in the third bay from the top of the chassis to ensure proper drive clearance within the chassis. When all the drives are properly inserted, the drivelock will secure the drives in place.
10. Reconnect the power and data cables to the drives as labeled.
Compaq Evo Workstation W6000 Hardware Reference Guide |
1-15 |
Product Features
11.Remove the subpanel 1 as described in “Removing the Bezel Blank” in Chapter 2, and reposition the subpanel 2 with the bezel blank in the proper orientation for the minitower configuration.
CAUTION: Hold the subpanel straight when you pull it away from the front bezel. Pulling the subpanel away at an angle could damage the pins that align it within the front bezel.
Changing from a desktop to a minitower configuration
When converting from a desktop to a minitower orientation, use the replacement subpanel that is shipped with your workstation to ensure that the Compaq logo is properly oriented.
12.Replace the subpanel, front bezel, and the workstation access panel. Be sure that the subpanel and front bezel align properly with the alignment tabs.
13.Reconnect the power cord to the grounded AC outlet, then reconnect the network cable and any external devices to the system.
1-16 |
Compaq Evo Workstation W6000 Hardware Reference Guide |
2
Hardware Upgrades
This chapter explains how to remove the workstation access panel and the front bezel. It also explains how to install the following hardware components:
■Memory
■Drives
■Expansion boards
■Processors
Compaq recommends that you finish the setup procedures for the preinstalled software before you install any optional hardware or thirdparty devices that were not included with your workstation.
Installation Sequence
Follow this sequence of steps to ensure the proper installation of any optional equipment. Before you begin, observe the following precautions.
WARNING: To reduce the risk of personal injury from hot surfaces, allow the internal system components to cool before touching them.
WARNING: To reduce the risk of electrical shock, fire, or damage to the equipment, do not plug telecommunications/telephone connectors into the network interface controller (NIC) receptacles.
Compaq Evo Workstation W6000 Hardware Reference Guide |
2-1 |

Hardware Upgrades
CAUTION: Static electricity can damage the electronic components of the workstation or optional equipment. Before beginning these procedures, ensure that you are discharged of static electricity by briefly touching a grounded metal object.
1.Shut down the operating system properly, then turn off the workstation and any external devices. Disconnect the power cord from the grounded AC outlet.
2.Disconnect the keyboard, monitor, mouse, network cable, and other external equipment connected to the workstation.
3.Open the workstation by removing its workstation access panel. See “Removing the Workstation Access Panel” in this chapter.
4.If you are installing or removing drives in the front bays, see “Removing the Front Bezel” in this chapter for instructions.
5.Install any optional equipment, such as memory, additional drives, expansion boards, processors, or batteries. See the appropriate sections in this chapter or the appendixes for installation instructions. Also refer to the documentation provided with the optional equipment.
6.Replace the front bezel and the workstation access panel, if necessary.
7.Reconnect the keyboard, mouse, monitor, network cable, and other external devices.
8.Plug the power cord into a grounded AC outlet.
9.Turn on the monitor, workstation, and any external devices you have installed.
10.Reconfigure the workstation, if necessary.
11.Test the workstation (optional) using the TEST utility.
2-2 |
Compaq Evo Workstation W6000 Hardware Reference Guide |
Hardware Upgrades
Removing the Workstation Access Panel
To remove the workstation access panel:
1.Shut down the operating system properly, then turn off the workstation and any external devices.
2.Disconnect the power cord from the grounded AC outlet.
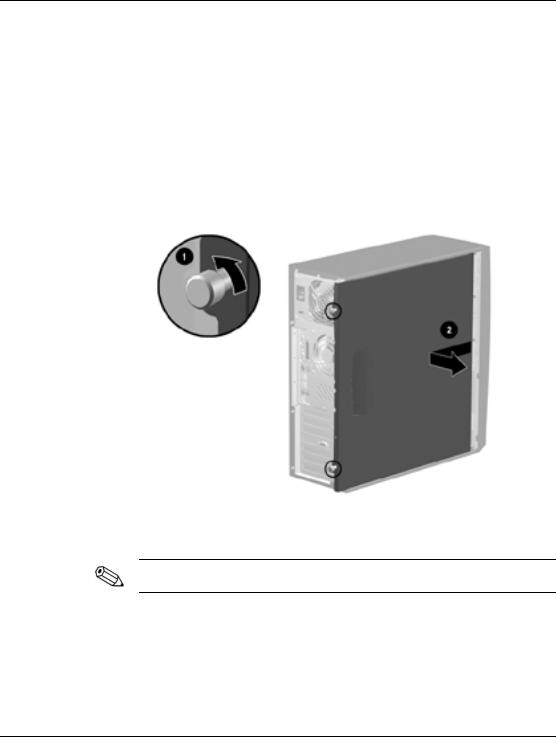
3.Loosen the two thumbscrews as shown in the following illustration.
Loosening the two thumbscrews and removing the workstation access panel
When replacing the workstation access panel, be sure to tighten both thumbscrews.
Compaq Evo Workstation W6000 Hardware Reference Guide |
2-3 |
 Loading...