


Compaq Presario 6400NX
HP Compaq Presario 6400NX, Compaq Presario 6401RSH, Compaq Presario 6404US, Compaq Presario 6410NX, Compaq Presario 6415CL Getting Started Guide
...
b
Getting Started
Compaq Presario
6000 and 8000 Series Computer
This guide helps you get acquainted
with the features of your computer
and provides solutions to problems.
Connection locations and system
components may vary.
© 2002, 2003 Compaq Information Technologies Group, L.P.
Compaq, the Compaq logo, Presario, Evo, and iPAQ are
trademarks of Compaq Computer Corporation in the U.S. and
other countries/regions.
Microsoft, MS-DOS, Windows, and Windows XP are trademarks
of Microsoft Corporation in the U.S. and other countries/regions.
Intel, Pentium, Intel Inside, and Celeron are trademarks of Intel
Corporation in the U.S. and other countries/regions.
Adobe, Acrobat, and Acrobat Reader are trademarks or
registered trademarks of Adobe Systems Incorporated.
All other product names mentioned herein may be trademarks
of their respective companies.
Compaq Computer Corporation shall not be liable for technical
or editorial errors or omissions contained herein or for incidental
or consequential damages in connection with the furnishing,
performance, or use of this material. The information in
this document is provided “as is” without warranty of any
kind, including, but not limited to, the implied warranties of
merchantability and fitness for a particular purpose, and is
subject to change without notice. The warranties for Compaq
products are set forth in the express limited warranty statements
accompanying such products. Nothing herein should be
construed as constituting an additional warranty.
This document contains proprietary information that is protected
by copyright. No part of this document may be photocopied,
reproduced, or translated to another language without the prior
written consent of Compaq Computer Corporation.
WARNING: Text set off in this manner
indicates that failure to follow directions
could result in bodily harm or loss of life.
CAUTION: Text set off in this manner
indicates that failure to follow directions
could result in damage to equipment or
loss of information.
Text set off in this manner represents a note
with additional information relating to a
topic.

Contents
1 Getting Information and Updates
Warranty and Support Guide . . . . . . . . . 1–2
2 Setting Up the Computer
Turning On the
Computer for the First Time . . . . . . . . . . . 2–1
Registering with Compaq . . . . . . . . . . . . 2–2
Making Recovery CDs . . . . . . . . . . . . . . 2–3
Working in Comfort . . . . . . . . . . . . . . . . 2–3
Getting Started iii
3 Using the Computer
Using the Diskette (Floppy) Drive . . . . . . 3–2
Using the Hard Drive . . . . . . . . . . . . . . 3–3
Using the CD or DVD Drive . . . . . . . . . . 3–5
Support for Disc Types . . . . . . . . . . . 3–7
Using the Combo Drive . . . . . . . . . . . . . 3–7
Inserting and Removing
a CD or DVD Disc . . . . . . . . . . . . . . 3–8
Listening to Music . . . . . . . . . . . . . . 3–9
Playing a Movie . . . . . . . . . . . . . . 3–10
Creating a CD . . . . . . . . . . . . . . . 3–11
Maintaining the CD or
DVD Drive . . . . . . . . . . . . . . . . . . 3–13
Using the DVD Writer Drive . . . . . . 3–13

Using the Mouse . . . . . . . . . . . . . . . . . 3–14
4 Using the Internet
Using the Scroll Mouse . . . . . . . . . . 3–15
Using the Optical Mouse. . . . . . . . . 3–16
Using the Wireless Optical
Mouse. . . . . . . . . . . . . . . . . . . . . . 3–17
Using the Compaq Keyboards. . . . . . . . 3–17
Using the Internet Buttons. . . . . . . . . 3–19
Customizing the Internet Buttons . . . . 3–22
The Basics . . . . . . . . . . . . . . . . . . . . . . 4–1
What Is the Internet? . . . . . . . . . . . . 4–2
What Is a Hyperlink?. . . . . . . . . . . . 4–2
Web Browsers . . . . . . . . . . . . . . . . 4–3
E-mail . . . . . . . . . . . . . . . . . . . . . . . . . 4–3
Content Advisor . . . . . . . . . . . . . . . . . . 4–7
Modifying Monitor Display Properties. . . 3–22
Turning Off the Computer . . . . . . . . . . . 3–23
Printing. . . . . . . . . . . . . . . . . . . . . . . . 3–24
Using the Print Menu. . . . . . . . . . . . 3–24
Saving Energy. . . . . . . . . . . . . . . . . . . 3–25
Standby Mode . . . . . . . . . . . . . . . . 3–26
Hibernation Mode . . . . . . . . . . . . . 3–27
Automatic Standby or
Hibernation Mode . . . . . . . . . . . . . 3–28
iv Getting Started
5 Maintaining the Computer
Routine Maintenance Guidelines . . . . . . 5–1
Preventive Maintenance. . . . . . . . . . . . . 5–2
Cleaning Up the Hard Drive . . . . . . . 5–3
Emptying the Recycle Bin . . . . . . . . . 5–4
Scanning the Hard Drive . . . . . . . . . 5–4
Defragmenting the Drive. . . . . . . . . . 5–5
Virus Protection . . . . . . . . . . . . . . . . . . 5–6

6 Using Application Recovery
and System Recovery
System Restore . . . . . . . . . . . . . . . . . . . 6–2
Application Recovery . . . . . . . . . . . . . . . 6–3
System Recovery . . . . . . . . . . . . . . . . . . 6–4
Using Compaq Recovery CD Creator . . . . 6–7
System Recovery Using Recovery CDs . . . 6–9
7 Finding Help & Support
Integrated Help Tool. . . . . . . . . . . . . . . . 7–2
Online Service and Support . . . . . . . . . . 7–2
Preparing to Ship the Computer. . . . . . . . 7–3
Solving Minor Problems . . . . . . . . . . . . . 7–4
8 Upgrading the Computer
Preparing the Computer . . . . . . . . . . . . 8–2
Removing or Upgrading a Drive. . . . . . . 8–6
Locating Drive Positions . . . . . . . . . . 8–7
Removing a Drive . . . . . . . . . . . . . . 8–7
Replacing or Adding a Drive . . . . . 8–13
Upgrading or Replacing Memory . . . . . 8–17
Removing a Memory Module . . . . . 8–18
Replacing or Adding a
Memory Module . . . . . . . . . . . . . . 8–19
Removing or Installing an
Expansion Card . . . . . . . . . . . . . . . . . 8–22
Reassembling the Computer . . . . . . . . . 8–27
Index
Getting Started v

vi Getting Started

1
Getting Information and Updates
Information about your computer is available in the
printed documents that came with your computer
and from the Compaq Web site. Use this guide as
your first point of reference, and then refer to the
following documents:
■ Quick Setup guide
■ Warranty and Support Guide
Getting Started 1–1
The Compaq Web site provides additional
information about your computer:
■ For general information about products and
services, go to
http://www.compaq.com/athome/
■ For answers to computer support questions,
go to
http://www.compaq.com/consumersupport/

Getting Information and Updates
When requesting computer support, include the
following information in your inquiry. Please write
it down now for your future reference. (The serial
number is found on a label attached to the chassis
of your computer.)
Product Name: ______________________________
Model Name: _______________________________
Serial Number: ______________________________
Date of Purchase: ____________________________
1–2 Getting Started
Warranty and
Support Guide
The Warranty and Support Guide describes the
Compaq commitment to repair or replace parts
during the computer’s warranty period and lists
important Compaq telephone numbers.
In the event of a mechanical problem, contact
Compaq, not the retailer who sold you the
computer. Keep the guide in a safe place for
future reference.

2
Setting Up the Computer
Follow the steps shown in the Quick Setup guide
to set up the computer in your work area. Then
read the topics in this section describing how to
turn on the computer for the first time, and finish
the registration process.
After registering, install any software programs that
came on CDs or DVDs included in the computer
box (select models only).
Getting Started 2–1
Turning On the
Computer for the First Time
After you’ve finished connecting the components of
your computer by using the steps illustrated in the
Quick Setup guide, you’re ready to turn on the
computer.
First, press the Power button on the monitor. Then,
to turn on the computer, press the Power button on
the front of the PC.

Setting Up the Computer
When you first turn on the computer, a series of
startup screens appears. For some models, you
choose your language: click an option to select
your language, and then click OK. Confirm your
selection by clicking Ye s. Wait while the PC makes
preparations. (It may take up to 15 minutes to set
We recommend that you register the Compaq
Presario at this time. You can register any of
these ways:
■ When you first start up your computer, follow
the onscreen instructions and register as soon
as you have a modem connection.
up the language on the PC.) To proceed with the
initial Microsoft
®
Windows® setup, you must
answer a few additional questions.
■ Double-click the Registration icon on your
desktop, and follow the onscreen instructions.
The registration icon appears on your
Registering with Compaq
desktop only if you did not register during
the initial setup of your computer.
As part of the initial setup in some
countries/regions, you are prompted to register the
computer with Compaq. It’s important to register so
that you can be notified of changes and updates to
the Compaq Presario.
2–2 Getting Started

Setting Up the Computer
Making Recovery CDs
In the unlikely event that there is damage to the
hard disk drive, or you have to replace it, you must
use recovery CDs that you create to reinstall the
operating system and software. Make the recovery
CDs for your PC by using the Compaq Recovery
CD Creator now, before a need occurs. Refer
to “Using Compaq Recovery CD Creator”
on page 6–7. This program assembles the
necessary files and writes the information
onto CDs.
To use the Compaq Recovery CD
Creator program, your PC must have
a CD-RW drive or other drive that can
write to CDs. If necessary, purchase a
Windows XP–compatible CD-RW drive
from a computer or electronic store.
Getting Started 2–3
Working in Comfort
After assembling your computer, but before you
begin using it, make sure the computer and your
work area are properly set up to maintain your
comfort and productivity. Refer to the printed
Safety and Comfort Guide included in your
literature pack.

Setting Up the Computer
2–4 Getting Started

3
Using the Computer
The operation of your computer is controlled by
two kinds of software:
■ The Microsoft Windows operating system,
which governs the interaction of the
computer’s hardware, peripherals, and
software applications
■ Software applications, such as Microsoft
Works, which perform specific functions
Getting Started 3–1
You will find information about using applications
and Microsoft Windows in the printed manuals
and online Help that accompany them. For
Microsoft Windows, you can also press the Internet
Help G button on your keyboard to access the
built-in Help and Support Center.
This chapter provides introductory information
about your computer’s hardware. For additional
details, see Chapter 8, “Upgrading the Computer.”
Using the Computer
Using the Diskette (Floppy)
Drive
The diskette drive (also known as a floppy drive)
uses a 3.5" diskette (or floppy disk) to store files.
A diskette can hold up to 1.44 MB of data. Once
information is copied onto a diskette, it remains
until you delete or overwrite it.
3–2 Getting Started
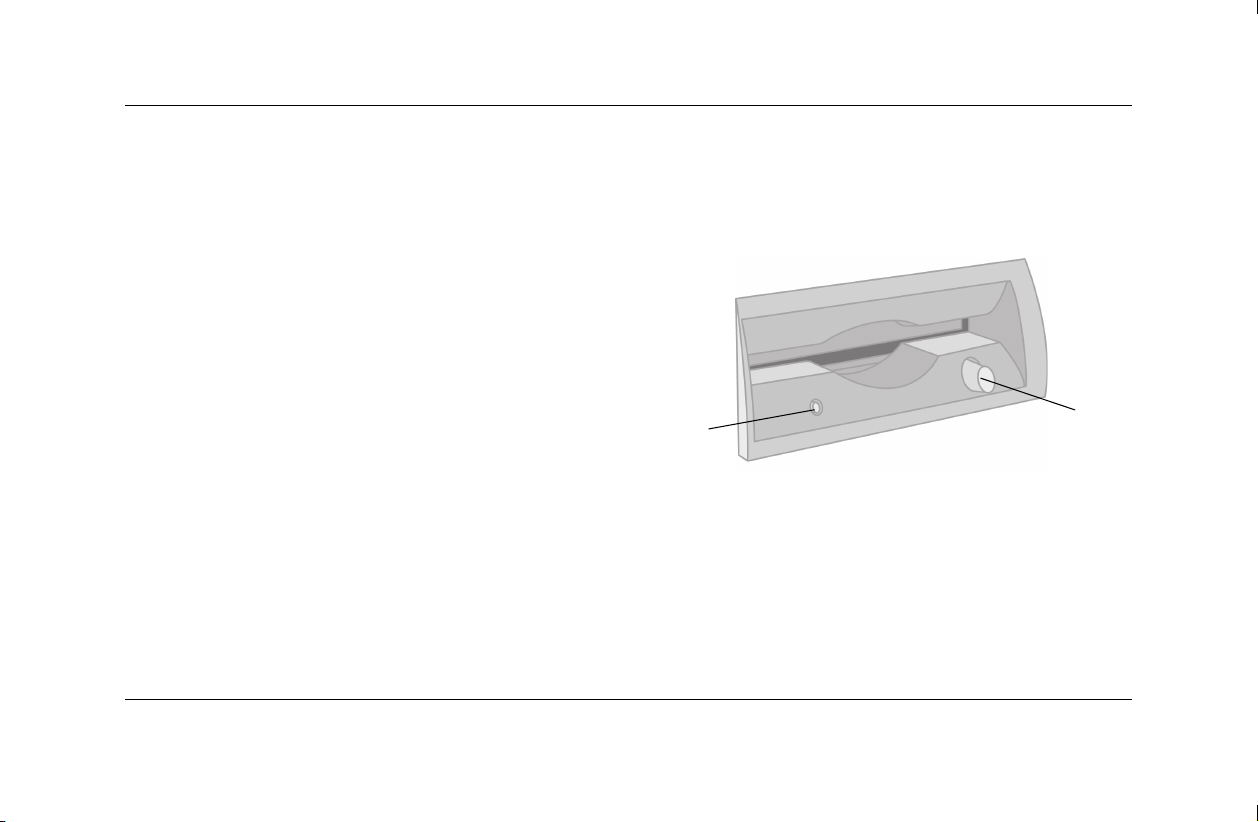
■ To insert a diskette, hold it with the label facing
up and the arrow on the diskette pointing
toward the drive; then gently push the diskette
into the drive.
2
Inserting and Removing a Diskette
1

Using the Computer
■ To remove a diskette, press the Eject button 1
on the diskette drive.
CAUTION: Wait until the diskette drive
activity is complete (the activity light 2
stops glowing) before removing a
diskette. Removing a diskette when the
drive is reading from or writing to the
diskette can damage the diskette or the
information stored on it.
Remove the diskette from the drive prior to shutting
down Microsoft Windows, so that Windows runs
when you restart.
Getting Started 3–3
Using the Hard Drive
You can store computer operating files,
applications, data, Internet files, and personal
files on your hard drive.
As you create and save files, download
information from the Internet, install applications,
or receive e-mail messages and attachments, your
hard drive storage space diminishes. The amount
of information you can store on your computer’s
hard drive depends on the size of the drive,
so you may want to check the available space
before installing an application or copying a
large amount of data.
Using the Computer
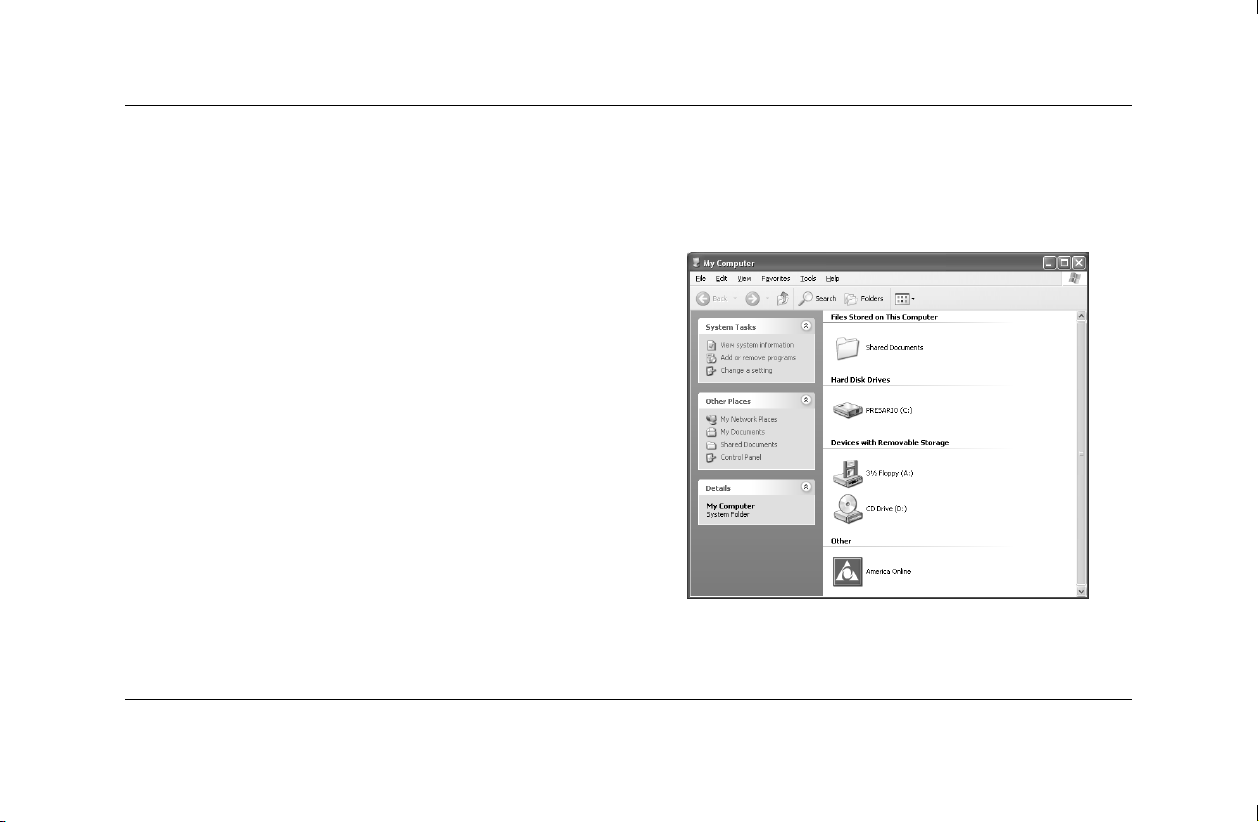
To Check Hard Disk Space
1. Click the Start button on the Windows
taskbar.
4. Notice the amount of free space listed in the
Details area, and make sure it is enough for
your application or data.
2. Click My Computer.
3. Click the hard disk drive you are checking,
usually labeled (C:).
3–4 Getting Started

Using the Computer
Using the CD or DVD Drive
Your computer may have one or two optical
drives — CD-ROM, CD-RW, DVD-ROM, and/or
DVD+RW/+R drives — depending on the model
you purchased. Some computers have a
combination drive (known as a combo drive),
which combines the functions of two drives into
one. These drives feature either a DVD+RW/+R
drive and a CD-RW drive, or a DVD-ROM and
a CD-RW drive. Optical drives allow you to
perform several different activities, such as storing
information, listening to music, or viewing and
creating movies.
Getting Started 3–5
DVD-ROM and DVD+RW/+R drives take longer to
begin playback than CD drives because they must
determine the type of media being played. If any
of the drives fails to play a disc, check to make sure
that the disc is inserted with the label facing up and
properly seated in the drive.

Using the Computer
Comparison of Drives and Actions
Allows you to CD-ROM CD-RW DVD-ROM DVD+RW/+R
Read CDs, CD-Rs, and CD-RWs ••• •
Read DVDs • •
Read data from CD • • • •
Listen to music • • • •
Record music onto a CD • •
Write data to disc for storage • •
View movies • •
Record home videos •
3–6 Getting Started

Using the Computer
Support for Disc Types
You can use several different types of optical discs
with your CD or DVD drives. The type of drive
in your computer and the type of disc you use
determine what you can do. For example, you
can listen to music, but not record it, if you use a
CD-ROM disc in the CD drive. On the other hand,
you can record and play back a DVD movie if
you use a DVD+R or DVD+RW disc in the
DVD+RW/+R drive.
A DVD+R disc is compatible with more
DVD set-top players than a DVD+RW disc.
Getting Started 3–7
Using the Combo Drive
The combination drive is available on select
models only. It combines the functions of two drives
into one: either a DVD+RW/+R drive and a
CD-RW drive or a DVD-ROM and a CD-RW drive.
When you insert a disc into the combo drive, the
computer automatically detects the type of disc:
■ If you insert a software program CD, it is
available for use.
■ If you insert a music CD, a window opens for
the program that plays CDs. See “Listening to
Music” on page 3–9.
■ If you insert a DVD movie, the Video window
and WinDVD control panel open. See
“Playing a Movie” on page 3–10.
Using the Computer
If you insert a blank CD-R or CD-RW disc, use
RecordNow to copy audio or data files. If you
insert a blank DVD, a program opens for you
to use to record to the disc. See “Using the
DVD Writer Drive” on page 3–13.
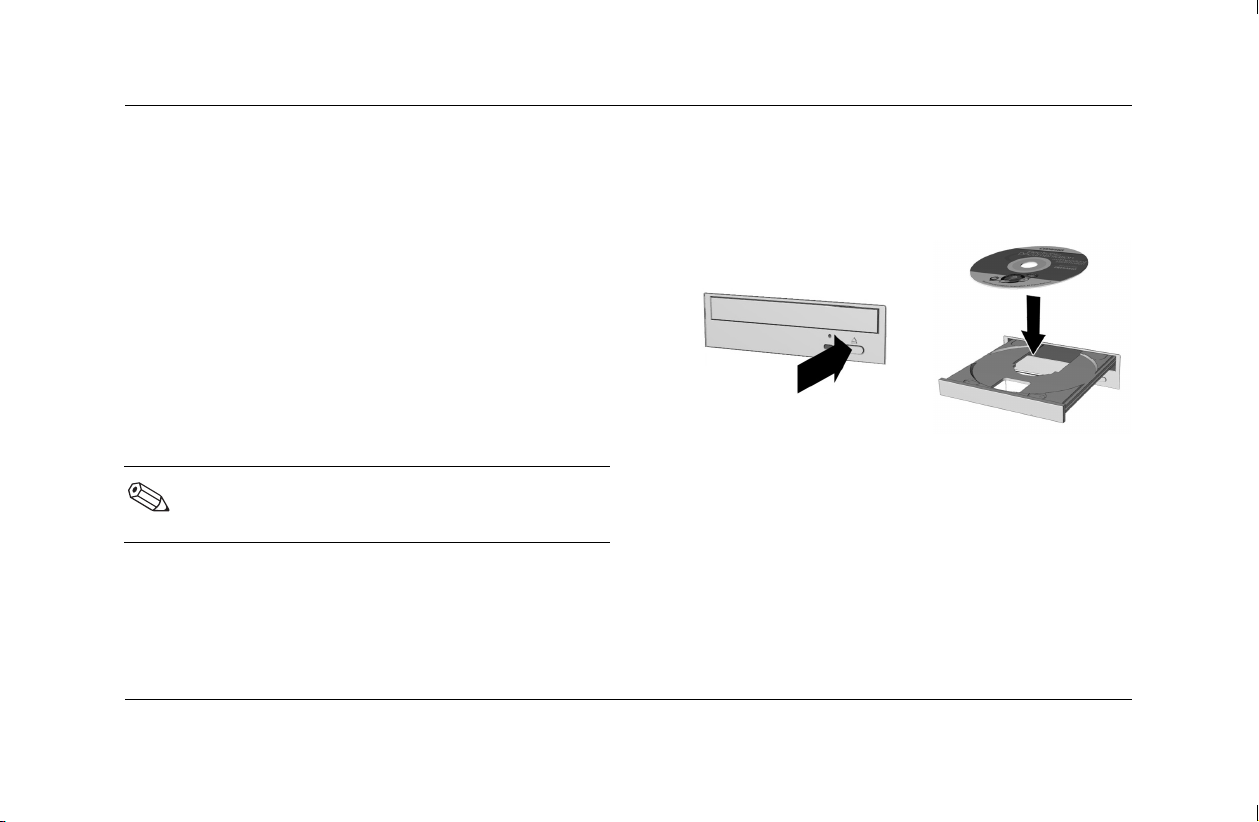
To Insert a Disc
1. Press the Load/Eject button to open the drive.
Inserting and Removing
aCDorDVD Disc
To insert or remove a CD or DVD disc, follow the
procedures below.
Inserting a CD or DVD disc
Your computer must be turned on before you
can insert or remove a CD or DVD disc.
3–8 Getting Started
2. Carefully lift the disc from the disc case. Hold
the disc by the edges and the center hole only,
to avoid touching the surface.
3. Place the disc, label side facing up, into the
round area of the tray.
4. Press the Load/Eject button to close the drive.

Using the Computer
To Remove a Disc
■ To remove the disc, press the Load/Eject
button to open the drive.
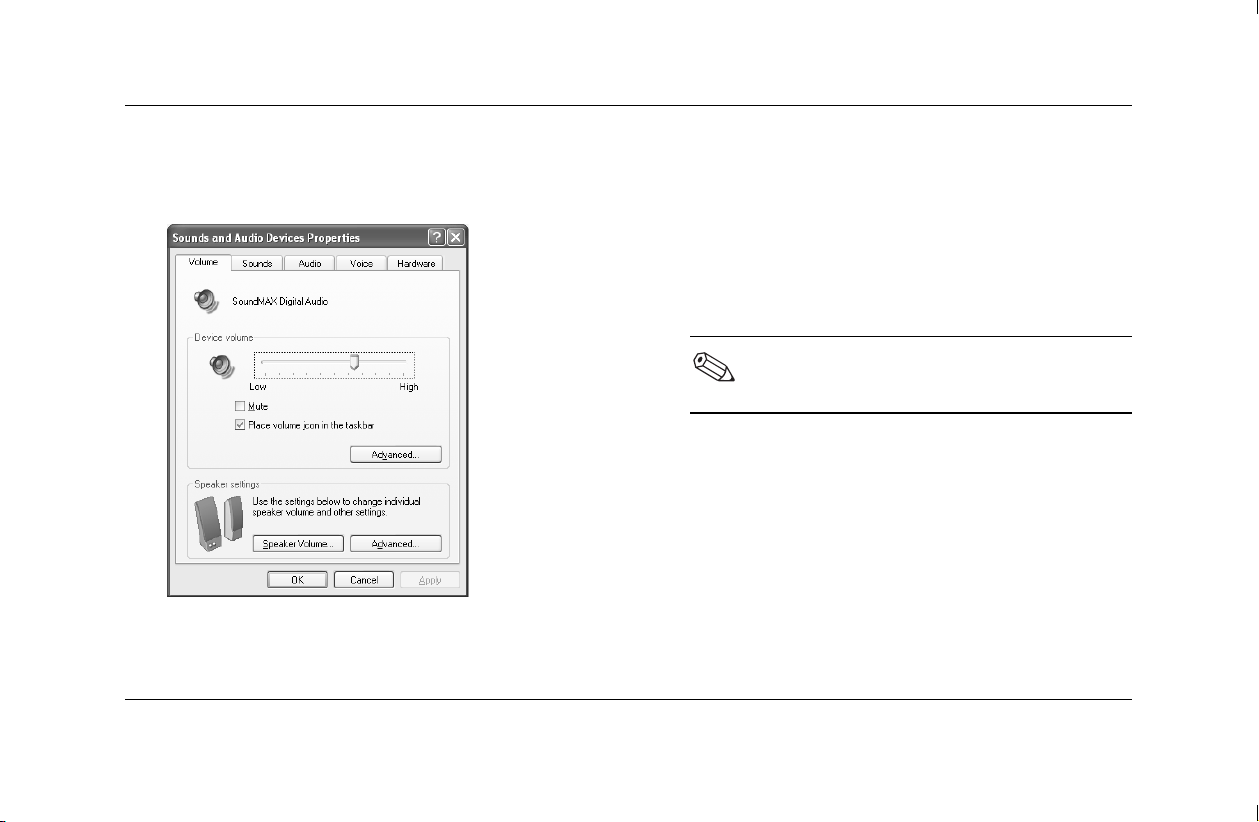
To Adjust the Volume
1. Click the Start button on the Windows
taskbar.
2. Click Control Panel.
Listening to Music
3. Click Sounds, Speech, and Audio
You can listen to music using any CD-ROM,
CD-RW, DVD-ROM, DVD+RW/+R, or combo
drive.
To Listen to Music
1. Insert a CD or DVD disc.
2. Wait for the disc to start playing automatically.
If the disc does not play automatically, follow
the onscreen instructions.
3. When you are finished listening, press the
Load/Eject button to eject the CD or DVD from
the drive.
Getting Started 3–9
Devices.
4. Click Adjust the System Volume.
Using the Computer
5. Make adjustments to the device and speaker
Playing a Movie
volume levels.
You can play a DVD movie only on a DVD-ROM or
DVD+RW/+R drive.
To Play a Movie
1. Insert a DVD disc.
For best performance, close all other
programs before playing a DVD movie.
2. Wait for the DVD to start playing
automatically. If it does not, follow these steps.
a. Click the Start button on your Windows
desktop.
b. Click All Programs, WinDVD, then
WinDVD Player.
6. Click Apply, then OK.
3–10 Getting Started
c. Click the Play button to start the movie.
3. Press the Load/Eject button to eject the DVD
from the drive.

Using the Computer
Creating a CD
There are several applications available for
creating CDs. Compaq provides CD burning
software on select models to assist you with
creating CDs.
Uses of the CD-RW Drive
You can create To
An audio CD Create personal music CDs with your favorite music tracks and MP3/WMA files.
A data CD Store data from files or folders on your hard disk. This feature is useful for backing up
important files or for sharing data with other people.
A direct copy of files Write files directly to a CD-R and CD-RW just like you copy files to a disk drive. You
can drag and drop files from one drive to another in Windows Explorer.
A copy of a CD Create an entire copy of a CD or a backup of data files.
Jewel Case inserts and
labels
Getting Started 3–11
Make custom jewel case inserts and CD labels to indicate the title and contents of a
CD (labels are sold separately).

Using the Computer
You can use either CD-R or CD-RW discs to create
your CDs. You can write to a CD-R disc only once;
but you can write to, erase, rewrite to, and reuse a
CD-RW disc.
It is recommended that you use a CD-R disc if
you are going to play it in a CD player, CD-ROM,
DVD-ROM, or DVD+RW/+R drive. CD-R discs are
compatible with more players than are CD-RW
discs.
CD-RW discs are typically used for making data
backups of your personal CDs and computer hard
drive.
CD-R and CD-RW Disc Comparison
Allows you to CD-R CD-RW
Write/Record to CD once • •
Write/Record to CD multiple times •
Reuse CD •
Erase information •
3–12 Getting Started
Using the Computer
Maintaining the CD or DVD Drive
Keep the following guidelines in mind when
maintaining and cleaning your CD or DVD drive:
■ Do not move the drive while it is operating.
■ Avoid exposing the drive to rapid changes in
temperature.
■ If the drive is exposed to sudden change in
temperature, wait one hour before turning off
the computer.
■ Avoid exposing the drive to high temperatures
or humidity, direct sunlight, or mechanical
vibrations.
■ Clean the panel and controls with a soft, dry
cloth.
■ Never spray cleaning fluids into the drive.
Getting Started 3–13
■ Unplug the computer if any liquids or objects
fall into the drive.
Using the DVD Writer Drive
The DVD Writer drive is a DVD+RW/+R drive
available on select models only.
The DVD Writer drive plays movie DVDs and music
CDs, reads data CDs and DVDs, and records files
to DVD+RW, DVD-R, CD-R, and CD-RW discs.
There are two types of DVD discs:
DVD+RW/+R and DVD-R/RW. DVD-R,
DVD-RW, and DVD-RAM discs do not work
in the DVD+RW/+R drive.
The guide for this drive is printed and included
in the computer box if your computer has a
DVD Writer drive.
Using the Computer
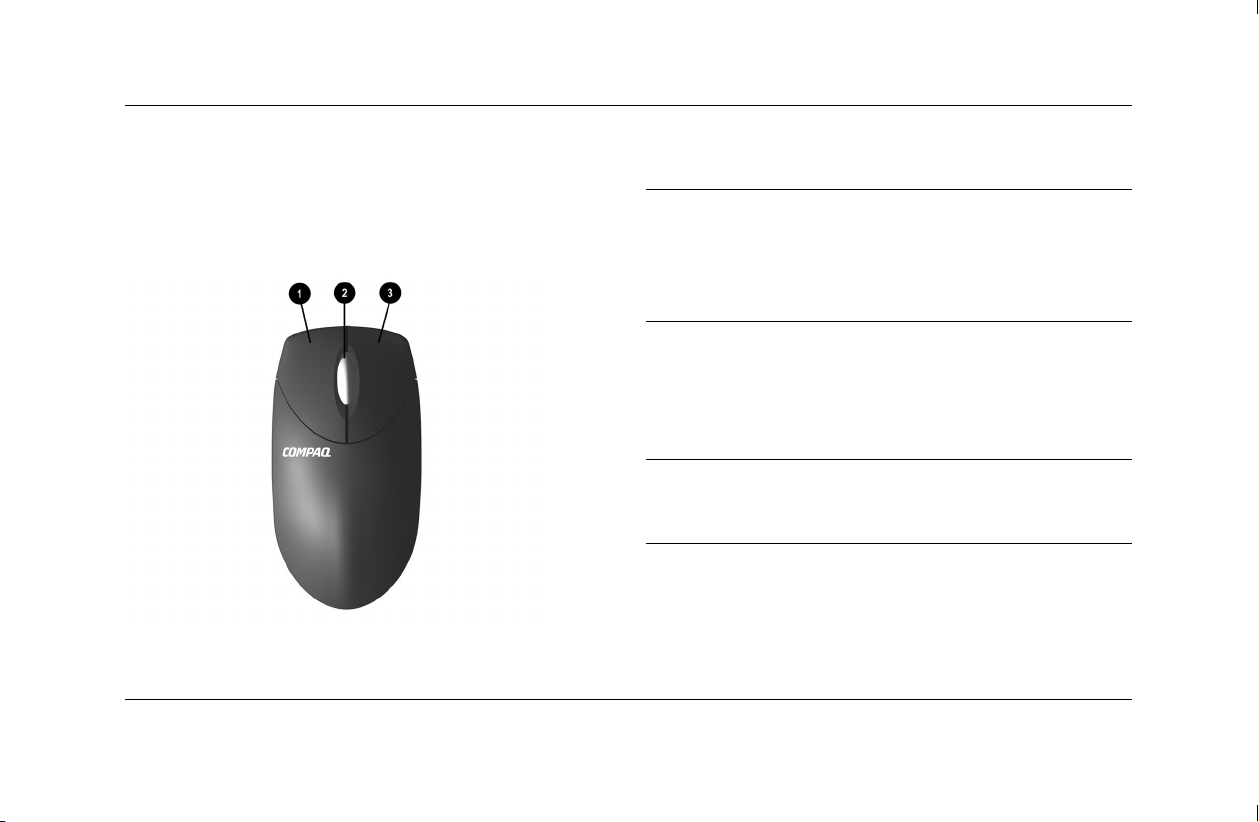
Using the Mouse
Your computer includes either a Scroll Mouse, an
Optical Mouse, or a Wireless Optical Mouse.
3–14 Getting Started
Mouse Components
1 Left mouse
button
2 Scroll wheel Spin to move backward and
3 Right mouse
button
Click and quickly release
to make screen selections.
Double-click and quickly
release to open applications
and files.
forward through a document
without having to continuously
move the mouse.
Click to activate autoscroll.
Click and quickly release
to display application menu
selections.

Using the Computer
If you wish, you can switch the functions of the
Using the Scroll Mouse
left and right buttons of a mouse.
The mouse directs the cursor on the Windows
To Modify Mouse Buttons
1. Click the Start button from the Windows
taskbar.
2. Click Control Panel.
3. Click Printers and Other Hardware.
4. Click Mouse.
5. Check “Switch primary and secondary
buttons” on the Buttons tab.
6. Click OK to apply the changes.
desktop. Use the mouse to move quickly through
a document or Web site.
Moving through a document or Web site with
the scroll wheel is faster than using the scroll bar.
You can use the scroll wheel to:
■ Scroll forward or backward through a
document or Web site by turning the scroll
wheel forward or backward.
■ Autoscroll by pressing down on the scroll
wheel until it clicks (you will see an autoscroll
icon on your desktop). Move the mouse
vertically, horizontally, or diagonally to scroll
in the desired direction. The farther you move
Getting Started 3–15

Using the Computer
the cursor from the starting point icon, the
faster the scrolling occurs. To stop
autoscrolling, press any mouse button.
Autoscrolling does not work with some
software.
When using the optical mouse:
■ Use a mousepad or a white sheet of paper
underneath your mouse. Using it on a glass
or see-through surface inhibits the ability of
the sensor to track the cursor.
■ Avoid using the mouse on a reflective surface
such as a mirror or shiny metal disk. This may
Using the Optical Mouse
The optical mouse is available with select models.
It provides the same functions as the scroll mouse,
but it uses an optical sensor instead of a
mechanical ball to determine the position of
the cursor on the screen. The surface on which
cause tracking problems.
■ Some wood grains and grooved surfaces may
also cause tracking problems.
■ If your mouse does not function properly, see
the troubleshooting section “Optical Mouse”
on page 7–25.
you use the optical mouse plays an important
role in tracking the cursor.
3–16 Getting Started
Using the Computer
Using the Wireless Optical Mouse
The wireless optical mouse and wireless keyboard
may be available. The wireless mouse provides the
same functions as the optical mouse, but uses a
receiver unit to communicate with your computer
instead of a connector cable.
If your mouse does not function properly, see
the troubleshooting section “Wireless Mouse”
on page 7–26.
A wireless keyboard functions the same as the
other keyboard types, except it uses a receiver unit
to communicate with your computer instead of a
connector cable.
The layout of the keyboards is the same,
except where noted.
Using the
Compaq Keyboards
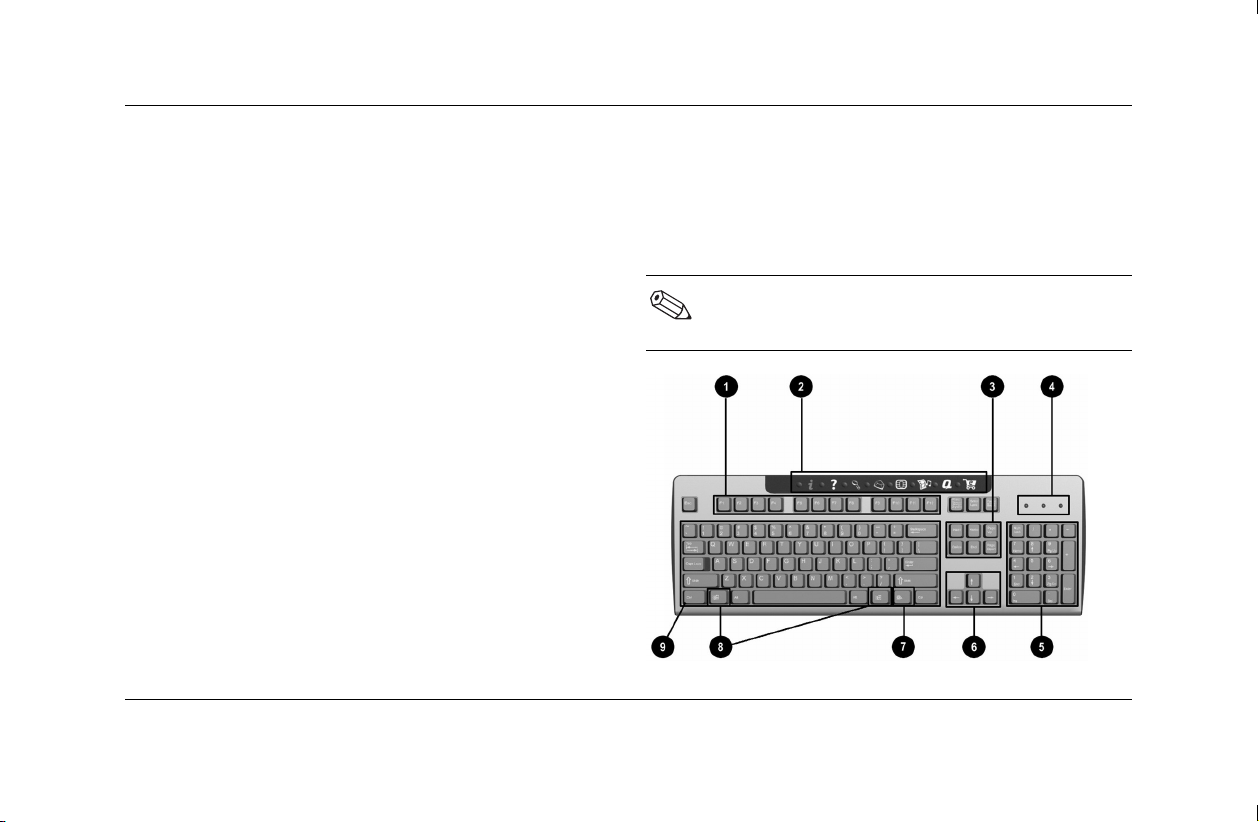
The keyboard has an arrangement of standard
keys and special buttons. The illustration shows the
location of the keys and buttons. The number and
location of keys or buttons on your keyboard may
vary from the illustration.
Getting Started 3–17

Using the Computer
Compaq Internet Keyboard Components
1 Function keys Perform special functions, depending on the software application being used.
2 Internet buttons Provide quick access to your favorite Web sites, services, and applications.
(Internet buttons are not available on all keyboards.)
3 Edit keys Include the following: Insert, Home, Page Up, Delete, End, and Page Down.
4 Status lights Indicate a quick status of your computer and keyboard settings (Num Lock,
Caps Lock, and Scroll Lock).
The wireless keyboard has two additional status lights for indicating a
low battery level for the keyboard and mouse.
5 Numeric keys Work like a calculator keypad.
6 Arrow keys Navigate through games or through a document or Web site. These keys allow
you to move left, right, up, and down, using the keyboard instead of the mouse.
7 Application key* Opens pop-up menus (like the right mouse button) in a Microsoft Office
application. May perform other functions in other software applications.
3–18 Getting Started
 Loading...