


 Loading...
HP Compaq 6715s, Compaq 6715b, Compaq 6515b, Compaq 6710s, Compaq 6710b Getting Started Guide
...Getting Started
HP Business Notebook PC
Document Part Number: 435748-001
March 2007
This guide explains how to set up your hardware and software, and begin using the computer in Windows®.
Enhanced for Accessibility
© Copyright 2007 Hewlett-Packard Development Company, L.P.
Windows is a U.S. registered trademark of Microsoft Corporation. Bluetooth is a trademark owned by its proprietor and used by Hewlett-Packard Company under license.
The information contained herein is subject to change without notice. The only warranties for HP products and services are set forth in the express warranty statements accompanying such products and services. Nothing herein should be construed as constituting an additional warranty. HP shall not be liable for technical or editorial errors or omissions contained herein.
Getting Started
HP Business Notebook PC
First Edition: March 2007
Document Part Number: 435748-001
Product notice
This user guide describes features that are common to most models. Some features may not be available on your computer.

Contents
1 First-time setup
Identifying required hardware . . . . . . . . . . . . . . . . . . . . . 1–1 Setting up the computer . . . . . . . . . . . . . . . . . . . . . . . . . . 1–3 Step 1: Insert the battery . . . . . . . . . . . . . . . . . . . . . . 1–4 Step 2: Connect the computer to external power. . . . 1–5 Step 3: Turn on the computer . . . . . . . . . . . . . . . . . . 1–6 Step 4: Set up the software . . . . . . . . . . . . . . . . . . . . 1–8 Step 5: Create recovery discs (recommended) . . . . . 1–8
2 Quick tour
Identifying required hardware . . . . . . . . . . . . . . . . . . . . . 2–1 Top components . . . . . . . . . . . . . . . . . . . . . . . . . . . . 2–2 Front components . . . . . . . . . . . . . . . . . . . . . . . . . . . 2–3 Left-side components . . . . . . . . . . . . . . . . . . . . . . . . 2–4 Right-side components . . . . . . . . . . . . . . . . . . . . . . . 2–5 Rear components . . . . . . . . . . . . . . . . . . . . . . . . . . . . 2–6 Bottom components. . . . . . . . . . . . . . . . . . . . . . . . . . 2–7 Wireless antennae (select models only). . . . . . . . . . . 2–8
Getting Started |
iii |

Contents
3 Next steps
Protecting the computer . . . . . . . . . . . . . . . . . . . . . . . . . . 3–1 Protecting the computer from viruses . . . . . . . . . . . . 3–1 Protecting your system files . . . . . . . . . . . . . . . . . . . 3–2 Protecting your privacy . . . . . . . . . . . . . . . . . . . . . . . 3–2 Protecting the computer from power surges . . . . . . . 3–2 Using the computer safely . . . . . . . . . . . . . . . . . . . . . 3–3
Connecting to a computer network . . . . . . . . . . . . . . . . . 3–5 Installing additional hardware and software . . . . . . . . . . 3–6 Identifying and installing hardware. . . . . . . . . . . . . . 3–6 Locating and installing software . . . . . . . . . . . . . . . . 3–6 Updating the software installed on the computer. . . . . . . 3–7 Finding the user guides . . . . . . . . . . . . . . . . . . . . . . . . . . 3–8 Turning off the computer correctly . . . . . . . . . . . . . . . . . 3–8
4 Troubleshooting
Troubleshooting resources . . . . . . . . . . . . . . . . . . . . . . . . 4–1 Quick troubleshooting . . . . . . . . . . . . . . . . . . . . . . . . . . . 4–2 The computer is unable to start up. . . . . . . . . . . . . . . 4–2 The computer screen is blank . . . . . . . . . . . . . . . . . . 4–3 Software is functioning abnormally . . . . . . . . . . . . . 4–4 The computer is turned on but not responding . . . . . 4–4 The computer is unusually warm. . . . . . . . . . . . . . . . 4–5 An external device is not working. . . . . . . . . . . . . . . 4–6 The WLAN connection is not working . . . . . . . . . . . 4–6 Help and Support . . . . . . . . . . . . . . . . . . . . . . . . . . . . . . . 4–7 Contacting technical support . . . . . . . . . . . . . . . . . . . . . . 4–8
A Connect to the Internet from your home
Choosing an ISP. . . . . . . . . . . . . . . . . . . . . . . . . . . . . . . . A–1 Using the New Connection Wizard . . . . . . . . . . . . . . A–2 Choosing the type of Internet connection . . . . . . . . . . . . A–2
iv |
Getting Started |

Contents
B Backup and recovery
Creating recovery discs . . . . . . . . . . . . . . . . . . . . . . . . . . B–1 Backing up your information . . . . . . . . . . . . . . . . . . . . . . B–2 When to back up . . . . . . . . . . . . . . . . . . . . . . . . . . . . B–2 Back up suggestions . . . . . . . . . . . . . . . . . . . . . . . . . B–3 Backing up specific files or folders . . . . . . . . . . . . . . B–4 Backing up the entire hard drive . . . . . . . . . . . . . . . . B–4 Creating recovery points . . . . . . . . . . . . . . . . . . . . . . B–5 Scheduling backups . . . . . . . . . . . . . . . . . . . . . . . . . . B–6 Performing a recovery . . . . . . . . . . . . . . . . . . . . . . . . . . . B–7 Performing a recovery from the recovery discs. . . . . B–7 Performing a recovery from the hard drive . . . . . . . . B–7
C Specifications
Operating environment. . . . . . . . . . . . . . . . . . . . . . . . . . . C–1 Rated input power . . . . . . . . . . . . . . . . . . . . . . . . . . . . . . C–2
Index
Getting Started |
v |

1
First-time setup
Identifying required hardware
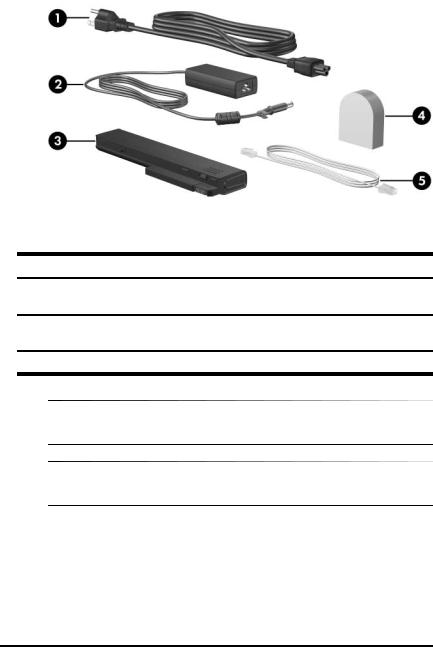
To set up the computer for the first time, you will need the computer, the AC adapter, the power cord, and the primary battery.
Components included with the computer may vary by region and by model.
Getting Started |
1–1 |
First-time setup
Component
1Power cord
2AC adapter
3Primary battery
Component
4Country-specific modem adapter (select models only)
5Modem cable (select models only) (optional for setup)
Use only the AC adapter provided with the computer or one approved for this computer.
Unless you use dial-up networking, the modem cable is optional for setup.
1–2 |
Getting Started |

First-time setup
Setting up the computer
Computer setup involves the following tasks:
1.Inserting the battery into the computer
2.Connecting the computer to external power
The battery begins to charge.
3.Turning on the computer
4.Setting up the software
5.Creating recovery discs (recommended)
Refer to Appendix B, “Backup and recovery,” for instructions.
ÄCAUTION: Reduce the risk of file corruption by observing the following practices during the hardware and software setup procedures:
■Do not unplug the computer from external power.
■Do not shut down the computer or initiate Standby or Hibernation.
Getting Started |
1–3 |
First-time setup
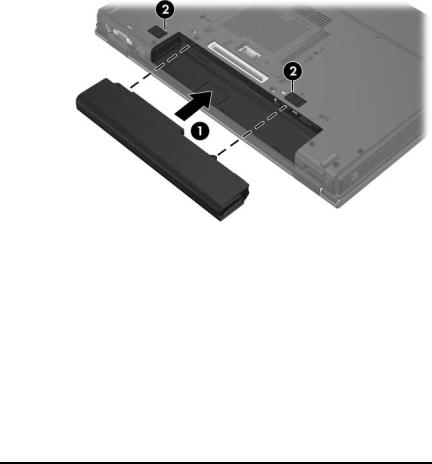
Step 1: Insert the battery
To insert a primary battery:
1.Turn the computer upside down on a flat surface, with the battery bay toward you.
2.Slide the battery 1 into the battery bay until it is seated.
The battery release latches 2 automatically lock the battery into place.
1–4 |
Getting Started |
First-time setup
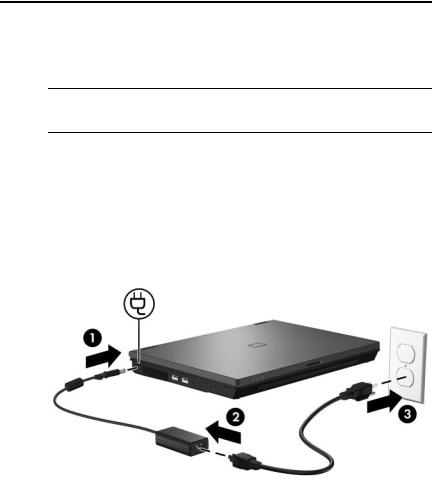
Step 2: Connect the computer to external power
Powercountry.cords and AC outlets vary in appearance by region and To connect the computer to external AC power:
1.Plug the AC adapter into the power connector 1 on the computer.
2.Plug the power cord into the AC adapter 2.
3.Plug the other end of the power cord into an AC outlet 3.
Getting Started |
1–5 |
First-time setup
When the computer receives AC power, the battery begins to charge and the battery light (on the front of the computer) turns on. When the battery is fully charged, the battery light turns off.
Leave the computer connected to external power until the battery is fully charged and the battery light turns off.
A partially charged new battery can run the computer after software setup is complete, but battery charge displays will not be accurate until the new battery has been fully charged.
Step 3: Turn on the computer
To open the computer:
1.Slide the display release latch 1 to the right to release the display.
2.Raise the display 2.
1–6 |
Getting Started |
First-time setup
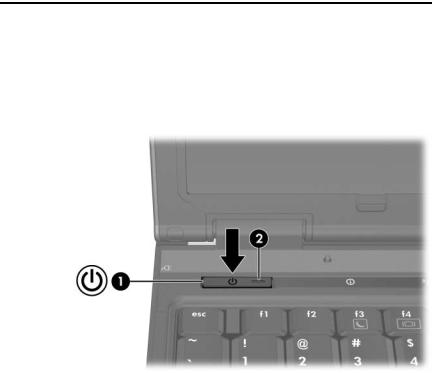
To turn on the computer:
»Press the power button 1.
The power light on the power button 2 turns on.
Getting Started |
1–7 |

First-time setup
Step 4: Set up the software
After the computer is turned on, it will go through software setup. Follow the on-screen instructions to set up the software. Note the following points:
■ After you respond to the setup prompt, you must complete the entire setup process without interruption. Setup time varies.
■ During software setup, the computer may pause periodically for several minutes. These normal pauses are indicated by an hourglass icon.
ÄCAUTION: If you are prompted to select an operating system language before the “Welcome to Windows” page is displayed, choose carefully. On some models, the languages that you do not choose are deleted from the system and cannot be restored during software setup.
To register the operating system and the computer during software setup, the computer must be connected by an RJ-45 (network) cable to an existing network that has access to the Internet. If you do not register during software setup, you can do so at any time after software setup is complete. For more information about connecting to the Internet, refer to Appendix A, “Connect to the Internet from your home,” in this guide.
Step 5: Create recovery discs (recommended)
You can create a set of recovery discs of your full factory image using HP Backup and Recovery Manager. You can use the recovery discs to start up (boot) the computer and restore the operating system and software programs to factory settings in case of system failure or instability.
Refer to Appendix B, “Backup and recovery,” for detailed instructions.
1–8 |
Getting Started |

2
Quick tour
Identifying required hardware
Components included with the computer may vary by region and model. The illustrations in this chapter identify the standard features included on most computer models.
Getting Started |
2–1 |

Quick tour
Top components
Component |
Component |
||
1 |
Power button |
9 |
Internal microphone |
|
|
|
(select models only) |
2 |
Power lights (2) |
- |
TouchPad scroll zone |
3 |
Info button |
q |
Fingerprint reader |
|
(select models only) |
|
(select models only) |
4 |
Wireless button |
w |
Right TouchPad button |
5 |
Wireless lights (2) |
e |
Left TouchPad button |
6 |
Presentation button |
r |
Drive light |
|
(select models only) |
|
|
7 |
Volume mute button |
t |
Battery light |
8 |
Volume scroll zone |
y |
TouchPad |
|
(select models only) |
|
|
2–2 |
Getting Started |
Quick tour
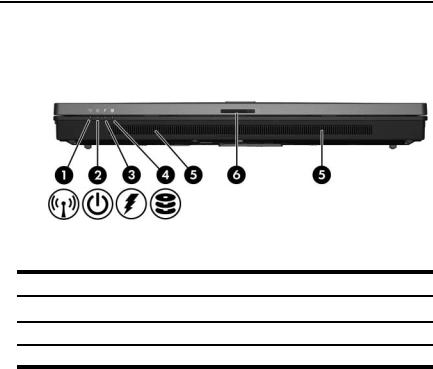
Front components
Component |
Component |
||
1 |
Wireless light |
4 |
Drive light |
2 |
Power light |
5 |
Speakers (2) |
3 |
Battery light |
6 |
Display release latch |
Getting Started |
2–3 |
Quick tour
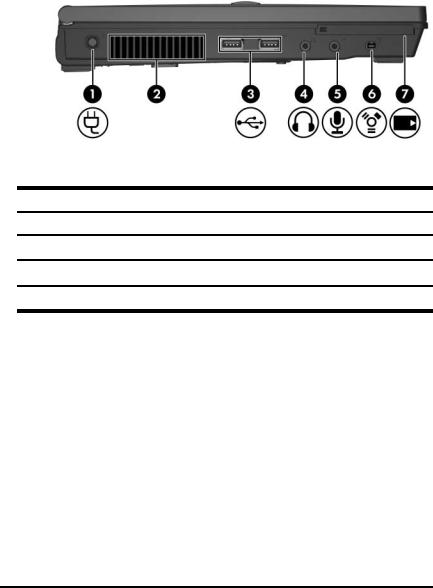
Left-side components
Component |
Component |
||
1 |
Power connector |
5 |
Audio-in (microphone) jack |
2 |
Vent |
6 |
1394 port (select models only) |
3 |
USB ports (2) |
7 |
PC Card slot |
4Audio-out (headphone) jack
2–4 |
Getting Started |
Loading...