


 Loading...
42" LCD Colour Television |
Instructions for use |
GB |
42LDF30U B

Contents |
|
Features ................................................................. |
3 |
Accessories ............................................................ |
3 |
Introduction............................................................. |
4 |
Preparation............................................................. |
4 |
Safety Precautions ................................................. |
4 |
Power Source ..................................................... |
4 |
Power Cord......................................................... |
4 |
Moisture and Water ............................................ |
4 |
Cleaning.............................................................. |
4 |
Ventilation ........................................................... |
4 |
Heat and Flames ................................................ |
4 |
Lightning ............................................................. |
4 |
Replacement Parts ............................................. |
4 |
Servicing............................................................. |
5 |
Waste Disposal................................................... |
5 |
Information for Users in European Union |
|
Countries ............................................................ |
5 |
Disconnecting the Device ................................... |
5 |
Headphone Volume ............................................ |
5 |
Installation........................................................... |
5 |
LCD Screen ........................................................ |
5 |
Warning .............................................................. |
5 |
Overview of the Remote Control ............................ |
6 |
LCD TV and Operating Buttons.............................. |
7 |
Viewing the ConnectionsBack Connectors .......... |
8 |
Viewing the Connections - Side Connectors ........ |
10 |
Power Connection ................................................. |
11 |
Aerial Connection .................................................. |
11 |
Using the Cable Holder ......................................... |
11 |
Connecting the LCD TV to a PC........................... |
12 |
Connecting to a DVD Player................................. |
13 |
Using Side AV Connectors ................................... |
14 |
Using Other Connectors....................................... |
15 |
Connecting Other Equipment via Scart ................ |
16 |
Inserting Batteries in the Remote Control |
|
Handset ................................................................ |
17 |
Operating Range for the Remote Control............. |
17 |
Switching the TV On/Off ....................................... |
17 |
To Switch the TV On ......................................... |
17 |
The TV will then switch on. ............................... |
17 |
To Switch the TV Off ......................................... |
17 |
Input Selection...................................................... |
18 |
Basic Operations .................................................. |
18 |
Operation with the Buttons on the TV............... |
18 |
Volume Setting.............................................. |
18 |
Programme Selection ................................... |
18 |
Viewing Main Menu....................................... |
18 |
AV Mode ....................................................... |
18 |
Operation with the Remote Control .................. |
18 |
Volume Setting.............................................. |
18 |
Programme Selection (Previous or Next |
|
Programme).................................................. |
18 |
Programme Selection (Direct Access) .......... |
18 |
Initial Settings ....................................................... |
19 |
General Operation................................................ |
19 |
Information Banner ........................................... |
19 |
Electronic Programme Guide (EPG) .................... |
20 |
Displaying the Subtitles .................................... |
20 |
Digital Teletext (** for UK only) ......................... |
21 |
Widescreen....................................................... |
21 |
IDTV Menu System .............................................. |
21 |
Channel List...................................................... |
21 |
Navigating the Entire Channel List ............... |
22 |
Moving the channels in the channel list ........ |
22 |
Deleting the Channels in the Channel List.... |
22 |
Renaming Channels ..................................... |
22 |
Adding Locks to Channels ............................ |
23 |
Setting Favourites......................................... |
23 |
How to Add a Channel to a Favourites |
|
List.......................................................... |
23 |
Removing a Channel from Favourite List23 |
|
On Screen Help ........................................... |
23 |
Program Guide ............................................. |
23 |
Timers............................................................... |
24 |
Conditional Access ........................................... |
24 |
TV Setup........................................................... |
24 |
Setup ................................................................ |
25 |
Configuration ................................................ |
25 |
AC3 Audio (**for EU countries only)....... |
25 |
Hard of Hearing (**for EU countries |
|
only)........................................................ |
25 |
Favourite Mode....................................... |
25 |
Channel List ........................................... |
25 |
Scan Encrypted ..................................... |
25 |
Receiver Upgrade .................................. |
25 |
Over Air Download (OAD) ...................... |
25 |
Parental Control ..................................... |
26 |
Maturity Lock........................................ |
26 |
Menu Lock ........................................... |
26 |
Set PIN................................................. |
26 |
Time Settings.......................................... |
26 |
Audio Description ................................... |
27 |
Audio Description................................. |
27 |
Preferred Language............................. |
27 |
Relative Volume................................... |
27 |
Standby Search (*) ................................. |
27 |
Language...................................................... |
27 |
Preferred................................................. |
27 |
Current.................................................... |
27 |
Language Settings............................................ |
28 |
Installation..................................................... |
28 |
Automatic Channel Scan........................ |
28 |
Manual Channel Scan ............................ |
28 |
Clear Service List (*)............................ |
29 |
First Time Installation.............................. |
29 |
English - 1 -

Navigating the Analogue TV Menu System .......... |
30 |
Analogue TV Menu System.................................. |
30 |
Picture Menu..................................................... |
30 |
Mode............................................................. |
30 |
Brightness/Contrast/Colour/Sharpness ........ |
30 |
Colour Temp.................................................. |
30 |
Noise Reduction ........................................... |
30 |
Film Mode ..................................................... |
30 |
Game Mode .................................................. |
30 |
Picture Zoom ................................................ |
30 |
Reset ............................................................ |
31 |
Store ............................................................. |
31 |
Sound Menu ..................................................... |
31 |
Volume.......................................................... |
31 |
Equalizer....................................................... |
31 |
Balance......................................................... |
31 |
Headphone ................................................... |
31 |
Volume.................................................... |
31 |
Store....................................................... |
31 |
Sound Mode ................................................. |
31 |
AVL ............................................................... |
31 |
Spdif Out....................................................... |
32 |
Effect............................................................. |
32 |
Store ............................................................. |
32 |
Feature Menu ................................................... |
32 |
Pip-Pap ......................................................... |
32 |
Pip-Pap................................................... |
32 |
Pip Size .................................................. |
32 |
PIP Position ............................................ |
32 |
Source .................................................... |
32 |
Program.................................................. |
32 |
Swap....................................................... |
32 |
Sleep Timer................................................... |
32 |
Child Lock ..................................................... |
33 |
Language...................................................... |
33 |
Default Zoom ................................................ |
33 |
Blue Background .......................................... |
33 |
Menu Background......................................... |
33 |
Backlight ....................................................... |
33 |
Menu Timeout ............................................... |
33 |
Teletext Language ........................................ |
33 |
Antenna Power (optional) ............................. |
33 |
Ext Out.......................................................... |
33 |
Install Menu ...................................................... |
33 |
Program ........................................................ |
33 |
Band ............................................................. |
33 |
Channel ........................................................ |
33 |
Colour System .............................................. |
34 |
Sound System .............................................. |
34 |
Fine Tune...................................................... |
34 |
Search .......................................................... |
34 |
Store ............................................................. |
34 |
Install Menu in AV Modes.............................. |
34 |
Colour System........................................ |
34 |
Store ............................................................. |
34 |
Program Table............................................... |
34 |
Name...................................................... |
34 |
Insert....................................................... |
34 |
Delete ..................................................... |
34 |
APS (Auto Programming System).......... |
34 |
Country ................................................ |
35 |
Source Menu .................................................... |
35 |
PC Mode Menu System........................................ |
35 |
PC Position Menu............................................. |
35 |
Autoposition .................................................. |
35 |
H (Horizontal) Position.................................. |
36 |
V (Vertical) Position ...................................... |
36 |
Phase............................................................ |
36 |
Dot Clock ...................................................... |
36 |
PC Picture Menu........................................... |
36 |
Sound Menu ................................................. |
36 |
Feature Menu ............................................... |
36 |
Source Menu ................................................ |
36 |
Displaying TV Information .................................... |
36 |
Mute Function....................................................... |
36 |
PIP (Picture-in-Picture) and PAP (Picture-and- |
|
Picture) Modes ..................................................... |
36 |
Picture Mode Selection......................................... |
37 |
Freezing Picture ................................................... |
37 |
Zoom Modes......................................................... |
37 |
Auto .................................................................. |
37 |
16:9................................................................... |
37 |
4:3..................................................................... |
37 |
Panoramic......................................................... |
37 |
14:9................................................................... |
37 |
Cinema ............................................................. |
37 |
Subtitle.............................................................. |
37 |
Zoom................................................................. |
38 |
Teletext ................................................................. |
38 |
Tips....................................................................... |
39 |
Screen Care...................................................... |
39 |
Image Persistence............................................ |
39 |
No Power.......................................................... |
39 |
Poor Picture...................................................... |
39 |
No Picture......................................................... |
39 |
Sound ............................................................... |
39 |
Remote Control................................................. |
39 |
Input Sources.................................................... |
39 |
Appendix A: PC Input Typical Display Modes....... |
40 |
Appendix B: AV and HDMI Signal Compatibility |
|
(Input Signal Types).............................................. |
41 |
Appendix C: Pin Specifications............................. |
42 |
SCART connector pin specifications ................ |
42 |
HDMI connector pin specifications ................... |
42 |
Signal Input....................................................... |
42 |
PC RGB Terminal (D-sub 15-pin connector). 42 |
|
Appendix D: PIP/PAP Mode Combinations .......... |
43 |
Specifications ....................................................... |
44 |
Product Guarantee ............................................... |
45 |
English - 2 -

Features
•Remote controlled colour LCD TV.
•Fully integrated digital TV (DVB-T).
•Two HDMI connectors for digital video and audio. This connection is also designed to accept high definition signals.
•200 programmes from VHF, UHF.
•OSD menu system.
•Two scart sockets for external devices (such as video, video games, audio set, etc.).
•Stereo sound system. (German+Nicam)
•Teletext, fastext, TOP text.
•Headphone connection.
•Automatic programming system.
•Forward or backward automatic tuning.
•Sleep timer.
•Child lock.
• A u t o m a t i c s o u n d m u t e w h e n n o transmission.
•NTSC playback.
•PIP / PAP / PAT functions.
•AVL (Automatic Volume Limiting).
•When no valid signal is detected, after 5 minutes the TV switches itself automatically to standby mode.
•PLL (Frequency Search).
•PC input.
•Plug&Play for Windows 98, ME, 2000, XP, Vista.
•Audio line out.
•Game Mode.
English
Accessories
M |
P<P |
OK
|
|
TV DTV |
INFO |
|
|
i |
|
I-II |
+ |
|
+ |
V |
|
P |
- |
|
- |
1 |
2 |
3 |
ABC |
DEF |
GHI |
4 |
5 |
6 |
JKL |
MNO |
PQR |
7 |
8 |
9 |
STU |
VWX |
YZ |
PP |
0 |
-/-- |
|
|
EXIT |
/ |
PC |
GUIDE |
RC 1205
Remote Controller
Batteries
2 X AAA
Instruction Book
Quick Guide
Cable Holder
- 3 -
Introduction
Thank you for choosing this product. This manual will guide you in the proper operation of your TV. Before operating
the TV, please read this manual thoroughly.
Please do keep this manual in a safe place for future references.
Preparation
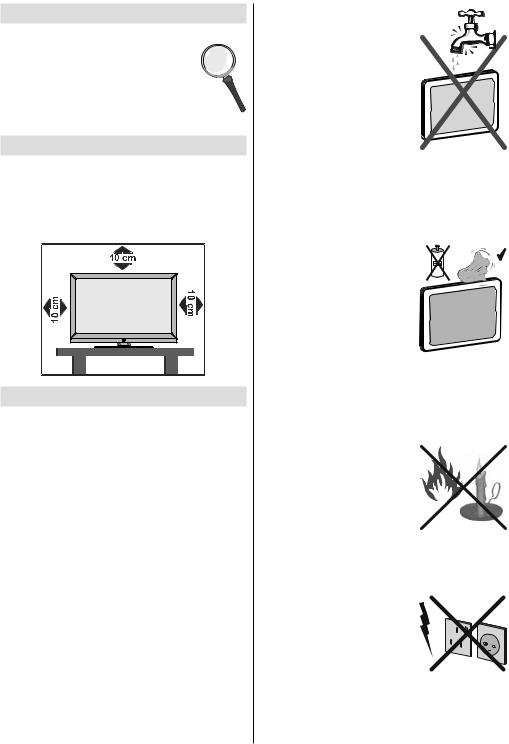
For ventilation, leave a free space of at least 10 cm all around the set. To prevent any faults and unsafe situations, please do not place any objects on top of the set.
Use this device in moderate climates.
Safety Precautions
Please read the following recommended safety precautions carefully for your safety.
Power Source
The TV set should be operated only from a 220240 V AC, 50 Hz outlet.
Power Cord
Do not place the set, a piece of furniture, etc. on the power cord (mains lead) or pinch the cord. Handle the power cord by the plug. Do not unplug the appliance by pulling from the power cord and never touch the power cord with wet hands as this could cause a short circuit or electric shock. Never make a knot in the cord or tie it with other cords. The power cords should be placed in such a way that they are not likely to be stepped on. A damaged power cord can cause fire or give you an electric shock. When it is damaged and needs to be replaced, it should be done by qualified personnel.
Moisture and Water
Do not use this device in a humid and damp place (avoid the bathroom, the
sink in the kitchen, and near the washing machine). Do
not expose this device to rain or water, as this may be
dangerous and do not place objects filled with liquids,
such as vases, on top. Avoid dripping or splashing.
If any solid object or liquid falls into the cabinet, unplug the TV and have it checked by qualified personnel before operating it any further.
Cleaning
Before cleaning, unplug the TV set from the wall outlet. Do not use liquid or aerosol cleaners. Use soft and dry
cloth.
Ventilation
The slots and openings on the
TV set are intended for ventilation and to ensure reliable operation. To prevent overheating, these openings must not be blocked or covered in anyway.
Heat and Flames
The set should not be placed
near to open flames and sources of intense heat such
as an electric heater. Ensure that no open flame sources, such as lighted candles, are placed on top of the TV.
Batteries should not be exposed to excessive heat such as sunshine, fire or the like.
Lightning
Before a storm and lightning
or when going on holiday, disconnect the power and
aerial leads from the wall sockets.
Replacement Parts
When replacement parts are required, make sure that the service technician has used replacement parts, which are specified by the
English - 4 -
manufacturer or have the same specifications as the original one. Unauthorized substitutions may result in fire, electrical shock or other hazards.
Servicing
Please refer all servicing to qualified personnel. Do not remove the cover yourself as this may result in an electric shock.
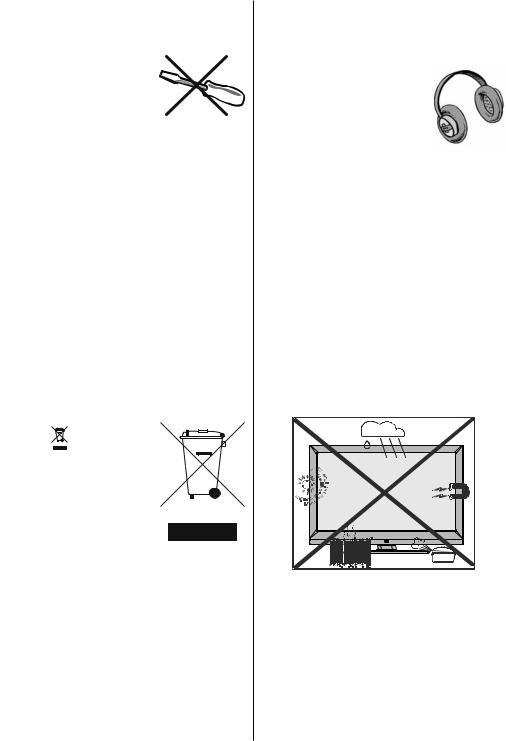
Waste Disposal
Instructions for waste disposal:
•Packaging and packaging aids are recyclable and should principally be recycled. Packaging materials, such as foil bag, must be kept away from children.
•Batteries, including those which are heavy metal-free, should not be disposed of with household waste. Please dispose of used battery in an enviromentally friendly manner. Find out about the legal regulations which apply in your area.
•Cold cathode fluorescent lamp in LCD PANEL contains a small amount of mercury; please follow the local laws or regulations for disposal.
Information for Users in European Union Countries
The mark |
is in compliance |
with the Waste Electrical |
|
and Electronic Equipment |
|
D i r e c t i v e 2 0 0 2 / 9 6 / E C |
|
(WEEE). |
|
The mark indicates the
requirement NOT to dispose the equipment including any
spent or discarded batteries
as unsorted municipal waste, but use the return and collection systems available. If the batteries or accumulators included with this equipment, display the chemical symbol Hg, Cd, or Pb, then it means that the battery has a heavy metal content of more than 0.0005% Mercury, or more than 0.002% Cadmium or more than, 0.004% Lead.
Disconnecting the Device
The mains plug is used to disconnect TV set from the mains and therefore it must remain readily operable.
Headphone Volume
Excessive sound pressure from earphones and headphones can cause hearing loss.
Installation
To prevent injury, this device
must be securely attached to the wall in accordance with the installation instructions when mounted to the wall (if the option is available).
LCD Screen
The LCD panel is a very high technology product with about a million thin film transistors, giving you fine picture details. Occasionally, a few non-active pixels may appear on the screen as a fixed blue, green or red point. Please note that this does not affect the performance of your product.
Warning
Do not leave your TV in standby or operating mode when you leave your house.
English - 5 -

Overview of the Remote Control
1.Standby
2.Yellow / Feature menu / Current language
(*)
3.Blue / Install menu / Favourite selection
(*)
4.Previous programme
5.Cursor up
6.Cursor right
7.Cursor down
8.TV / Digital TV
9.Mono/Stereo - Dual I-II
10.Programme up - Page down (in DTV mode) / Programme down - Page up (in DTV mode)
11.Numeric buttons
12.Exit (in DTV mode)
13.Hold (in TXT mode) / PIP position
14.Update (in TXT mode) / PAP mode
15.Index page / Guide (in DTV mode)
16.Reveal (in TXT mode) / Switch from TV to PC
17.Green (Picture menu) / Subtitle (*) (in DTV mode)
18.Red (Sound menu) / Channel list (in DTV mode)
19.Menu on/off
20.Ok - Confirm
21.Cursor Left
22.AV / Source
23.Info
24.Volume up/down
25.Mute
26.Personal preferences
27.Time / Subtitle on-off (**) (in DTV mode)
28.Teletext
29.Mix (in TXT mode) / PIP mode
30.Expand (in TXT mode) / Image size
(*) Only available for EU country options. (**) Only available for UK country option.
1
2
17 |
|
|
|
3 |
|
|
|
|
|
18 |
|
|
|
4 |
|
|
|
|
|
19 |
M |
|
P<P |
|
|
|
5 |
||
20 |
|
|
|
|
|
OK |
|
6 |
|
|
|
|
||
21 |
|
|
7 |
|
|
|
|
||
22 |
|
|
TV DTV |
8 |
23 |
|
INFO |
|
9 |
|
i |
I-II |
||
|
|
|||
24 |
+ |
|
+ |
10 |
V |
|
P |
||
25 |
|
|
- |
|
1 |
2 |
3 |
|
|
|
11 |
|||
|
ABC |
DEF |
GHI |
|
|
|
|||
|
4 |
5 |
6 |
|
|
JKL |
MNO |
PQR |
|
26 |
7 |
8 |
9 |
|
STU |
VWX |
YZ |
12 |
|
|
PP |
0 |
-/-- |
|
27 |
|
|
EXIT |
13 |
|
|
|
||
28 |
|
|
|
14 |
29 |
|
/WIDE |
PC |
15 |
|
|
|
||
30 |
|
RC 1205 |
16 |
|
|
|
|
||
English - 6 -

LCD TV and Operating Buttons
+ |
+ |
FRONT VIEW
|
1. |
Standby button |
|
2. |
TV/AV button |
TV/AV |
3. |
MENU button |
MENU |
4. |
Programme Up/ |
+ |
|
Down buttons |
P/CH |
5. |
Volume Up/Down |
|
||
+ |
|
buttons |
SIDE VIEW
REAR VIEW
English - 7 -

Viewing the ConnectionsBack Connectors
12
1.S/PDIF Out outputs digital audio signals of the currently watched source.
Use a digital optic cable to transfer audio signals to a device that has S/PDIF input.
2.Subwoofer Out is for connecting an external, active subwoofer to the set to give a much deeper bass effect.
Use an appropriate RCA cable to connect the set to a subwoofer unit.
3.Audio Line Out outputs audio signals to an external device such as an optional sound system.
To connect an external amplifier and speakers to your TV; connect the TV’s audio LINE OUT sockets to the line input sockets on an external amplifier with a stereo phono to phono cable.
4.SCART 2 inputs or outputs for external devices.
5.SCART 1 inputs or outputs for external devices.
Connect the SCART cable between SCART sockets on TV and SCART socket on your external device (such as a decoder, a VCR or a DVD player).
Note: If an external device is connected via the SCART sockets, the TV will automatically switch to AV mode. If both sockets are employed at the same time, SCART 1 will override SCART 2 unless manually selected.
Note: You should connect the decoder to EXT-1, if you are planning to watch a scrambled channel. The decoder might not function properly if you do not connect the decoder to the Scart 1 (Ext-1) socket.
6.Component Video Inputs (YPbPr) are used for connecting component video.
You can connect the component video and audio sockets with a device that has component
English - 8 -
output. Connect the component video cables between the COMPONENT VIDEO INPUTS on on the TV and the component video outputs of your device. While connecting, be sure that the letters on your TV, “Y”, “Pb”, “Pr” correspond with your device’s connectors.
7.PC/YPbPr Audio Inputs are used for connecting audio signals of a PC or a device that connects to the TV via YPbPr.
Connect the PC audio cable between the AUDIO INPUTS on the TV and audio output of your PC to enable PC audio.
Connect the audio cable between AUDIO IN on the TV and audio outputs of your device to enable component audio.
8.S/PDIF Coaxial Out outputs digital audio signals of the currently watched source.
Use an SPDIF coaxial cable to trasfer audio signals to a device that has S/PDIF input.
9.ANT Input connects to an aerial.
Note that if you use a decoder or a media recorder, you should connect the aerial cable through the device to the television with an appropriate aerial cable, as shown in the illustration on the following pages.
10.PC Input is for connecting a personal computer to the TV set.
Connect the PC cable between the PC INPUT on the TV and the PC output on your PC.
11.HDMI-2: HDMI Input
HDMI Inputs are for connecting a device that has an HDMI socket.
Your LCD Television is capable of displaying High Definition pictures from devices such as a High Definition Satellite Receiver or DVD Player. These devices must be connected via the HDMI sockets or Component Socket. These sockets can accept either 720p or 1080i signals. No sound connection is needed for an HDMI to HDMI connection.
12.HDMI 1: HDMI Input
If you use a wall mount kit (not provided with the LCD TV), we would definitely recommend to plug all your cables into the back of the LCD before mounting to the wall.
English - 9 -
Viewing the Connections - Side Connectors
1.CI Slot is used for inserting a CI card. A CI card allows you to view channels that you subscribe to. For more information, see “Conditional Access” section.
2.Headphone jack is used for connecting an external headphone to the system. Connect to the HEADPHONE jack to listen to the TV from headphones.
3.Video Input is used for connecting video signals from external devices.Connect the video cable between the VIDEO IN socket on the TV and the VIDEO OUT jack on your device.
4.Audio Inputs are used for connecting audio signals from external devices. Connect the audio cable between AUDIO IN on the TV and the AUDIO OUTPUT jacks on your device. Note: If you connect a device to the TV via the VIDEO INPUT, you should also connect your device with an audio cable to AUDIO IN on the TV to enable audio.
5.Switch is used for turning the TV on or off.
English - 10 -

Power Connection
IMPORTANT: The TV set is designed to operate on 220-240V AC, 50 Hz.
•After unpacking, allow the TV set to reach the ambient room temperature before you connect the set to the mains.
•Plug the power cable to the mains socket outlet.
Aerial Connection
• Connect the aerial or cable TV plug to the AERIAL INPUT socket located at the rear of the TV.
REAR VIEW
Using the Cable Holder
You can use the supplied cable holder as the following:
•Place the cable holder into the cable holder hole located on the rear side of the TV as illustrated above.
•Place cables into the cable holder after all necessary connections are made.
English - 11 -

Connecting the LCD TV to a PC
For displaying your computer’s screen image on your LCD TV, you can connect your computer to the TV set.
•Power off both computer and display before making any connections.
•Use 15-pin D-sub display cable to connect a PC to the LCD TV.
•When the connection is made, switch to PC source. See “Input selection” section.
•Set the resolution that suits your viewing requirements. Resolution information can be found in the appendix section.
REAR VIEW
Audio |
PC Input |
|
Inputs |
||
|
||
PC audio cable |
PC RGB cable |
|
(not supplied) |
(not supplied) |
|
to AUDIO INPUTS |
to PC input |
|
on the TV |
|
English - 12 -

Connecting to a DVD Player
If you want to connect a DVD player to your LCD TV, you can use connectors on the TV set. DVD players may have different connectors. Please refer to your DVD player’s instruction book for additional information. Power off both the TV and the device before making any connections.
Note: Cables shown in the illustration are not supplied.
•If your DVD player has an HDMI socket, you can connect via HDMI. When you connect to DVD player as illustrated below, switch to HDMI source. See, “Input Selection” section.
•Most DVD players are connected through SCART sockets. Use a scart cable to connect as shown below.
•You may also connected through COMPONENT sockets. Use a component video cable to connect video input. For enabling audio, use a component audio cable as illustrated below. When done, switch to YPbPr source. See, “Input selection” section.
Note: These three methods of connection perform the same function but in different levels of quality. It is not necessary to connect by all three methods.
|
|
|
|
|
|
|
|
|
|
|
|
|
|
|
|
|
|
|
|
|
|
|
|
|
|
|
|
|
|
|
|
|
|
|
|
|
|
|
|
|
|
|
|
|
|
|
|
|
|
|
|
|
|
|
|
|
|
|
|
|
|
|
|
|
|
|
|
|
|
|
|
|
|
|
|
|
|
|
|
|
|
|
|
|
|
|
|
|
|
|
|
|
|
|
|
|
|
|
|
|
|
|
|
|
|
|
|
|
|
|
|
|
|
|
|
|
|
|
|
|
|
|
|
|
|
|
|
|
|
|
|
|
|
|
|
|
|
|
|
|
|
|
|
|
|
|
|
|
|
|
|
|
|
|
|
|
|
|
|
|
|
|
Component |
Component |
|
|
|
|
|
|
|||||
Scart sockets |
video |
audio |
|
|
HDMI |
||||||||||
inputs |
inputs |
|
|
||||||||||||
|
|
|
|
|
inputs |
||||||||||
|
|
|
|
|
|
|
|
|
|
|
|
||||
DVD Player
REAR VIEW
English - 13 -

Using Side AV Connectors
You can connect a range of optional equipment to your LCD TV. Possible connections are shown below. Note that cables shown in the illustration are not supplied.
•For connecting a camcorder, connect to the VIDEO IN socket and the AUDIO SOCKETS. For selecting the related source, see the section “Input selection” in the following parts.
•To listen the TV sound from headphones, connect to the HEADPHONE jack of theTV.
Headphone
Camcorder
SIDE VIEW
English - 14 -
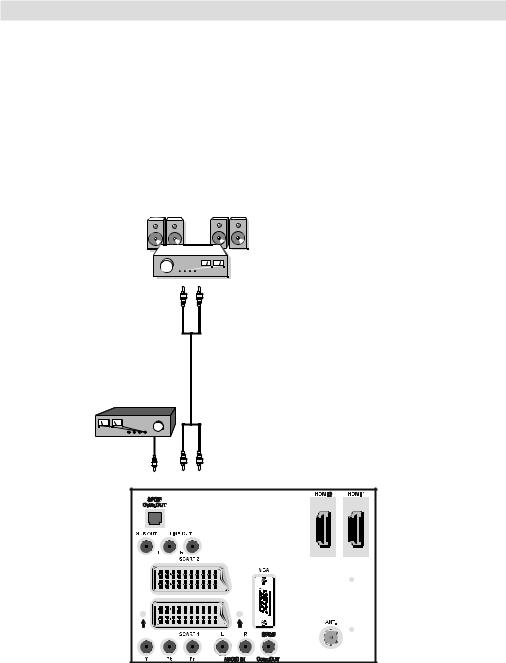
Using Other Connectors
You can connect a range of optional equipment to your LCD TV. Possible connections are shown below. Note that cables shown in the illustration are not supplied.
•For connecting a to a device that has SPDIF support, use an appropriate SPDIF cable to enable sound connection.
•To connect external speakers; connect the audio output sockets on the TV to an external amplifier that is connected to a speaker system.
•After connecting the cable between your TV and external amplifier, turn your TV and amplifier on.
•You can refer to your amplifier and speaker set instruction manual for further information.
External Speakers
A device that supports SPDIF signal.
REAR VIEW
English - 15 -
Loading...