


Table of Contents |
|
Before Connection .................................................................................................................. |
3 |
For your safety ......................................................................................................................................... |
3 |
Precautions .............................................................................................................................................. |
3 |
Connection .............................................................................................................................. |
5 |
Connect to the TV ................................................................................................................................... |
5 |
Connecting the Speakers ....................................................................................................................... |
5 |
Connecting the Antenna ......................................................................................................................... |
5 |
Connecting Control Cable ..................................................................................................................... |
6 |
Connect to the amplifier with digital signal input terminal ................................................................ |
6 |
Connect to the VCR ................................................................................................................................ |
6 |
Connecting to a PC ................................................................................................................................ |
7 |
Connecting the AC Power Cord ............................................................................................................. |
7 |
Connecting the Headphones ................................................................................................................. |
7 |
Control Locations ................................................................................................................... |
7 |
The DVD Player ...................................................................................................................................... |
7 |
The DAB / FM RADIO ............................................................................................................................. |
8 |
The MP3 Player ...................................................................................................................................... |
8 |
The Amplifier ........................................................................................................................................... |
8 |
Remote control ........................................................................................................................................ |
9 |
Installation of Batteries in the Remote Control .................................................................. |
10 |
Turning the Power On and Off ............................................................................................. |
10 |
Button Functions .................................................................................................................. |
10 |
DVD Menu Options ............................................................................................................... |
14 |
Menu function setup ............................................................................................................................. |
14 |
General Setup Page ............................................................................................................................. |
15 |
Audio Setup Page ................................................................................................................................ |
15 |
Video Setup Page ................................................................................................................................ |
15 |
Preference Page ................................................................................................................................... |
16 |
Password Setup Page ........................................................................................................................... |
16 |
Picture CD’s ......................................................................................................................... |
16 |
DAB/FM Radio ...................................................................................................................... |
17 |
MP3 Functions ..................................................................................................................... |
21 |
Listening to MP3 Player ....................................................................................................................... |
21 |
MP3 Recording ...................................................................................................................................... |
22 |
Clock/Timer Functions ......................................................................................................... |
24 |
Setting the Daily Timer ........................................................................................................................ |
25 |
Setting the Sleep Timer ....................................................................................................................... |
25 |
Protect the Disc .................................................................................................................... |
26 |
Troubleshooting ................................................................................................................... |
26 |
Specification ......................................................................................................................... |
27 |
Manufactured under license from Dolby Laboratories.
“Dolby”, “Pro Logic” and the double-D symbol are trademarks of Dolby Laboratories.
- 1 -
Disc types
|
|
Disc size 12cm |
|
Audio & Video |
single side, single layer / single side, double layer |
|
PAL and NTSC DVD disc |
|
|
|
|
|
|
Playback time 135min/240min max. |
|
|
|
|
Audio |
Disc size 12cm / 8cm |
|
CD Disc |
|
|
|
Playback time 74min/20min |
|
|
|
MP3 |
Audio |
MP3 Format disc |
|
|
|
*Player is CD-R, CD-RW compatible
Note: CD-R, CD-RW Discs recorded with writing device can only be used when they are correctly treated.
*Region Management Information
This DVD Player is designed and manufactured to respond to the Region Management Information that is recorded on a DVD disc. If the Region number described on the DVD disc does not correspond to the Region number of this DVD Player, this DVD Player cannot play that disc.
This Region number of this DVD Player is 2 .
- 2 -
Before Connection
Thank you for purchasing this hi-fi component system, in order to fully utilize this system, please read this instruction book carefully before use.
For your safety
CAUTION
RISK OF ELECTRIC SHOCK
DO NOT OPEN
CAUTION:
TO REDUCE THE RISK OF ELECTRIC SHOCK, DO NOT REMOVE COVER. NO USER SERVICEABLE PARTS INSIDE, REFER SERVICING TO QUALIFIED SERVICE PERSONNEL.
This symbol indicates that dangerous voltage constituting a risk of electric shock is present within this unit.
This symbol indicates that there are important operating and maintenance instructions in the literature accompanying this unit.
Caution:
To prevent fire or shock hazard, do not expose this equipment to rain or moisture.
Power Requirement
Because the power requirement of electrical products is different in various places, before you use this product, make sure that the power requirement of the product matches your household power.
Laser Product
This product is equipped with low power laser equipment inside. For your safety, don’t take apart any covers or try to take apart the product inside. Please contact an authorized service person for repairing.
CLASS 1
LASER PRODUCT
Caution:
This product is equipped with low power laser equipment inside, for your safety, don’t open the laser radiation protective equipment. Don’t look at the laser radiation when the equipment is operating.
Precautions
This equipment has been designed and manufactured to meet international safety standards but, like any electrical equipment, care must be taken if you are to obtain the best results and safety is to be assured.
…………………………….
DO read the operating instructions before you attempt to use the equipment.
DO ensure that all electrical connections (including the mains plug, extension leads and interconnections between the pieces of equipment) are properly made and in accordance with the manufacturer’s instructions. Switch off and withdraw the mains plug before making or changing connections.
DO consult your dealer if you are ever in doubt about the installation, operation or safety of your equipment. DO be careful with glass panels or doors on equipment
…………………………….
DON’T remove any fixed cover as this may expose dangerous voltages.
- 3 -

DON’T obstruct the ventilation openings of the equipment with items such as newspapers, tablecloths, curtains, etc. Overheating will cause damage and shorten the life of the equipment.
DON’T allow electrical equipment to be exposed to dripping or splashing, or objects filled with liquids, such as vases, to be placed on the equipment and don’t handle the power cord with wet hands.
DON’T place hot objects or naked flame sources such as lighted candles or nightlights on, or close to equipment. High temperatures can melt plastic and lead to fires.
DON’T use makeshift stands and NEVER fix legs with wood screws - to ensure complete safety always fit the manufacturer’s approved stand or legs with the fixings provided according to the instructions.
DON’T listen to headphones at high volume, as such use can permanently damage your hearing. DON’T leave equipment switched on when it is unattended unless it is specifically stated that it is
designed for unattended operation or has a stand-by mode. Switch off using the switch on the equipment and make sure that your family knows how to do this. Special arrangements may need to be made for infirm or handicapped people.
DON’T continue to operate the equipment if you are in any doubt about it working normally, or if it is damaged in any way - switch off, withdraw the mains plug and consult your dealer.
…………………………….
ABOVEALL,
NEVER let anyone especially children push anything into holes, slots or any other opening in the case - this could result in a fatal electrical shock;
NEVER guess or take chances with electrical equipment of any kind…it is better to be safe than sorry!
…………………………….
*Before operating this system, check the voltage of this system to see if it is identical with the voltage of your local power supply.
*Unplug the system from the wall outlet if it is not used for a long time. To disconnect the cord, pull it out by grasping the plug
*To avoid electric shock, do not open the cabinet.
*There are no user serviceable parts inside. In case of system failure, unplug the power cord and consult your dealer
*Do not place this unit on an unstable or sloping surface. Ensure good ventilation surrounding the product. To prevent fire, do not cover the ventilation of the apparatus with news papers, table-cloths, curtains, etc.
*Do not place this unit close to strong magnetic field.
*Don’t place this unit close to dampness, or the moisture will affect the life of the laser head.
*If the system is brought directly from a cold to a warm location, or is placed in a very damp room, moisture may condense on the lens inside the player. Should this occur, the system will not operate properly. Remove the disc and leave the system turned on for about an hour until the moisture evaporates.
*Should any solid object or liquid fall into the system, unplug the system and have it checked by qualified personnel before operating it again.
*Do not use attachments not recommended by the product manufacturer as they may cause hazards.
- 4 -
Connection
Caution: Please turn off all the equipment power before connecting.
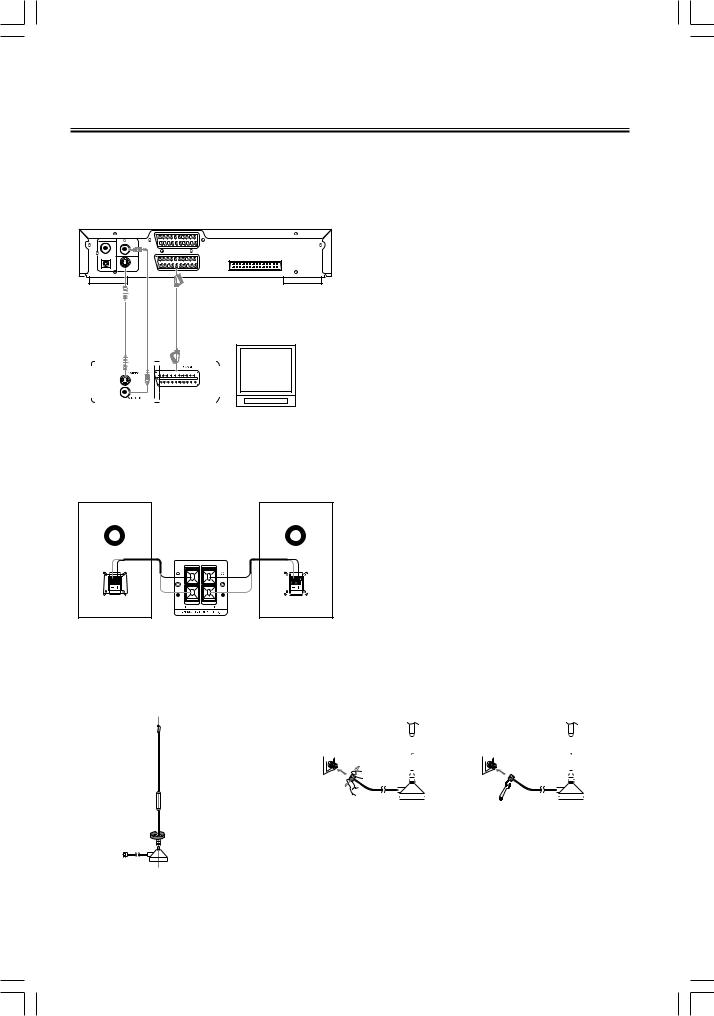
Connect to the TV
Connecting diagram
Terminal board for the DVD player
TV |
Connections to TV
Safety precautions
Some settings should be made for the unit according to the TV connection.
*According to the colour system setting of TV, select the colour system in the “TV Display” function setting.
*If the unit is connected to a wide screen TV, then set the “TV display” to “Wide” in the function setting menu.
*If the unit is connected to a TV, then set “TV display” to “Normal/PS” or “Normal/LB” in the function setting item.
Connecting the Speakers
Connect the speaker cords between the terminals as shown below.
Connect the cords with a silver line to the (+) (L) (R) terminals and cords with a gold line to the (-) (G) terminals.
Connection precautions
1. This unit has a high power output and wide dynamic range. If speakers other than those supplied are used, they must be chosen according to speaker specification, or the
speakers may be damaged.
2. Before connecting or removing mains power, please turn off the power on the unit and turn the volume to minimum or it may damage the speakers.
Connecting the Antenna
Tighten the antenna rod clockwise on the base of the antenna.
*The antenna should be connected to the antenna socket, tighten the antenna by hand with tool supplied. (Please note: Do not overtighten, this could damage the antenna or it’s fittings.)
*Position the antenna for the best reception.
Warning: The antenna supplied has a magnetic base. It must not be placed on any products that are sensitive to magnetism, such a TV’s and computers as this may cause damage.
- 5 -
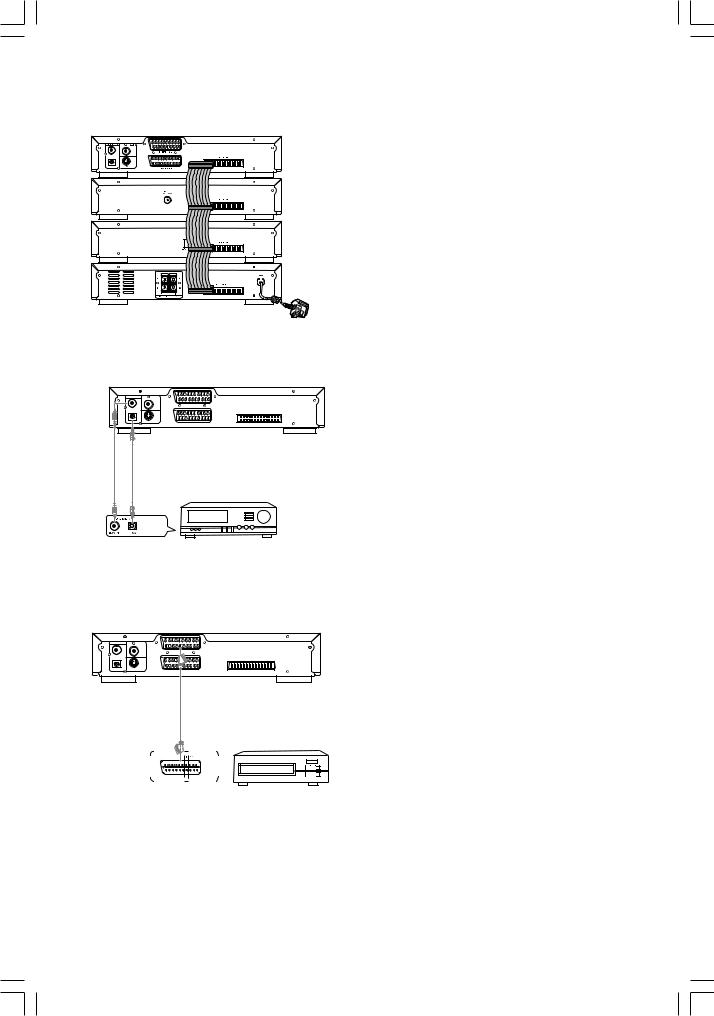
Connecting Control Cable
With the unit unplugged from the mains connect the power control cable to the DVD player, MP3 player, the amplifier and the radio via the connections on the rear of the units as shown .
Connect to the amplifier with digital signal input terminal
DVD player connections
Connection precautions
Please note: You can only use coaxial or optical, they can not be used at the same time.
With digital signal input terminal’s DTS,
Dolby Digital signal decode amplifier
With digital signal input terminal’s DTS, Dolby
Digital signal decode amplifier terminal board
Connect to the VCR
Terminal board for the DVD player
With VCR signal input |
terminal’s amplifier |
With VCR signal input terminal’s amplifier terminal board
- 6 -
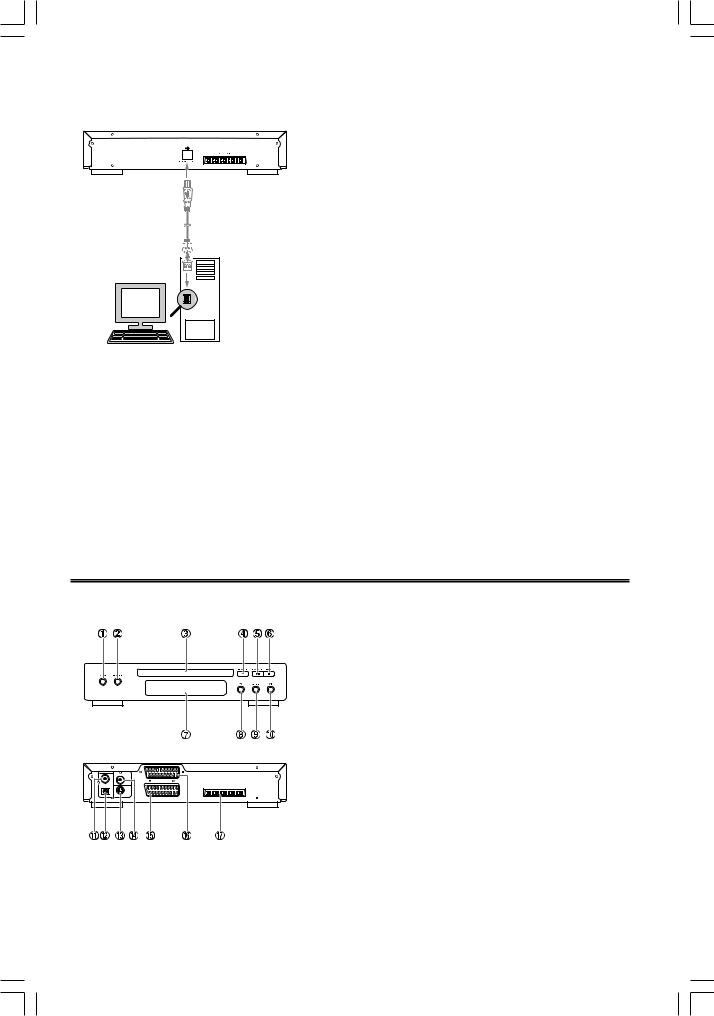
Connecting to a PC
The AX-M140 can be connected to a PC via the USB (B) Port on the rear of the unit. Music files on your PC can then be transferred to the Music bank for storage and play back through the AX-M140 HiFi. Your PC should see the AX-M140 Music bank as an external hard drive/storage device then files can be copied, pasted and deleted as desired.
Connecting the AC Power Cord
Insert the AC power cord into a wall outlet, and your system is ready for use.
Caution: Be sure to unplug the power cord from the outlet when going away or when the system is not in use for an extended period of time.
Connecting the Headphones
Connect a pair of headphones to the phone jacks. No sound comes out of the speakers. Note: Be sure to turn down the volume before connecting or putting on headphones.
Control Locations
The DVD Player
1. Vocal Mode Select / Language Select
2. Subtitle
3. Disc Tray
4. Open/Close
5. Play/Pause
6. Stop
7. VFD Display Lens
8. Previous
9. Repeat
10. Next
11. Digital Audio Out Coaxial
12. Digital Audio Out Optical
13. S-Video Output Terminal
14. Video Monitor Terminal
15. TV Scart Output
16. VCR Scart Input
17. Control Cable Connector
- 7 -
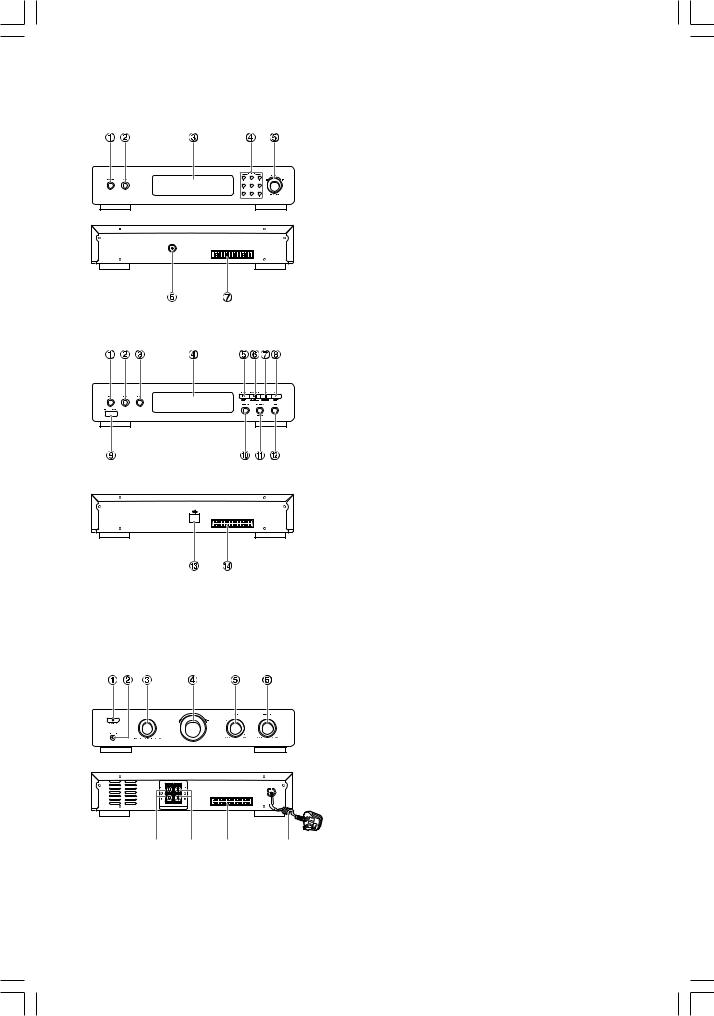
The DAB / FM RADIO
1. DAB/FM Switch
2. Information
3. VFD Display Lens
4. Number Buttons
5. Confirm
Select Down
Select Up
6. DAB/FM Antenna Jack
7. Control Cable Connector
The MP3 Player
1. |
File Copy |
2. |
Record |
3. |
CD-SYNC Record |
4. |
VFD Display Lens |
5. |
Previous |
|
Menu Select Down |
6. |
Play/Pause |
|
Menu Confirm |
7. |
Stop |
|
Menu Cancel |
8. |
Next |
|
Menu Select Up |
9. |
USB Storage Port/Portable MP3 connection |
10. |
Repeat |
11. |
Random |
|
Menu |
12. |
Intro |
13. |
USB Port (PC Connection ) |
14. |
Control Cable Connector |
The Amplifier |
|
1. |
Standby |
2. |
Headphone Jack |
3. |
Function |
4. |
Volume Control Knob |
5. |
Bass Control Knob |
6. |
Treble Control Knob |
7. |
Right Speaker Output Terminals |
8. |
Left Speaker Output Terminals |
9. |
Control Cable Connector |
10. |
AC Power Cord |
- 8 -
 Loading...