


HK BDS 2

harman/kardon
BDS 2 / BDS 5 Service Manual
Page 1 of 63
IMPORTANT INFORMATION ABOUT PAIRING NEW LOADER
WITH MAIN BOARD ON PAGE 64-65.
harman/kardon Service Manual
HK BDS 2 / BDS 5
2 x 65W and 5 X 65w multi-voltage Blu-ray home cinema
receivers
OWNER’S MANUAL INTRODUCTION 2
BDS SYSTEM ACCESSORIES 3
FRONT
REMOTE C
TROUBLESHOOTING GUIDE
BASIC SPECIFICATIONS
FFFF
ADDEDFSF
Released EU2010 Harman Consumer Group, Inc. Rev 4, 03/2012
8500 Balboa Boulevard
Northridge, California 91329
AND REAR PANELS 4
ONTROL FUNCTIONS
9
RE UPGRADE PROCESS 10
CONTENTS
TROUBLESHOOTING CHARTS 11
EXPLODED VIEW AND PARTS 22
BDS 2 PA
6
8
BDS 5 PA
PCB DRAWINGS 25
WIRING DI
SCHE
RTS LIST 23
RTS LIST 24
AGRAM 33
MATIC DIAGRAMS
34-63 SOFTWA
BDS
harman/kardon
BDS 2 / BDS 5 Service Manual
Page 2 of 63
Verify Line Voltage Before Using, Unpacking, Installation Location,
Cleaning, Moving the Receiver and Introduction
Introduction
Please register your product on our Web site at
www.harmankardon.com.
Note: You’ll need the product’s serial number.
At the same time, you can choose to be
notified about our new products and/or special
promotions.
Thank You for Choosing harman kardon® Products!
In the years since harman kardon engineers invented the high-fidelity receiver, we have
taken to heart this philosophy: Bringing the joy of home entertainment to as many people
as possible, adding performance and ease-of-use features that enhance the experience.
The BDS series of home entertainment systems offers a complete home entertainment
solution with a wealth of listening and viewing options in one sleek receiver. Each BDS
series system also includes a 5.1-channel, 2.1-channel or soundbar loudspeaker system,
a system remote control and all the cables and accessories you need to enjoy movies
and music in your own home, when you use them with your television or video display.
To get the maximum enjoyment from your new BDS system, we urge you to read this
manual thoroughly and refer back to it as you become more familiar with your new
system’s features and their operation.
If you have any questions about this product, its installation or its operation, please
contact your retailer or custom installer, or visit our Web site at www.harmankardon.com.
Verify Line Voltage Before Using
Your BDS receiver has been designed for use with 110 – 240-volt, 50Hz/60Hz AC current.
Your subwoofer has been designed for use with either 120-volt, 60Hz or 220 – 240-volt,
50/60Hz AC current, depending on where your system was sold. The receiver includes a
detachable IEC power cable designed for use in the region where the system is sold.
Connection to a line voltage other than that for which the units are intended can create
a safety and fire hazard and may damage the units. If you have any questions about
the voltage requirements for your specific model or about the line voltage in your area,
contact your dealer before plugging the unit into a wall outlet.
Unpacking
The carton and shipping materials used to protect your new player during shipment were
specially designed to cushion it from shock and vibration. We suggest that you save the
carton and packing materials for use in shipping if you move or if the unit ever needs
repair.
To minimize the size of the carton in storage, you may wish to flatten it. You can do it by
carefully slitting the tape seams on the carton’s bottom and collapsing it. You can store
cardboard inserts in the same manner. Packing materials that cannot be collapsed should
be saved along with the carton in a plastic bag.
If you do not wish to save the packaging materials, please note that the carton and
other sections of the shipping-protection materials are recyclable. Please respect the
environment and discard those materials at a local recycling center.
Remove the protective plastic film from the front-panel lens. Leaving the film in place will
affect the performance of your remote control.
Installation Location
• To ensure proper operation and to avoid the potential for safety hazards, place the
unit on a firm and level surface. When placing the unit on a shelf, be certain that the
shelf and any mounting hardware can support the weight of the product.
• Provide proper space both above and below the unit for ventilation. If this product will
be installed in a cabinet or other enclosed area, make certain that there is sufficient
air movement within the area. Under some circumstances, a fan may be required.
• Do not place the unit directly on a carpeted surface.
• Avoid installation in extremely hot or cold locations or in an area that is exposed to
direct sunlight or heating equipment.
• Avoid moist or humid locations.
• Do not obstruct the fan vents on the rear panel or the ventilation slots on the top and
sides of the unit or place objects directly over or next to them.
• Do not place the receiver directly on top of a product that generates excessive
heat.
• Due to the heat generated by the receiver and other components in your system,
there is the remote possibility that the rubber padding on the bottom of the unit’s
feet may leave marks on certain wood or wood-veneer materials. Use caution when
placing the unit on soft woods or other materials that heat or heavy objects may
damage. Some surface finishes may be particularly sensitive to absorbing such
marks, due to a variety of factors beyond harman kardon control, including the
nature of the finish, cleaning materials used, normal heat and vibration caused by
the use of the product, or other factors. Your warranty will not cover this type of
damage to furniture, so exercise caution in choosing an installation location for the
component and in performing normal maintenance practices.
• Your new harman kardon
connection for BD-Live™ interactivity.
®
Blu-ray Disc™ player requires a broadband Internet
Cleaning
Receiver
When the receiver gets dirty, wipe it with a clean, soft, dry cloth. If necessary, and only
after unplugging the AC power cord, wipe it with a soft cloth dampened with mild soapy
water, then a fresh cloth with clean water. Wipe it dry immediately with a dry cloth. NEVER
use benzene, aerosol cleaners, thinner, alcohol or any other volatile cleaning agent. Do
not use abrasive cleaners, as they may damage the finish of metal parts. Avoid spraying
insecticide near the unit.
Speakers and Subwoofer
When needed, use a soft cloth to remove any fingerprints or dust from the enclosures or
grilles. NOTE: Do not use any cleaning products or polishes on the enclosures or grilles.
Moving the Receiver
Before moving the receiver, disconnect any interconnection cords to other components,
and disconnect the unit from its AC outlet.
NOTE: The built-in Blu-ray Disc/DVD player in your BDS receiver is designed
and manufactured for compatibility with region management information that is
encoded on most Blu-ray Disc recordings and DVD recordings:
• BDS receivers sold in the USA are designed only for playback of discs
with Blu-Ray Disc Region Code A and DVD Region Code 1 information, or
for discs that do not contain any region code information.
• BDS receivers sold in Europe are designed only for playback of discs with
Blu-ray Disc Region Code B and DVD Region Code 2 information, or for
discs that do not contain region code information.
If there is a region code on a disc other than the one your BDS player is designed
for, it will not play in your BDS receiver.
3
BDS
harman/kardon
BDS 2 / BDS 5 Service Manual
Page 3 of 63
System Components and Supplied Accessories
System Components
Your BDS system includes the following components:
BDS 800 System
1 x BDS 5 5.1-channel Blu-ray Disc receiver
4 x SAT-TS60 satellite speakers
1 x SAT-TS60 center speaker
1 x HKTS200SUB powered subwoofer
BDS 700 System
1 x BDS 5 5.1-channel Blu-ray Disc receiver
4 x SAT-TS7 satellite speakers
1 x CEN-TS7 center speaker
1 x HKTS200SUB powered subwoofer
BDS 600 System
1 x BDS 5 5.1-channel Blu-ray Disc receiver
1 x SB10 soundbar speaker
1 x HKTS210SUB powered subwoofer
BDS 400 System
1 x BDS 2 2.1-channel Blu-ray Disc receiver
2 x SAT-TS60 satellite speakers
1 x HKTS200SUB powered subwoofer
BDS 300 System
1 x BDS 2 2.1-channel Blu-ray Disc receiver
2 x SAT-TS11 satellite speakers
1 x HKTS200SUB powered subwoofer
Supplied Accessories
If any of these items are missing, please contact harman kardon Customer Service via
www.harmankardon.com.
BDS 800, BDS 400 Systems
System
remote
control
EJECT POWER TV
iPOD
RADIO
DISC
A - B
REPEAT
SETTINGS
2
1
5
4
8
7
0
CLEAR
SURROUND
OPTIONS
HOME
OK
EXIT
POP-UP
TOP MENU
+ +
VOLUME
CHANNEL
MUTE
PROGRAM
BOOKMARK
THUMBNAIL
HDMI™ cable
AUX
DISPLAY
3
6
9
FIND
––
ZOOM
FM wire antenna
Two 5-meter (16.4-foot)
speaker cables – red and
white color bands
Satellite speaker
wall-mount brackets
(four with BDS 800
system, two with
BDS 400 system)
BDS 700, BDS 300 Systems
System
remote
control
EJECT POWER TV
iPOD
RADIO
AUX
DISC
A - B
REPEAT
DISPLAY
SETTINGS
2
1
3
5
6
4
8
9
7
0
FIND
CLEAR
SURROUND
OPTIONS
HOME
OK
EXIT
POP-UP
TOP MENU
+ +
VOLUME
CHANNEL
MUTE
––
PROGRAM
ZOOM
BOOKMARK
THUMBNAIL
One 4-meter (13.1-foot) speaker
cable for center speaker – green
color band (BDS 700 system only)
One mono RCA audio cable for
connection to the subwoofer –
purple connectors
BDS 600 System
System
remote
control
EJECT POWER TV
iPOD
RADIO
DISC
A - B
REPEAT
SETTINGS
2
1
5
4
8
7
0
CLEAR
SURROUND
OPTIONS
HOME
OK
EXIT
POP-UP
TOP MENU
+ +
VOLUME
CHANNEL
MUTE
PROGRAM
BOOKMARK
THUMBNAIL
AUX
DISPLAY
3
6
9
FIND
––
ZOOM
Two soundbar wallmount brackets
Two rubber feet
HDMI cable
FM wire antenna
Two 5-meter (16.4-foot)
speaker cables – red and
white color bands
Two 10-meter (32.8-foot) speaker cables
for rear satellites – gray and blue color
bands (BDS 700 system only)
Satellite speaker wallmount brackets and
hardware (four with
BDS 700 system, two
with BDS 300 system)
One center speaker
wall-mount bracket
(BDS 700 system only)
HDMI cable
FM wire antenna
Three speaker cables
Center speaker wallmount bracket (BDS
800 system only)
One mono RCA audio cable for
connection to the subwoofer –
purple connectors
4
One 4-meter (13.1-foot)
speaker cable for center
speaker – green color band
(BDS 800 system only)
Two 10-meter (32.8-foot) speaker cables
for rear satellites – gray and blue color
bands (BDS 800 system only)
Metal stop plates
and screws for
satellite speaker
wall-mount
brackets (four
with BDS 800
system, two with
BDS 400 system)
One mono RCA audio cable for
connection to the subwoofer –
purple connectors
BDS
harman/kardon
BDS 2 / BDS 5 Service Manual
Page 4 of 63
Receiver Front-Panel Controls
Receiver Front-Panel Controls
Disc Slot Information Display
Disc Slot: Insert a compatible disc into the slot. The BDS receiver’s disc player will
accept 5-inch (12cm) and 3-inch (8cm) discs.
Information Display: Various messages appear on this display in response to
commands and to show the audio/video that is playing, the settings or other aspects
of the BDS receiver’s status as described throughout this manual.
Eject Button (on top of unit): Press this button to eject a disc from the BDS
receiver’s built-in disc player. Before pressing this button, make sure no objects are
blocking the disc-slot opening. NOTE: If you do not remove the ejected disc within
90 seconds, it will automatically re-load back into the disc player for protection.
Standby Button (on top of unit): This button toggles the receiver between the On
and Standby modes.
Power Indicator: This LED surrounds the Standby button. When the BDS receiver
is plugged into AC power, the LED turns amber to indicate that the receiver is in
Standby mode (ready to be turned on). When you turn the BDS receiver on (by the
Standby button or the remote control’s Power button), the LED turns white.
Headphone Jack: Insert the 3.5mm stereo mini connector from a set of headphones
Eject Button
(on top panel)
Headphone Jack
into this jack. NOTE: When a plug is inserted into the Headphone jack, the BDS
receiver’s speaker outputs automatically mute; the HDMI audio output remains
active.
Volume Control: Rotate the disc clockwise to raise the volume; rotate
counterclockwise to lower the volume. The volume level will appear on the
Information Display and on the on-screen menu.
IMPORTANT: Do not turn the receiver’s Volume control up to or past the point
where the audio from the speakers becomes distorted. Doing so can damage the
speakers.
USB 2.0 Port: Gently insert a flash drive or HDD disk drive with a USB Standard-A
cable to this port.
IMPORTANT: Do not connect a PC or other USB host/controller to this port, or
you may damage both the BDS receiver and the other device.
Orient the device’s plug so it fits all the way into the BDS receiver’s USB connector.
You may insert or remove the device at any time – there is no installation or ejection
procedure.
Standby Button
(on top panel)
USB Port
Volume Control
5
BDS
harman/kardon
BDS 2 / BDS 5 Service Manual
Page 5 of 63
Receiver Rear-Panel Connections
Receiver Rear-Panel Connections
Main Power Switch Speaker Connectors (BDS 5 Shown)
AC Power Connector
NOTE: See the Connections section, on page 14, for detailed information about
making connections.
AC Power Connector: After you have made and verified all other connections, plug
the supplied AC power cord into this input and into an unswitched AC outlet.
Main Power Switch: This mechanical switch turns the BDS receiver’s power supply
on or off. After you have made and verified all connections (see the Connections
section, on page 14), set this switch in the On position. During normal use you will
usually leave this switch set to On; it cannot be turned on or off using the remote
control. To conserve energy when you’re not going to be using the receiver for an
extended period of time, set this switch to Off.
Speaker Connectors: Use the speaker wires supplied with the speakers to connect
the satellite and center speakers to the proper terminals.
•
The BDS 5 receiver (shown) has connections for five speakers: front left, front
right, surround left, surround right and center.
•
The BDS 2 receiver (not shown) has connections for two speakers: front left
and front right.
See Connections, on page 14, for more information.
Subwoofer Output: Use the supplied mono RCA audio cable (with the purple
connectors) to connect this jack to the subwoofer’s Line-Level In LFE jack.
See Connecting the Subwoofer, on page 16, for more details about making
connections.
BD-Live Connector: To be able to use the BD-Live feature, connect this port to your
local area network (LAN) using a Cat. 5/Cat. 5e/RJ-45 network cable. See BD-Live
Interactivity, on page 25, for details.
Cooling Fan Air Exhaust Optical
BD-Live Connector
Digital
Inputs
Subwoofer
Output
Optical Digital Inputs: Connect the optical digital output of an audio-only source
component here. The signal may be a Dolby
a standard PCM digital-audio bitstream.
NOTE: Use only one type of digital connection for each source component.
Coaxial Digital Input: Connect the coaxial digital output of an audio-only source
component here. The signal may be a Dolby Digital bitstream, a DTS bitstream or a
standard PCM digital-audio bitstream.
NOTE: Use only one type of digital connection for each source component.
HDMI Output (HDMI ver. 1.3a): Connect the BDS receiver’s HDMI output to your
TV’s HDMI input. Since the HDMI cable transmits both video and audio to the TV, we
recommend that you set the receiver’s HDMI audio output to Off in the receiver’s
Audio menu to take full advantage of your BDS system’s superior audio performance.
See Audio Settings, on page 21, for more information.
IMPORTANT: Your BDS receiver is in compliance with HDCP (High-Definition Copy
Protection). Your TV must also be HDCP-compliant to be used with the BDS receiver’s
HDMI output. For best results, we do not recommend HDMI connections in excess of
ten feet (about 3 meters) without a repeater. If your TV has a DVI input, you may use
an optional HDMI-to-DVI cable or adapter for the video connection to the TV. (The
DVI connection is video-only.)
Analog Audio Inputs 1 and 2: Use these inputs to connect to an audio-only source
component (such as a tape deck). Do not connect a turntable to these jacks without
a phono preamp.
The Bridge IIIP Connector: Connect The Bridge IIIP iPod/iPhone dock (available
separately) to this terminal.
FM Antenna Connector: Connect the supplied FM antenna to this terminal.
HDMI Output
Coaxial
Digital Input
Analog
Audio
Inputs
The Bridge IIIP
Connector
®
Digital bitstream, a DTS® bitstream or
FM Antenna Connector
6
BDS
harman/kardon
BDS 2 / BDS 5 Service Manual
Page 6 of 63
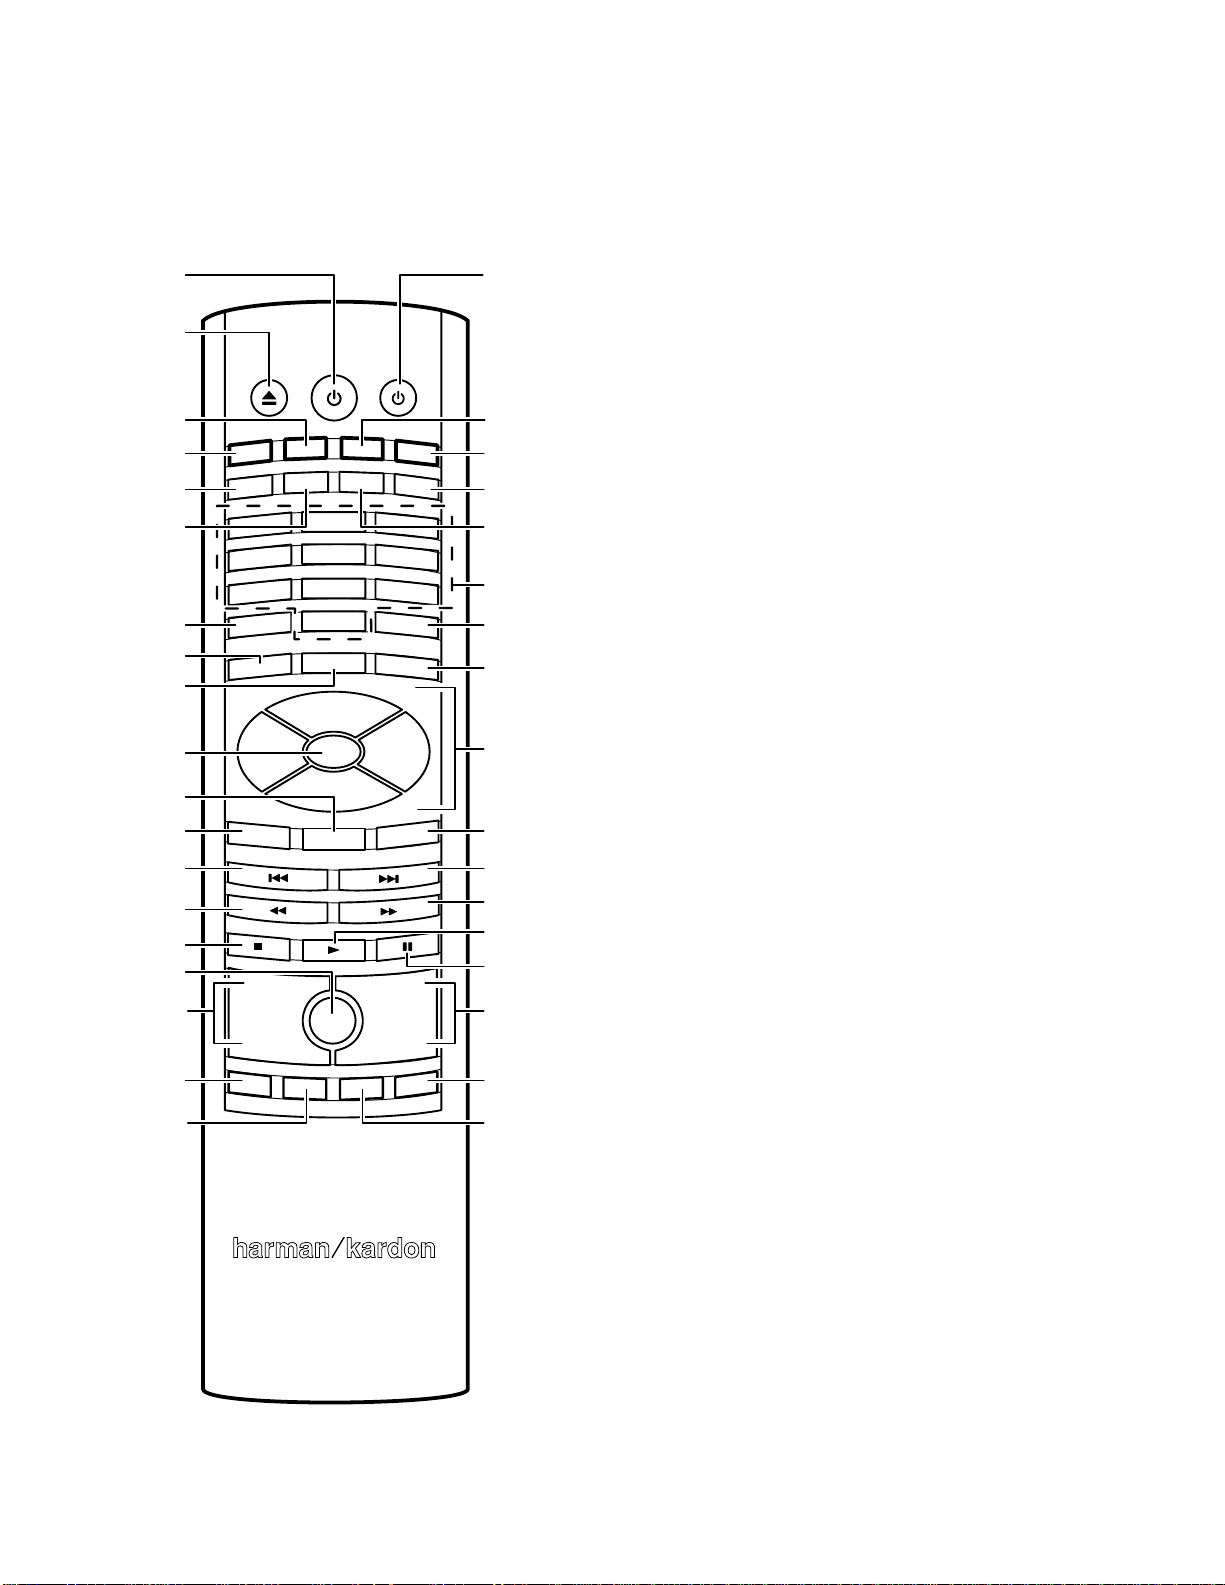
Remote Control Functions
Remote Control Functions
Power Button
Eject Button
EJECT POWER TV
Radio Button
RADIO
Disc Button
Settings Button
Repeat Button
Clear Button
Home Button
Surround Button
OK Button
Top Menu Button
Exit Button
Previous/Step
Button
Search/Slow
Reverse Button
Stop Button
Mute Button
Volume Up/Down
Buttons
Program (Red)
Button
Bookmark
(Green) Button
DISC
REPEAT
SETTINGS
1
4
7
CLEAR
EXIT
SURROUND
TOP MENU
HOME
+ +
VOLUME
PROGRAM
BOOKMARK
2
5
8
0
OK
MUTE
iPOD
A - B
THUMBNAIL
DISPLAY
3
6
9
FIND
OPTIONS
POP-UP
CHANNEL
––
AUX
ZOOM
TV Power Button
iPod Button
Aux Button
Display Button
A-B Button
Numeric Buttons
Find Button
Options Button
Cursor Controls
Pop-Up Menu
Button
Next/Step Button
Search/Slow
Forward Button
Play Button
Pause Button
Channel Up/
Down Buttons
Zoom (Blue)
Button
Thumbnail
(Yellow) Button
Eject Button: Press this button to eject a disc from the BDS receiver’s built-in disc
player. Before pressing this button, make sure no objects are blocking the disc slot
opening.
Power Button: Pressing this button toggles the BDS receiver between the On and
Standby modes.
TV Power Button: After you program the remote control, pressing this button turns
the TV’s power on and off. See Programming the Remote, on page 18.
Disc Button: Pressing this button selects the BDS receiver’s built-in disc player as
the system’s active audio and video source and plays a disc that has been inserted
into the player. Pressing this button also puts the remote control into the disc player
control mode. See Using the Disc Player, on page 23, for details. NOTE: Pressing this
button when the BDS receiver is in the Standby mode will switch it on.
Radio Button: Pressing this button selects the BDS receiver’s built-in FM radio as
the system’s active audio source. Pressing this button also puts the remote control
into the control mode for the radio. See Using the Radio, on page 26, for details.
NOTE: Pressing this button when the BDS receiver is in the Standby mode will
switch it on.
iPod Button: Pressing this butt on s elect s an iPo d inse rted in a conn ected
The Bridge IIIP dock (available separately) as the system’s active audio source.
Pressing this button also puts the remote control into the control mode for the iPod.
See Listening to Your iPod/iPhone, on page 25, for details. NOTE: Pressing this
button when the BDS receiver is in the Standby mode will switch it on.
Aux Button: Pressing this button selects the receiver’s active rear-panel audio input
as the system’s active audio source. Repeatedly pressing the button cycles through
all of the rear-panel audio inputs. See Listening to Audio Sources, on page 26, for
details.
Pressing this button also places the remote into the auxiliary-component control
mode, enabling the remote to use any pre-programmed and/or learned functions.
See Listening to Audio Sources, on page 26, for details. NOTE: Pressing this button
when the BDS receiver is in the Standby mode will switch it on.
Settings Button: Pressing this button displays the BDS receiver’s Settings menu.
See Settings Menus, on page 20, for details.
Repeat Button: When the BDS is playing a Blu-ray Disc recording or DVD, pressing
this button cycles through the following repeat modes: Chapter, Title, All, Off. When
the BDS is playing a CD or listening to media stored on an iPod or USB device, this
button cycles through the following repeat modes: Track, All, Off.
A-B Button: Pressing this button activates the A-B repeat mode. The first press sets
the “A” repeat point; the second press sets the “B” repeat point and begins repeating
the section of the program between the two points. Pressing the A-B button while
the A-B repeat mode is active cancels the A-B repeat mode. This feature works both
for the built-in disc player and for content from a USB device. Note: This feature is
disc-dependent. Some discs do not allow A-B repeat.
Display Button: When playing Blu-ray Disc and DVD recordings, pressing this
button activates a bar display containing information about the currently-playing
disc or program. The button does not function when the BDS is playing material from
an iPod, a USB device, an auxiliary source or the radio.
Numeric Buttons: Use these buttons to enter numbers for various items.
Clear Button: This button clears an incorrect entry made using the Numeric
buttons.
Find Button: Pressing this button during disc playback activates the search function,
allowing you to jump to a specific location on the disc. You can find a location by
title, chapter or time. Note: This feature is disc-dependent. Some discs do not allow
finding locations by title.
Home Button: Pressing this button returns the on-screen display to the Home
screen from whatever screen is active when the button is pressed.
8

BDS
harman/kardon
BDS 2 / BDS 5 Service Manual
Page 7 of 63
Remote Control Functions
Surround Button: Pressing this button cycles through all of the surround-sound
modes that are available for the active program. Each press of the Surround button
will change to the next mode in line. A pop-up display will appear, showing the
modes as you cycle through them. NOTE: Not all surround modes will be available
for all programs. See Surround-Sound Modes, on page 23, for more information.
Options Button: Pressing this button displays any available options for the item
that is active at the time the button is pressed. When listening to an Aux source,
pressing the Options button lets you adjust the audio delay to eliminate “lip sync”
errors between the sound and picture when watching video programs with sound
playing through one of the receiver’s rear-panel audio inputs. See Listening to Audio
Sources, on page 26, for details.
Cursor Controls: Use these buttons to navigate through items on the on-screen
menu.
OK Button: Press this button to select the highlighted item on the on-screen menu.
Exit Button: Pressing this button exits the current on-screen menu and displays the
previous screen.
Top Menu Button: Displays the top menu of the Blu-ray Disc recording or DVD that
is playing. NOTE: This feature is disc-dependent. Not all DVDs have top menus. If
the DVD has no top menu, pressing the Top Menu button may display the disc menu,
depending on how the disc’s menu system was authored. See Using the Disc Player,
on page 23, for details.
Pop-Up Button: Pressing this button while playing a Blu-ray Disc recording or DVD
displays its disc menu. NOTE: This feature is disc-dependent. Not all DVDs have
pop-up menus. If the DVD has no pop-up menu, pressing the Pop-Up button may
display the disc menu, depending on how the disc’s menu system was authored.
Previous/Step Button: Press this button once to skip to the beginning of a track
or, when viewing photos, to the previous photo. Press the button twice to skip to
the beginning of the previous track. Press the button repeatedly to go back through
the previous chapters or tracks. When video content is playing on Blu-ray Disc
recordings and DVDs, press the Pause button first; afterwards, each subsequent
press of the Previous/Step button reverses the video one frame.
Next/Step Button: Press this button once to skip to the beginning of the next track
or, when viewing photos, to the next photo. Press the button repeatedly to advance
through the next chapters or tracks. When video content is playing, press the Pause
button first; afterwards, each subsequent press of the Next/Step button advances
the video one frame.
Search/Slow Reverse Button: Press this button to reverse through a disc track.
For Blu-ray Disc recordings and DVDs, each press cycles through 2x, 4x, 8x, 16x
and 32x reverse speed. Pressing the button while a Blu-ray Disc recording or DVD is
paused will reverse through the chapter in slow motion. Each press cycles through
1/2, 1/4, 1/8 and 1/16 normal speed.
Search/Slow Forward Button: Press this button to fast-forward through the current
disc track. For Blu-ray Disc recordings and DVDs, each press cycles through 2x, 4x,
8x, 16x and 32x normal speed. Pressing the button while a Blu-ray Disc recording
or DVD is paused will play through the chapter in slow motion. Each press cycles
through 1/2, 1/4, 1/8 and 1/16 normal speed.
Stop Button: Press this button to stop playback at the current point. (Pressing the
Play button will resume playback from this point.) Press the Stop button twice to
stop playback fully. NOTE: Some settings and functions will be available only when
the player is fully stopped.
Play Button: Press this button to play a disc that has been loaded into the player’s
disc drawer or a music file that has been highlighted on the on-screen menu.
Pressing this button when viewing photos begins a slide show of all photos in the
current folder.
Pause Button: Press this button to pause a disc or music file that is playing. Pressing
the button while a Blu-ray Disc recording or DVD is playing will freeze-frame on the
current video frame. Pressing the button while the disc is paused will resume play.
Pressing this button while viewing photos freezes the current photo on the screen.
Volume +/– Buttons: Press these buttons to increase or decrease the volume of the
BDS receiver’s speaker outputs. NOTE: The Volume +/– buttons do not change the
volume of the HDMI audio outputs.
IMPORTANT: Do not turn the Volume buttons up to or past the point where the
audio from the speakers becomes distorted. Doing so can damage the speakers.
Mute Button: Press this button to mute the sound from the BDS receiver’s speaker
outputs. Press the button again to un-mute the sound. NOTE: The Mute button does
not mute the HDMI audio outputs.
Channel +/– Buttons: When Radio is the source selected on the remote control, the
Channel +/– buttons select the next higher or lower preset station.
Bookmark (Green) Button: Press this button to activate the Bookmark function.
See Bookmark Function, on page 24, for more information.
Thumbnail (Yellow) Button: Press this button while playing a photo slide show to
display thumbnail images of all photos in the slide show.
Program (Red) Button: Press this button to create a programmed playback
list for the currently-playing disc. See Programmed Play, on page 25, for more
information.
Zoom (Blue) Button: Press the Zoom button to zoom in on or recede from a video
image or slide. Use the Navigation buttons to zoom in on different sections of the
image. NOTE: This function is disc-dependent for Blu-ray Disc recordings and DVDs.
Not all discs can be zoomed in on.
Red, Green, Yellow and Blue Buttons: When the BDS is playing a Blu-ray Disc
recording, these buttons can activate features and menus that may vary from disc
to disc. Refer to the menu instructions for each particular disc for more information.
NOTE: These Blu-ray Disc functions may override the Bookmark, Thumbnail,
Program and Zoom functions.
9

BDS
harman/kardon
BDS 2 / BDS 5 Service Manual
Page 8 of 63
Troubleshooting
If your BDS system isn’t performing the way you think it should, check to see if the problem is
covered in this section before calling your dealer or contacting a harman kardon representative.
Problem Solution
Troubleshooting
The receiver won’t power up (the Power indicator is not lit): • Check that the receiver’s Power cord is properly plugged into the receiver’s AC
Sound plays through the BDS system speakers, but there is no TV picture: • Check the HDMI connection between the receiver and the TV.
There is no sound coming from just the subwoofer: • Check that the subwoofer’s Power cord is plugged into a working AC outlet.
There is a constant hum in the sound: • Check that all input cables are plugged all the way into their connectors.
The disc does not play: • Check that the disc is inserted correctly (label side up).
There is noise or other interference in the picture while playing a Blu-ray Disc recording
or DVD:
The sound and picture are out of sync when listening to an Aux source: • Press the Options button and perform the Lip Sync adjustment to bring the sound
Cannot tune in radio stations: • Check that the FM antenna is correctly connected.
The receiver does not respond to remote-control commands: • Replace all three remote-control batteries with fresh ones, and make sure that they
The remote does not control programmed components (TV or video): • Check that you have pressed the remote’s Aux button before trying to operate the
The Ø symbol appears on the screen when you press a remote-control button: • The selected function is not permitted at the time the button is pressed.
The receiver does not respond to commands, or it behaves in an erratic way: • Unplug the receiver’s Power cord from the AC outlet, wait 30 seconds, then plug
You can find additional troubleshooting information in the FAQs link on the Support page at www.harmankardon.com.
Power Input connector.
• Check that the Power cord is plugged into a working AC outlet. If the outlet is
controlled by a switch, make sure the switch is set in the “On” position.
• Check that the receiver’s Main Power switch (located on the rear panel) is in the
“On” position.
• Check that the TV is turned on and is set to the proper input source.
• Unplug the HDMI cable from the TV and plug it back in again.
• Check that the subwoofer’s Power switch is in the “On” position.
• Check that the Subwoofer Level control is not turned all the way down (fully
counterclockwise).
• Check that the audio connection between the receiver and the subwoofer has been
properly made.
• Check the receiver’s Settings: Configuration menu to make sure that the subwoofer
volume has not been set at –10dB.
• Check that all cables are at least 10 ft (3.3m) from fluorescent lights.
• Check that all cable connectors are clean. If necessary, wipe them with a cloth
slightly moistened with alcohol.
• Set the subwoofer’s Power switch to “Off.” If the hum goes away, there is a ground
loop between the subwoofer and the receiver. Plugging the subwoofer’s Power cord
into the same AC outlet that the receiver is plugged into should eliminate the ground
loop.
• Check that the disc is the correct type: BD-Video (single-layer or double-layer),
DVD-Video, DVD+R/+RW, DVD-R/-RW, CDDA (CD digital audio), CD-R/RW. Other
disc types will not play.
• Check that the disc surface is clean and not scratched.
• Check that the disc surface is clean and not scratched.
and picture into synchronization.
• Adjust the antenna’s position. If necessary, use a powered FM antenna or an
outdoor FM antenna.
are installed with the correct polarity.
• Hold the remote closer to the receiver.
• Check that the receiver’s remote sensor is in the line of sight of the remote control.
component.
• Re-program and/or re-teach the component’s commands into the remote.
it back in.
29

BDS
harman/kardon
BDS 2 / BDS 5 Service Manual
Page 9 of 63
Specifications
Specifications
BDS 5 receiver (BDS 800, BDS 700, BDS 600 systems)
BDS 2 receiver (BDS 400, BDS 300 systems)
Audio Section
Continuous average power, stereo mode (BDS 5, BDS 2): 65 watts per channel, 20Hz – 20kHz, @ <0.1% THD, both channels driven into 6 ohms
Multichannel power (BDS 5 only): 65 watts per channel, 20Hz – 20kHz, @ <0.1% THD, into 6 ohms
Input sensitivity/impedance (line inputs): 250mV/46k ohms
Signal-to-noise ratio (IHF-A): –90dB
Frequency response @ 1W (±0.5dB): 20Hz – 20kHz
Slew rate: 40V/µsec
FM Tuner Section
Frequency range: 87.5MHz – 108.0MHz (US and EU)
Usable sensitivity IHF: >14dBf
Signal-to-noise ratio (mono/stereo): –60dB/–55dB
Distortion (mono/stereo): 0.3%/0.5%
Stereo separation: –45dB @ 1kHz
Image rejection: –70dB
IF rejection: –80dB
Disc Player Section
Supported disc formats: 5-inch (12cm) or 3-inch (8cm) BD-Video (single-layer or double-layer), DVD-Video, DVD+R/+RW,
Region code (BD/DVD): A/1 (USA); B/2 (EU)
Audio formats: Dolby Digital, Dolby Digital Plus, Dolby TrueHD, DTS Digital, DTS-HD High Resolution Audio, DTS-HD
Still-image format: JPEG
Video signal system: NTSC (USA) or PAL (EU)
Frequency response: 20Hz – 20kHz ±0.5dB
Signal-to-noise ratio: –90dB (A-weighted)
Dynamic range: 90dB (16-bit)
THD @ 1kHz (DVD/CD): 0.1%
Wow & flutter: Below measurable limits
DVD-R/-RW, CDDA (CD digital audio), CD-R/RW discs
Master Audio, PCM, WMA (DRM-free version only): WMA9, CBR @ 192kbps, VBR @ 355kbps; MP3:
32kbps – 320kbps bitrates, including variable-bitrate encoding
Video Section
Television format: NTSC or PAL (selectable)
HDMI version: 1.3a, with 30/36-bit Deep Color
General
Power requirement: 110 – 240V AC, 50/60Hz
Power consumption: 110W maximum (BDS 5), 70W maximum (BDS 2); <1W standby
Dimensions (H x W x D): 4" x 15-25/32" x 10-1/4" (102mm x 401mm x 260mm)
Weight: 14.3 lb (6.5kg) (BDS 5); 14 lb (6.4kg) (BDS 2)
Depth measurement does not include terminal connections. Height measurement includes feet and chassis.
35

4-1
harman/kardon
BDS 2 / BDS 5 Service Manual
Page 10 of 63
Software upgrade
Preparation to upgrade software
1) Power on and press "SETTINGS" button and ‘Left’ button on the remote control to check the SW
version info .
2) Select an match upgrade package by the SW version info, for example ,
BDS2_EU VX.XX.XX, you must select the package HK_BDS2_EU_VX.XX.XX
3) Unzip the package, and copy the ‘UPG’ folder to the root folder in an USB disc
4) Start the CD Burning software and create a new CD project (Data Disc) .
5) Burn the UPG folder onto a blank CDR.
A. Procedure for software upgrade:
A) Upgrade software via USB Flash Drive:
1) plug in the Preparation step 3) mentioned USB disc
2) Power on and press "SETTINGS" button, invoke the Settings menu
3) navigate to General Settins-> ‘System’ -> System Upgrade -> USB
4) press ‘OK” to start upgrade.
5) it will reboot when upgrade successful (about 2Min).
B) Upgrade software via CDR
1) insert the upgrade CD.
2) Power on and press "SETTINGS" button, invoke the Settings menu
3) navigate to General Settins-> ‘System’ -> System Upgrade -> Disc
4) press ‘OK” to start upgrade.
5) it will reboot when upgrade successful (about 5Min).
B. Upgrading Procedure
C. &onfirmXpgradH
1,press "SETTINGS" button and ‘Left’ button on the remote control to check the new SW version info
and confirm the upgrade.
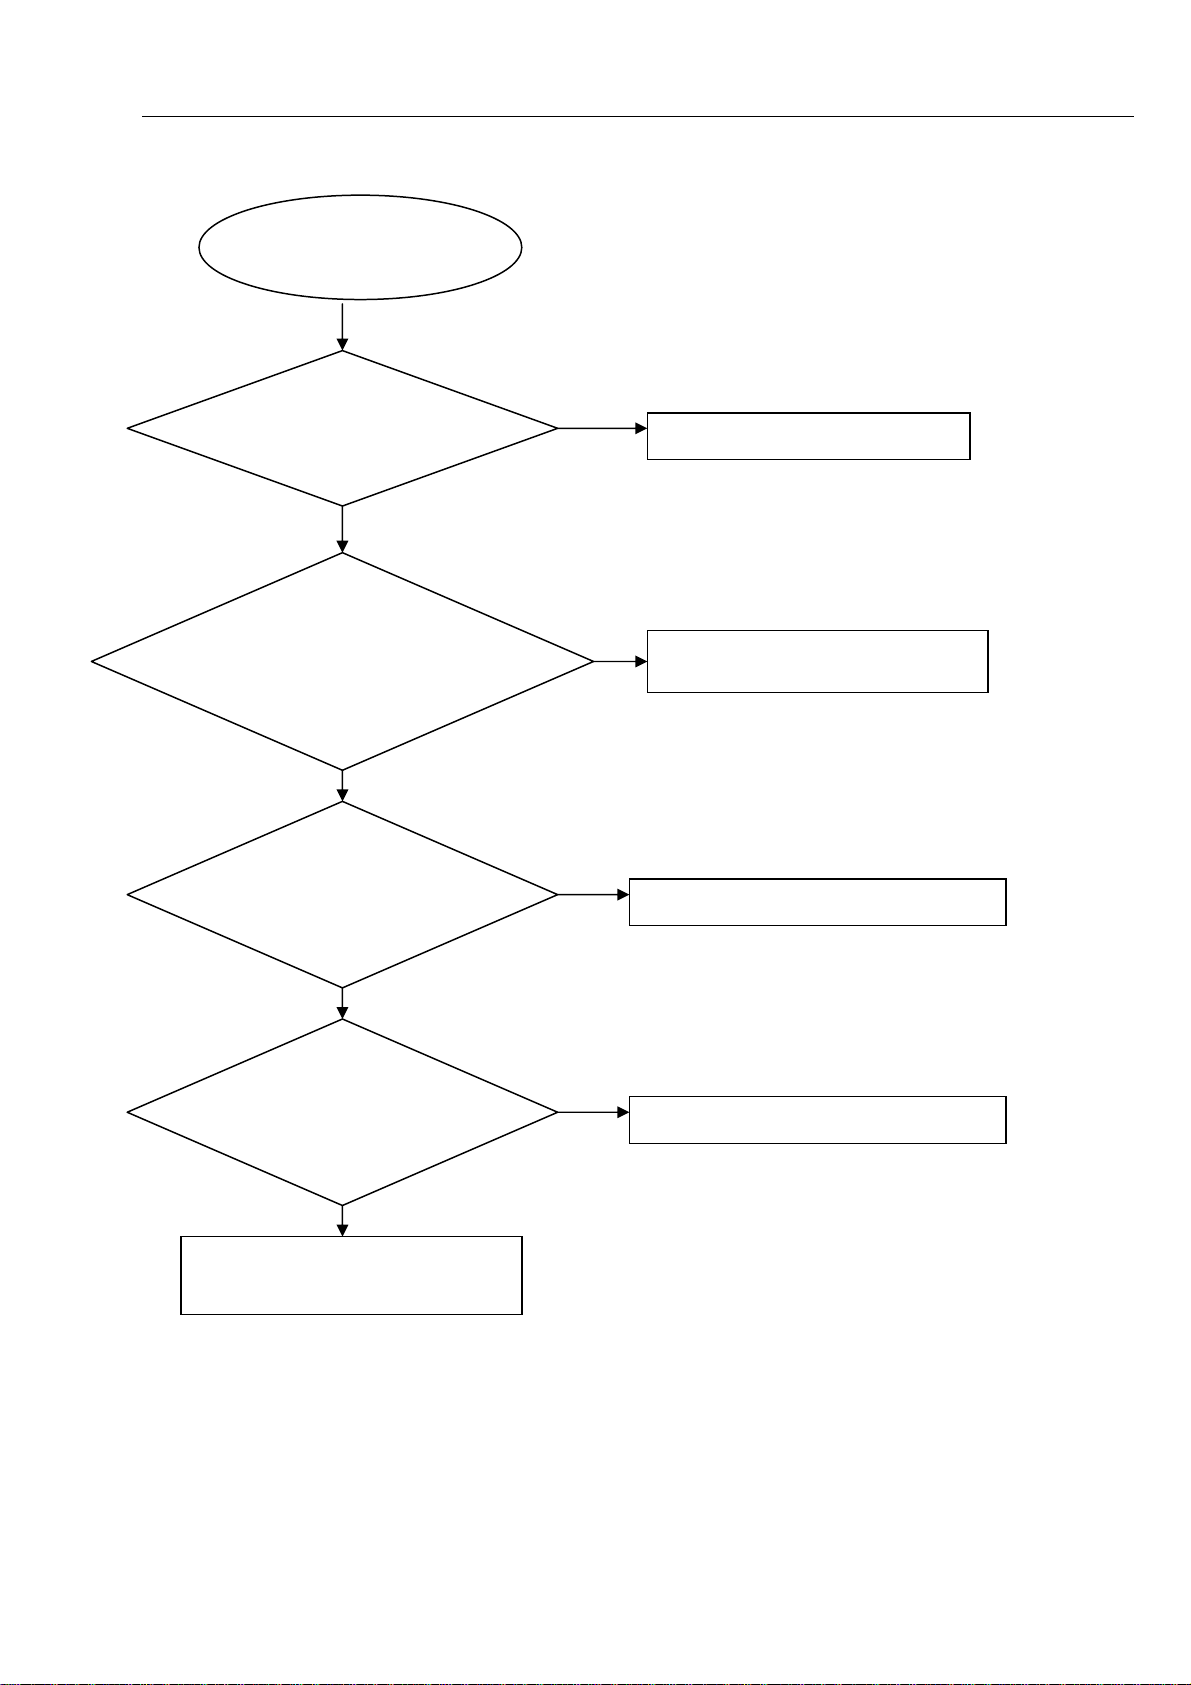
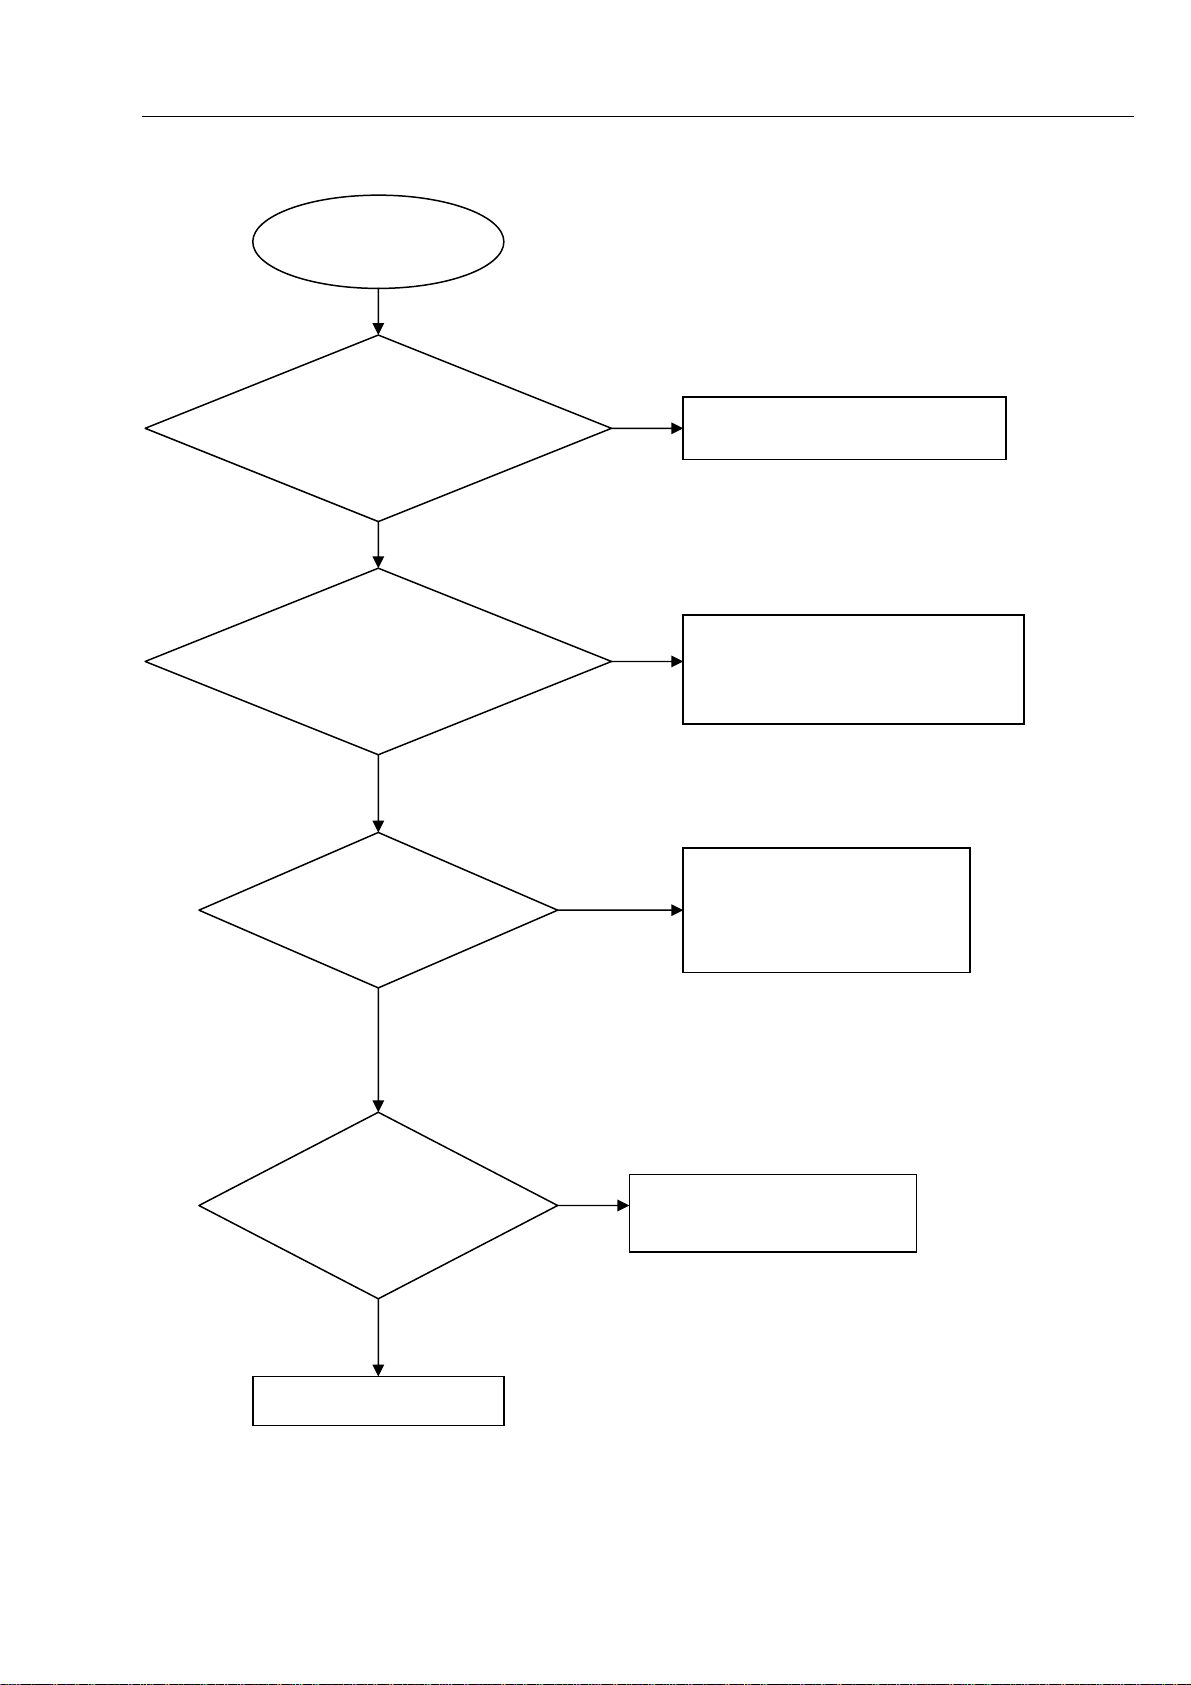
Power on led doesn't work
harman/kardon
BDS 2 / BDS 5 Service Manual
Page 11 of 63
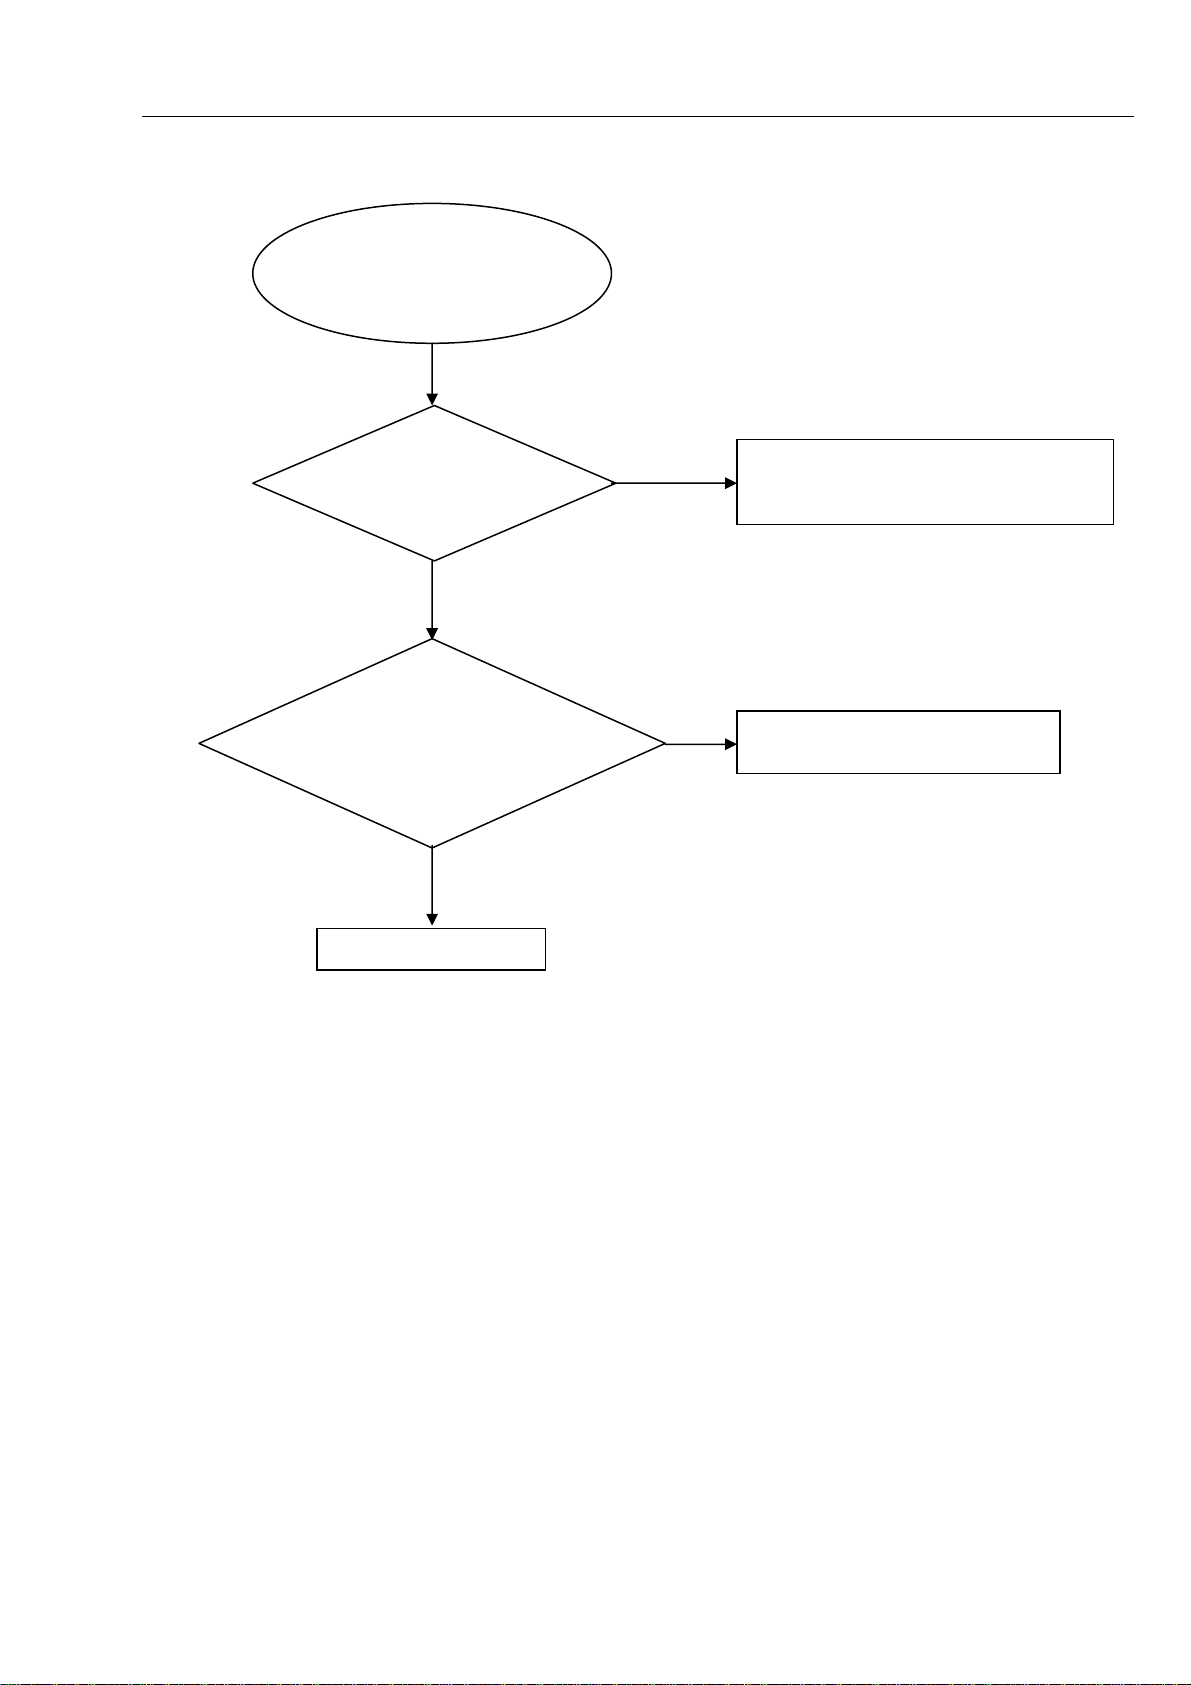
power on led doesn't work
GO
5-1 Trouble shooting Chart
Switch performance
check
OK
NG
change switch
Check the cable XS603 is
NG
connect well to power board
CN501
OK
Reconnect the cable
Check+5V,+12V,+5VSTB
voltage on the power and
front board
NG
Refer to Power supply board part
OK
Check the power on led
control circuit is OK
OK
Replace the LED610,LED611
NG
Replace the FB
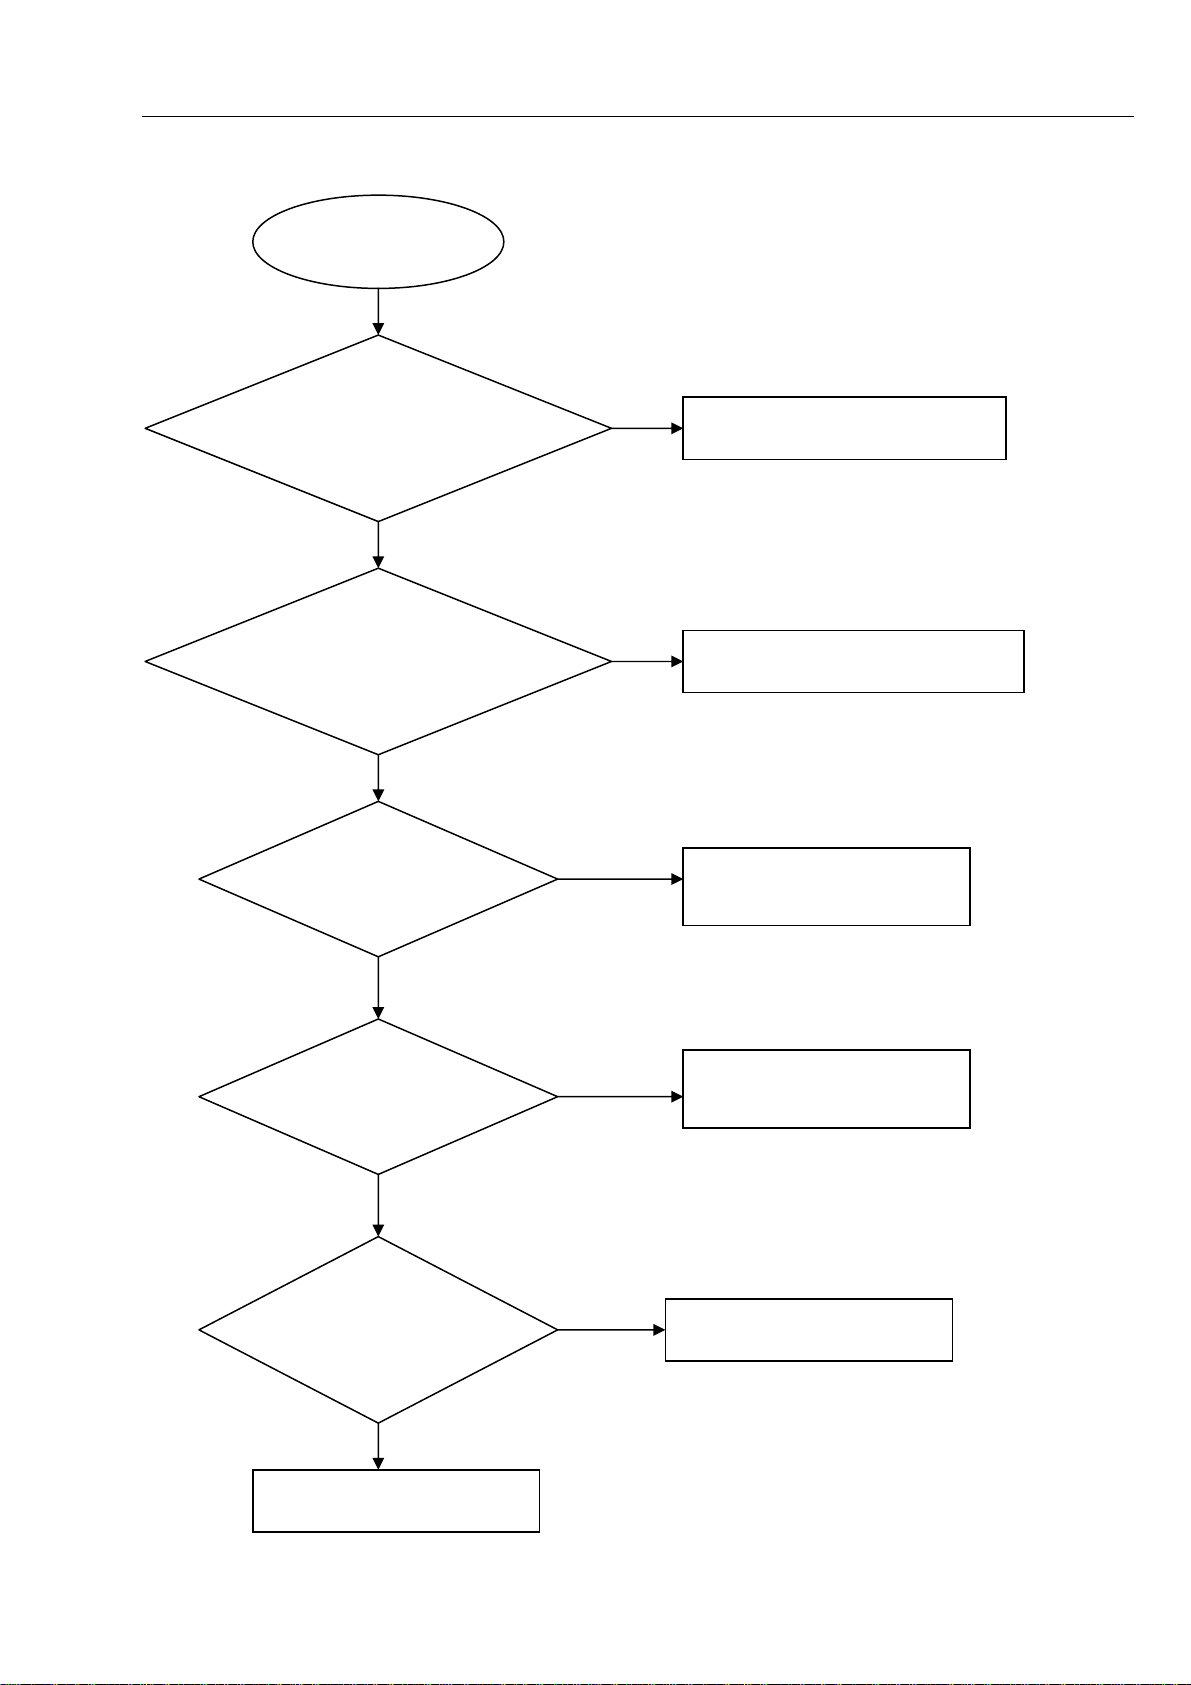
No display on VFD
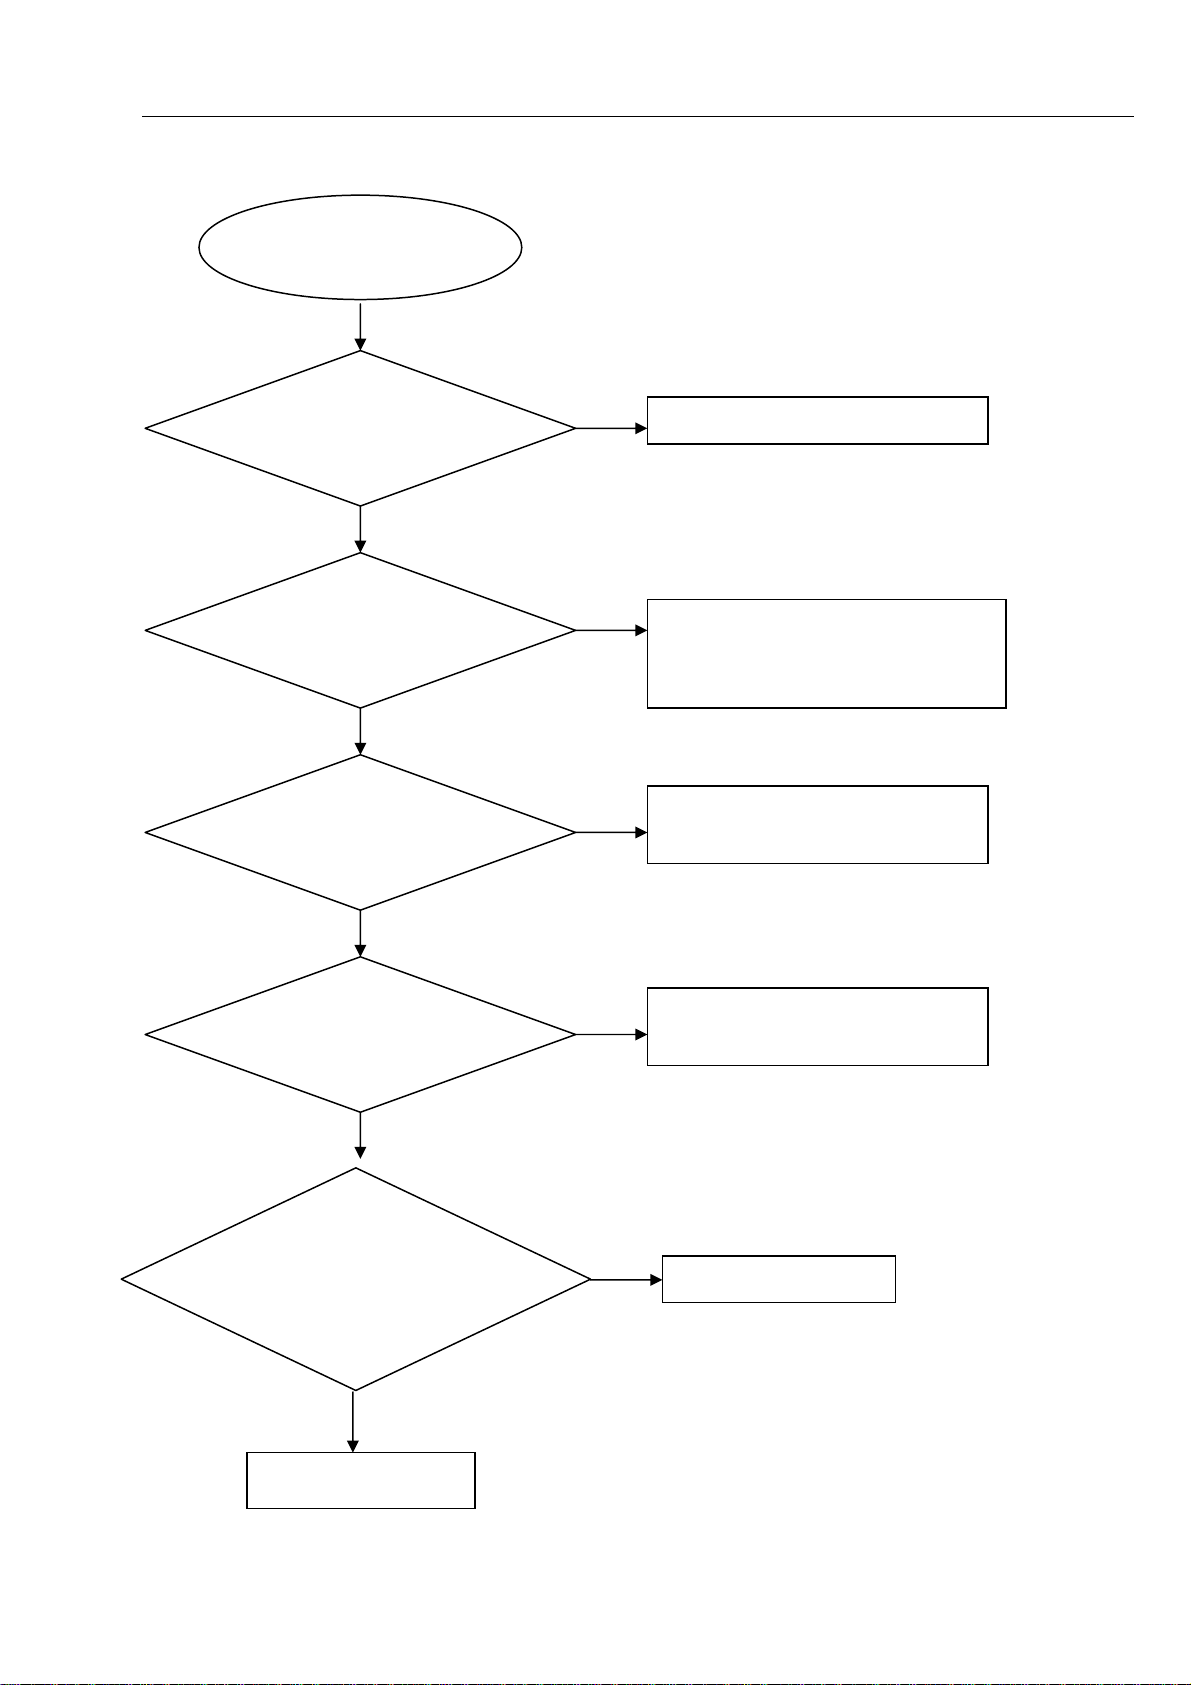
harman/kardon
BDS 2 / BDS 5 Service Manual
Page 12 of 63
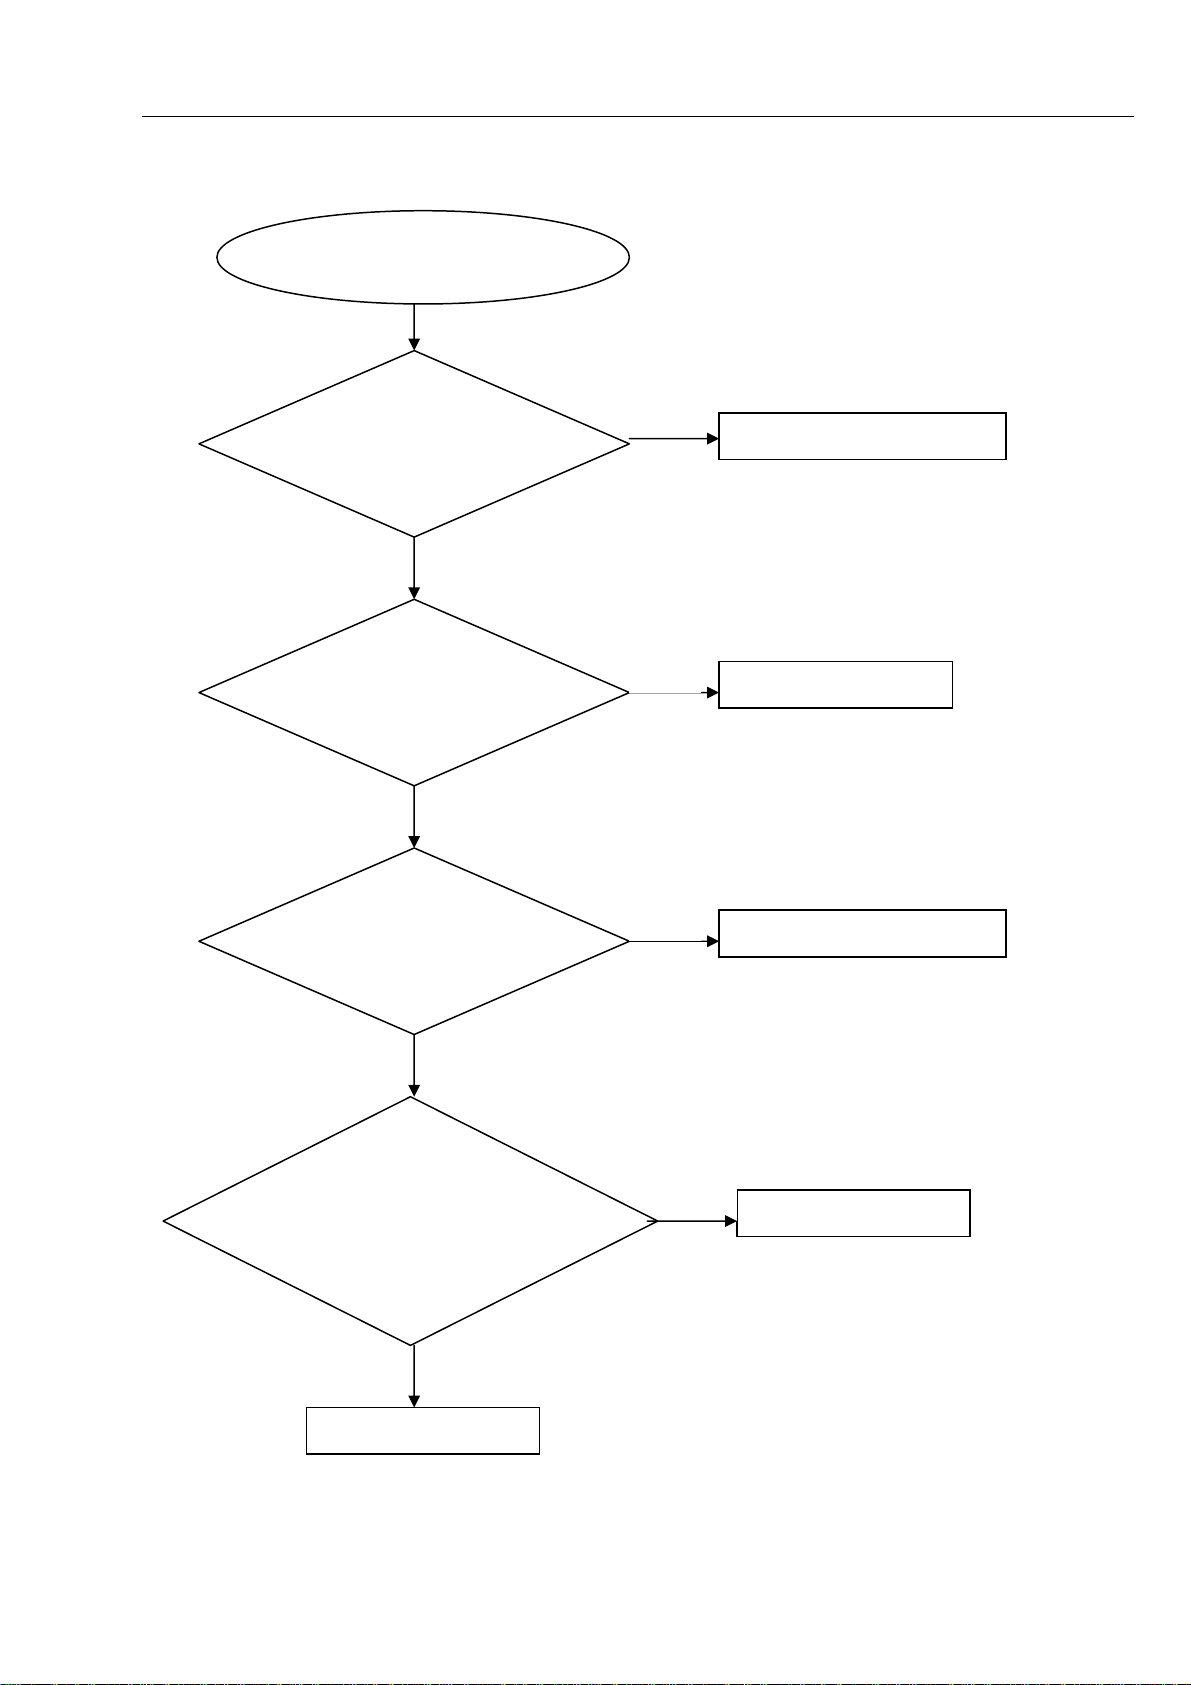
No display on VFD
5-2 Trouble shooting Chart
Go
Check every supply
voltage on AM board is
normal
Yes
Check+5V,+12V,+5VSTB
voltage on the power and
front board
Yes
Check the power key is
working normally
Yes
No
No
No
Refer to Power supply board part
Fix the connection XS603 on front board
and CN501 on power board, and 20pin
FFC cable from FB to AM board
Replace U721 on AM board, or replace
the AM board
Check the front board
signals VDIN,VCLK,
VSTB
Yes
1.Check whether bad
solder exists on pins of
VFD,
Yes
Replace VFD or FB
No
Check the U601 pin 31,32,34 arrive the
condition XP808 13,10,9
No
Correct connection
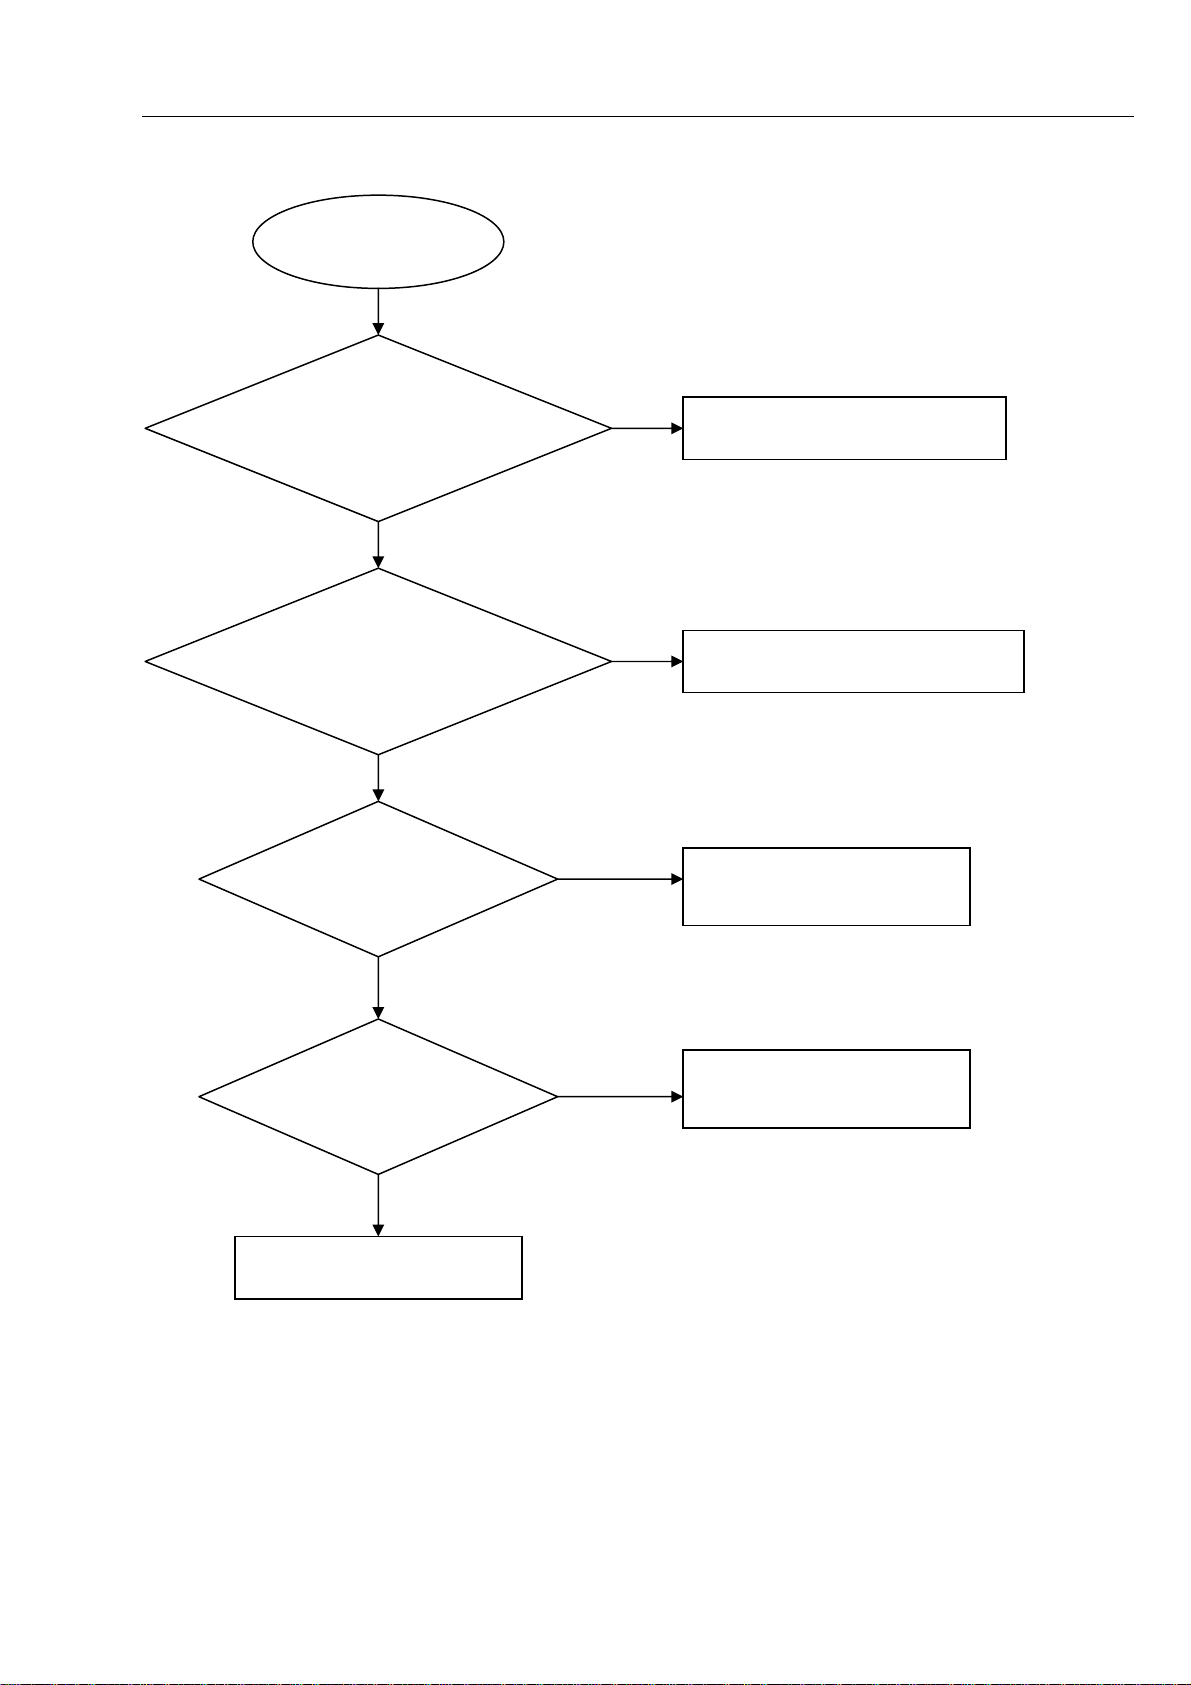
Remote control does not work
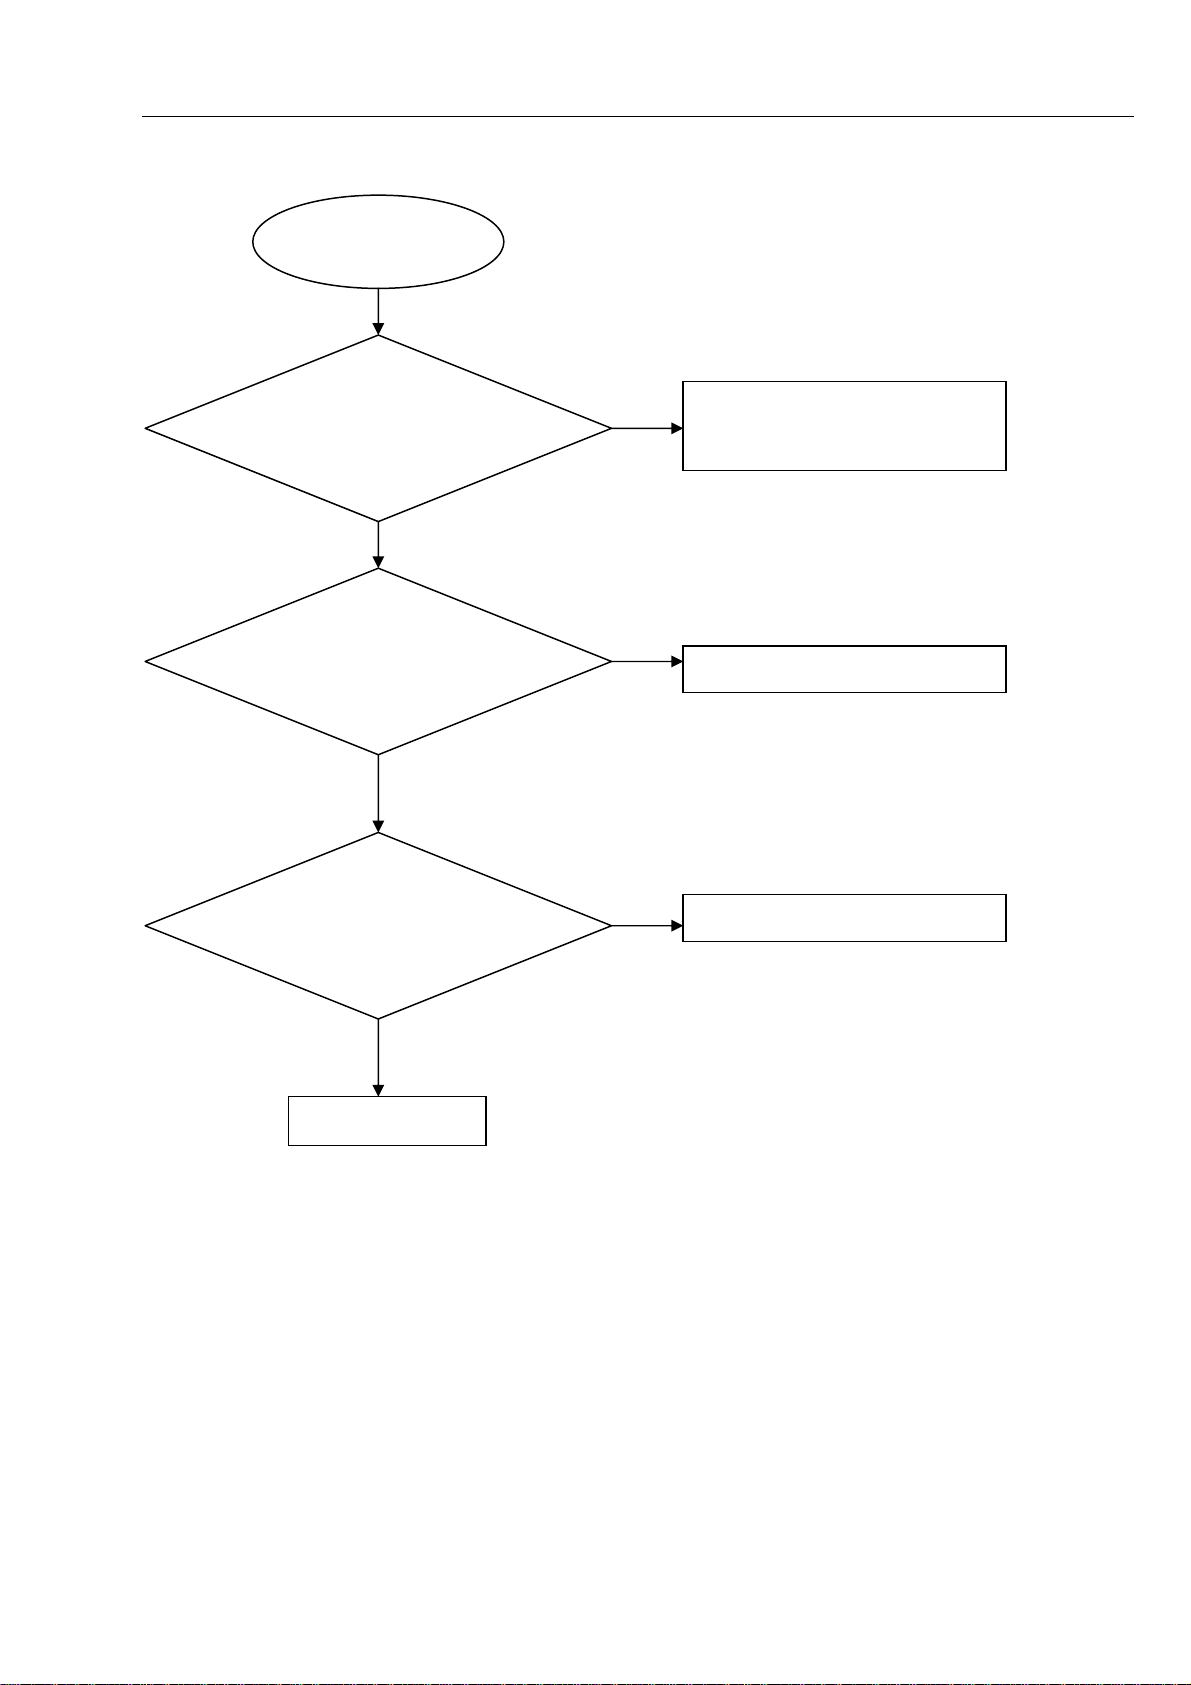
harman/kardon
BDS 2 / BDS 5 Service Manual
Page 13 of 63
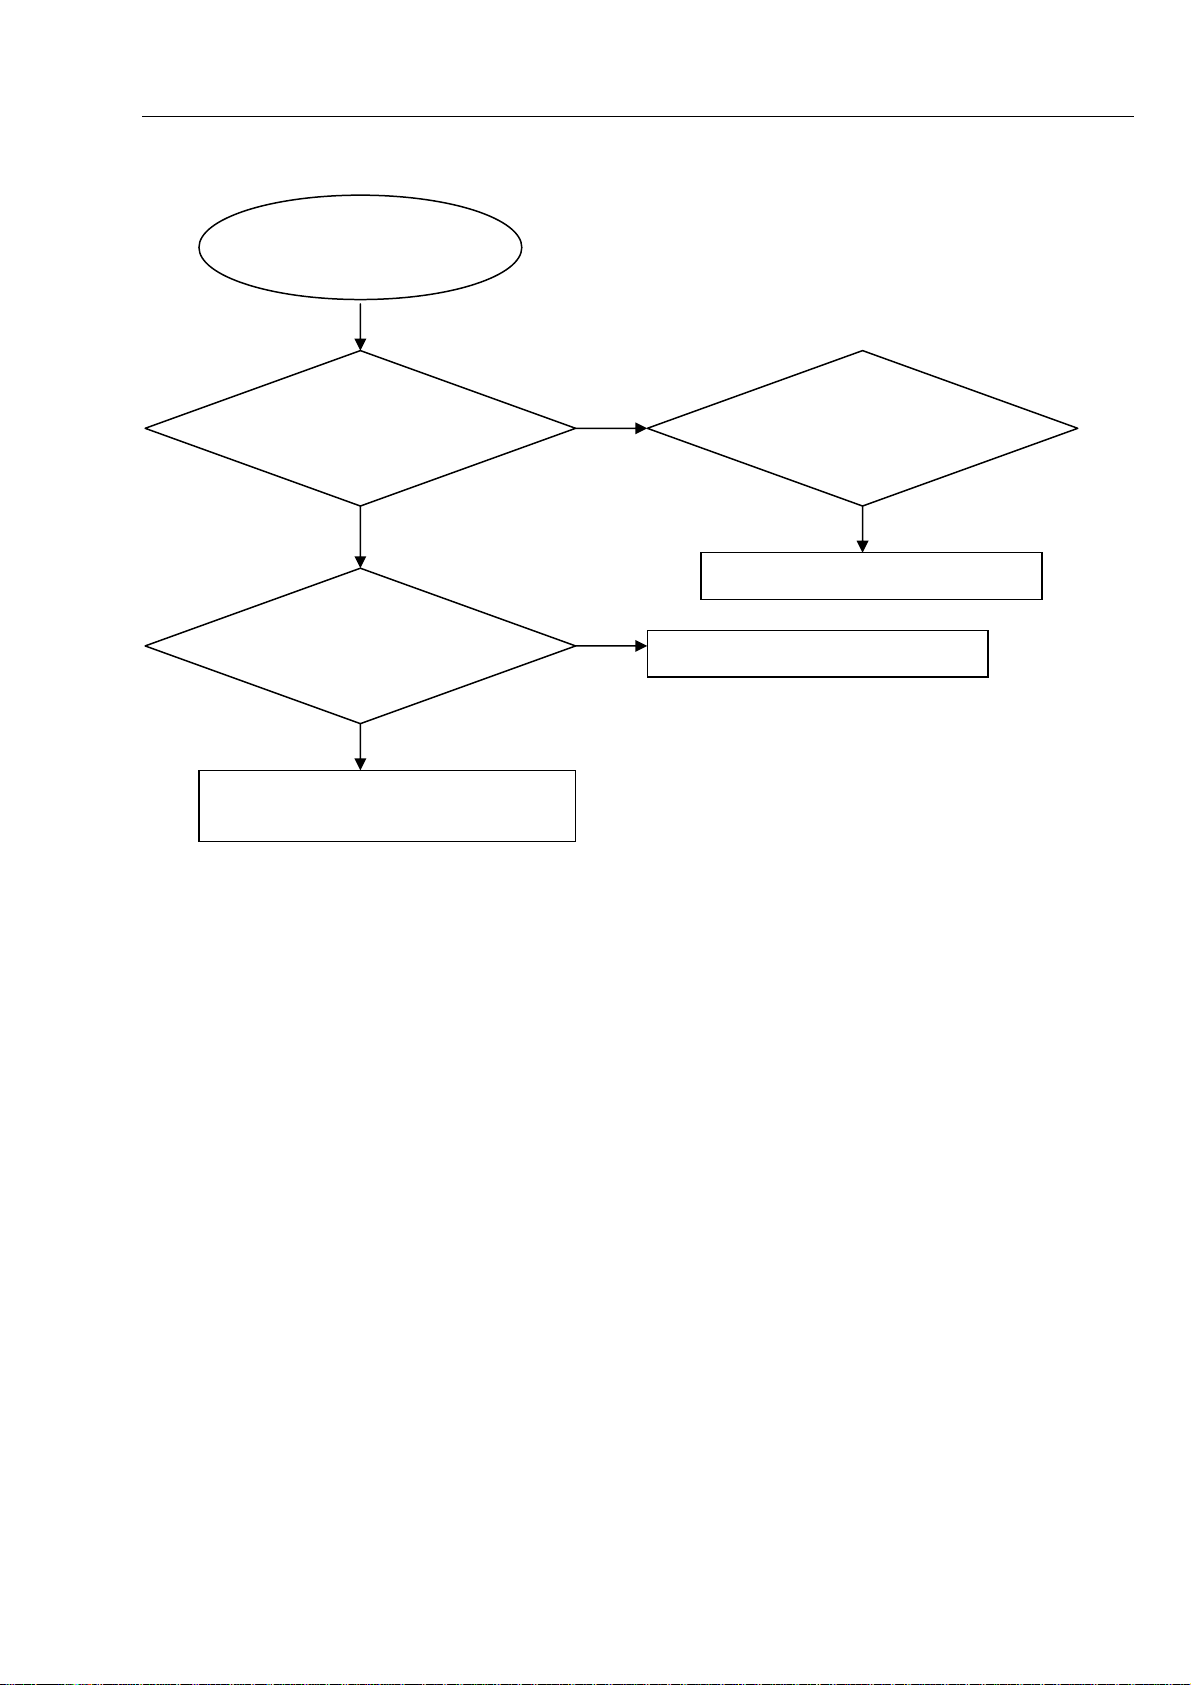
Remote control
does not work
Go
5-3 Trouble shooting Chart
Check whether the remote
controller’s battery is
exhausted or not.
Yes
Check the 2pin FFC cable
from AM to BD board is
connect wenll
Yes
Check the IR601 power
supply is OK, IR1’3 is about
3.3V
No
No
No
Replace the battery for remote
controller
Reconnect the cable
Check the +3.3V net on front board
Yes
Replace IR1
Can’t read disc or can’t eject
r
harman/kardon
BDS 2 / BDS 5 Service Manual
Page 14 of 63
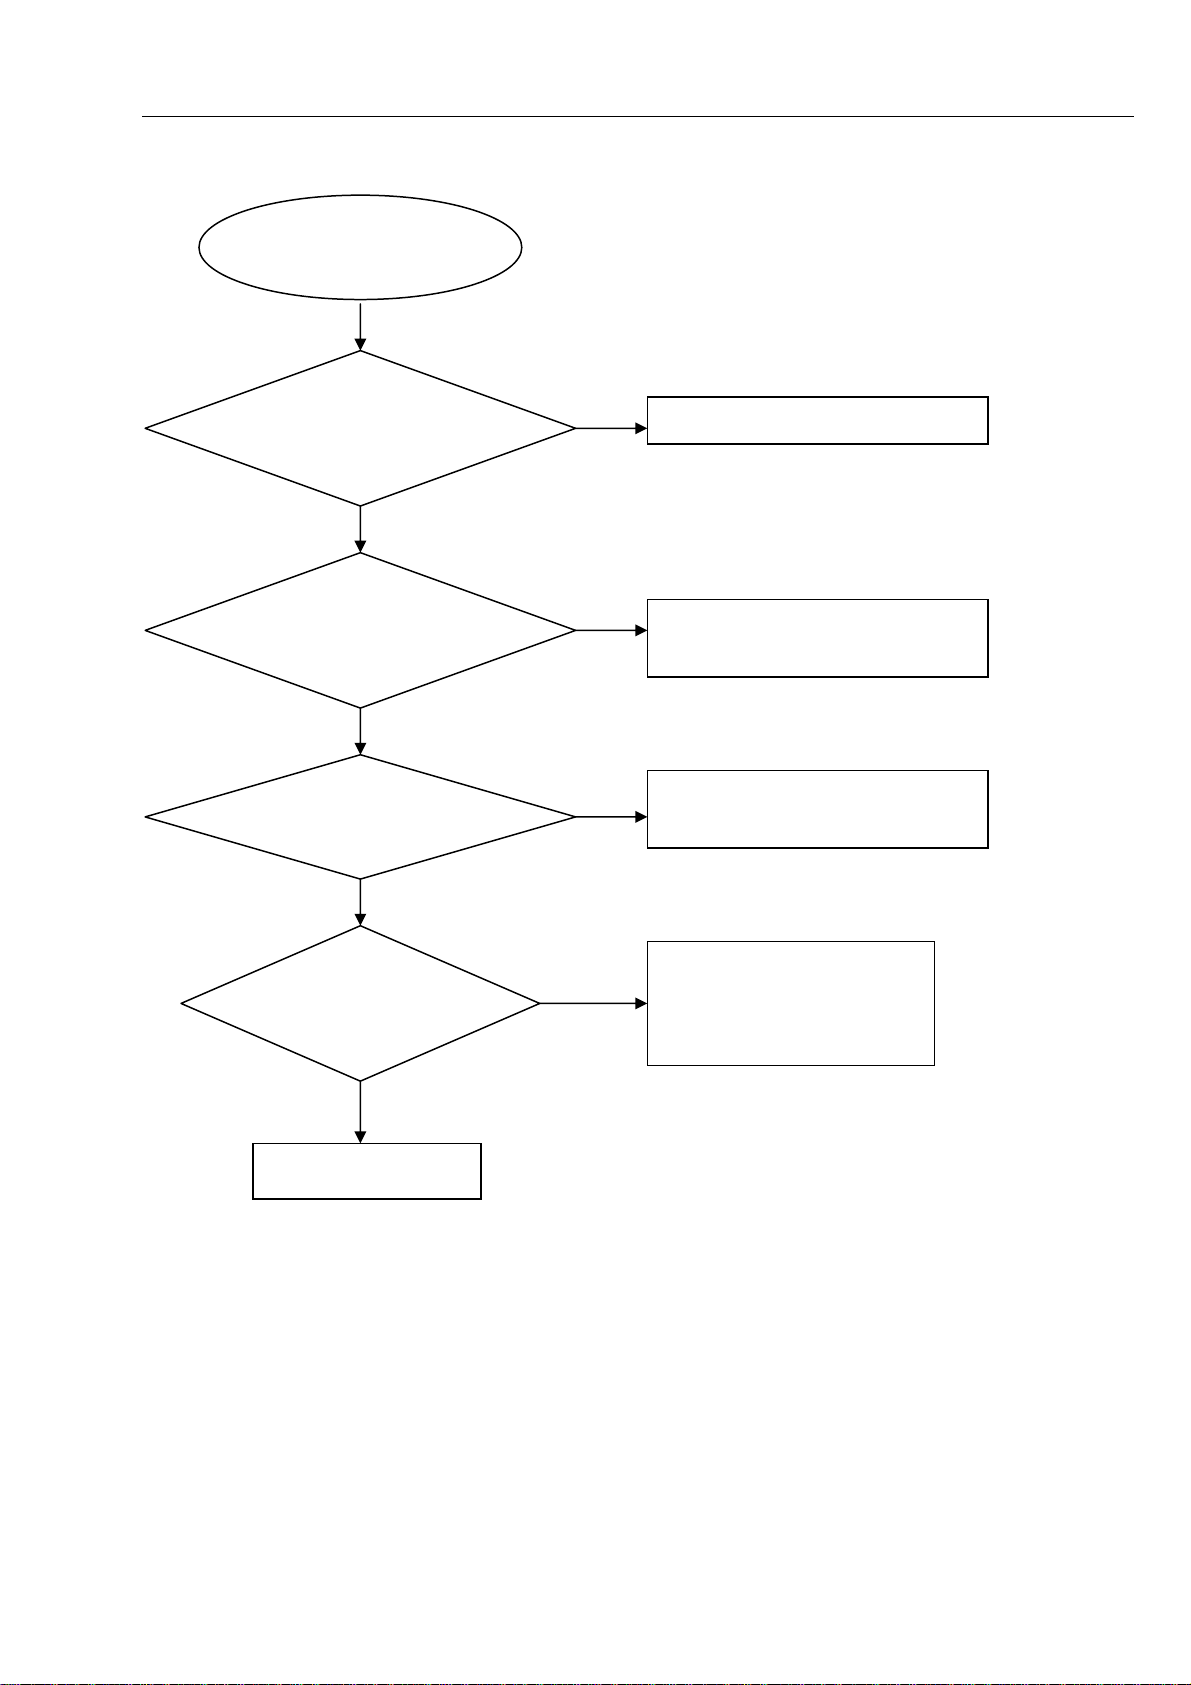
Can’t read disc or can’t
eject
GO
5-4 Trouble shooting Chart
Check whether the
DVD loader running is
normal
Yes
Check 45pin and 8pin
cable from BD board
connection to the loader is
normal
Yes
Replace the loade
NO
Check the connection 4pin cable from the
BD board
NO
Fix the connection the 45pin cable
5.1/2.1 channel no audio output
p
harman/kardon
BDS 2 / BDS 5 Service Manual
Page 15 of 63
5.1/2.1 channel no audio
ut
out
Go
5-5 Trouble shooting Chart
Check the 10pin/4pin cable is
connect well from AM to JC
board
Yes
Check XP701 is short
to GND
No
Check +32V at XP702 on
AM board is OK
No
Reconnect well
Yes
Replace the AM board
No
Refer to Power supply board
Yes
check the system weather is
ear mode or not, pull out the
4pin cable XS601 from FB to
AM board XP806
Yes
Replace the FB board
No
Replace the AM board
BD/DVD/CD no audio output
p
p
harman/kardon
BDS 2 / BDS 5 Service Manual
Page 16 of 63
BD/DVD/CD no audio
output
Go
5-6 Trouble shooting Chart
Check HDMI audio is ok
Yes
Check the 22pin cable
from BD to AM board is
connect well
Yes
Next actiong as the problem
channel no audio out
ut
5.1/2.1
No
No
Check the software
setup HDMI audio
oout
Turn to ON
Reconnect well
ut is ON or OFF
Tuner FM does not work
harman/kardon
BDS 2 / BDS 5 Service Manual
Page 17 of 63
Tuner FM does not work
Go
5-7 Trouble shooting Chart
Check the DVD mode is
OK,audio output is ok
Yes
Check Tuner module
pin5 supply voltage is
+3.3V
Yes
Check Tuner module
pin6,pin7,pin8,I2S output
Yes
Check the U202
74LV541 PIN20
VDD+3.3V,
No
No
No
No
Replace the AM board
Check AM board tuner voltage supply
circuit.
Change the Tuner module
Check the main board U202
power supply circuit
Yes
Replace U202 74LV541
AUX IN does not work
harman/kardon
BDS 2 / BDS 5 Service Manual
Page 18 of 63
AUX in does not
work
Go
5-8 Trouble shooting Chart
Check the DVD mode is
OK,audio output is ok
Yes
Check the AM board U18
AK5367 PIN2,PIN3,
PIN4,PIN5 L/R signal input
Yes
check the U18
AK5367
PIN30,VDD+5V,
No
No
No
Replace the AM board
Check the main board
R301,R302,R303,R304
Check the main board U18
power supply circuit
Yes
Check U18 AK5367
is broken.
Yes
Replace U18 AK5367
No
Check the U202 74LV541
IPOD IN does not work
harman/kardon
BDS 2 / BDS 5 Service Manual
Page 19 of 63
IPOD in does not
work
Go
5-9 Trouble shooting Chart
Check the DVD mode is
OK,audio output is ok
Yes
Check whether bad solder
exists on pins of BRIDGE
ċ connector
Yes
Check whether the
remote can control
the IPOD unit
No
Replace the AM board
No
Correct connection
No
Check the IPOD power supply
IC U723 LM7808
Yes
Check whether the
remote can control
the IPOD unit
Yes
Check U719,U720
input and output
signal is ok
Yes
Check the U18 AK5367 and
U202 74LV541
No
No
Replace U721 or replace the
AM board
Replace U719, U720
COAX/OPTICAL does not work
harman/kardon
BDS 2 / BDS 5 Service Manual
Page 20 of 63
COAX/OPTICAL
does not work
Go
5-10 Trouble shooting Chart
Check the DVD mode is
OK,audio output is ok
Yes
Check the coax/optical
RCA connector is ok
Yes
Check U714
PIN3,PIN22 +3.3V
No
Replace the AM board
No
Replace the RCA connector
No
Check the main board
U714power supply circuit
Yes
Check U714
CS8422 is broken.
Yes
Replace U714 CS8422
No
Check the U202 74LV541
 Loading...