


GPS-810
Portable Touchscreen Navigation System and A/V Media Player
User Manual
e d i u g
+ y a l p
™
018- S P G
For the latest software updates and other information, visit
www.guideandplay.com.

Contents
Introduction . . . . . . . . . . . . . . . . . . . . . . . . . . . . . . . . . . . . . . . . . . . . . . . . . . . . . . . . . . . 3
Unpacking . . . . . . . . . . . . . . . . . . . . . . . . . . . . . . . . . . . . . . . . . . . . . . . . . . . . . . . . . . . . . 3
Controls and Features . . . . . . . . . . . . . . . . . . . . . . . . . . . . . . . . . . . . . . . . . . . . . . 4 – 6
Before You Begin . . . . . . . . . . . . . . . . . . . . . . . . . . . . . . . . . . . . . . . . . . . . . . . . . . . 6 – 7
Initial Setup . . . . . . . . . . . . . . . . . . . . . . . . . . . . . . . . . . . . . . . . . . . . . . . . . . . . . . . . . . . 8
Navigation . . . . . . . . . . . . . . . . . . . . . . . . . . . . . . . . . . . . . . . . . . . . . . . . . . . . . . . . 9 – 19
Planning a Trip . . . . . . . . . . . . . . . . . . . . . . . . . . . . . . . . . . . . . . . . . . . . . . . . . . . . . . . . 9
Navigating to Your Destination . . . . . . . . . . . . . . . . . . . . . . . . . . . . . . . . . . . . . . . . . . 14
Navigation Options . . . . . . . . . . . . . . . . . . . . . . . . . . . . . . . . . . . . . . . . . . . . . . . . . . . 16
Traffic . . . . . . . . . . . . . . . . . . . . . . . . . . . . . . . . . . . . . . . . . . . . . . . . . . . . . . . . . . 16 – 17
Changing Navigation Settings . . . . . . . . . . . . . . . . . . . . . . . . . . . . . . . . . . . . . . . . . . . 18
The S
OURCE Screen . . . . . . . . . . . . . . . . . . . . . . . . . . . . . . . . . . . . . . . . . . . . . . . . . . . . 19
Playing Music, Video and Photo Files . . . . . . . . . . . . . . . . . . . . . . . . . . . . . 20 – 25
Compatible File Types . . . . . . . . . . . . . . . . . . . . . . . . . . . . . . . . . . . . . . . . . . . . . . . . . 20
Loading Media on Your SD Card . . . . . . . . . . . . . . . . . . . . . . . . . . . . . . . . . . . . . . . . . 20
Listening to Music . . . . . . . . . . . . . . . . . . . . . . . . . . . . . . . . . . . . . . . . . . . . . . . . . . . . 23
Watching Videos . . . . . . . . . . . . . . . . . . . . . . . . . . . . . . . . . . . . . . . . . . . . . . . . . . . . . . 24
Looking at Photos . . . . . . . . . . . . . . . . . . . . . . . . . . . . . . . . . . . . . . . . . . . . . . . . . . . . . 25
Using With a Bluetooth Phone . . . . . . . . . . . . . . . . . . . . . . . . . . . . . . . . . . . 26 – 27
To Connect to a New Phone . . . . . . . . . . . . . . . . . . . . . . . . . . . . . . . . . . . . . . . . . . . . . 26
Placing and Receiving Phone Calls . . . . . . . . . . . . . . . . . . . . . . . . . . . . . . . . . . . 26 – 27
Changing Settings . . . . . . . . . . . . . . . . . . . . . . . . . . . . . . . . . . . . . . . . . . . . . . . 28 – 30
Installation and Use in a Vehicle . . . . . . . . . . . . . . . . . . . . . . . . . . . . . . . . . . 31 – 33
Using the Remote Control . . . . . . . . . . . . . . . . . . . . . . . . . . . . . . . . . . . . . . . . 34 – 36
Troubleshooting . . . . . . . . . . . . . . . . . . . . . . . . . . . . . . . . . . . . . . . . . . . . . . . . . 37 – 38
Specifications . . . . . . . . . . . . . . . . . . . . . . . . . . . . . . . . . . . . . . . . . . . . . . . . . . . . . . . . 39
Battery Notes:
The Harman Kardon® GPS-810 uses a lithium-polymer battery. To protect the
performance of your GPS-810 and its battery, please observe the following
guidelines:
• Do not operate the GPS-810 in ambient temperatures outside of the
following range: 14° F (–10° C) to 131° F (55° C).
• Do not store the GPS-810 even for short periods in ambient
temperatures outside of the following range: –4° F (–20° C) to 140° F (60° C).
• Do not store the GPS-810 for long periods in ambient temperatures outside
of the following range: 32° F (0° C) to 77° F (25° C).
The GPS-810 will not charge the battery at temperatures above 122° F (50° C).
NOTE: Although the GPS-810’s battery will charge while the unit is connected to a
computer’s USB hub, we recommend connecting the unit to the included wall or car
charger to charge the battery.
User Manual
2
ediug
+yalp
™
GPS-810

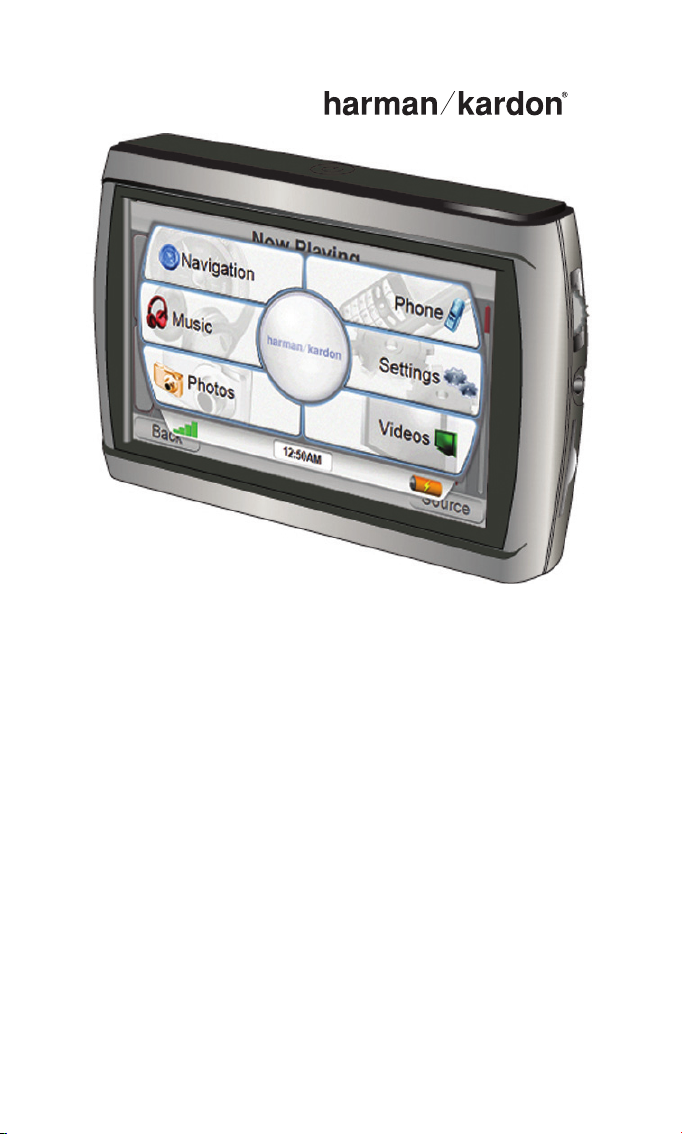
Introduction
Your new GPS-810 is a powerful portable touchscreen navigation system
and audio/video media player. The GPS-810’s GPS-powered navigation
features will make it easy for you to travel to almost any destination with
remarkable accuracy. Its A/V media player lets you listen to your favorite
music, and you can even watch videos and look at photos on its high-
resolution 4.3” 480 x 272 pixel WQVGA screen. You can also connect a
Bluetooth-enabled phone and place or receive calls via your GPS-810.
We know you’re eager to start using your GPS-810, so we’ve included a
Quick-Start Guide that will help you use its basic features right away.
This User Manual contains detailed information about all of the GPS-810’s
features and functions. To get the most out of your GPS-810, please read it
thoroughly.
Unpacking
Your GPS-810 box should contain these items:
• GPS-810 Unit
• Wall Charger
• Car Charger
• USB Cable
• Fold-Flat Mounting Bracket
• Mounting Base Disc and Adhesive Pad for Dash-Mounting
• Alcohol Cleaning Pad for Dash Surface
• Wireless Remote Control with Battery and Adhesive Pad for Mounting
• Carrying Case
• Quick-Start Guide
If anything is missing, notify the dealer where you purchased your GPS-810
right away.
Unpack your GPS-810 carefully and save the box and packing materials so
you can safely ship the unit in the future.
User Manual
ediug
+yalp
™
GPS-810
3
!
WARNING: Operation of any feature of this device while driving
is dangerous. Do not operate this device while driving. Do not
view or operate audio or video modes while driving.
For safety reasons, this device will cease navigation functions
when the video mode is enabled. Do not attempt to disable any
safety function incorporated in this device. Any alteration of this
device may cause serious injury and shall void the warranty.
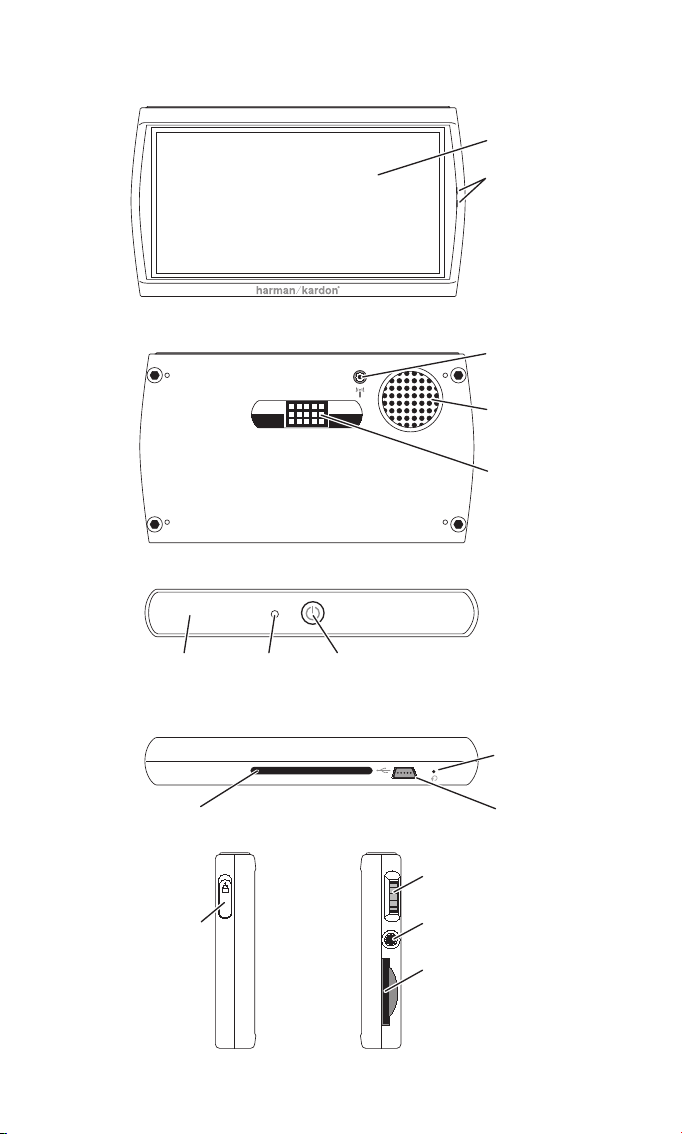
Controls and Features
User Manual
4
ediug
+yalp
™
GPS-810
L
EFT
S
IDE
F
RONT
T
OP
B
OTTOM
B
ACK
R
IGHT
S
IDE
Lock
Switch
Volume/
Brightness
Control
Headphone/Audio Output
Jack
Mini USB Connector
/
Charger Port
GPS
Antenna
ON/OFF
Button
SD Card
Slot
Reset
Button
Speaker
Mounting Base
Power Connection
Mounting Slot
Microphone
Auto Brightness
Sensor
Touchscreen
Connector for
External GPS
Antenna

User Manual
ediug
+yalp
™
GPS-810
5
Controls and Features
Front:
TOUCHSCREEN: 4.3” 480 x 272 pixel WQVGA LCD touchscreen.
M
ICROPHONE: Lets you use the GPS-810 to voice dial and talk on a
connected Bluetooth-enabled phone.
Back:
CONNECTOR FOR EXTERNAL GPS ANTENNA: Allows connection of the optional
Guide + Play external GPS antenna (model #GPS-ANT, not included), for use
when the GPS-810 is mounted in a location where its built-in GPS antenna
does not have a clear “view” of the sky.
S
PEAKER: Built-in speaker plays navigation voice guidance commands and
audio/video files from an inserted SD memory card (see SD Card Slot, on
page 6).
M
OUNTING BASE POWER CONNECTION: Supplies DC power and a hands-free
microphone connection to the GPS-810 when used with the supplied
mounting bracket in a vehicle.
Top:
AUTO BRIGHTNESS SENSOR: Senses ambient light for the operation of the Auto
Brightness feature (see Brightness, on page 27).
GPS A
NTENNA: Must have a clear “view” of the sky to receive signals from
GPS satellites.
ON/OFF B
UTTON: The GPS-810 has two different deactivation modes:
Standby and Off.
• S
TANDBY mode: Partially shuts-down the GPS-810, keeping the navigation
maps loaded into the unit’s memory for quicker turn-on.
• OFF mode: Completely shuts the GPS-810 off, requiring that the navigation
maps be loaded back into memory when the unit is turned back on.
When the GPS-810 is on, pressing the ON/OFF button for 1 second will place
it in S
TANDBY (the Touchscreen will display “Standby” for two seconds before
going blank); holding the ON/OFF button for 3 seconds will turn the unit OFF
(the Touchscreen will display “Powering Off” for 3 seconds before going
blank). When the GPS-810 is O FF or in S TANDBY, momentarily pressing the
ON/OFF button will turn it on.
NOTE: When the GPS-810 is being powered by the car or wall charger the ON/OFF
button icon will glow green while the unit is being charged, and will change to orange
when the unit is fully charged.
Bottom:
RESET BUTTON: Lets you reset the GPS-810 if it becomes unresponsive or
won’t power-off. Insert a paper clip or similar item into the small hole to
press the switch. (Resetting the unit does not erase information that you
have entered, such as your home location, etc.)
M
INI USB CONNECTOR/CHARGER PORT: Connects to your computer and to
the included wall charger using the included USB cable. Connects to your
vehicle’s cigarette lighter or accessory power port using the included car
charger.

Controls and Features (continued)
MOUNTING SLOT: Locks the GPS-810 onto the included fold-flat mounting
bracket for use in a vehicle.
Left Side:
LOCK SWITCH: Locks the GPS-810’s touchscreen and all of its controls. This
prevents accidental operation without your having to turn the unit’s power off,
so you can carry it in your pocket or purse.
Right Side:
VOLUME/BRIGHTNESS CONTROL: Adjusts the volume of the GPS-810’s built-in
speaker. The volume control will also adjust the volume of headphones or an
audio system that you have connected to the GPS-810’s headphone jack (see
below). To adjust the brightness, press the volume control knob in. The
BRIG HTNESS indicator will be superimposed on the screen and you can
change the screen’s brightness by rotating the volume knob.
H
EADPHONE/AUDIO OUTPUT J ACK: Lets you connect headphones for person-
al listening. You can also connect the headphone jack to an auxiliary input on
your vehicle’s audio system.
SD C
ARD SLOT: Accepts an SD memory card (not included). The SD card is
required to store audio/video media and photos to be played on your
GPS-810. The SD card slot can also be used to load maps for territories not
covered by the maps preloaded in the GPS-810’s memory.
Before You Begin Using the GPS-810
Charge its battery for a minimum of 6 hours:
1. Plug the included wall charger into a wall outlet.
2. Use the included USB cable to connect the GPS-810’s Mini USB
Connector/Charger port to the wall charger.
3. Let the unit charge for at least 6 hours before using it.
User Manual
6
ediug
+yalp
™
GPS-810
1. 2.
User Manual
ediug
+yalp
™
GPS-810
7
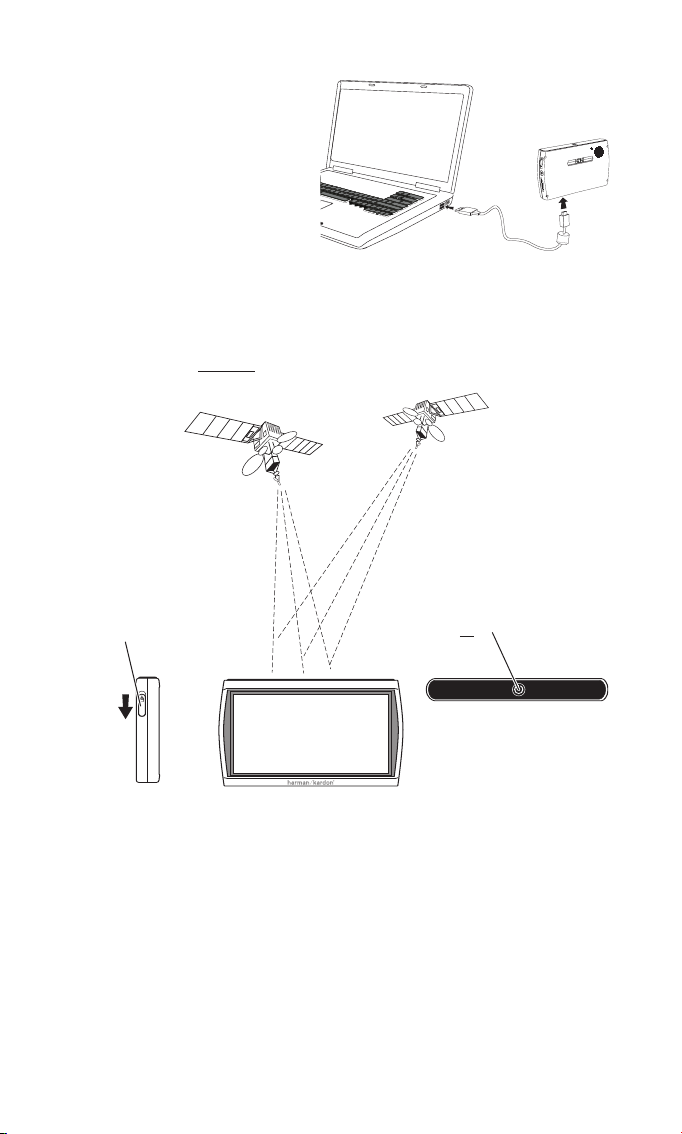
After the battery has charged for at least 6 hours:
1. Use the included USB cable to
connect the GPS-810 to your
computer’s USB hub (right).
2. Go to www.guideandplay.com.
3. Click on the Product Support
link.
4. Follow the instructions to
download the latest firmware
version into your GPS-810.
After the GPS-810’s firmware has been updated:
1. Make sure the LOCK switch is in the DOWN (unlocked) position.
2. Go outdoors to obtain GPS reception.
3. Hold down the ON/OFF
button until the unit turns on.
1. Unlock
Switch
3. Turn Power
ON
2. Go Outside
to Receive
GPS Signal
Initial Setup
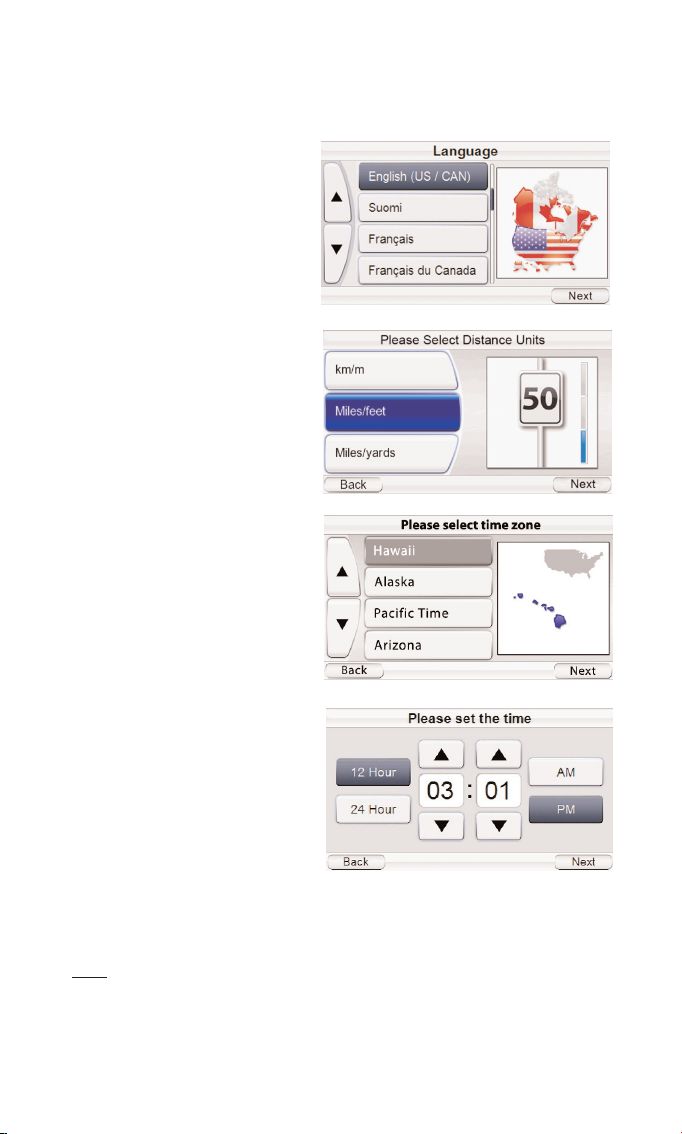
When you turn your GPS-810 on for the first time, the Setup Wizard will
appear. The Wizard will guide you through the GPS-810’s initial setup steps:
When you touch the N
EXT button on the PLEASE SE T THE TIME screen, the
GPS-810 will display the N
AVI GATIO N screen (see page 9).
NOTE: Once you complete these initial setup steps, the Setup Wizard will not reappear.
To change any of the GPS-810’s settings, see CHANGING S ETTINGS, on page 27.
User Manual
8
ediug
+yalp
™
GPS-810
1. Touch the button for the
screen language you want to
use (English, French or
Spanish).
Touch the N
EXT button.
2. Touch the button for the
distance units you want to
use (kilometers/meters, miles/
feet or miles/yards).
Touch the N
EXT button.
3. Touch the button for the
time zone where you are
located.
Touch the N
EXT button.
4. Set the current local time.
You can also set the clock
to display either 12-hour or
24-hour time. (Note that
after you initially set the
time, the GPS-810 will auto-
matically update the time
according to the GPS signals
it receives.)
Navigation
After you complete the initial
setup steps, the NAVIG ATION
screen (right) appears.
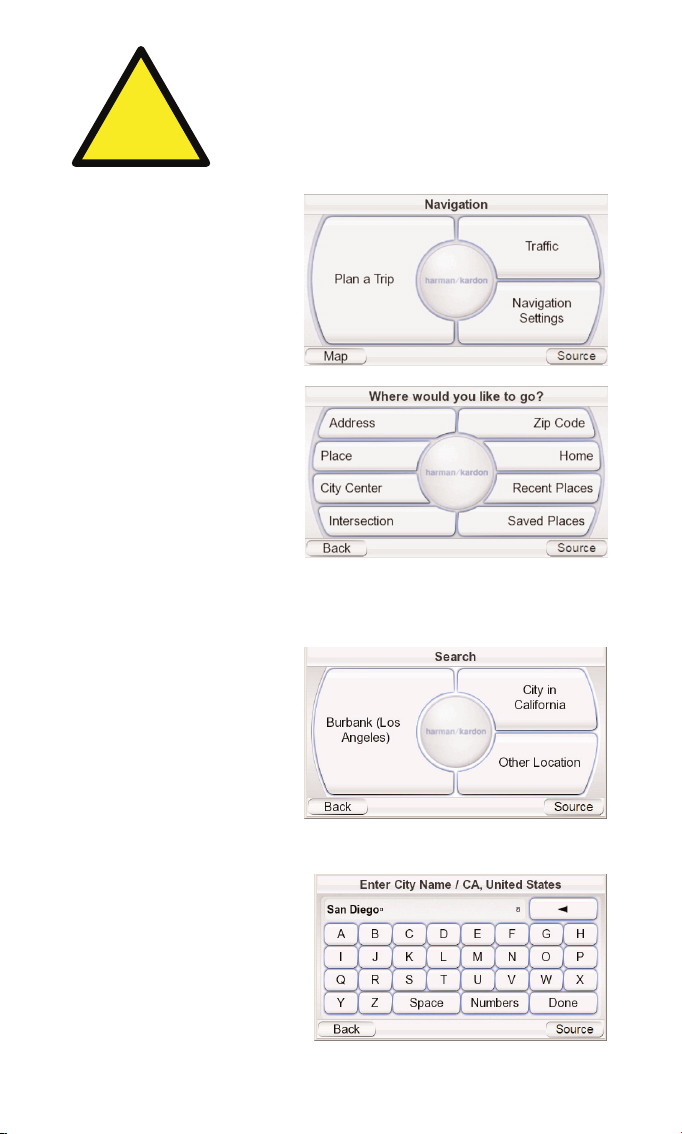
Planning a Trip
To begin navigation, touch the
PLAN A TRIP button. The WHERE
WOULD YOU LIKE TO GO? screen
(right) appears.
The W
HERE WOULD YOU LIKE TO
GO? screen gives you several
ways to plan your trip. You can
enter a specific street address,
choose a place from the
GPS-810’s extensive point-of-
interest database, enter a city
center, intersection or postal
code, or navigate to locations
you have recently visited or saved. The GPS-810 also lets you store your
home address so you can quickly enter it as your destination from wherever
you happen to be.
ENTERING A STREET ADDRESS
1. Touch the ADDRESS button on
the WHERE WOULD YOU LIKE TO
GO? screen. The SEARCH
screen appears (right).
2. Touch the appropriate
button for the city you want
to travel to.
• If you select one of the city buttons, the E
NTER CITY N AME screen
(below) appears.
• If you select O
THER LOCATION,
the SELECT COUNTRY and
SELECT STATE screens will
appear. Select the desired
country (the U.S. or
Canada) and then the
desired state. The E
NTER CITY
N
AME screen (right)
appears.
User Manual
ediug
+yalp
™
GPS-810
9
!
The geographic information provided by this device serves as a
navigational aid only and does not include information pertaining to
construction, road closures, speed restrictions, road or traffic
conditions, or other circumstances relevant to public safety. The
driver must always be aware of the actual road conditions and
surroundings, and decide whether or not to follow the information
provided by this device. Obey all traffic laws and observe safe driving
practices. The manufacturer does not accept responsibility for any
inaccurate or incomplete information provided by this device.
3. Spell the name of the
desired city. When you have
finished, touch the DONE
button. The ENTER STREET
NAME screen (right) appears.
• In most cases, once you’ve
entered some letters, the
screen will display all of the
cities that fit. Select the
desired city from the list.
4. Spell the name of the street. When you are finished, touch the D
ONE button.
The ENTER HOUSE NUMBER screen appears.
• In many cases, once you’ve entered some letters, the screen will display
all of the streets that fit. Select the desired street from the list.
5. Enter the desired address
number. When you touch
the D
ONE button, the CONFIRM
ADDRESS screen (right)
appears.
6. Touch G
O to begin naviga-
tion. The map screen will
appear. Once you start driv-
ing, the GPS-810 will guide
you to your destination. (See Navigating To Your Destination, on page 14.)
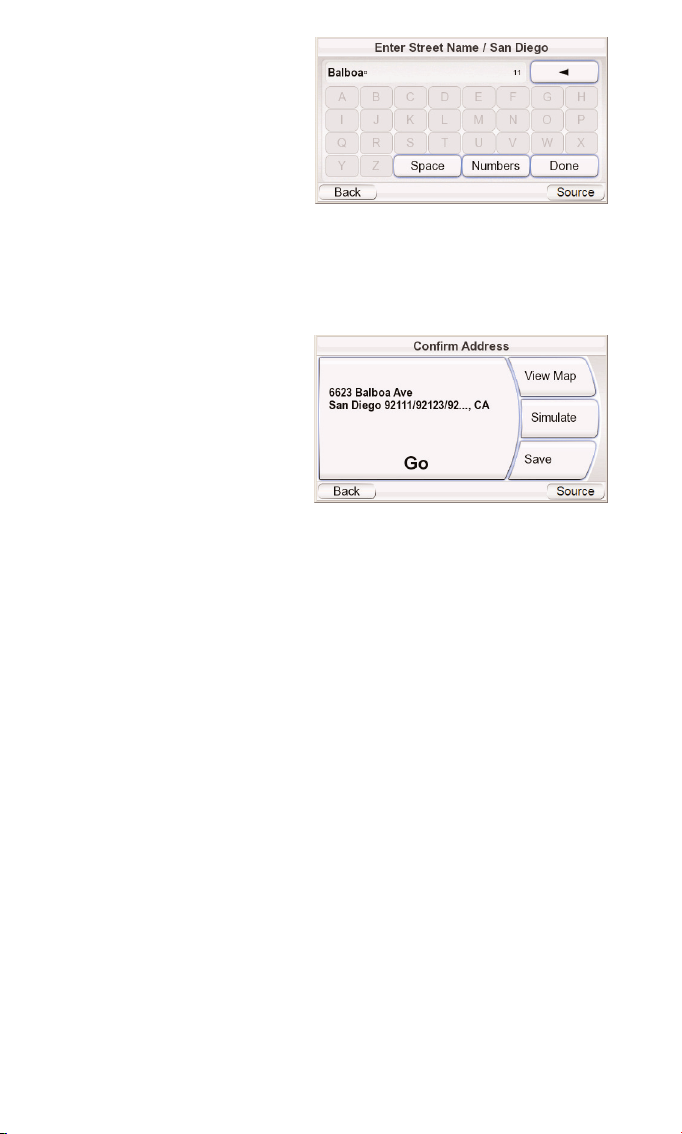
CHOOS ING A P LACE (FROM THE GPS-810 ’S DATABAS E)
The GPS-810 has a built-in point-of-interest database with millions of entries
in many different categories:
• S
ERVICES: Gas stations, car dealers and rentals, post offices, banks and ATMs
• T
RANSPORTATION: Airports, railroads, ferries, bus stations, parking areas,
rest areas
• S
HOPPING: Shopping centers, independent stores
• E
NTERTAINMENT: Amusement parks, zoos, movie theaters, casinos,
nightclubs and bars, tourist attractions
• C
ULTURE: Museums, libraries, live theater, concert halls, exhibition and
convention centers, schools, colleges and universities
• S
PORTS/RECREATION: Golf courses, ice skating rinks, swimming pools,
tennis courts, fitness and sports centers, stadiums, beaches, yacht basins,
parks & recreation centers
• E
MERGENCY/GOVERNMENT: Hospitals and clinics, emergency care centers,
dentists, first-aid centers
• F
OOD & DRINK: Restaurants, wineries
• L
ODGING: Hotels and motels, campgrounds and RV parks
• A
RTIFICIAL L ANDMARKS: Cemeteries
User Manual
10
ediug
+yalp
™
GPS-810
TO N AVIGATE TO A PLACE:
1. Touch the P
LACE button on
the WHERE WOULD YOU LIKE TO
GO? screen (see page 9). The
FIND A PLACE screen (right)
appears.
2. Select the desired area. The
SELECT A CATE GORY screen
(right) appears. (If you know
the name of the place, you
can enter it instead of
searching by category.)
3. Use the up/down arrow
buttons to find the desired
category, then touch it. The
SELECT PLACE screen (right)
appears.
4. Use the up/down arrow
buttons to scroll through
the list of places, then touch
the button for the place you
want to go. The CONFIRM
ADDRESS screen (right)
appears.
5. Touch G
O to begin navigation.
The map screen will appear.
Once you start driving, the
GPS-810 will guide you to
your destination. (See
Navigating to Your
Destination, on page 14.)
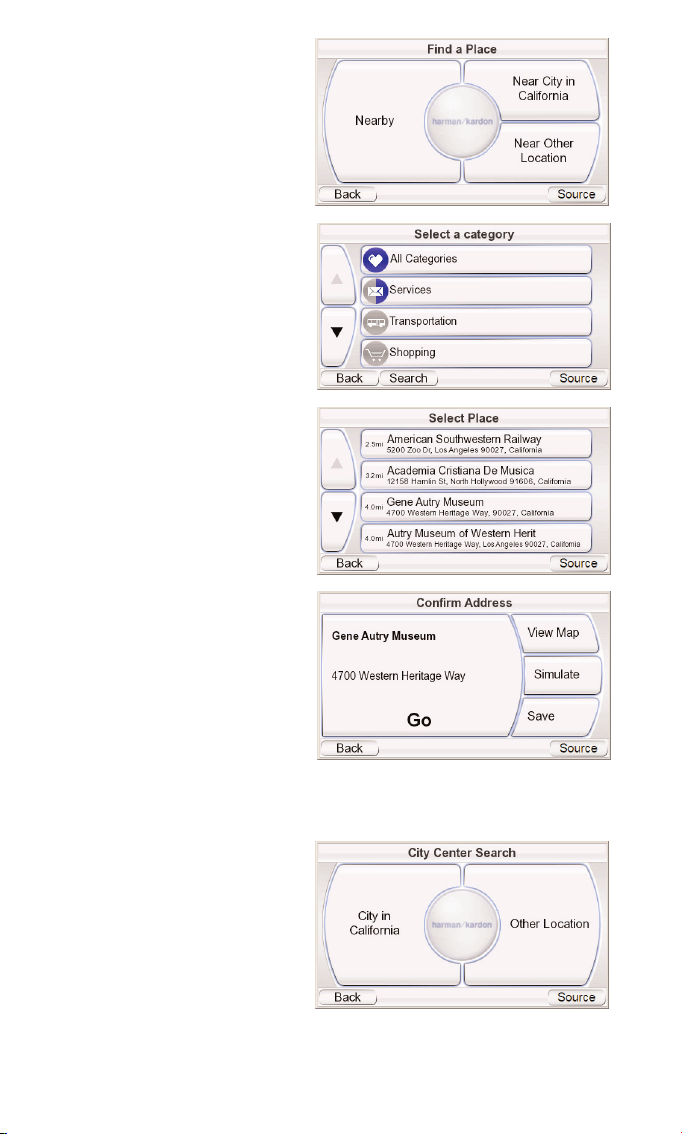
SELECTING A CITY CENTER,
I
NTERSECTION OR PO STAL
CODE
The GPS-810 can guide you to
a city center, to the intersection of two streets or to a specific postal code.
N
AVIGATING TO A CITY CENTER:
1. Touch the C
ITY CENTER button
on the WHERE WOULD YOU LIKE
TO GO? screen (see page 8).
The CITY CENTER SEARCH screen
(right) appears.
2. Touch the appropriate
button and enter the city’s
name. When you’re finished,
the CONFIRM ADDRESS screen
appears (see next page).
User Manual
ediug
+yalp
™
GPS-810
11
3. Touch the GO button to
begin navigation. The map
screen will appear. Once you
start driving, the GPS-810
will guide you to the center
of the city you selected.
(See Navigating to Your
Destination, on page 14.)
N
AVIGATING TO AN INTERSECTION:
1. Touch the I
NTERSECTION button
on the W
HERE WOULD YOU LIKE
TO GO? screen (see page 9).
The IN WHICH CITY IS THE
INTERSECTION? screen (right)
appears.
2. Select the city. The E
NTER
STREET NAME screen appears.
3. Enter the name of the first
street. When you are finished
the E
NTER SECOND STREET NAME
screen appears.
4. Enter the name of the
second street. The CONFIRM
ADDRESS screen (right) appears.
5. Touch the G
O button to
begin navigation. The map
screen will appear. Once you
start driving, the GPS-810 will guide you to the intersection you selected.
(See Navigating to Your Destination, on page 14.)
N
AVIGATING TO A POSTAL CODE:
1. Touch the P
OSTA L CODE
button on the WHERE WOULD
YOU LIKE TO GO? screen. The
F
IND A P OSTA L CODE screen
(right) appears.
2. Select the country and enter
the postal code. The E
NTER
STREET NAME screen appears.
3. Spell the name of the street.
When you are finished,
touch the DONE button. The
ENTER HOUSE NUMBER screen
appears.
4. Enter the desired address
number. When you touch
the DONE button, the CONFIRM
ADDRESS screen (right)
appears.
User Manual
12
ediug
+yalp
™
GPS-810

5. Touch GO to begin navigation. The map screen will appear. Once you start
driving, the GPS-810 will guide you to the address you’ve entered.
(See Navigating to Your Destination, on page 14.)
NAV IG ATING TO YOUR HOME
The GPS-810 stores your home address so you can easily select it as a
destination, no matter where you are in North America.
1. Touch the H
OME button on
the WHERE WOULD YOU LIKE TO
GO? screen (see page 9). The
CONFIRM HOME ADDRESS screen
(right) will appear.
2. Touch GO to begin naviga-
tion. The map screen will
appear. Once you start driv-
ing the GPS-810 will guide
you to your destination. (See Navigating to Your Destination, on page 14.)
NOTE: If you have not yet set your home address, the GPS-810 will have you do so.
NAV IG ATING TO RECENTLY VI SITED OR SAVED LOCATIONS
The GPS-810 stores a list of your recently visited locations in a HISTORY page
and also lets you save locations to a special list. You can easily select your
destination from either of these lists.
1. Touch the RECENT PLACES or
SAVED PLACES button on the
WHERE WOULD YOU LIKE TO GO?
screen (see page 8). The
RECENT PLACES page (right) or
the S
ELECT PLACE list (below,
right) will appear.
2. Use the up/down arrow but-
tons to scroll through the
list of places, then touch the
button for the place you
want to go. The CONFIRM
ADDRESS screen (below, right)
will appear.
3. Touch G
O to begin naviga-
tion. The map screen will
appear. Once you start driv-
ing, the GPS-810 will guide
you to your destination.
(See Navigating to Your
Destination, on page 14.)
User Manual
ediug
+yalp
™
GPS-810
13

CONFIRM ADDRESS SCREEN OPTIONS
Besides touching the GO button to begin navigation, the CONFIRM ADDRESS
screen (see page 14) also gives you these options:
V
IEW MAP: Touch to see a map showing your destination. You can change
the map view and zoom the view in and out (see Map Screen Options, on
page 15).
NOTE: Touching the VIEW MAP button does not begin navigation.
SIMULATE: Touch to have the GPS-810 simulate the trip. The simulation
includes all map movements and voice-guidance turn prompts, and takes
place at high speed. To abort the simulation, touch anywhere on the screen.
SAV E: Touch to save the address in the GPS-810’s address book. If you want
you can add a name to the address.
Navigating to Your Destination
Once you have entered your destination, touching the GO button on any of
the GPS-810’s C ONFIRM ADDRESS screens will begin navigation. The Map screen
(below) will appear. The blue arrowhead indicates your present location and
your direction of travel. The route that the GPS-810 has calculated is indicated
by the green line.
The map shows the distance to and direction of your next turn, and also
shows the remaining time and distance of your trip and your estimated
arrival time.
NOTE: If you are playing music on the GPS-810’s Music Player (see page 23), the MAP
screen will also display the title of the currently playing song.
As you drive, the GPS-810 keeps track of your position via GPS, will issue
voice guidance commands through the built-in speaker, telling you when
and where to turn, and the map will continually update your position along
your route. If you make a wrong turn, the GPS-810 will automatically
calculate a new route and will continue to guide you to your destination.
User Manual
14
ediug
+yalp
™
GPS-810
Distance Until Next Turn
and Direction of Next Turn
Remaining
Time & Distance
and Estimated
Arrival Time
Your Current Location
and Direction of Travel
(Blue Arrowhead)
Title of Currently Playing Song
Calculated
Route (Green)
Map Screen
L
OCK
/U
NLOCK
Button
(shown Locked)
Map
Zoom
Buttons
Map
View
Button
M
ENU
Button
 Loading...