


HD 970 CD Player
OWNER’S MANUAL |
|
|
|
|
HD 970 |
|
|
|
|
Play |
Pause |
Stop |
SKip/Search |
Display |
Power for the Digital Revolution®
Table of Contents
2Typographic Conventions
3Introduction
4Information
4Unpacking
5Front Panel Controls
6Rear Panel Connections
7Remote Control Functions
9Installation
10 Operation
10Loading and Unloading Discs
10Normal Play
11Display Dim
11Time Display
11Disc Info
12Search
12 |
Skip |
12 |
Folder |
12 |
+10/-10 |
12Input/Source Selection
13Programmed Play Operation
13Programmed Play
13Checking Program Contents
13Clearing Programs
14Repeat Play
15Troubleshooting Guide
16Technical Specifications
Declaration of Conformity
We, Harman Consumer Group International
2, route de Tours
72500 Château-du-Loir,
FRANCE
declare in own responsibility, that the product described in this owner’s manual is in compliance with technical standards:
EN 55013:2001+A1:2003
EN 55020:2002+A1:2003
EN 61000-3-2:2000
EN 61000-3-3.1995+A1:2001
EN 60065:2002
Jurjen Amsterdam
Harman Consumer Group International
01/05
Typographic Conventions
In order to help you use this manual with the remote control, front panel controls and rear panel connections, certain conventions have been used.
EXAMPLE – (bold type) indicates a specific remote control or front panel button, or rear panel connection jack.
EXAMPLE – (bold type) indicates a message in the front panel information display.
1– (number in a square) indicates a specific front panel control.
a– (number in an oval) indicates a button or indicator on the remote.
¡ – (number in a circle) indicates a rear panel connection.
2 TABLE OF CONTENS

Introduction
Thank you for choosing Harman Kardon HD 970 CD player.
The HD 970 is an exceptionally well-engineered product that offers high performance and ease of use.
Along with conventional CD audio discs, the HD 970 is also compatible with MP3 data from CDs and most recordable CD formats.
We ask that you take a few minutes to read through this Owner’s Manual to familiarize yourself with the controls and functions. This brief investment of time will yield dividends in the form of years of listening pleasure.
If you have any questions about this product, its installation or operation, please contact your dealer, as they are your best source of local information.
Description and Features
Ever since its introduction in 1992, Harman Kardon RLS (Real-time Linear
Smoothing) conversion technology has been hailed as an efficient, high performance means of transforming the, at that time 16-bit, digital signal from CD to high quality analog. The short RLS signal path resulted in hitherto unknown clarity and detail, in combination with awesome dynamic resolution of the critical bass frequencies.
RLS-II was a natural, yet radical evolution of the original RLS concept.
Since then, dramatic progress has been made in Digital Signal Processing, allowing the integration of DSP's in a standalone CD Player and the implementation of a very powerful algorithm in the digital domain: the birth of the RLS-III.
Using theoretical roots of the RLS, RLS-III has set new standards for dynamic range and shifted noise to an absolute non-audible frequency range with very high jitter rejection. The result is an astonishing common signal format of 24 bits at a sampling frequency of 384 kHz.
This 24 bits/384 kHz signal format allows Harman Kardon engineers to take a minimalist approach to the subsequent analog filtering, without paying any penalty in the form of the aliasing errors and artifacts.
Harman Kardon's analog processing legacy has been expressed to its optimal level in the output stage of the HD 970 with High Definition, Wide Bandwidth and Low Feedback circuitry in a pure Class A configuration, using only high grade components.
A unique feature of the HD 970 is that it allows other source components to be played back using the high-grade audiophile digital-to-ana- log convertors inside the CD player. Especially source components using older and less powerful convertors will benefit from this feature.
Important Note: The player will only output 2-channel PCM signals. Neither multi-channel Dolby Digital or DTS nor their 2-channel downmix signals will be output.
■Asynchronous Digital Processing for Highest Possible Jitter Rejection based on a 32bit DSP
■Real-time Linear Smoothing III
■Two Digital Inputs (One Optical and One Coaxial) for Dramatic Sound Quality Improvement of External Devices
■CD Playback with CD Text Functionality, MP3 Playback with ID3 Tag Information
■Digital Output for Direct Connection to Outboard Digital-to-Analog Converters
■Sophisticated Programming Features to Automatically Play Tracks in Preprogrammed or Random Order
■Full compatibility with CD-R and CD-RW format to play (finalized) recordable and erasable discs without problems.
CLASS 1 |
LASER |
INTRODUCTION 3 |

Information
Important Safety Information
Verify Line Voltage Before Use
Your HD 970 has been designed for use with 230-volt AC current. Connection to a line voltage other than that for which it is intended can create a safety and fire hazard, and may damage the unit.
If you have any questions about the voltage requirements for your specific model, or about the line voltage in your area, contact your selling dealer before plugging the unit into a wall outlet.
Do Not Use Extension Cords
We do not recommend that extension cords be used with this product. As with all electrical devices, do not run power cords under rugs or carpets or place heavy objects on them. Damaged power cords should be replaced immediately by an authorized service depot with cords meeting factory specifications.
Handle The AC Power Cord Gently
When disconnecting the power cord from an AC outlet always pull the plug, never pull the cord. If you do not intend to use the unit for any considerable length of time, disconnect the plug from the AC outlet.
Do Not Open The Cabinet
There are no user-serviceable components inside this product. Opening the cabinet may present a shock hazard, and any modification to the product will void your guarantee. If water or any metal object such as a paper clip, wire or a staple accidentally falls inside the unit, disconnect it from the AC power source immediately, and consult an authorized service station.
CAUTION: The HD 970 uses a laser system. To prevent direct exposure to the laser beam, do not open the cabinet enclosure or defeat any of the safety mechanisms provided for your protection. DO NOT STARE INTO THE LASER BEAM. To ensure proper use of this product, please read this owner’s manual carefully and retain it for future use. Should the unit require maintenance or repair, please contact your local
Harman Kardon service station. Refer servicing to qualified personnel only.
Installation Location
■To assure proper operation, and to avoid the potential for safety hazards, place the unit on a firm and level surface. When placing the unit on a shelf, be certain that the shelf and any mounting hardware can support the weight of the product.
■Make certain that proper space is provided both above and below the unit for ventilation. If this product will be installed in a cabinet or other enclosed area, make certain that there is sufficient air movement within the cabinet.
■Do not place the unit directly on a carpeted surface.
■Avoid installation in extremely hot or cold locations, or an area that is exposed to direct sunlight or heating equipment.
■Avoid moist or humid locations.
Cleaning
When the unit gets dirty, wipe it with a clean, soft dry cloth. If necessary, wipe it with a soft cloth dampened with mild soapy water, then a fresh cloth with clean water. Wipe dry immediately with a dry cloth. NEVER use benzene, thinner, alcohol or any other volatile cleaning agent. Do not use abrasive cleaners, as they may damage the finish of metal parts. Avoid spraying insecticide near the unit.
Moving The Unit
Before moving the unit, be certain to disconnect any interconnection cords with other components, and make certain that you disconnect the unit from the AC outlet.
Unpacking
The carton and shipping materials used to protect your new HD 970 during shipment were specially designed to cushion it from shock and vibration. We suggest that you save the carton and packing materials for use in shipping if you move or should the unit ever need repair.
To minimize the size of the carton in storage, you may wish to flatten it. This is done by carefully slitting the tape seams on the bottom and collapsing the carton down to a more twodimensional appearance. Other cardboard inserts may be stored in the same manner. Packing materials that cannot be collapsed should be saved along with the carton in a plastic bag.
If you do not wish to save the packaging materials, please note that the carton and other sections of the shipping protection are recyclable. Please respect the environment and discard those materials at a local recycling center.
4 INFORMATION
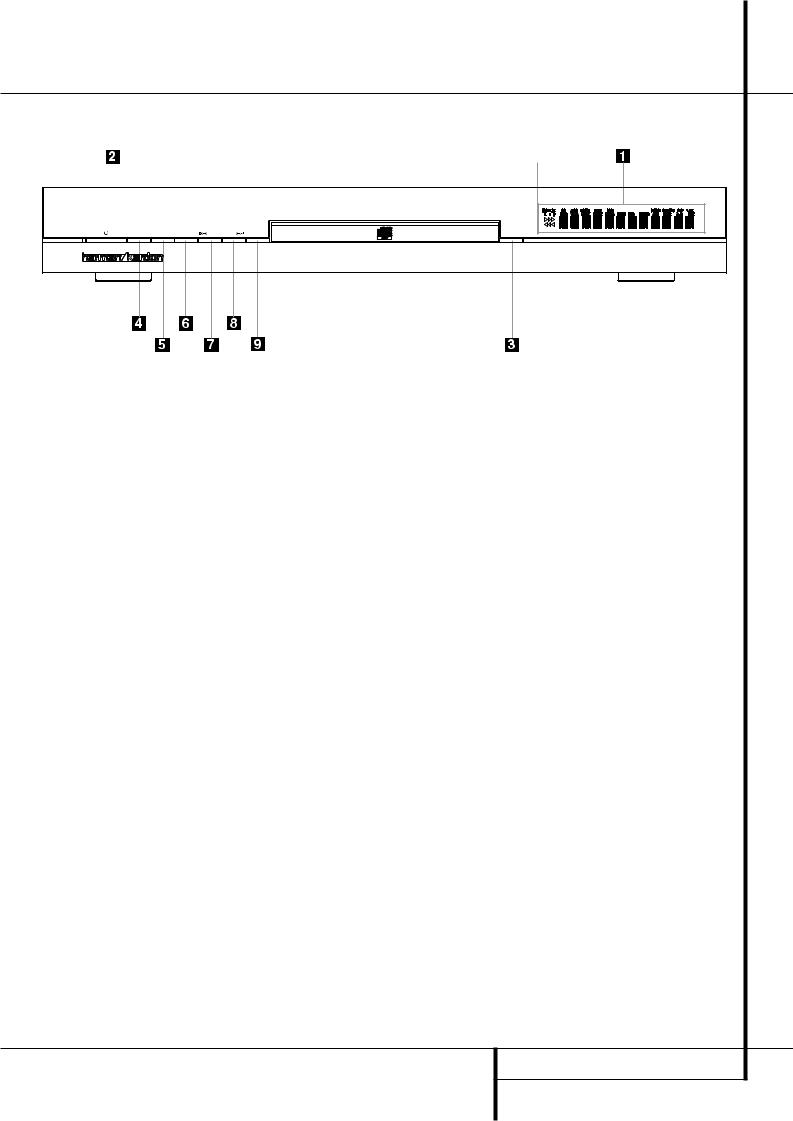
Front-Panel Controls
HD 970 |
|
|
|
|
|
Play |
Pause |
Stop |
SKip/Search |
Display |
Open/Close |
1Main Information Display 2 Power On/Off (Standby) 3 Open/Close
1Main Information Display: This display delivers messages and status indications to help you operate the CD player.
2Power On/Off (Standby): Press the button once to turn the CD player on, press it again to put the unit in the Standby mode.
3Open/Close: Press this button to open or close the Disc Tray.
4Play: Press to initiate playback or to resume playback after Pause has been pressed.
5Pause: Press this button to momentarily pause playback. To resume playback, press the button again. If a CD is playing, the sound will be muted.
4 Play
5 Pause
6Stop
6Stop: Press this button to stop the disc currently being played or to exit program mode (see page 13 for complete information).
7Skip/Search (Previous): Press this button to move backward through the music tracks on a CD disc. Keep the button pressed to search backwards at one of the available speeds.
7 Skip/Search (Previous)
8Skip/Search (Next) 9 Dimmer
8Skip/Search (Next): Press to move forward through the music tracks on a CD. Keep the button pressed to search forwards at one of the available speeds.
9Dimmer: Press this button to reduce the brightness of the Information Display by 50% or to turn the display off completely in the following order: FULL BRIGHTNESS HALF BRIGHTNESS OFF FULL BRIGHTNESS.
Important Note: When the unit is turned off (to Standby), pressing the Play button 49 on the front or on the remote will automatically turn on the player and start playback.
FRONT-PANEL CONTROLS 5
 Loading...