


ENGLISH |
HK 990 Integrated Amplifier |
Owner’s Manual |

Table of Contents |
Important Safety Instructions |
2Safety Instructions
3Introduction and Features
4Front Panel Controls and Functions
5Rear Panel Connections
7 Remote Control
9Remote Control Function List
10Setup Instructions
10Input Setup
11Speaker Setup
12EzSet and EQ Setup
12Level Setup
13Operating Instructions
13 Listening
13Recording
13Troubleshooting
14Specifications
DECLARATION OF CONFORMITY
We, Harman Consumer Group International
2, route de Tours
F-72500 Château-du-Loir
France
declare in own responsibility, that the product described in this owners manual is in compliance with technical standards:
EN 55013:2001 + A1:2003
EN 55020:2002 + A1:2003
EN 61000-3-2:2000
EN 61000-3-3:1995 + A1:2001
EN 60065:2002
Jurjen Amsterdam
Harman Consumer Group International 09/08
1.Read these instructions.
2.Keep these instructions.
3.Heed all warnings.
4.Follow all instructions.
5.Do not use this apparatus near water.
6.Clean only with a dry cloth.
7.Do not block any ventilation openings. Install in accordance with the manufacturer’s instructions.
8.Do not install near any heat sources such as radiators, heat registers, stoves or other apparatus (including amplifiers) that produce heat.
9.Do not defeat the safety purpose of the polarized or grounding-type plug. A polarized plug has two blades with one wider than the other. A grounding-type plug has two blades and a third grounding prong. The wide blade or the third prong is provided for your safety. If the provided plug does not fit into your outlet, consult an electrician for replacement of the obsolete outlet.
10.Protect the power cord from being walked on or pinched, particularly at plugs, convenience receptacles and the point where they exit from the apparatus.
11.Only use attachments/accessories specified by the manufacturer.
12. Use only with the cart, stand, tripod, bracket or table
specified by the manufacturer or sold with the apparatus.
When a cart is used, use caution when moving the cart/apparatus combination to avoid injury from tip-over.
13. Unplug this apparatus during lightning storms or when unused for long periods of time.
14.Refer all servicing to qualified service personnel. Servicing is required when the apparatus has been damaged in any way, such as power supply cord or plug is damaged, liquid has been spilled or objects have fallen into the apparatus, the apparatus has been exposed to rain or moisture, does not operate normally, or has been dropped.
15.Do not expose this apparatus to dripping
or splashing and ensure that no objects filled with liquids, such as vases, are placed on the apparatus.
16.To completely disconnect this apparatus from the AC Mains, disconnect the power supply cord plug from the AC receptacle.
17.The mains plug of the power supply cord shall remain readily operable.
18.Do not expose batteries to excessive heat such as sunshine, fire or the like.
The lightning flash with arrowhead symbol, within an equilateral triangle, is intended to alert the user to the presence
of uninsulated “dangerous voltage” within the product’s enclosure that may be of sufficient magnitude to constitute a risk of electric shock to persons.
The exclamation point within an equilateral triangle is intended to alert the user to the presence of
 important operating and maintenance (servicing) instructions in the literature accompanying the product.
WARNING: To reduce the risk of fire or electric shock, do not expose this apparatus to rain or moisture.
2 Table of Contents

Introduction
Congratulations on your choice of the Harman Kardon HK 990 Integrated Amplifier.
In order to obtain the best performance from this integrated amplifier, please be sure to read this owner's manual and use your integrated amplifier only in accordance with its instructions.
The special features, of this unit include:
In terms of raw power, the HK 990 is the most muscular amplifier ever to carry the harman/kardon® name, more than capable of driving the most demanding loudspeaker loads without breaking a sweat. But the HK 990’s awesome power is nothing if not highly refined, extending beyond watts and amps. With a choice of discrete optical or coaxial inputs or an analogonly signal path, as well as fourth-generation Real-Time Linear Smoothing (RLS IV), 2.2-chan- nel EzSet/EQ room optimization, dual subwoofer outputs and an audiophile-quality phono preamp section, the HK 990 offers a combination of features you will find irresistible. Others, of course, may simply hunger for all that power. We understand completely.
•High Current Capability provides the instantaneous current necessary to precisely drive and control nearly any loudspeaker system
•Ultrawide-bandwidth amplifier design for improved transient accuracy and phase linearity
•Low negative feedback for further improved dynamic accuracy
•Use of discrete electronic circuitry to provide the highest performance level
•Dual-path technology allows for pure analog or pure digital audio processing within the same product
•EzSet/EQ room optimization for quick and accurate system setup, optimized for two channels and two subwoofers
•Symmetric (balanced) XLR analog inputs offer lower noise levels and higher Signal-to-Noise performance
•RLS IV digital-to-analog conversion technology, with dual conversion using two stereo AD1955 high-grade DACs in Dual Mono configuration
•The HRS link allows Harman Kardon CD players to lock themselves to the external clock of the amplifier for a jitter-free connection, similar to having the CD playback inside the amplifier
•Dual differential input stages with their own high-voltage supply, resulting in high gain and low noise as well as high channel separation
•Cascoded predriver stage considerably reduces high-frequency distortion, allowing crystalclear high frequencies, free from any harsh sound
•Thermal Tracking Mechanism using ThermalTrak™ output stage transistors that include internal temperature sensors to bias the current of the output stage in real time
•Sophisticated electronic protection circuitry guards the amplifier from short-circuit or from damaged speakers and wires, without impairing sound quality, by using current limiting or output relays
•DC servo to ensure that the DC level of the amplifier output will stay within a contained limit at any condition
•Multiple protection circuits will switch the amplifier off in case overcurrent, overvoltage, overtemperature or DC protection is detected
•Dual toroidal transformers and up to 15.000μF of supply filtering per channel for high channel separation and tight bass control, even with low-impedance loads
•Dual-line dot-matrix display
•Record out available in both digital and analog domains (two analog outputs and one coaxial digital output)
•A/B speaker switching
•IR remote extension jacks for control of the amplifier when placed in a cabinet
•Harman Kardon system remote for control of compatible Harman Kardon CD players and tuners
Accessory list
•Owners Manual
•Remote Control + 4 AAA batteries
•EzSet Microphone
•Power cord
Introduction 3
ENGLISH
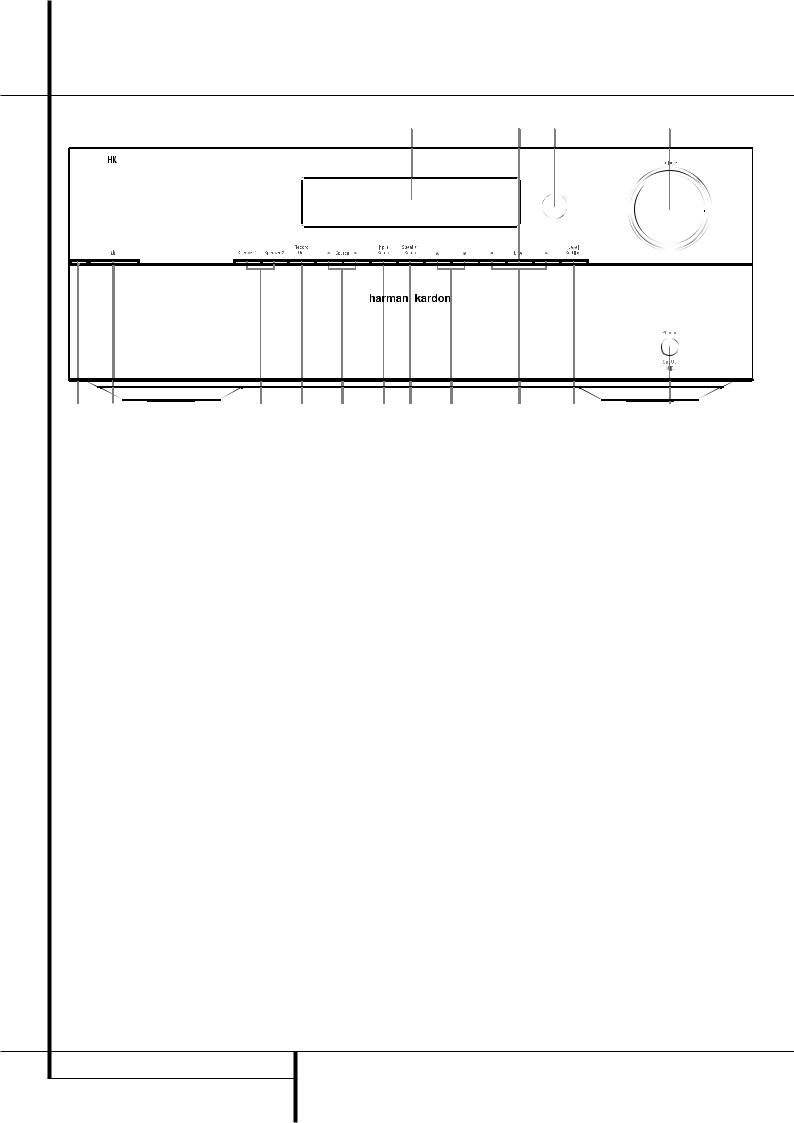
Controls and Functions
E D C B
|
|
|
|
|
|
|
|
|
|
|
|
|
|
|
|
|
|
|
|
|
|
|
|
|
|
|
|
|
|
|
|
|
|
|
|
|
|
|
|
1 |
2 |
3 |
4 |
5 |
6 |
7 |
8 |
9 |
A |
||
0Power Indicator: This LED will illuminate in amber when the unit is in the Standby mode to signal that the unit is ready to be turned on. When the unit is in operation, the indicator will turn white.
1System Power Control: Press this button to turn on the HK 990; press it again to turn the unit off (to Standby). Entering Standby also saves all Setup parameters.
2Speaker 1/2 Selectors: Press to select speaker pair 1 or 2, or both, or neither (headphone output only).
3 Record Out Selector: First press shows the record source presently selected in the display. Pressing on the the Source selectors 4within a few seconds after pressing 3changes the record source. Exit this function by pressing 3 again, or wait for a few seconds until exit takes place automatically.
4 Input Source Selector: Select input source for listening by pressing one of the ”Source” buttons repeatedly to scroll through all the Inputs either forwards or backwards, until the display shows the desired source.
5 Input Setup Button: Press this Button to enter/exit the Input Setup Mode. Here you can select the physical connection for each source (Analog/Digital etc.) as well as Gain, Bass/Treble etc. Refer to the Setup section of this manual.
6 Speaker Setup Selector: Press this Button to enter the Speaker Setup Menu, where you can switch subwoofers on and off, select crossover frequency, run automatic speaker setup (EzSet/EQ) etc. Refer to the Setup section of this manual.
7 Up/Down Arrow Buttons: Press to scroll through various options for adjustment in a menu.
8 Left/Right Arrow Buttons: Press to increase/decrease a parameter or to select between parameters after selecting a menu for adjustment with the Up/Down Arrow Buttons.
9 Level Settings Button: Press to enter/exit the Balance left/right adjustment for the speakers as well as subwoofer level.
A Headphone Jack/Setup Microphone Input: Plug in headphones if desired. With both ”Speaker 1” and ”2” selectors in the Off position, output is supplied only to headphones. When using the automatic loudspeaker setup and calibration system (EzSet/EQ), plug the microphone in here.
BVolume Control: Turn to raise or lower output volume.
CRemote Sensor Window: The sensor behind this window receives infrared signals from the remote control. Aim the remote at this area and do not block or cover it unless an external remote sensor is installed.
Enter Button: Press to select a parameter for adjustment and to confirm.
EMain Information Display: This display delivers messages and status indications to help you operate the amplifier.
4 Controls and functions
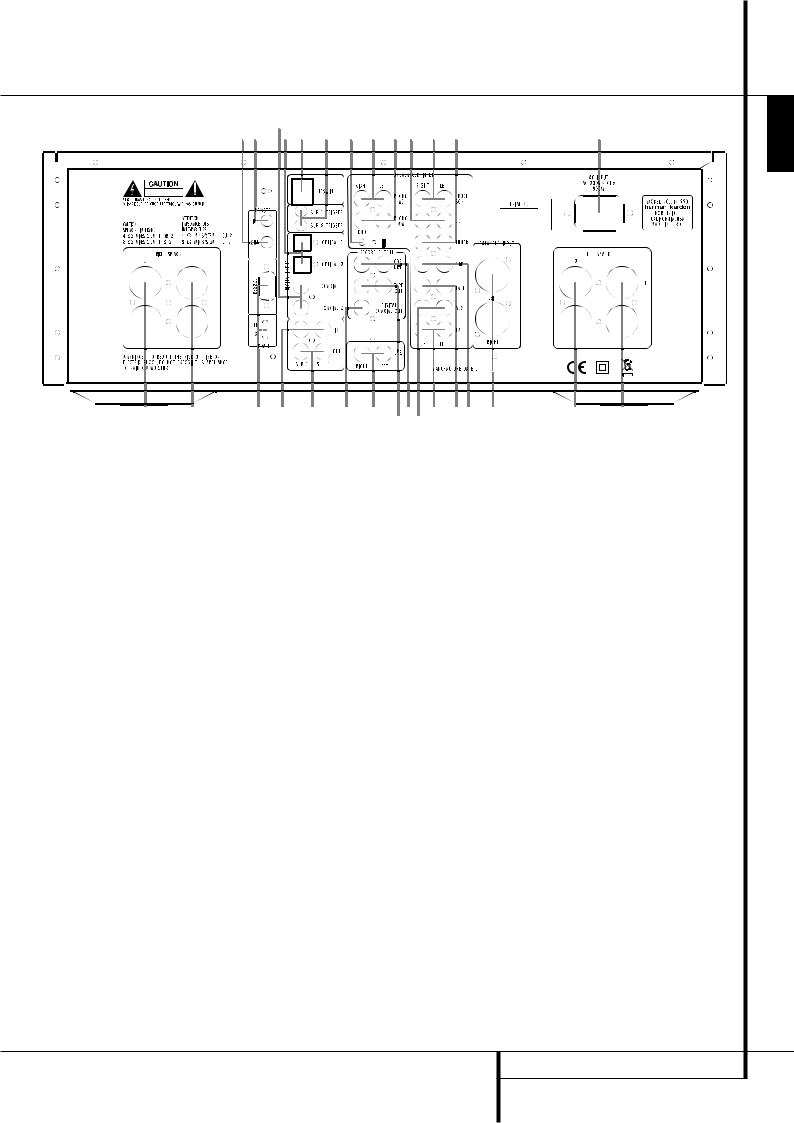
Connections
|
|
|
|
|
|
|
|
|
|
|
|
|
|||||
|
|
|
|
|
|
|
|
|
|
|
|
|
|
|
|
|
|
|
|
|
|
|
|
|
|
|
|
|
|
|
|
|
|
|
|
|
|
|
|
|
|
|
|
|
|
|
|
|
|
|
|
|
|
|
|
|
|
|
|
|
|
|
|
|
|
|
|
|
|
|
|
|
|
|
|
|
|
|
|
|
|
|
|
|
|
|
|
|
|
|
|
|
|
|
|
|
|
|
|
|
|
|
|
|
|
|
|
|
|
|
|
|
|
|
|
|
|
|
|
|
|
|
|
|
|
|
|
|
|
|
|
|
|
|
|
|
|
|
|
|
|
|
|
|
|
|
|
|
|
|
|
|
|
|
|
|
|
|
|
|
|
|
|
|
|
|
|
|
|
|
|
|
|
|
|
|
|
|
|
|
|
|
|
|
|
|
|
|
|
|
|
|
|
|
|
|
|
|
|
|
|
|
|
|
|
|
|
|
|
|
|
|
|
|
|
|
|
|
|
|
|
|
|
|
|
|
|
|
|
|
|
|
|
|
|
|
|
|
|
|
|
|
|
|
|
|
|
|
|
|
|
|
|
|
|
|
|
|
|
|
|
|
|
|
|
|
|
|
|
|
|
|
|
|
|
|
|
|
|
|
|
|
|
|
|
|
|
|
|
|
|
|
|
|
|
|
|
|
|
|
|
|
|
|
|
|
|
|
|
|
|
|
|
|
|
|
|
|
|
|
|
|
|
|
|
|
|
|
|
|
|
|
|
|
|
|
|
|
|
|
|
|
|
|
|
|
|
|
|
|
|
|
|
|
|
|
|
|
|
|
|
|
|
|
|
|
|
|
|
|
|
|
|
|
|
|
|
|
|
|
|
|
|
|
|
|
|
|
|
|
|
|
|
|
|
|
|
|
|
|
|
|
|
|
|
|
|
|
|
|
|
|
|
|
|
|
|
|
|
|
|
|
|
|
|
|
|
|
|
|
|
|
|
|
|
|
|
|
|
|
|
0 Right Loudspeaker output, System 2.
1 Right Loudspeaker output, System 1.
2RS-232 connector for possible future PC update. Update Switch.
3Input jacks for one or two subwoofer signals from external surround processor.
4 Output jacks for two subwoofers.
5Digital coaxial output jack for digital recording. Also permits digital recording of analog sources.
6 Preamplifier output jacks.
7Analog output jacks for tape recording.
8Analog output jacks for CD Recorder analog recording.
9AUX input jacks, suitable for analog signals from video games, video recorders etc.
ATV input jacks for analog sound input from your TV.
BTAPE input jacks for analog tape replay.
CCDR input jacks, for CD Recorder analog replay.
DBalanced analog inputs (XLR), for use with all signal sources that output balanced signals. Available via the CD Input function only, as an alternative to the unbalanced RCA jacks (Input J). Pin configuration for the XLR Inputs: Pin 1 is Ground, Pin 2 is Plus/Hot, Pin 3 is Minus/Cold.
E Left Loudspeaker output, System 2.
F Left Loudspeaker output, System 1.
G Power lead AC input.
HTUNER analog Input jacks.
IPROCESSOR Analog Inputs. These Inputs go directly to the power amplifier section of the HK 990, bypassing the Volume and Tone Control. Here you can connect the Front Channel Pre Out L+R signals from an external surround processor, to benefit from
the superior power of the HK 990 and control volume from the processor. NOTE: Only use the Processor Input with a device that has its own volume control!
JCD analog Input jacks. You can select either this Input or the Balanced Input as analog Input in the CD Input Setup Mode.
KPhono Input for record player with Moving Magnet (high output and high impedance) or High-Output Moving Coil cartridge.
LPhono Input for record player with Moving Coil (low output and low impedance) cartridge.
MIf your record player has a separate Ground wire, attach it here to avoid hum noise.
NConnect the trigger Input (if available) on one or two subwoofers to these trigger ON/ OFF output jacks. When you switch ON the HK 990, it sends a trigger signal, which switches ON the subwoofer. When switching OFF the HK 990, the subwoofer also switches OFF.
OHRS (High-Resolution Synchronization) Input. Use the included HRS-cable to connect the HD 990 CD player (or other similarly equipped player) for optimum sound quality.
POptical Digital Inputs (TOS-Link). Connect any digital device with Optical Digital Output to one of these Inputs. Push the Optical Jack through the hinged door that covers the Input until it clicks into place.
QCoaxial Digital Inputs. Connect any digital device with Coaxial Digital Output to one of these Inputs. Usually, Coaxial Digital transmission is preferred to Optical, given a choice.
RRemote IN. To control your HK 990 with an external infrared remote sensor, connect the wire from the remote sensor here.
SRemote OUT. Connect other Harman Kardon devices (you may also experiment with other brands) that you wish to control with the HK 990 Remote Control to this Output.
Connections 5
ENGLISH
 Loading...