


VIDEORECORDER
VIVANCE
GV 3143 HiFi
DEUTSCH
ENGLISH
FRANÇAIS
ITALIANO
NEDERLANDS

CONTENTS________________________________________________________
4 GV 3143 HiFi video recorder
Packing contents
Special features of your video recorder
5Set-up and safety
6Overview
The front of the video recorder
The back of the video recorder
The remote control
10 Connection and preparation
Connecting the antenna, television and mains cable Inserting batteries in the remote control
Switching the video recorder on and off (power save mode)
12 Tuning
Tuning the video recorder and the television Automatic channel tuning (using ATS euro plus)
15 Playback
Basic playback functions Additional playback functions Continuous playback
19 Search functions
Zero setting
Finding recordings using the Video Index Search System (VISS)
20 Recording
Four recording options
The Video Programming System (VPS/PDC) Immediate recording
Delayed recording by entering the ShowView number
Delayed recording by entering the data for the required television program
Checking, modifying or deleting recording information Interrupting recording stand-by mode
Reactivating recording stand-by mode
30 Copying
Connection and preparation Recording from external devices
2

CONTENTS_____________________________________________________________
32 Satellite receiver
Connection and preparation
Recording TV programs from the satellite receiver Recording – controlled by a satellite receiver
35 Using a Decoder
Connection and preparation Recording PAY TV programs
37Audio playback
38Special settings
Sorting, deleting and renaming television stations
Re-tuning television channels
Skipping television stations
Tuning new television stations
Switching the station on the video recorder on and off
43 Setting the date and time
Automatically updating the time and date Setting the time and date manually
44 Special features
Selecting special features in the »MODE« menu Selecting special features in the »SERVICE« menu
47Parental lock
48Television remote control
49Information
Rectifying minor problems
Technical data
GRUNDIG Service (page 51 )
ENGLISH
3

GV 3143 HIFI VIDEORECORDER__________
Packing contents
1 |
2 |
1 |
|
2 |
|||
|
3 |
||
|
3 |
||
|
|
||
|
|
4 |
|
|
|
||
|
P |
|
|
|
VIDEORECORDER |
5 |
|
5 |
4 |
|
|
|
|
GV 3143 HIFI video recorder Remote control
Operating manual
2 batteries, 1.5 V, mignon type
Antenna cable
Special features of your video recorder
Four recording options
–Immediate recording, in which you select the required channel on the video recorder and start recording immediately.
–Delayed recording using the ShowView number.
–Delayed recording by entering the time and channel of the programme you want to record (if you do not know the ShowView number).
–Delayed recording by entering the data in the TIMER menu of a Grundig television with the Megalogic function.
ShowView* recording
This function makes recording child’s play. Find the program in your TV guide, enter the code number and the video recorder is programmed automatically.
GRUNDIG Megalogic
Megalogic options:
–Receiving television stations in the same order from the television set.
–Starting playback on the video recorder automatically selects the video channel position on the television.
–The television station currently being shown on the television screen is immediately recorded after the start of the recording.
–You can enter the data for a programme in the TIMER menu of the television, and the television then controls the recording of the video recorder. The video recorder may not be switched off (Low-power stand-by) during this procedure.
|
* SHOWVIEW® is a registered trademark of the Gemstar Development |
4 |
Corporation. The SHOWVIEW system was manufactured under licence |
from the Gemstar Development Corporation. |
|
|
|

SET-UP AND SAFETY ___________________________________
°C |
°C |
2h |
|
|
This video recorder is designed to receive, record and play back video and audio signals.
Any other use is expressly prohibited.
If the video recorder is subject to sudden changes in temperature, for example if it is brought in from the cold to a warm room, connect it to the mains supply and let it stand for at least two hours before you insert a video cassette.
|
The video recorder is designed for use in dry rooms. If you do |
|
use it in the open, please ensure that it is protected from moi- |
Balkan |
sture, such as rain or water splashes. Do not expose the video |
|
recorder or cassettes to moisture. |
|
Place the video recorder on a hard, level surface. Do not place |
|
any objects (newspapers, for example) on top of the video |
|
recorder or any cloth or similar items underneath it. |
|
Do not place the video recorder near heating units or in direct |
|
sunlight, as this will impair cooling. Keep the video recorder |
|
away from devices which generate magnetic fields, such as |
|
loudspeakers. |
|
Do not insert any foreign objects into the video tape compart- |
P |
ment, as this may damage its precision mechanics. |
|
Do not place any vessels such as vases on the video recorder |
|
as they may spill liquid and present an electrical safety risk. |
|
Thunderstorms present a danger to all electrical devices. Even |
|
when the video recorder is switched off it can be damaged by |
|
a lightning strike to the mains or antenna cable. Always |
|
disconnect the mains and antenna plugs during a storm. |
P |
Do not open the video recorder casing under any circumstances. The manufacturer accepts no liability for damage resulting from improper handling.
ENGLISH
5

OVERVIEW_____________________________________________________________
The front of the video recorder
|
P |
VIDEO IN |
L AUDIO IN R |
A
■ N
VIDEO IN
L AUDIO IN R
II
●
* P
P Ü
Switches the video recorder into and out of stand-by mode (Low-power stand-by).
Terminates all drive functions; ejects the cassette.
Camcorder video input (socket located behind the cover panel).
Left and right camcorder audio inputs (sockets located behind the cover panel).
Starts playback.
Pause during recording, freeze-frame during playback.
Starts recording.
Selects the next channel down.
Selects the next channel up.
During playback: forward search; when stopped: fast forward.
During playback: reverse search; when stopped: fast rewind.
6
OVERVIEW_____________________________________________________________
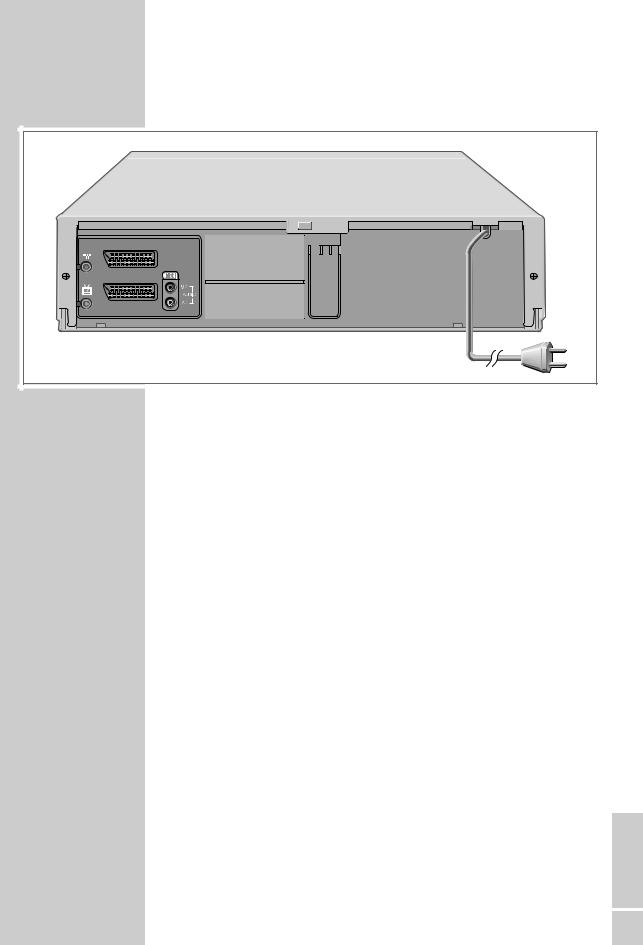
The back of the video recorder
AV2 (DEC./EXT.) |
AV1 (EURO AV) |
Ä |
Antenna input socket |
|
(from the roof antenna). |
Ö |
Antenna socket |
|
(to the television). |
AV2 (DEC./EXT.) |
Euro-AV (Scart) socket |
|
(to an external device). |
AV1 (EURO AV) |
Euro-AV (Scart) socket |
|
(to the television). |
OUT/SORTIE |
Audio outputs to the HiFi system. |
R/D AUDIO L/G |
|
Ü |
Mains cable for wall socket. |
ENGLISH
7
OVERVIEW_____________________________________________________________
Digital FX
OSD
Clear
Timer/SV
SP/LP |
Timer on |
Dub
Index
Audio |
Monitor |
|
|
|
|
|
|
|
|
|
|
|
|
|
|
|
|
|
|
|
|
|
|
|
|
|
|
|
|
|
|
|
|
|
|
|
|
|
|
|
|
|
|
|
|
|
|
|
|
|
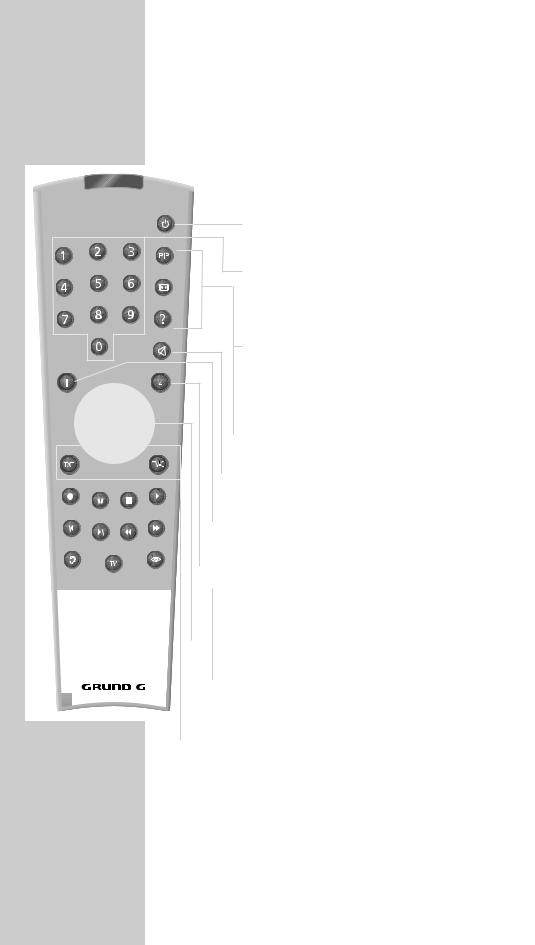
Tele Pilot 92 V
The remote control
The following section describes the most important features of the remote control. See the relevant chapters in this manual for information on how to operate the remote control.
Point the remote control at the video recorder.
|
Switches the video recorder in and out of stand- |
|
|
|
by mode (Low-power stand-by). |
1 ... 0 |
Switch the video recorder on from stand-by; |
|
numeric keys for various inputs, |
|
» 0 « selects channel positions »A I «, »A 2 « or |
|
»C V «. |
Digital FX Key has no function. |
|
OSD |
Calls up the on-screen display with information |
|
on functions and playing time. |
Clear |
Deletes data, activates settings, sets the playing |
|
time indicator to »0 : 0 0 : 0 0 «. |
dSwitches the loudspeakers to and out of mute mode.
iSwitches between the main menu and the TV image.
Timer/SV Activates ShowView recording.
+ – Select channels, » + « up, » – « down; Select various menu functions.
OK |
Calls up, confirms and saves data. |
® † Select various functions in the menus.
SP/LP Switches between long play and standard play mode.
Timer on Press briefly to activate TIMER recording; hold down to deactivate TIMER recording.
8

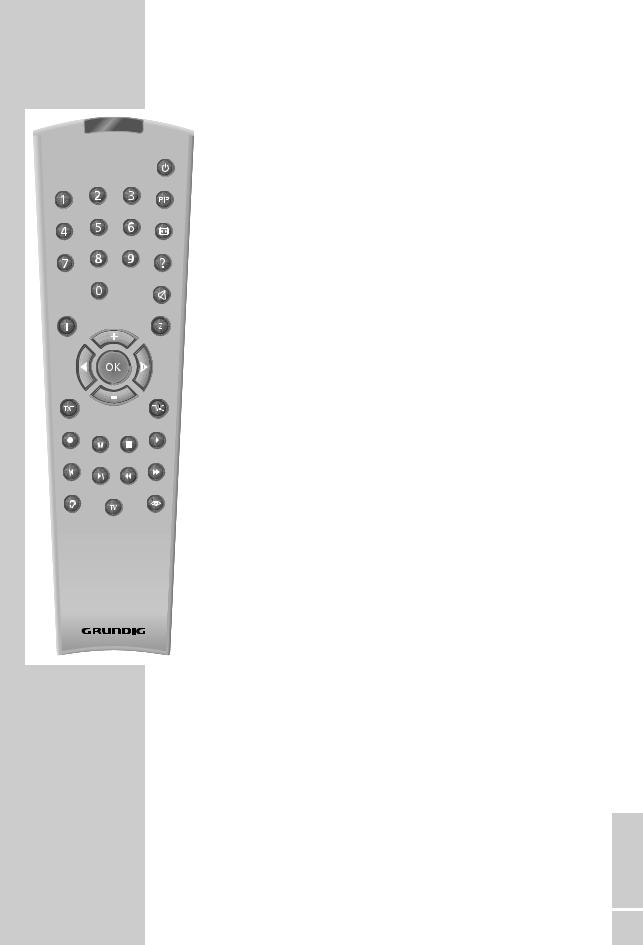
OVERVIEW_____________________________________________________________
Digital FX
OSD |
Clear |
Timer/SV
SP/LP |
Timer on |
Dub |
Index |
|
|
Audio |
Monitor |
●Starts recording.
I I |
Pause during recording, freeze-frame during play- |
|
back. |
■ |
Terminates all drive functions and switches the |
|
video recorder to ”Stop”. |
Starts playback. |
|
|
Reverse search during playback; |
|
Fast rewind in ”Stop” mode. |
Forward frame search during playback; |
|
|
Tape advance in ”Stop” mode. |
Monitor |
Switches the screen display between the TV image |
|
and the video recorder signal (Monitor mode). |
TV |
Switches the remote control from video recorder |
|
operation to television operation. The available |
|
options are described starting on page 47. |
Dub |
Displays the menus on a blue background. |
Index |
Activates the INDEX search functions. |
Audio |
Selects the audio channel for recording and play- |
|
back. |
Tele Pilot 92 V
ENGLISH
9

CONNECTION AND PREPARATION ___
Connecting the antenna, television and mains cable
TV |
R |
|
|
|
|
L |
|
|
|
R |
|
|
AV1 |
AV2 |
|
|
3 |
|
|
1 |
AV2 (DEC./EXT.) |
4 |
2 |
|
AV1 (EURO AV) |
|
|
|
Note: |
|
If your television is equipped with Megalogic functions, the |
|
video recorder and television set must be connected with the |
|
provided EURO-AV cable; see step 3. |
AV2 (DEC./EXT.) |
1 Plug the roof antenna cable into the antenna socket »Ä« |
AV1 (EURO AV) |
on the video recorder. |
|
2 Plug the antenna cable supplied into the »Ö« socket on |
|
the video recorder and the antenna socket on the television. |
AV2 (DEC./EXT.) |
3 Plug a standard Scart cable in the »AV1 (EURO AV)« |
AV1 (EURO AV) |
socket on the video recorder and the AV 1 socket on the |
|
television. |
|
– Stereo sound can only be played back on a stereo televi- |
|
sion set if this connection is used. |
|
4 Plug the mains cable into the wall socket. |
|
– The video recorder is now in stand-by mode. |
|
Caution: |
|
The only way to separate the video recorder from the mains |
|
supply is to pull the plug. |
|
Note: |
|
Instructions on connecting other devices, such as another |
|
video recorder, a decoder, a HiFi or a satellite receiver, can |
|
be found starting on Page 30. |
10
CONNECTION AND PREPARATION___________________
Inserting batteries in the remote control
1 Open the battery compartment by pressing the tab and removing the lid.
2 When inserting the batteries (mignon type, for example LR 6 or AA, 2 x1,5 V), observe the polarity designation on the battery compartment.
Note:
If the video recorder no longer reacts properly to remote control commands the batteries may be flat. Always remove flat batteries. No liability is accepted for damage resulting from leaking batteries.
Environmental note
Batteries, including those which are heavy metal-free, may not be disposed of with household waste. Please dispose of used batteries in an environmentally sound way, for example at public collection points. Find out about the legal regulations which apply in your area.
Switching the video recorder on and off (power save mode)
1Press » 1 ... 0« to switch on the video recorder.
2Press » « to switch to stand-by.
–The video recorder is now in stand-by mode and the display shows the current time.
3Press » « to switch off.
–The video recorder is now switched off, the time is no longer visible in the display and the green indicator » « is
illuminated. The power consumption is now less than 3 Watts.
Note:
You cannot switch off the video recorder if you have set it to record programs later.
ENGLISH
11

TUNING______________________________________________________________
Tuning the video recorder and the television
You do not need to do this if the video recorder and the television are connected via a EURO-AV (Scart) cable.
1Switch on the television.
2Select the »AV« channel position on the television set for recorder playback via the antenna cable.
3Tune the television to a free channel in the UHF band between channel 21 and channel 69. A free channel is one which does not carry a signal from a television station (you can only see and hear static).
– Many televisions display the channel number.
4Store the free channel position on the television.
5 Press » « to switch the video recorder to stand-by, then press and hold down »i«.
–The display on the video recorder reads something like »C H 2 7 «.
6Set the channel (in this example, channel 29) by pressing » * P Ü « on the video recorder, until the test picture from the video recorder appears on your television screen.
7If the quality of the test picture is OK, press »i« to save the setting.
– The video switches to stand-by.
Note:
If the quality of the test picture is unsatisfactory, or if the picture quality of other channels has deteriorated, then you should find another free channel on the television and repeat the setting from steps 1 to 5.
You can switch off the station on the video recorder. Fore more information see the ”Switching the station on the video recorder on and off” on Page 42.
12

TUNING _________________________________________________________________
AUTO INSTALLATION
PRESS OK KEY TO START.
AUTOMATISCHE EINSTELLUNG
ZUM START DIE OK-TASTE DRÜCKEN.
OK :EINGABE INFO:ENDE
SPRACHE
ENGLISH DANSK DEUTSCH SVENSKA FRANÇAIS SUOMI ITALIANO ESPAÑOL NEDERLANDS PORTUGUES
< > :WÄHLEN
OK :EINGABE INFO:ENDE
Automatic channel tuning (using ATS euro plus)
The video recorder has its own receiver unit. It can receive and record from television stations independently of the television. This means you must tune the television stations on the video recorder.
During this setting the clock is automatically updated. However, this is only possible if channel position 1 on the video recorder is occupied by a station with teletext.
There are 99 channel positions available which can be assigned as required to television stations received via the antenna, cable connection or satellite receiver.
Note on recording television programs with the Megalogic function:
If the video recorder is connected to a television set with Megalogic functions, this setting transfers the programs stored in the television to the video recorder.
Preparation
Switch on the television.
Select the channel position »AV« on the television for the video recorder.
Automatic tuning
Note
Do not terminate the automatic search prematurely.
1 When the device is first operated, the menu »AUTO INSTALLATION« appears automatically.
Hint:
If the »AUTO INSTALLATION« menu does not appear on the screen press » * P« and » P Ü « on the video recorder at the same time until you see the menu.
2Press » OK« to begin the setting.
–The »SPRACHE« (LANGUAGE) menu appears.
3Select the language using the »+ – ®†« buttons and then press » OK« to confirm.
–The »COUNTRY« menu appears.
ENGLISH
13

TUNING _________________________________________________________________
COUNTRY
|
A |
I |
|
B |
N |
|
DK |
P |
|
FIN |
E |
|
D |
S |
|
NL |
CH |
|
F |
OTHERS |
|
GB |
|
< > :SELECT |
||
OK |
:ENTER |
INFO:EXIT |
1 -----
AUTOMATIC SORTING
PLEASE WAIT
. 0%
INFO:EXIT
4Select the country you are in using the » + – ®†« buttons.
Note:
If your country is not shown in the »COUNTRY« menu, select »OTHERS« .
Press » OK « to confirm the country.
–A menu appears on the screen asking if all the cables have been connected to the video. Check that they are before continuing.
5Start the automatic channel search by pressing » OK«.
–The video recorder searches all channels for television stations, then sorts and saves them. The automatic search can take several minutes.
–When the automatic search is completed the message »AUTO SETUP COMPLETED!« appears on the screen along with the number of the output channel.
Note:
If the video recorder and the television are not connected with a EURO-AV (Scart) cable, you need to repeat the setting on Page 12 and set the channel shown in the menu on the television (for example »CH 21«).
6Press »i« to terminate the setting.
Note:
Further settings, such as sorting, deleting and renaming television stations, are described starting on page 38.
14
PLAYBACK_________________________________________________________
SP/LP
Dub
Index
Audio
Digital FX
OSD
Clear
Timer/SV
Timer on
Monitor
Tele Pilot 92 V
Preparation
Switch on the television.
Select the channel position »AV« on the television for the video recorder.
Insert a recorded video tape into the compartment with the window facing upwards until it is automatically drawn in.
–The video recorder display contains the following symbol: » ß « (= tape symbol).
Note:
If you put a cassette with the protection tab removed into the video recorder, playback starts automatically.
Basic playback functions
1Press » « to start playback.
– Information is displayed briefly on the television screen.
Note:
If the video recorder is connected to a television with Megalogic functions, the television switches on after playback is started from operating position stand-by and automatically switches to program position »AV«.
2To switch to freeze-frame/pause press »II«.
Press repeatedly to advance the picture frame by frame.
3Press » « or » « during playback to start a forwards or reverse search. Press several times to change the playback speed.
4To stop playback, press » ■«.
5To eject the cassette, press » ■ « on the video recorder.
ENGLISH
15

PLAYBACK _____________________________________________________________
Additional playback functions
Calling up information
OSD
OSD
1Press the »OSD« button to call up information.
–Display on the television screen: the channel position;
»USED« the elapsed playing time on the tape; »REM« the remaining playing time;
»0:00:00« the tape counter in hours, minutes and seconds;
the date and the time.
–You can call up this information successively on the video recorder display by pressing »OK«.
–The tape counter can be set to »0 : 0 0 : 0 0 « by pressing »Clear«.
2Switch off the information display by pressing »OSD«.
Fast forward/rewind
1Press » ■« to stop the tape.
2Press » « to rewind the tape or » « to fast forward.
Double playback speed
1 Press » « during playback.
2 Press » « again to return to normal playback speed.
Slow motion
1 During freeze-frame (playback/pause) press and briefly hold down »II«.
2 Press »®« or »†« to alter the slow-motion speed.
3 Press » « to return to normal playback speed.
Frame-by-frame playback
1 During freeze-frame (playback/pause) press »II« repeatedly.
2 Press » « to return to normal playback speed.
16
 Loading...