


Instructions for Use
GB IE MT

ELECTRIC OVEN
Dear customer!
Instructions for connection
Rating plate
We sincerely thank you for your purchase. We believe you will soon find ample evidence that you can really rely on our products. To make the
use of the appliance easier, we attach these comprehensive instruction manual.
The instructions should aid you in getting familiar with your new appliance. Please, read them carefully before using the appliance for the first time.
In any case, please make sure the appliance was supplied to you undamaged. Should you identify and transport damage, contact your sales representative or the regional warehouse from where the product was delivered. You will find the telephone number on the receipt or delivery report. We wish you a lot of pleasure with your new household appliance.
The connection should be carried out in compliance with the instructions in the section “Connection to the power mains”, and the relevant effective regulations and standards. This should only be performed by a qualified technician.
The rating plate indicating the basic information on the appliance is attached to the edge of the oven and it is visible when you open the oven door.
452968
3

452968
TABLE |
|
IMPORTANT - READ BEFORE USING THE APPLIANCE.......................................... |
5 |
Safety percautions........................................................................................................................ |
5 |
Warnings............................................................................................................................................ |
5 |
Appliance purpose ....................................................................................................................... |
6 |
APPLIANCE DESCRIPTION ............................................................................................ |
7 |
Cooling fan ....................................................................................................................................... |
7 |
Door switch...................................................................................................................................... |
7 |
THE OVEN .......................................................................................................................... |
8 |
Before using the oven for the first time............................................................................. |
8 |
Important warnings...................................................................................................................... |
8 |
Electronic programmable timer featuring adaptive technology, temperature |
|
display and cooking mode display....................................................................................... |
9 |
Lock / Child safety lock ........................................................................................................... |
10 |
Operating your oven................................................................................................................... |
12 |
Rapid oven preheat.................................................................................................................... |
13 |
Setting the oven temperature............................................................................................... |
16 |
Adaptive technology (adjusting the set cooking temperature) .......................... |
16 |
Turning off the oven................................................................................................................... |
18 |
Shelf levels (depending on the model) ............................................................................ |
18 |
Telescopic pull-out guides (depending on the model) ............................................ |
18 |
Oven accessories (depending on the model)............................................................... |
19 |
Grease filter (depending on the model)......................................................................... |
19 |
FOOD PREPARATION ................................................................................................... |
20 |
Baking pastry ............................................................................................................................... |
20 |
Cooking / roasting meat......................................................................................................... |
23 |
Grilling and browning............................................................................................................... |
25 |
Preservation................................................................................................................................... |
27 |
Defrosting......................................................................................................................................................... |
28 |
CLEANING AND MAINTENANCE............................................................................... |
29 |
Cleaning.................................................................................................................................................................... |
30 |
Maintenance (depending on the model) ......................................................................... |
31 |
Door lock (only with some models).................................................................................. |
34 |
Replacing appliance parts ..................................................................................................... |
35 |
SPECIAL WARNINGS AND ERROR REPORTING ................................................... |
36 |
Important ....................................................................................................................................... |
36 |
INSTRUCTIONS FOR INSTALLATION AND ............................................................. |
37 |
CONNECTION................................................................................................................. |
37 |
Important warnings.................................................................................................................... |
37 |
Installation....................................................................................................................................... |
37 |
Electrical connection................................................................................................................ |
38 |
TECHNICAL CHARACTERISTICS ............................................................................... |
40 |
Rating plate................................................................................................................................... |
40 |
4

IMPORTANT - READ BEFORE USING
THE APPLIANCE
Safety percautions
•This appliance is not intended for use by persons
(including children) with reduced physical, sensory or mental capabilities, or lack of experience and knowledge, unless they have been given supervision or instruction concerning use of the appliance by a person responsible for their safety.
Children should be supervised to ensure that they do not play with the appliance.
-WARNING: Accessible parts may become hot during use. To avoid burns, young children should be kept away
•WARNING: The appliance and its accessible parts become hot during use. Care should be taken to avoid touching heating elements. Children less than 8 years of age shall be kept away unless continuously supervised.
•WARNING: Ensure that the appliance is switched off before replacing lamp to avoid the possibility of electric shock.
•Do not use harsh abrasive cleaners or sharp metal scrapers to clean the oven door glass since they can scratch the surface, which may result in shattering of the glass.
•Do not use steam cleaners or high-pressure cleaners to clean the oven, as this may result in an electric shock.
•The appliance is not intended to be controlled by external timers or special control systems.
Warnings
• |
The appliance may only be connected to the power mains by licensed electrician. |
|
• |
Tampering with the appliance or non-professional repair thereof may result in risk of |
|
|
severe injury or damage to the product. Any repairs may only be carried out by an |
|
|
authorized service technician or expert. |
|
• |
If the power cords of appliances located near this appliance are caught in the oven door, |
|
|
they can be damaged, which may in turn result in a short circuit. Therefore, keep the |
452968 |
|
power cords of other appliances at a safe distance. |
|
|
|
|
|
|
|
5

•The appliance is intended solely for cooking. Do not use it for any other purpose, e.g. for room heating.
•Be particularly careful when cooking food in the oven. Due to high temperatures, baking trays, baking sheets, the grid and the oven interior walls become very hot. Always use oven mitts.
•Do not line the oven walls with aluminium foil and do not place baking trays or other cookware on the oven bottom. Aluminium foil would prevent air circulation in the oven, hinder the cooking process, and ruin the enamel coating.
•Appliance operation is safe with and without tray guides.
•Oven door become very hot during operation. A third glass is installed or additional protection to reduce the temperature of the outside surface (only with some models).
•Oven door hinges may be damaged if overloaded. Do not place heavy cookware on the open oven door and do not lean against the door while cleaning the oven. Before cleaning the oven, remove the oven door (see chapter »Removing and re-installing the oven door«). Do not stand or sit on the open oven door (children!).
The symbol on the product or on its packaging indicates that this product may not be treated as household waste. Instead it shall be handed over to the applicable collection point for the recycling of electrical and electronic
equipment. By ensuring this product is disposed of correctly, you will help prevent potential negative consequences for the environment and human health, which could otherwise be caused by inappropriate waste handling of thisproduct. For more detailed information about recycling of this product, please contact your local city office, your household waste disposal service or the shop where you purchased the product.
Appliance purpose |
The appliance is intended for conventional preparation of |
|
food in households and should not be used for any other |
|
purpose. Individual options of use are comprehensively |
|
described in this instruction manual. |
452968
6
APPLIANCE DESCRIPTION
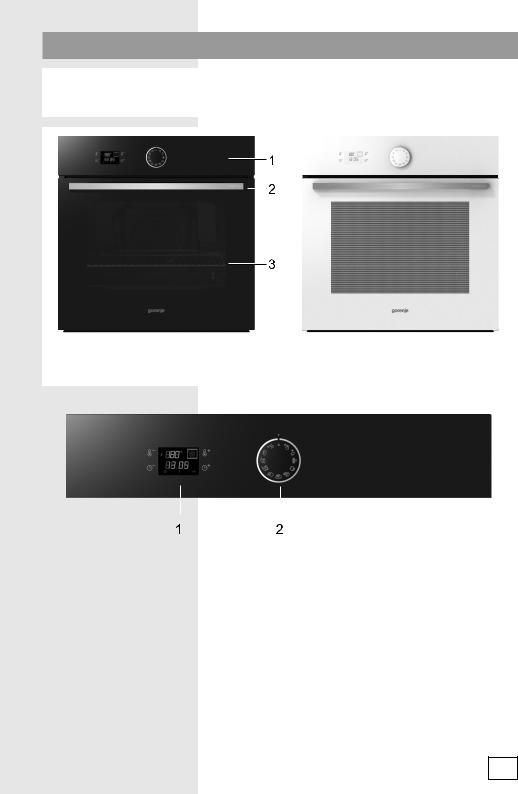
The figure represents one of the appliance models. Since a group of appliances to which these instructions apply, have different features, the instruction manual may describe functions and equipment that may not be available in your appliance.
1.Control panel
2.Oven door handle
3.Oven door
|
|
|
|
|
|
|
|
1 Electronic programmable timer featuring |
2 On/off button and oven mode selector |
||
adaptive technology, temperature display |
|
||
and cooking mode display |
|
|
|
|
|
|
|
|
|
||
Cooling fan |
The appliance features a built-in cooling fan which cools |
||
|
|
the appliance housing and control panel. |
|
|
|
||
Door switch |
The appliance is fitted with a door switch that perceives |
||
|
|
when the oven door is open. When the door is open and the |
|
switch is activated, all heaters are switched off to prevent heating of the oven with the door open. This function is also convenient when manually cleaning the oven when you wish the oven light to be on and the heaters to be off.
452968
7

THE OVEN
Before using the oven |
• |
Remove all accessories from the oven and clean them with |
for the first time |
|
warm water and a conventional detergent. Do not use |
|
|
abrasive cleaning aids. |
|
• |
When the oven is heated up for the first time, a specific |
|
|
odor of a “new appliance” will be discharged; therefore, |
|
|
ventilate the room thoroughly while the oven heats up. |
|
|
|
Important warnings |
• |
Use dark, black silicon coated or enamel coated baking |
|
|
trays, as these transmit the heat particularly well. |
|
• |
Only preheat the oven if specifically stated in the recipe or |
|
|
in the instruction tables herein. |
|
• |
Heating up an empty oven uses a lot of energy; therefore, |
|
|
a lot of power is saved if several types of pastry are cooked |
|
|
consecutively, as the oven is already heated up. |
|
• |
Approximately ten minutes before the anticipated end |
|
|
of the cooking process, the oven may be turned off. |
|
|
This way, you will save some power and make use of the |
|
|
accumulated heat. |
|
• |
Note: After cooking in the oven, the cooling fan will stop |
|
|
operating. If you leave your food in the oven, moisture can |
|
|
be released from it and cause condensation on the oven |
|
|
front panel and door. To prevent this, set the selector knob |
|
|
to the program of your choice and set the temperature to |
|
|
70 °C. The food will then stay warm. |
|
|
Hint: In order to keep the oven warm, you may also use |
|
|
the Aqua Clean cleaning program in which only the |
|
|
lower heater is activated and a temperature of 70 °C is |
|
|
maintained. |
452968
8
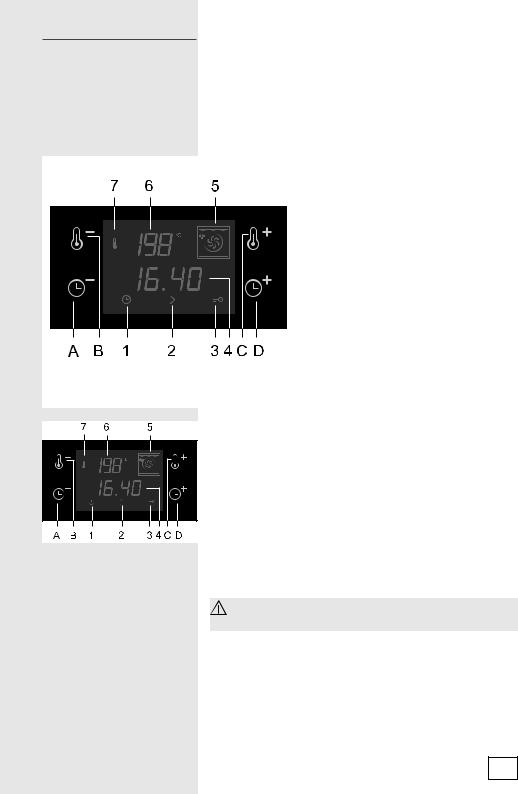
Electronic programmable timer featuring adaptive technology, temperature display and cooking mode display
Sensor keys:
A Decrease time key
B Decrease temperature key
C Increase temperature key
D Increase time key
Displays:
1 |
Clock |
2 |
Cooking duration |
3 |
Lock – child safety lock |
4 |
Time display |
5 |
Cooking mode display |
6 |
Temperature display |
7 |
Heater operation symbol |
• After connecting the appliance to the power mains for the first time or after a power supply failure, time display symbol (1) will flash. In order to enable oven operation,
first set the time of day (the clock) using the (A) and
(D) keys.
• Each time you press a key, this will be confirmed by a short acoustic signal.
• If you press and hold the (A) or (D) key, the rate at which the set value is being changed will increase.
•In case of a power supply failure lasting less than 2 minutes, all clock settings will be maintained.
The keys will respond better if you touch them with a larger area of your finger.
Electronic timer displays the CLOCK. It also allows setting the COOKING TIME.
SETTING THE TIME OF DAY/CLOCK
•When setting the clock, the oven selector knob must be deactivated.
452968
9
•To set the clock, press and hold for three seconds the time setting keys (A) and (D). Symbol 1 will flash for a few seconds.
•Use the (A) and (D) sensor keys to set the clock.
•After a few seconds, the settings will be automatically stored.
After the appliance is connected to the power mains for the first time or after a power failure, the clock display (4) and symbol (1) will flash. Clock can be set immediately using the (A) and (D) keys.
SETTING THE COOKING TIME
• The electronic timer allows setting the duration of oven operation (cooking time). The longest possible setting is 10 hours.
• To set the cooking time, the selector knob must be set to the desired cooking mode. (In the Rapid Preheat mode the duration cannot be set.)
• Touch the (A) or (D) key to set the cooking time. For every system the cooking time is already preset (see cooking table for the selected type of food). The preset time can be adjusted using the (A) and (D) keys.
•After the set time expires, the oven will automatically stop operating (end of cooking). An intermittent acoustic signal will be heard which you may turn off by touching any key. After one minute, the acoustic signal will be switched off automatically. Symbol (2) and the symbol (_:__) are flashing. To continue cooking, press the (D) key and set a new cooking time if necessary.
INSTANT RESET OF COOKING TIME SETTINGS
Press the (A) and (D) keys simultaneously and hold them for 3 seconds. A short beep will be heard. Time setting and the symbol (2) will disappear from the display. The time of day (clock) will appear.
For safety reasons, the oven will automatically go off after a certain period of time:
-after 10 hours, if the cooking temperature is above 120°C;
-after 24 hours, if the temperature set is lower than
120°C.
452968
10
Lock / Child safety lock The programmable timer allows you to lock the appliance controls to prevent unwanted activation of the oven. Before the safety lock is activated, oven selector knob must be deactivated.
TO ACTIVATE:
Press the (C) and (D) keys simultaneously and hold them for 3 seconds. A beep will be heard and symbol (3) will appear. The appliance controls are now locked.
If you turn the oven selector knob while the appliance is locked, the oven will not be switched on and the cooking mode display (5) will flash.
TO DEACTIVATE:
Press the (C) and (D) keys simultaneously and hold them for 3 seconds. A short acoustic signal will be emitted and the symbol (3) will disappear from the display. The oven can now be used again.
452968
11
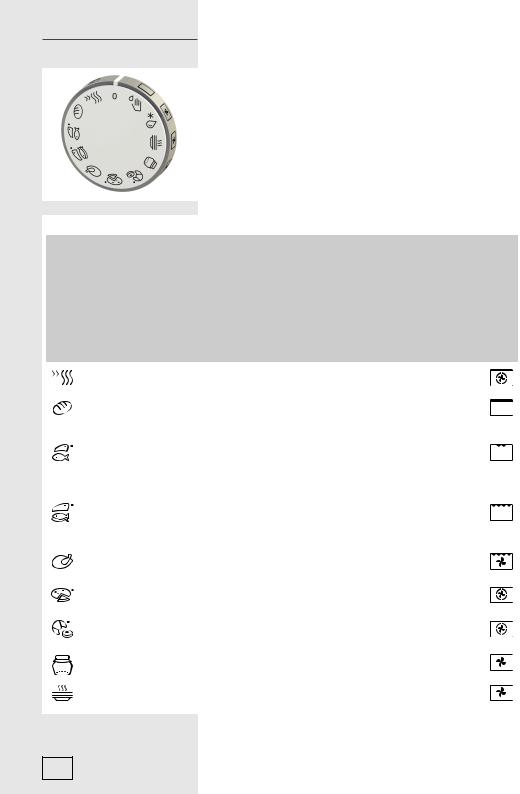
Operating your oven On/off button and oven mode selector
Rotate the selector dial to the desired cooking mode/ system or the desired type of food. Cooking mode and the preset temperature will appear on the display. The oven starts to operate.
Cooking table for selected types of food
Symbol |
Dish/ Function |
Preset temperature (°C) |
Maximum possible temperature setting (°C) |
Preset cooking time (h/min) |
Quantity (kg) |
Guide level (height) (from bottom) |
Warning |
Preset operation mode |
|
|
|
|
|
|
|
|
|
|
Rapid preheat |
160 |
275 |
- |
- |
- |
Not appropriate for cooking |
|
|
food. |
|
||||||
|
|
|
|
|
|
|
|
|
|
|
|
|
|
|
|
|
|
|
Bread |
190 |
275 |
0:55 |
1 |
2 |
Baking in shallow baking tray |
|
|
/ tin. |
|
||||||
|
|
|
|
|
|
|
|
|
|
|
|
|
|
|
|
|
|
|
|
|
|
|
|
|
Cooking / grilling on the grid |
|
|
Cutlets, fish* |
|
|
|
|
4 |
placed in guides 4, 3*; a dip |
|
|
240 |
275 |
0:23 |
2x0,2 |
tray should be placed in guides |
|
||
|
(smaller pieces) |
3* |
|
|||||
|
|
|
|
|
2, oven door should be closed. |
|
||
|
|
|
|
|
|
|
|
|
|
|
|
|
|
|
|
Turn the food halfway through. |
|
|
|
|
|
|
|
|
Cooking / grilling on the grid |
|
|
Cutlets, chops, fish* |
|
|
|
|
4 |
placed in guides 4, 3*; a dip |
|
|
240 |
275 |
0:25 |
4x0,2 |
tray should be placed in guides |
|
||
|
(larger pieces) |
|
|
|
|
3* |
2, oven door should be closed. |
|
|
|
|
|
|
|
|
|
|
|
|
|
|
|
|
|
Turn the food halfway through. |
|
|
|
|
|
|
|
|
Roast the chicken on a grid in |
|
|
Chicken |
170 |
275 |
1:05 |
1 |
2 |
the 2nd guide, installing the dip |
|
|
|
|
|
|
|
|
tray in the bottom guide. |
|
|
|
|
|
|
|
|
|
|
|
Pizza |
200 |
275 |
0:19 |
1x0,5 |
2 |
Baking in the shallow baking |
|
|
tray / tin. |
|
||||||
|
|
|
|
|
|
|
|
|
|
|
|
|
|
|
|
|
|
|
Small pastry, |
|
|
|
|
|
Baking in shallow baking |
|
|
160 |
275 |
0:26 |
2x0,3 |
2,3 |
trays in two levels / guides |
|
|
|
cookies |
|
||||||
|
|
|
|
|
|
simultaneously. |
|
|
|
|
|
|
|
|
|
|
|
|
Preservation |
180 |
230 |
0:45 |
|
2 |
|
|
|
|
|
|
|
|
|
|
|
|
Plate warmer |
60 |
230 |
|
|
2 |
|
|
|
|
|
|
|
|
|
|
|
452968
12

Symbol |
Dish/ Function |
Preset temperature (°C) |
Maximum possible temperature setting (°C) |
Preset cooking time (h/min) |
Quantity (kg) |
Guide level (height) (from bottom) |
Warning |
Preset operation mode |
|
|
|
|
|
|
|
|
|
|
|
|
|
|
|
|
Place the food on the grid, the |
|
|
Defrosting |
- |
- |
2:0 |
- |
2 |
dip tray should be installed in |
|
|
|
|
|
|
|
|
the bottom guide. |
|
|
|
|
|
|
|
|
|
|
|
|
|
|
|
|
|
Pour 0.6 l of water into the |
|
|
|
|
|
|
|
|
baking tray and place it into the |
|
|
|
|
|
|
|
|
bottom guide. After 30 minutes, |
|
|
Cleaning |
70 |
90 |
0:30 |
- |
2 |
the food remains on the oven |
|
|
|
|
|
|
|
|
enamel surfaces will soften and |
|
|
|
|
|
|
|
|
they can be removed with a |
|
|
|
|
|
|
|
|
damp cloth. |
|
|
|
|
|
|
|
|
|
|
Note: A dot next to the food symbol means that the oven should be preheated to the indicated temperature before the food is placed in it. With large and small grill heater, preheating takes approximately 5 minutes.
Rapid oven preheat |
Use this system to rapidly preheat the oven to the desired |
|
|
temperature. This operation mode is not suitable for |
|
|
cooking food. |
|
|
• Select the cooking system with the oven mode |
|
|
|
selector. |
|
• |
Oven preheating starts immediately. |
|
• |
If required, adjust the preset temperature. |
|
• When the oven is heated up to the desired temperature, |
|
|
|
the preheat process is completed and an intermittent |
|
|
sound will be emitted. To turn off this sound, rotate the |
|
|
selector dial. |
|
• |
The oven is now ready for further cooking. |
452968
13

 (
( ) Upper / lower heater
The heaters on the upper and lower side of the oven radiate heat uniformly and evenly into the oven interior. Pastry and meat can be cooked on one shelf level only. Preset temperature 200°C.
 (
( ) Grill
Only the infra / grill heater, a part of the large grill, will operate.
It is appropriate for grilling smaller quantities of sandwiches, sausages, or for toasting bread. Temperature is preset to 240°C.
 (
( ) Large grill
With this operation mode, the upper heater and the infra heater are activated simultaneously. The infra heater installed on the oven interior ceiling radiates heat directly. To boost the heating effect or to make optimal use of the entire area of the oven grid, the upper heater is also activated.
This operation mode is appropriate for cooking smaller chunks of meat, such as steaks, roasts, chops, ribs, etc. Preset temperature 240°C.
 (
( ) Grill & fan
With this operation mode, the infra heater and the fan are activated simultaneously. It is appropriate for grilling meat and large chunks of meat or poultry on one shelf level.
Also appropriate for cooking food au gratin or browning. Preset temperature 170°C.
 (
( ) Hot air and lower heater
With this operation mode, the lower heater and the hot air fan operate simultaneously. This is particularly convenient for making pizza. Also ideal for moist or heavy pastry, fruit cakes made of leavened dough, short pastry, or cheesecakes.
Preset temperature 200°C.
452968
14
 Loading...