


GE GZS22IYNBHFS, GZS22IMNBHES, GZS22IENBHDS, GSS25IYNBHFS, GSS25IGNBHWW Owner’s Manual
...REFRIGERATORS
Side by Side
SAFETY INFORMATION . . . . . 3
USING THE REFRIGERATOR
Controls . . . . . . . . . . . . . . . . . . . . . . . . . . 5
ClimateKeeper2TM . . . . . . . . . . . . . . . . . . 6
TurboCoolTM. . . . . . . . . . . . . . . . . . . . . . . 6
ExpressChillTM . . . . . . . . . . . . . . . . . . . . . 7
Water Filter - MWF . . . . . . . . . . . . . . . . 8
Water Filter - XWF . . . . . . . . . . . . . . . . 9
Shelves and Bins. . . . . . . . . . . . . . . . . . 10
Crispers and Pans. . . . . . . . . . . . . . . . . 13
Automatic Icemaker. . . . . . . . . . . . . . . 14
Ice and Water Dispenser. . . . . . . . . . . 15
CARE AND CLEANING . . . . . . 17
The Outside. . . . . . . . . . . . . . . . . . . . . . 17 The Inside . . . . . . . . . . . . . . . . . . . . . . . 17 Behind the Refrigerator . . . . . . . . . . . 17 Preparing for Vacation . . . . . . . . . . . . 18 Preparing to Move . . . . . . . . . . . . . . . . 18 Replacing the Light Bulbs. . . . . . . . . . 19
INSTALLATION INSTRUCTIONS
Preparing to Install the
Refrigerator. . . . . . . . . . . . . . . . . . . . . 20 Moving the Refrigerator . . . . . . . . . . . 21 Installing the Refrigerator. . . . . . . . . . 25 Installing the Water Line. . . . . . . . . . . 29
TROUBLESHOOTING TIPS
Normal Operating Conditions . . . . . . 32
Troubleshooting . . . . . . . . . . . . . . . . . . 33
LIMITED WARRANTY . . . . . . . 35
CONSUMER SUPPORT
Water Filter Limited Warranty . . . . . 36
Performance Data Sheet . . . . . . . . . . . 37
Consumer Support . . . . . . . . . . . . . . . .40
Write the model and serial numbers here:
Model #_________________
Serial # _________________
Find these numbers on a label inside the refrigerator
compartment at the top on the right side behind the controls..
OWNER’S MANUAL &
INSTALLATION
INSTRUCTIONS
Models
Models 22, 23, 25,26,27 and 29
ENGLISH/FRANÇAIS/
ESPAÑOL
GE is a trademark of the General Electric Company. Manufactured under trademark license.
Pub No. 49-60646-6 06-18 GEA

THANK YOU FOR MAKING GE APPLIANCES A PART OF YOUR HOME.
Whether you grew up with GE Appliances, or this is your first, we’re happy to have you in the family.
We take pride in the craftsmanship, innovation and design that goes into every GE Appliances product, and we think you will too. Among other things, registration of your appliance ensures that we can deliver important product information and warranty details when you need them.
Register your GE appliance now online. Helpful websites and phone numbers are available in the Consumer Support section of this Owner’s Manual. You may also mail in the pre-printed registration card included in the packing material.
2 |
|
49-60646-6 |

IMPORTANT SAFETY INFORMATION
READ ALL INSTRUCTIONS BEFORE USING THE APPLIANCE
|
|
To reduce the risk of fire, explosion, electric shock, or injury when using your refrigerator, follow |
||
|
WARNING |
|||
|
|
these basic safety precautions: |
|
|
|
|
|
||
Ŷ 7KLV UHIULJHUDWRU PXVW EH SURSHUO\ LQVWDOOHG |
Ŷ 7R DYRLG VHULRXV LQMXU\ RU GHDWK FKLOGUHQ VKRXOG QRW |
|||
|
DQG ORFDWHG LQ DFFRUGDQFH ZLWK WKH ,QVWDOODWLRQ |
stand on, or play in or with the appliance. |
||
|
,QVWUXFWLRQV EHIRUH LW LV XVHG |
Ŷ &KLOGUHQ DQG SHUVRQV ZLWK UHGXFHG SK\VLFDO VHQVRU\ |
||
Ŷ 8QSOXJ WKH UHIULJHUDWRU EHIRUH PDNLQJ UHSDLUV RU |
or mental capabilities or lack of experience and |
|||
|
cleaning. |
knowledge can use this appliance only if they are |
||
|
NOTE: Power to the refrigerator cannot be |
supervised or have been given instructions on safe |
||
|
disconnected by any setting on the control panel. |
XVH DQG XQGHUVWDQG WKH KD]DUGV LQYROYHG |
||
|
NOTE: Repairs must be performed by a qualified |
Ŷ 7KLV DSSOLDQFH LV LQWHQGHG WR EH XVHG LQ KRXVHKROG |
||
|
Service Professional. |
and similar applications such as: staff kitchen areas |
||
Ŷ 5HSODFH DOO SDUWV DQG SDQHOV EHIRUH RSHUDWLQJ |
LQ VKRSV RIILFHV DQG RWKHU ZRUNLQJ HQYLURQPHQWV |
|||
Ŷ 'R QRW XVH DQ H[WHQVLRQ FRUG |
IDUP KRXVHV E\ FOLHQWV LQ KRWHOV PRWHOV EHG |
|||
Ŷ 'R QRW VWRUH RU XVH JDVROLQH RU RWKHU IODPPDEOH |
EUHDNIDVW DQG RWKHU UHVLGHQWLDO HQYLURQPHQWV |
|||
catering and similar non-retail applications. |
||||
|
vapors and liquids in the vicinity of this or any other |
|||
|
Ŷ &RQQHFW WR SRWDEOH ZDWHU VXSSO\ RQO\ $ FROG ZDWHU |
|||
|
appliance. |
|||
Ŷ 'R QRW VWRUH H[SORVLYH VXEVWDQFHV VXFK DV DHURVRO |
supply is required for automatic icemaker operation. |
|||
The water pressure must be between 40 and 120 psi |
||||
|
cans with a flammable propellant in this appliance. |
|||
|
(275-827 kilopascals). |
|||
Ŷ 7R SUHYHQW VXIIRFDWLRQ DQG HQWUDSPHQW KD]DUGV |
||||
|
||||
|
WR FKLOGUHQ UHPRYH WKH IUHVK IRRG DQG IUHH]HU |
|
||
|
doors from any refrigerator before disposing of it or |
|
||
|
discontinuing its use. |
|
||
|
|
|
|
|

 CAUTION To reduce the risk of injury when using your refrigerator, follow these basic safety precautions.
Ŷ 'R QRW FOHDQ JODVV VKHOYHV RU FRYHUV ZLWK ZDUP water when they are cold. Glass shelves and covers may break if exposed to sudden temperature changes or impact, such as bumping or dropping. Tempered glass is designed to shatter into many small pieces if it breaks.
Ŷ .HHS ILQJHUV RXW RI WKH ³SLQFK SRLQW´ DUHDV clearances between the doors and between the doors and cabinet are necessarily small. Be careful closing doors when children are in the area.
Ŷ 'R QRW WRXFK WKH FROG VXUIDFHV LQ WKH IUHH]HU compartment when hands are damp or wet, skin may stick to these extremely cold surfaces.
Ŷ 'R QRW UHIUHH]H IUR]HQ IRRGV ZKLFK KDYH WKDZHG completely.
Ŷ ,Q UHIULJHUDWRUV ZLWK DXWRPDWLF LFHPDNHUV DYRLG contact with the moving parts of the ejector mechanism, or with the heating element that
UHOHDVHV WKH FXEHV 'R QRW SODFH ILQJHUV RU KDQGV on the automatic ice making mechanism while the refrigerator is plugged in.
Ŷ Use a sturdy glass when dispensing ice (on models with ice dispenser
STATE OF CALIFORNIA PROPOSITION 65 WARNINGS
WARNING This product contains one or more chemicals known to the State of California to cause cancer and birth defects or other reproductive harm.
INSTALLATION

 WARNING
 EXPLOSION HAZARD
.HHS IODPPDEOH PDWHULDOV DQG YDSRUV VXFK DV JDVROLQH DZD\ IURP UHIULJHUDWRU )DLOXUH WR GR VR FDQ UHVXOW LQ ILUH explosion, or death.
READ AND SAVE THESE INSTRUCTIONS
INFORMATION SAFETY
49-60646-6 |
3 |

SAFETY INFORMATION
IMPORTANT SAFETY INFORMATION
READ ALL INSTRUCTIONS BEFORE USING THE APPLIANCE
CONNECTING ELECTRICITY

 WARNING
 ELECTRICAL SHOCK HAZARD
Plug into a grounded 3-prong outlet
'R QRW UHPRYH WKH JURXQG SURQJ 'R QRW XVH DQ DGDSWHU 'R QRW XVH DQ H[WHQVLRQ FRUG
)DLOXUH WR IROORZ WKHVH LQVWUXFWLRQV FDQ UHVXOW LQ GHDWK ILUH RU HOHFWULFDO VKRFN
Do not, under any circumstances, cut or remove the third (ground) prong from the power cord. For personal safety, this appliance must be properly grounded.
The power cord of this appliance is equipped with a 3-prong (grounding) plug which mates with a standard
SURQJ JURXQGLQJ ZDOO RXWOHW WR PLQLPL]H WKH SRVVLELOLW\ RI HOHFWULF VKRFN KD]DUG IURP WKLV DSSOLDQFH
Have the wall outlet and circuit checked by a qualified electrician to make sure the outlet is properly grounded.
Where a standard 2-prong wall outlet is encountered, it is your personal responsibility and obligation to have it replaced with a properly grounded 3-prong wall outlet.
'R QRW XVH DQ DGDSWHU
The refrigerator should always be plugged into its own individual electrical outlet which has a voltage rating that matches the rating plate.
$ 9ROW $& +] RU DPS IXVHG JURXQGHG electrical supply is required. This provides the best performance and also prevents overloading house
ZLULQJ FLUFXLWV ZKLFK FRXOG FDXVH D ILUH KD]DUG IURP overheated wires.
Never unplug your refrigerator by pulling on the power cord. Always grip plug firmly and pull straight out from the outlet.
,PPHGLDWHO\ GLVFRQWLQXH XVH RI D GDPDJHG VXSSO\
FRUG ,I WKH VXSSO\ FRUG LV GDPDJHG LW PXVW EH replaced by a qualified service professional with an
DXWKRUL]HG VHUYLFH SDUW IURP WKH PDQXIDFWXUHU
When moving the refrigerator away from the wall, be careful not to roll over or damage the power cord.
PROPER DISPOSAL OF YOUR OLD REFRIGERATOR

 WARNING SUFFOCATION AND ENTRAPMENT HAZARD
)DLOXUH WR IROORZ WKHVH GLVSRVDO LQVWUXFWLRQV FDQ UHVXOW LQ GHDWK RU VHULRXV LQMXU\
IMPORTANT: Child entrapment and suffocation |
Before You Throw Away Your Old Appliance |
|
are not problems of the past. Junked or abandoned |
Ŷ 7DNH RII WKH IUHVK IRRG DQG IUHH]HU GRRUV |
|
refrigerators are still dangerous even if they will sit |
Ŷ Leave the shelves in place so that children may not |
|
IRU ³MXVW D IHZ GD\V ´ ,I \RX DUH JHWWLQJ ULG RI \RXU ROG |
||
easily climb inside. |
||
refrigerator, please follow the instructions below to help |
||
|
||
prevent accidents. |
|
Refrigerant and Foam Disposal:
'LVSRVH RI DSSOLDQFH LQ DFFRUGDQFH ZLWK )HGHUDO DQG /RFDO 5HJXODWLRQV )ODPPDEOH LQVXODWLRQ PDWHULDO XVHG requires special disposal of your appliance. Contact your local authorities for the environmentally safe disposal of your appliance.
4 |
49-60646-6 |
Controls
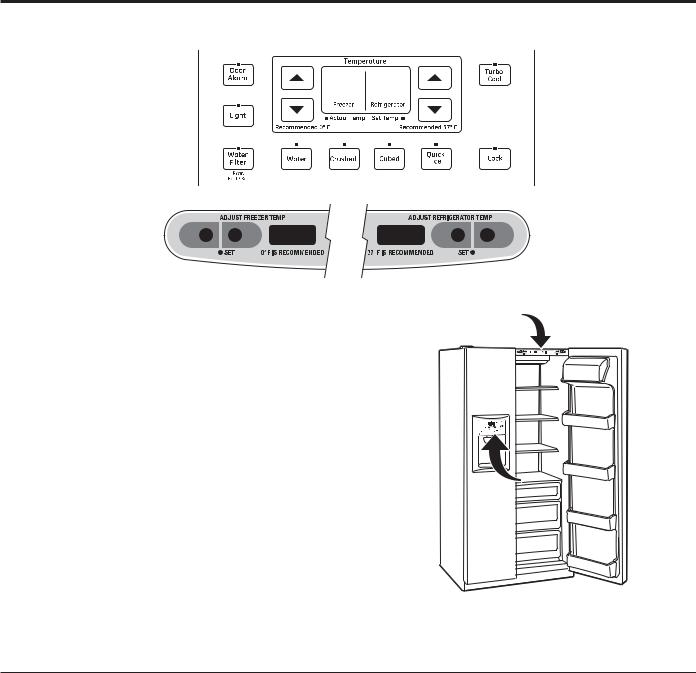
Not all features are on all models. Your controls may be similar to the following:
OR
The temperature controls are preset in the factory
DW ) & IRU WKH UHIULJHUDWRU FRPSDUWPHQW DQG) & IRU WKH IUHH]HU FRPSDUWPHQW $OORZ
KRXUV IRU WKH WHPSHUDWXUH WR VWDELOL]H WR WKH SUHVHW recommended settings.
The temperature controls can display both the SET temperature as well as the actual temperature in the
UHIULJHUDWRU DQG IUHH]HU 7KH DFWXDO WHPSHUDWXUH PD\ vary slightly from the SET temperature based on usage and operating environment.
Ŷ 2Q VRPH PRGHOV VHWWLQJ ERWK FRQWUROV WR WKH ZDUPHVW setting until the display flashes (off) will stop cooling
LQ ERWK WKH IUHH]HU DQG UHIULJHUDWRU FRPSDUWPHQWV
Ŷ 2Q RWKHU PRGHOV VHWWLQJ HLWKHU FRQWURO WR WKH ZDUPHVW setting until the display flashes (off) will stop the
FRROLQJ WR WKH IUHH]HU DQG UHIULJHUDWRU
Ŷ NOTE: Turning the refrigerator off via the controls on the touch panel does not shut off electrical power to the refrigerator.
NOTE: The refrigerator is shipped with protective film-
FRYHULQJ WKH WHPSHUDWXUH FRQWUROV ,I WKLV ILOP ZDV QRW removed during installation, remove it now.
Performance Air Flow System
7KH 3HUIRUPDQFH $LU )ORZ 6\VWHP LV GHVLJQHG WR PD[LPL]H WHPSHUDWXUH FRQWURO LQ WKH UHIULJHUDWRU DQG
IUHH]HU FRPSDUWPHQWV 7KLV XQLTXH VSHFLDO IHDWXUH consists of the Air Tower along the back wall of the refrigerator and the Air Tunnel on the bottom portion of
WKH IUHH]HU UHDU ZDOO
Placing food in front of the louvers on these components will not affect performance. Although the Air Tower and the Air Tunnel can be removed, doing so will affect
WHPSHUDWXUH SHUIRUPDQFH )RU UHPRYDO LQVWUXFWLRQV on-line, 24 hours a day, contact us at
GEAppliances.com RU FDOO *( &$5(6 ,Q &DQDGD contact us at geappliances.ca or call 1.800.561.3344.)
Controls REFRIGERATOR: THE USING
49-60646-6 |
5 |
USING THE REFRIGERATOR: &OLPDWH.HHSHU™/ TurboCool™
ClimateKeeper2™ (on some models.)
How it Works
The ClimateKeeper2™ is the industry’s most advanced |
Moisture sensitive foods such as fresh fruit, salads, |
|
refrigeration system, delivering optimum temperature and |
rice, etc., can now be stored on open shelves without |
|
humidity performance to keep food garden fresh longer |
excessive moisture loss. |
|
DQG UHGXFH IUHH]HU EXUQ |
'XH WR WKH KLJKHU KXPLGLW\ LQ WKH UHIULJHUDWRU \RX PD\ |
|
The ClimateKeeper2™ |
on occasion experience fog or small amounts of moisture |
|
system features two |
in the refrigerator compartment. This is normal and may |
|
evaporators—one for the |
come and go as different food loads and environmental |
|
refrigerator and one for the |
conditions change. Wipe dry with a paper towel if |
|
IUHH]HU |
desired. |
|
This provides two separate |
7KH VHSDUDWH DLUIORZ V\VWHP PLQLPL]HV WKH PL[LQJ RI DLU |
|
cooling systems, and |
between the two compartments, which reduces fresh |
|
separates the airflow between |
food odor transfer to improve the taste of ice. |
|
WKH IUHVK IRRG DQG IUHH]HU |
7KH &OLPDWH.HHSHU V\VWHP DOVR UHGXFHV WKH QXPEHU |
|
compartments during normal |
RI GHIURVWLQJ F\FOHV LQ WKH IUHH]HU HYDSRUDWRU WKHUHE\ |
|
cooling operations.* |
UHGXFLQJ IUHH]HU EXUQ |
|
This ensures that the |
)UHH]HU DLU LV XVHG LQ WKH CustomCool™ feature. |
|
humidity levels in the fresh food compartment are |
7HVWLQJ VKRZV D KLJKHU OHYHO RI KXPLGLW\ LQ WKH )UHVK |
|
significantly higher than in a conventional system,** |
||
)RRG VHFWLRQ LQ ClimateKeeper2™ refrigerators versus |
||
allowing fresh produce and other unsealed foods to |
||
conventional units. |
||
retain their moisture content and freshness longer. |
||
|
||
TurboCool™ (on some models.) |
|
|
How it Works |
How to Use |
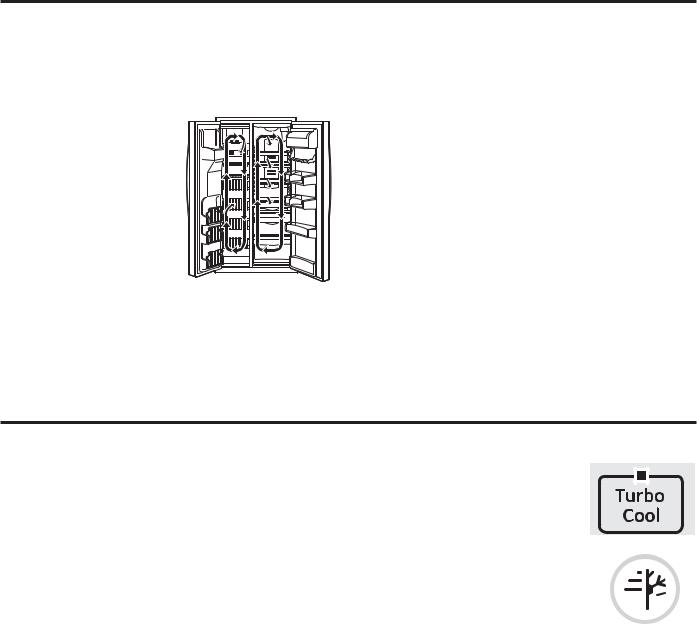
TurboCool™ rapidly cools the refrigerator compartment in order to more quickly cool foods. Use TurboCool™ when adding a large amount of food to the refrigerator compartment, putting away foods after they have been sitting out at room temperature or when putting away
ZDUP OHIWRYHUV ,W FDQ DOVR EH XVHG LI WKH UHIULJHUDWRU KDV been without power for an extended period.
Once activated, the compressor will turn on immediately and the fans will cycle on and off at high speed as needed for eight hours. The compressor will continue to run until the refrigerator compartment cools to
DSSUR[LPDWHO\ ) & WKHQ LW ZLOO F\FOH RQ DQG RII WR maintain this setting. After 8 hours, or if TurboCool™ is pressed again, the refrigerator compartment will return to the original setting.
Press TurboCool™. The
TurboCool™ temperature display will show Tc DQG WKH /(' ZLOO EH DFWLYDWHG
After TurboCool™ is complete, the TurboCool™ indicator light will go out.
NOTES: The refrigerator temperature |
OR |
|
|
cannot be changed during |
|
TurboCool™. |
|
7KH IUHH]HU WHPSHUDWXUH LV QRW 
 affected during TurboCool™.
When opening the refrigerator door during TurboCool™, the fans will continue to run if they have cycled on.
6 |
49-60646-6 |

ExpressChill™ (on some models.)
How it Works
The ExpressChill™ feature is a system of dampers, a fan and a temperature thermistor.
The pan is tightly sealed to prevent the pan’s temperature from causing temperature fluctuations in the rest of the refrigerator.
The controls for this pan are located in the top of the refrigerator or on the dispenser with the temperature controls.
How to Use
1.Empty the pan. Place the Chill Tray in the pan. Place the items on the tray and close the pan completely.
2.Select the ExpressChill™ pad. On some models, you can then select the chill time (use chart to determine best setting). Other models will only have one option (45 minutes). On models with multiple settings, tap the pad until the light appears next to the desired setting.
How to Remove and Replace the Drawer
To remove:
1. Pull the drawer out to the stop position.
2. Rotate all four swing locks to the unlock position.
3. Lift the front of the drawer up and out.
Ŷ 7R VWRS D IHDWXUH before it is finished, tap that feature’s pad until no options are selected and the display is off.
Ŷ 'XULQJ ([SUHVV&KLOO |
|
|
the display on the |
|
|
controls will count down |
([SUHVV&KLOO |
|
the time in the cycle. |
||
|
To replace:
1. Make sure all four swing locks are in the unlock position.
2. Place the sides of the drawer into the drawer supports, making sure the swing locks fit on the drawer slots.
3. Lock all four swing locks by rotating them to the lock position.
ExpressChill™ Chart (on some models)
NOTE: Results may vary depending on packaging, starting temperature and other food traits.
15 Minutes |
30 Minutes |
%HYHUDJH &DQ R] |
2 to 6 Beverage Cans |
2 Small Juice Boxes |
R] HDFK |
± R] HDFK |
3ODVWLF R] %RWWOHV |
|
of Beverage |
|
4 to 6 Small Juice Boxes |
|
± R] HDFK |
|
)RLO -XLFH 3DFNHWV |
|
Wine (750 ml bottle) |
45Minutes
2 Liters of Beverage
1/2 Gallon of Juice
Gelatin—1 package
([SUHVV&KLOO REFRIGERATOR: THE USING
49-60646-6 |
7 |
USING THE REFRIGERATOR: :DWHU)LOWHU&DUWULGJH0:)
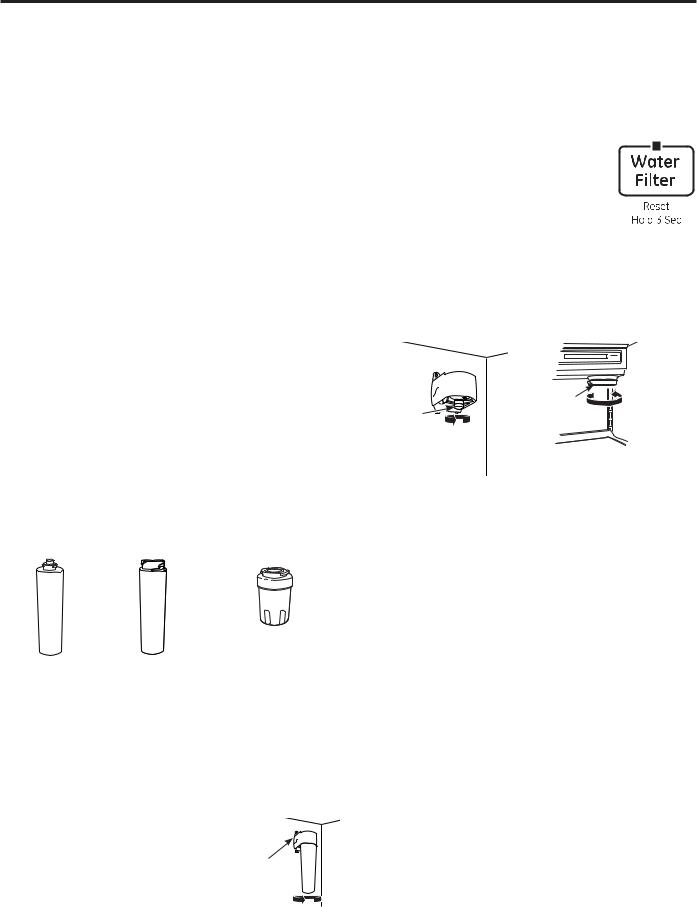
Water Filter Cartridge - MWF(On some models.)
Water filter cartridge
The water filter cartridge is located in the back upper right corner of the refrigerator compartment.
When to replace the filter on models with a replacement indicator light
There is a replacement indicator light for the water filter cartridge on the dispenser. This light will turn orange to tell you that you need to replace the filter soon.
The filter cartridge should be replaced when the replacement indicator light turns red or if the flow of water to the dispenser or icemaker decreases.
When to replace the filter on models without a replacement indicator light
The filter cartridge should be replaced every six months or earlier if the flow of water to the dispenser or icemaker decreases.
Removing the filter cartridge
,I \RX DUH UHSODFLQJ WKH FDUWULGJH ILUVW UHPRYH WKH ROG RQH by slowly turning it to the left. Do not pull down on the cartridge. A small amount of water may drip down.
Installing the filter cartridge
1. ,I \RX DUH UHSODFLQJ D 6PDUW:DWHU FDUWULGJH ZLWK DQ adapter, it must be removed before installing the cartridge. To remove the adapter, turn it to the left about 1/4 turn.
,I \RX DUH UHSODFLQJ D :DWHU E\ &XOOLJDQ FDUWULGJH leave the adapter in place. This adapter will stay in the refrigerator when you replace future cartridges.
|
|
Some models use |
With adapter |
Without adapter |
this type of water |
filter. |
||
(appearance may vary) |
|
|
2.On models ithout a replacement indicator light, apply the month and year sticker to the new cartridge to remind you to replace the filter in six months.
3. )LOO WKH UHSODFHPHQW FDUWULGJH ZLWK ZDWHU IURP WKH WDS to allow for better flow from the dispenser immediately after installation.
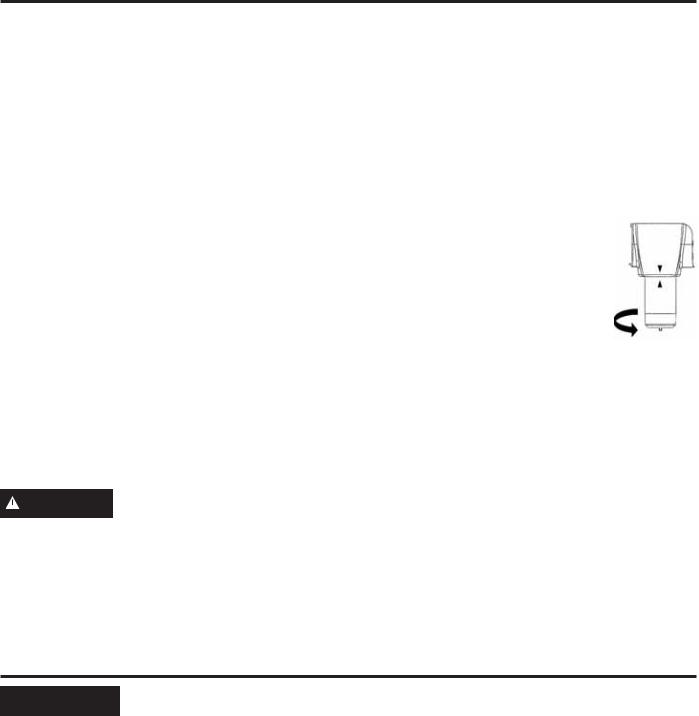
4. Line up the arrow on the cartridge and the cartridge holder. Place
the top of the new cartridge up
LQVLGH WKH KROGHU 'R QRW SXVK LW Cartridge up into the holder. Holder
5.Slowly turn it to the right until the filter cartridge stops.
'2 127 29(57,*+7(1 $V \RX WXUQ WKH FDUWULGJH it will automatically raise itself into position. The cartridge will move about 1/2 turn.
6.Run water from the dispenser 1-1/2 gallons (about three minutes) to clear the system and prevent sputtering.
7. 3UHVV DQG KROG WKH :$7(5 ),/7(5 SDG
(on some models) on the dispenser for 3 seconds.
NOTE: A newly-installed water filter cartridge may cause water to spurt from the dispenser upon first use.
Filter bypass plug
You must use the filter bypass plug when a replacement filter cartridge is not available. The dispenser and the icemaker will not operate without the filter or filter bypass plug.
|
)LOWHU |
|
)LOWHU |
Bypass |
|
Plug |
||
Bypass |
||
|
||
Plug |
|
|
SmartWater |
Water by Culligan |
7R XVH WKH ILOWHU E\SDVV SOXJ RQ :DWHU E\ &XOOLJDQ models, you must first remove the filter adapter from the cartridge holder by turning it to the left.
)RU WKH PD[LPXP EHQHILW RI \RXU ILOWUDWLRQ V\VWHP *(
Appliances recommends the use of GE Appliances
EUDQGHG 6PDUW:DWHU ILOWHUV RQO\ 8VLQJ *( $SSOLDQFHV branded filters in GE Appliances and Hotpoint refrigerators provides optimal performance and reliability.
*( $SSOLDQFHV EUDQGHG 6PDUW:DWHU ILOWHUV DUH DOZD\V the right choice because they are patented and designed
VSHFLILFDOO\ IRU *( $SSOLDQFHV SURGXFWV 6PDUW:DWHU
ILOWHUV PHHW ULJRURXV LQGXVWU\ 16) VWDQGDUGV IRU VDIHW\ and quality that are important for products that are filtering your water. GE Appliances has not qualified non-GE Appliances branded filters for use in GE Appliances and Hotpoint refrigerators and there is no assurance that non-GE Appliances branded filters meet GE Appliances standards for quality, performance and reliability.
,I \RX KDYH TXHVWLRQV YLVLW RXU :HEVLWH DW
GEAppliances.com, or call 1.800.GE.CARES (1.800.432.2737).
Replacement filters:
,I \RX KDYH TXHVWLRQV RU WR RUGHU DGGLWLRQDO ILOWHU cartridges, visit our website at gewaterfilters.com or call GE Appliances Parts and Accessories,
,Q &DQDGD FDOO
8 |
49-60646-6 |
Water Filter Cartridge - XWF (On some models.)
Water Filter Cartridge
The water filter cartridge holder is located in the back upper-right corner of the fresh food refrigerator compartment.
When to Replace the Filter
,I WKHUH LV D UHSODFHPHQW LQGLFDWRU OLJKW IRU WKH ZDWHU ILOWHU cartridge on the dispenser, the red filter light will start blinking to tell you that you need to replace the filter soon.
)RU H[WHUQDO FRQWURO PRGHOV WKH ILOWHU OLJKW ZLOO EOLQN while you are dispensing until the filter is replaced.
)RU WRS FRQWURO PRGHOV WKH ILOWHU OLJKW ZLOO EOLQN ZKLOH the door is open until the filter is replaced.
)RU PRGHOV WKDW GRQ¶W KDYH WKH LQGLFDWRU OLJKW WKH ILOWHU cartridge should be replaced every six months, or earlier if the flow of water to the dispenser or icemaker decreases.
Removing the Filter
,I \RX DUH UHSODFLQJ WKH ILOWHU ILUVW UHPRYH WKH SUHYLRXV one:
2SHQ WKH ILOWHU FDUWULGJH KRXVLQJ E\ VTXHH]LQJ WKH front tabs and gently pulling down.
2.Rotate the filter down.
3.Gently grasp the filter and slowly turn it counterclockwise about a ¼ turn. The filter should automatically release itself when you have rotated it far enough to the left. A small amount of water may drip down.
 CAUTION ,I DLU KDV EHHQ WUDSSHG LQ WKH V\VWHP the filter cartridge may be ejected as it is removed. Use caution when removing.
Filter Bypass Plug
To reduce the risk of property damage due to water leakage, you MUST use the filter bypass plug when a replacement filter cartridge is not available. Some models do not come equipped with the filter bypass plug. To
REWDLQ D IUHH E\SDVV SOXJ FDOO *(&$5(6 ,Q
Canada, call 800.561.3344. The dispenser and icemaker will not operate without either the filter or bypass plug installed. The bypass plug is installed in the same way as a filter cartridge.
Installing the Filter Cartridge in a Side by Side Refrigerator
1.Line up the arrow on the filter with the arrow on the filter cartridge holder. Gently push the top of the new filter up inside the holder.
2.Slowly turn the filter to the right until it
VWRSV '2 127 29(57,*+7(1 $V \RX turn the filter, it will automatically raise itself into position. The filter will move about a ¼ turn or 90 degrees.
3.Run water from the dispenser for 2 gallons (7.6 liters) or approximately 5 minutes to clear the system. Water may spurt out and air bubbles may be visible during this process.
3UHVV DQG KROG WKH :$7(5 ),/7(5 SDG RQO\ RQ select models) on the dispenser for three seconds.
Application Guidelines/Water Supply
6HUYLFH )ORZ |
0.5 gpm (1.89 lpm) |
Water Supply |
Potable Water |
Water Pressure |
25-120 psi (172-827 kPa) |
Water Temperature |
) ) & & |
Capacity |
170 gallons (643.5 liters) |
Sign-up for TEXT REMINDERS by texting REPLACE to 70543.

 WARNING To reduce the risk associated with choking, do not allow children under 3 years of age to have access to small parts during the installation of this product. The disposable filter cartridge should be replaced every 6 months at the rated capacity, or sooner if a noticeable reduction in flow rate occurs.
)RU WKH PD[LPXP EHQHILW RI \RXU ILOWUDWLRQ V\VWHP *( $SSOLDQFHV UHFRPPHQGV WKH XVH RI *( $SSOLDQFHV EUDQGHG filters only. Using GE Appliances-branded filters in GE Appliances and Hotpoint® refrigerators provides optimal performance and reliability. GE Appliances filters meet rigorous industry standards for safety and quality that are important for products that are filtering your water. GE Appliances has not qualified non-GE Appliances-branded filters for use in GE Appliances and Hotpoint refrigerators and there is no assurance that non-GE Appliancesbranded filters meet GE Appliances standards for quality, performance and reliability.
If you have questions, or to order additional filter cartridges, visit our website at gewaterfilters.com or call GE Appliances Parts and Accessories, 877.959.8688. (Canada 1.800.661.1616 or GEAppliances.ca/en/products/ parts-filters-accessories)
;:)&DUWULGJH)LOWHU:DWHUREFRIGERATOR: THE USING
USING THE REFRIGERATOR: Shelves and Bins
Shelves and Bins
Not all features are on all models.
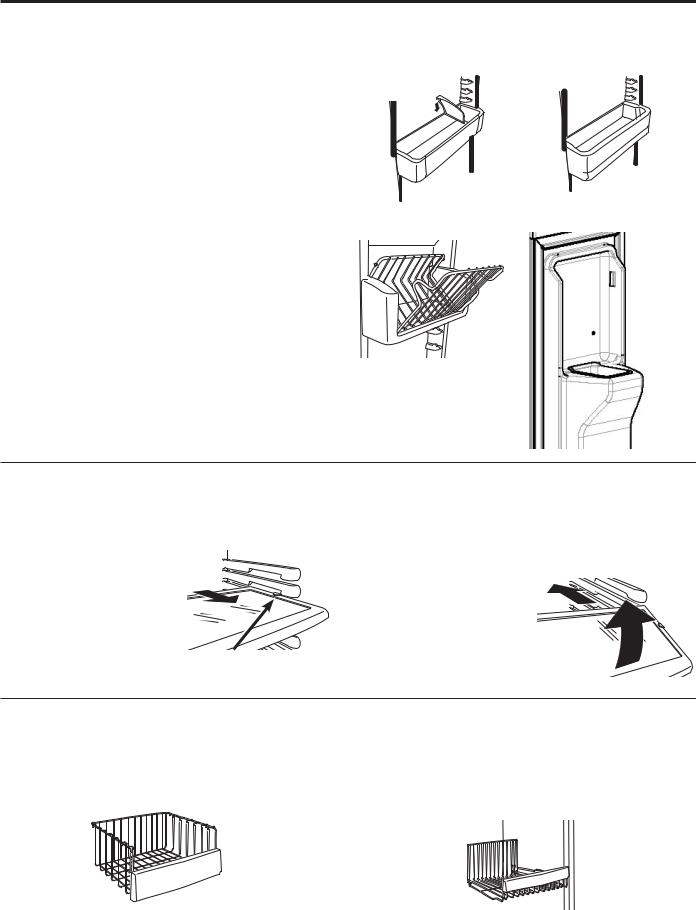
Refrigerator Door Bins and Freezer Door Tilt-Out Bins
Large Bins
7KH ODUJHU UHIULJHUDWRU GRRU ELQV DQG IUHH]HU WLOW RXW GRRU bins are adjustable.
To remove: Lift the front of the bin straight up, then lift up and out.
To replace or relocate: Engage the back side of the bin in the molded supports of the door. Then push down on the front of the bin. Bin will lock in place.
Small Bins
To remove: Lift the front of the bin straight up then out.
To replace: Position the bin above the rectangular molded supports on the door. Then slide the bin down onto the support to lock it in place.
The snugger helps prevent tipping, spilling or sliding of small items stored on the door shelf. Place a finger on either side of the snugger near the rear and move it back and forth to fit your needs.
NOTE: Be careful when placing items in the top bin. Make sure that items do not block or fall into the ice chute.
Snugger
Refrigerator bin |
)UHH]HU ELQ |
,FH &KXWH
)UHH]HU WLOW RXW ELQ
Slide-Out Spillproof Shelf
The slide-out spillproof shelf allows you to reach items stored behind others. The special edges are designed to help prevent spills from dripping to lower shelves.
To remove: Slide the shelf out
until it reaches the stop, then press down on the tab and slide the shelf straight out.
Press tab and pull shelf forward to remove
To replace or relocate: Line the shelf up with the supports and slide it into place. The shelf can be repositioned when the door is at 90° or more. To reposition the shelf, slide the shelf past the stops and angle downward. Slide shelf down to the desired position, line up with the 
supports and slide into place.
Make sure you push the shelves all the way back in before you close the door.
Freezer Baskets (on some models)
To remove, slide out to the stop position, lift the front past the stop position, and slide out.
Make sure you push the baskets all the way back in before you close the door.
Freezer Baskets (on some models)
To remove, push the basket all the way to the back of
WKH IUHH]HU /LIW XS XQWLO WKH EDFN SLQV DUH GLVHQJDJHG
Lift the entire basket up and pull out.
Make sure you push the baskets all the way back in before you close the door.
10 |
49-60646-6 |
Shelves and Bins
Not all features are on all models.
QuickSpace™ Shelf (on some models)
This shelf splits in half and slides under itself for storage of tall items on the shelf below.
This shelf can be removed and replaced or relocated just like Slide-Out Spillproof Shelves.
On some models, this shelf can not be used in the lowest position.
Slide-Out Freezer Shelves
To remove, slide out to the stop position, lift the front past the stop position, and slide out from rib.
Make sure you push the shelves all the way back in before you close the door.
ShelfSaver™ Rack (on some models)
Use this rack to store beverage cans for easy
access.
,W FDQ DOVR KROG D ´ [ ´ baking dish.
Door Can Rack (on some models)
This door rack holds up to 9
cans.
NOTE: This rack can only be mounted in the top position under the dairy bin.
Fixed Freezer Shelves
To remove, lift the shelf up at the left side and then bring
the shelf out.
NOTE FOR DISPENSER MODELS: ,Q RUGHU WR WDNH IXOO advantage of the tilt-out ice bin (on some models), only
store items on the shelf below the ice bin that are no taller than the lowest point on the bin.
Door Wine/Beverage Rack (on some models)
This rack holds up to 5 cans, one bottle of wine or one 2-liter bottle of soda.
The rack hangs from the sides of the dairy bin.
To remove:
1. Empty the wine/beverage
rack.
2. Holding the bottom of the dairy bin, lift the front straight
up, then lift up and out.
3. To detach the rack from the dairy bin, pull the rack’s side wires out of the holes on each side of the dairy bin.
To replace:
1. Reattach the rack to the sides
of the bin.
2. Engage the back side of the bin in the molded supports on the door. Then push down on the front of the bin. The bin will lock into place.
Removable Beverage Rack
(on some models)
The beverage rack is designed to hold a bottle on its side.
,W FDQ EH DWWDFKHG WR DQ\ slide-out shelf.
To install: |
|
1. Line up the large part of |
1 |
the slots on the top of the |
|
rack with the tabs under the |
2 |
shelf. |
|
2.Then slide the rack back to lock it in place.
Bins and Shelves REFRIGERATOR: THE USING
49-60646-6 |
11 |
USING THE REFRIGERATOR: Shelves and Bins
Shelves and Bins
Refrigerator Doors (on some models)
The refrigerator doors may feel different than the ones you are used to. The special door opening/closing feature makes sure the doors close all the way and are securely sealed.
When opening and closing the door you will notice a stop
SRVLWLRQ ,I WKH GRRU LV RSHQHG SDVW WKLV VWRS SRLQW WKH door will remain open to allow you to load and unload food more easily. When the door is only partially open, it will automatically close.
The resistance you feel at the stop position will be reduced as the door is loaded with food.
When the door is only partially open, it will automatically close.
Beyond this stop the door will stay open.
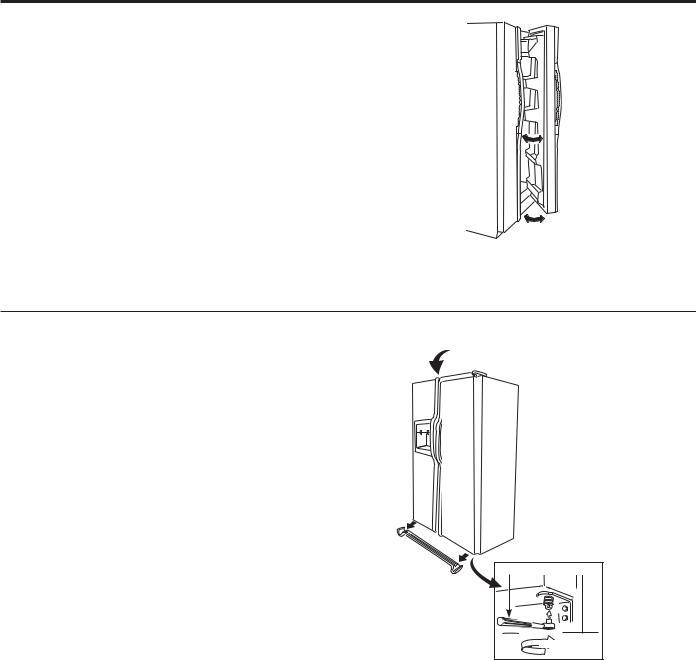
Door Alignment
,I GRRUV DUH XQHYHQ DGMXVW WKH UHIULJHUDWRU GRRU
To remove the base grille, open the doors, remove the screw at each end of the base grille and then pull the grille straight out.
8VLQJ D ´ VRFNHW ZUHQFK WXUQ WKH GRRU DGMXVWLQJ
VFUHZ WR WKH ULJKW WR UDLVH WKH GRRU WR WKH OHIW WR lower it. (A nylon plug, imbedded in the threads of the pin, prevents the pin from turning unless a wrench is used.)
2.After one or two turns of the wrench, open and close the refrigerator door and check the alignment at the top of the doors.
´ 6RFNHW :UHQFK |
Raise |
12 |
49-60646-6 |
 Loading...