

User Guide
Gateway DC-T60 Digital Camera
Version 1.0


Checking out your Gateway DC-T60 digital camera . . . . . . . . . . . . 1
Product features . . . . . . . . . . . . . . . . . . . . . . . . . . . . . . . . . . . . . . . 2
Package contents . . . . . . . . . . . . . . . . . . . . . . . . . . . . . . . . . . . . . . 3
Operating system support . . . . . . . . . . . . . . . . . . . . . . . . . . . . . . . 3
Front . . . . . . . . . . . . . . . . . . . . . . . . . . . . . . . . . . . . . . . . . . . . . . . . 4
Mode dial . . . . . . . . . . . . . . . . . . . . . . . . . . . . . . . . . . . . . . . . . . 5
Back . . . . . . . . . . . . . . . . . . . . . . . . . . . . . . . . . . . . . . . . . . . . . . . . 6
Navigation/Set buttons . . . . . . . . . . . . . . . . . . . . . . . . . . . . . . . . 7
Bottom. . . . . . . . . . . . . . . . . . . . . . . . . . . . . . . . . . . . . . . . . . . . . . . 8
Sides . . . . . . . . . . . . . . . . . . . . . . . . . . . . . . . . . . . . . . . . . . . . . . . . 8
Learning the basics. . . . . . . . . . . . . . . . . . . . . . . . . . . . . . . . . . . . . . . 9
Connecting the wrist strap . . . . . . . . . . . . . . . . . . . . . . . . . . . . . . . 9
Using the battery and AC power . . . . . . . . . . . . . . . . . . . . . . . . . . 9
Installing the battery . . . . . . . . . . . . . . . . . . . . . . . . . . . . . . . . . 10
Connecting the AC power adapter . . . . . . . . . . . . . . . . . . . . . . 11
Installing the Secure Digital (SD) memory card. . . . . . . . . . . . . . 12
Turning on your camera . . . . . . . . . . . . . . . . . . . . . . . . . . . . . . . . 13
Setting the date and time . . . . . . . . . . . . . . . . . . . . . . . . . . . . . . . 14
Taking your first picture . . . . . . . . . . . . . . . . . . . . . . . . . . . . . . . . 14
Viewing pictures on the LCD . . . . . . . . . . . . . . . . . . . . . . . . . . . . 16
Recording your first movie . . . . . . . . . . . . . . . . . . . . . . . . . . . . . . 17
Viewing movies on the LCD. . . . . . . . . . . . . . . . . . . . . . . . . . . . . 18
Deleting pictures and movies . . . . . . . . . . . . . . . . . . . . . . . . . . . . 19
Using your camera . . . . . . . . . . . . . . . . . . . . . . . . . . . . . . . . . . . . . . 20
Taking pictures . . . . . . . . . . . . . . . . . . . . . . . . . . . . . . . . . . . . . . . 20
Understanding the viewfinder LED. . . . . . . . . . . . . . . . . . . . . . . . 22
LCD information . . . . . . . . . . . . . . . . . . . . . . . . . . . . . . . . . . . . . . 23
Photography modes . . . . . . . . . . . . . . . . . . . . . . . . . . . . . . . . . 23
Movie mode . . . . . . . . . . . . . . . . . . . . . . . . . . . . . . . . . . . . . . . 24
Playback modes . . . . . . . . . . . . . . . . . . . . . . . . . . . . . . . . . . . . 25
Setting the focus. . . . . . . . . . . . . . . . . . . . . . . . . . . . . . . . . . . . . . 26
Using the flash . . . . . . . . . . . . . . . . . . . . . . . . . . . . . . . . . . . . . . . 27
Setting the picture size and quality . . . . . . . . . . . . . . . . . . . . . . . 29
Determining the number of pictures . . . . . . . . . . . . . . . . . . . . . 30
Using the zoom feature . . . . . . . . . . . . . . . . . . . . . . . . . . . . . . . . 31
Using picture modes. . . . . . . . . . . . . . . . . . . . . . . . . . . . . . . . . . . 33
Taking pictures in the Auto mode . . . . . . . . . . . . . . . . . . . . . . . 34
Taking pictures in the Program mode . . . . . . . . . . . . . . . . . . . . 34
Taking pictures in the Shutter speed priority mode . . . . . . . . . 35
Taking pictures in the Aperture priority mode . . . . . . . . . . . . . . 36
Taking pictures in the Manual mode . . . . . . . . . . . . . . . . . . . . . 37
Taking pictures in a Scene mode . . . . . . . . . . . . . . . . . . . . . . . 38
Using advanced viewing features . . . . . . . . . . . . . . . . . . . . . . . . 39
Recording and adding voice memos to a picture . . . . . . . . . . . . 41
Listening to a voice memo . . . . . . . . . . . . . . . . . . . . . . . . . . . . . . 42
Deleting images . . . . . . . . . . . . . . . . . . . . . . . . . . . . . . . . . . . . . . 43
i

Using advanced features . . . . . . . . . . . . . . . . . . . . . . . . . . . . . . . . . 44
Using the self-timer. . . . . . . . . . . . . . . . . . . . . . . . . . . . . . . . . . . . 44
Adding printing information on the SD memory card . . . . . . . . . 45
Lightening or darkening the overall picture brightness . . . . . . . . 46
Protecting files on your SD memory card . . . . . . . . . . . . . . . . . . 49
Formatting SD memory cards . . . . . . . . . . . . . . . . . . . . . . . . . . . 51
Using the Setup menus . . . . . . . . . . . . . . . . . . . . . . . . . . . . . . . . 52
Connecting your camera. . . . . . . . . . . . . . . . . . . . . . . . . . . . . . . . . . 63
Installing software . . . . . . . . . . . . . . . . . . . . . . . . . . . . . . . . . . . . . 63
Connecting to your computer and transferring files . . . . . . . . . . . 63
Connecting to your TV and viewing pictures . . . . . . . . . . . . . . . . 69
Frequently Asked Questions (FAQs). . . . . . . . . . . . . . . . . . . . . . . . 71
Battery. . . . . . . . . . . . . . . . . . . . . . . . . . . . . . . . . . . . . . . . . . . . . . 71
Using. . . . . . . . . . . . . . . . . . . . . . . . . . . . . . . . . . . . . . . . . . . . . . . 72
Terms . . . . . . . . . . . . . . . . . . . . . . . . . . . . . . . . . . . . . . . . . . . . . . 74
Contacting Gateway . . . . . . . . . . . . . . . . . . . . . . . . . . . . . . . . . . . . . 76
Specifications. . . . . . . . . . . . . . . . . . . . . . . . . . . . . . . . . . . . . . . . . . . 77
Safety, Regulatory, and Legal Information . . . . . . . . . . . . . . . . . . . 78
ii

Checking out your Gateway DC-T60 digital camera
Your new digital camera uses a 6.3 megapixel charged-coupled device
(CCD) imager to produce high quality pictures with as high as
2816 x 2112 picture resolution. You can compose and view pictures
through the optical viewfinder or on the 2.0” color LCD, then view
the pictures on the 2.0” color LCD.
After you take pictures or movie clips, use the USB cable to download
image files from your camera to your computer. You can enhance
and retouch your pictures on your computer with the SimpleStar
PhotoShow photo editing software or other image editing software.
Then share your pictures with your family and friends through
e-mail, on a Web site, or with prints.
1

Product features
■ LCD – The 2.0" color LCD makes it easy to compose your subject
for pictures and video clips. It also displays images that you have
taken.
■ Recording medium – Supports SD memory cards as large as
512 MB.
■ Camera mode – A variety of camera modes let you adjust your
camera to your preferences and take photographs according to the
photographic conditions.
■ Optical zoom – 3x optical lens lets you to take wide-angle and
telephoto pictures.
■ Digital zoom – 4.4x digital zoom and 3x optical zoom combined
let you zoom as much as 13.2 times. In Playback mode, you can
use the zoom function to enlarge a selected portion of pictures
at 2x and 4x the normal LCD size.
■ Flexible flash settings – Flexible flash settings let you change your
flash according to your lighting environment and Photography
mode setting.
■ Focus mode – Lets you take pictures with the focus distance to
the subject set to auto, macro, infinity, 3 m, or 1 m.
■ Self-timer mode – Provides camera timer setting options for
2 seconds, 10 seconds, 10+2 seconds, and interval.
■ Still image capture – Lets you take pictures as single shots, a series
of 3 images with different exposures, and 5 images consecutively.
■ Movie mode – Records short video clips.
■ Voice memo – Lets you record voice memos for as long as 30
seconds immediately after you take a picture. You can also record
a voice memo later while viewing the picture in Playback mode.
■ Camera settings – Use the menu settings to control picture
quality.
■ Thumbnail display – Displays as many as nine pictures on the
LCD for easier and quicker picture selection.
■ TV and PC connection – View pictures on a TV with the A/V cable
or transfer pictures to your computer with the USB cable.
■ DPOF settings – Lets you embed printing information on your
SD memory card and print pictures on a Digital Print Order
Format (DPOF) compatible printer by inserting the SD card into
the printer.
2

Package contents
■ DC-T60 Digital camera
■ 32 MB Secure Digital (SD) memory card
■ Rechargeable Lithium-ion battery (LI-100)
■ AC power adapter/charger
■ Quick start guide and user guide
■ USB cable
■ A/V cable
■ DC-T60 software CD with Windows 98SE USB driver, SimpleStar™
PhotoShow software, and .PDF user guides.
■ Camera wrist strap
Operating system support
■ Windows XP
■ Windows 2000
■ Windows ME
■ Window 98SE
■ MAC OS 9.0 or later
3

Front
Mic
Shutter button
Mode dial
Power
button
Component Description
Mode dial Lets you select Photography, Playback, and SET-UP
Shutter button Press half-way down to focus and lock the camera
Power button Turns the camera power on and off.
Mic Records voice memos and sound for video clips.
Self-timer LED/
Auto focus LED
Optical viewfinder Lets you frame a picture without using the LCD.
Built-in flash Provides flash illumination.
Lens/Auto lens cover Lets you take wide angle and telephoto pictures. When
camera modes.
exposure setting, then press all the way down to take
a picture.
Blinks green during self-timer mode until the picture is
taken. The camera also uses the LED to focus on
images photographed in a dark environment.
the camera is turned off, the auto lens cover closes
automatically to protect the lens.
Self-timer LED/Auto Focus LED
Optical viewfinder
Lens/Auto lens cover
Built-in
flash
4

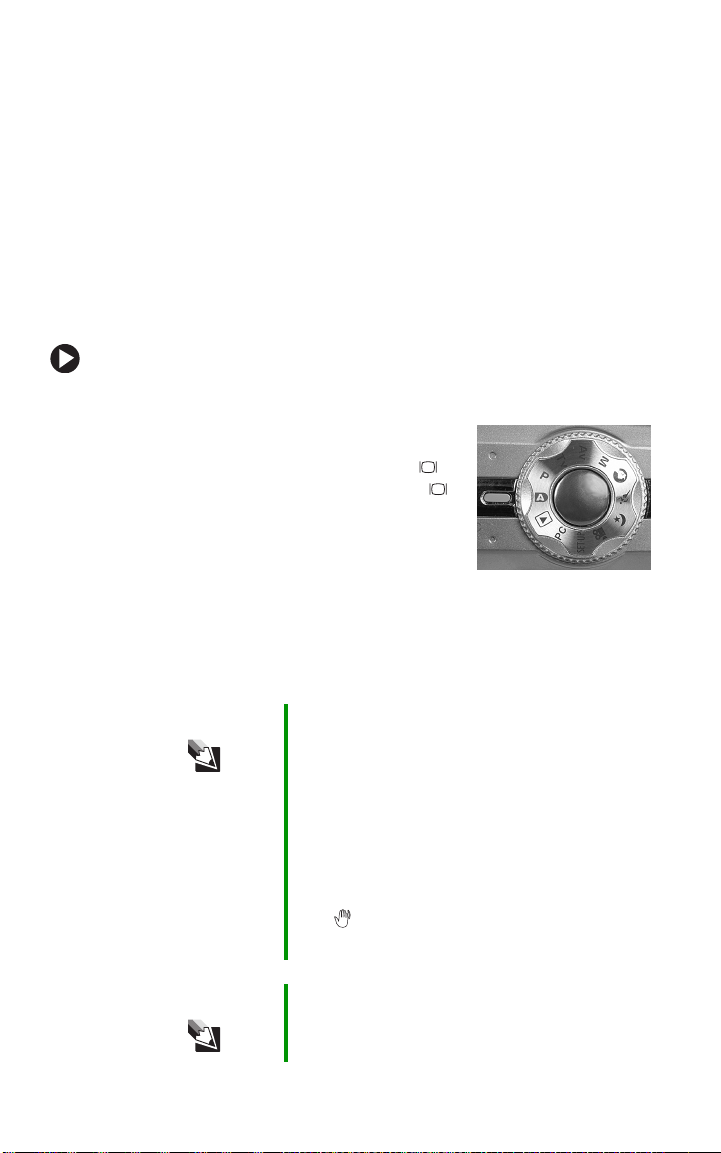
Mode dial
Shutter speed
priority
Manual mode
Portrait modeAperture priority
Sports mode
Program mode
Auto mode
SET-UP modePlayback mode
PC mode
Night scene mode
Movie mode
Component Icon Description
Aperture priority Av Sets the camera for aperture priority and an
Manual mode M Sets the camera for fully manual operation.
Portrait mode Sets the camera to photograph portrait subjects and
Sports mode Sets the camera to photograph fast-moving
Night scene mode Sets the camera to photograph subjects against the
Movie mode Sets the camera to record video clips.
SET-UP mode SET-UP Adjusts camera settings.
PC mode PC Sets the camera to download pictures to your
Playback mode View, rotate, delete, and select pictures to print from
Auto mode Sets the camera for fully automatic settings.
Program mode P Sets the camera for automatic shutter speed and
Shutter speed
priority
automatic shutter speed setting.
blur the background.
subjects.
backdrop of evening or night scenes.
computer.
your camera.
aperture settings. Other camera settings can be
changed in this mode.
Tv Sets the camera for shutter speed priority and an
automatic aperture setting.
5
Back
Diopter
adjustment dial
Viewfinder
Viewfinder LED
Zoom button
MENU button
Speaker
Delete button
Display button
LCD
Navigation/Set
buttons
Component Icon Description
Diopter adjustment
dial
Viewfinder Lets you frame the picture.
Viewfinder LED Provides information about the camera’s current
Zoom button Photography mode: Lets you adjust the camera
MENU button Menu Toggles the camera menu on and off.
Speaker Plays camera sounds and recorded audio.
Delete button Lets you erase images stored on the memory card.
Display button Photography mode: Lets you turn the LCD on and
Lets you adjust the focus for the viewfinder window.
This does not effect the picture focus.
state. For more information, see “LCD information”
on page 23.
lens to take wide angle or telephoto pictures. For
more information, see “Setting the focus” on page 26
and “To use the digital zoom:” on page 32.
Playback mode: Lets you increase, decrease, or
select thumbnails of the pictures you view on your
camera. For more information, see “To view
thumbnail images:” on page 40.
For more information, see “Deleting images” on
page 43.
off. For more information, see “To use the LCD to
take pictures:” on page 20.
Playback mode: Lets you toggle picture information
on and off. For more information, see “LCD
information” on page 23.
6
Component Icon Description
Navigation buttons
SET button
LCD Lets you access menus to operate the camera,
SET Photography mode: Lets you navigate camera
setting options. For more information, see
“Navigation/Set buttons” on page 7.
Playback mode: Lets you scroll through and view
pictures. For more information, see “Navigation/Set
buttons” on page 7.
compose pictures, and view pictures after they have
been taken. For more information, see “LCD
information” on page 23.
Navigation/Set buttons
Set button
Exposure
compensation/
backlight correction/
Navigate left button
Auto focus
Navigate up button
Flash setting/
Navigate right button
Self-timer/
Navigate down button
Component Icon Description
Set button Photography mode: Lets you toggle between
taking pictures and viewing pictures.
Menu mode: Lets you set menu selections.
Auto focus button
Navigate up button
Flash setting
button
Navigate right
button
Self-timer button
Navigate down
button
Exposure
compensation/
backlight
correction button
Navigate left
button
Photography mode: Lets you select an auto focus
setting.
Menu mode: Lets you navigate up through the
menu options.
Photography mode: Lets you select a flash setting.
Menu mode: Lets you navigate right through the
menu options.
Photography mode: Lets you select a self-timer
setting.
Menu mode: Lets you navigate down through the
menu options.
Photography mode: Lets you select an exposure
compensation or backlight correction setting.
Menu mode: Lets you navigate left through the
menu options.
7
Bottom
Battery/
Memory card
compartment
Tripod socket
Component Description
Battery/memory card
compartment
Tripod socket Lets you mount your camera to a tripod.
Lets you access the camera battery and memory
card.
Sides
Search
dial
Wrist strap
eyelet
DC IN 5V
connector
USB/ A/V Out
port
Component Description
Search dial (Shutter speed (Tv) / Aperture (Av) / Manual (M))
mode: Lets you change the shutter speed or aperture
setting.
Playback mode: Lets you select the next or previous
picture.
Wrist strap eyelet Attach the wrist strap to your camera here.
DC IN 5V connector Connect the AC power adapter to the camera to
USB connector
A/V Out connector
operate the camera without a battery or to charge the
rechargeable battery.
Connect a USB cable to the camera to transfer pictures
to your computer.
- OR Connect an A/V cable to the camera to view pictures
on a TV from the camera.
8
Learning the basics
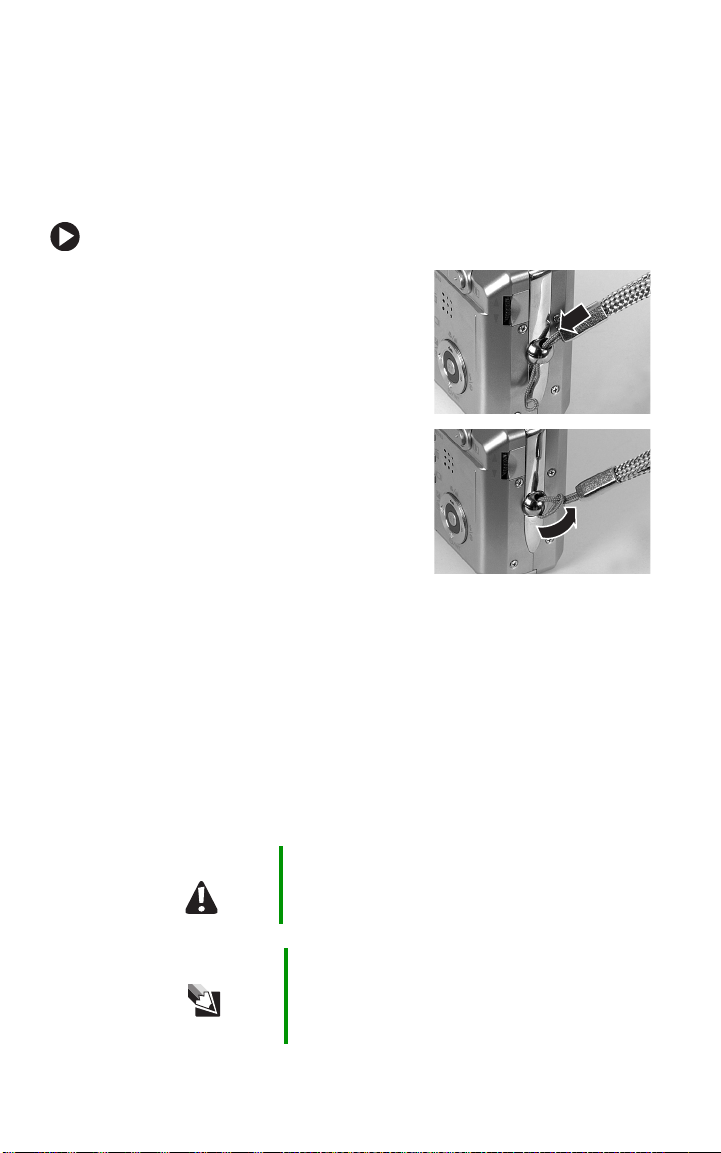
Connecting the wrist strap
Attach the wrist strap to carry the camera and help prevent the
camera from dropping and getting damaged.
To connect the wrist strap:
1 Find the wrist strap that came with
your camera.
2 Thread the small looped end of the
wrist strap through the wrist strap
eyelet on your camera.
3 Pull the large looped end of the
wrist strap through the small loop
until the strap is secure.
Using the battery and AC power
You can use the rechargeable Lithium-ion battery or AC power
adapter to power your camera. Before using the camera for the first
time on battery power, you should fully charge the battery for about
3 hours. If the camera is not fully charged the first time, the battery
life may be shortened.
You can also use the AC power adapter to power the camera while
the battery is charging. For more information, see “Connecting the
AC power adapter” on page 11.
Caution To protect your camera from battery leakage or
corrosion, remove the batteries if you do not plan
to use your camera for an extended period of time.
Tips & Tricks Using the camera in low temperatures can shorten
the battery life and reduce the camera
performance. Avoid using the camera battery in
extremely cold environments.
9
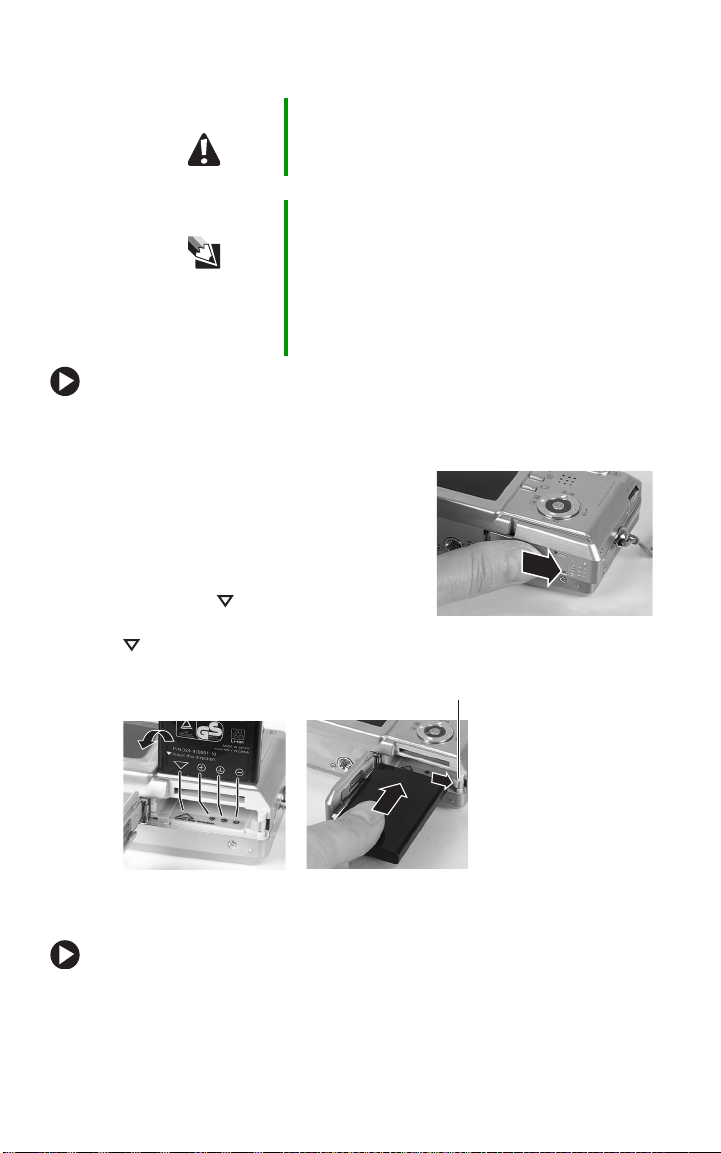
Installing the battery
Caution Make sure that the power is turned off before
Tips & Tricks We recommend that you fully charge the battery for
installing or removing the battery.
about 3 hours before you use your camera the first
time. The charge time may vary dependent upon
the ambient room temperature and the charge in
the battery. For more information about charging
your camera, see “Connecting the AC power
adapter” on page 11.
To install the battery:
1 If the camera is turned on, press and release the Power button on
the top of your camera to turn off the camera.
2 Slide the battery/memory card
compartment cover open.
3 Push the battery lock lever to the
side, then insert the battery into
your camera. Make sure that you
match the and the
symbols on the batteries with the
and the + and – symbols inside the battery compartment.
+ and –
Battery lock lever
4 Close the battery/memory card compartment cover.
To remove the battery:
1 If the camera is turned on, press and release the Power button on
the top of your camera to turn off the camera.
2 Slide the battery/memory card compartment cover open.
10
3 Release the battery lock lever. The battery ejects slightly from the
battery compartment.
4 Remove the battery.
Important If you have used your camera recently, the battery
may be warm when you remove it from the camera.
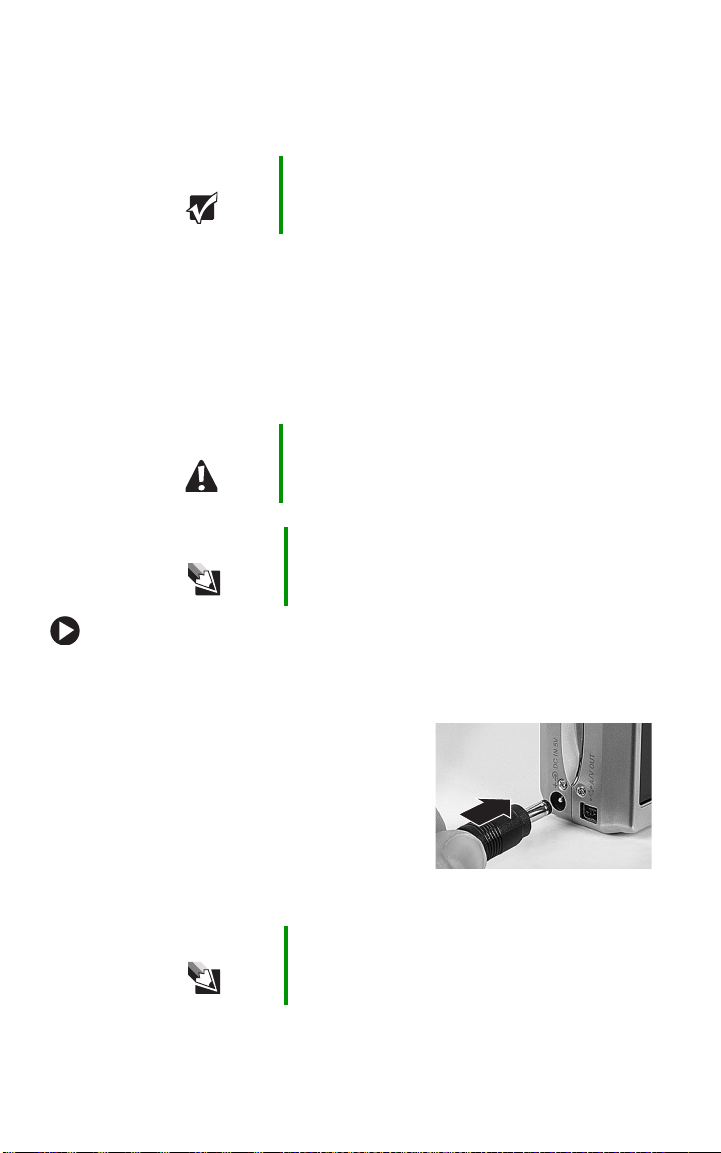
Connecting the AC power adapter
Use the AC power adapter to:
■ Charge the Lithium-ion rechargeable battery
■ Power your camera while recharging the battery
■ Power your camera without a battery installed
Caution Make sure that you only use the AC power adapter
Tips & Tricks Use the AC power adapter to save battery power
To connect the AC power adapter:
1 If the camera is turned on, press and release the Power button on
the top of your camera to turn off the camera.
2 Connect one end of the AC power
adapter to the DC IN 5V connector
on the camera.
specified for your camera. Other AC power
adapters could cause damage to your camera.
when transferring pictures or video clips to your
computer, TV, or VCR.
3 Plug the other end of the AC power
adapter into a wall outlet. As the
battery charges, the viewfinder
LED turns green. When fully
charged, the LED turns off.
Tips & Tricks If the rechargeable battery needs to be replaced,
the LED indicator turns red.
11
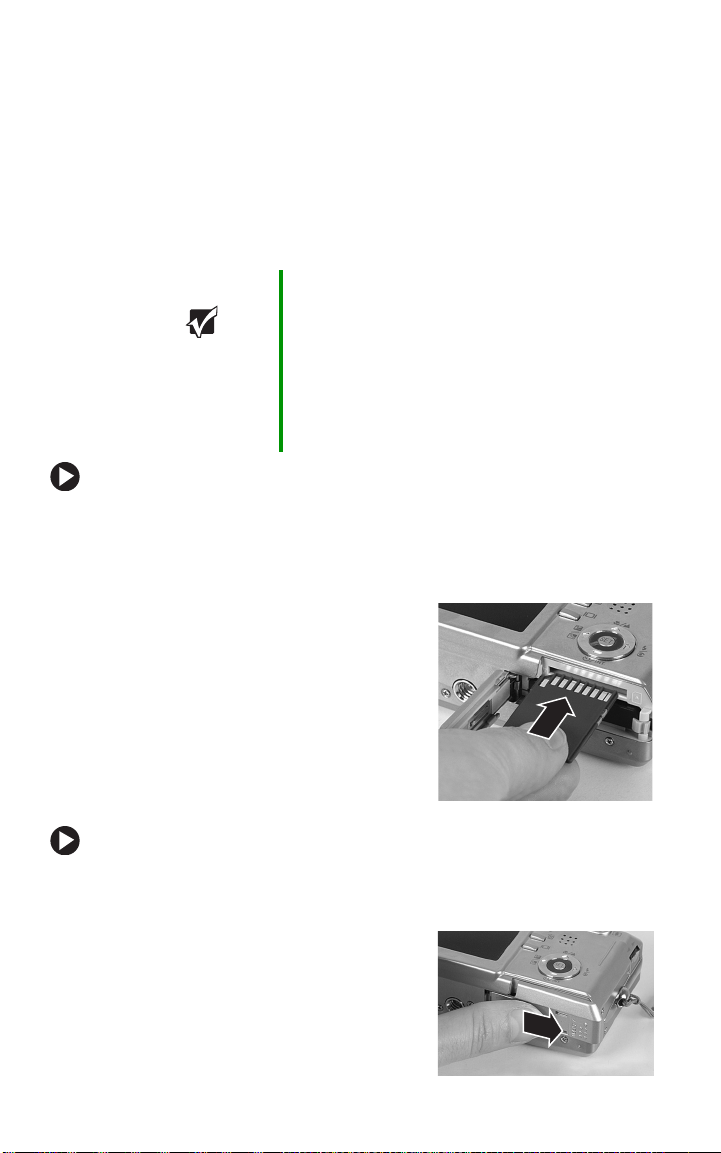
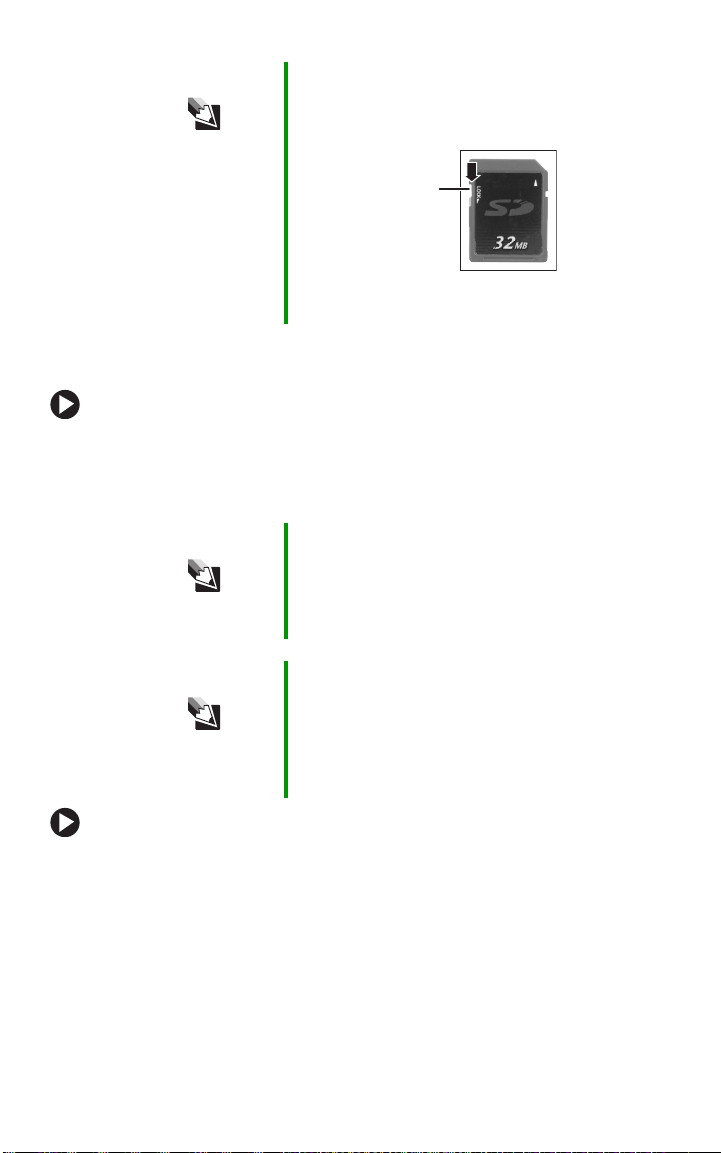
Installing the Secure Digital (SD) memory card
Your camera comes with a 32 MB or larger SD memory card to store
still pictures and video clips. The memory card stores the image files
whether the camera is turned on or off. You can copy the files to a
computer and delete the files from the memory card to free-up space
for new pictures. For more information about copying files to your
computer, see “Connecting to your computer and transferring files”
on page 63.
Important You can use an SD memor y card as large as
To install an SD memory card:
1 If the camera is turned on, press and release the Power button on
the top of your camera to turn off the camera.
2 Slide the battery/memory card compartment cover open.
3 Insert the SD memory card. The SD
memory card is keyed and will only
fit in the slot one way. The metal
contacts should face toward the
back side of the camera. Make sure
that the card is pushed all the way
in the card slot.
512 MB for more image file storage capacity. The
SD memory card that came with your camera has
already been formatted.
If you purchase an additional memory card, make
sure that you format the card so that it works
correctly with your camera. For more information,
see “To format an SD memory card:” on page 51.
4 Close the battery/memory card
compartment cover.
To remove an SD memory card:
1 If the camera is turned on, press and release the Power button on
the top of your camera to turn off the camera.
2 Slide the battery/memory card
compartment cover open.
3 Press in gently on the visible edge
of the SD memory card to eject it.
12
Tips & Tricks To prevent valuable data from being accidentally
erased, slide the write protect tab (on the side of
the SD memory card) to “LOCK.”
Slide
tab to
lock
Slide the lock back to the write-protect off position
to add, edit, or erase files on the SD memory card.
Turning on your camera
To turn on your camera:
■ Press and hold the Power button on the top of your camera for
about one second. The LED momentarily turns green, then
orange, then the LED turns off when the camera turns on.
Tips & Tricks After you turn the camera on, it may take several
seconds to charge the flash. The viewfinder LED
is green, then orange while the camera is charging
the flash. When the LED turns off, the camera is
ready to take pictures.
Tips & Tricks The camera power automatically turns off when the
camera has not been used for a fixed period of time.
To continue using the camera, turn the camera on
again. For more information about changing the
Auto Off time setting in the Setup menu’s Basic tab,
see “Auto Off” on page 61.
To turn off your camera:
■ Press and release the Power button on the top of your camera.
13

Setting the date and time
Set the date and time the first time you use your camera or when
you turn on your camera after leaving the battery out of the camera
for an extended period of time.
To set the date and time:
1 Turn the camera on. See “Turning on your camera” on page 13.
2 If the date/time screen does not
appear, turn the mode dial to
then press the navigation button.
The Custom tab opens.
Press the / buttons to highlight
Date/Time, then press the Set button.
The Custom Date/Time menu opens.
3 Press the / buttons to highlight
the date field, then change the date
field value with the / buttons.
The date and time setting order is
year, month, day, hour, and minute.
4 After you have set the date and time,
select a picture mode with the mode
dial to exit the menu.
SET-UP,
Taking your first picture
Use the Auto mode to get started taking pictures quickly and
easily.
The Auto mode lets your camera make all the correct settings
for your pictures. In Auto mode the shutter speed, aperture
setting, focus, flash (if required), white balance, and system metering
method are fully controlled by your camera. You compose the
pictures and let your camera take care of the rest.
14
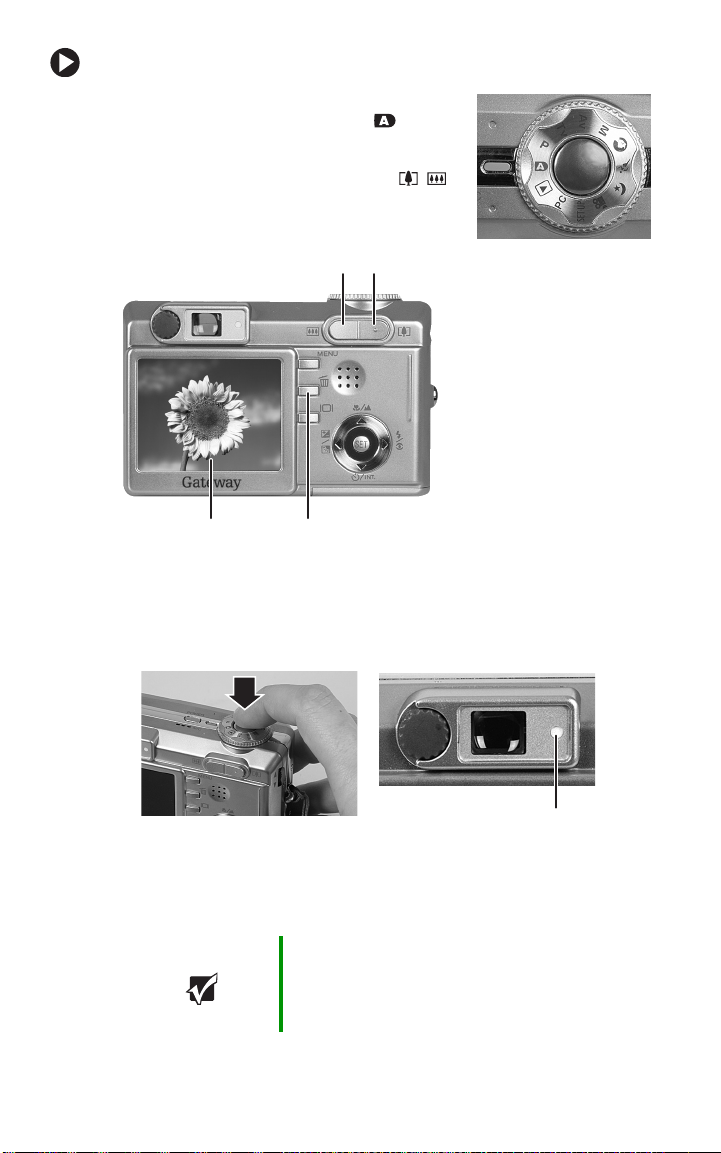
To take your first picture:
1 With the camera power turned on, set
the mode dial to Auto mode .
2 Use the LCD to compose your picture.
Frame the subject with the zoom
buttons.
Wide
zoom
Telephoto
zoom
LCD
Delete button
3 Press the shutter button halfway down to automatically focus the
image. The viewfinder LED turns green when the picture is
focused.
Viewfinder LED
turns green
4 Press the shutter button all the way down to take the picture.
After the picture is taken, it appears momentarily on the LCD.
Important If lighting conditions require additional flash
lighting, the flash automatically flashes twice. The
first flash is for the red-eye flash compensation and
the second flash is for the picture.
15
5 Press and release the Power button on the top of your camera to
turn off the camera.
For more information about picture modes and options, see “Taking
pictures” on page 20 and see “Using picture modes” on page 33.
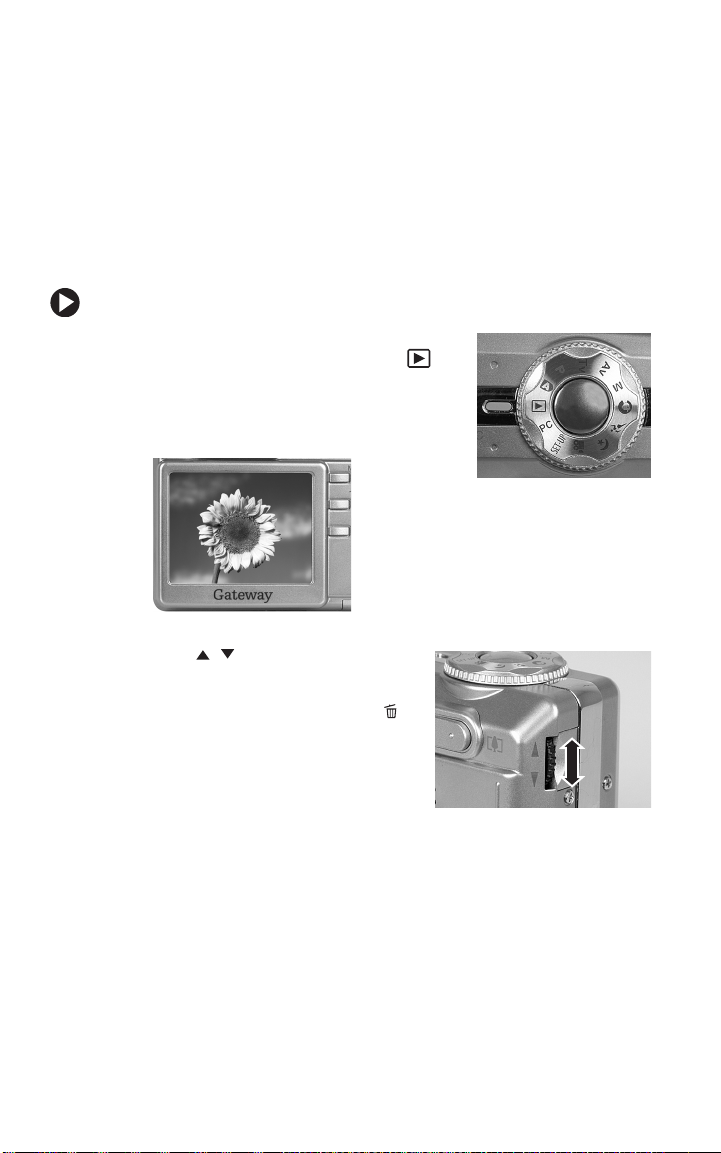
Viewing pictures on the LCD
After you have taken your first picture you can view it on your
camera’s LCD.
To view your first picture:
1 With the camera power turned on, set
the mode dial to Playback mode .
2 View the last picture you took on the
LCD.
3 Use the / buttons on the
search dial to view other pictures.
To delete the photo, press the
button on the back of the camera,
then follow the instructions on the
LCD.
16
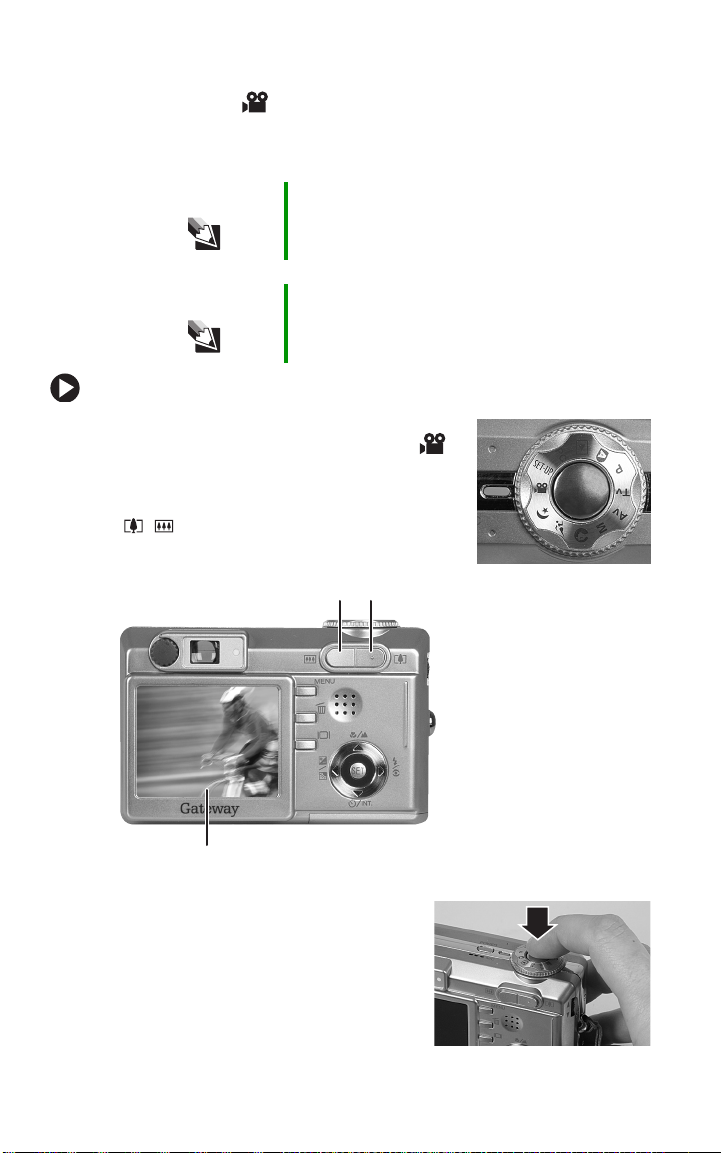
Recording your first movie
The Movie mode lets you record video clips at 320 x 240 pixels.
Sound is also recorded with the video clip. Use the LCD to compose
the video.
Tips & Tricks The LCD cannot be turned off and the flash does
not function when recording video clips.
Tips & Tricks The video clip recording time depends on the
amount of memory available on the memory card.
To shoot your first video clip:
1 With the camera power turned on, turn
the mode dial to the Movie mode
2 Use the LCD to compose your video
clip. Frame the subject with the zoom
buttons.
Wide
zoom
.
Telephoto
zoom
LCD
3 Press the shutter button to start
recording the video clip.
4 Press the shutter button a second
time to stop the video clip
recording. When the recording
stops, the camera takes a few
seconds to process the clip to the
memory card.
17

Viewing movies on the LCD
Use the Playback mode to view video clips on the LCD.
To view video clips on the LCD:
1 With the camera power turned on, turn
the mode dial to the Playback mode
The last video clip you recorded is
displayed on the LCD.
2 Press the SET button to play the video
clip.
You can also use the navigation buttons
to view video clips:
Button During playback During pause During stop
SET
—
Each press of the
button increases the
playback speed
incrementally
(2X, 4X, Normal)
Each press of the
button increases the
reverse playback
speed incrementally
(2X, 4X, Normal)
Pauses playback Resumes playback Scrolls to the previous
Press to stop
playback and return to
start of the clip
Search
dial
—
Press SET to cancel
pause and continue
clip playback.
Forward playback
resumes. Each press
of the button
increases the
playback speed
incrementally
(2X, 4X, Normal).
Reverse playback
resumes. Each press
of the button
increases the reverse
playback speed
incrementally (2X, 4X,
Normal).
Press to stop
playback and return to
start of the clip
Rotate the Search dial
clip forward or
backwards frame-byframe
or
to step the
.
image on the memory
card
Scrolls to the next
image on the memory
card
Rotate the search dial
or
the previous or next
image on the memory
card
—
—
—
to scroll to
18

Deleting pictures and movies
You can erase the last picture or movie you took with the Quick
Delete feature.
To delete a picture or movie in the Quick Delete mode:
1 With the camera power turned on, turn the mode dial to one of
the photography modes.
2 Press the button. The last picture or movie you took is
displayed on the LCD.
3 Press the / buttons to highlight Execute, then press the Set
button. The picture or movie is deleted.
19
Using your camera
Taking pic tures
Your camera is equipped with both an optical viewfinder and a 2.0”
full-color LCD to compose pictures.
The LCD helps you accurately compose pictures. However, the LCD
uses battery power when it is turned on. You can use the optical
viewfinder to conserve battery power. For example, if your battery
charge is low, turn off the LCD and compose images through the
viewfinder.
To use the LCD to take pictures:
1 Turn the camera on. See “Turning on your camera” on page 13.
2 Turn the mode dial to a photography mode.
3 If the LCD is turned off, press the
button to turn on the LCD. Press the
button one or more times, until
display
appears.
4 Compose your picture in the LCD.
5 Press the shutter button down halfway to focus the image, then
press the shutter button down the rest of the way to take the
picture. The viewfinder LED is red while the camera processes the
picture.
OSD full
20
Tips & Tricks After focusing, the LCD will show an approximation
of the image brightness when the picture is taken.
If the lighting is too dark for a good picture
exposure, the preview image on the LCD will be
dark. You can change the camera settings, such as
the shutter speed or aperture, to set the camera for
more light sensitivity. However, some settings may
cause the shutter speed to be too slow for a
handheld picture. If the shutter speed is too slow
for a handheld picture, the unsteady hold warning
icon is displayed. You may want to use a tripod
to steady the camera.
Tips & Tricks The image on the LCD may look dim in bright
sunlight. This is common for the LCD because the
sunlight may be brighter than LCD brightness.
Tips & Tricks For more information about focusing the camera,
see “Setting the focus” on page 26.
To use the viewfinder to take pictures:
1 Turn the camera on. See “Turning on
your camera” on page 13.
2 Turn the mode dial to a photography
mode.
3 If the LCD is turned on, press the
button to turn off the LCD. Press the
button one or more times, until
monitor Off
appears.
LCD
4 Compose your picture in the
viewfinder. If the image looks
blurry in the viewfinder, rotate the
diopter adjustment dial to focus
the viewfinder for your eyes. This
setting does not change the picture
focus.
Viewfinder
5 Focus the camera and take the
picture.
Tips & Tricks For more information about focusing the camera,
see “Setting the focus” on page 26.
21

Understanding the viewfinder LED
The viewfinder LED changes color depending on what mode you are
in and what the status of the camera is.
Viewfinder LED
Color State Power off
mode
Green On Battery
charging in
progress
Red On AC
adapter
plugged in
Flashing
—
Orange On Battery
charging
error
Flashing
—
Photography
modes
Auto focus
successful and
locked on
subject
Writing to
memory card
in progress
■
Picture not in
focus
■
Interval
photography
in Standby
mode
■
Processing
picture
■
Flash
charging in
progress
■
Battery fully
discharged
■
Battery
cover open
■
SD card
write protect
on
Playback
PC mode
mode
—
■
Accessing
the SD
card in
progress
■
DPOF
file being
created
——
—
Battery
fully
discharged
Camera
connected to
computer
■
Accessing
the SD
card in
progress
■
Computer
mode
standby
Not
recognized
by PC
■
Battery
fully
discharged
■
SD card
missing
22
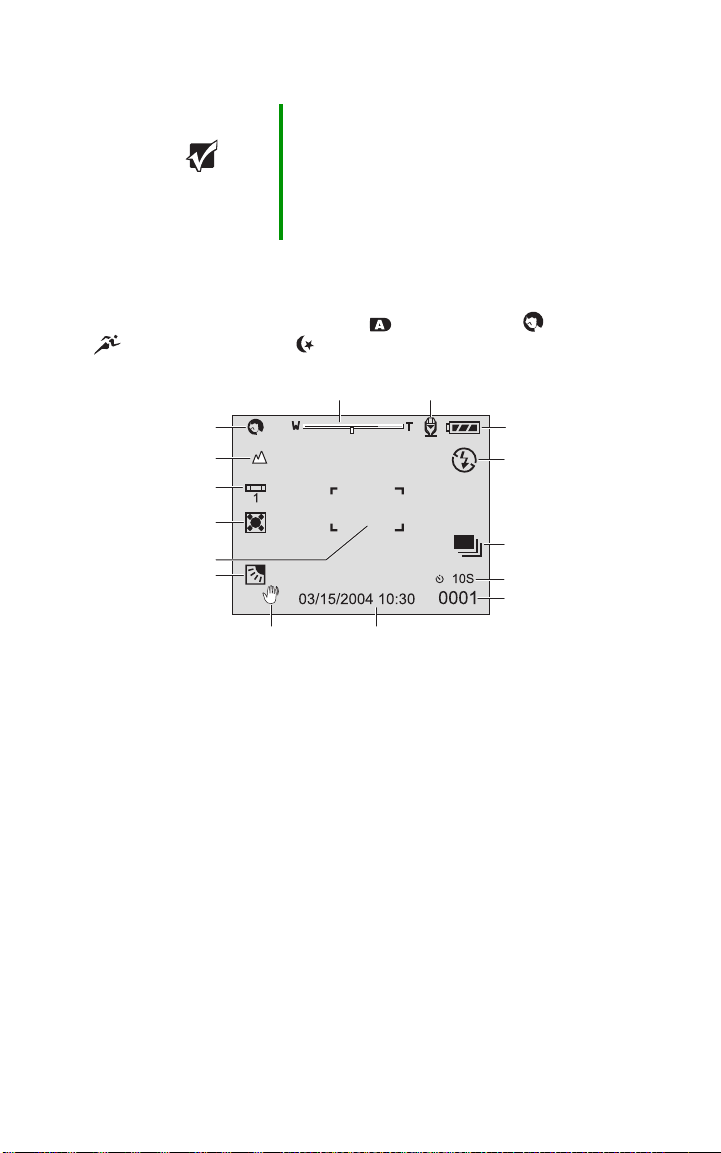
LCD information
Important The following LCD information is representative of
information that may be displayed in the various
camera modes. Not all icons will appear at the
same time. The icons that are displayed depend on
the selected mode and the options available for the
selected mode.
Photography modes
The following information appears on the LCD when you are in
photography modes: Auto mode , Portrait mode , Sports mode
, Night scene mode .
Mode icon
Focus icon
White balance icon
Metering icon
Focus area
Backlight
correction icon
Zoom status
Unsteady hold
warning icon
Voice memo mode
Battery status
Flash icon
Capture mode icon
Self-timer icon
Pictures remaining
Date &
time
23
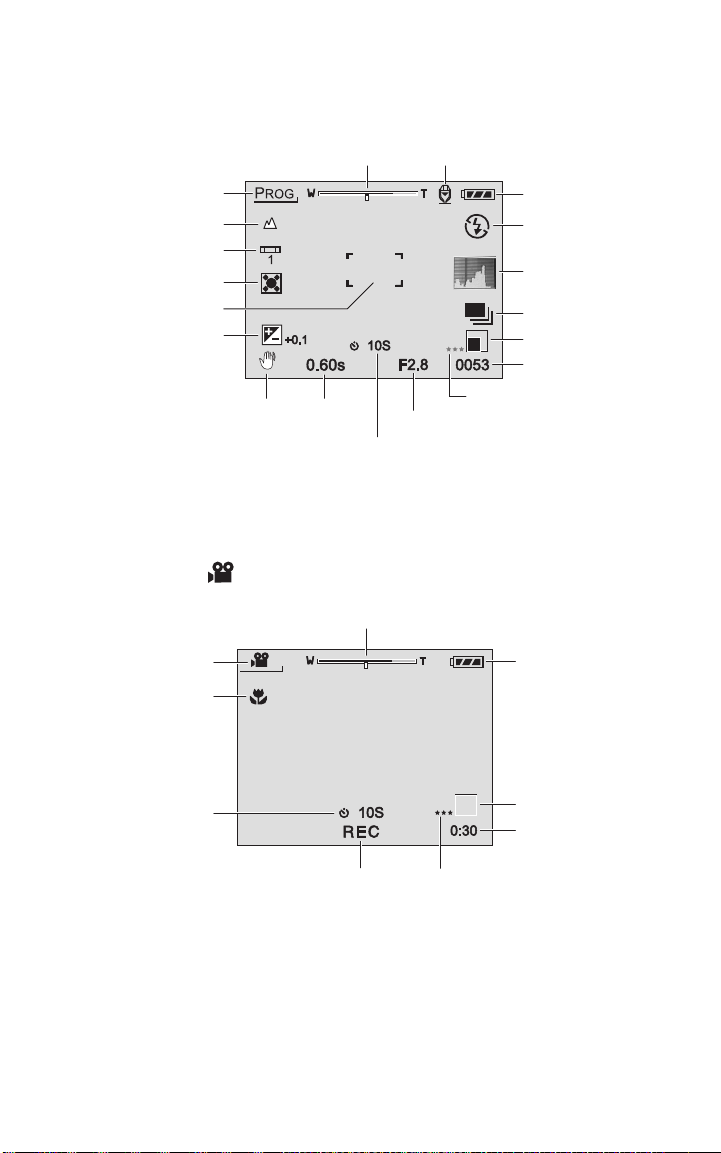
The following information appears on the LCD when you are in
n
photography modes: Program mode
Tv, Aperture priority mode Av, Manual mode M.
P, Shutter speed priority mode
Mode icon
Focus icon
White balance icon
Metering icon
Focus area
xposure compensation
Unsteady
hold warning
icon
Zoom status
Shutter
speed
Self-timer
icon
Voice memo mode
Aperture
Battery status
Flash icon
Histogram
Capture mode ico
Picture size
Pictures remaining
Picture
quality
Movie mode
The following information appears on the LCD when you are in
Movie mode .
Zoom status
Mode icon
Focus icon
Battery status
24
Self-timer icon
Recording
indicator
Picture
quality
Picture size
Recording time/
elapsed time

Playback modes
The following information appears on the LCD when you are in
picture Playback mode .
Mode icon
File
Voi ce
memo
icon
Protect
icon
Folder
number
The following information appears on the LCD when you are in
video Playback mode .
Movie
status bar
number
To ta l
time
Play
mode
Mode
icon
Protect
icon
Folder
number
Elapsed
time
File
number
25

Setting the focus
You can set the camera to focus on subjects with auto focus,
macro focus,
fixed at 1 meter. If you change the Focus mode, the camera retains
the focus settings when the camera is turned off. The focus settings,
however, are limited to the capabilities of the selected photography
mode.
infinity focus, 3M focus fixed at 3 meters, or 1M focus
Tips & Tricks Some settings may cause the shutter speed to be
too slow for a handheld picture. If the shutter speed
is too slow for a handheld picture, the unsteady
hold warning icon is displayed. You may want
to use a tripod to steady the camera.
The camera has five Focus modes:
Icon Focus mode Description
Auto focus Select this mode for fully automatic focus. Auto focus focuses
Macro Select this mode for close-up photography.
Infinity Select this mode for distant photography where subjects are
3M Fixed at
3 meters
Fixed at
1M
1 meter
on subjects from approximately 2½ feet (80 cm) to infinity
in wide angle and telephoto settings.
Wide angle (zoom off) - focuses from approximately 3½
inches (9 cm) to infinity.
Telephoto (at optical zoom 3x) - focuses from approximately
1 foot (30 cm) to infinity.
approximately 16 feet (5 m) or more from the camera.
Select this mode for photography where the subject is
approximately 10 feet (3 m) from the camera.
Select this mode for photography where the subject is
approximately 3 feet (1 m) from the camera.
To change the focus settings:
1 Turn the camera on. See “Turning on your camera” on page 13.
2 Turn the mode dial to one of the photography
modes.
3 Press the button to select the Focus mode.
Press the button one or more times, until
the icon for the focus setting you want to use
is displayed in the left corner of the LCD.
26

For Auto mode , Program mode
Tv, Aperture priority mode Av, Manual mode M, Sports mode ,
or Movie mode
[No icon] Auto focus Macro Infinity
Fixed at 1 meter Fixed at 3 meters
:
P, Shutter speed priority mode
For Portrait mode and Night scene mode :
[No icon] Auto focus Infinity
Fixed at 1 meter Fixed at 3 meters
4 Compose the picture.
5 Press the shutter button down
halfway to focus the image. The
viewfinder LED turns green to
indicate that the subject is in focus.
Tips & Tricks The camera focus time depends on how much the
picture subject is moving. If the subject moves
significantly, the focus may take slightly longer than
still subjects. Generally, the camera focus locks in
about 1 second.
6 Press the shutter button down the
rest of the way to take the picture.
After you take the picture, it
appears on the LCD momentarily.
Using the flash
The flash is designed to work automatically in low lighting
conditions or when additional lighting is required. The intensity of
the flash varies depending upon the surrounding lighting
conditions. You can also set the Flash mode manually.
The camera retains the current flash setting when the camera is
turned off.
27

The camera has four Flash modes:
Icon Flash mode Description
Auto flash The flash fires automatically according to the ambient lighting
Red-eye
reduction
Forced flash Select this mode for photography in high contrast lighting
Suppressed
flash
conditions. Auto flash only works in the Auto mode
Select this mode for general photography. Use the red-eye
reduction flash to take pictures of people and animals in
low-light conditions.
The flash emits a precursor-flash before the main flash fires.
This causes the eye’s pupil to contract, reducing the red-eye
phenomenon. The flash always fires twice, and the
photograph is taken at the second flash.
When the camera mode is set to Auto mode or Program
mode P, the flash fires at a light intensity based on the
brightness of the subject.
When the camera is set to Shutter speed priority mode Tv,
Aperture priority mode Av, or Manual mode M, the flash will
always fire.
When the camera is set to Portrait mode , the flash is set
to Red-eye reduction mode automatically.
situations (such as a strong backlight behind a subject),
fluorescent lighting, and other situations that need fill-in
lighting on the subject.
When the camera is set to Night scene mode , the flash
is set to Forced flash mode automatically, except in the
Infinity focus mode .
Select this mode for places where flash photography is
prohibited, when the subject is too far away for the flash to
be effective, or when in situations where the lighting
conditions may be low but you want to take pictures in the
natural lighting.
When the camera is set to Sports mode , the flash is set
to Suppressed flash mode automatically.
.
28
Tips & Tricks If the lighting conditions are too dark for a handheld
picture and the flash is set to the Suppressed flash
mode , the unsteady hold warning icon is
displayed to indicate that the picture may be blurry
if taken. You may want to use a tripod to steady the
camera.
Tips & Tricks The flash does not operate in the Movie mode
or Continuous or Auto Exp. capture modes.

To change the flash settings:
1 Turn the camera on. See “Turning on your camera” on page 13.
2 Turn the mode dial to one of the photography modes.
3 Press the button to select the Flash mode. Press the
button one or more times, until the icon for the setting you want
to use is displayed below the battery icon on the right corner of
the LCD:
[No icon] Auto Red-eye forced flash
Suppressed flash Forced flash
4 Compose the picture.
5 Focus the camera and take the picture. See “Setting the focus”
on page 26.
Tips & Tricks After the flash fires, it takes about 5 to 10 seconds
to recharge the flash for the next picture. As the
flash charges, the viewfinder LED turns orange.
When fully charged, the LED turns off.
Setting the picture size and quality
The camera resolution (picture size) and quality settings determine the
number of pixels (dimensions), picture file size, and compression
ratio for your pictures. These settings affect the number of pictures
that can be stored on a memory card. As you become more familiar
with your camera, we recommended that you try each resolution
and quality setting to understand the effects that these settings have
on your pictures.
Your camera has four resolution (picture size) settings:
■ 2816 x 2112 – approximately 6 megapixels
■ 2272 x 1704 – approximately 4 megapixels
■ 1600 x 1200 – approximately 2 megapixels
■ 640 x 480 – less than .5 megapixels
To learn more about the definition for megapixels, see the FAQ
“Q: What does the term megapixel mean?” on page 74.
Your camera has three picture quality settings:
■ Fine
■ Standard
■ Economy
29

Higher resolution and higher quality pictures offer the best
photographic quality but produce larger image file sizes. Because of
this, fewer pictures fit on a memory card. Use high resolution and
high quality settings for pictures that you plan to print and for
situations that require the finest detail.
Lower resolution and lower quality pictures take up less memory
space and may be quite suitable for sharing through e-mail, in a
report, or on a Web page.
Determining the number of pictures
The following table indicates the approximate number of still
pictures that can be stored on an SD memory card.
SD Memory Card/Number of Pictures
Resolution
(Size)
2816 × 2112 Fine 11 22 45 91 183
2272 × 1704 Fine 18 37 76 151 305
1600 × 1200 Fine 37 76 153 306 616
640 × 480 Fine 145 298 602 1200 2417
Quality 32 MB 64 MB 128 MB 256 MB 512 MB
Standard 18 38 77 154 311
Economy 34 70 142 283 571
Standard 30 61 124 247 498
Economy 59 121 244 487 981
Standard 59 121 244 487 981
Economy 118 242 489 975 1963
Standard 210 430 870 1734 3491
Economy 379 775 1566 3121 6284
To set the picture size and quality:
1 Turn the camera on. See “Turning on your camera” on page 13.
2 Turn the mode dial to one of the photography modes.
3 Press the Menu button. The Picture
menu opens.
4 Press the / buttons to highlight
Size, then press the Set button. The
picture size options are displayed.
5 Press the / buttons to highlight
the picture size option, then press the
Set button.
30

6 Press the / buttons to highlight Quality, then press the Set
button. The picture quality options are displayed.
7 Press the / buttons to highlight the picture quality option,
then press the
Set button.
8 Press the Menu button to exit the Menu mode.
Using the zoom feature
The optical zoom lets you take telephoto and wide-angle pictures.
You can also enlarge pictures as much as 3 times the normal size
using the optical zoom.
The digital zoom lets you take telephoto or enlarged pictures as
much as 13.2 times the normal picture enlargement. The camera
combines the 3x optical zoom with the 4.4x digital zoom to increase
the camera’s digital zoom capabilities.
For more information, see the FAQ “Q: What is the difference
between optical zoom and digital zoom?” on page 74.
Tips & Tricks When you use the zoom feature, the camera is
Tips & Tricks The more the picture subject is enlarged with the
Tips & Tricks The digital zoom feature is cancelled when the
more sensitive to camera movement. If the shutter
speed is too slow for a handheld picture, the
unsteady hold warning icon is displayed. You
may want to use a tripod to steady the camera.
digital zoom, the more pixelated (grainy) the image
is in the picture.
button is pressed and the LCD is turned off.
To use the optical zoom:
1 Turn the camera on. See “Turning on your camera” on page 13.
2 Turn the mode dial to one of the photography modes.
3 If the LCD is turned off, press the button to turn on the LCD.
Press the button one or more times, until
appears.
OSD full display
31

4 Press the buttons to
compose the picture:
■ Press the button to enlarge
the subject on the LCD for a
more close-up picture. The
zoom status meter indicates the
settings for the digital and
optical zoom.
Optical zoom:1x to 3x Digital zoom:1x to 4.4x
■ Press the button to reduce the subject on the LCD for a
wider angle picture.
Wide
zoom
Telephoto
zoom
5 Focus the camera and take the picture. See “Setting the focus”
on page 26.
To use the digital zoom:
1 Turn the camera on. See “Turning on your camera” on page 13.
2 Make sure that the camera is set to take digital zoom pictures.
See “Digital Zoom” on page 55.
3 Turn the mode dial to one of the photography modes.
4 If the LCD is turned off, press the button to turn on the LCD.
Press the button one or more times, until
appears.
OSD full display
32

5 Use the buttons to compose
the picture:
■ Press the button to enlarge
the subject on the LCD for a
more close-up picture. The
zoom status meter indicates the
settings for the digital and
optical zoom.
Optical zoom:1x to 3x Digital zoom:1x to 4.4x
■ Press the button to reduce the subject on the LCD for a
Wide
zoom
Telephoto
zoom
wider angle picture.
6 Focus the camera and take the picture. See “Setting the focus”
on page 26.
Using picture modes
Your camera includes a number of photography modes that let you
set preferences for taking pictures:
■ Auto mode lets your camera make all the correct settings for
your pictures. For more information, see “Taking pictures in the
Auto mode” on page 34.
■ Program mode (P) lets your camera automatically adjusts the
shutter speed and the aperture setting, then you can adjust other
camera settings. For more information, see “Taking pictures in the
Program mode” on page 34.
■ Shutter speed priority mode (Tv) lets you set the shutter speed
and the camera automatically sets the aperture value. For more
information, see “Taking pictures in the Shutter speed priority
mode” on page 35.
■ Aperture priority mode (Av), lets you set the aperture setting and
the camera automatically sets the shutter speed based. For more
information, see “Taking pictures in the Aperture priority mode”
on page 36.
■ Manual mode (M) lets you take full control of your camera to
customize your photography settings. For more information, see
“Taking pictures in the Manual mode” on page 37.
■ Scene mode automatically adjusts the camera settings for specific
types of photography scenes: Portrait mode
Night scene mode . For more information, see “Taking pictures
in a Scene mode” on page 38.
, Sports mode ,
33

Taking pictures in the Auto mode
The Auto mode lets your camera make all the correct settings
for your pictures. In Auto mode the shutter speed, aperture
setting, focus, flash (if required), white balance, and system metering
method are fully controlled by your camera. You compose the
pictures and let your camera take care of the rest.
To take pictures in the Auto mode :
1 Turn the camera on. See “Turning on your camera” on page 13.
2 Turn the mode dial to the Auto mode
photography mode.
3 Compose the picture.
4 Focus the camera and take the picture.
See “Setting the focus” on page 26.
Taking pictures in the Program mode
When you take pictures in the Program mode (P), the camera
automatically adjusts the shutter speed and the aperture setting
according to the brightness of the subject. Unlike the Auto mode
, you can manually change the white balance settings, the system
metering method, and exposure compensation.
To take pictures in the Program mode (P):
1 Turn the camera on. See “Turning on your camera” on page 13.
2 Turn the mode dial to the Program
mode (
P).
3 If required, set the white balance
settings. For more information, see
“White Balance” on page 56.
4 If required, set the system metering
method. For more information, see
“Metering” on page 57.
5 If required, set the system exposure compensation. For more
information, see “Lightening or darkening the overall picture
brightness” on page 46.
6 Compose the picture.
7 Focus the camera and take the picture. See “Setting the focus”
on page 26.
34

Taking pictures in the Shutter speed priority mode
When you take pictures in the Shutter speed priority mode (Tv), the
camera gives priority to the shutter speed. The camera automatically
sets the aperture value based on the shutter speed setting.
When you set the camera to a fast shutter speed, moving subjects
appear still in the picture.
When you set the camera to a slow shutter speed, moving subjects
appear in motion with a blurred effect in the picture.
To take pictures in the Shutter speed priority mode (Tv):
1 Turn the camera on. See “Turning on your camera” on page 13.
2 Turn the mode dial to the Shutter speed
priority mode (
3 Set the shutter speed from 8 seconds to
1/1500 of a second with the search dial:
■ Rotate the search dial in the
direction to select a faster shutter
speed or rotate the search dial in
the direction to select a slower
shutter speed. The shutter speed
and corresponding aperture
setting are displayed on the LCD.
■ If the aperture setting is
displayed in white, the
exposure setting is
correct for a picture.
■ If a combined aperture
and shutter speed setting
does not provide enough
light for a good picture
exposure, the aperture
setting is displayed in
red.
■ If the shutter speed
setting is too slow to take a handheld photograph without
blurring the picture, the unsteady hold warning icon is
displayed.
Tv).
Unsteady
hold
warning
Shutter
speed
Aperture
setting
35

4 Compose the picture.
5 Focus the camera and take the picture. See “Setting the focus”
on page 26.
Taking pictures in the Aperture priority mode
When you take pictures in the Aperture priority mode (Av), the
camera gives priority to the aperture setting. The camera
automatically sets the shutter speed based on the aperture setting.
When you set the camera to a small aperture (higher F-stop value),
pictures have a sharper focus in the foreground and background
(greater depth-of-field).
When you set the camera to a large aperture (smaller F-stop value),
pictures have sharper focus in the foreground and a more blurred
focus in the background (shallow depth-of-field).
To take pictures in the Aperture priority mode (Av):
1 Turn the camera on. See “Turning on your camera” on page 13.
2 Turn the mode dial to the Aperture
priority mode (
3 Set the aperture setting from F 2.8 to
F 6.7 with the search dial:
Av).
36
■ Rotate the search dial in the
direction to select a larger
aperture (F-stop value) (smaller
aperture setting) or rotate the
search dial in the direction to
select a smaller aperture (F-stop
value) (larger aperture setting).
The aperture value and
corresponding aperture setting are displayed on the LCD.

■ If the shutter speed value
is displayed in white the
exposure setting is
correct for a picture.
■ If the combined aperture
and shutter speed setting
does not provide enough
light for a good picture
exposure, the shutter
speed value is displayed
in red.
■ If the aperture setting is
Unsteady
hold
warning
Shutter
speed
Aperture
setting
too small, making the
shutter speed too slow to take a handheld photograph without
blurring the picture, the unsteady hold warning icon is
displayed.
4 Compose the picture.
5 Focus the camera and take the picture. See “Setting the focus”
on page 26.
Taking pictures in the Manual mode
Use the Manual mode (M) to set the camera shutter speed and
aperture to your preferences. In Manual mode (
control of your camera to customize your photography settings.
M), you take full
To take pictures in the Manual mode (M):
1 Turn the camera on. See “Turning on your camera” on page 13.
2 Turn the mode dial to the Manual mode (M).
3 Press the button to select the shutter speed or aperture setting.
The setting you select is displayed in blue.
4 Select the shutter speed or aperture setting with the search dial:
■ Rotate the search dial in the
direction to select a faster
shutter speed or larger aperture
value or rotate the search dial in
the direction to select a
37

slower shutter speed or smaller aperture value. The shutter
speed and corresponding aperture setting are displayed on the
LCD.
■ If the shutter speed or
aperture value is
displayed in white, the
exposure setting is
correct for a picture.
■ If the combined aperture
and shutter speed setting
does not provide enough
light for a good picture
exposure, the shutter
speed value is displayed
in red.
■ If the shutter speed is too
Unsteady
hold
warning
Shutter
speed
Aperture
setting
slow to take a handheld photograph without blurring the
picture, the unsteady hold warning icon is displayed.
5 Compose the picture.
6 Focus the camera and take the picture. See “Setting the focus”
on page 26.
Tips & Tricks 1/250th of a second is the maximum shutter speed
you can use in the flash photography mode.
Taking pictures in a Scene mode
You can set the camera to a Scene mode that automatically adjusts
the camera settings for specific types of photography scenes. The
camera has three Scene modes:
Icon Scene mode Description
Portrait Select this mode to take a picture with a subject shar ply
Sports Select this mode to take pictures of fast-moving subjects.
Night scene Select this mode to take pictures of subjects against a dusk
38
focused and the background slightly out of focus.
The Flash mode is turned on automatically in the Red-eye
reduction mode .
The flash does not operate in the Sports mode .
or night-time background. The Flash mode is turned on
automatically in the Forced flash mode .

To take pictures in the Scene mode:
1 Turn the camera on. See “Turning on your camera” on page 13.
2 Turn the mode dial to one of the photography Scene modes:
Portrait mode
, Sports mode , Night scene mode .
3 Compose the picture.
4 Focus the camera and take the picture. See “Setting the focus”
on page 26.
Using advanced viewing features
Use the Playback mode to view pictures and video clips in
full-screen view or view as many as nine thumbnail images on the
LCD. While viewing pictures, you can rotate the picture to change
the orientation and you can zoom in on a selected area of the
picture. You can also listen to voice memos if they were recorded
with a picture.
You can also view your pictures in an automated sequential slide
show.
To view images on the LCD:
1 Turn the camera on. See “Turning on your camera” on page 13.
2 Turn the mode dial to the Playback
mode
displayed on the LCD.
. The last image you took is
3 Rotate the search dial to move forward
or backwards through the images:
■ Rotate the search dial in the
direction to view the previous
frame or rotate the search dial in
the direction to view the next
frame.
Tips & Tricks When viewing pictures, you can also use the
/ navigation buttons to move forward or
backwards through the pictures.
39

Tips & Tricks When viewing pictures, you can press the
button to view detailed image information about
each picture. Press the button again to turn the
image information display off.
To rotate pictures on the LCD:
■ In the Playback mode :
■ Press the button to rotate the current
picture 90° counter-clockwise.
■ Press the button to rotate the current
picture 90° clockwise.
To view thumbnail images:
1 In the Playback mode , press the
button. The images are displayed as
thumbnail views.
2 Rotate the search dial in the / direction to
move forward or backwards through the images.
- OR -
Press the / / navigation buttons to
move forward, backwards, up, or down
through the pictures.
3 When you want to view a picture that you
highlighted with a green frame, press the
button.
To change the picture zoom view:
SET
1 In Playback mode , follow the instructions in “To view images
on the LCD:” on page 39 to navigate to a picture.
2 Adjust the zoom ratio with the and buttons:
40

■ Press the button once to display
the picture at 2x the normal size.
While in zoom view, the green frame
indicates what part of the picture
you are viewing.
■ Press the button twice to display
the picture at 4x the normal size.
While in zoom view, the green frame
indicates what part of the picture
you are viewing.
■ Press the / / navigation buttons to scroll side to side
and up or down through the picture.
■ Press the button once or twice to return the picture to the
normal viewing size.
Whole
picture
view
Current
picture
zoom view
To view pictures in an automatic slide show:
1 In Playback mode , press the Menu
button. The Play tab opens.
2 Press the / buttons to highlight
Slide Show, then press the Set button.
The slide show starts.
3 To stop the slide show, press the Set
button.
Recording and adding voice memos to a picture
You can record as much as a 30 second audio memo with each
picture. If you turn on the voice memo feature, immediately after
you take a picture you can add your voice memo. You can also record
a voice memo with a picture when you are viewing pictures in the
Playback mode .
To record a voice memo with a picture:
1 Turn the camera on. See “Turning on
your camera” on page 13.
2 Turn the mode dial to one of the
photography modes.
3 Press the Menu button. The Picture
menu opens.
41

4 Press the navigation button to
highlight the Function tab.
5 Press the navigation button to
highlight
Set button. The Voice Memo options
are displayed.
Voice Memo, then press the
6 Press the / buttons to highlight
On, then press the Set button. The Voice Memo option turns on.
7 Press the Menu button to exit the menu.
Tips & Tricks After the Voice Memo option is turned on, the
camera records voice memos after each picture. To
stop each voice recording, press the shutter button.
To turn off the Voice Memo feature, repeat this
procedure and highlight OFF.
To add a voice memo to a picture in Playback mode:
1 While viewing pictures in the
Playback mode , press the
shutter button down all the way to
start the voice memo recording, the
recording starts.
2 Press the shutter button down
again. The recording stops.
Listening to a voice memo
You can listen to voice memos while viewing pictures.
To listen to an audio memo recorded with a picture:
■ In the Playback mode , a Mic icon is displayed with each
picture that includes a voice memo. Press the
the voice memo.
42
Set button to play

Deleting images
You can delete the last image you took in the Playback mode .
To delete images in the Playback mode:
1 Turn the camera on. See “Turning on your camera” on page 13.
2 Turn the mode dial to the Playback
mode
displayed on the LCD.
3 Select the image that you want to
delete. For more information, see “To
view images on the LCD:” on page 39.
4 Press the button. The Delete
menu opens.
5 Press the / buttons to highlight
one of the options, then press
■ Single selects the image you are
currently viewing in the Playback
mode .
■ All selects all of the images on the memory card.
■ Select lets you choose the image you want to delete from the
thumbnail view.
6 Press the Set button. A message asks if you want to Cancel or
Execute.
. The last image you took is
SET.
7 Press the / buttons to highlight Execute, then press the Set
button. The image is deleted.
43

Using advanced features
Using the self-timer
You can use the camera’s self-timer button to set a delay time
before a picture is taken. You can also set the camera to take pictures
in intervals to create a time-lapsed series of pictures.
The camera has four self-timer modes:
Icon Self-timer
mode
Description
10
seconds
2 seconds Use this setting to prevent blurring that can result when the
10 + 2
seconds
Interval Use this setting to take a time-lapsed series of pictures.
Use this setting to take group pictures. Select this mode to
take a picture about 10 seconds after the shutter button is
pressed.
camera is moved while pressing the shutter button. Select
this mode to take a picture about 2 seconds after the shutter
button is pressed.
Use this setting to take group pictures in succession. Select
this mode to take a picture about 10 seconds after the
shutter button is pressed. Following the first picture, the
camera prepares to take another picture and recharges the
flash if required. A second picture is taken about 2 seconds
after the camera is ready to take the picture.
Select this mode to take pictures in
number of picture cycles
The picture fixed interval can be set to 1, 3, 10, or 60
minutes. The number of picture cycles can be set from 2
to 99.
During the time between the fixed intervals, the red
viewfinder LED flashes and the camera turns off.
Note: For more information about setting the fixed intervals
and number of picture cycles, see “Interval/Count” on
page 56.
.
fixed intervals
and
44

To set the self-timer:
1 Turn the camera on. See “Turning on your camera” on page 13.
2 Turn the mode dial to one of the photography
modes.
3 Press the button to select the Self-timer
mode. Press the Self-timer button one or
more times, until the icon for the self-timer
setting you want to use is displayed.
■ The Self-timer mode selection sequence is:
Off 10 seconds 2 seconds
Interval 10 + 2 seconds
■ The Movie mode and Continuous or Auto Exp. mode
selection sequence is:
Off 10 seconds 2 seconds
4 Compose the picture.
5 Focus the camera and take the picture. See “Setting the focus”
on page 26. The self-timer LED flashes, the timer countdown is
displayed on the LCD, and the picture is taken after the preset
time has elapsed.
Tips & Tricks To cancel the self-timer after it has already started,
press the SET button.
Adding printing information on the SD memory card
Digital Print Order Format (DPOF) lets you embed printing
information on your memory card. You can select the pictures and
the number of prints to make in the camera’s DPOF menu. When
you insert the memory card into a DPOF compatible printer, the
printer automatically prints the pictures you selected in the DPOF
menu.
Tips & Tricks Make sure that you have the Date and Time set
correctly, so the correct date and time print on the
pictures that you select to print with dates and
times.
45

To select images for printing on a DPOF enabled printer:
1 Turn the camera on. See “Turning on your camera” on page 13.
2 Turn the mode dial to the Playback
mode
displayed on the LCD.
. The last image you took is
3 View the image that you want to print
with the camera’s DPOF feature. For
more information, see “To view images
on the LCD:” on page 39.
4 Press the Menu button. The Playback
menu opens.
5 Press the navigation button to
highlight
button. The DPOF options are
displayed:
■ Single selects the image you are
currently viewing in the Playback mode.
■ All selects all of the images on the memory card.
DPOF, then press the Set
6 Press the / buttons to highlight
Print Num., then press the Set button.
Select the number of copies to print
with the / buttons, then press
Set button. You can set as many
the
as nine prints for each image.
7 Press the / buttons to highlight
Date, then press the Set button. Select
whether to have the date print on the pictures with the /
buttons, then press the
Set button.
8 Press the / buttons to highlight Print Enable, then press the Set
button.
9 Press the / buttons to highlight Execute, then press the Set
button. When you insert the memory card into a DPOF printer,
the DPOF information is sent to your printer and your pictures
print.
Lightening or darkening the overall picture brightness
The Exposure compensation/Backlight correction feature lets
you lighten or darken the overall picture brightness.
46

Use Exposure compensation/Backlight correction settings when the
difference in brightness between the subject and the background
subject is not well balanced. Also use this feature when the subject
occupies only a small part of the picture composition and the
contrast between the subject and the rest of the picture varies
significantly.
Use Positive compensation (0 to +2.0) when taking pictures of:
■ High contrast printed text, for example, black text on white
paper.
■ Subjects with a strong backlight, for example, people on the
beach with the sun behind them.
■ Very bright scenes, for example, a snow field with people in
the picture.
Use Negative compensation (0 to -2.0) when taking pictures of:
■ High contrast printed text, for example, white text on black
paper.
■ Subjects illuminated by a bright light, for example, an actress
under a spotlight against a dark background.
■ Weak light reflecting subjects, for example, an evergreen tree
forest.
Use Backlight correction compensation (+1.3 fixed) when taking
pictures of:
■ Subjects with a strong backlight, for example, people on the
beach with the sun behind them.
To use the exposure compensation/backlight correction feature:
1 Turn the camera on. See “Turning on your camera” on page 13.
2 Turn set the Backlight correction compensation , turn the
mode dial to the Auto mode
priority mode
Sports mode
Tv, Aperture priority mode Av, Portrait mode , or
.
- OR -
Turn set the Exposure compensation , turn the mode dial to
the Program mode
priority mode
P, Shutter speed priority mode Tv, or Aperture
Av.
, Program mode P, Shutter speed
47
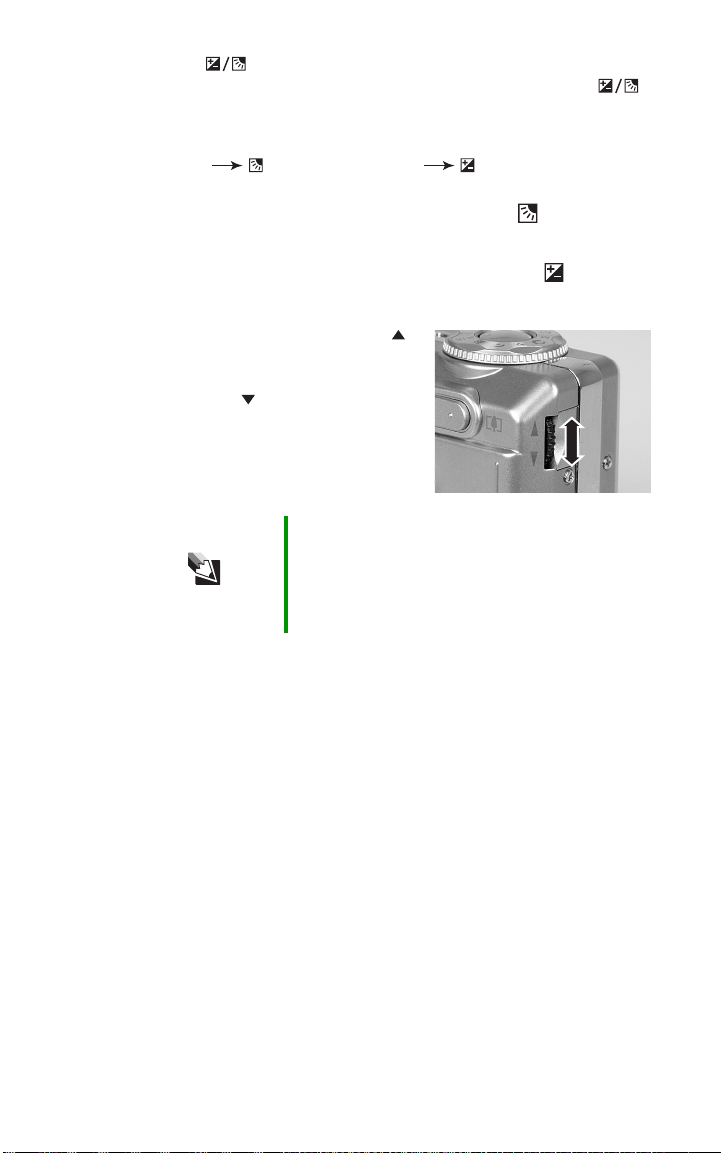
3 Press the button to select one of the Exposure
compensation or Backlight correction modes. Press the
button one or more times, until the icon for the exposure
compensation/backlight setting you want to use is displayed:
[No icon] Auto Backlight correction Exposure compensation
4 If you selected the Backlight correction mode , then go to
Step 6.
5 If you selected the Exposure compensation mode , select the
exposure value with the search dial:
■ Rotate the search dial in the
direction to decrease (darken)
the value or rotate the search
dial in the direction to
increase (lighten) the value.
Tips & Tricks The Exposure compensation setting ranges from
-2.0 EV to +2.0 EV. 0 EV is the default setting. The
larger the value, the brighter the overall image. The
smaller the value, the darker the overall image. The
currently selected value is displayed on the LCD.
6 Compose the picture.
7 Focus the camera and take the picture. See “Setting the focus”
on page 26.
48
Protecting files on your SD memory card
You can “lock” your memory card so images (files) on the card are
read-only and cannot be deleted. Use this mode if you want to
prevent erasing important images by mistake.
Important The image protection does not protect your
memory card if you format the SD memory
card.
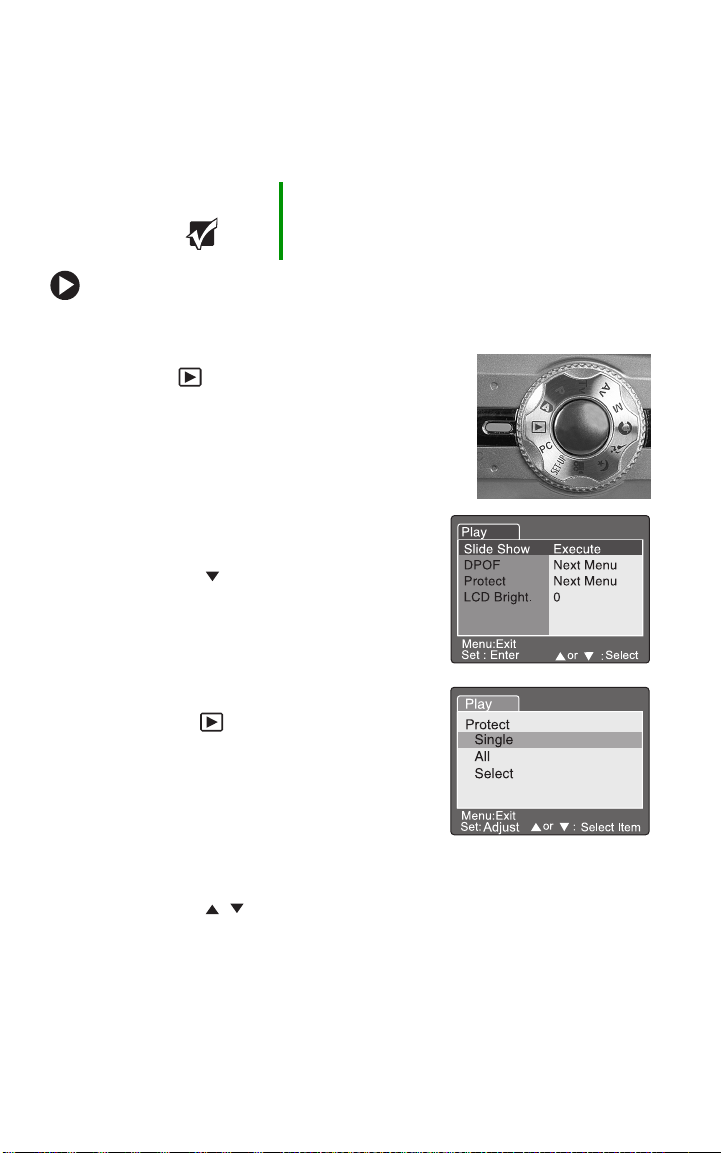
To protect images:
1 Turn the camera on. See “Turning on your camera” on page 13.
2 Turn the mode dial to the Playback
mode
displayed on the LCD.
. The last image you took is
3 Select the image that you want to
protect. For more information, see
“Protect” on page 58.
4 Press the Menu button. The Playback
menu opens.
5 Press the navigation button to
highlight
button. The Protect options are
displayed:
■ Single protects the image you are
currently viewing in the Playback
mode .
■ All protects all of the images on
the memory card.
■ Select provides a thumbnail view
of the images on the memory
card. You can choose the image
you want to protect.
Protect, then press the Set
6 Press the / buttons to highlight one of the Protect options.
The Protect confirmation options are displayed.
49

7 If you highlighted the Single or All option, press the / buttons
to highlight
indicates the image is locked.
- OR -
Set, then press the Set button. The Locked mode icon
If you highlighted the
navigation buttons to select a picture thumbnail view, then press
the button. The Locked mode icon indicates the image is
locked. You can select additional thumbnail pictures to protect
while in this mode.
Select option, press the / /
To cancel image protection:
1 Turn the camera on. See “Turning on your camera” on page 13.
2 Turn the mode dial to the Playback
mode
displayed on the LCD.
. The last image you took is
3 Select the image that you want to cancel
protection for. For more information,
see “Protect” on page 58.
4 Press the Menu button. The Playback
menu opens.
5 Press the navigation button to
highlight
button. The Protect options are
displayed:
■ Single unprotects the image you
are currently viewing in the
Playback mode .
■ All unprotects all of the images on
the memory card.
■ Select provides a thumbnail view
of the images on the memory
card. You can choose the image
you want to unprotect.
Protect, then press the Set
6 Press the / buttons to highlight one of the Protect options.
The Protect confirmation options are displayed.
50

7 If you highlighted the Single or All option, press the / buttons
to highlight
unlocked image is displayed without the Locked mode icon .
- OR -
Cancel Protection, then press the Set button. The
If you highlighted the
navigation buttons to select a picture thumbnail view, then press
the button. The Locked mode icon turns off to indicate
the image is unlocked. You can select additional thumbnail
pictures to cancel image protection while in this mode.
Select option, press the / /
Formatting SD memory cards
You can use an SD memory card as large as 512 MB for more image
file storage capacity. The SD memory card that came with your
camera has already been formatted.
If you purchase an additional memory card, make sure that you
format the card so that it works correctly with your camera.
To format an SD memory card:
1 Press and release the Power button on the top of your camera to
turn off the camera.
2 Install a new SD memory card or memory card that has
information you want to completely erase. For more
information, see “To install an SD memory card:” on page 12.
3 Turn the camera on. See “Turning on your camera” on page 13.
4 Turn the mode dial to SET-UP. The
Basic tab opens on the LCD.
5 Press the / buttons to highlight
Format, then press the Set button. The
Format SD Card menu opens.
Caution Formatting the memory card deletes all information
stored on the card. Before formatting your memory
card, make sure that you copy all important image
files from the card to your computer.
51

6 Press the / buttons to highlight
Execute, then press the Set button. An
OK message appears to indicate that
the memory card is formatted.
Using the Setup menus
Your camera features Setup menus that
lets you adjust, optimize, and change
preset camera settings to your own customized preferences. After you
adjust the settings, the changes are saved so the next time you use
your camera they will continue to be in effect.
There are three types of Setup menus:
■ Photography menus. Use these menus when
a Photography mode is selected and
you want to change the settings
associated with taking pictures (Pictures
tab), change other photography
functions (Function tab), and change
settings for the auto exposure and auto
white balance (AE/AWB tab). The AE/
AWB tab is not available in the Auto mode . For more
information, see “To use the Setup menu in Photography mode:”
on page 53.
■ Playback menu. Use this menu when the
Playback mode is selected and you
want to change the settings associated
with the Play tab such as viewing
images, printing your pictures on a
Digital Print Order Format (DPOF
option) compatible printer, protecting
image files from being erased, and
setting the LCD brightness. For more information, see “To use the
Setup menu in Playback mode:” on page 58.
■ SET-UP menus. Use these menus when
the
SET-UP mode is selected and you
want to change the settings related to
the camera’s basic settings (Basic tab),
such as formatting the SD memory
card and custom settings (Custom tab),
such as restoring default settings. For
more information, see “To use the
Setup menu in SET-UP mode:” on page 59.
52

To use the Setup menu in Photography mode:
1 Turn the camera on. See “Turning on your camera” on page 13.
2 Turn the mode dial to one of the photography modes
3 Press the Menu button. The Picture
menu opens.
4 Press the / / navigation buttons
to select menus and menu options.
5 Press the Set button to adjust and select
menu options.
6 Press the Menu button to exit the Setup menu.
Setup menu Description
Photography menu/Picture tab
Size
Sets the desired image size for pictures.
2816 x 2112 – approximately 6 megapixels
2272 x 1704 – approximately 4 megapixels
1600 x 1200 – approximately 2 megapixels
640 x 480 – less than .5 megapixels
Note: The Movie mode captures at 320 x 240
pixels.
Quality
Sets the quality (compression rate) for pictures.
Fine – Low compression rate
Standard – Normal compression rate
Economy – High compression rate
Note: The Economy mode is not available for the
Movie mode .
Sharpness
Sets the picture sharpness (clarity).
Hard – Hard touch
Normal – Normal touch
Soft – Soft touch
Note: The Sharpness feature is not available for
the Movie mode .
53

Setup menu Description
Contrast
Sets the difference between bright and dark areas
of pictures.
Hard – Increases contrast
Normal – Sets contrast automatically
Soft – Decreases the contrast
Color
Sets the color preferences for pictures.
Standard – Standard color
Vivid – Bright color
Sepia – Brown-toned color
Monochrome – Black and white
Photography menu/
Function tab
Capture Mode
Sets how the camera records pictures.
Single – Sets the camera to take 1 picture each
time you press the shutter button.
Continuous – Sets the camera to take as many
as 5 consecutive pictures each time you press the
shutter button. The fastest interval between
pictures is 0.62 seconds.
Note: When taking pictures in the Continuous
mode, press and hold the shutter button until 5
pictures have be taken. If you release the shutter
sooner, the continuous photography will end.
Auto Exp. – Sets the camera to take 3
consecutive pictures at 3 levels of exposure
compensation: standard (0), underexposure (-
0.67), and overexposure (+0.67).
Voice Memo
Sets the camera to record a voice memo for as
long as 30 seconds after you have taken a picture
or when reviewing pictures in the Playback mode
.
ON – Turns on voice memo.
OFF – Turns off voice memo.
Note: When the Voice Memo mode is ON,
immediately after you take a picture, the picture
preview is displayed and the memo recording
starts. Speak toward the camera mic on the top
of the camera, then press the shutter button to
stop the recording.
54

Setup menu Description
LCD Brightness
Sets the LCD brightness level. The LCD
brightness adjustments range from -5 to +5.
Press the button to brighten the LCD.
Press the
Digital Zoom
Sets the camera to take digital zoom pictures as
much as 4 times the optical zoom capabilities.
ON – Turns on digital zoom photography (default).
OFF – Turns off digital zoom photography.
Preview
Sets the camera to display the picture on the LCD
immediately after the picture is taken. To cancel
preview, press the shutter button half way down.
ON – Displays the picture for 2 seconds after it is
taken (default).
OFF – Turns off the picture preview feature.
Note: When the Preview mode is ON, the voice
memo option is turned off.
Date Print
Sets the camera to display the date the picture
was taken on the picture. The option must be
activated before the picture is taken.
ON – Imprints the current date on pictures when
they are taken.
OFF – Turns off imprinting.
button to darken the LCD.
55

Setup menu Description
Interval/Count
Sets the camera to automatically take pictures at
a fixed time interval for a set number of cycles.
Press the /
settings.
1 Min. – Records pictures in 1 minute intervals.
3 Min. – Records pictures in 3 minute intervals.
10 Min. – Records pictures in 10 minute intervals.
60 Min. – Records pictures in 60 minute intervals.
You can select from 2 to 99 picture cycles. For
more information, see “Using the self-timer” on
page 44.
Important: The number of interval pictures you can
take is limited to the capacity of your memory card.
Note: During the time between the fixed intervals,
the red viewfinder LED flashes and the camera
turns off.
Photography menu/
AE/AWB tab
White Balance
Sets the camera white balance by averaging the
various types of light entering the camera lens.
The white balance can be set to automatically set
the white balance or you can set it manually,
based on the lighting environment. Press the
/ buttons to change the interval settings.
Auto – Sets the white balance automatically.
Incandescent – Sets the white balance for
incandescent lighting.
Fluorescent 1 – Sets the white balance for
fluorescent lighting with a bluish cast.
Fluorescent 2 – Sets the white balance for
fluorescent lighting with a reddish cast.
Day Light – Sets the white balance for daylight
(outdoor) lighting.
Cloudy – Sets the white balance for cloudy sky
lighting.
Manual – Sets the white balance manually.
Note: This menu is not available in the
Auto mode
buttons to change the interval
or Movie mode .
56

Setup menu Description
Metering
Sets the camera light metering method for
calculating the exposure.
Multi – Measures the entire image area to
calculate the picture exposure.
Spot – Measures a small portion of the center of
the image area to calculate the picture exposure.
ISO
Sets the camera’s sensitivity to the lighting
conditions. The settings range from ISO 50 to
ISO 200. The higher the ISO setting, the more
sensitive the camera is to lighting conditions. For
example, in dark lighting conditions ISO 200 is
more sensitive than ISO 50. A higher ISO setting,
however, renders a more pixelated (grainy)
picture.
50 – Sets the ISO setting to the equivalent of
ISO 50 (normal).
100 – Sets the ISO setting to the equivalent of
ISO 100 (sensitive setting).
200 – Sets the ISO setting to the equivalent of
ISO 200 (high sensitivity setting).
Auto – Sets the ISO setting automatically in the
range of ISO 50 to ISO 200. This option is only
available in the P mode.
Note: The ISO is automatically set for modes: Auto
mode , Portrait mode
Night scene mode , or Movie mode .
Manual WB
Lets you set the camera white balance manually.
To set the white balance, select the Manual WB
option, then compose a picture in the location you
plan to take pictures. Point the camera toward a
white object, such as white paper, positioned
inside the blue box area on the LCD. Press the
buttons to highlight Execute, then press SET
/
to set the manual WB setting.
Cancel – Turns off manual white balance.
Execute – Turns on manual white balance.
, Sports mode ,
57

To use the Setup menu in Playback mode:
1 Turn the camera on. See “Turning on
your camera” on page 13.
2 Turn the mode dial to the Playback
mode
displayed on the LCD.
. The last image you took is
3 Press the Menu button. The Play tab
opens.
4 Press the / navigation buttons to
select menus and menu options.
5 Press the Set button to adjust and
select menu options.
6 Press the Menu button to exit the Setup menu.
Setup menu Description
Playback menu/Play tab Slide Show
Sets the camera to automatically play pictures, in
order, one image at a time. For more information
about playing a slide show, see “To view pictures
in an automatic slide show:” on page 41.
58
DPOF
Sets the camera to embed printing information on
your SD memory card and print your pictures on a
Digital Print Order Format (DPOF) compatible
printer by inserting the SD card into the printer. For
more information about using the DPOF mode, see
“Deleting images” on page 43.
Protect
Sets the camera to “lock” your memory card so
images (files) on the card are read-only and cannot
be deleted. Use this mode if you want to prevent
erasing important images by mistake. For more
information, see “Protecting files on your SD
memory card” on page 49.

Setup menu Description
LCD Bright.
Sets the camera LCD brightness.This function does
not adjust the brightness of recorded images. For
more information, see “LCD Brightness” on page 55.
To use the Setup menu in SET-UP mode:
1 Turn the camera on. See “Turning on
your camera” on page 13.
2 Turn the mode dial to the SET-UP mode.
The Basic tab opens.
3 Press the / / navigation
buttons to select menus and menu
options.
4 Press the Set button to adjust and
select menu options.
5 Change the mode dial to another
setting to close the
SET-UP menu.
59

Setup menu Description
SET-UP menu/Basic tab
Card Info.
Provides information about the memory card size
and the remaining available memory on the memory
card.
Fr. No. Reset
Sets the camera to record pictures to a newly
created folder starting with 0001.
Cancel – Does not reset the file number.
Execute – Resets the file number and creates a
new folder.
Format
This function erases all images and reformats the
SD memory card in your camera. Protected images
are also erased. The memory card cannot be
formatted if the write-protect tab is set to lock.
Cancel – Does not format the memory card.
Execute – Formats the memory card.
60
Sound
Turns sound recorded with voice memo and video
clips on or off.
ON – Turns on sound.
OFF – Turns off sound.
Beep
Turns camera beep sounds on or off.
ON – Turns on sound.
OFF – Turns off sound.

Setup menu Description
Auto Off
Turns off the camera after it has not been used for
a specified period of time. This feature saves battery
power and reduces battery wear.
1 Min. – Turns camera off after 1 minute of inactivity.
2 Min. – Turns camera off after 2 minutes of
inactivity.
3 Min. – Turns camera off after 3 minutes of
inactivity.
Note: Auto Off does not operate during a slide show
or while the camera is connected to a computer and
while it is in SET-UP mode.
SET-UP menu/Custom tab Date/Time
Sets the date and time. For more information, see
“Setting the date and time” on page 14.
Sys. Reset
Sets all of the camera’s basic settings back to the
default settings. The time setting will not be reset.
Cancel – Does not return to default settings.
Execute – Returns the camera to default settings.
Language
Sets the language that is displayed on the LCD.
English – English
Français – French
Deutsch – German
Español – Spanish
Italiano – Italian
– Chinese (Traditional)
– Chinese (Simplified)
61

Setup menu Description
Video Output
Sets the video output format for the video equipment
you are going to connect the camera to.
NTSC – National Television System Committee
(NTSC) system (used in North America)
PAL – Phase Alternating Line (PAL) system (used
in most European countries)
System Info.
Displays the firmware version installed on the
camera.
62

Connecting your camera
You can share pictures and video clips with your family and friends
by:
■ Connecting your camera to your computer and transferring the
image files to your computer.
■ Connecting your camera to a TV to display pictures directly from
your camera on the TV.
Installing software
Before you connect your camera to your computer to transfer image
files, install the SimpleStar PhotoShow image editing software from
the Gateway DC-T60 Digital Camera software CD.
If you use Windows 98SE as the operating system on your computer,
install the Windows 98SE USB driver from the Gateway DC-T60
Digital Camera software CD. Windows XP, Windows 2000, and
Windows ME operating systems do not require additional USB driver
software.
To install SimpleStar PhotoShow:
1 Insert the Gateway DC-T60 CD into your computer’s CD drive.
The user options are displayed.
2 Click Install SimpleStar PhotoShow, then follow the on-screen
instructions.
To install the Windows 98SE USB driver:
1 Insert the Gateway DC-T60 CD into your computer’s CD drive.
The user options are displayed.
2 Click Install Windows 98SE Driver, then follow the on-screen
instructions.
Connecting to your computer and transferring files
When you connect your camera to your computer and transfer
image files to your computer, you can share them with family and
friends through e-mail, on a Web site, or on prints.
If your computer uses Windows 98SE, before connecting your
camera to your computer, make sure that you install the
Windows 98SE USB driver. For more information, see “Installing
63

software” on page 63. Windows XP, Windows 2000, and
Windows ME operating systems do not require additional driver
software.
Tips & Tricks If you have purchased an SD memory card
reader, you can also transfer pictures and
move clips from the SD memory card from
the camera with a card reader.
To connect and transfer files from your camera to your computer using
SimpleStar PhotoShow*:
1 If you are using Windows 98SE, make sure that you have installed
the USB device driver for the camera. For more information, see
“To install the Windows 98SE USB driver:” on page 63.
Important Windows XP, Windows 2000, or Windows ME
operating systems do not require additional driver
software.
2 Make sure that you have installed the SimpleStar PhotoShow
program to help transfer your image files from your camera to
your computer. For more information, see “To install SimpleStar
PhotoShow:” on page 63.
*SimpleStar PhotoShow is compatible with Windows based operating systems only.
Tips & Tricks In addition to using the SimpleStar PhotoShow
program, you can also transfer image files from
your camera to your computer using Windows My
Computer. For more information, see “To transfer
files from your camera to your computer using My
Computer:” on page 66.
- OR -
If you are using Windows XP and the SimpleStar
PhotoShow program is not installed, the
Removable Disk
connect your camera and provides options to copy
pictures to a folder on your computer, view a slide
show, open folders on your camera with Windows
Explorer, and other options.
dialog box opens when you
64

3 Connect the small square end of the USB cable to the camera’s
A/V Out port, then connect the other end of the cable to your
computer.
4 Turn the camera on. A message tells you that new hardware was
found.
5 Turn the mode dial to PC mode. A
message tells you that new pictures
have been detected on a removable
drive.
6 Click Yes , then follow the on-screen instructions to manage and
edit your image files with SimpleStar PhotoShow.
65

To transfer files from your camera to your computer using My
Computer:
1 If you are using Windows 98SE, make sure that you have
installed the USB device driver for the camera. For more
information, see “To install the Windows 98SE USB driver:” on
page 63.
2 Connect the small rectangular end of the USB cable to the
camera’s
A/V Out port, then connect the other end of the cable to your
computer.
3 Turn the camera on. A message tells you that new hardware was
found.
4 Turn the mode dial to PC mode. A
message tells you that new pictures
have been detected on a removable
drive.
66

5 Click Start, My Computer. The My Computer window opens and the
camera appears as a Removable Disk drive (drive letter E: or
higher).
6 Double-click the camera’s drive letter, double-click the
DCIM folder, then double-click a sub-folder. The folder opens.
67

7 C lick the f ile o r fol der y ou wa nt t o cop y (pr ess a nd ho ld th e CTRL
SHIFT button when you click to select multiple files or folders),
or
then right-click your selection. A menu opens.
8 Click Copy.
9 Open the destination folder where you want to copy your
pictures. For example, in Windows XP, click
open the My Pictures folder.
Start, My Pictures to
68
Tips & Tricks Folder names vary depending on the operating
system you are using. You may want to create a
new folder to copy your files to your computer. Make
sure you make note of the folder name and location
so you can easily navigate to the image files later.

10 Right-click inside the destination folder. A menu opens.
11 Click Paste. A copy of the file or folder appears in the new folder
location.
Connecting to your TV and viewing pictures
You can connect your camera to a TV to view the pictures that are
on your camera’s memory card. To connect the camera to your TV
to view pictures and video clips, your TV must have an RCA type
Video In port and an RCA type Audio In port.
Important Use this feature with TVs that support NTSC or PAL
video signals only. If you use a PAL TV, the images
will have a black border around them.
To view pictures on a TV display:
1 Connect the small square end of the
A/V cable to the camera’s A/V Out port.
69

2 Connect the A/V cable’s yellow RCA
type connector to the yellow Video In
jack on your TV.
3 Connect the A/V cable’s white RCA
type connector to the white Audio In
jack on your TV.
4 Tu rn the camera on.
5 Turn the mode dial to the Playback mode .
6 Use the same controls on the camera to view images on a TV as
you use to view pictures and video clips on the camera’s LCD.
For more information about viewing images, see “Viewing
pictures on the LCD” on page 16.
70

Frequently Asked Questions (FAQs)
Battery
Q: How can I get better battery performance for my digital camera?
A: When your battery power is low, avoid using the camera functions
that consume the most power. Store and use your batteries at the
optimum temperature. Take advantage of external power sources
when you can.
In addition:
■ Keep at least two batteries: one in the camera and one charging
or in reserve for when you need to swap them out.
■ Use rechargeable Lithium-ion batteries in your Gateway DC-T60
camera. Rechargeable batteries often get up to two times as many
pictures on a fresh charge, so make sure your batteries are fully
charged before taking a lot of pictures.
■ Avoid using the camera’s LCD when you want to extend the
battery life. Using the LCD consumes the most battery power, so
turn off the LCD and use the viewfinder to take pictures. For more
information, see “To use the viewfinder to take pictures:” on
page 21.
■ Use the camera’s AC power adapter to view your pictures on the
camera without using the battery power.
■ Avoid operating the zoom lens. Using the zoom lens forces the
lens to extend and retract with each power cycle. Set the camera’s
Auto Off mode to a longer time setting. A better power
conservation strategy is to leave the camera on when you are
taking pictures within a few minutes of each other. For more
information about changing the Auto Off time setting in the
Setup menu’s Basic tab, see “Auto Off” on page 61.
■ Avoid using the flash when possible.
■ Use your camera and batteries as close to room temperature as you
can. Colder temperatures tend to drain the battery power more
quickly.
■ Store spare batteries that are charged in the coolest place you can
find (at or above freezing), but be sure to bring cold batteries back
up to room temperature before using them in the camera.
■ Use an external card reader to transfer image files from your
camera to your computer if possible. This method of file transfer
will let you manage image files without turning the camera on.
71

Using
Q: Why can I not take or delete pictures with the SD memory card
in the locked position?
A: When the SD memory card is in the locked position, it protects
the images on the card. You cannot delete files from or add files to
the SD memory card until you slide the lock switch on the card to
the unlock position.
Q: Why is there a delay when taking a picture with my digital
camera?
A: There is a delay while the digital camera auto focuses on the
subject. The camera also analyzes whether the flash is required and
changes other automatic settings. There are other factors that can
contribute to this delay. For example, low batteries may cause the
camera to operate slower, or the subject may be moving.
Some steps to help shorten the time delay are:
■ Steady the camera
■ Gently press the shutter button half way down to auto focus the
subject. This activates the auto focus and checks the condition of
the flash. When your subject is ready, take the picture.
Q: Why is there a delay before I can take another picture after I push
the shutter button?
A: There are several reasons for the delay. The camera must:
■ Set the focus, exposure time, white balance, and other settings.
■ Charge the charged-coupled device (CCD) imager. The camera
cannot hold th e char ge for long, so i t does it rig ht before you snap
the picture.
■ Copy the image out of the CCD into random access memory
(RAM).
■ Compress the image into a smaller, more memory-space efficient
format, such as .JPG.
■ Write the image to the SD memory card.
72

Q: What are troubleshooting steps for Windows USB connection
issues?
A: Usually setting up a digital camera on a computer is simple: plug
the camera in, let the computer install the device driver, and use the
computer. However, sometimes the USB connection does not work.
Review the following information to help solve the typical USB
connection problems:
■ Is my memory card compatible with my camera?
A large number of problems are caused by incompatible memory
cards. In many cases the memory cards work while taking pictures,
but fail to download files from the camera to the computer. To
avoid this problem, format new SD memory cards to ensure that
they will be compatible with your camera. For more information
about formatting an SD memory card, see “To format an
SD memory card:” on page 51.
■ Does the LCD go dark after being connected for 2 seconds?
If the Found New Hardware wizard does not appear on the
computer display, then check to see if the camera’s LCD is on and
the camera is in the
is in
PC mode, then you may have a bad USB cable or a faulty
PC mode. If the LCD is on and the camera
camera or computer USB port.
■ Does the New Hardware Wizard start?
Windows XP, Windows 2000, and Windows Me operating
systems should automatically recognize a new camera connected
to the USB port and use the Microsoft Mass Storage driver to
communicate with it. If you connect the camera and a Found New
Hardware wizard opens, select the option to let the computer
auto-search for the drivers, then click
Next. The wizard completes
the driver installation (computers with Windows 98SE require
that you install a USB driver to operate your Gateway camera).
Q: The lens on the camera is stuck and will not retract. What should
I do?
A: This could be related to a low battery charge. Make sure that the
battery is fully charged, try a new battery, or use the AC power
adapter if available.
Q: Can I use my AC adapter for the DC-T60 camera in other
countries?
A: The AC adapter (US type) accepts voltages between 100 to
240 volts, 50/60 Hz. However, it requires an adapter that is
compatible with outlets used in the country you are visiting.
73

Q: What picture resolution do I need to print a 4 x 6 inch photo
print? What about 8 x 10 inch prints?
A:
Print Size Minimum picture
Megapixels needed
resolution needed
4 x 6 1024 x 768 Less than 1 megapixel
5 x 7 1280 x 960 1
8 x 10 1600 x 1200 2 or more
Larger than
8x10
Q: Should I have any concerns about putting my digital camera
2048 x 1536 or more 3
through the X-ray machines at the airport?
A: No, there is no evidence that putting your camera through an
X-ray machine causes any harm.
Te rm s
Q: What is an SD memory card?
A: The SD Card is a highly secure stamp-sized flash memory card that
has a fast data transfer rate and consumes very little battery power.
The SD card can be used in a variety of digital products such as digital
music players, cellular phones, handheld PCs (HPCs), digital
cameras, digital video camcorders, smart phones, car navigation
systems, and electronic books.
Q: What is the difference between optical zoom and digital zoom?
A: Optical zoom is similar to the zoom feature that you find in a
regular 35mm camera. When you press the button to zoom in or
out, the physical lens elements move inside the camera to achieve
the desired effect.
The digital zoom does not have moving parts. Instead it uses the
camera’s “electronic brain” to digitally magnify the optical image.
This digital magnification causes the image to be more pixelated
(grainy picture) than the same image taken with an optical zoom.
Q: What does the term megapixel mean?
A: A pixel is a small square of visual information that makes up an
image on your computer screen. When all of the pixels are displayed
side-by-side, they make up the complete picture that you see on the
screen.
For example, a 17-inch computer monitor that has a resolution of
1,280 pixels wide by 1,024 pixels tall makes up an image on your
74

computer display. Similarly, a digital camera's CCD has a certain
number of pixels that it is capable of capturing. The pixels are then
stored on the camera’s memory card and later transferred to your
computer. A camera with 1,000,000 pixels is a one megapixel
camera.
Q: What does CCD mean?
A: CCD is the acronym for charged-coupled device. The image sensor
separates the spectrum of color into red, green, and blue so the
camera can digitally process the image.
75

Contacting Gateway
Internet support
For camera hardware support and information, go to the Gateway
Support Web site at support.gateway.com
For camera software support for SimpleStar PhotoShow, go to the
SimpleStar Web site at simplestar.com
Telephone support
Talk to a Gateway Technical Support representative about a
non-tutorial technical support question at 1-888-737-6949.
If you need tutorial assistance, see this guide and the quick start
guide that came with your camera.
.
.
76

Specifications
Product specifications are subject to change without notice.
Item Description
Image sensor 1/1.8” CCD sensor
Image resolution Picture: 2816 x 2112, 2272 x1704, 1600 x 1200, 640 x 480
Video: 320 x 240
LCD 2.0” low temperature poly silicon TFT color LCD
Viewfinder Real image optical zoom viewfinder
Image quality Fine/Standard/Economy
Recording medium External memory: supports SD memory card as large as
Compression format JPEG compliant
Image file format DCF 1.0, DPOF 1.1, EXIP 2.2, AVI
Lens f=7.2 mm - 21.6 mm (equivalent to 35 mm - 105 mm on a
Focus range Approx. 2.6 feet (.80 m) to infinity (both wide and telephoto)
Auto-focus TTL method AF
Shutter speed Long exposure: 8 seconds - 0.6 seconds
Image capturing Single image / 3 images with -0.67, 0, +0.67EV / 5 images
Digital zoom 4.4x (Capture mode)
Metering system Multi metering/spot metering
Exposure Program AE / Shutter speed priority / Aperture priority / Manual
Exposure compensation -2EV to +2EV (in 0.3EV increments)
White balance Auto / Incandescent / Fluorescent 1 / Fluorescent 2 / Daylight
Flash Auto / Red-eye reduction / Suppressed flash / Forced flash
Flash effective range 2 feet - 9.8 feet (0.6 m - 3.0 m) (wide/ISO=200)
ISO sensitivity Equivalent to ISO 50/100/200/Auto (ISO 50 - ISO 200)
Self-timer 10 sec. / 2 sec. / 10 + 2 sec. / Interval (1, 3, 10, 60 min.)
Video output NTSC / PAL
Interface DC IN 5V terminal
Power supply Lithium-ion battery (optional)
Dimension (W x D x H) Approx. 3.7 x 2.5 x 1.8 inches (94 x 63 x 35 mm) (without
Weight Approx. 6.3 ounces (180 g) (without battery and SD card)
512 MB
35mm camera)
F=2.8 - 4.7
Approx. .3 feet (.09 m) to infinity (macro wide)
Approx. 1 foot (.30 m) to infinity (macro telephoto)
Normal exposure: 1/2 second - 1/1500 second
continuously
2x and 4x (Playback mode)
/ Portrait / Sports / Night scene
/ Cloudy / Manual
A/V Out port
USB 1.1
AC power adapter (5 V, 3 A, positive polarity)
protruding parts)
77

Safety, Regulatory, and Legal Information
Important safety information
Warn ing To reduce the risk of electric shock, do not modify
your camera or open the case. There are no
user-serviceable parts inside. Opening the case
voids the warranty. If your camera needs service,
contact Gateway at: support.gateway.com
Warnings and precautions
■ Disconnect all cables before moving your camera. Moving your
camera with its cables attached may damage the cables and cause
fire or electric shock danger.
■ Do not expose your camera to rain or moisture. If this happens,
wipe the camera with a dry cloth.
■ Do not drop your camera or leave it under heavy objects.
■ Do not operate your camera while driving a vehicle.
■ Do not leave the camera where it will be subjected to prolonged
exposure to direct sunlight, extreme temperatures (such as inside
a parked automobile or near a heat source) moisture, vibration,
excessive dust, and sand.
■ Avoid areas with strong magnetic fields.
■ Disconnect your camera and remove the batteries when not used
for a long period of time.
■ Do not use any batteries other than the ones specified for your
camera.
■ Do not place your camera on an unstable cart, stand, or table.
78

Regulatory compliance statements
FCC Statement
This device complies with Part 15 of the FCC Rules. Operation is subject to the
following two conditions:
1 This device may not cause harmful interference, and
2 This device must accept any interference received, including interference that may
cause undesired operation
Note: This equipment has been tested and found to comply with the limits for Class B
digital devices, pursuant to Part 15 of the FCC Rules. These limits are designed to
provide reasonable protection against harmful interference in a residential installation.
This equipment generates, uses and can radiate radio frequency energy and, if not
installed and used in accordance with the instructions, may cause harmful interference
to radio communications. However, there is no guarantee that interference will not
occur in a particular installation. If this equipment does cause harmful interference to
radio or television reception, which can be determined by turning the equipment off
and on, the user is encouraged to try to correct the interference by one or more of the
following measures:
■
Reorient or relocate the receiving antenna
■
Increase the separation between the equipment and receiver
■
Connect the equipment into an outlet on a circuit different from the one the receiver
is connected to
Use of shielded cable is required to comply with Class B limits in Subpart B of Part 15 of
the FCC Rules. Do not make any changes or modifications to the equipment unless
otherwise specified in the manual. If such changes or modifications are be made, you
could be required to stop operating the equipment.
FCC declaration of conformity
Responsible party:
Gateway Companies, Inc.
610 Gateway Drive, North Sioux City, SD 57049
(605) 232-2000 Fax: (605) 232-2023
Product:
■
DC-T60 Digital Camera
Canada
Industry Canada (IC)
Unintentional emitter per ICES-003/NMB-003
This digital apparatus does not exceed the Class B limits for radio noise emissions from
digital apparatus as set out in the radio interference regulations of Industry Canada.
Le présent appareil numérique n’émet pas de bruits radioélectriques dépassant les
limites applicables aux appareils numériques de Classe B prescrites dans le règlement
sur le brouillage radioélectrique édicté par Industrie Canada.
California Proposition 65 Warning
Warn ing This product contains chemicals, including lead,
known to the State of California to cause cancer
and/or birth defects or reproductive harm.
79

Notices
Copyright © 2004 Gateway, Inc.
All Rights Reserved
14303 Gateway Place
Poway, CA 92064 USA
All Rights Reserved
This publication is protected by copyright and all rights are reserved. No part of it may be
reproduced or transmitted by any means or in any form, without prior consent in writing from
Gateway.
The information in this manual has been carefully checked and is believed to be accurate. However,
changes are made periodically. These changes are incorporated in newer publication editions.
Gateway may improve and/or change products described in this publication at any time. Due to
continuing system improvements, Gateway is not responsible for inaccurate information which may
appear in this manual. For the latest product updates, consult the Gateway Web site at
www.gateway.com
incidental, or consequential damages resulting from any defect or omission in this manual, even if
advised of the possibility of such damages.
In the interest of continued product development, Gateway reserves the right to make improvements
in this manual and the products it describes at any time, without notices or obligation.
Trademark Acknowledgments
Gateway and the Black-and-White Spot Design are trademarks or registered trademarks of
Gateway, Inc. in the U.S. and other countries. SpotShop, Spotshop.com, and Your:)Ware are
trademarks of Gateway, Inc. Intel, Intel Inside logo, and Pentium are registered trademarks and
MMX is a trademark of Intel Corporation. Microsoft, MS, MS-DOS, and Windows are trademarks or
registered trademarks of Microsoft Corporation. All other product names mentioned herein are used
for identification purposes only, and may be the trademarks or registered trademarks of their
respective companies.
. In no event will Gateway be liable for direct, indirect, special, exemplary,
80

Index
A
A/V
cable 2
out port 8, 69
AC power
connecting adapter 11
connector location on
camera 8
adjusting camera
for lighting conditions 7, 46
light metering methods 57
aperture priority
program mode settings 33, 34
setting with search dial 8
settings 5, 36
auto focus
button 7
delay 72
LED 4
auto mode 5, 14
focal distance 26
using 34
AV
aperture priority setting 5, 36
B
backlight correction 7, 46
battery
auto off setting 61
charging 9
compartment location 8
conserving power 20
FAQs 71
installing 10
LED indicator 22
lock lever 10
recharging 8, 9
removing 10
status indicator 23
battery power
conserving 71
brightness
adjusting for LCD 59
adjusting for picture 7, 46
button
auto focus 7
delete 6, 19
display 6
flash 7
MENU 6
self-timer 7
SET 7
shutter 4
zoom 6
buttons
navigation 7, 18
C
camera
default settings 61
focusing 20, 26
modes 4, 5
turning off 13
turning on 13
camera sounds
turning on and off 60
charging
battery 9
flash 13
composing pictures 2, 7
computer
transferring files to 2
transferring files with My
Computer 66
transferring files with
PhotoShow 64
connecting
AC power adapter 11
camera to TV 2, 8, 69
USB cable to computer 65
connector
A/V out 2, 8, 69
AC power 8
contacting
Gateway 76
controls
movie playback 18
81

D
date
setting 14, 61
DC IN connector 8
delete button 6, 19, 43
deleting
files 6, 19, 43
movies 19
pictures from thumbnail
views 43
video clips 19
digital zoom
compared to optical zoom 74
turning on and off 55
using 32
diopter dial
focusing viewfinder with 6
display
button 6
See LCD
displaying
thumbnails 2, 6, 40, 43
downloading
files from camera 5
DPOF
adding print info 45, 58
settings 58
E
erasing
image files 6, 19, 43
exposure
compensation 7, 46
settings 7, 46
F
FAQs
battery 71
conserving power 71
deleting pictures 72
terms 74
troubleshooting computer
connection 73
troubleshooting PC mode 73
USB connection 73
files
erasing 6, 19, 43
protecting 49
transferring 5
firmware version 62
flash
changing settings 29
charging 13
conserving battery power 71
location 4
maximum shutter speed 38
setting button 7
settings 2
using 27
flash mode
auto flash 28
forced flash 28
red-eye reduction 28
suppressed flash 28
focus
auto mode 7, 26
camera 4, 20, 26
delay 27, 72
fixed focal distance 26
infinity mode 26
macro mode 26
settings 26
sharpness 36
focusing
camera 4, 20, 26
in dark environment 4
viewfinder 6
formatting
memory card 51, 60
I
image protection
cancelling 50
enabling 49
image software
SimpleStar PhotoShow 64
images
cancelling protection 50
deleting from thumbnail
views 43
deleting in playback mode 43
enabling protection 49
protecting in thumbnail view
49
82

viewing thumbnails 40
infinity mode
focal distance 26
installing
battery 10
Windows 98SE USB driver 63
ISO settings 57
L
language menu options 61
LCD
adjusting brightness 59
composing pictures with 20
conserving power 71
information 23
setting preview preferences 55
turning on and off 6
viewing movies on 18, 39
viewing pictures on 2, 7, 16
LED
auto focus 4
self-timer 4
viewfinder 6, 22
lens
cover 4
telephoto 4
wide angle 4
light meter
adjustments 57
listening to voice memos 42
Lithium-ion battery 9
charging 9
installing 10
locking memory card 13
M
macro zoom
focal distance 26
manual mode
using 37
memory card
capacity 30
compartment location 8
formatting 51, 60
installing 12
lock 13
protecting files 49
removing 12
Secure Digital 12
storage capacity 12
write protect tab 13
MENU button 6
menus
photography 52, 53
playback 52, 58
SET-UP 52, 59
turning on and off 6
viewing on LCD 7, 18
microphone 4
mode dial 4, 5
modes 5, 38
aperture priority 36
auto 5, 14
flash 28
focus 26
manual 5, 37
movie 2, 5, 24
night scene 5, 38
PC 5, 22
photography 4, 5, 23
picture 33
playback 4, 5,
power off 22
program 5, 33
scene 38
self-timer 2
SET-UP 4, 5, 59
shutter speed priority 35
voice memo 54
movie
mode 5, 24
picture resolution 53
playback controls 18
viewing video frames with
movies
deleting 19
downloading 5
recording 2, 5, 17
viewing on LCD 18, 39
25, 43, 58
search dial 18
N
navigation button 7, 18
night scene mode 5, 38
83

NTSC
video output 62
O
operating system support
MAC OS 9.0 and later 3
Windows 2000 3
Windows 98SE 3
Windows ME 3
Windows XP 3
optical zoom 31, 74
P
PAL
video output 62
PC mode 5, 22
photography
menu 52, 53
modes 22, 23
picture
capture mode 54
exposure 57
modes 33
previewing 55
printing date 55
setting color 54
setting contrast 54
setting quality 53
setting sharpness 53
setting size 29, 53
sharpness 36
viewing 40
picture information
turning on and off 6
pictures
adding voice memos 42
cancelling protection 50
deleting thumbnails 43
downloading 5
lightening and darkening 7,
46
playing voice memos 42
protecting 49
rotating 40
transferring to computer 2
viewing on LCD 39
viewing on TV 2, 8, 69
viewing thumbnails 2, 6, 40
playback
controls 18
menu 52, 58
mode 5, 25
playback mode 22
deleting images 43
port
A/V out 8
portrait mode 5
ports
A/V out 2, 69
USB 8
power
button 4
connecting AC adapter 11
conserving 71
turning off 13
turning on 13
power off mode 22
previewing pictures on LCD 55
printing
from memory card 45, 58
program mode 5
aperture setting 33
shutter speed setting 33
using 34
protecting
images 49
, 38
R
recharging
battery 8, 9
recording
movies 17
voice memos 2, 4, 41
red-eye reduction 28
resetting
camera 61
resolution
picture 29
video clip 17, 53
rotating
pictures 40
S
scene mode
84

taking night pictures 5, 38
taking portrait pictures 5, 38
taking sports pictures 5, 38
search dial
setting 8
viewing pictures 8
viewing video frames 18
Secure Digital
memory card 12
self-timer
button 7
LED 4
mode 2
setting 45
using 44
SET button 7
setting picture quality 29
setting up
voice memos 41, 54
settings
aperture priority 5, 36
auto focus 7
auto mode 5
battery auto off time 61
camera defaults 61
date and time 14, 61
diopter adjustment dial 6
flash 2, 29
focus 26
language 61
manual mode 5, 37
MENU mode 6
mode dial 4
movie mode 5
night scene mode 5
PC mode 5
playback mode 5
portrait mode 5
power button 4
program mode 5
scene mode 38
search dial 8
self-timer 7, 44,
SET-UP mode 5
shutter button 4
shutter speed priority 5, 33, 35
sports mode 5
45
time 61
white balance 57
zoom button 6
SET-UP menus 52, 59
setup menus 52, 53, 58, 59
SET-UP mode 5
shutter button 4
shutter speed
in auto mode 34
in manual mode 37
in program mode 33, 34
maximum with flash 38
priority setting 5, 33, 35
setting with search dial 8
slide show
playing 58
viewing pictures in 41
software
technical support 76
sound
adjusting camera 60
turning on and off 60
speaker 6
specifications 77
sports mode 5, 38
system info
firmware version 62
T
technical support
contacting 76
Internet 76
telephone 76
telephoto
lens 4
zoom 6, 31
thumbnail pictures 2, 6, 40, 43
thumbnails
protecting pictures 49
using to cancel image
protection 50
time
setting 14, 61
transferring files
about 2
from USB out port 8
to computer using My
85

Computer 66
to computer using
PhotoShow 64
using PC mode 5
tripod socket 8
troubleshooting
PC mode 73
turning on
voice memos 54
TV mode
shutter speed priority setting
5, 33, 35
U
USB
connecting cable 65
driver for Windows 98SE 63
FAQs 73
port location 8
using
self-timer 44
pictures on a TV 8, 69
pictures on LCD 16
pictures on TV 2
thumbnail pictures 2, 6, 40
voice memo
adding to picture 41, 42
listening to 42
recording 2, 41
setting up 41, 54
W
white balance
manually adjusting 57
wide angle
lens 4
zoom 6, 31
wrist strap
connecting 9
location 8
write protect tab
memory card 13
V
video clip
See movie or movies
video out 2, 8, 69
video output format
NTSC 62
PAL 62
viewfinder
focusing 6
location 6
optical 4
viewfinder LED 6, 22
PC mode status indicators 22
photography mode status
indicators 22
playback mode status
indicators 22
power mode status indicators
22
viewing
movies 18
pictures from playback mode
5
pictures from slideshow 41
pictures in zoom mode 40
86
Z
zoom
adjusting picture ratio 40
digital 31, 32, 55, 74
optical 31, 74
optical vs. digital 74
status 23
telephoto 6, 31
wide angle 6, 31
zoom button
enlarging pictures with 6
viewing thumbnails with 40


MAN T60 DIG CAM USR GDE R0 3/04Printed in China
 Loading...