


TABLE OF CONTENTS |
|
WELCOME TO THE REALM OF THE STONE PROPHET............. |
i |
What Comes with This Game? ................................................... |
1 |
Using the Mouse......................................................................... |
1 |
Getting Started Quickly .............................................................. |
1 |
WELCOME BACK TO RAVENLOFT............................................... |
2 |
HOW TO PLAY................................................................................. |
4 |
The Adventure Screen ................................................................. |
4 |
Basic Training for Combat.......................................................... |
4 |
Apprentice Instructions for Spellcasting...................................... |
6 |
Movement ................................................................................... |
8 |
NPC Encounters ....................................................................... |
10 |
Water Consumption ................................................................. |
12 |
Things You Can Do from the Adventure Screen........................ |
13 |
Save, Load, Pause, and Quit .................................................... |
20 |
PLAYING IN-DEPTH..................................................................... |
21 |
Inventory Screen....................................................................... |
21 |
Automapping............................................................................ |
25 |
Adventuring Strategy................................................................ |
28 |
Game Options........................................................................... |
30 |
CREATING YOUR PARTY OF CHARACTERS ............................. |
32 |
Generating Characters.............................................................. |
32 |
Importing Characters from RAVENLOFT®: STRAHD’S POSSESSION.. |
35 |
Character Basics ....................................................................... |
37 |
Races......................................................................................... |
37 |
Classes ...................................................................................... |
40 |
Single-Class vs. Multi-Class...................................................... |
44 |
Racial Advantages .................................................................... |
44 |
Alignments................................................................................ |
45 |
Ability Scores ............................................................................ |
46 |
Other Characteristics ................................................................ |
47 |
SPELLS AND POWERS ................................................................. |
49 |
Character Powers...................................................................... |
50 |
Cleric Spells .............................................................................. |
53 |
Mage Spells .............................................................................. |
62 |
Strategies for Using Spells......................................................... |
75 |
BESTIARY....................................................................................... |
78 |
TABLES........................................................................................... |
87 |
INDEX OF SPELLS AND POWERS.............................................. |
92 |
THIS PRODUCT HAS BEEN RATED BY THE ENTERTAINMENT SOFTWARE RATING BOARD. FOR INFORMATION ABOUT THE ESRB RATING, OR TO COMMENT ABOUT THE APPROPRIATENESS OF THE RATING, PLEASE CONTACT THE ESRB AT 1-800-771-3772.

i
WELCOME TO
THE REALM
OF THE STONE
PROPHET
The desert of Har’Akir is ancient beyond belief. Not all of its past is marked by noble deeds and great kings. In ancient days, the evil pharaoh Anhktepot ruled a great and powerful nation. His downfall stemmed from his desire for immortality. Cursed by Ra, the sun god, Anhktepot’s soul still remains in his mummified form and brings death to those it touches at night.
STONE PROPHET, the second computer role-playing game based on the highly acclaimed AD&D® 2nd Edition RAVENLOFT® game world, begins when your characters become trapped in a wasteland haunted by unnatural creatures, fierce sand storms, and cursed villagers afflicted by a horrible rotting disease. Your party’s only hope of escape is to follow the advice of a blind seer and seek out the Stone Prophet, a huge, hieroglyphic wall hidden deep within a mysterious obelisk. Some say the writings on the wall, when deciphered, may lead the party to freedom. . .
or to death. One thing is certain, a great conflict has been foreseen, and the mummy lord is gathering his forces.
1
What Comes with This Game?
Your game box should contain this rule book, a CD-ROM, and a data card. The rule book explains game commands and contains handy references on characters, monsters, and spells. To play the game, install your CD-ROM according to the instructions on the data card.
Using the Mouse
In this book, the term “click” means move the cursor to the desired area on the screen and press either the left or right mouse buttons.
♦“Left-click” means move the cursor to the desired area and press the left mouse button.
♦“Right-click” means move the cursor to the desired area and press the right mouse button.
♦“Double-click” means move the cursor to the desired area and press the right mouse button two times in quick succession.
Getting Started Quickly
STONE PROPHET includes a character generator that allows you to individually design and name the characters for your adventure. To start right away, you may begin with a party of characters already included in a pre-saved game.
Because your success in STONE PROPHET depends on the skills and talents of these characters, you may wish to read on, even when starting with the party included in the game. The sections “How to Play,” starting on page 4, and “Creating Your Party of Characters,” starting on page 32, can be very helpful.
You may also import a party of characters from a saved game of RAVENLOFT: STRAHD’S POSSESSION. To find out how this is done, refer to the section “Importing Characters from RAVENLOFT: STRAHD’S POSSESSION,” starting on page 35.

2
WELCOME BACK TO RAVENLOFT
On the Terror of Har’Akir
The heat of the day invades the shadows. Beneath a relentless sun, exposed flesh withers brown, and beasts the like of which are unknown beyond Har’Akir prowl the wasteland. It is a desert filled with fierce storms and ruined temples. Only the frightened survive, those wise enough to cower within the tents and hovels they call their homes.
Huddled within, the population of Har’Akir waits out the unbearable days of blistering heat and the nights of unending cold. So tightly have they wrapped their fears about them, that often the silence is broken only by a curious, double howl. It is the cry of the death dog.
In the village of Muhar, the greatest fear is reserved for the lord of the land, Anhktepot. Once a Priest of Ra, Anhktepot dreamed of immortality and power. Common goals, it is true, yet Anhktepot distinguished himself by the destruction, terror, and death he wrought in searching out the key to these ageold dreams. In ways twisted and evil, he achieved them and was forever condemned by Ra to live inside his mummified body. It is said this mummy
3
lord spends decades at a time “dreaming” in his moldering tomb. Such times are these, and yet. . . .
A plague works its way from tent to tent, a strange rotting disease which corrupts the flesh and steals the muscle from the bone. Fierce storms drive the sands before them, and all the land seems engulfed in death and chaos. Has Anhktepot awakened? It is the question on the lips of every villager, followed quickly by another: what has turned the wrath of the mummy lord upon us?
Unfamiliar voices call out across the desert wastes, and foreign names are heard among the ruins. Strangers are in the land. The rumors begin, and more questions are asked. Has the presence of the newcomers brought the wrath of Anhktepot upon them all? The villagers gather in small groups, building up their suspicions like walls to keep the strangers out.
What few know, and fewer still have the courage to admit is this: powers beyond those of Anhktepot are at work in Har’Akir. Unseen forces are plotting, preparing for battle, and only strangers from a distant land shall hold the key to its resolution.
These things the Prophet tells us.
4
HOW TO PLAY
The Adventure Screen
|
|
|
|
COMPASS |
|
|
|
|
|
|
|
|
|
|
|
|
|
|
|
|
|
|
||
|
|
|
|
|
|
|
|
|
|
|
|
|
|
|
|
|
|
|
|
|
|
|
|
|
|
|
|
|
|
|
|
|
|
|
|
|
|
|
|
|
|
|
|
|
|
|
|
||
GAME OPTIONS |
|
|
|
|
|
|
|
|
|
|
|
|
|
|
|
|
|
|
||||||
|
|
|
|
|
|
|
|
|
|
|
|
|
|
|
|
|
|
|
|
|
|
|
|
|
|
|
|
|
|
|
|
|
|
|
|
|
|
|
|
|
|
|
|
|
|
|
|
|
|
|
|
|
|
|
QUICK |
|
|
|
|
|
|
|
|
|
|
|
|
|
|
|
|
|
|
|
|
|
|
|
|
|
|
|
|
|
|
|
|
|
|
|
|
|
|
|
|
|
|
||
|
|
|
|
|
SAVE |
|
|
|
|
|
|
|
|
|
|
|
|
|
|
A HOLY SYMBOL |
|
|||
|
|
|
|
|
|
|
|
|
|
|
|
|
|
|
|
|
|
|
|
|
OR SPELLBOOK |
|
||
|
|
|
|
|
|
|
|
|
|
|
|
|
|
|
|
|
|
|
|
|
CAN APPEAR |
|
||
|
|
|
|
AUTO MAP |
|
|
|
|
|
|
|
|
|
|
|
|
|
|
||||||
|
|
|
|
|
|
|
|
|
|
|
|
|
|
|
|
|
|
HERE |
|
|||||
|
|
|
|
|
|
|
|
|
|
|
|
|
|
|
|
|
|
|
|
|
AN IN-HAND |
|
|
|
|
|
|
|
|
|
|
|
|
|
|
|
|
|
|
|
|
|
|
|
|
|
|
||
|
|
|
|
|
|
|
|
|
|
|
|
|
|
|
|
|
|
|
|
|
|
|
||
|
|
|
|
|
QUICK |
|
|
|
|
|
|
|
|
|
|
|
|
|
|
|||||
|
|
|
|
|
|
|
|
|
|
|
|
|
|
|
|
|
|
|
ITEM |
|
|
|||
|
|
|
|
RESTORE |
|
|
|
|
|
|
|
|
|
|
|
|
|
|
|
|
|
|
||
|
|
|
|
|
|
|
|
|
|
|
|
|
|
|
|
|
|
A CHARACTER |
|
|||||
|
|
|
|
|
|
|
|
|
|
|
|
|
|
|
|
|
|
|
|
|
|
|||
|
|
|
|
|
|
|
|
|
|
|
|
|
|
|
|
|
|
|
|
|
PORTRAIT |
|
||
|
|
|
|
|
|
|
|
|
|
|
|
|
|
|
|
|
|
|
|
|
|
|||
|
|
|
|
REAR RANK |
|
|
|
|
|
|
|
|
|
|
|
|
|
|
WATER SUPPLY |
|
||||
|
|
|
CHARACTER |
|
|
|
|
|
|
|
|
|
|
|
|
|
|
|
||||||
|
|
|
|
|
|
|
|
|
|
|
|
|
|
|
|
|
|
|
|
|
||||
|
|
|
|
|
|
|
|
|
|
|
|
|
|
|
|
|
|
|
|
|
||||
|
|
|
|
|
|
|
|
|
|
|
|
|
|
|
|
|
|
|
|
|
|
|
|
|
|
|
|
|
|
|
A HIT POINT |
|
FRONT RANK |
|
MAIN MENU |
|
MESSAGE AREA |
|
HEIGHT |
|
|
|
|||||||
|
|
|
|
|
|
|
|
BAR |
|
CHARACTER |
|
BUTTON |
|
|
|
CONTROL BAR |
|
|
|
|||||
|
|
|
|
|
|
|
|
|
|
|
|
|
|
|
|
|
|
|
|
|
|
|
|
|
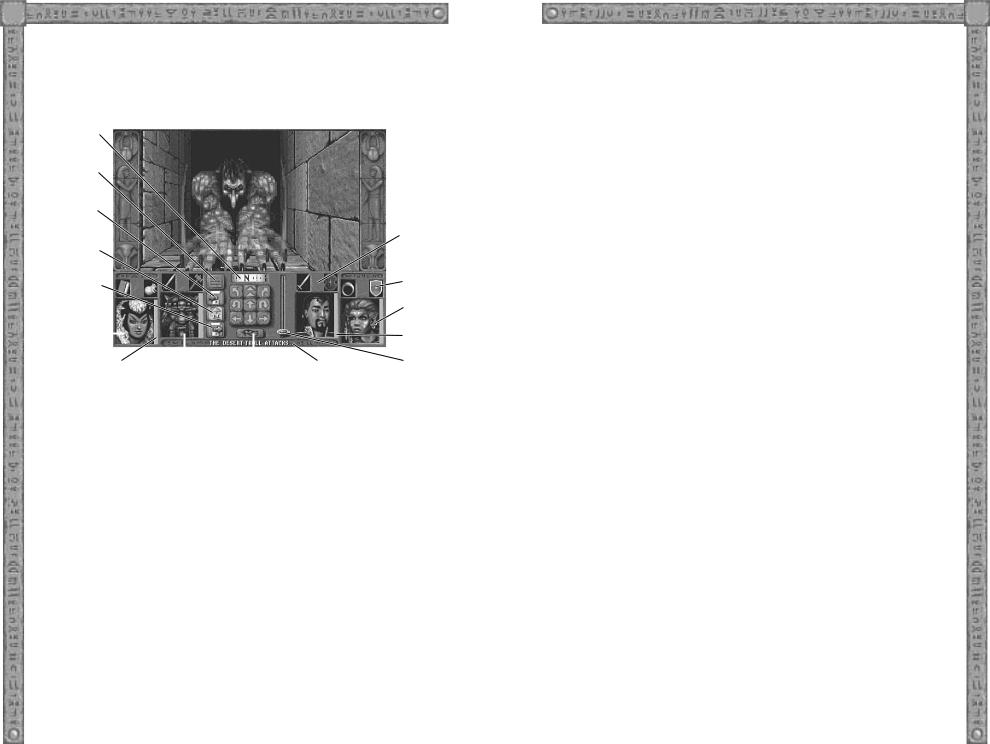
Basic Training for Combat
Desert trolls and stone golems roam the sandy wastes. Fierce desert storms appear from nowhere to cause chaos and destruction. Challenges abound, from dust devils and floating death heads to the terrible power of Anhktepot, ruler of Har’Akir.
If your party is to survive, it must know the basics.
Attacks are made from the Adventure Screen. To fight, place the mouse cursor over the weapon you wish your character to use and left-click with the mouse. Available weapons appear above the character portraits at the bottom of the screen, while the image of a bare hand means the character holds no weapon. You may also place the cursor over the image of the attacking beast. When your characters are close enough to engage their enemy, the cursor changes into a sword icon. By left-clicking in this manner, each character attacks once with each hand. Note that this option does not affect potions or books a character may be carrying. It activates weapons only.
5
To attack, characters must have their weapons “in-hand” and “ready.” To accomplish this, place the mouse cursor over one of the character portraits at the bottom of the screen and left-click with the mouse. The Inventory Screen is displayed and the game pauses. Items owned by the characters, including weapons and armor, are displayed on this screen. Do the standing figures hold weapons (swords, daggers, etc.) in their hands? If so, those weapons are “in hand.” If your characters are barehanded, look for weapons in the inventory slots at the bottom of the screen. By left-clicking on an object in an inventory slot, you can move it up to your character’s hand. Left-click again and it is “in hand.” Armor and items of clothing are moved in much the same way and are put in place by clicking over the appropriate location on the character’s mannequin.
By “ready,” we mean the weapon is in a usable condition. If it is not, the weapon is shaded out on the Adventure Screen.
A right-click returns you to the Adventure Screen, ready to do battle.
It is possible to have an item “in hand” but not “ready.” Two-handed weapons demand the attention of both of your character’s hands. On the Inventory Screen, the weapon would appear in one hand, while the second hand would have to be free before the weapon could be “ready.”
Melee, thrown, and ranged weapons compose the three basic types of arms characters use. Left-click on the ready weapon and your character uses all of his or her skill to wield it in battle. While it seems easy, keep some common sense rules in mind:
♦Thrown weapons have to be retrieved after a fight and made “ready” again.
♦Ranged weapons, such as bows and slings, require ammunition. Arrows are conveniently carried in your character’s quiver, while rocks for slings are carried in a sling pouch.
♦Fire ranged weapons by left-clicking on the readied bow, sling, etc., on the Adventure Screen. As with thrown weapons, however, the character must retrieve the ammunition used. More information on ranged and thrown weapons can be found in the “Things You Can Do from the Adventure Screen” section starting on page 13.
6
Apprentice Instructions for Spellcasting
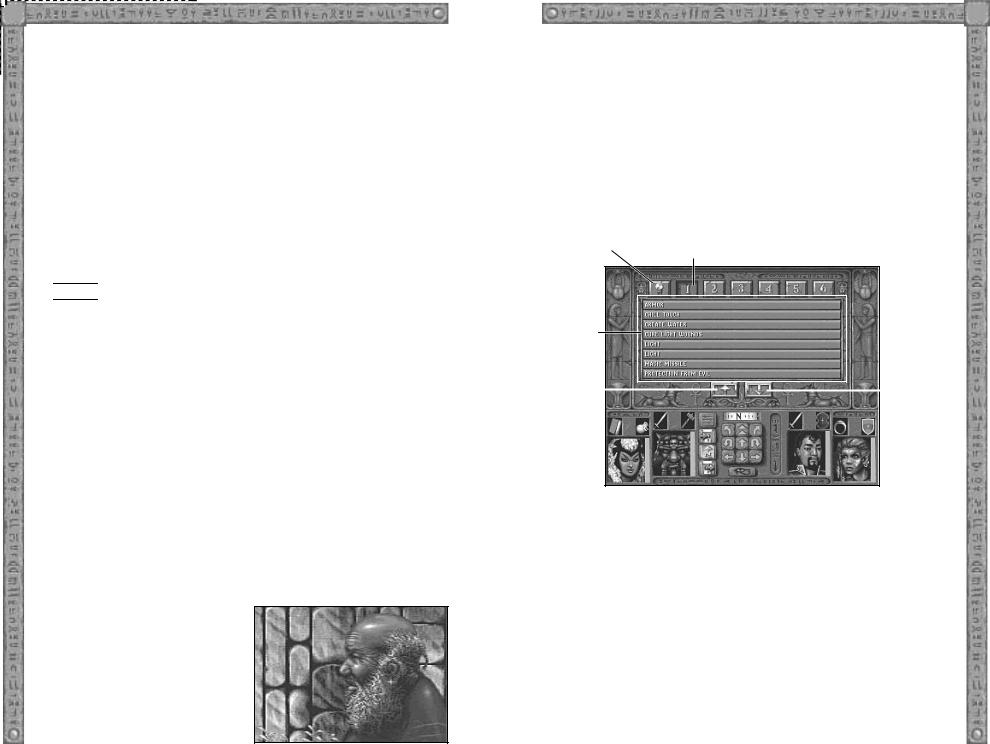
You know your party is about to encounter certain dangers; another sand mephit, or perhaps a serpent of Set intent upon attacking your party with its venomous bite. If the area is safe and fate has given the characters time enough to prepare, spells can be prayed for or memorized.
To spellcast, first determine if a mage or a cleric accompanies the party. A mage has a golden spellbook displayed, centered above his or her portrait on the Adventure Screen. For a cleric a golden holy symbol appears in the same location. (An icon comprised of both a spellbook and a holy symbol is displayed for a multi-classed character with both skills.) When you bring up the Main Menu, among the choices are REST, PRAY, and MEMORIZE. To choose cleric spells, leftclick on PRAY. To choose mage spells, left-click on MEMORIZE.

 To bring up the Main Menu, move the cursor over the Eye of Ra icon which appears at the bottom center of the Adventure Screen. By left-clicking when the mouse cursor is over the Eye of Ra, the Main Menu appears in the center of the Adventure Screen. Double right-clicking over the Eye of Ra “quick saves” your game and returns you to the DOS prompt.
When you click on MEMORIZE, the spell screen which appears contains a list of mage spells. It also indicates the number of spells available for each level of a mage’s experience. To decide which spells are readied for use, place the cursor over the – or + signs next to your choice and left-click. For example, if three Level 1 spells are available, your mage may choose three chill touch spells, or two of one sort and one of another, or three separate Level 1 spells could be chosen.
If more than one mage is with the party, icons bearing the names of the mages appear at the top of the spell screen. Simply click on the name of the mage you wish to memorize spells. Click on DONE when you are finished.
A cleric can pray for spells in a similar fashion.
In order to use the spells chosen, your character(s) must now rest. REST is one of the choices on the Main Menu. It is available only if there are no monsters nearby and your party has the time to stop and prepare its spells. Left-click over the REST option and your magic-users prepare their mystical
7
skills for use. If characters with healing abilities are in your party when this option is chosen, a window appears to ask if the healers wish to heal the wounded members of the party. Answer yes by left-clicking on that option and the healing takes place while the screen informs you of passing time. The party’s rest may be disturbed at any time if intruders enter the area.
Spellcasting: after praying for or memorizing spells and then resting, the clerics and mages in your party are ready for battle. Point the cursor to the mage’s golden spellbook or the cleric’s holy symbol and left-click to display a menu of Level 1 spells ready for immediate use.
CHARACTER POWERS |
|
LEVEL 1 |
AND/OR ABILITIES |
|
SPELLS |
|
|
|
READIED
SPELLS
SCROLL SPELL |
|
|
|
SCROLL SPELL |
LIST UP |
|
|
|
LIST DOWN |
|
|
|
|
|
In STONE PROPHET the list of available spells fills the center of the Adventure Screen, pausing the game and allowing time to be taken in choosing the appropriate spell for the situation. Two arrows at the bottom of the spell screen allow you to scroll through a long list of spells.
Left-clicking on the buttons labeled 2, 3, 4, etc. displays readied spells from those levels, if any. (The ribbon to the left of these numbers is a special character powers ribbon, explained more fully under the “Spells and Powers” section on page 49) Pointing the cursor to the name of the spell itself and left-clicking activates the spell. Spells which project an object or an effect over distance require a second step: pointing the cursor to the intended target and left-clicking again. Spells requiring the character to touch an opponent are shown as a change in the hand symbol above the character’s portrait. Left-click on the altered hand image to use the spell.
8
Once used, spells must be regained by resting. Different spells may be chosen by praying for or memorizing them, then resting once again. Mages pick up more spells as they journey through the various caverns and labyrinths of this forsaken world. These are found in the form of scrolls which can then be added to the mage’s spellbook. A character who is both a cleric and a mage has his or her spell lists displayed in two different colors, allowing you to differentiate between the types.
Movement
|
|
|
|
|
|
|
|
MOVE FORWARD |
|
|
|
|||||
|
|
MOVE |
|
|
|
|
|
|
|
|
|
|
|
MOVE |
|
|
|
|
|
|
|
|
|
|
|
|
|
|
|
|
|
||
|
|
FORWARD |
|
|
|
|
|
|
|
|
|
|
|
FORWARD |
|
|
|
|
|
|
|
|
|
|
|
|
|
|
|
||||
|
|
AND TURN |
|
|
|
|
|
|
|
|
|
|
|
AND TURN |
|
|
|
|
LEFT |
|
|
|
|
|
|
|
|
|
|
|
RIGHT |
|
|
|
|
|
|
|
|
|
|
|
|
|
|
|
|
|
|
|
|
|
|
|
|
|
|
|
|
|
|
|
|
|
|
|
|
|
|
TURN LEFT |
|
|
|
|
|
|
|
|
|
|
|
TURN RIGHT |
|
|
|
|
|
|
|
|
|
|
|
|
|
|
|
||||
|
|
|
|
|
|
|
|
|
|
|
|
|
|
|
|
|
|
|
|
|
|
|
|
|
|
|
|
|
|
|
SIDE-STEP |
|
|
SIDE-STEP LEFT |
|
|
|
|
|
|
|
|
|
|
|
|
|
|||
|
|
|
|
|
|
|
|
|
|
|
RIGHT |
|
|
|||
|
|
|
|
|
|
|
|
|
|
|
|
|
|
|
|
|
|
|
|
|
|
|
|
|
|
|
|
|
|
|
|
|
|
|
|
MOVE |
|
|
|
|
|
|
|
|
|
|
|
|
|
|
|
|
BACKWARD |
|
|
|
|
|
|
|
|
|
|
|
|
|
|
|
|
|
|
|
|
|
|
|
|
|
|
|
|
|
|
|
|
|
|
|
|
|
|
|
|
|
|
|
|
|
|
|
|
DOUBLE-TIME |
|
|
DIRECTIONAL ARROWS: |
|
FORWARD |
|
|
with the exception of DOUBLE-TIME FORWARD, |
|
|
|
|
all the arrows refer to the same movements as |
|
|
|
|
those on the game screen |
|
|
|
|
|
|
All movement takes place on the Adventure Screen. While basic movement is simple and self-explanatory, several choices have been added. These allow movement to be customized to your taste.
ARROW MOVEMENT
Place the mouse cursor over one of the directional arrows centered at the bottom of the screen and left-click to move in that direction. The arrows displayed are: forward and “double time” forward, move forward and turn to the right, and move forward and turn to the left. Also available are backward, side-step to the right, side-step to the left, and turn right and turn left. The movement continues as long as the left mouse button is held down and stops when the button is released. Walking your characters into a wall or other obstacle also effectively stops their progress.
9
ON SCREEN MOVEMENT
While holding the left mouse button down, move the cursor into the top third of the screen. The cursor becomes an arrow and your characters move in the direction it is pointing. Try moving the cursor to various areas on the screen and watch how the screen responds to that movement. Pushing the arrow to the very top of the screen results in a “double time” forward march. Movement continues as long as the left mouse button is held down. As long as the left mouse button is held down, no other function is available. You cannot move the party and simultaneously click to pick up objects, or move and simultaneously use the cursor to bring up menus. Once the left mouse button is released and movement ceases, the mouse cursor can be used for other available functions.
FREE MOUSE MOVEMENT
For free mouse movement, hit the space bar on your computer’s keyboard. Next, move the mouse without pressing either the right or left mouse buttons. The party moves in the direction the mouse is moved. Push the mouse forward and the party moves forward. Push it to the side and the party moves to the side.
Press the right mouse button and the party moves forward without the mouse having to be moved. The party starts slowly and then accelerates to a “double time” march.
To leave this mode press the spacebar again, and the cursor reappears in the position it occupied when you began free mouse movement. Try working with this method for a while and see if it is right for you.
STEP MOVEMENT
Step movement is possible for players who find the smooth scrolling interface difficult to control. It allows the party to move “one square at a time.” To activate this option, move the cursor over the compass located above the movement arrows and left-click. Please note, however, that “step movement” is not available simultaneously with “free mouse movement” as described previously. Step movement is possible only when the directional arrows are used. In addition to clicking on the Adventure Screen compass, it may be activated from the game options menu.
KEYBOARD MOVEMENT
The directional arrows correspond to the keyboard’s number pad.
10
FLYING
At certain points in the game your party gains the ability to fly. When this ability is present, a height control bar appears to the right of the movement arrows on the bottom of the Adventure Screen. This control allows your party to rise from one level to the next. You should note that this ability exists only when activated by a special spell, scroll, or potion. Once flying is activated, you may use the bar by placing the mouse cursor over the bar and moving it up or down along its “slot.” On the Adventure Screen, the viewpoint of your party rises or falls as you move the height bar up or down.
When your party is flying, you may not only change its height, but may also use the other movement options as well. For example, you can raise the height bar to its top position, then click on the forward movement arrows to send your party flying forward through the cavernous reaches of a great, Har’Akiri labyrinth.
NPC Encounters
NON-PLAYER
CHARACTER
RESPONSE
QUESTION
PRINT OPTION
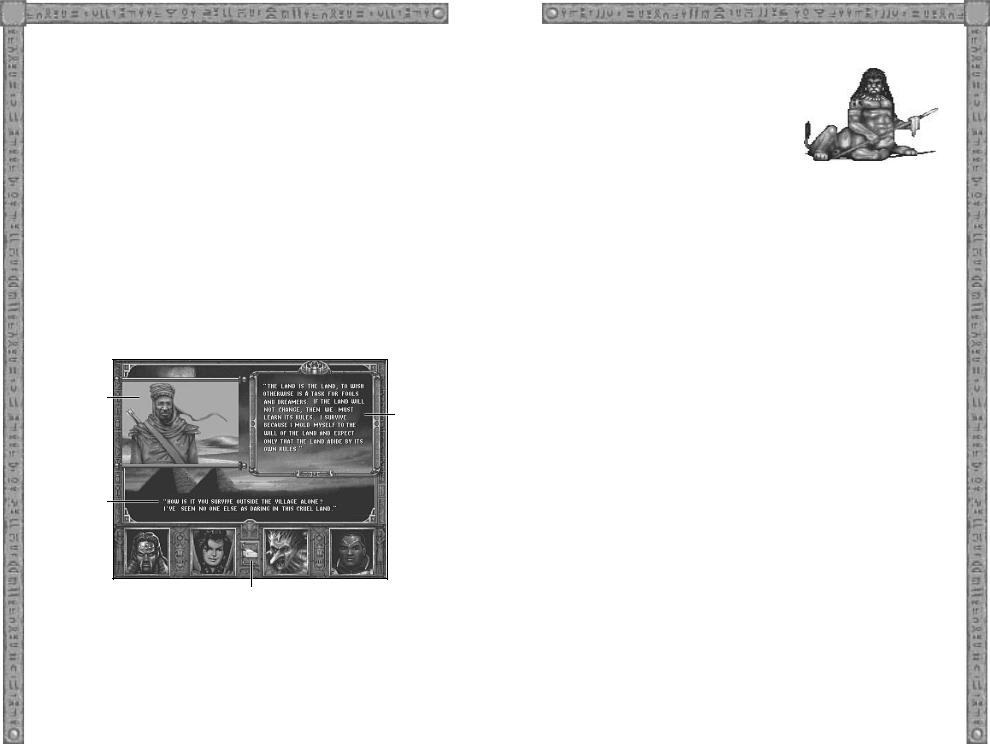
Blasting monsters with fireballs and having your characters wield two-handed swords against minotaurs is only but half the fun. Much care has been taken to design STONE PROPHET as an interactive adventure, one in which story and battle are effectively balanced. When your party comes across an NPC, or Non-Player Character, it is given the opportunity to ask several questions and learn more about the dangers and difficulties of life in Har’Akir.
11
NPC DIALOGUE
Your party is close enough to converse with an NPC when placing the mouse cursor over the NPC results in a “talk bubble.” Left-click and a close-up of the NPC appears along with one or more ques-
tions your party may ask this inhabitant of Har’Akir. Move the cursor to highlight the question of your choice, then left-click to set
the response in motion. Several levels of continuing questions may follow the response. When the party has learned all it needs to know, one or more right-clicks takes you back to the Adventure Screen.
In addition to the main encounters, your party has the opportunity to talk with various minor NPCs, such as the Statues of Fortune. In these cases a left-click on the “talk bubble” results in a single question from the party. The face of the party member asking the question is displayed, along with his or her question, in the center of the Adventure Screen. The response of the NPC may direct your party in the right direction, or offer it valuable information about the level being explored.
Many interesting quests and sub-plots await your characters on their way to unravel the mysteries of Har’Akir. Communication can often be as interesting as exploration.
OBJECTS GIVEN TO THE PARTY DURING AN ENCOUNTER
There are times when an NPC may give the party one or, in some cases, two objects. If only one object is to be given, it is placed on the mouse pointer. If you already have an object selected (i.e. its picture already overlays the mouse pointer), the newly given object is placed in the inventory of the character whose portrait is displayed on the far left of the Adventure Screen.
If that character’s inventory is full, then the object is placed in the inventory of the character to the right of him or her, and so on, until an open inventory slot is found. If all of the party’s inventory slots are filled, the new object is dropped on the ground. This process works in the same fashion when two objects are given to the party, except that one of the objects is always placed somewhere in inventory or on the ground.
ADD AN NPC TO THE PARTY
When the game begins, your party starts with a maximum of two characters. While these characters can never be dropped from the party, many NPCs (Non-Player Characters) eagerly await their arrival, hoping to join these loyal and dedicated characters on their

12
sworn quest. Should you decide to allow another character into the party, his or her portrait is placed in one of the empty character slots at the bottom of the Adventure Screen. From then on, the new character is handled in the same way as the original characters.
Among the NPCs which may join your party in STONE PROPHET are a desert troll, a jackalwere, and a wemic adventurer.
Should an NPC be accepted into the party when all the character slots on the Adventure Screen are filled, a prompt appears asking which NPC currently with the party is to be dropped. Characters dropped from the party may announce a location where they can be found and regained by the party at a later time, or they may go their own way, never to be seen again.
When one NPC is dropped from the party to pick up a different NPC, any objects in the departing character’s inventory are swapped into the new character’s inventory. All twelve slots are filled if necessary. Objects from the departing character’s “mannequin” are the last items swapped, and any object for which there is no room in inventory is dropped on the ground.
The swapping of inventory has one important limitation. Objects specific to a particular character are never swapped. A good example would be the armor for the wounded desert troll which the party encounters. As a non-human character, the troll possesses armor specific to its physical characteristics and not of use to other party members.
Note: In STONE PROPHET, several NPCs who may join the party are not adventurers themselves, but civilian inhabitants of Har’Akir. They are referred to as “commoners,” and as such they neither gain experience, nor can they advance in levels. Their value to the party rests entirely within certain quests the party must fulfill in order to accomplish its goals and escape from Har’Akir.
Water Consumption
Because STONE PROPHET takes place in a desert environment, water consumption is important to the party’s survival. The thin blue lines next to the characters’ health bars represent one day’s supply of water and indicates each character’s level of water consumption. Characters who fail to drink water are soon overcome by the desert heat and begin to take damage.
13
Throughout the game, supplies of water can be found in bottles. One bottle of water restores one character’s blue line from zero to its maximum value.
Note: Characters automatically drink water as long as it is available somewhere in the party’s inventory. It is not necessary to assure that each character has water in his or her personal inventory, nor to manually have them drink water.
When the party is resting, water consumption continues at its normal rate.
If the wounded desert troll NPC is allowed to join the party, he neither needs water nor will drink any that is available to the party. Water is deadly to a desert troll.
Should water be unavailable to the party, characters without water lose 1 point of Strength for every twelve hours of game time that they go without water. When a character’s Strength falls to 3 points, he or she begins to take damage at the rate of 3 hit points per hour until the character dies. If water becomes available to the party during this period, the Strength of the affected characters is slowly restored.
All NPCs begin with a half day’s supply of water.
The create water spell provides everyone in the party with a full day’s supply of water. When the party rests, water consumption continues; however, any cleric who has memorized a create water spell automatically casts the spell while resting continues. If the spell has not been memorized, a warning appears asking whether or not you wish the cleric(s) in your party to memorize and cast this spell.
Characters drink water in the same way that they drink potions. See the “Drink a Potion” section on page 15.
Things You Can Do from the Adventure Screen
All combat, spellcasting, and exploration in STONE PROPHET takes place from the Adventure Screen. When other screens are activated, they overlay the Adventure Screen. Option selections such asREST, PRAY, MEMORIZE, AUTOMAP, LOAD, SAVE, QUIT, and OPTIONS are available by left-clicking over the Eye of Ra icon. This brings up the Main Menu in the center of the Adventure Screen. Double right-clicking over the Eye of Ra quick saves your game and returns you to the DOS prompt.
To access the Inventory Screen, left-click over any character’s portrait.

14
ADD SPELLS TO A MAGE’S SPELLBOOK
When the party comes across hidden scrolls (parchments bearing the inscriptions of powerful magic), you can add these to your mage’s repertoire by scribing the scrolls into the mage’s spellbook. This is done by picking up the scroll and moving it to the Inventory Screen as described in the “Pick Up and Drop Objects/Add Items to Inventory” section on page 17. In STONE PROPHET, the spellbook is an icon displayed in the mage’s area on the Inventory Screen. This icon cannot be picked up or moved. It is a permanent fixture, as it should be, for the spellbook is a mage’s link to his art and spellcasting ability.
To scribe a scroll, the scroll must be selected and moved on top of the spellbook icon. Left-click to place the scroll (and thus the spell) into the mage’s spellbook. If the spell already exists in the spellbook, the scroll does not scribe. The scroll can still be used by placing it in a magicuser’s hand and left-clicking to activate the scroll. See the “Cast Spells from Scrolls” section at the bottom of this page.
ATTACK OPPONENT
As previously mentioned, begin your characters’ attacks by left-click- ing on a weapon which is “in-hand” and “ready.” Once used, a weapon is shaded out until it is again made ready (perhaps by replenishing its supply of ammunition). Fighters, paladins, and rangers can carry and fight with a second weapon, but may suffer a penalty to their combat ability for doing so. For more information, see the “Basic Training for Combat” section on page 4.
CAST MAGE AND CLERIC SPELLS
After praying for or memorizing spells and then resting, characters are ready to spellcast. Left-click on the mage’s golden spellbook or the cleric’s holy symbol to display a menu of Level 1 spells ready for immediate use. Left-clicking on the buttons labeled 2, 3, 4, etc. displays readied spells from those levels. Activate the spell by clicking on the name of the spell, then following the instructions as they appear. Spells requiring the character to touch an opponent are shown as a change in the hand symbol above the character’s portrait. Left-click on the altered hand image to use the spell.
CAST SPELLS FROM SCROLLS
15
CHECK CHARACTER STATUS
The golden bar to the right of each character’s portrait is a graphic representation of the character’s health. It diminishes if your character is wounded or harmed by any means.
DRINK A POTION
To have a character drink a potion on the Adventure Screen, left-click on the in-hand potion. To have a character drink a potion on the Inventory Screen, move the potion over the head of the mannequin figure and left-click.
When a character drinks a potion of jump, the ability jump is added to the character’s abilities. To use the jump ability, left-click on a mage’s golden spellbook, a cleric’s holy symbol, or a character’s ability ribbon which appears to the left of the 1st-level spell button. To activate the ability, left-click on the name of the ability.
FIRE A RANGED WEAPON
To fire a ranged weapon, it must first be placed in the character’s primary hand. Next, left-click on the in-hand bow, sling, orsling of seeking. As the weapon fires, ammunition is expended from either the quiver (arrows), or belt pouch (sling stones). This assumes ammunition is available.
LOOK AT A
SIGN OR
WRITING
When the party is near a sign or other writing (such as on a tomb or wall), the writing can be displayed for easy reading by placing the mouse cursor over the sign or writing and left-clicking.
Left-click on an in-hand scroll. The scroll is consumed when the spell is cast.
16
MEMORIZE SPELLS
With this option, mage characters select the spells they wish to memorize. A menu, including the selection MEMORIZE appears when the mouse cursor is left-clicked over the Eye of Ra icon. By left-clicking on MEMORIZE, a screen of available mage spells is displayed. If more than one mage is in the party, their individual names appear on icons at the top of the screen. Choose which mage is to memorize spells by clicking on the appropriate icon.
By left-clicking the cursor over the – and + signs on the spell screen, the choice of spells is made. Only the number and type of spells available to a character of your mage’s level and experience are allowed; nevertheless, you have much to look forward to as the mage(s) in your party advance in levels, becoming ever more masterful spellcasters. Remember, a mage must REST before his or her spells can be cast.
NAVIGATE
Watch the compass to maintain the party’s orientation and use the AUTOMAP selection to view its progress throughout the game. Automap can be selected by left-clicking over the Eye of Ra icon at the bottom center of the Adventure Screen. This brings up the Main Menu. Choose AUTOMAP from this menu. More information on the automap is available in the “Automapping” section on page 25.
OPEN A GATE
To open a gate, left-click on the release lever or button near the gate. Some gates are locked or guarded by hidden traps and can only be opened with keys or special actions. See the “Unlock a Door or Gate” section on page 19 for more information.
OPEN DOORS
Some doors are opened simply by having your characters walk through them. Other unlocked doors can be opened by pointing the cursor to the center of the door and left-clicking, assuming of course that your party has approached the door and is close enough to open it. Other doors may require a key, a spell, or activation of a hidden pressure plate to open them. See the “Unlock a Door or Gate” section on page 19 for more information.
PICK A LOCK
To pick a lock, left-click on the thief’s lock pick, place it over the lock and left-click again. Thieves automatically attempt to disarm any traps they find associated with locks.
17
PICK UP AND DROP OBJECTS/ADD ITEMS TO INVENTORY
Hidden beneath the searing desert of Har’Akir lie many treasures, supplies to be plundered, armor, weapons, and keys to help the party on its way. When the mouse cursor is moved over an object which can be picked up, the cursor takes on the appearance of a golden hand icon. By right-clicking when the golden hand icon is over an object, the object is picked up. Another right-click drops it. To keep the object and add it to one of your character’s inventories, pick up the object and move it to the character’s portrait. Left-click to bring up the Inventory Screen. Left-clicking with the item over an inventory slot places the item in that slot. After picking up the object, you may also double right-click when the object is over the character’s portrait. This automatically adds the item to that character’s inventory. In the case of an arrow, a double right-click over the character’s portrait automatically adds the arrow to the character’s quiver. In the case of a sling stone, a double right-click over a character’s in-hand sling pouch automatically adds the stone to the sling pouch.
Note: When an object has been picked up, the first four function keys on your keyboard may be used to place the item in inventory. For example, pressing F1 places the object in the 1st character’s inventory, whileF2 places the object in the 2nd character’s inventory, etc. For this purpose characters are counted from left to right, with the first character being on the far left.
Items may be dropped quickly from a character’s inventory by selecting the desired object and pressing the D key on your keyboard.
In the game world of STONE PROPHET, some objects can be picked up from tables. Important scrolls, books, and items, those generally of critical importance to the game, can be found
resting on tables of similar design. The tables upon which these objects rest have distinct similarities, enough for you to recognize when the party has found a table with an important object upon it.
Picking up an object from a table is done in exactly the same fashion as picking up any other object.
On the Adventure Screen, use the right mouse button to pick up, drop, use, and throw objects, while using the left mouse button to move, activate buttons and levers, operate character interactions, and other, non-object related tasks. This allows the party to continue to move while “holding” an object in the Adventure Screen.
18
In the same way that there are special tables from which objects can be picked up, special urns exist in which objects have been placed. To acquire an object from a special urn, right-click on the image of the urn and any object within appears on the mouse cursor.
PLACE AN OBJECT IN A CHARACTER’S HAND
After picking up an object on the Adventure Screen, double right-click over the character’s hand in which you wish to place it. If an object is already in the hand you’ve chosen, the new object is swapped with it and the object previously in-hand can then be dropped by moving it onto the adventure window and right-clicking with the mouse. Any object in a character’s hand can be dropped or swapped in this way. Simply start by double right-clicking over the in-hand object.
PRAY FOR SPELLS
With this option clerics select the spells for which they wish to pray. By left-clicking when the mouse cursor is over the Eye of Ra icon, the Main Menu appears in the center of the Adventure Screen. When you left-click on PRAY, a screen of available cleric spells appears. If more than one cleric is in the party, their individual names appear on icons at the top of the screen. You can then choose which cleric is to pray for spells by clicking on the appropriate icon.
By left-clicking the cursor over the – and + signs on the spell screen, the choice of spells is made. Only the number and type of spells available to a character of your cleric’s level and experience are allowed; nevertheless, you have much to look forward to as the cleric(s) in your party advance in levels, becoming ever more masterful spellcasters. Clicking on DONE returns to the Adventure Screen. Remember though, a cleric must REST before his or her spells can be cast.
READ BOOKS OR SCROLLS
Left-click on an in-hand book or parchment. Some books, parchments, or wall murals may be written in a language your characters do not understand. In this case characters who possess a read languages power or a special scroll of comprehend languages must be employed.
19
REST
This option allows characters to rest, heal, and memorize spells. How long they rest depends on the number and level of spells being memorized (or prayed for). The party cannot rest with creatures nearby, and even if monsters are not in the vicinity, there is always a chance of a random encounter while the party sleeps.
RESURRECTION OF DEAD CHARACTERS
When a character dies, his or her portrait turns to a shade of gray. A cleric in the party may bring the character back to life with araise dead spell. Unfortunately, a raise dead spell has no effect on elven characters.
Note: Dead characters can also be replaced by having new NPCs join the party; however, when a dead character is replaced with another character, the dead character is lost forever and cannot be returned to life with a raise dead spell.
A character brought back to life by the use of a raise dead spell has his or her Constitution reduced by 1. Raise dead can be used on any one character to a maximum of five times, and then only if that character’s Constitution is greater than zero.
THROW AN ITEM
After selecting an item from inventory or double right-clicking to select an object in a character’s hand on the Adventure Screen, move the object onto the adventure window. Right-click again when it is over the center line (horizon) of the screen to throw the object. (To drop an item, right-click below the center line of the Adventure Screen. This type of throwing is not the same as throwing a dart or dagger.
THROW A RANGED WEAPON (DAGGER OR THROWING KNIFE)
To throw a ranged weapon, left-click on any in-hand dagger or throwing knife where it appears above the character’s portrait. Daggers are automatically replaced with daggers from the character’s inventory, and throwing knives are replaced in the same way. They are not available for quick replacement if enclosed in a container.
UNLOCK A DOOR OR GATE
To unlock a door or gate, place the appropriate key over a keyhole on the Adventure Screen and left-click to open the lock. Keys on a key ring need not be removed from the ring; simply place the key ring over the keyhole and left-click.

20
USE AN OBJECT IN A CHARACTER’S HAND
To use an object in a character’s hand, left-click on the object or weapon where it appears above the character’s portrait.
Save, Load, Pause, and Quit
SAVE GAME
To save your game, move the mouse cursor over the Eye of Ra icon and left-click to bring up the Main Menu. Left-click over theSAVE option. This displays a list of named, saved games. Click on an available slot, type in a name for the game you are saving, and press Enter to save it. Saving your game from time to time during play is a good idea.
Quick Save can be done in two different ways. First, to the left of the movement arrows on the bottom of the Adventure Screen are four icon buttons. The second button from the top represents a computer disk with information being saved to it. Clicking on this button allows you to save the game without going through the Main Menu. Another method is to press S on your keyboard. To restore a game from the quick save position you can either click on the fourth icon button, the one representing information being restored from a disk, or you can press Shift R on your keyboard.
Also, double right-clicking over the Eye of Ra quick saves your game and returns you to the DOS prompt.
You should note that the quick save file is a hidden file and never appears in the saved game list, so don’t be alarmed when you do not see it displayed.
When the last member of your party dies and the game is over, an option to quick restore from your previous save position is displayed. This saves you the trouble of going through the menus to reestablish your adventure.
LOAD GAME
To restore a previously saved game, move the mouse cursor over the Eye of Ra icon and left-click. From the Main Menu, left-click again over the LOAD option. This displays a list of named, saved games. Click on the game you wish to continue playing.
PAUSE GAME
Pause the game at any time by left-clicking when the mouse cursor is over the Eye of Ra. The Main Menu appears in the center of the Adventure Screen and the game is paused.
21
The game is also paused when the Inventory Screen is displayed. This is done by left-clicking the mouse cursor over any character portrait. Right-clicking on the Inventory Screen returns you to the Adventure Screen and the game.
You may also pause the game by pressing P on your keyboard. To resume, press P again.
QUIT GAME
To quit the game, left-click when the mouse cursor is over the Eye of Ra. The Main Menu appears in the center of the Adventure Screen. Left-click over the QUIT option to end your game.
It is also possible to quit the game at almost any time by pressing Alt-Q on your keyboard.
PLAYING IN-DEPTH
Inventory Screen
ARMOR |
DISPLAY |
|
HIT POINT |
WHITE SKULL AND/OR |
CLASS |
STATISTICS |
ENCUMBRANCE |
BAR |
SPELLBOOK APPEARS HERE |
CHARACTER
PORTRAIT
DISPLAY MOUSE INVENTORY
POINTER WITH
AN OBJECT
OBJECT
INFORMATION
HEAD
NECK |
|
SHOULDER |
|
HAND |
CONTAINER |
|
|
WRIST |
SLOTS |
|
BODY
IN-HAND ITEM
RING
INVENTORY SLOTS |
|
A MAGE’S SPELLBOOK |
|
CHARACTER STATISTICS |
To display the Inventory Screen, move the cursor over one of the character portraits at the bottom of the Adventure Screen and left-click.
The Inventory Screen is divided into four sections, one for each of the four possible characters. It contains slots for storing various pieces of equipment in inventory. Names and character portraits appear at the top of each section.

22
CHARACTER RANKING IN PARTY
Characters whose portraits appear on the left and right sides of the screen are considered to be in the rear rank of the party. Characters whose portraits appear near the center of the screen are considered to be in the front rank. This front and rear ranking applies only to interior locations. When the characters are outside they are considered to have formed a less-ordered group and all react as if they have positions in the front rank.
In interior locations, characters in the rear rank can attack only with long or ranged weapons (spear, sling, bow, etc.).
To change the positions of your characters, left-click over the character’s portrait at the top of the screen. The character’s slot becomes outlined in white. Click on a blank slot to move the character to that slot; clicking on another character’s portrait causes the two to switch positions.
HIT POINT BAR
Hit points for each character are represented by a yellow bar at the right of the character’s portrait. As a character takes damage, the bar descends to the bottom of the portrait square. When hit points are dangerously low, the bar turns red.
ARMOR CLASS SYMBOL
The golden shield to the right of the character portrait represents his or her Armor Class (AC). The number displayed on the shield is the current AC.
SCALE SYMBOL/ENCUMBRANCE
To the right of the Armor Class symbol is the scale symbol. Left-click on this icon and a window appears displaying how much weight the character is carrying, how much he or she is capable of carrying, and an encumbrance rating from the encumbrance table found on page 91. The inside of the scale changes color as encumbrance increases and shows red when a character becomes severely encumbered.
A moderately encumbered character receives a -1 penalty to attack; a heavily encumbered character receives a -2 penalty on the attack and a +1 penalty to Armor Class; a severely encumbered character receives a -4 attack penalty and a + 3 Armor Class penalty.
Among the NPCs which can join your party are a wemic adventurer and a desert troll. Both of these characters are capable of carrying twice the weight in equipment and supplies as other characters.
23
WHITE SKULL SYMBOL
Left-click on this icon to display a list of afflictions currently affecting a character. Poison, paralysis, and rotting disease are but a few of the unwelcome examples. Note: this icon does not appear unless a character is afflicted in one form or another.
WHITE SPELLBOOK
Left-click on a white spellbook and a list of magic spells currently influencing a character is displayed. As with the white skull symbol, this icon does not appear until active magic begins to affect the character.
STATISTICS DISPLAY
Next to the character’s portrait on the Inventory Screen is a small green box with a curved arrow inside. Left-clicking on this icon displays the character’s statistical information. Information displayed includes the character’s class and alignment, as well as total experience points gained and the number of experience points necessary to reach the next level. Right-clicking on the green box icon displays statistical information for all of the characters in the party at once.
When a character’s statistics are displayed, the green box appears with a curved arrow inside. Left-clicking on the changed icon returns to the character’s inventory information. A right-click on the changed icon returns to the inventory information for every character in the party.
CHARACTER MANNEQUINS
Below the character portraits on the Inventory Screen stand character mannequins. These represent the characters’ bodies, where clothing, armor, various weapons, and items such as key rings and helmets can be placed. Items may be placed on the following areas.
♦Head: helmets
♦Neck: amulets and medallions
♦Hands: weapons, shields, sacks, key rings, potions, or any similar objects
♦Wrists: bracers and gloves
♦Shoulder: a quiver to hold arrows
♦Body: armor, cloaks, robes
24
Though male, female, short, and tall figurines are displayed, any clothing found fits any character. Two exceptions to this rule exist: the wemic wears only wemic armor and the desert troll wears only desert troll armor.
Note: The desert troll NPC cannot wield any weapons or carry any objects in his hands. The only item of use to the desert troll is his special armor.
RINGS
To the right and left of each character mannequin is a representation of the character’s hands. Rings can be placed on these representations by left-clicking when a ring is over the hand icon. Each character may wear two rings at any one time.
INVENTORY SLOTS
Twelve inventory slots exist beneath each character mannequin. An exception to this is the desert troll, who has only eight inventory slots. While the troll has fewer inventory slots, he has twice the weight carrying capacity of a fighter. Objects you wish your characters to carry with them on the adventure may be placed in each character’s inventory slots. To do this, use the object manipulation techniques described in the “Pick Up and Drop Objects/Add Items to Inventory” section on page 17.
TO OPEN A CONTAINER
To open a container, such as a sack or a chest, place the object in the left hand of a character mannequin. When this is done, the container opens up and displays its contents. Objects within the container may now be put into inventory, swapped with items already in inventory, or the character may simply place the entire container in inventory.
To close the container, left-click on the character’s left hand.
OBJECT INFORMATION
When an object is selected, it is superimposed over the mouse pointer. When selected on the Inventory Screen, a message bar appears in the center of the screen below the character portraits and gives a short description of the object.
To return to the Adventure Screen, right-click with the mouse anywhere on the Inventory Screen, except over the statistics icon.
25
Automapping
SCROLL
MAP NORTH
SCROLL MAP
EAST
MAPPING
AREA COLLECTED MAPS
SCROLL |
|
|
|
|
|
|
|
|
|
|
|
|
|
||||
|
|
|
|
|
|
|
|
INSERT TEXT |
|
|
|||||||
MAP |
|
|
|
|
|
|
|
|
|
|
|
|
|
|
|
||
|
|
|
|
|
|
|
|
|
|
|
|
|
|||||
WEST |
|
|
|
|
|
|
|
|
|
SHOW MAP |
|
|
|||||
|
|
|
|
|
|
|
|
|
|
|
|
|
|
TEXT ON/OFF |
|
|
|
|
|
|
|
|
|
|
|
|
|
|
|
|
|
|
|
||
|
|
|
|
|
|
|
|
|
|
|
|
|
|
|
|
|
|
|
|
|
|
|
|
|
|
|
|
|
|
|
|
|
|
|
|
|
|
|
|
|
|
|
|
|
|
|
|
|
|
|
|
|
|
|
|
|
|
|
|
|
|
|
|
|
|
|
|
|
|
||
|
|
|
|
|
|
|
|
|
|
|
|
|
|
|
|
|
|
|
|
|
|
|
|
|
|
|
|
|
|
|
|
ERASE TEXT |
|
|
|
|
|
|
|
|
|
|
|
|
|
|
|
|
|
|
|
|
|
|
|
|
|
|
|
|
|
|
|
|
|
|
|
SAVE MAP |
|
|
|
|
|
|
|
|
|
|
|
|
|
|
|
|
|
TO DISK |
|
|
|
|
|
|
|
|
|
|
|
|
|
|
|
|
|
|
|
|
|
|
|
|
|
|
|
|
|
|
|
|
|
|
|
|
|
|
|
|
|
|
|
|
|
|
|
|
|
|
|
|
|
|
|
|
|
|
|
|
|
|
|
|
|
|
|
|
|
|
|
|
|
|
|
|
|
|
SCROLL MAP SOUTH |
|
RETURN |
|
GLOBAL SAVE |
|
|
|
|||||||
|
|
|
|
|
|
TO GAME |
|
AND RESTORE |
|
|
|
|
|
|
|||
|
|
|
|
|
|
|
|
|
|
|
|
|
|
|
|
|
|
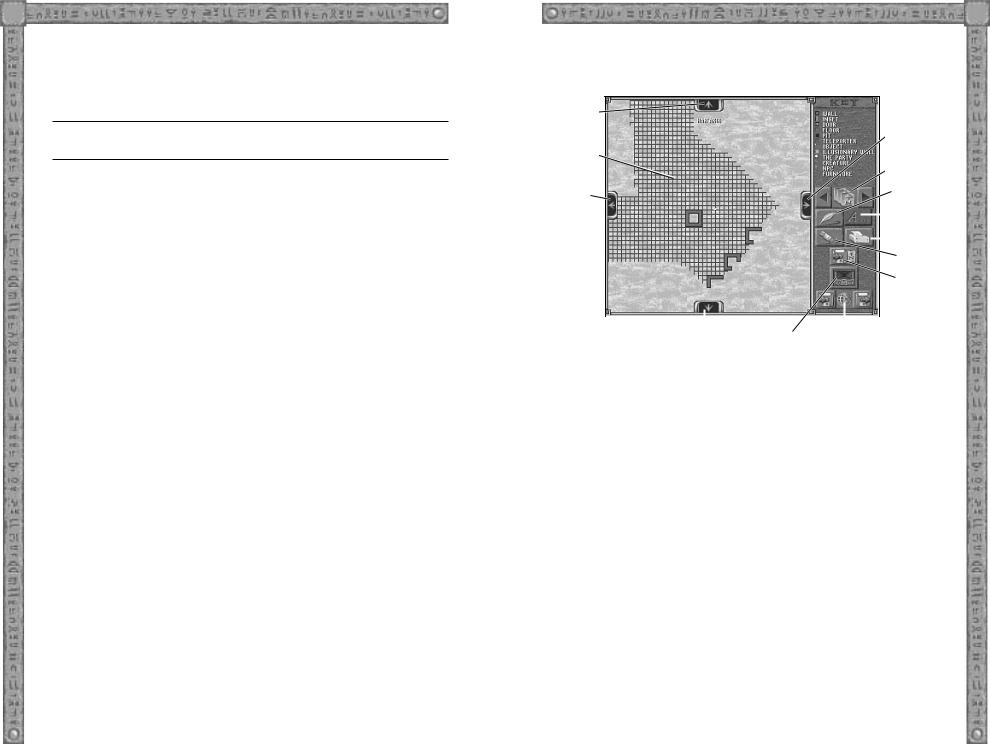
As your party explores the many lairs and labyrinths of Har’Akir, the last thing you want to do is map each step of the way with pencil and paper. We’ve made it easy by including a versatile automapping feature. The map is displayed from the Adventure Screen. To the left of the movement arrows at the bottom of the screen are four icon buttons, the third of which represents a parchment map. Left-click on this button to display the automap. You may also choose the automap feature from the Main Menu. To do this, move the cursor over the Eye of Ra icon and left-click, bringing up the Main Menu. Choose AUTOMAP from this menu by placing the cursor over the option and left-clicking.
LINE OF SIGHT
The area map is based on your characters’ line-of-sight, so the only parts of a dungeon which have been explored are shown. Everything on the map reflects the current status of the items shown. Doors are displayed open or closed. This makes automapping a very useful tool. Walls, insets, doors, floors, trap doors, rugs, pressure plates, illusionary walls, your party, trees, creatures, NPCs, and furniture are all displayed on the map. Note, however, that items and creatures of which your characters are not yet aware remain hidden.

26
MAP SCROLLING
At the top, bottom, and sides of the automapping window are small arrows, icons which can be used to scroll to the north, south, east, and west of the map. This becomes useful when the map grows larger than can be displayed all at once.
MAP ICON BUTTONS
Various icon buttons are displayed below the legend to the right of the screen. Representing the abilities to scroll through several maps, display text, save to disk, return to the game, and use global save and restore, these buttons add a number of versatile features to the mapping process.
COLLECTED MAPS
The first icon below the legend appears as a number of parchments between a right and a left button. By clicking on the buttons to either side, you may scroll through the maps available from levels already explored.
INSERT TEXT
The second icon is a quill. Left-clicking on the quill allows you to type notes anywhere on the map window. Simply move the cursor to the desired position and left-click to begin your text line. Hitting the Enter key allows you to continue your text on the next line. Up to four lines of text are available for each entry. Press the Esc key to return the cursor to the screen, and left-click on the quill to exit this mode.
SHOW OR HIDE TEXT
The third icon appears as the letter A. Clicking on this button hides or displays the text which you have entered on the map. In this way any text can be temporarily hidden to allow better viewing of the map.
The text can be restored by clicking A once again. Note that when the text button is off, the text is not printed when the print option is used.
ERASE TEXT
The fourth icon is a pencil eraser. Left-click on the eraser icon once and you may move the cursor over any line of text on the map. Another left-click erases the line you have chosen. Click on the eraser once more to exit this mode.
27
The fifth icon is a computer printer, and clicking on this button sends the automap to print. This unique feature allows you to print the layout of the map your characters are currently exploring.
Note: Text is not printed as it appears on your computer screen. Text is printed below the map, but remains useful because of a footnoting technique wherein letters overlaid at various locations on the map are associated with text notes. A little practice quickly allows you to make the most accurate use of this feature.
Special Note: Please be certain your printer is On and set up to print out a map. In order for the print function to work, the printer must be set to print the IBM character set. Refer to your printer instructions for information on how to set up your printer, and if you are using a laser printer, be aware you may have to change the printer font to the IBM character set.
MAP SAVE
The sixth icon is a save button. It represents information being saved to a computer disk. By selecting this option you save the currently viewed map into a file in the “Automaps” subdirectory.
EXIT
The seventh icon is an exit button. It looks like a miniature version of the Adventure Screen. Left-click on this button to return to the Adventure Screen.
GLOBAL SAVE AND RESTORE
The eighth icon shows two disks, one on either side of a global map. The disk to the left is “global save” and the disk to the right is “global restore.” Using this feature saves all of the maps, text, and information you have acquired, even if the last member of your party dies. Ordinarily, mapping information is lost when the last party member falls; however, if global save has been used, your party’s hard won information can be made available to the next set of characters who venture into Har’Akir. Global save records all of the areas explored by the party at the time of the save. Global restore brings back the maps and information available at the time of the last global save. Map areas explored only in a previous game are shaded down. In this way you can see which areas are newly explored and which have been restored from a previous adventure.
 Loading...