


TABLE OF |
|
CONTENTS |
|
Multiplayer . . . . . . . . . . . . . . . . . . . . . . . . . . . . |
28 |
Network Minimum System Requirements . . . . . . |
28 |
Main Multiplayer Menu . . . . . . . . . . . . . . . . . . |
28 |
Game Types . . . . . . . . . . . . . . . . . . . . . . . . . |
30 |
Quick Battle . . . . . . . . . . . . . . . . . . . . . . . . . . . |
32 |
Quick Battle Setup . . . . . . . . . . . . . . . . . . . . |
32 |
Keyboard Commands . . . . . . . . . . . . . . . . . . . . . . |
34 |
Starfleet Archival Database . . . . . . . . . . . . . . . . . . |
37 |
Query: Alpha Quadrant, Recent History . . . . . . . |
37 |
Query: Astrometrics, Maelstrom . . . . . . . . . . . . |
38 |
Query: USS Dauntless NCC-71879 . . . . . . . . . . . |
39 |
Query: Admiral Liu, Letter of Condolence . . . . . . |
40 |
Query: Crew Records, USS Dauntless . . . . . . . . . |
41 |
Query: Sovereign Project/Classified . . . . . . . . . . |
53 |
Query: Geordie LaForge, |
|
Notes on the Sovereign Class . . . . . . . . . . . . |
57 |
Query: Operational Ships and Facilities, Maelstrom . . |
59 |
Configure . . . . . . . . . . . . . . . . . . . . . . . . . . . . . |
77 |
General Options . . . . . . . . . . . . . . . . . . . . . . |
77 |
Sound . . . . . . . . . . . . . . . . . . . . . . . . . . . . |
77 |
How to Configure your Computer’s Graphics . . . . |
78 |
Configure Controls . . . . . . . . . . . . . . . . . . . . |
79 |
Credits . . . . . . . . . . . . . . . . . . . . . . . . . . . . . . . |
80 |
Customer Support . . . . . . . . . . . . . . . . . . . . . . . . |
84 |
Software License Agreement . . . . . . . . . . . . . . . . . |
86 |
Keyboard Command Chart . . . . . . . . . . . . . . . . . . . |
94 |
Keyboard Reference Card . . . . . . . . . . . . . . . . . . . |
95 |
F O R W A R D
FOREWORD
In late 1998, Activision contacted Totally Games about the possibility of creating a new and truly authentic interactive Star Trek® experience. Totally Games had already created four best-selling and well-loved space combat titles in the other great space fantasy license, Star Wars®. The team here was interested in trying something new and different so with excitement we began our work. We spent six months researching, designing and testing out our ideas to see if we could design a product that would fuse the best of Trek and modern computer technology to create an involving and compelling game experience while doing the universe justice.
Our goal was to create an exciting game that would be accessible and understandable to anyone who has ever seen Star Trek®. Who when watching Kirk or Picard did not want to see how it felt to be in the Captain’s chair and save the day? Our challenge to the game industry and ourselves was to reinvent the venerable genre of space combat games while at the same time creating a game that leveraged the best known science fiction universe.
Since the start, Star Trek®: Bridge Commander™ has been a labor of love for our entire team here at Totally Games. We are happy to have been able to help deliver this game into your hands and now hope you will enjoy playing it, sharing it with friends and extending it as far as possible. The entire team hopes to meet many of you online in battle or on the forums to discuss the game and how to extend it.
May the wind be at our backs,
Sincerely,
Lawrence Holland, Creative Director David Litwin, Project Lead
And the Bridge Commander Development Team of Totally Games
1

INTRODUCTION
INTRODUCTION
The Dauntless had been ordered to the Remmler array at Arkaria base to undergo badly needed maintenance. After the many fleet actions the ship had participated in during the Dominion War, it was in dire need of a refit.
Captain Wright was a veteran of three major conflicts—the war with the Cardassians, the fight against the Borg and the Dominion War. His service record was impressive, which is why he earned command of the Dauntless, the ship nicknamed within the ranks of Starfleet as “The Seeing Eye.” Wright had experience, which showed in his graying hair and the chiseled lines in his face.
A tall man, he had a commanding presence. His confidence was tempered only by his humility, as evidenced by the way he always gave praise to his crew before himself. He was considered a just commander to serve under. In all that he was and in his every action, he had earned the respect of every crew he commanded.
Wright sat in his ready room preparing some last minute reports on a PADD in front of him. The chime of his communicator distracted his attention from his report. Almost reluctantly, he tapped the combadge on his tunic.
“Wright here.”
“Captain, has the baryon sweep passed through engineering?”
“Yes, Number One. It’s already passed through the bulk of the ship and is now aft of engineering on the nacelles.”
“Then I’ll have our very anxious Chief Brex beam up to start a rundown on ship’s systems and unlock the engineering stations.”
“Good thinking, Commander. We’ll have to get underway very soon as it is. We’ve received our marching orders.”
“Something interesting I hope.”
“Probably routine; a simple re-supply run to the Vesuvi system. Until their science observation post is complete, we are to investigate their star’s odd behavior. Readings are inconclusive from the science teams on Vesuvi 3, and Federation scientists are interested.”
“The Vesuvi system? That’s in the Maelstrom.”
“Should make for a fun time for Miguel at the very least.” “I’ll let him know so he can get psyched up, sir.”
Wright chuckled. “You do that, Number One. I’ll need you back up here as soon as possible as well.”
INTRODUCTION
“Aye, sir.”
“Wright out.” The Captain went back to writing up his
report.
After six months’ service aboard this vessel, the Commander has proven to be a most promising First Officer. I have no doubt more seasoning will see him on his way to his own starship command.
A tinge of yellow light pierced the black curtain surrounding the sphere of solar fire illuminating the Vesuvi system. Next to the Briar Patch and the Badlands, the Maelstrom had been listed by the United Federation of Planets as one of the most inhospitable areas for human colonization, mostly due to its dense pockets of radiation and solar disturbances. The Vesuvi system fell near the edge of this volatile area, making its incipient Federation colonies unsavory posts for any UFP personnel.
The terraforming process had just begun on Vesuvi 3. It was slow work setting up the atmosphere processors that would clean and filter the toxins poisonous to humans while at the same time establishing a more habitable environment replete with breathable oxygen. Until now, trying to colonize any region of the Maelstrom was considered unthinkable. Recent advances in atmospheric shielding made it possible, finally, to carve out a foothold for Federation research. The brightest minds in science had long made a case for establishing research outposts within the Maelstrom to better understand the phenomena recorded within it. The Draegos colony, on Vesuvi 3, was to be the first of these science posts, in addition to two private colonies at the edge of the system established to mine the rich mineral deposits discovered there.
Chief Serson of the Starfleet Corps of Engineers had been assigned to Draegos only three months ago. He’d hoped for a more noteworthy project, but his expertise in terraforming worked against him.
“Six months. I can’t believe it — six months until we can get this damned atmosphere processor online.” Serson knew he had more to offer than acting as foreman on a project like this for half a year, no matter the scale. “You’d think, with all of my contributions to the Prometheus, I’d be assigned to the Sovereign refit. Instead I’m standing here routing ODN lines for an atmosphere generator.”
“It could be worse, you know. If you spend less time grumbling we might be able to finish in five months instead of six.” Lieutenant Nathan James had been Chief Serson’s friend for the last six years. They enjoyed their assignments together, made frequent by their similar backgrounds in Engineering and Science.
2 |
3 |

INTRODUCTION
After seven hours outside the Starfleet habitation biosphere the heat from the solar radiation could be felt on their skin, even through the climate-controlled suits they wore. There were one hundred and thirtytwo engineers assigned to this project, all living within a large duranium composite dome erected as a shelter from the harsh solar radiation that beat down on them relentlessly.
“Hey, James, pass me that coil spanner,” Serson said. “Will I ever be glad when our re-supply ship gets here. I received a subspace message from my wife. She’s been stationed on Starbase 12, and she said she was putting something on the next re-supply run for me. Said it would help me cope with the harsh conditions.”
James brought the coil spanner to Serson, then moved back to his task linking the ODN conduits.
“I hope it’s Saurian brandy. I’m beginning to get sick of synthehol,” James quipped.
Serson cracked a smile as he used the coil spanner on the ODN network links.
The intercom inside the suits chimed, signaling an open channel. The voice that came over the helmet speakers belonged to Jordan, the female communications officer inside the biosphere. “Okay gentlemen, you’ve just passed your safe time outside. Get back in for your Hyronalin hypos.”
“Hyronalin—that stuff makes me vomit.” James protested
playfully.
“Well, either you take the hypo, or you die of radiation poisoning. It’s your choice, and it would technically only matter if someone left behind missed you.”
“That’s not very nice.”
“Oh, sorry, Nathan. We’d all miss you.” She added with a giggle that could be heard over the suit intercoms, “After all, where would we find another pigeon for poker night?”
“Okay, Jordan, we’re heading in now. Any word from Starbase 12?” Serson looked up hopefully.
“They’ve signaled that a re-supply ship has been routed to us; should be here within the hour. A Galaxy Class ship no less. Guess we’re getting the royal treatment.”
“More like a royal pain in the butt,” James snapped. “I’d only really be happy if we got to leave with them. I’m going to have a permanent suntan when we leave this post.”
He and Serson began the walk back to the biosphere. The gray duranium hull of the saucer section became visible as the
Dauntless crossed out of the planet’s shadow and into the light of the Vesuvi star.
INTORDUCTION
“We have arrived in the Vesuvi system, Captain,” Ensign Kiska reported with exuberance. It was unusual to find this attitude in most Bajorans, but her youth belied resentment of her people’s struggle with the Cardassians. She was green, but very bright and extremely eager.
Captain Wright hit the intercom switch in his ready room in response. “Understood. We’ll be out in a moment, Ensign.”
“Aye, sir,” she replied.
“Has the Icarus been prepared for launch, Number One?” “Yes, sir. If I may ask, is it necessary to take a shuttlecraft
down to the settlement?”
“I have a surprise from my daughter for my son-in-law. I trust you won’t say anything to the crew if you happen to see it as I pack.”
“Of course not, sir.”
Wright pulled a blue bottle from his duty chest and held it up for a moment before packing it into his travel case.
“Ah, I see, sir. Can’t transport down with that.”
“Not unless I want the ship’s log to note that I carried Romulan Ale to a Federation colony that’s not supposed to have any intoxicants at all. There are certain privileges afforded in deep space vessels, and this is one of them.” The Captain put the last of the items into his travel case.
“I understand, sir. I shall omit any reference to it in my official log.” The Commander smiled, knowing the Captain would get the joke.
“I have something for you when I get back—your review. I just finished it. We’ll talk more when I get back.”
“Aye, sir. Have a good time. I’ll make sure everything runs smoothly until you get back.”
The Captain started out of the ready room as the Commander followed him.
“If the Admiral calls for any reason, tell her I’ll return within the next two hours.”
“Will do, sir.”
“And take care of our ship, Number One. I want her back in one piece.”
“I’ll try to keep her together while you’re gone, sir.” Wright stepped into the turbolift, travel case in hand. He looked at his First Officer with a nod of approval. “Commander, you have the Conn. Shuttle Bay Two.” The doors to the turbolift snapped shut, and its hum could be heard as it sped away from the bridge.
4 |
5 |

GETTING STARTED
GETTING STARTED
LAUNCH SCREEN
The following buttons are available from the Splash Screen:
Install – Begins the installation of the game. This button will become “Reinstall” once the game is installed.
Extras – Click here for demos and other products.
Links – Internet links to other Star Trek™ titles and websites.
Play – Launches the game. This option is not available until you have installed the game.
Help/Support – Click here for help with the game. This button will open the Bridge Commander™ Help File, which provides installation instructions, known compatibility issues, and troubleshooting steps.
Exit – Closes the Launch Screen.
INSTALLATION
To install the game, insert the game CD into your CD-ROM drive and choose one of the following options to install the game:
If your CD-ROM drive has AutoPlay enabled, the Launch Screen will appear automatically. Click Install and follow the on-screen installation instructions.
If AutoPlay is not enabled, double-click on the My Computer icon on your desktop. Double-click on the CD-ROM drive icon. Double-click on the Setup icon. When the Launch Screen appears, click Install.
QUICKSTART
If you want to circumvent this manual and take the Conn right away, there are a few things you will need to know first. Most importantly there are two major gameplay modes, “Bridge Mode” and “Tactical Mode.” In Bridge Mode you will be able to give orders to your crew, while in Tactical Mode you will be in direct control of your ship. Press the Space Bar to switch between the Bridge and Tactical modes.
The following are the basic commands and keys you will need to know if you wish to jump right into the game:
GETTING STARTED
MOUSE CONTROLS
On the Bridge
To select a crewmember, move the mouse left or right to look towards the crewmember you wish to select and left-click with your mouse. A menu will appear with the options available for that crewmember. Some crewmembers will have other submenus that can also be selected. To deselect a crewmember, click on an area off the menu. Click on another crewmember to bring up their menu instead.
In Tactical
To select menu options in this mode, simply use the mouse to left-click on a menu. To fire your phasers, left-click an area other than the menus. To fire your torpedoes, right-click an area other than the menus.
KEYBOARD CONTROLS – General
Move up/down on the menus |
|
Back out of/Open a submenu |
|
Switch between Tactical and Bridge modes |
Space Bar |
Cycle through targets |
T |
Toggle Map Mode |
M |
KEYBOARD CONTROLS – Tactical Mode
Move the ship up/down |
W/S keys |
Move the ship left/right |
A/D keys |
Roll the ship left/right |
Q/E |
Cycle through Targets |
T |
Toggle, Chase and Tracking Cameras |
C |
Fire your Phasers |
F or left-click |
Fire your Torpedoes |
X or right-click |
Select Speed |
0-9 |
Set Impulse Reverse |
R |
Please note that all of these keys are for the default settings in the game. See page 34 for a detailed list of all keyboard commands.
6 |
7 |

MAIN LCARS MENU
MAIN LCARS MENU
When you begin the game, you will be introduced to a menu called LCARS, the Library Computer Access and Retrieval System. From the LCARS menu, you can select the type of game you would like to play, load a saved game, configure the various options in the game, view credits or quit the game.
To navigate the menu, you can use your mouse or the arrow keys. To select a menu option, left-click with the mouse or hit the ENTER key on your keyboard. Use the TAB key to move between the different parts of the interface, and use the arrow keys to cycle through various settings or to navigate between parent and child menus.
You can access the LCARS menu at any time by pressing the ESCAPE (ESC) key.
NEW GAME
Select this button to set up a new single player campaign of Star Trek™: Bridge Commander. Enter your name and select a difficulty setting, then click Start to begin.
Please see page 27 for more information on the single player campaign.
QUICK BATTLE
This button takes you to the bridge of your ship, where you can initiate a simulated battle with starships in the ship’s computer library. This mode allows you to command any ship in the computer and select friendly and enemy ships of your choosing. Use this mode to hone your combat skills, simulate great battles from Starfleet history, and learn more about any ship’s strengths and weaknesses. Please see page 32 for more information on Quick Battle.
MULTIPLAYER
This button opens the multiplayer menu. From there you may choose to host your own game or join a game, either over the internet or a LAN. There are several different types of multiplayer games, wherein you may choose to command any ship and test your mettle against other top captains. Please see page 28 for more information on multiplayer.
LOAD GAME
Select this button when you wish to load or delete a previously saved game. See page 27 for more on loading saved games.
MAIN LCARS MENU
CONFIGURE
Select this button to configure the various settings in the game. Here you can set your general options, sound options, graphics options and configure your controls. Please see page 77 for more detailed information on configuring your game.
QUIT GAME
Select this option to end your current game, or to exit the program to the desktop.
8 |
9 |
COMMANDING YOUR SHIP
COMMANDING YOUR SHIP
Commanding a starship requires critical thinking, strategic and tactical awareness, decisiveness, and leadership. As Captain, you will need to lead your crew through dangerous situations, balancing your mission objectives against the safety of your ship and crew. You will often need to delegate control of your ship and bridge functions to your crewmembers, while remaining ready to intercede at a moments notice.
BRIDGE
Welcome to the bridge of your ship, Captain. As the Captain, you are responsible for the safety and well being of your entire crew. From here, you can give your crew different commands as you explore the troubled region of space known as the Maelstrom.
Interacting with the Crew
You will be commanding some of the finest officers Starfleet has to offer. To interact with your crewmembers, simply move the mouse left or right to look towards them. A status window will appear above each character when your view is centered on them. This status window, also known as Character Tool Tips, will indicate the officer’s rank, name and bridge function. It will also display their status or the order they are currently carrying out. To select a crewmember, make sure you are looking at them and that this status window appears above them. When you are looking at the desired crewmember, click on them with your left mouse button.
When you select an officer, a menu of orders as well as a mouse cursor will appear. To issue a command, move the mouse cursor and click on your menu choice, and your officer will begin to carry out his or her new order. You can use the Up or Down arrow keys to move up or down the menu options. Open and close submenus using the Left or Right arrow keys, and activate a selected menu option by pressing ENTER. To deselect an officer, move the mouse cursor away from the menu area and click anywhere else on the screen.
In addition, you can choose your officers and open their menus by using the F1-F5 keys. F6 brings up the guest menu. Press the same function key
(F1-F5), or the F6 key, to deselect an officer and close their menu. Keyboard commands are described in further detail on page 34.
COMMANDING YOUR SHIP
CREW POSITIONS
Throughout your missions, you will become intimately familiar with your crew and their responsibilities. The following is a brief explanation of their positions:
First Officer
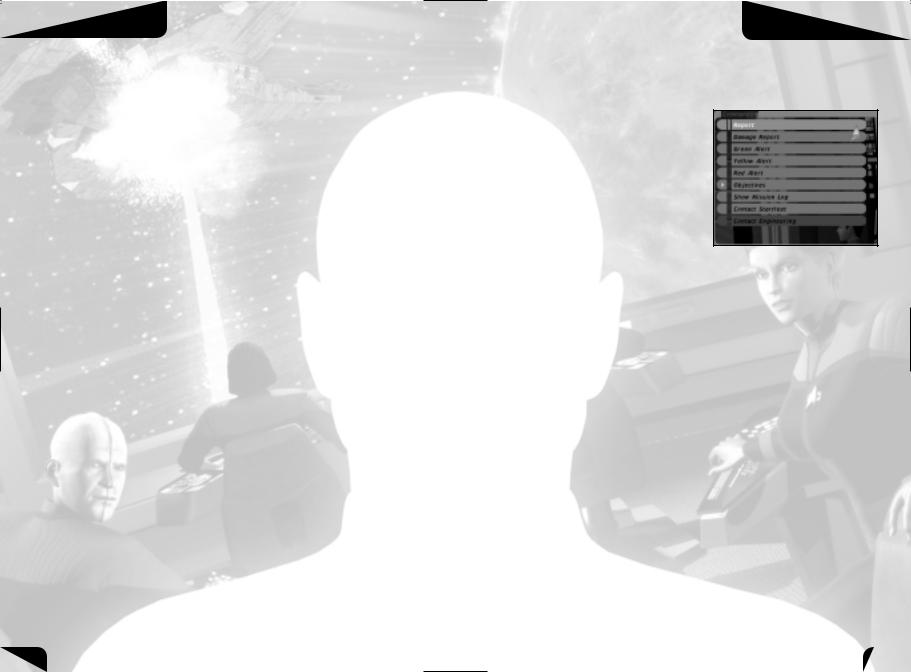
As your First Officer, Commander Saffi Larsen acts as your right hand throughout your missions. She is responsible for the various alert stages of your ship as well as assisting you in keeping track of all objectives and logs in the game. She is also responsible for priority communications to Engineering and Starfleet. See page 41 for Saffi’s personal records and service jacket.
Report – Clicking on this button will solicit your First Officer’s advice, comments or candid opinions about the current situation.
Damage Report – Click here to have Saffi order damage reports from the bridge crew.
Green Alert – Click on this button to take your ship to Green Alert status, otherwise known as Condition Green. This means you are in a non-aggressive state, and all your shields and weapons will be powered down, allowing you to repair and recharge your batteries.
Yellow Alert – Click on this button to take your ship to Yellow Alert status. This is a defensive state with your shields raised. Your weapons, however, will not be powered up.
Red Alert – Click on this button to take your ship to Red Alert status. This brings weapons and shields online, making you ready for combat. At Red Alert you will begin draining battery power. Battery power is described in further detail on pages 17-20.
Objectives – Click on this button to bring up a list of the current mission objectives. Click on the specific objectives to get a more detailed description.
Show Mission Log – Click on this button to review all the pertinent dialogue that has occurred thus far in the game.
Contact Starfleet – Click on this button to contact Admiral Liu at Starbase 12.
Contact Engineering – If Brex, your Chief Engineer, is in Engineering, click on this button in order to speak with him.
10 |
11 |

COMMANDING YOUR SHIP
Helm
Your Helm Officer, Ensign Kiska LoMar, is responsible for communications and piloting the ship. From LoMar’s menu, you will find orders for hailing, navigation and other non-combat maneuvers she may need to perform. See page 49 for LoMar’s personal records and service jacket.
Report – Click on this button for LoMar’s advice, comments or opinions.
Hail – Click on this button to open a list of the nearby ships, planetary colonies and bases. Clicking on one of these will order LoMar to open a channel and attempt to hail.
Occasionally you will be given friendly ships under your command. When this happens, an additional menu will appear with the following commands available:
Resume Old Orders – Orders
this ship to ignore your last order.
Attack Target – Orders this ship to attack and destroy your target.
Disable Target – Orders this ship to attack and disable your target.
Defend Target – Orders this ship to defend your target.
Protect Me – Orders this ship to attack your attackers.
Dock With Starbase – Orders this ship to dock, re-arm and repair (only at Starbase 12).
Set Course – Clicking on this button will bring up a list of available solar systems to which you can warp. Due to Starfleet regulations, you cannot warp directly to an inner planet of a solar system. Once your ship arrives at the outer edge of a solar system, you are then free to travel deeper within at a reduced warp factor. The solar system you are currently located in appears at the top of the Set Course Menu. Click on the current solar system to open a list of the various regions inside.
Warp – When you have selected a destination on the Set Course Menu, click on the Warp button to order LoMar to engage the warp engines and take you there.
COMMANDING YOUR SHIP
Orbit Planet – Click on this button for a list of the planets and moons in the region. To orbit a specific planet, click on the name of the planet, and LoMar will establish planetary orbit.
Nav Points – LoMar is also responsible for plotting coordinates in space. These coordinates appear on the Nav Points Menu. Click on the Nav Points button for a list of Nav Points LoMar has plotted and entered into the Conn. Select a Nav Point and LoMar will automatically maneuver the ship to it.
Intercept – If an object is targeted, the Intercept command becomes available. Click on this button to order LoMar to intercept the target. If you are farther than 50 KM from your target, LoMar will initiate an InSystem Warp to get to the target quickly.
All Stop – Click on this button to have LoMar stop the ship.
Dock – If you are near Starbase 12, clicking on this button will initiate the docking sequence so you may resupply and/or repair your ship,
as needed.
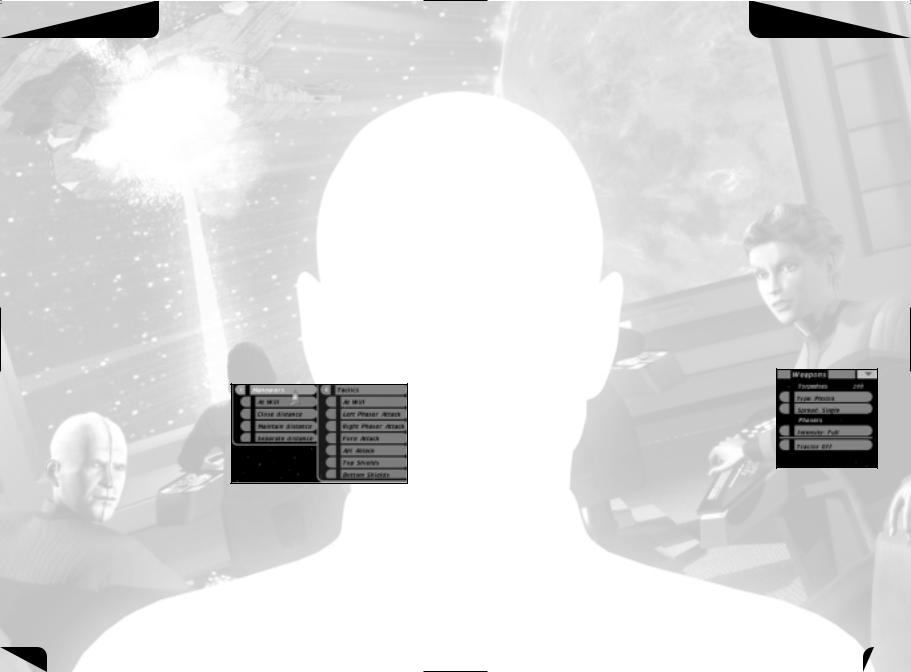
Tactical
Your Tactical Officer, Lieutenant Felix Savali, is responsible for engaging and fighting any ships that threaten you. On Felix’s menu, you will find orders for the various maneuvers and battle tactics he can perform. See page 47 for Felix’s personal records and service jacket.
Report – Click on this button to
query Felix for his advice, comments or opinions.
Manual Fire – Toggle this button to enable Manual Firing Mode. With this mode activated, your mouse cursor will change into a targeting reticle, and you will take over weapons control from Felix. Felix will continue maneuvering the ship (if ordered) in this mode. Move your new mouse cursor over the target to attack specific areas on its hull. When this mode is toggled off, your cursor will return to normal and Felix will regain weapons control.
Phasers Only – Toggle this button to order Felix to restrict his firing to phasers only. He will not use torpedoes when this is toggled on.
Target At Will – Toggle this button to allow Felix to select targets at his discretion. When one target is destroyed, he will automatically choose another.
12 |
13 |
COMMANDING YOUR SHIP
Target List
You can click on the target you want on the Target List. If you click on the target’s name for a second time, it will bring up a list of its subsystems (some subsystems contain a list of components—click the subsystem’s name a second time to open that list). You can target a specific subsystem by clicking on it. For example, if you would like to cripple a ship rather than destroy it, you could target the ship’s impulse engines or weapons systems. The Target List works the same on Felix’s Menu as in Tactical Mode. See page 23 for a more thorough description of the Target List.
Orders Menu
Orders you can give to your Tactical Officer are displayed near the top of the screen, to the right of the Tactical Menu.
Destroy – Click on this button to order Felix to destroy your current target, or any targeted subsystems.
Disable – This button orders Felix to disable any target or targeted subsystems. This is useful for stopping a target without dealing it a critical blow.
Stop – This will order Felix to stop attacking a given target.
Evade – Toggle this button to have Felix evade a given target. This is particularly useful when you need to avoid enemy torpedoes.
Maneuvers Menu
Click on this button for a list of maneuvers Felix can perform. The various maneuvers are:
At Will – Felix will change the distance to the target at his discretion.
Close Distance – Felix will close on the target, and maintain a close distance to it.
Maintain Distance – Felix will attempt to stay the same distance from the target.
Separate Distance – Felix will move away from the target, and maintain a far distance from it.
COMMANDING YOUR SHIP
Tactics Menu
Click here for a list of tactics you can have Felix employ. Be sure to choose the tactic that will bring your most powerful weapons and shields to face your enemy. Choosing a tactic that exposes a weak shield to your enemy could be a deadly mistake. The various tactics Felix can initiate are:
At Will – Felix will attack using various tactics at his discretion.
Left Phaser Attack – Felix will attack with the phasers on the left (or port) side of the ship.
Right Phaser Attack – Felix will attack with the phasers on the right (or starboard) side of the ship.
Fore Attack – Felix will attack with the phasers and torpedoes at the front of the ship.
Aft Attack – Felix will attack with the rear torpedoes.
Top Shields – Felix will maneuver the ship to keep the top (or dorsal) shields facing the target.
Bottom Shields – Felix will maneuver the ship to keep the bottom (or ventral) shields facing the target.
Weapons
The various weapons for your ship are listed on this panel.
Torpedoes
•Type – Clicking on this button will rotate between the various torpedo types loaded on your ship. At the very beginning of the game, you will only have Photon torpedoes available to you.
•Spread – Clicking on this button will determine the number of torpedoes fired at one time.
Phasers
•Intensity – Clicking on this button will toggle between Full and Low Intensity phasers. Low Intensity phasers do less damage per second than Full, but can fire longer because they use less energy. Low Intensity phasers do not generally damage the hull of your target and are therefore safer to use than Full when disabling ships you do not wish to destroy. Low Intensity phasers will, however, damage a target’s hull if you have not targeted any particular system or subsystem.
TIP – If you wish to disable a target without destroying it, you should use Low Intensity phasers. Also, Low Intensity phasers can be more effective for damaging subsystems, provided the target’s shields are disabled or in a weakened state.
14 |
15 |

COMMANDING YOUR SHIP
Special
•Tractor – Click on this button to activate the tractor beam. When a target is in range, and to the fore or aft of your ship, the tractor beam will be projected and automatically lock onto the target. Your target will then have difficulty moving and turning. Using your tractor beam will draw power directly from your Main Battery, so use it with discretion. Battery power is described in further detail on pages 17-20.
•Cloak (Multiplayer and Quick Battle only) – If your ship is equipped with a cloaking device, you may click this button to activate your cloak. If you’re cloaked, your enemies will not see you on their Target List and cannot fire phasers at you. Your shields will go offline, and you may not fire your weapons while cloaked. Using your cloak will draw power directly from your Reserve Battery, so use it with discretion. Battery power is described in further detail on pages 17-20.
Science
Your Science Officer, Lieutenant Commander Miguel Diaz, is responsible for using the sensors to investigate the various regions of space to which you travel. Under Miguel’s menu, you will find commands to scan the area as well as various targets and objects. Miguel can also launch probes. See page 44 for Miguel’s personal records and service jacket.
Report – Click on this button to request Miguel’s opinions, comments
or advice.
Scan Area – Click on this button to |order a scan of the area.
Scan Target – Click on this button to have Miguel scan your currently selected target.
Scan Object – Clicking on this button will display a list of nearby objects. Click any object on the list to have Miguel scan it.
Launch Probe – Clicking on this button will launch a probe. A probe is a small device sent to gather more information about something within the surrounding area. Launching a probe will extend your sensor range. It does so by allowing you to detect and identify objects around the probe's position as if your ship were at that same location. If your sensors have been disabled or destroyed, you will still be able to get sensor information by launching a probe. Note: Probes may not be launched in Multiplayer.
COMMANDING YOUR SHIP
Engineering
Your Chief Engineer, Lieutenant Commander Brex, is responsible for the general maintenance of the ship and assigning damage control teams in critical situations. On Brex’s menu, you can allocate power to your ship and assign engineering teams to repair damaged systems. See page 51 for Brex’s personal records and service jacket.
Engineering Menu
Report – Click this button for Brex’s advice, opinions and sparkling wit.
Repair Team Assignments –
This area is reserved for the current ship systems that are damaged and being repaired. You have three repair teams who will automatically repair systems in the order they were damaged. If only one system is damaged, all three of your repair teams will work on it at the same time so it
will be repaired three times as fast. Click any system on this list to move it down in priority, making room for the next damaged system.
Damaged Systems – Damaged systems not currently being repaired appear in this area. As systems are repaired, the topmost systems on this list are automatically assigned to a repair team. If there is any system you want repaired immediately, click on that system, and it will be immediately placed at the top of the repair queue.
Destroyed Systems – This is a list of systems that have been damaged beyond repair. It is a useful reference during combat and will clarify your overall status and disadvantages. The only way to repair these systems is to dock at Starbase 12.
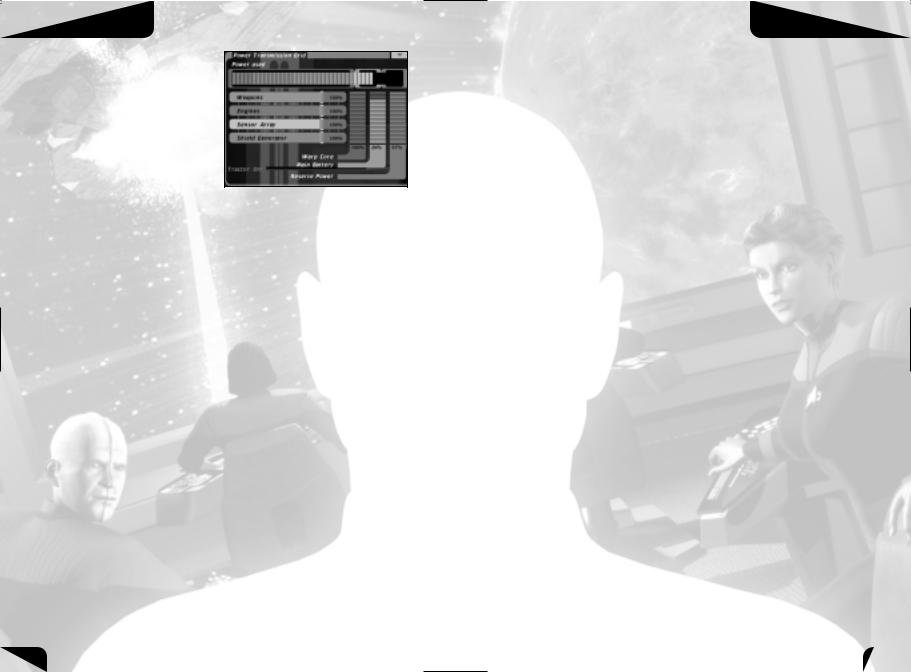
Power Transmission Grid
This panel shows the current state of your ship's batteries and Warp Core. The Warp Core produces all the power for your ship, as well as keeping the ship’s Main Battery and Reserve Battery charged. The Power Transmission Grid allows you to change the amount of power allocated to your ship’s systems. Increased power will result in increased performance, although it may drain your batteries over time. Decreasing power will reduce a system's performance, but will reduce battery drain (or allow for recharging if power
16 |
17 |
COMMANDING YOUR SHIP
usage is low enough). Learning to balance the power levels on your ship will increase your ship's combat effectiveness, especially during prolonged engagements.
There are three main components to this panel— the Power Source Gauges, Power Used Bar, and the Power Allocation Sliders.
Power Source Gauges
These are the three vertical bars on the right hand side of the display. The left bar represents your ship's Warp Core. The middle bar represents your Main Battery, while the right bar represents your Reserve Battery.
Warp Core – This bar displays the condition of your Warp Core. As your Warp Core takes damage, its ability to produce power will be reduced (this will be reflected in the Power Used Bar). If your Warp Core reaches 0%, your ship will suffer a warp core breach and be destroyed.
Main Battery – This bar represents the charge level in your Main Battery. If your power usage is more than the Warp Core produces, power will be drawn from the Main Battery and the gauge will show the battery decrease. If you are not using too much power, then the Main Battery will slowly recharge.
Reserve Power – This bar represents the charge level in the Reserve Battery. If the ship’s power usage is very high, you will drain the Reserve Battery, and the gauge will show the battery decrease. If you are not using too much power, then the Reserve Battery will slowly recharge.
COMMANDING YOUR SHIP
Power Used Bar
This color-coded bar (whose sections correspond to the Power Allocation Sliders) shows the total power being used by your ship systems—a longer bar corresponds to increased power usage. The frame surrounding this bar allows you to see the source of the power being used. The frame is divided into three sections:
Blue – This corresponds to your ship’s Warp Core. This is the amount of power constantly produced the Warp Core—if you are using less than this amount, the remainder will be used to charge the ship’s batteries.
Yellow – This corresponds to your ship’s Main Battery. If you are using more power than your Warp Core can provide, the bar will enter this part of the frame as power is drawn from the Main Battery. If you are constantly draining power from the Main Battery, it will eventually run out and stop providing power.
Red – This corresponds to your ship’s Reserve Battery. In extreme situations, you may be drawing more power than your Warp Core and Main Battery can provide. In this case, the bar will enter this part of the frame and the additional power will be drawn from the Reserve Battery, up to its limit. You cannot draw any more power once your reserve capacity is fully utilized and the bar reaches the far right of the frame.
Power Allocation Sliders
This section, located below the Power Used Bar, allows you to control the power levels for each of your systems. Drag the slider on each bar to the desired power level—the power level is shown on the right end of each bar. 100% is the normal capacity for each system, although you can boost them all the way up to 125% if necessary. (There are no ill effects from doing so, except for the increased power draw.) This extra capacity should be used carefully, since the higher drain could leave you without battery power at an awkward moment.
Weapons – Increasing the power to weapons will make them charge or reload faster. Decreasing power will slow recharging and reloading.
Engines – Increasing engine power will make your ship more maneuverable, and will increase your maximum speed; decreasing engine power will make your ship turn more sluggishly, and move slower.
18 |
19 |
COMMANDING YOUR SHIP
Sensor Array – Higher power levels will increase the effective range of your sensors, while reduced power will shorten their range. The power allocated to the Sensor Array also affects the range at which objects appear on your Target List.
Shield Generator – Higher shield power increases the recharge rate of your shields. Lower power levels result in a slower recharge rate.
Note that if you take damage to the Warp Core, your power settings may be automatically adjusted to account for reduced warp core capacity.
There are two additional items that may appear under the Power Allocation Sliders, depending on your ship’s configuration.
Tractor: On/Off – Indicates whether your tractor beams are powered on or off.
Cloak: On/Off – Indicates whether your cloaking system, if applicable, is engaged or not.
Power Usage Tips
These are some simple tips and guidelines for managing your power.
•Try not to waste power. Leaving your ship in Red Alert (with all of your systems powered) over a long period of time will eventually drain your batteries. When you are not in combat, go to Green Alert to conserve power and recharge your batteries.
•If you notice your ship behaving more sluggishly than usual, or objects dropping off the Target List, check your power settings. You may have suffered damage to your Warp Core, or run out of battery power. Adjust your settings, if necessary, to deal with the reduced amount of power available. Remember that Warp Core damage will cause your batteries to drain faster, since the Warp Core is no longer providing as much power.
•If your Power Used Bar extends out of the blue frame, you are draining your battery. If it does not, you are recharging the batteries. If the bar extends into the yellow frame, you are using your Main Battery, and if it extends all the way into the red frame, you are also using your Reserve Battery.
•Docking and repairing at a starbase will replenish your batteries.
•Tractor beams and cloaking devices are very useful in combat, but remember that they can quickly drain your batteries. Keep an eye on your battery levels while using them, and try not to use them for extended periods of time.
COMBAT
COMBAT
To engage in combat, you can either issue orders to your Tactical Officer or you can engage the enemy firsthand in Tactical Mode, pitting your skills and strategies against the enemy’s. For more information on the various commands you can issue to Felix, please review the “Tactical” section under “Crew Positions” on page 13.
Combat in Star Trek®: Bridge Commander™ is unlike that in most space combat simulations. More akin to naval combat, or submarine warfare, it requires a heightened sense of tactics and strategy. Starships are massive, powerful vessels, and although they are fast, they are less nimble than starfighters. They are more ponderous in their ability to maneuver, and starship combat, therefore, is much like a graceful dance of death between deadly giants as they continually jockey for position. Effective combat maneuvers involve continually orienting your ship to protect your weakest shields, while at the same time bringing your most powerful weapons to bear.
DISTANCE
Tactics, in this game of 3D chess, are everything. As Captain, you will need to maximize your defenses while exploiting your enemies’ weaknesses. You will want to get in close to an enemy when firing phasers, as beam weapons are less powerful from a distance. Torpedoes track their targets more effectively from a distance. You will want to maintain your distance so that your torpedoes have a better chance of tracking their targets. Conversely, maintaining your distance may make it difficult to evade incoming torpedoes since they will be tracking you more effectively. Of course, you may have a chance of evading torpedoes from a distance if you are outside of their tracking range. As soon as your enemy fires torpedoes, it is a good idea to increase speed and turn the nose of your ship in the perpendicular direction. Continue to direct your ship perpendicular to the torpedo’s trajectory. You cannot expect to evade them all, so if you must take a hit be sure it is on a stronger shield.
OFFENSE
You may also need to target your enemies’ individual subsystems effectively, according to the needs of the moment. If your enemy is wearing you down with repeated phaser fire, it may be more important to disable or destroy their weapons subsystems before taking them out. Damaging or disabling one of their engines will handicap their ability to maneuver, making them easier prey. Disabling their sensors will make it impossible for them to target you, and disabling a cloaking device will leave them unable to hide.
20 |
21 |
COMBAT
Alternatively, you may want to wear down their shields first so you can more effectively take out individual subsystems afterward. Try to work down a particular shield instead of spreading your fire across all sides of an enemy.
DEFENSIVE TACTICS
Effective defensive tactics include prioritizing repairs in the heat of battle, effectively managing power to your most critical systems, and maneuvering out of harm’s way. For example, if you are severely damaged, you may find it necessary to repair your shield systems before your weapons. Phasers may take priority over torpedoes in certain situations. You may find it necessary to boost power to your weapons and shields while reducing power to sensors in a difficult battle. Boosting engines may be necessary when engaging faster enemies. Continue to move your ship to keep enemies from penetrating a particular shield. Increase the distance between yourself and your enemy if they are wearing you down with phaser fire. All phasers do reduced damage at greater distances, although this range differs from ship to ship. Stations generally have the greatest range of damage.
TACTICAL MODE
While you can issue commands to Felix from the bridge, there will be times when you will need to view the action from the exterior of the ship. In these situations, you can switch to the exterior Tactical Mode by pressing the Space Bar on the keyboard. Tactical
Mode will provide you with a great deal of information about your ship and the ship you have targeted, as well as the region around you.
Remember that Felix and your other crewmembers are also accessible while in Tactical Mode (see below).
In Tactical Mode, you can take the Conn and pilot the ship yourself. To navigate, use any of the flight
directional keys (W, S, A, D, Q, or E), and Felix will relinquish the controls of the ship to you. To fire your phasers, hold down the left mouse button (or press F). Click on your right mouse button (or press X) to fire your torpedoes. Be sure the cursor is not over a menu when using your mouse to fire.
In Tactical Mode, you will still be able to issue commands to your crew via the F1-F5 keys. Use your mouse to select menu options when your cursor is over a menu. When you issue an order to Felix within this mode, or upon your return to the Bridge, Felix will take the Conn from you.
COMBAT
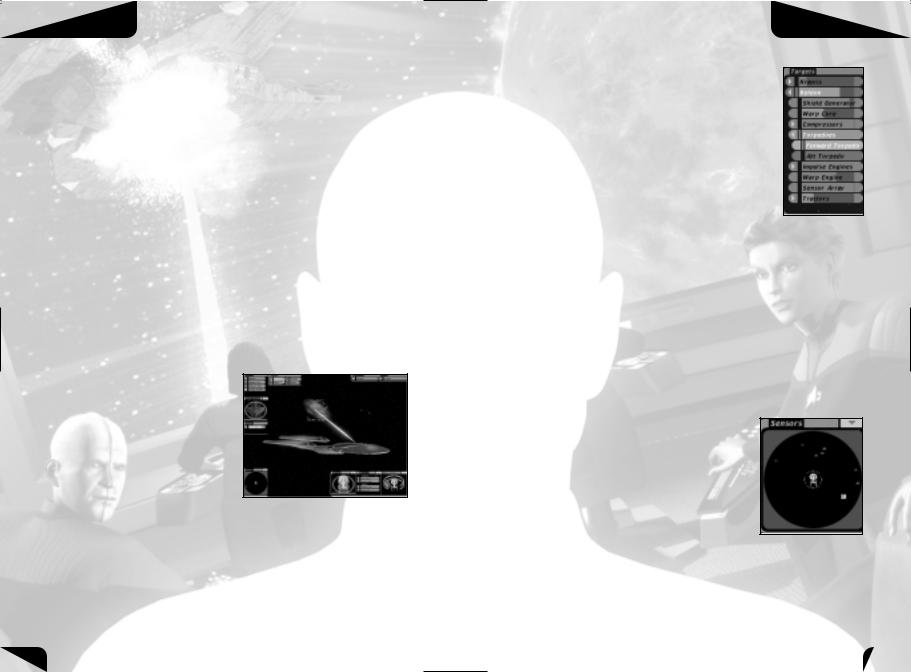
TARGET LIST
You have a few different ways to choose a target. You can press the T key to rotate through all the targets in the area or the I key to rotate through the enemy targets only. Also, you can click on the target you want on the Target List. If you click on the target’s name for a second time, it will bring up a list of its subsystems. Some subsystems contain multiple components. These subsystems have a rightward arrow to the left of their name. Click on the subsystem’s name a second time to open its component list. You target a specific subsystem, or subsystem component, when clicking on it. For example, if you click on a Cardassian Keldon that appears
on the Target List, it becomes selected as your target. Click on the Keldon a second time and a list of its subsystems appears. Click on the Keldon’s Torpedoes, and the Torpedoes subsystem becomes targeted. If you click on Torpedoes a second time, the list of its different torpedo tubes appears, which in this case would be a Forward Torpedo tube and an Aft Torpedo tube.
Subsystems that have been disabled will change color to gray on the Target List and subsystems that have been destroyed will disappear completely off the Target List.
You can also use the keyboard commands to select targets and navigate the Target List. Press the Tab key until the Target List becomes highlighted, then use the UP and DOWN arrow keys to move up and down the list. Press the Right arrow key or Enter to select a target or open a list of the target’s systems and subsystems.
SENSORS
Sensor contacts and targets within range are displayed on a round panel in the lower left hand side of the screen. Use this to gauge the number of enemies in proximity to your ship. At the center of this display is an image of your ship, enabling you to quickly ascertain the relative position of ships and objects around you. You will notice that contacts are colored according to their affiliation,
enemy or ally. Contacts also appear as arrow icons, indicating their facing, or the direction they are moving. You will also notice your target becomes highlighted by a bracket on the sensor display panel, as do enemy ships that are firing upon you. Torpedoes are also indicated on the display, and are differentiated by type, helping you to identify threats you may not be able to see.
22 |
23 |
COMBAT
The Sensors display is two-dimensional representation of three-dimensional space, and “actual” distances are not necessarily the same as they appear on your Sensors. Distance drops off in a non-linear fashion, so as an object gets further from your ship the scale of the Sensors display increases. Because of this, extremely distant objects will stay towards the edge of the Sensors display instead of dropping off entirely. Also, contacts that appear to be the same distance from your ship may actually be at different offsets from the plane, and therefore further from your ship than they appear. Sensor contacts will begin to fade as they move above or below the plane your ship is traveling on. Click on the arrow in the upper right corner to minimize
this panel.
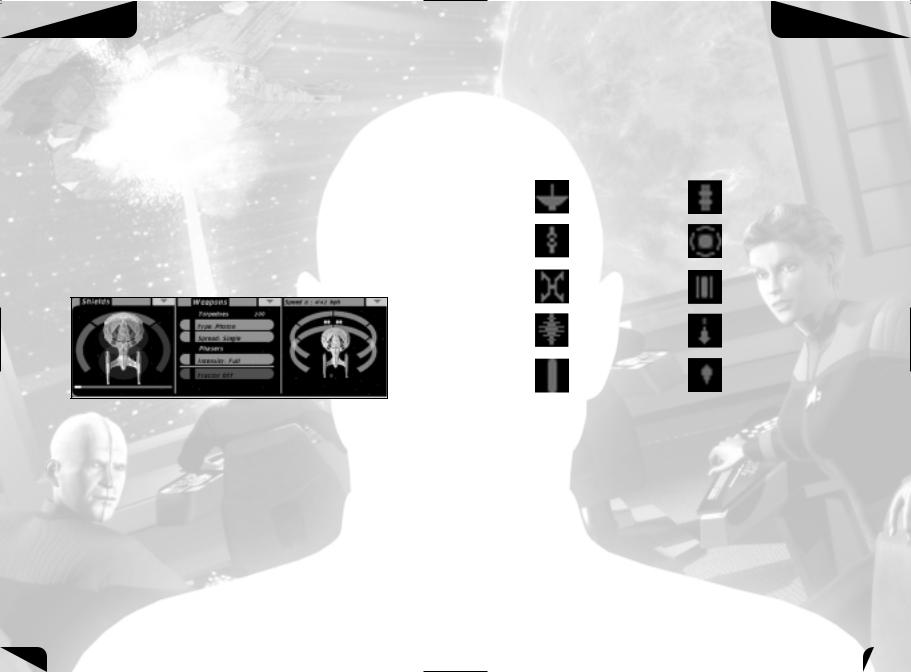
SHIELDS AND WEAPONS DISPLAYS
In the lower right hand corner of the screen, you will notice several displays. These displays indicate the speed of your ship, the type of torpedoes you are using, your phaser intensity setting, the strength of your shields and the readiness of your weapons.
Shields
The Shields display shows the strength of your bow (forward), aft (rear), port (left), starboard (right), ventral (bottom), and dorsal (top) shields. Bright green indicates your shields are at full strength. As you take phaser and torpedo hits from the enemy, your shields will gradually turn from green to yellow, then red, and finally to black when you no longer have any shields on that side of the ship. Your target and its shields will be displayed in the Target Shields display, in the upper left corner of the screen. Click the arrows in the upper right corners of these panels to minimize them.
TIP – As a good Captain, you should constantly rotate the shields facing the enemy in order to prevent any single shield from being depleted completely. In addition, your ship will begin to take damage as weapons energy begins to bleed through weakened shields.
COMBAT
Damage Icons
The amount of damage you take will steadily increase as the strength of your shields decreases. If you suffer damage to any of your systems, icons will be displayed on the image of your ship to indicate which systems have been damaged. Damaged systems have a yellow icon, disabled systems have a gray icon, and when a system is completely destroyed the damage icon appears red. These icons are also displayed with damaged systems in the damage control section of Engineering.
|
Sensor Array |
|
|
Warp Core |
|
Device |
|
|
Shield Generator |
|
|
|
||
|
|
|
||
|
Hull |
|
|
Torpedo Tube |
|
|
|
||
|
|
|
||
|
Impulse Engine |
|
|
Phaser or Beam Weapon |
|
|
|
||
|
|
|
||
|
|
|
|
|
|
Warp Engine |
|
Pulse Weapon or Cannon |
|
|
|
|||
|
|
|
|
|
These icons will allow you to quickly discern the systems that have been damaged, disabled or destroyed on your vessel. The icons will also appear on your Target Shields display so you may quickly ascertain the relative damage to your target. Learn these icons well, since they will provide valuable information in the midst of a heated battle.
As your ship takes damage, you can select the Engineering Menu by clicking on also or pressing F5 on the keyboard. From Engineering, you can review your damage control options (see the "Engineering" section under "Crew Positions" on page 17). Brex will automatically assign teams to begin repairing the damaged systems; however, you can always choose other systems to repair first at your discretion.
24 |
25 |
COMBAT
Weapons
Your Weapons display, also described in the “Tactical" section under “Crew Positions” on page 15, enables you to configure torpedo type and spread, phaser intensity, and to turn your tractor beam or cloaking device (if applicable) on and off. Click the arrow in the upper right corner to minimize this panel
The other important indicator in combat is the Phaser Arc and Torpedo Display. This display is located in the lower right corner of the screen and features a ship’s speed indicator at the top. At Red Alert, there will be various strips surrounding an image of your ship. These strips indicate your phasers’ charge and readiness to fire. There are two layers of strips, representing the dorsal and ventral sides of the ship.
As you fire your phasers, the strips will begin to change color, turning from green to yellow, then to red, and finally to black. Green represents phasers that are fully charged and ready to fire, while black represents phasers that are completely drained of power. Disabled phasers appear gray, and when a phaser is destroyed the strip associated with it will disappear. Your phasers will recharge over time; however, you can increase the rate of recharge by allocating more power to weapons in the Engineering Menu. When a target is within one of your phaser firing arcs, a transparent blue/gray indicator will emanate from your ship image towards the phaser strip facing the target. A target may be in more than one arc at a time. These transparent blue/gray indicators also show where the target is relative to your ship, as well as which phaser arc will fire. When no indicator appears, your target is most likely in a blind spot where your phasers cannot fire.
TIP – It is important to rotate your ship to continually move your target from one firing arc to another to prevent any one phaser array from becoming completely depleted, and to keep enemy ships out of blind spots.
You will also find a number of circular dots near the bow and stern of your ship image. These dots represent the torpedo tubes on your ship. When these indicators are green, torpedoes are loaded and ready to fire on that side of your ship. Red indicates torpedoes are currently being loaded or may be unavailable because you have run out; gray indicates that the torpedo tube has been disabled. These dots disappear when a corresponding torpedo tube has been destroyed. This panel can also be minimized by clicking on the arrow in the upper right corner.
TIP – As you encounter a wide range of adversaries, it becomes extremely important that you monitor the power available to your ship, the strength of your shields and the readiness of your weapons. A good Captain will always protect the weak sides of his ship from enemy fire while bringing his most highly charged and readied weapons to bear.
SINGLE PLAYER
SINGLE PLAYER CAMPAIGN
STARTING A NEW GAME
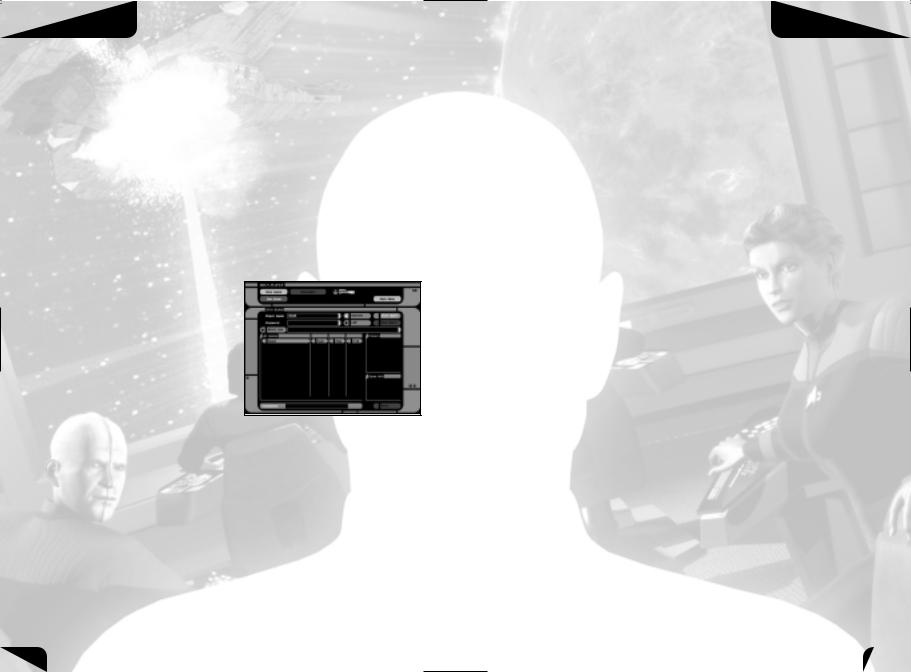
From the main LCARS menu you may select “New Game” to begin a campaign. The following buttons and options appear on the New Game menu:
Player’s Name: Click in the text box to edit your name, or the name for your game. The player's name cannot contain the following characters: , < . > ? / “ \ | :
Difficulty: You may select the difficulty for your game by clicking one of the three radio buttons next to the “Difficulty” tab. First Officer is the easiest setting, Captain is the medium setting and Admiral is the most difficult setting in the game.
Start: Click this button when you are ready to start your game and launch into your first mission!
Editing your name is strictly optional, but it is sometimes fun to name your game after yourself, a great Captain, or a special ship. Please note that keeping the same player name if you restart will overwrite old saved games.
You may also wish to specify the game’s difficulty, choosing to play as a First Officer, Captain or Admiral. First Officer setting is best suited for a new player, or players more interested in the storyline than the difficulty of the missions. Admiral setting is best for seasoned players who want an extra challenge in their gameplay. The difficulty on the Captain setting is a middle ground between the others.
After entering your name and selecting a difficulty level, click the Start button in the lower right hand corner of the screen to begin.
LOADING SAVED GAMES
At key points in the single player campaign, the game will autosave and create a file based on the player’s name. To load a game, click on the file you wish to load and then click on the Load Game button. If you wish to delete a saved game, select the file you wish to delete and then click the Delete button.
26 |
27 |
MULTIPLAYER
MULTIPLAYER
The multiplayer element of Star Trek®: Bridge Commander™ allows you to take on other Federation, Klingon, Romulan, Ferengi, Kessok or Cardassian Captains in battles of skill and strategy.
NETWORK MINIMUM SYSTEM REQUIREMENTS
To play a multiplayer game of Star Trek®: Bridge Commander™, you must meet or exceed the following system requirements:
•28.8k modem (for up to 3 players)
•33.6k modem (for up to 4 players)
•56k modem (for 4 players with a dedicated server)
•LAN/Broadband connection required for 5-8 player games.
MAIN MULTIPLAYER MENU
From the main multiplayer menu, you can choose to host or to join a game that already exists.
Host Game – Press this button to host a multiplayer game. Make sure your system meets the minimum specifications to run the game (see Minimum System Requirements above).
Join Game – Press this button to join a multiplayer game that has been created by another player. Query for a
list of games (see Start Query on page 29), select the game you wish to join and click the Start button at the bottom right of the screen.
Main Menu – Press this button to return to the Main LCARS Menu.
Join Game Menu
Player Name – Type in the name for your own ship, or yourself, in this area.
Password – Type a password for access to a restricted game here.
Direct Join Game – Click this button if you know the IP Address where the game you want to join is located. Next, enter the IP address in the field to the right of the button and click the Start button to connect to the selected server.
MULTIPLAYER
TIP – A proper IP address must be entered, or your connection will fail and you will receive an Invalid IP Address message. A proper IP address contains no more than twelve (12) numbers with a maximum of three (3) in each of four sections, separated by periods (e.g. XXX.XXX.XXX.XXX). For example, a valid IP address might begin 192.168.x.x.
Internet/LAN – Choose either “Internet“ or “LAN“ to specify whether you wish to play the game over the net or over a local area network.
Start Query/Stop Query – Click on the Start Query button to begin searching for servers on the Internet or a LAN. If you wish to stop before the query is finished, you can click on the Stop Query button. After performing the query, the following information will be displayed:
Name – This is the name of the game as designated by the host.
Type – The type of game being played (e.g. Deathmatch, Team Deathmatch, etc.)
Ping – The amount of time it takes a packet of information to reach the host and travel back to you. Select a game with a lower number for the most enjoyable multiplayer experience.
P/M – This lists the number of players in the game and the maximum amount of players that will be allowed in the game.
Players in Game – This lists the names of the various players in the game.
Game Info – This area lists the specific parameters in order to win the game.
Start – Click on this button to launch into the selected game.
Host Game Menu
From this menu, you can choose the parameters of the type of game you wish to play.
Game – Select the type of game you wish to play from this column. Game Types are explained on page 30.
Game Name – Here, you can specify the name of your game.
Player Name – Type the name for your own ship, or yourself, in this area.
Password – If you wish to restrict access to your game, you can type a password here. Only individuals who know your password will be able to join you.
28 |
29 |
 Loading...