


Players Manual v5.0
Manual v.5
© 2001 by Matrix Games. All Rights Reserved.
Protected under copyright and international treaties. No portion of this manual may be reproduced without written permission from Matrix Games.
© 2001 by Matrix Games. All Rights Reserved.

|
Players Manual v5.0 |
Contents |
|
Contents ............................................................................................................................................ |
i |
Introduction ...................................................................................................................................... |
1 |
Welcome to Steel Panthers: World at War...................................................................................... |
1 |
What Comes with This Game?..................................................................................................... |
1 |
How to Read This Manual ............................................................................................................ |
1 |
Copy Protection............................................................................................................................ |
1 |
Operating System and Hardware Requirements ......................................................................... |
1 |
Screen Resolution ........................................................................................................................ |
2 |
Scale............................................................................................................................................. |
2 |
Running SP: WAW ....................................................................................................................... |
2 |
Languages.................................................................................................................................... |
2 |
Installing the game ....................................................................................................................... |
2 |
Tutorial For Steel Panthers: World at War ...................................................................................... |
3 |
Getting Started................................................................................................................................. |
3 |
The Selection Screen ................................................................................................................... |
3 |
The Preferences Screen .............................................................................................................. |
6 |
Unit Information Screen................................................................................................................ |
7 |
The Buttons .................................................................................................................................. |
9 |
Let the Battle Begin ....................................................................................................................... |
10 |
Follow Me! .................................................................................................................................. |
11 |
Fire! ............................................................................................................................................ |
11 |
Experienced Players Guide ........................................................................................................... |
14 |
General Changes........................................................................................................................... |
14 |
Unit Scales ................................................................................................................................. |
14 |
Load and Save Games............................................................................................................... |
14 |
Map Changes ............................................................................................................................. |
14 |
Internet Play .............................................................................................................................. |
14 |
Play-by-Email ............................................................................................................................. |
15 |
Head-to-Head versus PBEM ...................................................................................................... |
15 |
Floating Pop-out Boxes and Info/Chat Area............................................................................... |
15 |
Combat Sounds and Music ........................................................................................................ |
16 |
Game Changes .......................................................................................................................... |
16 |
Preferences Screen.................................................................................................................... |
21 |
Changes to Game Play.................................................................................................................. |
27 |
Reinforcement Request.............................................................................................................. |
28 |
Movement................................................................................................................................... |
28 |
Weather ...................................................................................................................................... |
29 |
Spotting ...................................................................................................................................... |
29 |
General Combat ......................................................................................................................... |
29 |
Campaigns ................................................................................................................................. |
36 |
Changes to the Armor Combat System......................................................................................... |
37 |
Armor Penetration ...................................................................................................................... |
37 |
Ammunition Effectiveness .......................................................................................................... |
37 |
Armored Skirts............................................................................................................................ |
38 |
Vehicle Damage ......................................................................................................................... |
38 |
National Characteristics................................................................................................................. |
38 |
New Unit Classes .......................................................................................................................... |
39 |
Gliders and Transport Aircraft ....................................................................................................... |
39 |
Commandos and Partisans ........................................................................................................... |
40 |
New Terrain Types ........................................................................................................................ |
40 |
Jungle Terrain............................................................................................................................. |
41 |
Rough Terrain............................................................................................................................. |
41 |
© 2001 by Matrix Games. All Rights Reserved

|
Players Manual v5.0 |
Hilltop Placement ....................................................................................................................... |
41 |
New Battlefield and Obstacle Effects ............................................................................................ |
42 |
Caves ......................................................................................................................................... |
42 |
Fires............................................................................................................................................ |
42 |
Mines .......................................................................................................................................... |
42 |
Fording ....................................................................................................................................... |
42 |
Breakdowns................................................................................................................................ |
42 |
Buildings ..................................................................................................................................... |
42 |
Long World War II Campaign ........................................................................................................ |
43 |
New Countries ............................................................................................................................... |
43 |
Editor Changes .............................................................................................................................. |
43 |
Date ............................................................................................................................................ |
43 |
Length of battle........................................................................................................................... |
43 |
Visibility....................................................................................................................................... |
43 |
Weather ...................................................................................................................................... |
43 |
Weather Values:......................................................................................................................... |
44 |
Terrain ........................................................................................................................................ |
44 |
Encyclopedia Changes.................................................................................................................. |
45 |
Detailed Player Guide.................................................................................................................... |
46 |
The Selection Screen .................................................................................................................... |
46 |
Choosing Scenarios and Campaigns......................................................................................... |
46 |
Playing a Scenario ..................................................................................................................... |
47 |
Playing a Campaign ................................................................................................................... |
49 |
Playing a Battle........................................................................................................................... |
49 |
The Game Editor ........................................................................................................................ |
49 |
Load and Save Games............................................................................................................... |
49 |
Preferences Screen................................................................................................................... |
49 |
The Battle Map Toolbar.............................................................................................................. |
50 |
What the Numbers Mean............................................................................................................... |
52 |
Movement ...................................................................................................................................... |
55 |
Moving Entire Formations .......................................................................................................... |
55 |
Waypoints and Objectives.......................................................................................................... |
56 |
Limited Intelligence..................................................................................................................... |
60 |
Recon Special Ability.................................................................................................................. |
60 |
Combat .......................................................................................................................................... |
60 |
Accuracy..................................................................................................................................... |
61 |
Opportunity Fire (OpFire) ........................................................................................................... |
63 |
Terrain Effects on Movement and Combat ................................................................................ |
66 |
Combat Results ............................................................................................................................. |
67 |
Armor Damage ........................................................................................................................... |
69 |
Indirect Fire.................................................................................................................................... |
70 |
Indirect Fire Missions..................................................................................................................... |
71 |
Selecting a Target ...................................................................................................................... |
71 |
Spotting ...................................................................................................................................... |
72 |
Pre-registered Targets ............................................................................................................... |
72 |
Air Support..................................................................................................................................... |
73 |
Aircraft Entry, Exit Spaces and Target Hexes............................................................................ |
73 |
Gliders and Paratroops .............................................................................................................. |
74 |
Special Forces and Guerrillas .................................................................................................... |
75 |
Command Control and Orders ...................................................................................................... |
75 |
Entrenchment ................................................................................................................................ |
79 |
Entrenchment vs. ”In – Cover” ................................................................................................... |
79 |
Ammunition.................................................................................................................................... |
79 |
Tutorial Section.............................................................................................................................. |
81 |
Tutorial on “Flanking” Maneuver” in SPWAW ........................................................................... |
82 |
Artillery Tutorial........................................................................................................................... |
84 |
© 2001 by Matrix Games. All Rights Reserved

Players Manual v5.0 |
|
Tutorial - Mine and Obstacle Removal...................................................................................... |
89 |
Tutorial - Assaulting a Bunker .................................................................................................... |
92 |
Assaulting mines and bunkers under fire ................................................................................... |
94 |
The Tiger I tank – an overview................................................................................................. |
101 |
Order of Battle Editor................................................................................................................... |
105 |
The Basics................................................................................................................................ |
105 |
Playing Scenarios and Campaigns.............................................................................................. |
111 |
The Purchase System .............................................................................................................. |
111 |
Battle Generator ....................................................................................................................... |
113 |
Deploy Units ............................................................................................................................. |
115 |
Unit Configuration..................................................................................................................... |
117 |
How to Setup Play By Email Game............................................................................................. |
118 |
PBEM – Automatic Program........................................................................................................ |
124 |
Mega Campaign .......................................................................................................................... |
126 |
Scenario Editor ............................................................................................................................ |
133 |
Map Controls ............................................................................................................................ |
135 |
Editor Deploy Screen ............................................................................................................... |
136 |
Build a Map............................................................................................................................... |
138 |
Multihex Industrial Buildings..................................................................................................... |
150 |
Tutorial: Designing Your Own Scenarios ................................................................................. |
154 |
Step 1 – Choosing a Battle....................................................................................................... |
154 |
Step II – Making a Map ............................................................................................................ |
155 |
Step III – Choosing Your Units ................................................................................................. |
159 |
Step IV – Placing Your Units .................................................................................................... |
160 |
Step V – Placing Objectives and Units..................................................................................... |
161 |
Step VI - Final Touches............................................................................................................ |
163 |
Working with Waypoints ........................................................................................................... |
165 |
Using Beach Assault & River Crossing Scenario Maps in SPWAW generated battles. ............. |
166 |
How to Convert SP1 Scenarios into SPWAW Scenarios............................................................ |
168 |
Tools......................................................................................................................................... |
168 |
Step by Step Instructions ......................................................................................................... |
168 |
DESIGN YOUR OWN CAMPAIGN ............................................................................................. |
172 |
By Paul Vebber............................................................................................................................ |
172 |
User Campaign Editor .............................................................................................................. |
174 |
FAQ ............................................................................................................................................. |
177 |
Questions about playing the game........................................................................................... |
177 |
Questions about scenario designing ........................................................................................ |
185 |
Design notes................................................................................................................................ |
190 |
The Armor Combat System...................................................................................................... |
190 |
Online Play with Combat Net....................................................................................................... |
193 |
Using the Game Lobby............................................................................................................. |
194 |
Abbreviations ............................................................................................................................... |
200 |
Glossary....................................................................................................................................... |
201 |
Hotkeys........................................................................................................................................ |
202 |
Deploy Screen Keyboard Equivalents:..................................................................................... |
202 |
Hot Key Only On Deploy Screen:............................................................................................. |
202 |
Battle Map Screen Keyboard Equivalents................................................................................ |
202 |
Map Editor Keyboard Equivalents:........................................................................................... |
203 |
Hot Key Only on Map Editor Screen ........................................................................................ |
204 |
SPWaW Game Editor-WaWEd ................................................................................................... |
205 |
Steel Panthers World at War Map Editor..................................................................................... |
214 |
Printing Maps From SPWaW. ..................................................................................................... |
226 |
Credits ......................................................................................................................................... |
229 |
© 2001 by Matrix Games. All Rights Reserved
Players Manual v5.0
© 2001 by Matrix Games. All Rights Reserved
Players Manual v5.0
Introduction
Welcome to Steel Panthers: World at War
Steel Panthers: World at War adds a new chapter to the popular Steel Panthers series from designer Gary Grigsby and published by Strategic Simulations Inc. Though SP: WAW is based largely on Steel Panthers game system, it is far more than a sequel. It transforms a classic DOS game into a Windows format that can be easily played on most computers. It richens the tapestry of combat with enhancements to armor, infantry and artillery, and more faithfully representing WW2 combined arms warfare than previous versions. The sound and graphic enhancements add a whole new dimension of immersion into the game.
So, climb into the turret and take command. You make the decisions as you command individual tanks, guns and squads of infantry. Your battlefield is the era of World War II, from the Japanese invasion of China in 1930 to the hair-trigger standoff between Communism and the Free World in 1949. Choose from the forces of twenty-seven nations as you maneuver over a wide range of terrain, from the steppes of Russia to the island jungles of the Pacific.
SPWAW comes with more than 175 scenarios as well as several long campaigns and a sample Mega campaign. Players may also create their own battles using the game’s powerful Editor. Games may be played against the computer, face-to-face, by E-mail and over the Internet.
What Comes with This Game?
SP: WAW is a stand-alone game. You don’t need any prior versions of Steel Panthers. The game is available as a download from Matrix Games or on the SPWaW Mega Campaign CD’s.. Also included included is the New Military Gamer “Combat Net” online play software, and a set of utilities from Fred Chlanda for editing scenarios and maps, converting scenarios from earlier game versions and for editing the game graphics. Updates are available through our web site at http://www.matrixgames.com. Check there to ensure you have the most up to date version of the game!
How to Read This Manual
If you are new to the Steel Panthers experence, proceed step-by-step through the Tutorial section of the manual. It will familiarize you with the basic controls and concepts of SPWAW. If you have mastered the Tutorial or are already a battle hardened fan of Steel Panthers, you can start with the Experenced Player Guide. If you are an experienced Steel Panthers player but want a refresher on the rules, take a look at the Detailed Player Guide. A glossary at the end of this manual defines commonly used terms in the game, while the latest updates will be reflected in the Readme.txt file.
Copy Protection
There is no copy protection for SPWAW.
Operating System and Hardware Requirements
SPWAW is now a native Windows program that uses Direct Draw and Direct Sound. It will play on all Windows O/S including ME Millenium, Windows 2000 and NT. Players must have Direct X 6.1 or better installed on their computers. The program has been tested on systems with as little as 32 MB of RAM. But it was developed on a system with 64 MB, so we recommend at least that much RAM. No hardware graphics acceleration was programmed and on some systems best
© 2001 by Matrix Games. All Rights Reserved.

Players Manual v5.0
results are obtained turning hardware acceleration off, but 3D sound card enhancement is recognized and utilized. The game does require a sound card to function.
Screen Resolution
The screen resolution of the game has been changed from 640x480 to 800x600. This increase in screen space allows for more controls, buttons and better spacing. It also makes icons appear sharper and allows users to a larger slice of the map in the Battle Map. The game automatically sets this screen resolution. You should not need to change screen resolution prior to playing the game.
Scale
Each terrain tile in the game (called a hex) is 50 meters or about 50 yards across, and each turn represents a few minutes. The scale can be changed from hexes to meters to yards by using the @ key. All movement rates, sighting routines, command and control ranges, communications ranges, weapon ranges and unit frontages have been adjusted accordingly. Units are individual vehicles and heavy guns, small groups of light mortars, and teams or squads of infantry and heavy weapons from 2-20 men strong. Shots by units typically represent individual rounds or small shot groups for tanks and artillery, and bursts of 5-10 rounds for small arms and automatic heavy weapons.
Running SP: WAW
To start the game either double-click on spwaw.exe or use the Steel Panthers: World at War icon found under the Windows Start and Program buttons.
Languages
SP: WAW is available in English, Finnish, Polish, French, German, Spanish, Italian and Danish. Other languages will be included in the future.
Installing the game
SP: WAW version 5.0 is available as a very large (400 MB) dowload from the Internet or from the Mega campaign CD’s. To install, click on the setup file and Setup will begin. This method requires about 800MB free on your computer to install. If you have the setup file itself on a CD (through a game magazine or some other CD distribution method), then you need about 600 MB to install. Updates are available through our web site at http://www.matrixgames.com.
© 2001 by Matrix Games. All Rights Reserved.
Players Manual v5.0
Tutorial For Steel Panthers: World at
War
by “Wild Bill” Wilder
Getting Started
To start the game either double-click on spwaw.exe or use the Steel Panthers: World at War item under the Windows Start and Program buttons.
The first screen you see after the intro is a screen allowing you to continue or exit. “Online Play” is for playing multiplayer online, while “Timed Play” is for playing vs the AI or Hotseat under time pressure (your turn ends after a preset time period and is automatically saved). Go ahead and click on “Solitaire Play.”
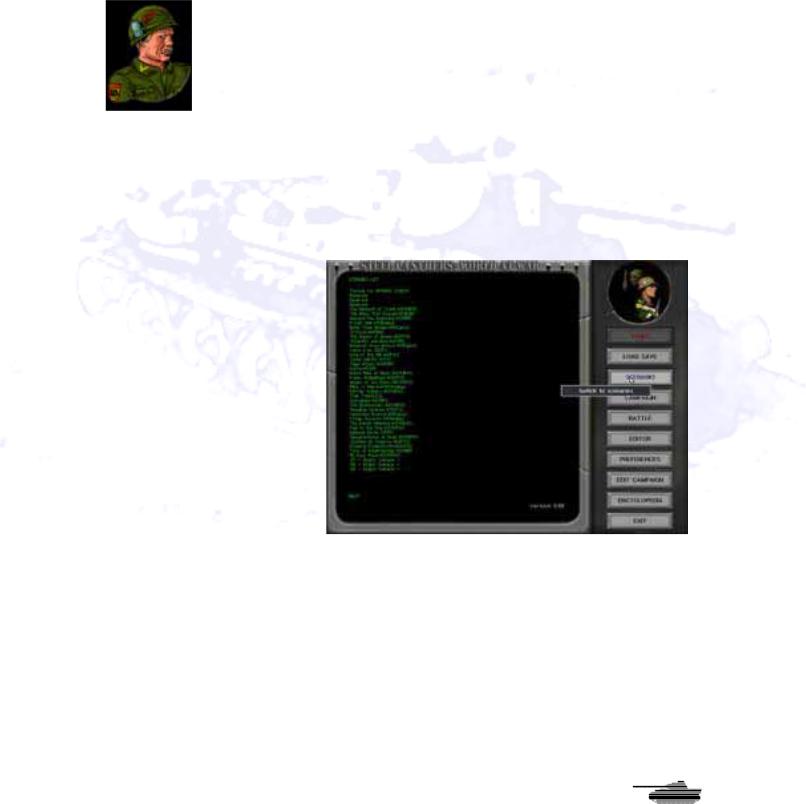
The Selection Screen
This is where we begin. This screen is the Selection or main screen of the game. It’s like a crossroads, where you can branch off in various directions. If you look on the right side of the screen, you’ll see a list of scenarios and long campaigns. Other buttons allow you to create your own scenarios and even peruse through an encyclopedia that offers data on the weapons in SPWAW.
For now, click on the “Scenario” button. You’ll see a long list of the scenarios – each an individual battle. Click on the Tutorial scenario in the first slot. Now
you’ll see a body of text in the center of the screen. This briefs you about the background of the battle, the countries involved, how long the battle lasts and other details. Once you have finished reading the background text, click on “Start.”
© 2001 by Matrix Games. All Rights Reserved.
Players Manual v5.0
Player Control Screen
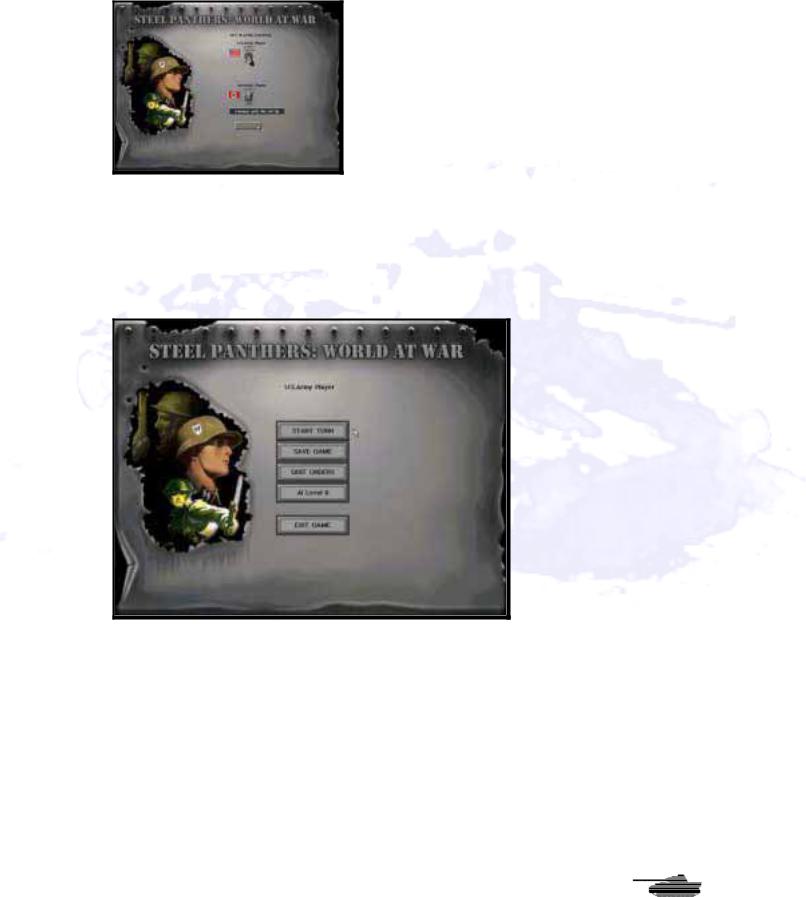
Now there’s a new screen with two toggle switches that determine which sides are played by human or computer opponents. For now, leave the buttons as they are. In this tutorial, you will command a U.S. Army tank and infantry force, while the computer opponent will command the German forces. Click on “Continue.”
The US Army Screen
The Set-Up Screen for the U.S. forces – your forces – is now displayed. You have several choices, including starting the game, saving it to be played later, Quitting Orders (which skips your turn and lets your opponent move), adjusting the advantage given to the computer AI (Artificial Intelligence) or exiting the battle completely. If you want to continue, just click on “Start Turn.” Changing the AI level give the AI increased experience and morale benefits that make it a tougher opponent. It does not change how the AI plays its game.
© 2001 by Matrix Games. All Rights Reserved.
Players Manual v5.0
The Battle Map
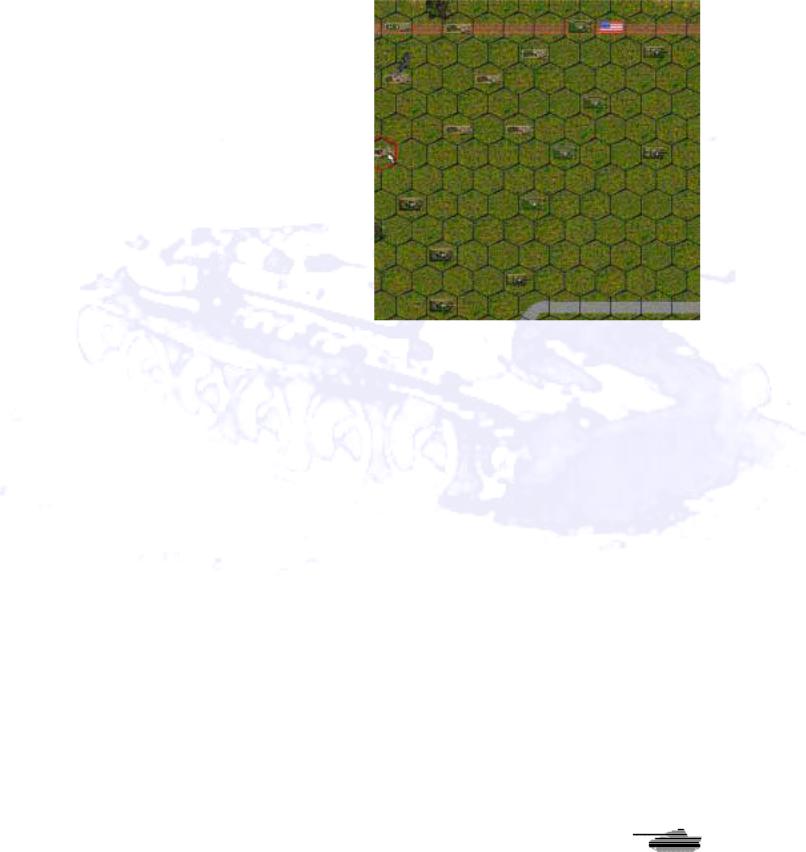
The Battle Map is where most of the action will occur. It gives you a top-down view of the battlefield, as if you were in an airplane overlooking the fighting. You can see your troops, the enemy forces and the terrain you’ll be fighting over.
Take a second to look around the map. Move the cursor towards any map edge, and the screen will scroll in that direction. Your battlefield here is a section of French countryside during July 1944, a few weeks after the Allied armies splashed ashore at D-Day. You’ll find farms, a small town, and hills on either end of the map, a small stream to the left and an open valley in the center of the map. Notice that some spots (the ones marked with an American, German or “V” flag) are labeled as Objectives. Those are the locations you must capture to win the game. Hover the mouse over them and you will note that they award points at game’s end. There are other ways victory hexes can award points, they are described further on in the manual.
You can zoom in or out using the two buttons marked like magnifying glasses, or use the plus and minus keys on your keyboard. The + button or key will zoom in for a close-up view, while the minus will zoom back out. There are four zoom levels in the game.
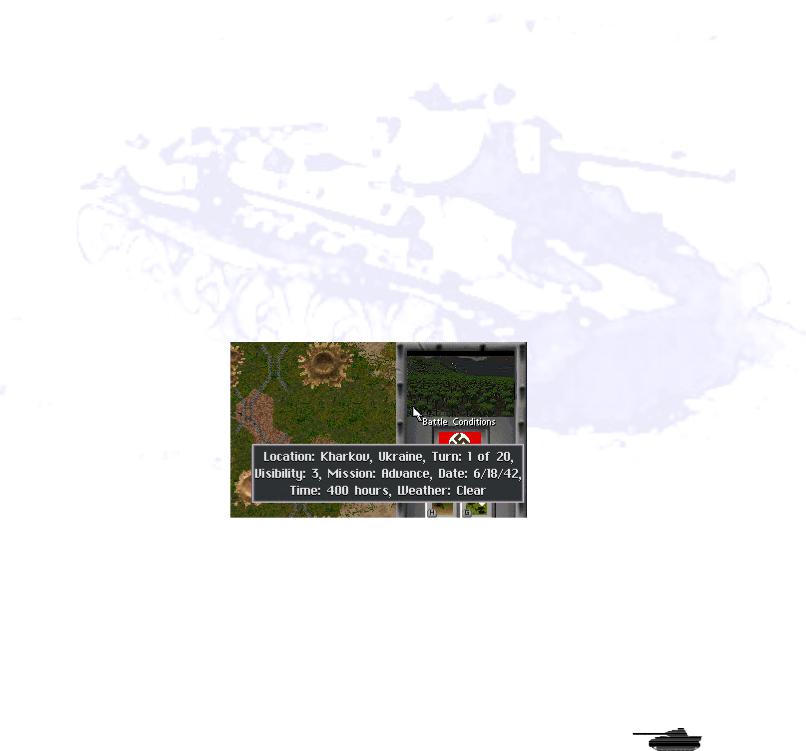
A quick way to move about the main map is to use the mini-map in the bottom right corner. Your troops are displayed as white dots, the enemy (when you spot them) will appear as red dots and the victory objectives (which you must capture to win) are shown as green dots. Click anywhere on the mini-map, and that spot will appear in the center of the main map. Note the small rectangular buttons on the top and bottom of the mini-map. Sometimes the Battle Map is too large to display in a single mini-map. In that case, the top left and bottom buttons will be green. Clicking on them will scroll the mini-map. If those buttons are red, then only a single mini-map is used. In either case, the top right button will center the mini-map on the current selected unit. In the top right corner of the main map, you’ll see a box, labeled “Battle Conditions,” with a picture of some trees in it, which indicates clear weather. In bad weather you will see rain, fog or snow. Put the cursor on it and you’ll see that you’re in the first turn of the game, and that you have about 15 turns before the game ends. You’ll also see the visibility, your mission (Advance on a crucial objective), the date and the weather.
© 2001 by Matrix Games. All Rights Reserved.
Players Manual v5.0
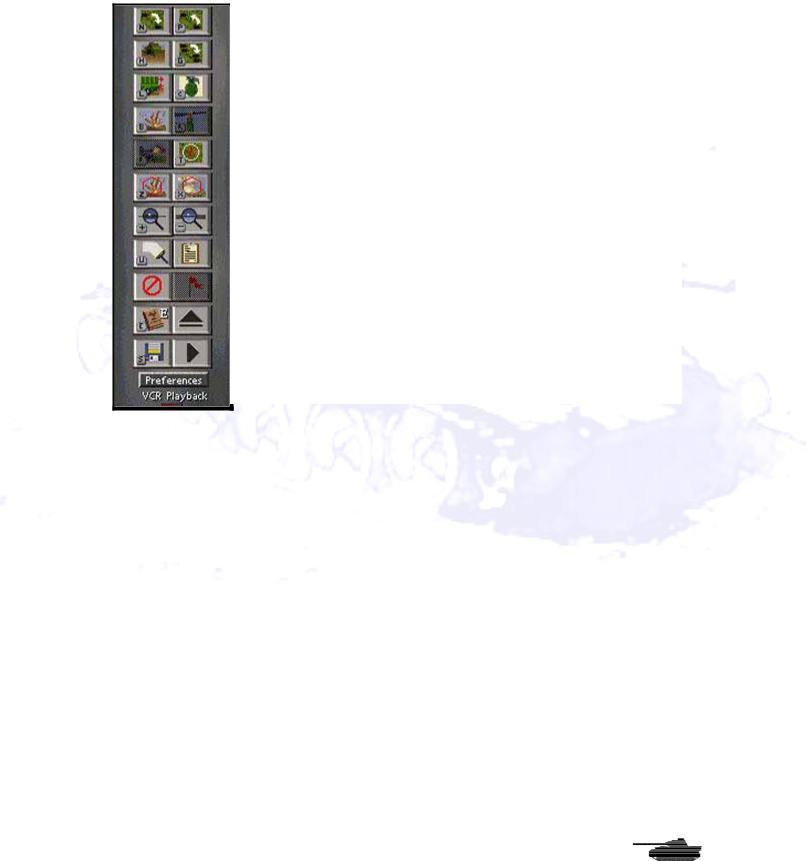
To the right of the screen is the rectangular menu bar with a series of buttons. This is where you issue orders to your forces. Placing the cursor over each button will display a text box describing the function of the button. Note the two arrow buttons at the bottom of the menu bar. The top one gives you the option to exit the current game and return to the Selection screen, where you can restart or exit SPWAW. The bottom button ends your turn. You’ll always be given a “yes” or “no” option to end the turn or game. If you want to pause the game at any time, hit ALT and TAB together and windows will minimize SPWAW and take you to another application or the desktop. Sometimes you will have to hit ALT-TAB a couple of times before the screen switches. To return to the game, click on the SPWAW button on the task bar.
Now click on a narrow bar, below all the buttons, called Preferences.
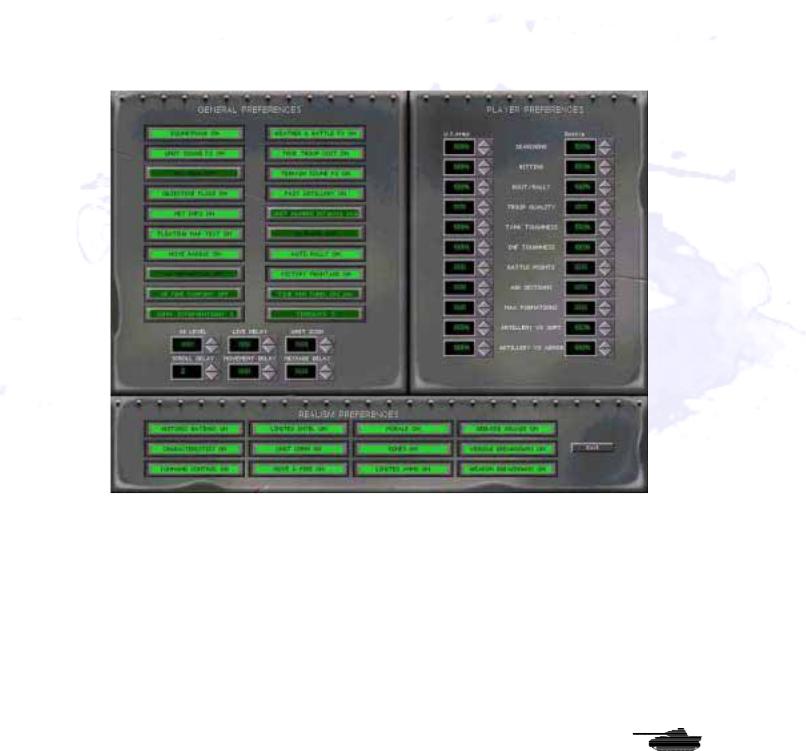
The Preferences Screen
Now you’ve entered the nerve center of the game, where you can customize SPWAW to play just the way you wish. All of these features are explained in more detail later in the SPWAW manual.
One button that will definitely affect play is the green “Command Control” button. Look for it under “Realism Preferences.” Clicking this button to “on” will recreate some of the problems that real commanders faced in controlling their forces. Another is “OpFire Confirm” This will allow you choose whether to take advantage of an Opfire Opportunity or not. For now leave this off and let the computer decide.
For the tutorial, make sure “Command Control” and “OpFire Confirm” clicked off. Then click on “Exit” to return to the Battle Map.
© 2001 by Matrix Games. All Rights Reserved.

Players Manual v5.0
Unit Information Screen
Now that you’ve learned something about the game controls, it’s time to meet the troops you’ll be commanding. On the Battle Map, you’ll see a unit of six tiny infantrymen outlined by a red hexagon outline. That’s the A0 unit – the headquarters for your entire force (the “A” indicates it belongs to Formation A, while the “0” shows that it’s a headquarters unit). In a sense, YOU are the A0 unit, in command of every American unit on the map. But you also have an on-map headquarters unit. When a scenario begins, the cursor automatically flashes on your A0 unit. Take care of him – he’s very important.
If you are not centered on the A0, don’t worry. We’ll get back to him.
At the bottom of the Battle Map, you’ll see some brief information on the highlighted unit, such as stance, number of shots it can fire, and how far it can move. For now, right-click on the AO, or any other unit. This takes you to the Unit Information Screen.
There’s a lot of important information here. This screen gives you very specific data about a unit, such as the types of weapons it carries, the ammunition and whether it is equipped with a radio. Equally important, it displays the morale and experience of the unit as well as the skills of the leader commanding it. The higher these numbers are, the better the unit will perform in battle. Note that while vehicles will display different information than personnel units. Foot soldiers aren’t armor-plated.
Your Forces
© 2001 by Matrix Games. All Rights Reserved.
Players Manual v5.0
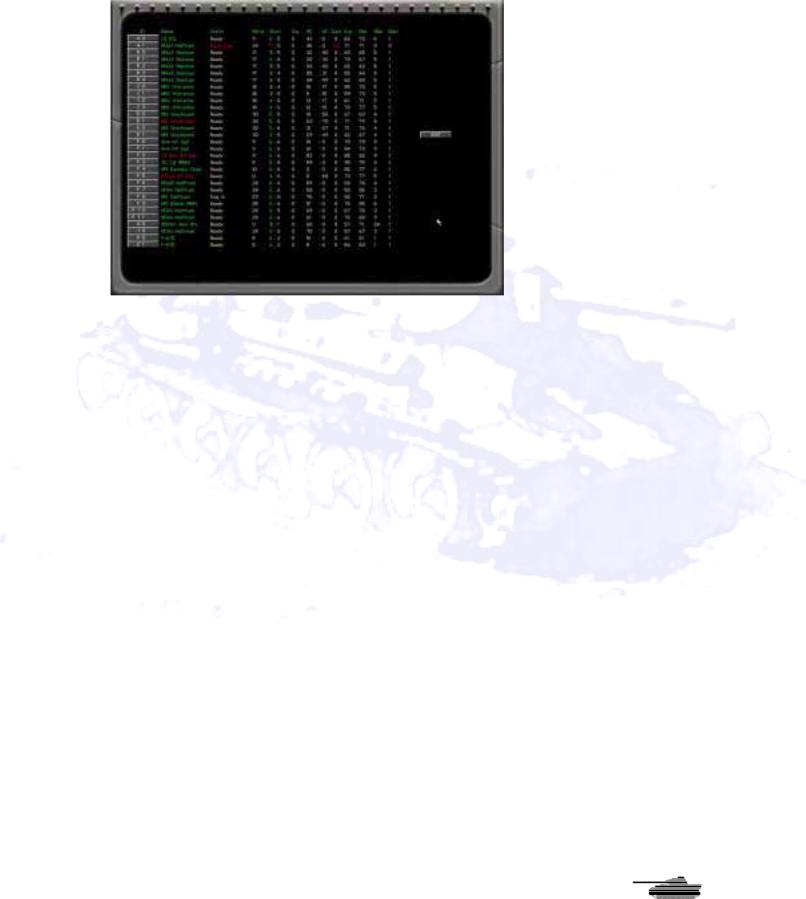
But just what units do you have? Click on the notepad button in the center of the buttons on the right. This is the Unit Menu, which gives you a quick way to check the status of your forces, their current movement and combat capabilities, and other vital data. Note that a M3A1 half-track – unit A1 – is listed as destroyed. Don’t worry about it or the wrecked and burning half-track on the Battle Map – they’re there for show.
The letter/number label helps determine what formation a unit is part of. Units with the same letter are in the same platoon. With the Command and Control turned off option, keeping formations together can help, but is not crucial to success. With Command and Control turned on, keeping formations together is critical. If the unit name and number are green, then the unit is in communication with its formation leader and can be rallied. If it is in red, it is out of communications.
Click on any of the gray buttons on the left of the screen – it will take you to the Battle Map and highlight in red whatever unit you’ve selected. You’ll notice that at the bottom of the screen are listed a battery of 105-millimeter howitzers and two P-47D fighter-bombers. Although you decide what targets they shoot at, you can’t move them (they’re located in the rear, off the map). They are assigned targets using the artillery menu. Only formation leaders (those ending in “0”) and Forward Observers can call in artillery.
Now use the Unit Menu to go back to unit A0.
© 2001 by Matrix Games. All Rights Reserved.
Players Manual v5.0
The Buttons
Most of the commands you’ll issue throughout the game, from moving units to calling in artillery and air strikes, will be given through the buttons on the Menu Bar to the right of the Battle Map. You’ll notice two things about the menu. First, hovering the mouse cursor over a button will display a small text box that tells you what the button does. Second, most of the buttons are marked with a small letter that corresponds to a keyboard command. To cycle between units, for example, you can click on the top left button or hit the “N” key. If a button is totally gray, then the unit can’t perform that action.
Getting Ready to Fight
What are you trying to accomplish in this battle? In SP: WAW, you have two goals. The first is to destroy the enemy before he destroys you. Every enemy unit you kill gives you victory points equal to its point cost. Every unit you lose gives points to your enemy.
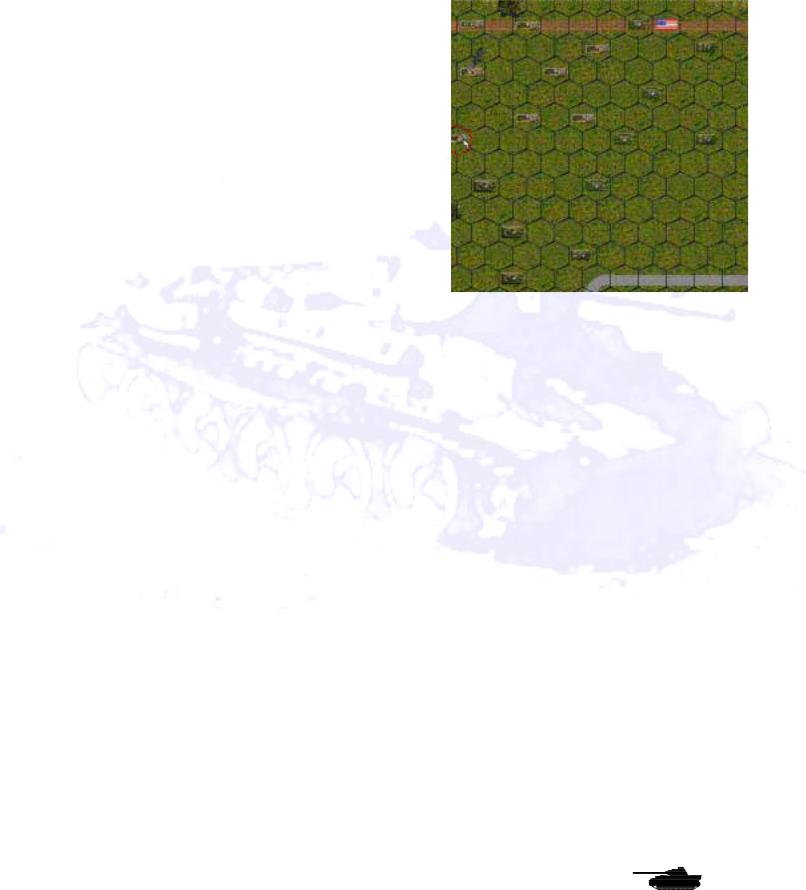
The second goal of every battle is to capture (or keep, if you already own them) various objective areas. There several new ways victory hexes award points; in this case they are awarded to the side to occupy them at the end of the game. Go to the Preferences Screen and click on the green bar, in the upper left column, marked “Hex-Grid On.” When you exit back to the Battle Map, you’ll see that the map now has an overlay of hexagons. Each space on the SPWAW map is a hexagon (“hex” for short) representing about 50 yards of ground.
In this scenario, the map measures 100 hexes from side to side and 80 hexes top to bottom, or 5 kilometers by 4 kilometers. You can turn the hexagons off again if you want a more aesthetic view of the map.
The locations you’ll need to capture in this battle are several vital crossroads around the village of St. Lunaire. In this battle you’ll find Objective One at hex 41, 24 on the map (those numbers are the vertical and horizontal coordinates, just like you see on a road map). The U.S. flag on the objective hex shows that you already control it. On the other hand, the German flag at Objective Four at hex 71,22 shows that your opponent already controls that location.
However, the objectives at hexes 62, 6, 56, 24 and 51,33 have white boxes marked with a “V.” This means they are neutral hexes that aren’t controlled by other side. To win the game, you’ll have to capture the neutral and German-controlled objectives while retaining control of the one you start with. Be warned that your computer opponent will be trying to do the same thing to you.
How much are the objectives worth? Run the cursor over each one and you’ll discover that the three neutral hexes in the middle of the map are worth 900 points apiece, while the other two are worth 250 points. That tells you right away what your priorities should be as commander.
You take control of an objective that is not yours by moving through it with one of your units. When you do this, the flag will immediately change to reflect that it is yours. And since it is yours, its points belong to you as long as it remains yours till the end of the game. If, however, the enemy retakes it, then those points are his unless you take the hex back.
© 2001 by Matrix Games. All Rights Reserved.
Players Manual v5.0
Let the Battle Begin
Now it’s time to issue orders to your troops. First, we’ll load your foot soldiers into transport vehicles. In this tutorial, the first thing you want to do is to load your infantry onto the transport provided for them. First move your cursor to the hex where your A0 leader unit is. If you have a hard time finding it, go to the “Unit Menu” button, open it, and click on AO. That will take you to hex 36,26.
You’ll want your headquarters to climb aboard half-track unit J0, which is in the hex to the right. But wait a minute. Your half-track can’t give the foot soldiers a lift unless they both occupy the same hex. To order a unit to occupy a hex that already has a friendly unit, hold down the shift key while clicking on the destination.
Click on the A0 unit. It should be highlighted with a red cursor. Now hold
down the Shift key and left click on hex 37,26, where the half-track is. You’ll see and hear the HQ unit move there.
Be sure that the A0 unit is still highlighted, and not the half-track. You can verify that because the A0 unit’s information should be displayed at the bottom of the Battle Map. Or, information on the A0 will pop up when you hover the cursor over the hex.
Now click on the Load button or press the “L” key, and then click on the half-track in the hex. The A0 should disappear. Now it’s loaded on the half-track. Click on the Half-track and the last unit loaded will appear in the information window.
The rest of your infantry – the ones that show several little soldiers – should also be loaded on to the nearest half-tracks. Once you have finished, load the bazooka, mortar and machinegun units. Units F3 and F4 (a mortar and a machinegun unit) will both climb aboard half-track F11.
Remember that your half-tracks have limited space, so you can’t cram all your troops aboard one vehicle. If a unit is too large to fit on a given transport, a dialogue will ask if you want them to load anyway. If you say yes, the excess will be lost and considered destroyed.
You also have an anti-tank gun in hex 33, 29. The half-track that will carry it is in hex 34.29. Antitank guns can’t move by themselves, so this time you’ll have to move half-track F8 to the gun’s hex. Then highlight the gun and load it. Transports are rated for the size gun they can tow. If the carry value is 1xx, it can tow a 1xx-weight (lt. or medium) gun. If 2xx, then it can carry a 2xx weight (heavy) gun.
But the half-track now has its rear pointed to the enemy, exposing its thin rear armor. You should always try to keep the front of your units facing toward the enemy. To change the direction of the half-track, put the cursor over it, left-click to select it, then move the cursor to a spot away from the unit, in the direction you want it to face, and right click on an empty hex. Now it’s pointed in the same direction as your other units.
When you right clicked to redirect your half-track, a swath of hexes may have been highlighted.
© 2001 by Matrix Games. All Rights Reserved.
Players Manual v5.0
The highlighted area is showing you the line of sight for the half-track – in other words, the hexes that it can see and shoot into. You can clear the darkened area by clicking on the paintbrush button on the Menu Bar, or hitting the “u” key.
If you loaded everyone properly, your screen should now look like this. Notice that the hex grid still is on. Turn if off from the Preferences Screen if you’d like.
Follow Me!
Your troops are aboard their vehicles, the engines are idling, the men are tense and it’s time to move out. But where is the enemy? You don’t see him on the map, and there’s a good reason why. SPWAW recreates the uncertainty of battle by using a Fog of War system. You don’t know where the enemy is unless you spot him, and your chances of spotting him depend on factors such as experience, terrain and weather. Just remember that your enemy doesn’t know where you are either.
This tutorial is a Meeting Engagement, in which both sides basically are headed for the same objectives. Your paths will cross. There will be fighting. But you can give yourself an edge by anticipating the enemy’s plans and cleverly moving your troops. Recon troops are especially important to scouting out enemy positions. Select an armored car and right click or press the space bar. You will notice a note near the bottom of the first column that indicates the armored car is a Recon unit. So what do you do? Do you move your entire force together toward one objective hex? Do you split up your group into smaller sections and head for all of them at once? Decisions, decisions! But that is your job as commander.
Fire!
Here’s a quick lesson in the movement and combat systems of SPWAW. First, left click on tank B1 in hex 40, 24, and highlight the vehicle. Who commands this tank? What kind of leader is he? Simply right click on the tank and you’ll see Sgt. Lopez commands it. He seems to have courage (his morale is relatively high), but he is a little low on experience.
You’re going to order this tank to move straight down the road to hex 45, 24 (six hexes away). To move the tank, you don’t have to click on each hex in that row. Simply left-click on tank B1, then left-click on hex 45.24. Now watch it move. What happened when it got to the hex? Some Germans hidden in those trees next to the road took a potshot at it. It is likely that one shot did not give your troops enough information to spot from which the enemy is firing. You have to be careful moving a unit a long distance in a single “click” as enemies in your path will tend to get the jump on you. Moving the units of a formation in small “bounds”, rather than the full extent of their movement at once, will pay off when moving into enemy territory.
Right click on the tank to see its status. The display at the bottom of the screen tells you that it has a Suppression Level of 1, but is otherwise undamaged. Suppression is a measure of how shaken your men are by combat. Units get bonuses to their hit chances when at 0 suppression. Units accumulate suppression points for a wide variety of reasons, from thinking the enemy is nearby, to being shot at or seeing a friendly unit get wiped out. Suppression can go as high as 99 and each time a leader successfully rallies, it is cut in half. Suppression reduces your hit chances, and can cause your troops to become pinned, retreat or rout as suppression becomes larger relative to the unit’s morale.
© 2001 by Matrix Games. All Rights Reserved.
Players Manual v5.0
But what about the enemy? You can’t see him, but you know he is in that patch of woods. Are there other enemy units with him? Do you move closer or wait to bring up help? Should you deal with this threat, or continue on to the objective hexes? Again you are faced with tactical command decisions.
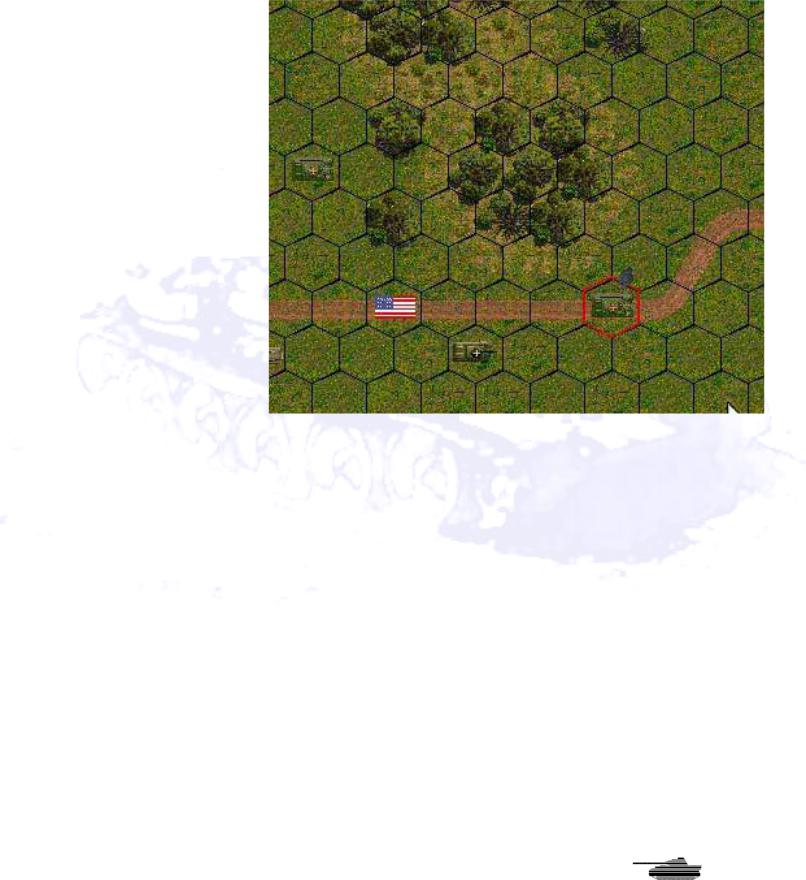
First, turn tank B1 toward the enemy. Right-click on one of the forest hexes from which the shot originated. Your tank will turn in that direction. It was a pretty big “bang” so it must have been an antitank weapon (SPWAW has different sounds for different weapons, which helps you identify what’s shooting at you).
Well, we know the enemy is there, and we don’t want him continuing to fire, so we had better take care of him. Let’s move an armored car - - the M8 Greyhound D0 in hex 42, 25 -- to hex 45, 25. No fire. Okay, we’ll bait the enemy a bit by moving closer. One vehicle will move while the other watches and provides cover fire. There is a chance that enemy units will fire at moving troops (“opportunity fire”), depending on their experience, weapons and the type of target they encounter. At the bottom of the Battle Map, you will notice that the currently selected unit will have a * or # beneath the information on their headquarters link (the same symbols also appear on the list of units in the Unit Menu). A * indicates your unit has been spotted by the enemy. They may not know exactly where the enemy is, but they’ve heard voices, or perhaps a tank engine revving, so they know their opponents are nearby. If you think the enemy is in a specific hex, but can’t actually see them, you can take a blind shot by using the “Z” key. However, your fire won’t be as effective.
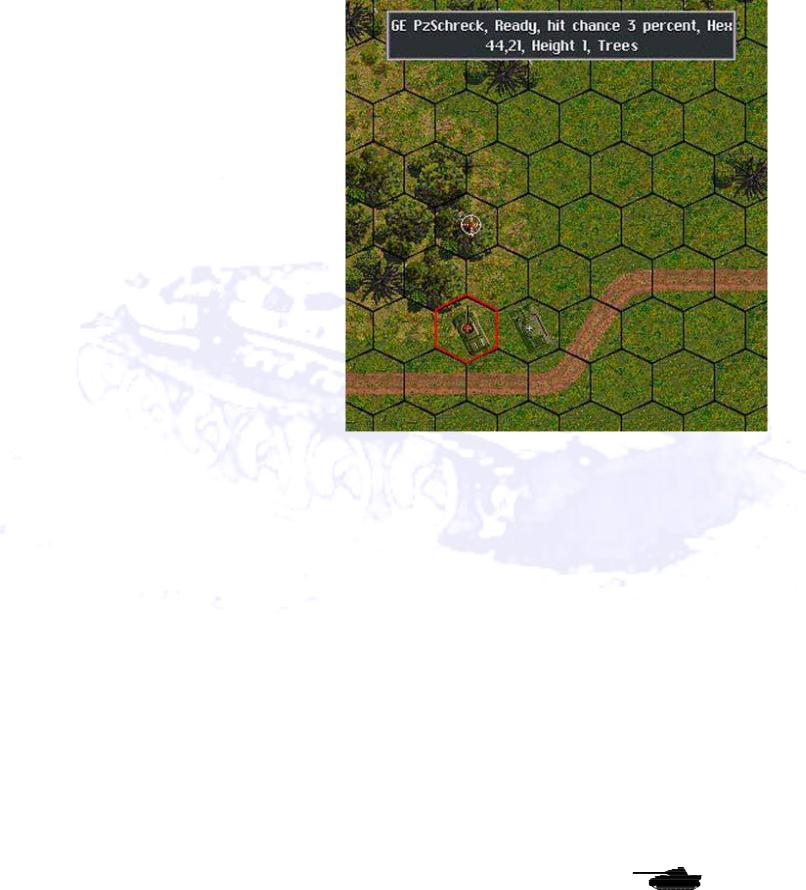
Move tank B1 from hex 45, 24 to hex 45, 23. The enemy fires again, but we still can’t see him. Notice that he fired with both anti-tank and rifle fire (many units are armed with multiple weapons). The problem is that it’s hard to spot small units such as snipers, recon squads and anti-tank teams. We’ll now move Greyhound D0 from 45, 25 to the hex where the Sherman was, hex 45, 24. Nothing. Move again to hex 44, 23. Wham! He fires again. Your armored car may or may not survive – as in real life, combat is unpredictable -- but now at least you are likely to have seen see your foe. He is in the trees in hex 44,21. Move the cursor over him and right you find it is a Panzerschreck team armed with anti-tank rockets. These weapons are deadly to armor but little danger to infantry.
So what do you do? Again, you’ll make those choices that will determine victory or defeat. Should you move infantry in to do the job? Should you bring them inside the half-track and dismount
© 2001 by Matrix Games. All Rights Reserved.
Players Manual v5.0
nearby (thereby exposing the halftrack), or dismount the infantry now and wait while they move on foot to the battle site? Should you simply blaze away with your tank and armored car? Let’s try that. First we will fire with the B1 tank. Left click on the tank, then left click on hex 44, 21. The tank will fire its main gun and its machine gun at the sighted enemy. If you look at the bottom of the screen you’ll see how many times the tank can fire its weapons in this turn.
The four numbers labeled “Shots” indicates how many shots it can fire from each of its weapons. It probably has two shots it can fire from its cannon, and five shots from each of its three machine guns. Let’s fire on him again. Use the same procedure. We’ll continue to fire all weapons until we use up all of B1’s shots for this turn. Note that not all the weapons may fire every time. How many weapons the unit can coordinate in one “fire order” depends on the experience of the unit. That should pin the enemy down and prevent him
from firing at you. If B1 doesn’t eliminate him or force him to retreat, then bring up your armored car and other troops to finish the job. Remember that using all your shots in your turn will leave you fewer opportunity fire shots during your opponent’s move. You get some shots returned at the end of your turn, and can be awarded “special” shots in some circumstances even if you have none, but the more you have the more responsive your units will be during the enemy turn. Always moving at high speed around the battlefield and shooting every chance you get can lead to breakdowns.
Move the rest of your units cautiously. When you’re done with your turn, click the “sideways” arrow button at the bottom of the Menu Bar. The enemy will then move, and you’ll hear the sounds of movement. You might even spot the enemy on the map (they’ll also appear as red dots on the mini-map).
We’ll stop the tutorial here. You’ve learned the basics of SPWAW. You’ll have many more questions, but you’ll find the answers in the remainder of this manual.
© 2001 by Matrix Games. All Rights Reserved.

Players Manual v5.0
Experienced Players Guide
If you are already an experienced player of the Steel Panther series, then the rules that follow will help you jump into the game quickly.
General Changes
Unit Scales
Though SP: WAW is based on the Steel Panthers III game system, its unit scale is closer to Steel Panthers I. Units represent individual vehicles, guns and squads or teams of infantry and infantry heavy weapons. Unlike Steel Panthers III, vehicles and guns have a "+" symbol over the turret instead of the number of vehicles, thus not obscuring the vehicle icon. Infantry, however, still have their strength displayed over the unit, as long as the unit is not routed. The size of icons can be adjusted, with “XXX” (the default setting) being the largest.
Load and Save Games
Players may now save up to 1000 scenarios or saved games, compared to 200 in SP3. They may also have up to 32 user-defined campaigns at one time, rather than 14.
Map Changes
Players may now add description files to their custom maps. Custom maps may now be chosen for compter generated battles. Maps can be up to 100 x 240 hexes in size. Maps are now stored in a new Maps directory. Map editor allows selective placement of buildings. Custom user graphics can be added with the map editor.
Internet Play
Multi-player TCP/IP Internet play is now enabled! Anywhere from 2 to 6 players can battle against each other over the Internet, or a LAN. Gang up in a 5 on 1 fight or 3 against 3. Gamers can set a “Gamer Timer” this will be the amount of time each player has to finish his turn. Once the time is up the turn automatically moves to the next player’s turn. There are several other features described below to help control INTERNET play. To play TCP/IP select the “Online Play” button on the intro screen, it will prompt you to create or join and display your IP address. If you are running the game choose create, otherwise choose join and enter the IP address of the game you are joining. When all players have joined, the games creator will start. Creating a game is covered below.
Auto-Save - When Playing the game will auto save after each turn to slot 0 or 1.
Military Gamer “Combat Net” Network [COMBAT NET] - The release of SPWaW v5.0 will also be the grand opening of our Military Gamer “Combat Net” Network. Aiding players in finding opponents online 24 hours a day. This new software add-on is client software that will connect you to the MGN network. It will auto start your game and find out your current ping rate and IP number. When you start your game it will pass the IP information to the game as well.
Military Gamer “Combat Command” - League Play the way Mars intended it to be. Players can now play fast and hard to win cash and prizes. If you think you’re the best then play with the rest.
© 2001 by Matrix Games. All Rights Reserved.
Players Manual v5.0
Play-by-Email
You have a choice of playing head-to-head, playing an unsecured Play-by-Email (PBEM) game, or of playing a password-protected PBEM game. Password-protected games are saved in a separate Email directory for convenience and are fully encrypted. Three files, a “.dat”, ”.aux”, and a ”.cmt” file - are required to be exchanged. Follow the instructions that appear when you start or end a game. Note that in a scenario, both players must enter passwords before any play commences.
Secure PBEM games are now possible with battle generator games as well as scenarios. The number of secure PBEM games has been increased to 10.
The security alerts players to most types of cheating, but allows you to continue anyway, so innocent file mishandling does not ruin an exciting game. You can see how many times your opponent started and ended his turns by hitting the “1” key. You can also use the hot key ctrl-L to activate combat logging, this creates a file of all combat activity during a turn that can be exchanged as a record of what happened in the turn. The timestamp on the file should be before the game file save time. While not a sure fire way to prevent cheating, exchanging these files can help complicate the cheaters job of covering his tracks. If the number of starts and ends is different, then your opponent has had some sort of crash, either accidentally or deliberately. This does not mean he is cheating, but you should note it.
An uncanny knack for avoiding your minefields and ambushes, and a perpetual difference in loads and starts with no explanation, may be grounds to look for other opponents. On the other hand, equal numbers of loads and starts doesn’t guarantee honest play. The Internet play in version 5.0 will provide the most secure venue for play. Secure play files can grow quite large, but zip very well, so for “normal” PBEM against trusted adversaries, you can save complication by not entering a password when prompted and simply hitting “enter”. This saves the file as a “regular” save game in the save folder.
Head-to-Head versus PBEM
For head-to-head games and non-secure PBEM games, toggle both player control switches to human control, then click on “Continue.” A screen will appear prompting the first player to create a password. If you want to play head-to-head, click on “Password” and then hit “Enter,” without creating a password. You’ll then be taken to the “Start Turn” menu. If you create a password, a PBEM game will be created and you’ll be prompted to save the game (password-protected PBEM games must be saved into one of the save-game slots numbered 3-12). The game will inform you which files to email to your opponent, who will in turn choose his own password. Players who trust one another, or just don’t feel like using passwords, can opt to click “Exit” instead of saving the game. In this case, the games will be saved in the “Save” rather than “Email” directories, and no .aux files will be created. However, that means there’s nothing to keep the unscrupulous from peeking at their opponent’s deployment, replaying turns that didn’t go their way, etc.
Floating Pop-out Boxes and Info/Chat Area
The floating pop-out boxes that show unit and map data, as well as combat results, now appear at the top of the screen if the “Floating map text” button is turned off in Preferences. The default setting is off. These boxes will no longer obscure units on the Battle Map. The area that used to contain ads, now contains the more important messages such as combat results. Not all text is repeated here, because of problems displaying numbers based on random draws, but you can now keep the text boxes off to speed play and still be informed as to important combat results and the taunts of your online opponents. The F5 key will brig up the last 50 or lines of combat text/chat. The tab key activates and deactivates this area.
The new hotkey ctrl-L will cause a pop-up box with the message “combat text 1” or “combat text 0” for combat information logging on of off. It will also be added to the F5 hotkey message buffer.
© 2001 by Matrix Games. All Rights Reserved.
Players Manual v5.0
When combat loggin is on, all combat related pop-up box messages are printed to a file in the main SP:WaW directory called “combat.txt”. This can be used for scenario testing, pbem, etc.
Combat Sounds and Music
In many cases, you will now hear very realistic sounds for the weapons the units are firing. You may use the new Order of Battle (OOB) Editor to change sounds and to assign a specific sound to a specific unit. It’s a handy way to allow players to identify what’s firing at them by the sounds they hear. Artillery with a smaller warhead will now make a smaller explosion sound. Roger Wilco and Battlecom voice support has been added allowing players on the Internet to talk to each other during game play.
Game Changes
•Maximum map sizes in the battle generator and the scenario editor have been increased to 100 hexes wide x 240 hexes high. In the scenario editor, you may choose a very large map by selecting “Custom” map size. You will be prompted for a size between 1 and 10. Selecting 0 to 2 produces the standard map sizes. Selecting 3 to 10 produces a map of greater height than normal, in increments of 20 hexes. In the battle generator, clicking the “Large” map button toggles through the various map sizes, from “Small” to “100x240”. For very large maps, during deployment and game play, clicking the little green button at the bottom of the thumbnail will cause the map to scroll down 80 hexes and clicking the upper left button will cause the map to scroll up 80 hexes. If the map is displaying the very top part or bottom part of the map, the button will not be lit, indicating there are not 80 hexes left to scroll in that direction. During game play, there will be a green light on the upper right of the mini-map. Clicking it will center the map on the currently selected hex. Moving the mouse to the top or bottom of the screen will also cause the thumbnail to scroll, when the red rectangle on the thumbnail reaches the top or bottom of the visible portion of the map.
•A landscape display is now featured in the upper right corner of the Battle Map. Hovering the mouse over it creates a pop-up box that indicates the battle location, current date, time (which changes each turn), weather, visibility, battle type, number of turns in the scenario and the number of turns left before the game ends. Weather sounds associated with the current weather should be playing, as long as the “Soundtrack” and “Weather and Combat FX” options are on. Once the first shots erupt in the scenario, you’ll hear general combat sounds (the rumble of gunfire in the distance). Other display changes include:
•The degree of armor slope for armored vehicles. This is in the Unit Information Screen,
© 2001 by Matrix Games. All Rights Reserved.
Players Manual v5.0
which appears when you right-click on a unit. Penetration tables for armor-piercing weapons. These also are displayed in the Unit Information Screen. The tables show, for each weapon, the maximum penetration in millimeters at various ranges and using various types of ammunition. Note that these figures are based on a flat, perpendicular shot for a T/D ratio ~1 (in other words, an ideal shot) and various factors will affect actual results). Ammunition with chemical or fragmentation warheads, such as HEAT (High Explosive Anti-Tank) and HE (High Explosive), will not have their effectiveness vary with range. However, small-caliber weapons, such as 12.7-millimeter machine guns and 20millimeter anti-tank guns, are assumed to be firing a combination of HE and AP and are treated as firing HE against soft targets and AP against hard targets, despite the fact the are allotted only HE ammunition.
•The hot key for the “Select all units in formation” command has been changed to “A”,” while the button has been removed from the display. The hot key to “fire a specific weapon” has been changed to “C” and a button provided. To use this command, the firing unit must already have a target selected.
•Units ID tags have been added to help find where friendly and enemy units are located.
•“Command” has been changed in several places to “Com” to save space.
•Players can now also review the battlefield once a scenario is complete.
•Players when purchasing units will now be able to see remaining aircraft flights and mines. When purchasing units the top of the screen will show formations special code values and descriptions. You will also see the unit based Experience, Morale, Rally and Leader modifiers. The bottom of the screen will now show the units Maximum Penetration value and percentage chance of it having a radio.
•Reduced all default delays to none & make default maps small maps.
•The list of unique battle locations has been increased to 665.
•The artillery barrage message delay has been reduced to one half the message delay set in the Preferences. This should speed up artillery barrages. Also, remember that if you hold down the “f” key during the barrage for a bit, the fast artillery option will turn on.
•In the map editor the name of the terrain shape file set and the file icon are displayed when placing buildings. Buildings and terrain can be selectively selected using the Shift-! Command.
•The “PAUSE” button (the one labeled “pause/break” next to the Scroll lock button, will pause the game. The Print screen button still has problems though, so a third party screen capture program is required.
•HQ units now have their + sign in parentheses - ie (+) OR for infantry - (6). So players can more easily spot them for C2 purposes.
•In Internet play the player number owning a unit appears at the 11 o’clock position relative to the unit. Players are numbered 1 through 6 in small yellow numbers with a “P” before them.
•When a player feels his situation is hopeless he can surrender by using the F9 key. If the opponent accepts, the game will then be scored as though it ended that turn. Some may view it more a cease fire than a surrender as victory hexes remain in the hands of the
© 2001 by Matrix Games. All Rights Reserved.

Players Manual v5.0
current owner, but abandoned vehicles of the player with the fewer victory hexes will be counted destroyed for the opponent. The end of battle victory objectives and the remaining points of a points per turn victory objective are not counted.
•When Vehicle moves in dry weather in desert scenarios they now leave a dust trail.
•Help screens have been added to the game. They can be brought up by the “Help” button or by using hot keys. The Terrain Effects charts are brought up with the “I” key.
•Preferences can be selected on the opening screen.
•Two new battle types have been added to Desert, Summer and Winter. The new ones are Jungle and Rough. Jungle is for Pacific Theater battles and Rough is used for Balkans and Italy battle locations.
•A new system of experience and morale for purchasing units has been created in the OOB’s. Players and designers will be given a choice of troop types::
a.0 = Normal troops-
b.1 = Recon troops
c.2 = Dedicated artillery
d.10 = Elite troops +10 experience/morale
e.11 = Elite Recon troops
f.12 = Elite Dedicated artillery
g.20 = Second line troops – 10 experience/morale
h.21 = Second line Recon troops
i.22 = Second line Dedicated artillery
•When selecting units for purchase, the type of unit, elite, normal or 2nd line, will be shown at the top of the unit OOB description box underneath the unit description and unit points. The Historic ratings feature does not affect this.
•Computer opponent has been reprogrammed to use reserve forces more aggressively. Also, it should now commit these reserves earlier than it did in previous versions of the game.
•Fortifications are now treated as armored targets for bombardment purposes. This means they will receive the benefit of armor ratings and will no longer take casualties from rounds that do not hit the fortification.
•Units that are abandoned or destroyed before the battle starts no longer count as killed at the end of the battle. This includes destroyed units placed by scenario designers and campaign forces that were destroyed and not repaired before the next battle..
•Daytime battles and night battles can be displayed differently. In daytime battles a unit’s movement radius can be seen as dark hexes against the light map. Night battles reverse this. The “Move Radius” button in Preferences toggles this feature on or off. The F8 key is the hot key for this.
•Pressing the F7 key can check a unit’s vision. This allows the player to see what is visible for the unit.
© 2001 by Matrix Games. All Rights Reserved.

Players Manual v5.0
•All new graphics for single hex and multihex buildings have been added that allow European style rowhouses and city blocks to be constructed. Look at the map Editor section for more details
•Added a toggle for the asterisk “*” display in the unit information section. Pressing the asterisk key will enable/disable the asterisk for knowing your unit has been spotted by your opponent.
•The @ key changes the range from yards to meters to hexes. The ranges on the unit information screen is in hexes only.
•“Tank Panic” has been added. Now an infantry unit without anti tank weapons may panic and run when a tank enters the hex. The presence of a friendly AFV or AT unit with in 3 hexes greatly reduces the chance of tank panic.
•A “Battle Difficulty” button has bee added for Generated and Long campaigns to adjust the numbers of points given to the AI.
•Waypoints and unit objective are no longer cancelled by purchasing additional units in scenario design.
•Added a “Save” prompt when exiting the scenario editor.
•Added a yes/no prompt when pressing the “Load All” button.
•Added the all new Mega Campaign. Mega Campaigns will be available for purchase from Matrix Games. A very small Mega Campaign demo is included with the game.
•Purchase point values for computer opponent (which start out equal to your base force normal points plus all support points, whether or not you use them) were reduced from x1 for defend, x1 for delay, x1 for meeting, x4 for advance, x7 for assault to x.50 for defend, x.66 for delay, x1 for meeting, x1.5 for advance and x2 for assault.
•The computer opponent, when playing early war Belgium, Holland or France will now purchase substantially fewer tanks. Combined with less artillery, expect a lot of infantry.
•The weather routines were rewritten. In all types of battles, the visibility should now reflect the conditions better than before. Bad weather now reduces visibility severely, as does darkness.
•Added to the list of unit classes which lose primary weapon shots after moving (which were MG, mortar, heavy mortar, and heavy MG) are AT Gun, Flak, howitzer, artillery, and infantry guns.
•Made some changes in the armor penetration model. There will also be a substantial upgrade to the armor combat model in 5.0 APCR performance has been greatly enhanced, depicting its performance much more accurately. T/D effects have been revised based on better curve fitting and a couple new data sets from Combat Leader research. A new ricochet tweak improves the depiction of the "critical angle" so ricochet probability will be low below critical angle and ramp up quickly. All this assumes lots of things, but less things are generalized than before! You should get fewer "945,395mm armor" results now and small T/D ratios will now ricochet much less often (so 88 hitting at grazing angles will act like an iceberg on the Titanic more than a stone on the water) HE and HEAT penetration have been redone, HE now has an element that decreases with range to reflect the kinetic energy component of an HE rounds penetration. IT can
© 2001 by Matrix Games. All Rights Reserved.

Players Manual v5.0
now vary for 67 to 133% of the listed number, vice 50-100% as before. IT will only go over 100 due to the kinetic energy component at shorter ranges. HEAT rounds penetration is distributed much less randomly, and will be closer to the maximum unless it tumbles in flight otherwise strikes at a poor orientation to the armor. There is 15% chance a HEAT round will tumble and a 10% chance an HE round will shatter on impact and fail to explode (or be a dud).
•Added hex coordinates for units on HQ screen. This will make it easier for you to find a unit using the new alt-J feature.
© 2001 by Matrix Games. All Rights Reserved.

Players Manual v5.0
Preferences Screen
Below is an explanation of the preferences buttons. For convenience sake, all buttons are listed, even though not all have been changed.
•Soundtrack – “On” means players will hear music on all screens, except in the combat screen, where instead they will hear the weather and battle sound tracks if they are also turned on. “Off” means no music will be played.
•Weather and Battle FX – “On” means the weather sound track will be played in the combat screen, as long as the “Soundtrack” button also is on. After combat ensues, a second sound track will play random battle noises.
•Unit Sound FX – Enables unit movement and gunfire sounds.
•Terrain Sound FX – “On” means that when the mouse is moved over some hexes, a sound will be played. The only sounds currently available are for burning vehicles and water. Future updates may add sounds for railroads, buildings and others.
•Hex Grid – Controls the hex grid overlaying the map.
•Objective Hexes – “On” means that little flags appear in victory hexes. These can be turned off if players want to see the underlying terrain in the hex.
•Fast Artillery – Vastly speeds up the artillery bombardment animations. This is
© 2001 by Matrix Games. All Rights Reserved.

Players Manual v5.0
recommended to speed up play. Artillery does not show up on the VCR replay at all when Fast Artillery is on.
•Hex Info – “On” means that as the mouse is moved around the map, terrain and unit data appear in a small pop-out box.
•Floating Map Text – “On” means that the pop-up boxes, enabled by the “Hex Info” button, will appear wherever the mouse hovers over the screen. “Off” means that these boxes will appear at the top of the screen. Note that boxes displaying combat results never float.
•Live Delay – This value determines how long the mouse must be left over a unit or hex, before the Hex Info box is displayed.
•Unit Number – This button has four settings. “Off” means no numbers appear on top of the units. “Your Infantry” will display the number of men remaining in infantry units. “Your Units” will display numbers for infantry and place a small “+” sign over vehicles. “+” signs will glow orange for all the units in a formation when any of the formation’s units are selected. This enables formations to be kept together for command purposes. “All Units” displays unit numbers on enemy infantry, and cannot be modified once a PBEM game or online game starts.
•Time per Turn –This setting determines how much time a player is given to make his move, before his turn ends and the other player moves in “Online” and “Timed play” modes.
•Move Radius – This button is a 3-way toggle. “A” means that all the hexes that the currently selected unit can reach will be highlighted. ”B” shows darkened hexes in daytime and highlighted hexes during nighttime “Off’ turns the feature off. Note that with the Command and Control on, a unit will not have a movement radius highlighted if its formation has not been assigned an objective. With Command and Control on, non-recon units are restricted to moving in the general direction of their objective unless command points are spend to direct them to do otherwise (see Command and Control below)
•Unit Icon – This value determines the size of the unit icon that appears on the screen. There are four values, with setting 1 displaying the smallest icons and setting XXX the largest.
•True Troop Cost/Rarity -The "True Troop Cost/Rarity" toggle button can now be found on the Preferences Screen. When on, this button will cause troop costs to be generated, using the unit's experience as a factor. Before now, this only occurred when "Country Training" option was off. The option is useful if two players want an even battle with balanced points. This option replaces the old "Hide Fort" option, which is now considered to always be off.
Rarity Ratings - When "True Troop Cost" is on units rarity ratings now come into play. Units that were rare or out of production will have a greater chance of not being available to the player. A unit's rarity affects their chances of being available on the purchase menus. Units currently unavailable will now show up in red on the purchase screen. Units that are out of production show up in yellow. Units Rarity Ratings are rechecked after you purchase each one of them. Note: if you delete a formation that is rechecked and is now no longer available, you cannot buy them back, so be careful! This button is a 3 way toggle – True troop cost and Rarity off, True troop cost only on and both True troop cost and rarity on. When “rarity” is on…” then continue from right after “When “True Troop cost” as is.
© 2001 by Matrix Games. All Rights Reserved.

Players Manual v5.0
•Movement Delay – This value determines how long a pause occurs between frames of animation in movement. This means that a high value will cause units to appear to move slowly from hex to hex, while a low value sends them zipping along the map. If you prefer the brief delays that were common in Steel Panthers I or II, then reduce this value. XXX is the fastest speed possible, limited only by your CPU speed and graphics card capability.
•Message Delay – This value determines how long messages, such as combat results, remain on the screen. An XXX setting will display no messages at all. This speeds up the game, but you won’t be notified of the damage you inflict and receive. Note that the VCR replay uses the selection you chose. If you turn messages off, your opponent will not see them at either, and if you set a long time delay, your opponent will be spending a lot of time watching messages.
•Limited Ammo/Reduced Ammo Limited Ammo On - The unit receives the ammunition listed in the purchase screen and the ammunition is reduced when the unit fires. Reduced Ammo On - The unit receives 50% to 99% of the ammunition listed in the purchase and the ammunition is reduced when the unit fires.
Limited Ammo Off - The unit receives the ammunition listed in the purchase screen and the ammunition is NOT reduced when the unit fires.
•Characteristics– This is to turn on or off the National characteristics of the different countries, such as Italians retreating quickly or Soviets defending fanatically.
•Unit Comm – The unit communications button controls whether units suffer from command control paralysis if they are too far from their headquarters. “On” means that if a unit is farther than 3 hexes from the headquarters unit of the formation, it must have a radio and make a radio experience check to be in communication. “Off” means that all units are always in full communication with all other units.
•Command Control – Enables the SP: WAW command control system. “On” means that headquarters units generate command points (orders) and must expend them to change the formation objective, change a unit stance, call in artillery strikes or move away from the formation objective. “Off” means that units do not generate or need orders. Note that even if command control is enabled, some headquarters and recon units do not have to expend orders to move away from the formation objective (See Command and Control below).
•Morale – “On means that normal rules for morale are in effect with units suffering a readiness penalty from reduced morale. “Off” means that units do not check morale or suffer a readiness penalty. They stay in good order until destroyed.
•Move and Fire – “Off” means that units are not assessed penalties for moving and shooting. If “On,” units lose movement points for shooting depending on their abilities.
•Mines – “Off” means mines are ignored and are harmless. However, even if harmless, mines still will appear on the map, and units will tend to avoid them.
•Historic Ratings – “On” means that when units are generated, their experience levels are created using historically derived tables (so that German paratroopers will tend to have to have higher experience ratings than the poor old Italian infantry). “Off” means that the player may manually set the experience level using the Troop Quality setting.
•Limited Intel – Enabling this setting will make enemy units harder to spot as well as
© 2001 by Matrix Games. All Rights Reserved.

Players Manual v5.0
make them less likely to remain spotted. The number of men in an enemy squad will not be displayed. A recon unit that spots an enemy artillery unit and moves away, for example, will find that the enemy battery may become hidden again depending on the cover it is in. This may happen immediately or after a few turns. Infantry and support weapons that are seen moving may also disappear in a few turns after they stop moving. Perhaps most important, units will not be automatically spotted if they fire, which makes snipers and pillboxes particularly effective. The chances of spotting, and of spotted units disappearing, depend on the relative experience levels of the units involved, their skill of their leaders, the weather, the visibility and the terrain. Please note that infantry and other leg type units are much harder to spot in general than they were in Steel Panthers III, especially at ranges greater than 10 hexes. Occasionally, units that leave LOS remain spotted for a turn. This typically happens when units crest a hill and then go back into defilade (behind the crest).
•Searching – This value is a multiple in the spotting calculations, with 100% being 1.0. Increasing this number will boost the range at which you tend to spot an opposing unit. Lowering it will reduce the chances, and lower the range at which units will be spotted.
•Hitting – This value is a multiple in the to hit calculations, with 100% being 1.0. Higher values equal more hits. This affects all direct fire attacks. Note that experience and suppression also play big roles in determining hit chances.
•Rout/Rally – This value is a multiple in the rally calculations, with 100% being 1.0. Higher values increase the chance of units rallying and increase the threshold at which they degrade to pinned, retreated or routed status.
•Troop Quality – This value is the base experience, when units are being created. A XXX setting will use historical values. The lowest value is 30 and represents the freshest of conscripts. At the high end, values above 110 or 120 are not recommended unless “Hollywood heroism” is desired for that side. Historic Ratings must be off for this to function.
•Tank Toughness – Base vehicle armor values are multiplied by this value before adjusting for slope or aspect, with 100% being 1.0. Increasing this value creates tougher tanks.
•Infantry Toughness – Infantry casualties are divided by this value, with 100% being 1.0. Really boost this value, and you can have whole companies of Rambos.
•Artillery Vs Hard Targets – The chance of an artillery shot hitting a vehicle is increased or decreased by the selected percentage.
•Artillery Vs Soft Targets – The chance of an artillery round killing infantry is increased or decreased by this amount.
•Battle Points – If this value is XXX, Random values are used. If not, the player can manually set the base number of points that each side may spend to purchase units. The higher the value, the more units that the player – and the computer opponent – can purchase.
•Air Sections – If this value is XXX, historical values are used. If, the player can manually set the maximum number of air section each side can have in a battle.
•Max Formations – This allows the player to limit the number of formations each side can have in a battle. The game supports 100 per side with 400 units per side maximum. This
© 2001 by Matrix Games. All Rights Reserved.
 Loading...