


Sid Meier’s
 ™
™
C r e a t e A N e w N a t i o n
TECHNICAL SUPPLEMENT
HARDWARE & SYSTEM REQUIREMENTS
To play Colonization, your computer must have:
•a 386SX processor or better (For best play, we recommend at least a full 386 with a system speed of 33MHz or more),
•at least 575,000 bytes (approx. 565 Kb) of free conventional memory,
•VGA graphics or better, and
•DOS version 5.0 or higher.
For ease of play and convenience, we strongly recommend that your computer system include a mouse.
1

SOFTWARE COMPATIBILITY ISSUES
Please note that this list includes only the known conflicts and incompatibilities. Since no test procedure can ever be totally comprehensive, you may run into undiscovered problems. Please consult with Customer Service if you do.
This game has not been tested under Microsoft Windows; therefore we suggest you do not use it with Windows. Chances are very good that the two will not work together.
We strongly recommend that you not have any Terminate-and-Stay- Resident programs (TSRs) other than disk caching programs (SMARTDRV, for example) loaded into memory when playing Colonization. Not only will they decrease the amount of free memory available (thus slowing the game), but there may be unpredictable interactions.
KEYBOARD CONTROLS
All the features of Colonization are available through keyboard control except Trade Routes. If you do not have a mouse attached to your system, or if you prefer using the keyboard, the control system described here is for you.
THE MAP
All the commands available on the map are included in the pull-down menus at the top of the screen. To open one of these menus, hold down [Alt] and press the letter that is highlighted in the menu name. (For example, to open the game menu, you would press [Alt]-[G].)
Once the menu is open, there are two ways to select one of the listed features. You can use the arrow keys to scroll the highlight bar to the feature you want, then press [Enter] to select it. If there is a shortcut key (a “hot key”) listed alongside the feature, you can simply press that key instead.
2

Advisers Shortcuts
Rather than going through the menu, you can consult your advisers at any time (even when not on the map) using the following shortcuts:
Religious Adviser . . . . . . . . . |
[F2] |
Colony Adviser . . . . . . . . . . |
.[F6] |
Continental Congress |
|
Naval Adviser . . . . . . . . . . . |
.[F7] |
Adviser . . . . . . . . . . . . . . . . . |
[F3] |
Foreign Affairs Adviser . . . . .[F8] |
|
|
|
||
Labor Adviser . . . . . . . . . . . . |
[F4] |
Indian Adviser |
[F9] |
|
|
||
Economic Adviser . . . . . . . . . |
[F5] |
Current Colonization Score |
[F10] |
|
|
||
Map Commands
The command keystrokes for the map view are listed below. Most of these keys give commands to the active unit (the flashing one) or whichever unit the highlight box currently surrounds.
Move active unit |
. . . .Arrow Keys |
Active ship/wagon, Load |
|
||
Activate unit |
|
A |
most valuable cargo . . . . |
. . . . .L |
|
. . . . . . . . |
|
|
|||
Wait for next unit |
|
W |
Active ship/wagon, Unload |
||
. . . . . . . . . |
most valuable cargo |
U |
|||
Active unit, do nothing |
|
||||
|
Disband (delete) |
|
|||
this turn |
[Spacebar] |
|
|||
active unit |
[Shift]-D |
||||
Fortify active unit |
|
F |
|||
. . . . . . . . |
Put display in View mode |
V |
|||
Put active unit on Sentry |
S |
||||
Put display in Move mode |
. . . .M |
||||
Build colony with active unit |
. . .B |
||||
Got to the Europe screen |
. . . . .E |
||||
Active unit, join colony |
B |
||||
Zoom in |
Z |
||||
Clear forest with |
|
|
|||
|
|
Zoom out |
X |
||
active Pioneer unit |
P |
||||
|
|
||||
Plow field with |
|
|
Show Hidden terrain . . . . |
. . . . .H |
|
|
|
|
|
||
active Pioneer unit . . . . . . . . |
. .P |
Center view on cursor |
|
||
Build Road with |
|
|
or active unit . . . . . . . . . |
. . . . .C |
|
|
|
|
|
||
active Pioneer unit . . . . . . . . |
. .R |
Get terrain information . . . |
. . .[F1] |
||
Active unit, Go |
|
G |
Exit game . . . . . . . . . . . . |
. .[ESC] |
|
to a named place |
. . . . . . . . . |
|
|
||
Active ship, dump |
|
|
|
||
cargo Overboard |
. . . . . . . . . |
. .O |
|
|
|
THE COLONY DISPLAY
Rather than menus, the colony display has colonists and units. If any are present in the colony, one is highlighted. To select the highlighted unit, tap [Tab]. The [Tab] key moves the highlight between the different views, while the arrow keys move the highlight within the active view.
3

Key Commands
The following key commands are available on the colony display:
Move highlight from view to view . . . . . . . . . . . . . . . |
. . . . . [Tab] |
Move highlight within a view . . . . . . . . . . . . . . . . . . |
Arrow keys |
Open Jobs menu for a colonist/unit . . . . . . . . . . . . . . |
. . . . [Enter] |
Load most valuable cargo . . . . . . . . . . . . . . . . . . . . |
. . . . . . . . L |
Load all of selected cargo onto selected ship/wagon |
. . . . . . . [=] |
Load some of selected cargo onto selected ship/wagon . . . . . [+] |
|
Unload cargo from ship . . . . . . . . . . . . . . . . . . . . . . |
. . . . . . . .U |
Unload all of selected cargo from ship/wagon . . . . . . |
. . . . . . . [ - ] |
Unload some of selected cargo from ship/wagon . . . . |
. . . . . . [ _ ] |
Toggle between views in Multi-function display . . . . . |
. . . . . . . M |
Show Production view in Multi-function display . . . . . . |
. . . . . . . 1 |
Show Units view in Multi-function display . . . . . . . . . . . |
. . . . . . 2 |
Show Construction view in Multi-function display . . . . . |
. . . . . . 3 |
Toggle production Numbers on/off . . . . . . . . . . . . . . . . |
. . . . . . N |
Open Construction menu . . . . . . . . . . . . . . . . . . . . . . . |
. . . . . . C |
Buy the current construction project . . . . . . . . . . . . . . |
. . . . . . B |
Get information about the selected item . . . . . . . . . . . . |
. . . . [F1] |
Exit and return to the Map . . . . . . . . . . . . . . . . . . . . . . |
. . . [ESC] |
SOME EXAMPLES
To change the orders of a unit: [Tab] to select the unit, press [Enter] to call up the orders menu, then highlight the item you want on the menu and press [Enter] again.
Load cargo onto ship or wagon: [Tab] to select the ship you want to load (move the cursor to a different ship, if you have to, using the arrow keys), [Tab] to select the warehouse strip at the bottom of the screen; move the cursor to the cargo you wish to load, then press [=] to load all of that cargo (up to 100) or [+] ([Shift]-[=]) to load some of it.
Load all of the most valuable cargo: Tap the load key ([L]) to load the most valuable cargo currently available.
Move a colonist to a different square in the area view: Use [Tab] and the arrow keys to select the colonist you want to move (the highlight box flashes when the colonist is selected), then move the white cursor to the square to which you wish to move that colonist. Press [Enter] to command the colonist to move.
4

EUROPE DISPLAY
The Europe display functions much like the colony display. [Tab] moves the highlight from area to area, and the arrow keys move it within each area. [Enter] selects the highlighted item or opens a menu related to the highlighted item. The menus themselves function exactly like those on the map.
The key commands available at the Europe display are:
Move highlight from view to view . . . . . . . . . . . . . . . . . . . . [Tab]
Move highlight within a view . . . . . . . . . . . . . . . . . . Arrow keys
Open dock options menu for a Colonist. . . . . . . . . . . . . . . [Enter]
Open harbor options menu for a Ship . . . . . . . . . . . . . . . . [Enter]
Buy full load of selected cargo . . . . . . . . . . . . . . . . . . . . . . . . . L
Buy full load of selected cargo . . . . . . . . . . . . . . . . . . . . . . . . [=]
Buy some of selected cargo. . . . . . . . . . . . . . . . . . . . . . . . . . [+]
Sell cargo from ship . . . . . . . . . . . . . . . . . . . . . . . . . . . . . . . . . U
Sell all of selected cargo . . . . . . . . . . . . . . . . . . . . . . . . . . . . . [ - ]
Sell some of selected cargo . . . . . . . . . . . . . . . . . . . . . . . . . . [ _ ]
Open recruit menu . . . . . . . . . . . . . . . . . . . . . . . . . . . . . . R or 1
Open purchase menu . . . . . . . . . . . . . . . . . . . . . . . . . . . . P or 2
Open train menu . . . . . . . . . . . . . . . . . . . . . . . . . . . . . . . T or 3
Get information about the selected item . . . . . . . . . . . . . . . . . F1
Exit and return to the map . . . . . . . . . . . . . . . . . . . . . . ESC or E
ALSO:
Special thanks to Murray Taylor for “debabelizing” and to Errol Roberts for the “dog’s teeth”.
5
|
Sid Meier’s |
|
|
|
|
|
|
|
™ |
C r e a t e A N e w N a t i o n |
||||
Instruction |
|
|
|
® |
|
|
|
|
|
Manual |
S T R |
A T E |
G |
Y |

INTRODUCTION
1

BACKGROUND
Colonization puts you in the role of Viceroy of the New World. You are sent by your King and country to establish colonies in the newlydiscovered Americas that lie to the west. You face many of the same challenges that faced colonial organizers of the time—competition from other Old World powers, strange native cultures, the problems of establishing profitable trade programs, and the problems of organizing an army from a rag-tag band of colonists.
The game begins with the European discovery of the Americas (1500) and continues until approximately the time of the American Revolution (1800). In the beginning of the game you are given a trading/exploration ship and a small group of colonists. You have no knowledge of what lies ahead of your ship, so you must explore until you find a suitable spot to lay down your first colony. As your colonies grow larger and larger, you inevitably encounter native populations and are confronted with competing imperial powers from the Old World.
To be successful in Colonization, you must balance your need for military might with your need for essentials. You must decide early what your strategy is and pursue it relentlessly, but be flexible enough to adjust to a changing situation. It is very important to have a consistent policy with the natives, because your handling of those relationships are critical. Finally, you must build a colonial society that has the infrastructure to survive a test by fire—
the War of Independence.
In Colonization, you have the chance to change history. As a colonial power, you decide the policies, you make the plans, you choose what is important and what is insignificant. Finally, you will be called upon to decide when to declare independence from your mother country.
The French, British, Spanish, and Dutch competed in the New World for dominance. But only the British and Spanish remained when the dust settled.
What happened to the Dutch; what did they do wrong?
And the French… there are still French-speaking peoples in Canada and Louisiana, but they do not predominate.
Why?
2

COLONIES AND COLONISTS
The major problem the real colonists had upon arrival in the New World was survival. They could bring very limited food supplies and tools across the Atlantic on their initial voyage, so colonists had to quickly establish a steady source of nutrition to enable them to live. Many colonial enterprises, such as those at Roanoke Island and countless others in the Caribbean, vanished soon after they arrived, and starvation was probably the cause. Others, like the English settlements in Virginia, were just barely able to scrape by for the first several years—and without the aid of native tribes they very likely would have perished.
The colonists of New England in Massachusetts were lucky enough to settle in an area with exceptionally friendly, helpful natives. They established and maintained with the Indians a peace that lasted for many generations, to the great benefit of the colonies. Without this forbearance and compassion from the natives, this colony, too, would have vanished.
Resources: One thing the New World had in abundance was resources. Colonists had to learn the best ways to cultivate these new foods and staples like corn, tobacco, cotton, and so on, to establish a viable economy. Of course in Mesoamerica, the Spanish were after different resources—gold and silver. The Spanish sought to exploit the existing cultures to enrich their royal coffers. Frenchman found a different sort of wealth in the pelts of beaver and otter along the waterways of North America, and in the fisheries off the Great Northern Banks. The Dutch were interested in a vast global trading empire that would dominate the world market, and beaver was at the center of their North American enterprise. Whatever their approach to the exploitation of the New World, the natural resources of the largely undeveloped Americas were the catalyst that kept the Europeans coming to the New World in hopes of riches.
Colonies: Your colonies act as processing centers for the resources found in the countryside. The people in a colony work the area surrounding their settlement to grow food, to harvest cash crops (cotton, tobacco, sugar cane), to mine ore and silver, and to trap the elusive beaver. Inside each colony is a small cottage industry capable of turning out a meager supply of processed goods like cloth, rum, or cigars.
Some colonists can act as lumberjacks to provide timber needed for internal building. As the population of a colony increases, it can erect more and more buildings. A carpenter's shop allows colonists to add improvements such as a stockade for protection from angry natives, docks which allow the development of a fishing enterprise, or larger processing facilities to improve the output of the colonial industries.
3

Skills: Possibly the most important resource you have at your disposal is the skills of your people. Many of your colonists arrive in the New World as unskilled, indentured servants or petty criminals. Others arrive as free colonists ready to work. Still others bring skills learned and practiced for many generations in Europe. These skilled workers can be very valuable because their output is far superior to that of ordinary, unskilled workers.
Education: Your colonies can construct schools so that the skilled can teach the unskilled what they know. Education is a vital aspect of creating a viable society. Petty criminals can learn to be servants, and servants can earn their freedom through education. Free colonists can become masters of their new trade—capable of teaching others.
Indian Lore: Expertise in some areas, such as tobacco planting, fur trapping, and wood lore, can be learned from natives, so maintaining friendly relations with the Indians is important. As your presence in the New World increases, they become uneasy, restless, angry and somewhat unpredictable, unless you trade with them and succumb to their demands. You must maintain friendly relations in order to learn what they have to teach.
Trade: Once your colonists have a thriving cottage industry, are producing enough food to sustain colonial life, and have learned to grow cash crops, you can begin to build an economy. To do this, you must trade with your home country. The market sets the prices of goods and commodities, and if you flood the market you’ll see prices fall. You must be careful, therefore, to create a balanced economy. As your colonial treasury grows and your people learn more and more skills, you can convert your cottage industry into a much larger production machine.
Taxation: Your king sees your colonies as a mere extension of his personal domain and as a source of revenues to support his international activities. From time to time, he increases your tax rate, enabling him to take more profit from your trade. He may also increase taxes whenever his government intervenes upon your behalf.
Ships: In order to maintain your trade, and protect your commerce from privateers and other unfriendly sea forces, you’ll need to establish a naval presence in coastal waters. You can purchase cargo ships and warships from the Crown (your king’s government) or you can build them yourself. The latter strategy requires a coastal colony with a shipyard and plenty of lumber. There are three types of cargo ships (caravels, merchantmen, and galleons) and two warships (privateers and frigates). Sooner or later your European rivals will ply the coastal waters with their own frigates and privateers, and blockade your main harbors— you must be ready for this. A third type of warship, the man-o-war, does not appear in American waters until the War of Independence begins.
4
Ore: In the long term, one of the most important resources found in the New World is an abundance of metal ores. Your blacksmiths can process this ore to create tools and other metal products. Gunsmiths can then use the tools to fashion muskets. As European competition heats up, you’ll find it more and more necessary to stockpile muskets.
Founding Fathers: From the time your people build their first colony, great issues are debated in the Town Halls. There are five categories of discussion: trade, politics, military, religion, and exploration. As the discussions continue, great ideas are formed— ideas that fundamentally affect the course of history. As your colonies grow, these ideas—embodied in the men who articulate them—increase the potential inherent in your colonies as an independent nation.
Independence: Ultimately, if your colonies grow and become self-sufficient, your people will desire independence. When you feel ready to take on the Royal Expeditionary Force, which you can see growing throughout the game, you can declare independence. If you successfully defend your colonial empire, you win the game.
TO PLAYERS OF CIVILIZATION
One of the main goals in the design of Colonization was to provide a rewarding experience to those who loved Civilization. This meant maintaining a lot of the same features that were used so successfully in Civilization. For this reason, if you played Civilization, you’ll find a lot that is familiar—particularly in the user interface. Many of the same game mechanics have found a life here, as well.
If you’ve played Civilization a lot, probably the best way to learn this game is to jump right in and start to experiment; if you are unfamiliar with Civilization, read on, and have fun.
Even if you are familiar with Civilization, we strongly encourage you to play one game at the Discoverer level and take advantage of the tutorial.
5

BEFORE YOU START
This manual contains details and tips on playing Colonization. It also provides background material about the topic and suggestions for further reading on the Age of Discovery. The manual applies to all computer systems, except where indicated.
Components: The game includes three 3.5" disks, this manual, a player-aid card, and a short technical supplement that provides technical information not included in the manual. If your copy of Colonization does not include all these components, contact our customer service department for help: (410) 771-1151.
Installation: To install Colonization onto your hard drive: Insert Disk A into your floppy drive, and type INSTALL. Follow the instructions that appear on the screen thereafter.
Learning the Game: There are essentially two ways to approach learning this game: you can study the manual first (Chapters I through VII), or you can just begin playing, referring to the manual when you have questions. The table of contents and the index will help you pinpoint information about a particular aspect of the game. Whichever method you prefer, we recommend you read the introduction of this manual first to get an idea of your goals.
INTERFACE
This section is for players using an IBM-compatible machine. If you’re playing a different version of the game, refer to the technical supplement for details about the interface.
Colonization is designed to be fully operational using a variety of controllers. It can be operated using the mouse only, the keyboard only, or with a combination of both. The easiest way to control the game is by using both mouse and keyboard. This manual is written along these lines.
A description of how to operate the game with keyboard only appears in the technical supplement.
6

Using the Mouse: We assume here that the user understands basic mouse functionality, like clicking and dragging. Since your mouse has two buttons, the interface distinguishes between them. The following definitions refer to their usage in this manual.
•A “click” refers to placing the pointer over an area of the screen and clicking with the left mouse button.
•A “click-and-hold” refers to holding the left mouse button down until the cursor changes to a direction arrow.
•A “right-click” is a click with the right mouse button.
•A “drag” means holding the left button down while moving the mouse.
•A “Shift-drag” is dragging while holding down the Shift key.
•“Opening a menu” requires a “click” on the name of the menu in the menu bar.
•“Selecting” means clicking on something.
•“Pressing a button” with the mouse means “clicking” on the screen button.
Right Mouse Button: In general, the right mouse button provides the user with information about whatever he has right-clicked on. Not everything responds to a right-click, but it’s almost always worth a try.
Menu Bar: Along the top of the main display (see Map Display), is the menu bar. The game can be played exclusively using menu bar commands accessed by mouse.
Short Cut Keys: Most menu items have a short-cut key associated with them: this key is indicated on the menu by a highlighted letter that corresponds to the key that can be used instead of the mouse and menus.
PRE-GAME OPTIONS
When you start Colonization, you are required to make a number of choices about the game you wish to play. To start the game, follow the instructions in the technical supplement. After the title and credits animation, you are asked some questions.
Game/World Options
In Colonization you have a variety of choices concerning the world in which you wish to play.
Start Game in NEW WORLD: If you choose this option, the computer creates an “undiscovered America” (randomly generated), so you can get the sense of what it might have been like to actually discover and explore a “New World.”
Start Game in AMERICA: This option causes the computer to create a world in which the Americas are accurately mapped according to real-world geography.
7

Customize New World: Choose this option if you want to have some control over the world that is created. You can adjust the average size of land masses, the amount of moisture in the world, whether you want the climate to be temperate, cold, or tropical, and so on. All of these choices have a dramatic effect upon the final geography of the New World.
Load Game: Use this option to continue a game that you have previously saved. There are 10 slots for saving games during play (see Save/Load Game). The next-to-last and last slots of the saved game menu contain autosaved games from the most recently played game, if the autosave feature was on (see Game Options). Other slots contain games that you have previously saved.
View Hall of Fame: This option shows the Hall of Fame screen
– all the top scoring games you’ve played.
Difficulty Levels
The next set of options allows you to select the difficulty level at which you wish to play. A number of factors are adjusted at each level to make the game more or less difficult to win.
Discoverer: This is the easiest level and is recommended for novice players.
Explorer: Your opponents are now a little stronger and smarter, and the natives, a little less friendly. This level is recommended for the occasional player who wants an interesting game, but doesn’t want too difficult a challenge.
Conquistador: This level is recommended for those who are experienced with Colonization and who like a challenging game experience. The enemy powers are substantially more aggressive and cunning, but still probably somewhat below your level.
Governor: At this level, your opponents are evenly matched with you. Skilled players will generally like this level the best; it is a strong challenge, and victory is never guaranteed.
Viceroy: This is the most difficult level at which to play. You can win if you are very skilled, have lots of experience, and make few mistakes. This level can be won, but not consistently.
Choose Your Nationality
Here you select the nationality you wish to represent in the game. Each nationality has a special power or condition that differentiates it from the other three. These powers and conditions can fundamentally affect the strategy you use to play the game.
English Power: During the Age of Discovery, England was steeped in religious strife and dissension. The colonies became a safe haven for religious groups looking for freedom from persecution.
•Accordingly, the English produce a greater number of immigrants than the other nations.
8

French Power: The primary strength of the French colonial endeavor lay in their ability to cooperate with the native population. Alliances and trade agreements were made and maintained between French colonists and native tribes for many years. While these relationships were not without violent incident, they were largely successful.
•The French have the ability to live among the natives more peacefully than other nations.
Spanish Power: Spain had recently completed a centuries-long war of re-conquest of the Iberian Peninsula and had an abundance of military-minded young men spoiling for further conquest. The Native American population offered a good target for just such adventures. The Spanish ruthlessly destroyed countless Amerindian civilizations in their relentless search for gold, silver, and other plunder.
•Accordingly, the Spaniards receive a 50% attack bonus when attacking Indian villages and towns.
Dutch Power: During the Age of Expansion, the Dutch gained their independence from Spain, and quickly began to extend their economic influence globally. They established the Dutch East India Company, which dominated trade in the East Indies. They subsequently attempted to do the same in the west by establishing the Dutch West India Company. These large-scale trading concerns were made possible by the rulers of the Netherlands, who were primarily of the merchant class.
•Accordingly, the Dutch economy is more stable than the other European powers. This is reflected by the consistency of prices in Amsterdam. Also, the Dutch start the game with a trading vessel.
Your Name
Type in the name by which you wish to be known. Enter it by pressing the Enter key. The game suggests a name if you can’t think of one.
9

THE GAME TURN
Colonization is played in a series of game turns, each following a strict sequence of actions. Each of your opponents (including the natives) has a segment of the turn (called player turn) in which to move units and manage affairs. During your segment, you direct the movement of colonists, ships, and wagons, make decisions about the jobs each of your people is doing, attack enemy units, make naval attacks, and so on.
Date
At the beginning of each game turn the date advances.
Player Turns
Each game turn is divided into a series of player turns. The natives go first in every game turn, then each nationality goes in order (England, France, Spain, Netherlands).
European Issues: During each player turn, events in Europe are assessed first (like changes in market prices and the tax rate, the arrival of new immigrants to the docks, and various other items).
Colonial Issues: Next, events and issues in each of the nation’s colonies are assessed and reported if necessary (food shortages and spoilage, lack of this or that resource to complete this or that project, and completion of construction projects).
Movement and Combat: Finally, each unit may now move and attack according to the rules of movement and combat (see Moving Units and Combat in the New World). Each unit is activated one after the next, until all have had the opportunity to move (see Giving Orders for details).
During the movement phase, you may perform all other management tasks for your colonies, like examining the map and your colonies (see The Map Display), checking European status (see The Europe Display), consulting any of your advisors for reports (see Other Menus), and so on. When all active units have been moved or have had the chance to move, your player turn ends and the next player's begins.
End of Game Turn
At the end of each game turn, you see an “End of Turn” message flashing (if the “End of Turn” option is turned on under Game Options). Otherwise, “End of Turn” is only displayed at the end of a turn in which you haven’t yet had a chance to move a unit. Pressing the Space Bar, Enter key, or clicking on the information sidebar (see Information Sidebar) causes the next game turn to begin. Before invoking the next turn—while the “End of Turn” message is still flashing—you may continue to perform management functions as described above.
10

ENDING THE GAME AND WINNING
A game of Colonization may be ended in several different ways. You may quit or retire at any time, attempt a revolution (which you can either win or lose), or play until the game ends automatically.
ENDING PLAY
Quitting: You may quit during your turn by choosing “Exit” from the game menu on the map display (see Game Menu). When you quit you are given a chance to change your mind before the decision is irrevocable. Your score will not be calculated, and you will not be entered into the Hall of Fame if you quit.
Retiring: You may retire from play during any turn by choosing “Retire” from the game menu. Again, you are given a chance to change your mind. If you proceed, your score is calculated and shown, and you may be entered into the Hall of Fame if you qualify.
The Revolution: If you declare your nation’s independence, then back up that claim with a convincing show of military strength that results in victory, the game ends with a celebration, and you receive a hefty bonus to your score. If you fail to establish your sovereignty, you do not receive a bonus.
Automatic Ending: The game ends for scoring purposes in the year 1800 if you’re not fighting the War of Independence. At this time, your score is calculated and the end of game sequence is shown. You may continue to play after 1800, but no further scoring will occur. The game ends automatically in 1850 if you’re fighting the War of Independence in 1800 and you don’t win the war first. It also ends if you lose your last colony (for any reason) and it is the year 1600 or later.
WINNING
You win by successfully gaining independence from your mother country. Any other result is considered inferior. While you may receive a good score, you will never achieve true greatness without declaring and winning independence.
SCORING
Your Colonization score is a sum of the following points:
Colonization scoring
Population Score: You score points for the colonists in your nation at game’s end according to the following schedule:
+1 for each petty criminal or indentured servant (see Colonists and Skills).
+2 for each free colonist (see Colonists and Skills).
+4 for each skilled colonist (see Colonists and Skills).
Continental Congress Score: +5 for each Founding Father in your Continental Congress (see Continental Congress).
Treasury Score: +1 for every 1000 gold in your treasury.
Rebel Sentiment Score: +1 for each point of rebel sentiment (see Liberty Bells).
Indian Destruction Penalty: -(difficulty +1) for each native settlement you destroyed.
11

Revolution Bonus
If your people achieve their independence before any other European powers do, your Colonization score is doubled. If one other power declares before you, your bonus is 50%, and if two other colonial powers become independent ahead of you, your bonus is 25%. In addition, you get one point per liberty bell produced after foreign intervention (see Liberty Bells During
the Revolution).
Additionally, if you’ve declared your independence before 1780, your score is increased; the sooner you declare, the better
your Bonus.
YOUR EPITAPH
At the end of every game, the people of the world remember you for your accomplishments—great or small. They will give your name to some item for which you will forever be remembered.
HALL OF FAME
The Hall of Fame records the best colonial empires you have built, listed in order of ranking. The ranking is derived from the Colonization score modified by a difficulty factor (derived from the Level of Difficulty you chose when starting the game).
You can examine the Hall of Fame when starting a new game from the pre-game options menu. When you retire or reach the end of a game, you are shown the Hall of Fame even if you don’t qualify to carve your name there.
12

THE NEW WORLD
13

The New World in which you establish your colonies is the newlydiscovered Americas. If you chose “Start a Game in America” from the world menu, it is the “real” Americas—geographically accurate. If you chose “Start a Game in New World,” it is an imaginary world— historically plausible, but imaginary. If you wish to experiment and, to some extent, customize the New World, you can choose “Customize New World” from the world menu.
Regardless of the setting you chose, the eastern and western edges of the New World map connect to your home country, so a ship can reach your home port by sailing off either the eastern or western edge of the known ocean (although it takes longer to reach Europe from the western edge). The northern and southern map edges are bounded by polar ice which cannot be penetrated.
When the game starts, you have no knowledge of what lies over the horizon; you only recognize the area immediately surrounding your ship. The Native American tribes and other European powers remain hidden until you encounter them directly. As you move and explore, you discover more and more of the New World. Once revealed, an area remains visible for the remainder of the game.
The map is divided into squares, which are illustrated according to terrain type. Each terrain has its own economic usefulness, effect upon movement, and effect upon combat (see the Terrain Chart).
The economic usefulness of underlying terrain is important when considering where to build a new colony, since the area surrounding a colony can be worked by the colonists to produce commodities such as food, tobacco, cotton, fur, and so on. The inhabitants of the colony need to grow food to eat and to increase their population; other commodities can be sold or processed to produce goods for sale (see Working the Colony). Most terrain on the map may be “improved” by clearing the forest, plowing, and building roads to make it more productive (see Other Orders and the orders menu).
14
THE MAP DISPLAY
The most important display in the game is the map display. This is the screen most commonly used during play. From here you control the movement of your people around the New World, observe the development of other European powers, and examine reports from your various advisors.
Menu Bar |
Area shown |
in Map View |
New World |
View |
Information |
Sidebar |
Map View |
The map display consists of several different parts: the map view, New World view, information sidebar, and the menu bar.
MAP VIEW
The largest area of the map display is the map view. It shows a part of the New World in detail. Here you can get as close to the surface of the planet as possible, so you can examine the terrain, move your colonists, and observe the activities of your neighbors.
At the beginning of the game, when the New World is largely unexplored, the map view appears to be one large ocean—as far as you know, there is no New World. But as you travel farther westward, you encounter islands and continents. As you explore, more and more areas appear until you have "recorded" an
entire map.
It is sometimes advantageous to explore the world as quickly as possible so you can discover important resources, good defensible areas, and exotic tribes.
15

Changing the Map View: You can quickly and easily move the map view (scroll) to a different area of the New World in a variety of ways. If you click anywhere on the map, the view centers on your click. Use the Center key (C) to center on the currently-active (flashing) unit. You can select “Find Colony” from the view menu, and type the name of a known colony into the dialogue box. The view centers on the chosen colony. Finally, you can click in the New World view (see below), and the map view centers.
Movement or View Mode: The map view can be in either of two modes at any time. Move mode is the “normal” mode—that is, the mode in which you normally play the game. View mode allows you to check out any square on the map to see what type of terrain is there. The display may be put into view mode in one of two ways.
To examine a terrain square, right-click on the square (or put the display into view mode [V]), causing a square cursor to appear. Use arrow keys, number pad, or mouse to move the square cursor around on the map. As you do so, information about the currently-selected square appears in the information sidebar to the right (see Information Sidebar). Press the move mode key (M) or click in the information sidebar to return to movement mode.
Zooming in and out: If you want to see a wider area of the map for some reason, you can zoom and unzoom the view. Press the zoom key (Z) to zoom in, and the unzoom key (X) to zoom out.
Showing Hidden Terrain: To get a clearer picture of what terrain lies under forests, colony icons, and so on, press the hidden terrain key (H), and the map automatically clears the land of all obscuring terrain. Terrain returns to normal when you do anything else.
Alternatively, right-clicking on any square causes information about that square to appear in the information sidebar (see below) and switches to view mode automatically. To return to move mode, either press the move mode key (M) or click in the sidebar.
Terrain Types
The following is a brief description of each terrain type.
Prairie (Cotton Land): This is relatively flat, open land, ideal for producing cotton; you can also grow food crops here.
Grasslands (Tobacco Land): Fertile soil in temperate areas, this is perfect for tobacco growing; you can also harvest food here.
Savannah (Sugar Land): Rich, moist soil specially suited for growing sugar; this land is good for food production, as well.
Plains (Food Land): This area is good for growing a wide variety of food stuffs. You can grow a little cotton here as well.
16

Tundra: This rather cold, open land can produce a minimal amount of food, but little other agriculture; however, you often find ore here.
Marsh: A cool, wet, briny area where the sea meets the land. You can grow some foodstuffs, and find ore in abundance.
Swamp: Low, tropical wetlands that often harbor bog deposits of ore. You can grow a little food and some sugar cane here.
Desert: A dry, sparse area difficult to grow food in (although it is possible). You can sometimes mine ore here.
Arctic: Cold and icy, the arctic is almost incapable of supporting life.
Forested Terrain: Each of the above types of terrain may also be forested. When forested, the agricultural potential of the terrain is severely limited. However, wooded terrain can produce lumber, and trappers can find beaver and deer pelts in the forests. Note that forests in the colder terrain types produce the most fur
and lumber.
Mountains: There are large areas of mountainous terrain, difficult for travel, but likely sources of ore and silver. Colonies cannot be established in mountain terrain.
Hills: A gently rolling area that offers easy access to ore; you can also develop some agriculture here.
Rivers: You can find rivers in any of the above terrain types as well. In general, the presence of a river, with its nourishing water and sedimentary soil, enhances the production of whatever can normally be produced in a terrain type (major Rivers are even more productive). Fur trapping is more lucrative along rivers because of the many beaver dams found in such places. Additionally, rivers function much like roadways in the wilderness. Colonists and wagons moving along a river are assumed to be using canoes or other types of boats to hasten travel.
Lakes: These are bodies of fresh water—good for fishing.
Ocean: This is the wide open water of the sea. It is somewhat useful for fishing, especially along the coasts.
Sea Lane: This is open ocean that leads to standard sea routes from the New World to Europe, and vice-versa. To return to Europe, a ship only has to enter a sea lane, then move toward the east (if exiting east) or west (if exiting west) map edge.
17

Special Resources
Aside from the intrinsic terrain in a square, some squares also contain special resources, represented by icons superimposed over the normal terrain. These icons indicate a particularly abundant source of produce. They are as follows:
Silver Deposits: Usually found in the mountains, these are particularly abundant sources of silver, like the incredible veins the Spanish found near Potosi. Silver deposits, if mined, become depleted after a while, depending upon the extent of the deposit.
Ore Deposits: Found in hilly areas, these are abundant sources of iron and other metals used in making tools and weapons. Ore deposits, if mined, also become depleted after a while.
Mineral Deposits: These are generally rich metal deposits that yield both ore and silver. They are not as productive as other deposits, but have the benefit of diversity. These too may deplete after extensive mining.
Trapping Areas: These are areas in which particularly large numbers of fur-bearing mammals—beaver, otter, raccoon, and so on—are found. This can be especially productive terrain if a river runs through it.
Game Areas: The presence of game indicates abundant food. Trapping is also worthwhile in these areas.
Oasis: An oasis is a fertile area with water reserves and nutrients, found in dry, arid terrain like deserts. These areas are capable of producing a surprising quantity of food, and a few other resources.
Prime Cotton Land: This is an area extremely well suited for cultivation of cotton.
Prime Tobacco Land: This is an area particularly well suited for cultivation of tobacco.
Prime Sugar Land: This is an area especially well suited for cultivation of sugar cane.
Prime Timber Land: This is an area of tall pine and straight oak that produces lumber perfectly suited for construction.
Prime Food Land: This is an area ideal for agriculture involving food—corn, squash, beans, and wheat.
18

Fishery: Underwater banks, reefs, and nutrients make these excellent fishing grounds.
Rumors of Lost Cities: There may be something of value if you enter this square, or there may be nothing; it may be very dangerous to enter, or benign; there may be a Fountain of Youth, or an abandoned burial ground. You’re always taking a chance entering these squares, but it may be worth it.
Indian Villages, Towns and Cities: These are centers of Indian culture and commerce. There are three different sizes of settlement: the group of teepees is a camp of the nomadic tribes (Sioux, Apache, or Tupi). The long house represents a village of the woods-dwellers (Iroquois, Cherokee, and Arawak). The pyramids are Aztec cities and the terraced stone dwellings,
Inca cities.
NEW WORLD VIEW
In the upper right hand corner of the map display is a smaller view. This is the New World view and is an extremely “zoomed out” view of the entire New World. The small white box inside this view shows the portion of the New World that is currently visible in the map view. The currently-active unit (if any) appears in the New World view as a flashing dot.
During the early years of exploration and discovery, the New World view is of little use because it is almost totally dark. But as you map larger areas, it becomes very useful in showing where your current view is located in relation to the rest of the New World. Also, you’ll be able to locate at a glance the positions of your rivals and judge how close they are to you.
Map Scrolling: You can click anywhere in the New World view to cause the map view to center on your click. This is a very convenient, high-speed way to move the view from place to widely-separated place on the map.
19
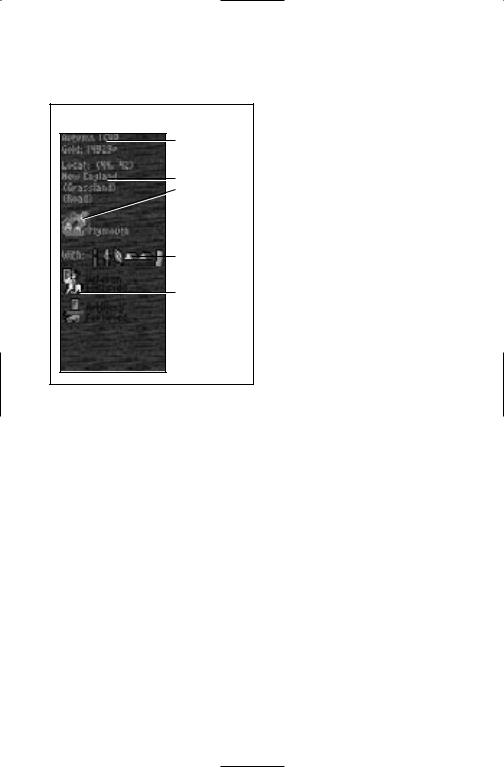
INFORMATION SIDEBAR
Along the right side of the map display is an area called the information sidebar. The following information appears here.
Information Sidebar
Date & |
Treasury |
Terrain Type |
& Other |
Features |
Cargo |
present |
Units |
present |
Date and Treasury:
Immediately beneath the New World view is the current game date and the amount of gold you currently control in your colonial treasury.
Active Unit: When the display is in movement mode (M), information about the currently active unit appears at the top—a picture of the unit, its name, how many moves it has remaining and its current location (given in x,y coordinates).
Terrain Type and Other Features: A brief description of the type of terrain appears as well—the underlying ground, whether it’s forested, whether or not there are improvements such as roads and plowed fields, special resources, and so on.
Colonies and Cargoes: If there is a colony in the square, some information is given about it as well—its name, and the contents of its storage area. The order in which the cargo is listed depends upon the current market value of that cargo and the amount currently stored at the colony. In essence, the most valuable cargo is always listed first, the next most valuable second, and so on.
20

MENU BAR
Across the top of the display is the menu bar. From here, you can access all the various options, displays, reports, and so on in the game. All game functions such as passing orders to units and buying and selling cargo may be accomplished using the menu bar.
GAME MENU
The game menu includes the following:
Game Options
From here you can adjust various game features. A standard toggle switch turns features on and off.
Show Indian Moves: When this switch is on, you can watch the motion of bands of natives as they move near your people.
Show Foreign Moves: When this switch is on, you can watch the movement of other Europeans in the New World—but only when they are near one of your people.
Fast Piece Slide: This option makes your game pieces move faster on the map.
End of Turn: The end of turn option causes a message announcing the end of each turn to appear.
Autosave: The autosave option causes versions of the current game to be saved at the end of each turn and at the end of each decade. The most recently saved game is always available in the last slot of the save game menu; the previous decade saved game is always in the next-to-last slot.
Combat Analysis: The combat analysis option causes a special screen to appear explaining the combat parameters before each combat situation is resolved.
Water Color Cycling: You can toggle water color cycling on/off to speed the game’s performance.
Tutorial Help: If you want advice while you play, turn this on.
Colony Report Options
These options allow you to turn on or off certain types of reports that appear automatically during the game.
Sound Options
This allows you to turn music and sound effects on and off.
Pick Music
Because we know you’ll love the music in this game (especially if you have a wave table synthesis sound card), we give you the option to listen to any of the compositions at any time. Note that music must be “ON” under sound options for this to work.
21

Save/Load Game
This allows you to save the game you’re currently playing, or load a previously saved game. There are 10 slots for saving games during play. The last two are special, “autosave” slots. The next-to- last slot always contains a version of the most recent game from last turn; every ten years, a copy of the game is saved and placed in the last slot.
Declare Independence
Also included on this menu is the option to declare your independence. Do this only when you are sure your colonial empire is ready to withstand a prolonged conflict with your home country (see Declaring and Winning Your Independence).
Retire
This ends the current game and calculates your score. Note that your colonial empire will be lost if it’s not already saved.
Exit
This ends the game without calculating a score; your colonial empire is lost if not already saved.
OTHER MENUS
The views menu contains options for switching the map display from view to move modes, for viewing the Europe screen, and other helpful commands.
The orders menu lists any special commands that can be given to the currently-active unit, in addition to normal movement commands (see Giving Orders for details).
The reports menu contains special reports that you can request from your various advisors. The reports are described in the appropriate sections of the manual.
The trade menu contains items related to automating various aspects of trade in the game (see Automating Trade).
The Colonizopedia gives you access to the on-line encyclopedia of Colonization. Use it to obtain information quickly about a variety of game-related topics. Right-clicking on units, terrain, and other stuff also accesses the Colonizopedia.
22
THE COLONISTS
23

As Viceroy of the New World, you control the activities of all the colonists from your nation. You decide where they move, what they explore, where they build settlements, what they build inside the settlements, and so on. Each of your people has a skill—or the potential to gain a skill—that can be valuable to you and your empire, if you use it wisely. Deciding whom to give what skills, and where to employ them is a major part of Colonization.
Not only do you decide where your people work, you also determine what job they do. It is usually wise to let skilled people do what they do best, although sometimes this is not possible, and sometimes it is not advisable. You must decide year-to-year how best to utilize your people resources.
Also, by combining your people's skills with other resources like horses, tools, and muskets, you can create colonists with special abilities and powers. Mounting a colonist on horseback creates a scout who can range far and wide gathering information about the New World and carrying news of your arrival. Giving a colonist tools creates a pioneer unit that can build roads, clear woods, and plow the land to make it yield its produce more efficiently. If you give your people muskets they become soldiers that can defend your hard-won foothold in the New World, expand the might of your new nation, and break free from tyranny.
Icon: Each colonist is represented by a small icon of a person. Each type of colonist wears clothes or carries implements that reflect his skill or status. For example, the carpenter stands in front of a sawhorse, the petty criminal has his head and hands in stocks, and the lumberjack wears a red shirt and holds a saw (see the Colonizopedia or Skills Chart for details).
Orders Box: In addition, each colonist who moves around the map carries an “orders box.” This box has two functions: the color of the box indicates the colonist’s nationality (red for English, blue for French, yellow for Spanish, and orange for Dutch); and a letter inside the box indicates the orders the colonist is currently carrying out.
24
 Loading...