

Page 1

CHAPTER 1:
SYSTEM REQUIREMENTS
Minimum Configuration
486DX2/50 MHz processor
4 MB RAM
DOS 5.0 or higher
Double-speed CD-ROM drive (300K/second transfer rate and ≤ 400
ms seek time)
VGA video card
1 MB of free hard disk space
Keyboard
Supported
Sound Blaster™ (or 100% compatible), Sound Blaster Pro, or Sound
Blaster 16 sound card
Gravis Ultrasound™ sound card
Pro Audio Spectrum™ sound card
Windows® 95 operating system
Recommended
486/66 MHz processor
Sound Blaster 16™ (or 100% compatible) sound card
This product has been rated by the Entertainment Software Rating Board. For
information about the ESRB rating, or to comment about the appropriateness
of the rating, please contact the ESRB at 1-800-771-3772.
Page 2
CHAPTER 2:
COMMAND REFERENCE
Menu Controls
ACTION PRESS
Highlight menu item
Cycle/toggle highlighted item or
Adjust slider left/right
Activate highlighted command/
Continue
Return to previous screen
Gameplay Controls
ACTION PRESS
Launch ball/Start new game Hold , then release
Left/Right flippers LEFT/RIGHT keys
—or—
LEFT/RIGHT or keys
Nudge (i.e., ‘tilt’) up
Nudge left/right /
Toggle Message area on/off
Pause game
Scroll playfield up/down
Exit game twice
/
Page 3
CHAPTER 3:
QUICK START
This section shows you how to install and launch Extreme Pinball™ from
MS-DOS® or Windows® 95.
DOS Installation
1. Insert the CD in your CD drive.
2. At the DOS prompt, type d: to change to your CD drive (substitute
the correct letter of your CD drive if other than ‘D:’).
3. When you see the ‘D:’ prompt, type setup to start the installation
program.
4. First, you are prompted to select a hard disk to install to. The default
drive is C:; type the letter of your hard drive if different. To continue,
press . You are prompted to select a directory to install to.
5. The default directory is C:\ EXTREME, but you can type the name of a
different directory if you wish. To continue, press . The Install Size
Select screen appears.
6. To select a Full Install (12 MB hard disk space required; game can run
without the CD in the drive) or Partial Install (only 200K disk space
required, but the game runs directly off the CD), press to highlight
your install size, then press to confirm. The Sound Card Select
screen appears.
7. Press to highlight your sound card, then press to confirm.
Follow the prompts to confirm any more sound card options, and the
Select Playback Quality screen appears.
8. Press to highlight the appropriate sound quality for your machine.
The faster your CPU, the higher the sound quality that will run acceptably
on your computer. Press to continue, and you return to the main
Setup menu.
To go back and select a different sound card, highlight SELECT
SOUND CARD and press , then follow steps 7 and 8 above.
To view instructions, highlight INSTRUCTIONS and press .
Page 4
9. To save your settings and exit to your operating system, highlight EXIT
AND SAVE and press . You return to your operating system.
Running the Setup Program After Installation
After you’ve installed the game, you can run the setup program again to
change your sound card settings.
1. Insert the CD in your CD drive.
2. At the DOS prompt, type d:\ setup to start the setup program
(substitute the correct letter of your CD drive if other than ‘D:’).
Follow the instructions above to change your sound card settings or view
instructions.
Starting the Game from DOS
1. Insert the CD in your CD drive.
If you selected Full Install, you can run the game from the hard disk
without the CD in your CD drive. At the DOS prompt, move to the
directory where the game is installed. By default, it is installed in C:\
EXTREME, so you would type:
c:
cd \ extreme
If you selected Partial Install, you must run the game from the CD. At
the DOS prompt, type d: to change to your CD drive (substitute the
correct letter of your CD drive if other than ‘D:’).
2. To start the program, type extreme . The Extreme Pinball
introduction screens appear.
Press any key to advance to the Game Setup menu.
Windows® 95 Instructions
Extreme Pinball runs automatically under the Windows 95 operating system
when the CD is inserted in the drive.
Installation for Windows 95
1. Start the Windows 95 operating system.
2. Insert the CD into your CD drive. The first time you insert the CD, the
Page 5

installation program automatically begins.
3. Follow the instructions in steps 4—9 of the DOS Installation section
above to select a hard drive, directory, and sound card for Extreme
Pinball.
4. When the setup program is finished running, the game automatically
begins.
Starting the Game from Windows 95
After you have installed the game, the game begins automatically when the CD
is inserted.
While running the Windows 95 operating system, insert the CD into the
CD drive. The program begins.
When you exit from the game, you return to the Windows 95 operating
system.
Page 6
CHAPTER 4:
SETTING UP THE GAME
Game Setup Menu
Use the Game Setup menu to choose the table, number of balls, and number
of players for your game. Default options are listed in bold type in this manual.
ACTION PRESS
Highlight menu item
Cycle/toggle highlighted item or
Adjust slider left/right
Activate highlighted command/ Continue
Return to previous screen
BEGIN Start a new game with the current settings.
SELECT
TABLE
PLAYERS Select 1, 2, 3, or 4 player icons. When you select more
BALLS To cycle the number of balls per game between 3, 5, or
OPTIONS Go to Options screen to set sound and game options.
HIGH
SCORES
To view scores for a different table, select the table, and then select
HIGH SCORES.
Select one of the four tables: URBAN CHAOS,
MONKEY MAYHEM, MEDIEVAL KNIGHTS, or
ROCK FANTASY. See Playing Pinball.
than one player, players take turns shooting. (Watch the
Scoreboard area at the bottom of the table to see who
shoots next.)
7, press . If you’re a novice, increase the
number of balls to give yourself more chances. As you
improve, decrease the number of balls to raise the level
of challenge.
See Options Menu below.
Go to High Scores screen to view the top scorers for the
selected table. Press any key to exit.
Page 7

CREDITS Go to the Credits screen. Press any key to exit.
QUIT Select this item to exit to your operating system. (Or
press from the Game Setup screen.)
To start a new game with the current settings, highlight BEGIN and press
.
Options Menu
Set sound and scoreboard display options.
MUSIC VOLUME Press to adjust the volume of the
background music.
SOUND FX
VOLUME
STEREO Toggle between NORMAL and
SCOREBOARD
COLOR
SCOREBOARD
VISIBILITY
EXIT Save your settings and return to the Game
Press to adjust the volume of the game
sound effects.
REVERSED stereo channels.
Cycle through available colors for the table
scoreboard.
Cycle between AUTO, MANUAL
PREFERRED ON, and PREFERRED OFF.
AUTO means that the scoreboard is
displayed only when necessary for gameplay,
while MANUAL means that you can toggle
the scoreboard on/off during gameplay by
pressing .
Setup menu.
Page 8
CHAPTER 5:
PLAYING PINBALL
Starting a game
1. Select BEGIN from the Game Setup menu and press . The selected
Table appears. The camera scrolls up and down to show you the entire
table. If you wait long enough, you can view a demo of the table–watch it
to pick up tips.
2. To begin a game, press and hold . The camera immediately moves to
the bottom of the table to show you the ball in the launcher tube.
3. To launch the ball, release .
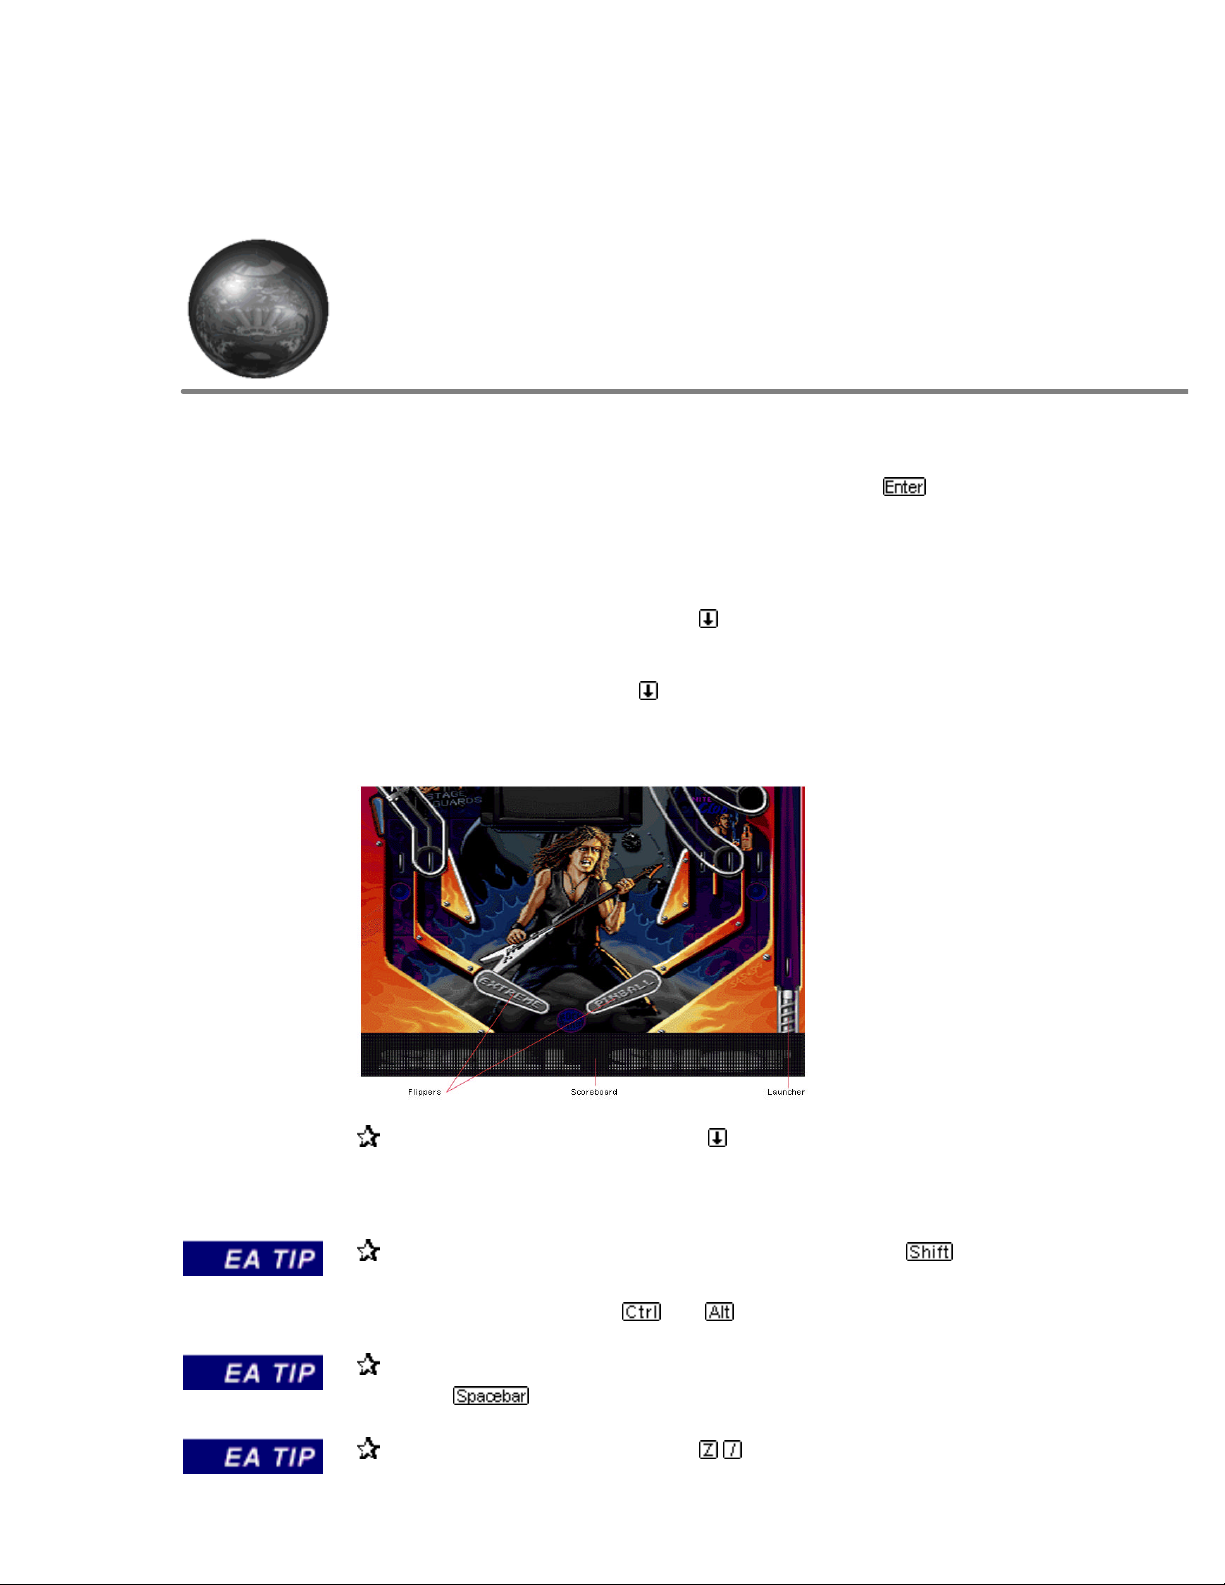
On the Table
To launch the ball, press and hold . The longer you hold the arrow key,
the further the plunger goes down (giving you more power). When you
have the power you want, release the arrow key.
To shoot with the left/right flippers, press LEFT/RIGHT . This
controls all flippers on the left or right side of the table. Alternatively you
can use the left and right and keys to control the flippers.
To apply a shot of body english to the table to nudge the ball upward,
press .
To nudge the ball left/right, press / .
Page 9

To toggle the Scoreboard at the bottom of the screen on/off, press .
To pause the game, press . To continue, press any key.
To exit the game and return to the Game Setup menu, press twice.
After the game
Sure, it was fun while it lasted, but eventually your last ball disappears down
the chute, leaving you wanting more, more, more! Hey, look on the bright
side–at least you don’t have to pump any more quarters in.
If you achieved one of the ten highest scores, you’re prompted to enter
your name. Type in the letters, and then press to confirm.
To start a new game on the current table, press .
To exit and return to the Game Setup screen, press twice.
Page 10

CHAPTER 6:
TABLES
Urban Chaos
The brave new world of the future turns out to be a lot like the bad old world
of Urban Chaos. The city of Televox 203 (in the future, cities are named for
their network addresses) has become isolated from other cities due to
communications failures and infrastructure decay. Your task: to restore order
by stamping out crime and scoring mondo points.
Tips
When your Bullet Proof Vest ball saver is filled, keep the flippers down
when the ball rolls down the middle–the vest will keep the ball from going
down the drain. If the flippers are up, the ball may slip through.
To get an SCP MONITOR REPORT detailing the status of your
bonuses, hold the left or right flipper in the up position.
One of the main goals in the game is to activate all six SCPMON
Network links. Once all 6 links are active, you are eligible for multiball
and very high scoring:
Page 11

LINK
NAME
DESCRIPTION LINK ACTIVATOR TARGET
L1 Lower ramp in the center of the
playfield.
L2 Middle ramp connected to L1,
L4, and L5
L3 Side ramp in the middle of the
playfield that connects to L4.
L4 Large horseshoe-shaped loop
that goes around the playfield
L5 Top ramp that goes to the
isolation area Precinct kickout
L6 The City Hall Spiral Parasites bull’s eye
Oversized drop target in front
of the ramp (must be hit twice)
Suburbia bull’s eye
Suburbia Lane
Hi-Tek bull’s eye
Isolation area Rehab captive
ball
Monkey Mayhem
Astronaut Binford T. Dremmel was on an uneventful intergalactic mission
when he accidentally warped through a worm hole and ended up in uncharted
space. Out of fuel, he crashed on a mysterious planet known only as the
Monkey Planet. When he stumbled from the wreckage of his ship, he was
taken prisoner by alien chimps!
As Dremmel, you must gather tools to help you survive and repair your ship. If
you can activate the Brapper (a huge board, that when pulled back far
enough, will fire the spaceship along the rocket path and away from the
Monkey Planet) with the aid of some friendly hamsters, Dremmel may
someday return to Earth with a story that will guarantee him millions on the
talk show circuit...
Tips
THE MONORAIL–Ride the monorail 15 times and receive a “frequent
rider” bonus. After each bonus, the rides necessary increases.
RIFF RAFF THE GIRAFFE–Every 10 shots that hit RIFF RAFF puts a
YUM YUM BIRD in the ZOO TUNNEL to be collected
TOOLS CACHE–Open the diverter to the tools cache by 2 HIGH
ROAD ramp shots followed by a hit to WASHOE’S CAGE. Eventually,
the number of HIGH ROAD ramp shots increases to three. After all six
tools are collected the seventh trip starts a special high value bonus round
called “TOOLTIME”.
FOREST HIDEOUT SECRET ENTRANCE–Gain entrance to the
Page 12

forest hideout by dropping all of the TREES IN THE JUNGLE. Each
entrance rewards a JUNGLE TREASURE.
To increase Banana prices:
TARGET BANANA PRICE INCREASE
Abominable Rangatang Drop Target 5K
Yum Yum Bird 20k
Jungle Treasure 10k
Forest Hideout 3k
Zoo Escape Route 3k
SECRET COMBO SHOTS–There are three secret combinations of
certain shots that award large bonuses of they are hit within a certain
period of time. See how many you can figure out!
To get BINFORD’S REPORT on the status of your bonuses, hold the
left or right flipper in the up position.
Medieval Knights
Welcome to the realm of medieval knights. Here, you battle trolls, dragons,
bats, and the deadly terrors of the dark castle. If you’re valiant, you may
ascend to the throne room. But beware, or you may be banished to death’s
dungeon!
Page 13

Tips
ROLLOVER LIGHTS (FEAR)–Aim for the flashing letter. The value
increases each time you hit it.
ROLLOVER LIGHTS (FEAR)–Light all of the letters and the end of ball
multiplier is increased.
DROP TARGETS (Key, Mace, Potion)–Values increase if the target is
lit before it is dropped.
TARGET TO LIGHT THE TARGET
Key Shoot the TROLLS LAIR
Mace Shoot the MB/1M/LOCK hole in the
castle
Potion Shoot the SWAMP
TROLL’S LAIR–Score points for each letter. Shoot all four letters and
triple the value of MOAT LOOPS.
MOAT LOOP–Open the MOAT GATES by hitting the green bull’s eye
beside the TROLLS LAIR. The value increases with each loop.
GREEN BULL’S EYE–Value increases significantly when lit. Light the
bull’s eye by an ARMORY RAMP shot.
Rock Fantasy
Page 14

Step back to the mythic era when the legendary band Rock Makers first
formed. As manager, it’s up to you to assemble lead singer Jerry K., guitarist
Pete, bassist Lyle, and drummer Mad Dog D into the Rock Makers and drive
them on a path to stardom. If you have the makings of a Malcolm McLaren,
you’ll see the boys perform on stage for their adoring fans, complete with a
video screen and cannon to fire off.
Tips
FRONT STAGE–The target values increase significantly when balls are
locked.
DANCE ACROSS THE STAGE TRAIL–Increase the value of each
loop on this trail each time you drop all four of the EQUIPMENT drop
targets.
GROUP DROP TARGETS–Each time you drop all four targets, the
ROAD TO STARDOM lane is lit for 5 seconds for greatly increased
values and the VACATION FUND value increases.
LETTER WHEELS: Shoot the letter wheels and spell a word to receive
the reward.
CANNON: Press to direct the cannon launch.
SECRET COMBO SHOTS–There are 3 secret combinations of certain
shots that award large bonuses of they are hit within a certain period of
time. See how many you can figure out!
Page 15

Credits
For Epic MegaGames:
Producer: James Schmalz
Game Design: James Schmalz, Terry Cumming
Lead Programmer: Chad Faragher
Programming: Nick Oddson
Art: James Schmalz, Nick Stadler, Lennart Sas, David Carter
Additional Art: Jeremy War, Shannon Maracle
Music: Robert Allen, Alex Brandon, James Schmalz
Sound Effects: Alex Brandon, James Schmalz, Lisa Schmalz
Voice Effects: Alex Brandon, Eric Downer
For Electronic Arts:
Executive Producer: Scott Orr
Supervising Producers: Rob Martyn, Michael Pole
Producer: Happy Keller
Assistant Producers: Greg Kawamura, Sean House
Product Manager: Reagan Luntz
Documentation: David Lee, Jason Armatta
Documentation Layout: Tom Peters
Package Design: Michael Lippert
Package Art Direction: Nancy Waisanen
Quality Assurance: Brian Studwell
Contract Administrator: Kyra Pehrson
Special Thanks: Robert Gonzales, Dana Loberstein
Page 16

James Schmalz: Graduated from the University of Waterloo in Mechanical
Engineering 1992. Started making computer games full-time after the release
of the shareware game Solar Winds. Went on to create Epic Pinball. Interests
include reading, working out at the gym and um...computer games.
Chad Faragher: Raised in Northwestern Ontario. Attended University of
Waterloo for Computer Science. Interests include music, improvisational
comedy, and computers. Breakfast, lunch, and dinner at MacDonalds. Sleep
in the day, work with the Zombies. Summoned by DE in May of 1994. A
special thanks to all those who stayed up late with me.
Nicholas Oddson: Came from Kenora (similar to Chad), and also attended
the University of Waterloo for Computer Science. I tend to spend my time
jamming with Chad, reading various novels from the Fantasy genre and
performing improvisational comedy in a local troupe. All in all, Chad and I are
very similar... Man, I’ve got to get some sort of identity. Favorite game:
Sopwith. Favorite table: Probably Monkey Mayhem, but they’re all great.
Started working for DE in April ‘95.
Jeremy War: I was born in Mississauga, Ontario and am currently attending
the University of Waterloo. My future goals involve continual work in game
design and development. My main areas of interest encompass science fiction,
drawing, and computer graphics. In my spare time I enjoy hockey, martial
arts, and, of course, computer gaming. I am DE’s newest acquisition and am
having a great time! Hey Kid, how’s it going?
Page 17

CHAPTER 7:
PROBLEMS With YOUR
SOFTWARE?
If you are having a problem installing or using your software, we want to help.
First, please make sure you have read thoroughly the Installation and
System Requirements sections at the beginning of the manual.
If you have followed the directions and are still having trouble installing or
operating the software, below are some hints that might help solve the problem.
CD Problems
A double-speed CD-ROM drive is required to run Extreme Pinball directly
off the CD—and you’ll get even better results from a triple- or quad-speed
CD drive.
Receive “File not found” error message when installing or
running the game
Make sure the game was properly installed. See Quick Start.
Make sure that the CD is in the CD drive. The CD must be in the drive to
install or run the game.
Make sure that the correct driver for your CD drive is loaded in your
AUTOEXEC.BAT and CONFIG.SYS files. (Example: In
AUTOEXEC.BAT, your CD driver line could be: “C:\ DOS\
MSCDEX.EXE /S /D:SONY_000”, and in CONFIG.SYS, the CD
device driver might appear similar to “C:\ DEV\ SLCD.SYS
/D:SONY_000 /B:340 /M:P /V /C”.)
Memory Problems
Extreme Pinball requires 430K free conventional memory (500K+
recommended for full sound) and 3 MB of extended memory (XMS) to run.
Receive “Out of memory” message
Your system does not have enough free memory available.
Make sure your system has at least 4 MB of RAM.
Page 18

Make sure you have at least 430K conventional memory and 3 MB
XMS free:
Type mem /c from the DOS prompt to check the amount of
available memory on your system. A memory summary statement similar
to the following is displayed (exact numbers will vary by system):
TYPE OF
MEMORY
Conventional 651,360 63,344 592,016
Upper 158,560 156,256 2,304
Reserved 393,216 393,216 0
Extended
(XMS)
Total memory 16,777,216 2,997,882 13,779,344
Total under 1
MB
Largest executable program size 591,728 (578K)
Largest free upper memory block 1,284 (0K)
MS-DOS is resident in the high memory area.
TOTAL = USED + FREE
15,570,080 2,385,056 13,185,024
813,920 219,600 594,320
The important numbers are bold. The “Extended (XMS)” line must read
3,145,728 bytes or higher in the “Free” column. The “Largest executable
program size” line must read 440,320 (430K) or higher. For detailed
information on freeing up additional memory, refer to Creating a DOS Boot
Disk.
General Memory Information
We recommend that you use the HIMEM.SYS extended memory
manager instead of the EMM386.EXE expanded memory manager or a
third party memory manager such as QEMM386.SYS.
We recommend that you do not load ANSI.SYS.
We recommend that you do not load DOSKEY.COM.
We recommend that you do not use a disk caching utility such as
SMARTDRV.EXE.
Sound problems
Extreme Pinball supports Sound Blaster™, Sound Blaster Pro™, Sound
Blaster 16™, and 100% Sound Blaster compatible sound cards, as well as
Pro Audio Spectrum and Gravis Ultrasound cards.
Installed sound card, but there is no sound
Page 19

If you are having difficulties with your sound card, please note that the
preferred IRQ setting for this game is 5 or 7. If your IRQ settings is not 5
or 7, please change it on your DOS boot disk. If you are unsure how to
check or change your IRQ setting, refer to your sound card
documentation or contact your sound card manufacturer.
Make sure your speakers or headphones are plugged into the
appropriate jack and the volume control is turned up.
Make sure you selected the correct sound card.
Refer to Sound Configuration below.
Installed sound card, but get static from speakers
Make sure you selected the correct sound card.
Sound Configuration
Make sure the appropriate statement for your sound card is included in your
AUTOEXEC.BAT file:
Sound Card Statement
Sound Blaster SET BLASTER=[settings] T1
Sound Blaster Pro SET BLASTER=[settings] T4
Sound Blaster 16 SET BLASTER=[settings] T6
Gravis Ultrasound SET ULTRASOUND=220,1,1,11,15
If the appropriate statement is not included in the AUTOEXEC.BAT,
consult your sound card documentation and/or run the configuration utility
for your sound card.
Page 20

CHAPTER 8:
CREATING A DOS BOOT DISK
Starting your computer using a DOS boot disk allows you to free up more
memory without altering the CONFIG.SYS and AUTOEXEC.BAT files on
your hard drive. Booting your computer with a DOS boot disk does not
prevent you from accessing your hard drive, it merely provides a different
method for configuring your memory. After you create a DOS boot disk, you
will copy your CONFIG.SYS and AUTOEXEC.BAT files from your hard
disk onto the boot disk and modify these copies. We recommend using this
procedure to avoid altering the CONFIG.SYS and AUTOEXEC.BAT files
on your hard drive, which may affect your memory configuration for running
other applications.
Below are instructions for creating a DOS boot disk. Please follow these
steps exactly.
1. From the DOS prompt, type then press .
2. Place the blank disk into drive A:.
3. Type format a:/s and press . Be sure to include the spaces.
4. You will be prompted to insert a blank disk into drive A:. Do so if you
haven’t already, and press .
5. Once the disk is finished formatting, you will be asked to label (name) the
disk. Type in a name and press or simply press for no name.
6. A prompt appears asking whether you wish to format another disk. Type
then press .
You now have a DOS boot disk. Rather than changing your permanent
system software configuration, you can use the DOS boot disk and the
HIMEM memory manager software included with MS DOS 5.0 (or greater)
to temporarily free up conventional memory and set up Extended (XMS). To
do so, follow the instructions below.
READ THIS SECTION COMPLETELY BEFORE YOU BEGIN.
To configure your DOS boot disk to free up additional conventional memory
and enable Extended memory:
1. Back up your CONFIG.SYS and AUTOEXEC.BAT files before editing
Page 21

them so that you can return to the originals if you have any problems:
a. At the C:\ prompt, type copy c:\ config.sys c:\ config.bak .
b. Type copy c:\ autoexec.bat c:\ autoexec.bak .
2. Copy the CONFIG.SYS and AUTOEXEC.BAT files from the root
directory on your hard drive (C:\ ) to the root directory on the boot disk
that you have just created (A:\ ):
a. At the C:\ prompt, type copy c:\ config.sys a:\ .
b. Type copy c:\ autoexec.bat a:\ .
3. Open the boot disk copy of the AUTOEXEC.BAT file (on A:) using the
EDIT program from MS DOS 5.0 or greater:
a. From the C: prompt, type cd \ dos .
b. Type edit a:\ autoexec.bat .
4. From the boot disk copy of the AUTOEXEC.BAT file, delete all lines
except the following (items enclosed in [brackets] indicate
system-specific variables):
Line Notes
PATH=[Path] [Path] will vary by system
PROMPT $P$G
[Your sound card driver] Example:
SET SOUND = C:\ SBPRO
SET BLASTER = A220 I7 D1 T4)
[Your CD-ROM driver] Example:C:\ DOS\ MSCDEX.EXE
/S /D:SONY_000
C:\ [directory]\ MOUSE.COM (Or equivalent mouse driver)
5. Save the edited AUTOEXEC.BAT file and open the boot disk copy of
the CONFIG.SYS file from within EDIT.
To save, press - to bring down the File menu, then type .
To open, press - , type , then type a:\ config.sys and press .
6. While still in EDIT, delete all lines from the boot disk copy of the
CONFIG.SYS file EXCEPT the following:
Line Notes
DEVICE=C:\ DOS\ HIMEM.SYS (Or C:\ WINDOWS\ HIMEM.SYS)
DOS=HIGH
BUFFERS=30
FILES=30
[Your CD-ROM device driver] Example: C:\ DEV\ SLCD.SYS/D:SONY_000
/B:340 /M:P/V /C
Your CONFIG.SYS file should now look like the above example. If it does
Page 22

not, edit it now to make it look similar to the text above.
7. Save the edited CONFIG.SYS file and exit the EDIT program.
To save, press - , then type .
To exit the Edit program, press - , then type .
You now have a boot disk which should free up enough conventional memory
and set up enough Extended memory to run the program. The boot disk
bypasses the AUTOEXEC.BAT and CONFIG.SYS files on your hard drive
and configures your memory based on the AUTOEXEC.BAT and
CONFIG.SYS files on your boot disk.
To start up your machine using the DOS boot disk:
1. Insert the DOS boot disk into drive A:, then restart your machine. Your
computer will boot up to the A:\ prompt.
2. Type and press to return to your hard drive.
For more information on editing your CONFIG.SYS and AUTOEXEC.BAT
files, or on changing your startup configuration, consult your DOS manual.
Technical Support
If you have questions about the program, our Technical Support Department
can help. If your question isn’t urgent, please write to us at:
Electronic Arts Technical Support
P.O. Box 7578
San Mateo, CA 94403-7578
Please be sure to include the following information in your letter:
Product name.
Type of computer you own.
Amount of and configuration of memory.
Any additional system information (like type and make of video card,
sound card, monitor, BIOS, etc.).
DOS and/or Windows version number.
Description of the problem you’re having.
If you need to talk to someone immediately, call us at (415) 572-ARTS
Monday through Friday between 8:30 AM and 4:30 PM, Pacific Time.
Please have the above information ready when you call. This will help us
answer your question in the shortest possible time.
EA Tech Support Fax: (415) 286-5080.
Page 23

How to reach us online
CompuServe: Game Publishers Forum A (GO GAMAPUB)
Or send e-mail to 76004,237
America OnLine: Send e-mail to ELECARTS
Internet e-mail: support1@ea.com
Or send e-mail to elecarts@aol.com or 76004.237@compuserve.com
World Wide Web: Access our Web Site at http://www.ea.com
FTP: Access our FTP Site at ftp.ea.com
If you live outside of the United States, you can contact one of our other
offices.
In Australia, contact: In the United Kingdom, contact:
Electronic Arts Pty. Ltd. Electronic Arts Ltd.
P.O. Box 432 P.O. Box 835
Southport Qld 4215 Slough SL3 8XU, UK
Australia. Phone (753) 546465.
In Australia:
Gameplay, Hints, and Tips Line Phone:
1 902 262 062 (1.00 per min.) ITMS
Technical Support Phone:
1 902 263 163 (2.00 per min.) ITMS
7 days a week 8:30 AM—10:30 PM.
If you are under 18 years of age parental consent required.
LIMITED WARRANTY
Electronic Arts (“EA”) warrants to the original purchaser of the computer
software product, for a period of ninety (90) days from the date of original
purchase (the “Warranty Period”), that under normal use, the media and the
user documentation are free from defects in materials and workmanship.
WARRANTY CLAIMS
To make a warranty claim under this limited warranty, please return the
product to the point of purchase, accompanied by proof of purchase, your
name, your return address, and a statement of the defect. OR send the
compact disk(s) to us at the address below within 90 days of purchase.
Include a copy of the dated purchase receipt, your name, your return address,
and a statement of the defect. EA or its authorized dealer will replace the
product and return it to you (postage prepaid) or issue you with a credit equal
to the purchase price.
Page 24

To replace defective media after the 90-day warranty period has expired,
send the original disk(s) to: Electronic Arts Customer Warranty, P.O. Box
7578, San Mateo, CA 94403-7578. Enclose a statement of the defect, your
name, your return address, and a check or money order for $7.50 per
replacement compact disc.
The foregoing states the purchaser’s sole and exclusive remedy for any breach
of warranty with respect to the software product.
LIMITATIONS
This warranty is in lieu of all other warranties and no other representations or
claims of any nature shall be binding on or obligate Electronic Arts. Any
implied warranties applicable to this software product, including warranties of
merchantability and fitness for a particular purpose, are limited to the ninety
(90) day period described above. In no event will Electronic Arts be liable for
any special, incidental, or consequential damages resulting from possession,
use, or malfunction of this Electronic Arts software product.
Some states do not allow limitations as to how long an implied warranty lasts
and/or exclusions or limitations of incidental or consequential damages so the
above limitations and/or exclusions of liability may not apply to you. This
warranty gives you specific rights, and you may also have other rights which
vary from state to state.
NOTICE
Electronic Arts reserves the right to make improvements in the product
described in this manual at any time and without notice.
This manual and the software described in this manual are copyrighted. All
rights are reserved. No part of this manual or the described software may be
copied, reproduced, translated, or reduced to any electronic medium or
machine-readable form without the prior written consent of Electronic Arts,
P.O. Box 7578, San Mateo, California 94403-7578, Attn: Customer Support.
Microsoft, MS-DOS, and Windows are registered trademarks of Microsoft
Corporation. Sound Blaster, Sound Blaster Pro, and Sound Blaster 16 are
trademarks of Creative Technology, Ltd. Gravis and Ultrasound are
trademarks of Advanced Gravis Computer Technology, Ltd.
Extreme Pinball is a trademark and Electronic Arts is a registered trademark
of Electronic Arts.
Software © 1995 Electronic Arts, Digital Extremes, and Epic MegaGames.
All rights reserved.
Documentation © 1995 Electronic Arts. All rights reserved.
 Loading...