

Page 1

TABLE OF CONTENTS
Installation 1
EverQuest II Account Key 1
Welcome to EverQuest® II 1
Creating Your Character 1
Choose Your Race & Gender 2
Choose Your Alignment 2
Choose Your Class 2
Customize Your Appearance 2
Choose Your Name & Server 2
Character Basics 3
Attributes 3
Character Classes 4
User Interface 9
Character Selection Screen 9
Main Game Screen 10
Hotkeys 11
EQII Menu 12
Gameplay Basics 13
Starting Cities: Freeport, Qeynos & Kelethin 13
Right-Click Context Menus 13
Moving Around 13
Exiting the Game 15
Inventory & Equipment 16
Persona 17
Chat Windows & Commands 19
In-Game Mail System 20
Banking 21
Trading with Other Players 22
Buying & Selling 22
The Open Market 22
Grouping with Other Players 25
Housing 26
Spells, Combat Arts & Other Abilities 26
Recovering Health & Power 29
Combat 29
Considering Enemy Reaction & Strength 29
Attacking 31
Heroic Opportunities 32
Death 33
Crafting 36
Tradeskill Arts 36
Your Recipe Book 36
The Crafting Process 36
Workshops 37
Character Advancement 38
Gaining Experience & Leveling Up 38
Improving Skills 38
Advanced Training 38
Alternate Achievement 39
Titles 41
Artisan Advancement 41
PvP (Player Versus Player) 42
Gameplay on PvP servers 42
PvP Rules 42
Player Communication 43
PvP Combat 43
City PvP 44
PvP Death 44
PvP Rewards 44
The Kill List 45
Community 45
Guilds 45
Station Players™ 47
EverQuest® II Echoes of Faydwer™
EverQuest® II Kingdom of Sky™ 55
EverQuest® II Desert of Flames™ 57
Customer Support 59
Using the Knowledge Base 59
Creating a Customer Service Ticket 59
Technical & Billing Support 60
Credits 61
User Agreement and Software License
48
68
Questing 33
The Quest Journal 33
The Quest Helper 34
Acquiring Quests 34
Collection Quests 35
Betrayal Quests 35
Completing Quests 35
1
Page 2

INSTALLATION
Insert the EverQuest II Disc 1 into your DVD-ROM drive. If your computer is
set up to auto play discs, the installation should begin on its own within a minute.
Otherwise you can start the installation by opening My Computer, double-clicking
on the DVD-ROM drive where the disc is located, and then double-clicking on the
EverQuest II icon. Follow the instructions given by the setup program to complete the
installation.
EverQuest II can help you register an account during installation. To do so, you must
have an active Internet connection. You may receive a popup warning before the
connection if you use firewall software or have certain Internet settings. Dialup users
may be prompted to enter the telephone number of their ISP for connection. If the
Internet connection fails, registration will be skipped, but can be completed the first
time you start the game.
When installation is finished, double-click the EverQuest II icon on your desktop to
start the game. You will be prompted for a Station.com account login. If you do not
have an account, create one by clicking the New Account button and registering.
EverQuest II Account Key
The first time you log into EverQuest II you will be prompted for an account key.
This is printed inside your disc holder.
WELCOME TO EVERQUEST II
Welcome to a brand new experience in online gaming. Whether you’re a newcomer
or you’re familiar with the original EverQuest, prepare to have your assumptions
challenged and your imagination entertained!
EverQuest II is an enormous and unique world rich with sights, sounds, and
adventures. Thousands of players from all around the world will join you in this
world, known to inhabitants as Norrath, to explore, quest for treasure, grow in
renown, and participate in the battle between darkness and light for an experience
unlike any other.
But first you must create who you will be in Norrath!
CREATING YOUR CHARACTER
The first step on your journey through EverQuest II is creating your character. This
will be your avatar in the vast world, and it will be through this character that you
will become known.
At the entry screen, click the Create Character button in the lower right of the screen.
Choose Your Race & Gender
Your first choices for your character are race and gender. There are 17 choices
available for your race, each of which appears as a portrait. Click the portrait of the
race you wish to be; the character image to the left will change to that race. Read the
description that appears at the top of the window to learn the selected race’s unique
abilities and advantages.
Above the portraits click either the Male or the Female button to pick your gender. Gender
only affects your character’s appearance, not attributes or abilities. You will have the
opportunity to customize your character’s appearance later in the creation process.
When you are satisfied with your choices of race and gender, click “Next” in the
lower right corner of the screen.
2
Page 3
Customize Your Appearance
After you select your race, you will be able to customize the appearance of your
character. Click on the buttons inside the box on the left for general areas you would
like to customize, such as eyes, head, and body. Some races may have additional areas
for customization, like the iksar crest. Below the buttons is a list of specific features
within the general area you selected. Click the feature you would like to adjust. On the
right side of the screen, under the close-up view of your face, slider bars allow you to
alter the feature. Color palettes are used to select the color of certain features.
You may lock settings so they cannot accidentally be changed by clicking on the
padlock icon. To unlock the setting click on the padlock icon again. Unlock all
settings by clicking the Unlock All button.
Randomizing Your Character’s Appearance
You can randomly generate your character’s appearance by using the randomize
buttons. Click the Randomize All button to change all features (except those you
have locked). Individual features may also be selectively randomized by clicking the
Randomize button at the bottom of the box.
Saving and Loading Customizations
You may save the work you’ve done customizing your character’s appearance by
clicking “Save” at the bottom of the screen. Enter a filename for the customization in
the field and click OK to save. The character customization file will be saved with the
.ccf extension in a folder called “saved_customizations” in your EverQuest II directory.
You may load a saved customization by clicking “Load” at the bottom of the screen.
Select the filename of the customization you want to load and click OK.
When you are satisfied with your character’s appearance, click “Next” in the lower
right corner of the screen.
Choose Your Starting City
Your choice of starting city will influence your alignment, either good or evil. Good
characters will begin in Qeynos or Kelethin, depending on race, while evil characters
begin in the city of Freeport.
Note: Certain races are inherently good (such as high elves), or evil (such as trolls).
These characters will not have free choice of starting city, but will make their home
in the city or cities appropriate to their inherent alignment. Additionally, only certain
races historically native to Faydwer may start in Kelethin: Fae, Wood Elves, High
Elves, Half Elves, Dwarves and Gnomes.
Choose Your Class
Your class is your character’s profession, which will determine the ways in which
your character will handle the challenges of the world and the role he or she will fill
when playing with friends. Remember that some classes have an inherent alignment
and may be race restricted. For instance, Dark Elves are evil, and cannot choose a
good class such as Paladin. Classes available to your chosen race will be visible,
while others will be grayed out.
Click on the portrait of the class you would like to play. A description of the class will
appear at the top of the window.
When you have selected the class you wish to play, click “Next” to continue.
Choose Your Name & Server
The last stage of character creation allows you to pick a name and a server on which to play.
3
Page 4

Selecting a Character Name
Enter the name you want your character to be known by in the field. This is the name
all other players will know you by in the world. If you’re stumped for a name, click
the Get Random Name button and one will be generated for you. Please do not pick
offensive or otherwise inappropriate names, as these will be rejected. Review the
Sony Online Entertainment naming policy on EverQuest2.com for rules on names.
If the name you have chosen is already in use by another player, or your chosen name
is not allowed for other reasons, you will be notified and given the opportunity to pick
a different name.
Selecting a Server
Servers are the worlds in which you will play. Each server is the same basic world,
but through the actions of the players and the communities that develop on them,
each server is singular in its own way. Also, certain servers may have special rules or
designations in place that differentiate them from others, such as these:
Antonia Bayle, Lucan D’Lere, Venekor Roleplaying Preferred Servers
Vox, The Bazaar Station Exchange™ Servers
Innovation, Valor, Talendor German Servers
Runnyeye, Splitpaw, Darathar European English Servers
Sebilis Japanese Server
Storms, Gorenaire French Servers
If you have friends in EverQuest II that you would like to play with, find out which
server they are on and choose it as your play server.
CHARACTER BASICS
Attributes
Your character has five attributes that define his or her physical and mental abilities.
Depending on your race, these attributes will vary to reflect innate strengths and
weaknesses.
Strength represents your character’s physical strength. It affects your character’s
ability to deliver physical damage, and his or her carrying capacity. Strength also
affects Power for Guardians, Berserkers, Monks, Bruisers, Paladins Brigands,
Swashbucklers, Rangers, Assassins and Shadowknights.
Agility is a measure of your character’s nimbleness and dexterity – increased agility
makes your character harder to hit. For Brigands, Swashbucklers, Dirges, Troubadors,
Rangers, and Assassins, Agility also affects Power.
Stamina is your character’s fortitude. It affects maximum Health and how much
damage an unconscious character can take before dying.
Intelligence represents your character’s powers of reasoning and overall intellect.
It can influence magic use, affecting magical damage. For Wizards, Warlocks,
Conjurors, Necromancers, Illusionists, Coercers, Troubadors, Shadowknights and
Dirges, it also affects Power.
Wisdom is a measure of your character’s spiritual strength and willpower. It can
affect your character’s ability to resist magical attacks. For Templars, Inquisitors,
Wardens, Furies, Mystics, Defilers and Paladins, Wisdom also affects Power.
Your character’s Power and Health pools are perhaps the most important to monitor
when adventuring.
4
Page 5
Health represents your character’s resilience, especially in battle. As your character
takes damage, Health is reduced. It will regenerate with time and rest; however, if
your Health is depleted, your character will die.
Power allows your character to perform spells and combat arts. These are often
draining, and using them reduces your Power. It will regenerate with time and rest.
You will not be able to use spells and abilities that require more Power than you
currently have available.
Your character also has resistances to a variety of attacks he or she may encounter.
The higher your resistance to a particular type of attack (such as heat, magic, or
physical attacks), the less that attack will harm you.
Character Classes
There are 24 classes to pick from for your character. Some, however, are only
available to characters of a particular alignment. For example, only evil characters
from Freeport can choose to be a Shadowknights, while only good characters from
Qeynos can be Paladins.
Guardian
Those who seek up-close combat will find the melee-driven style of
the Guardian to be to their liking. The Guardian is the front-line force
in a party. Combining the power of armored protection and physical
prowess, the Guardian can take large amounts of physical damage
from enemies and remain standing. This style of combat requires
Guardian’s role allows the less resilient members of his party to perform their roles
more effectively. The Guardian can wear all forms of armor and may choose from all
forms of weaponry.
his enemies in melee combat. The Berserker shows neither mercy nor apprehension
in combat. The Berserker can wear all forms of armor and may choose from all forms
of weaponry.
the Guardian to be in close range with his target at all times. The
Berserker
Those who seek to devastate their foes through an expertise in martial
weaponry will find the Berserker to be an exciting profession. The
Berserker’s skills in melee combat consume the entirety of his role
and abilities. The Berserker is the personification of unbridled rage
and fury, making him a powerful combatant. The Berserker serves his
party on the frontlines of battle where he can best vent his rage upon
Monk (Good Only)
Those who desire to engage in graceful, hand-to-hand martial combat
will find the Monk profession to be an exciting path. The Monk
is a spiritual combatant who practices philosophies of mind-overbody. The Monk is best served on the frontlines where her advanced
physical skills are most effective against her foe. The Monk can wear
leather armor and may choose from hand-to-hand or blunt weapons.
Bruiser (Evil Only)
The Bruiser profession is ideal for those who want to pummel their
enemies hand-to-hand. The Bruiser is a juggernaut of physical pain,
having transformed his body into a vicious tool for inflicting suffering
on his foes. The honing of the Bruiser’s physical body conveys
offensive as well as defensive advantages. The Bruiser is most
armor and use hand-to-hand or blunt weapons.
effective on the frontlines of combat. The Bruiser can wear leather
5
Page 6
Paladin (Good Only)
Those who desire to fulfill a role of nobility, honor, and virtue will
find the Paladin profession to be ideal. The Paladin excels in martial
combat and possesses divine magical abilities to enhance her skills in
combat. As a true martial combatant, the Paladin is most efficient on
the frontlines where she is able to engage the enemy in close combat.
augment her martial skills, increasing her capabilities for both defense and healing
during a fight. The Paladin can wear plate armor and may use most one- and twohanded weapons.
Shadowknight can wear plate armor and use most one- and two-handed weapons.
hinder or harm her foes. The Warden can wear leather armor and may use hammers,
staves, maces, and swords as weapons.
destructive forces upon his enemies. The Fury can wear leather armor and use
weapons such as hammers, staves, maces, and swords.
By invoking her protective magic, the Paladin may temporarily
Shadowknight (Evil Only)
The Shadowknight profession is ideal for those who seek personal
power through physical force and live to spread fear, hate, and
despair. The Shadowknight is trained in martial skills and has the
ability to conjure dark magic to enhance his abilities in combat.
This combination of offensive and defensive capabilities makes
the Shadowknight a very effective frontline combatant. The
Warden
The Warden profession is ideal for those who desire to use
harmonious magic provided by nature to fulfill a protective role in the
world. The Warden serves her party by invoking her druidic powers to
mend wounds and purge the effects of disease and poison that afflict
her allies. The Warden may also invoke powers to bestow temporary
protective effects on and enhance the attributes of her allies, as well as
Fury
Those who seek to harness the feral and destructive forces of nature
will find the Fury to be a suitable profession. Although the Fury
conjures his power from nature’s ferocity and is a druid of predation
and vengeance, he can play a vital support role in the party by
providing magical healing and protection. The Fury can enhance his
allies’ physical attributes and abilities in combat, and bring down
Templar (Good Only)
The Templar profession is ideal for those who desire to excel in a role
of support by conjuring powerful restorative and protective magic to
benefit allies. The Templar serves her party by mending the wounded
and purging illness and suffering from the afflicted. The Templar
may also use her powers to bestow temporary augmentations to her
divine powers, the Templar may invoke offensive powers that will hinder or harm
adversaries. The Templar can wear plate armor and use hammers, staves, and maces
as weapons.
allies’ defenses and attributes. As a secondary application of her
Inquisitor (Evil Only)
The Inquisitor fulfills a militant support role by providing restorative
and protective benefits to her allies. The Inquisitor is able to mend
wounds and purge ailments of all sorts, while striking opponents with
divine power. The Inquisitor can wear plate armor and use hammers,
staves, and maces as weapons.
6
Page 7
Mystic (Good Only)
Those who seek a symbiotic connection with the spirit world in order
to fulfill a supportive role will find the Mystic to be to their liking.
The Mystic is a shaman of spiritual preservation and enlightenment,
offering magical healing and relief from disease and poison. The
Mystic can also use her powers to grant brief enhancements to her
weaken and harm enemies. The Mystic can wear chain armor and may use hammers,
staves, spears, and maces as weapons.
magical attacks. The Defiler can wear chain armor and use hammers, staves, spears,
and maces as weapons.
allies’ attributes and provide magical protection in combat, as well as
Defiler (Evil Only)
Those who crave power through the corruption and enslavement of the
spirit world will find the Defiler class to be an ideal profession. The
Defiler best serves as a first line of defense for the party, being able
to heal wounds and remove ailments that afflict allies. The Defiler is
also able to augment his allies’ attributes or enhance their abilities in
combat. In addition, the Defiler can weaken and harm enemies with
Wizard
The Wizard profession is ideal for those who seek to unleash the purest
forms of destruction through the arcane magic of fire and ice. Wielding
these powerful elemental energies, the Wizard serves her party by
devastating opponents from afar with damaging magic. The Wizard can
wear cloth armor and use staves, wands, and daggers as weapons.
Warlock
Those who desire to wield the destructive forces of poison and decay
in order to obliterate their foes will find the Warlock profession to be
ideal. The Warlock serves his group best from behind the frontlines
where he can better avoid a physical confrontation and ravage
opponents with poison and disease. The Warlock can wear cloth armor
and use staves, wands, and daggers as weapons.
Conjuror (Good Only)
The Conjuror suits those who wish to summon powerful minions to
perform their bidding in combat. The Conjuror’s minion can be a
creature native to Norrath or a manifestation of an elemental force.
The Conjuror works best behind the frontlines of combat, directing his
minion and wielding arcane elemental spells. These spells can strike
cloth armor and may use staves, wands, and daggers as weapons.
down opponents or weaken their abilities. The Conjuror can wear
Necromancer (Evil Only)
The Necromancer is ideal for any who are intrigued by the mastery
of death and the commanding of undead servants. The Necromancer
is able to summon a wretched undead servant to attack his enemies,
and use the powers of death to weaken and destroy his enemies.
The Necromancer can wear cloth armor and use staves, wands, and
daggers as weapons.
Illusionist (Good Only)
The Illusionist profession is an ideal choice for those who seek to
fill a role of support and control through the magic of illusions. The
Illusionist supports her party, using illusions to confuse, misdirect,
and damage opponents. These illusions require little maintenance by
7
Page 8
the Illusionist, freeing her to concentrate on helping bring order to chaotic combat
situations. The Illusionist can also bestow temporary augmentations to her allies’
attributes, as well as offensive and defensive capabilities. The Illusionist can wear
cloth armor and use staves, wands, and daggers as weapons.
Coercer (Evil Only)
Those who seek to dominate their foes, subjugating an enemy’s will
to her own, will find the Coercer to their liking. The Coercer serves a
party best behind the frontlines. She can subdue multiple opponents,
send enemies fleeing in induced unbridled terror, and even seize
control of minds. A Coercer can also mentally augment her allies,
and use staves, wands, and daggers as weapons.
chain armor and use dual-wield and one-handed weapons.
strength in battle. The Dirge can wear chain armor and use dual-wield and onehanded weapons.
improving their abilities in combat. The Coercer can wear cloth armor
Troubador
The Troubador is ideal for those who desire to inspire and protect their
allies through the unique magic generated by their songs of bravery
and heroism. The Troubador best serves her party from behind the
frontlines of combat. Through her music, the Troubador inspires allies
to perform outstanding feats of skill and courage. The Troubador may
also use her songs to demoralize her enemies. The Troubador can wear
Dirge
The Dirge is an ideal profession for those who desire to use songs
of misery and sorrow to inspire intense battle rage in their allies and
despair in their enemies. The Dirge best serves his party behind the
frontlines where he can play mournful songs behind the protection
of his allies. The Dirge’s songs inspire bold feats in allies, boosting
their attributes and skills, and demoralize enemies, diminishing their
Ranger (Good Only)
The Ranger is an ideal profession for those who seek mastery of the
wilderness. Unrivaled in her abilities to hunt foes and locate dangers
in the wilds of Norrath, the Ranger best serves her party in the midst
of combat. Using stealth, perception, and cunning, the Ranger flushes
out the enemy and initiates combat. The Ranger can then drop back
Ranger can wear chain armor and use dual-wield and one-handed weapons.
from the frontlines where she can attack with ranged weapons. The
Assassin (Evil Only)
The Assassin profession is ideal for those who wish to master sinister
strikes and hidden attacks. The Assassin serves his party best in the
frontlines of combat. He surveys the battle for potential prey and
attacks of opportunity, striking from the shadows to inflict massive
damage. The Assassin can wear chain armor and use most dual-wield
and one-handed weapons.
Swashbuckler (Good Only)
Those who seek to engage in combat with grace and panache while
crippling opponents with strategic attacks will find the Swashbuckler
profession to their liking. The Swashbuckler is a rogue who prefers
to perform flamboyant acts of skill and daring, striking suddenly and
using shadows to confuse opponents. The Swashbuckler best serves
a party as a secondary line of physical offense, inflicting damage on
8
Page 9
opponents—particularly in devastating first strikes. The Swashbuckler can wear chain
armor and use most dual-wield and one-handed weapons.
Brigand (Evil Only)
Those who enjoy a tough and unpredictable scrapper that works the dark
corners of the world for gain through intimidation will find the Brigand to
their liking. He serves his group best as an unseen element in the chaos of
battle, positioning himself just behind the frontlines and dealing powerful
strikes of opportunity against the enemy. The Brigand can wear chain
armor and use most dual-wield and one-handed weapons.
USER INTERFACE
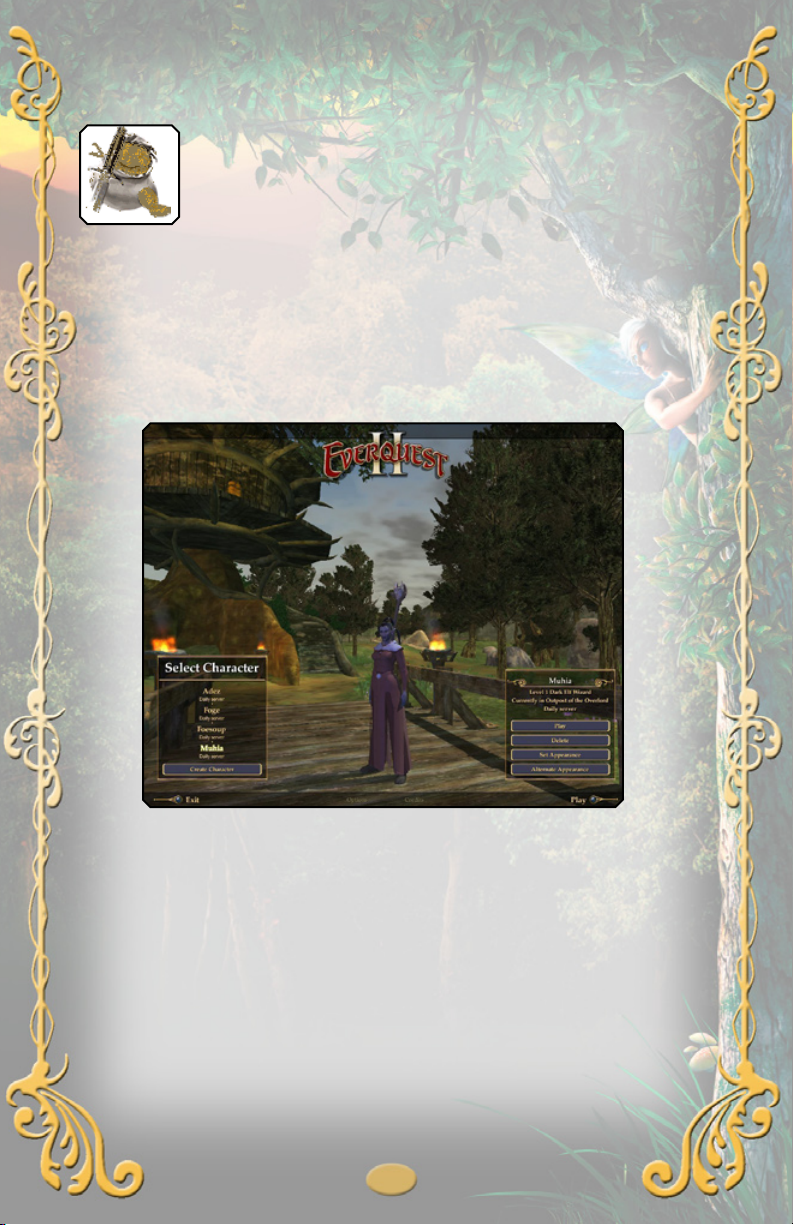
Character Selection Screen
When you have more than one character in EverQuest II, you can select which one
you want to play from the Character Selection Screen. Your characters are displayed
along with their names, current level, the servers they are on, and the zone they are
camped in.
EXAMPLE:
On the left of the screen is a list of your characters. Click on the one you would like
to play. When your selected character appears, click Play in the lower right of the
screen to enter the world.
You can also select the character you wish to play from the patcher screen, from the
pull-down menu that appears on the left.
Deleting Characters
You may delete a character by selecting him or her and clicking the Delete button
in the lower right of the screen. Please be certain you want to do this! You will be
prompted to type in the character’s name to confirm the deletion.
Resetting Appearance
You can change your character’s appearance once by clicking the Set Appearance
button in the lower right of the screen. This will return you to the character
9
Page 10
customization screen where you may alter your character’s appearance.
Note that you may only do this once, and once you reset your appearance and click
“Finish” the button will no longer appear on the Character Selection Screen.
Set Alternate Model Appearance
U.S. and European players can now use unique Asian-styled characters that were
developed for the EverQuest II East project created by SOGA, a joint-venture with
SOE’s development studio based in Taiwan. These alternate models can be seen ingame by players who set their Options to display them.
Click the Alternate Appearance button to enter character customization and set your
alternate model appearance. This will not change your original character appearance,
but will set your character’s appearance for those who have alternate models turned on.
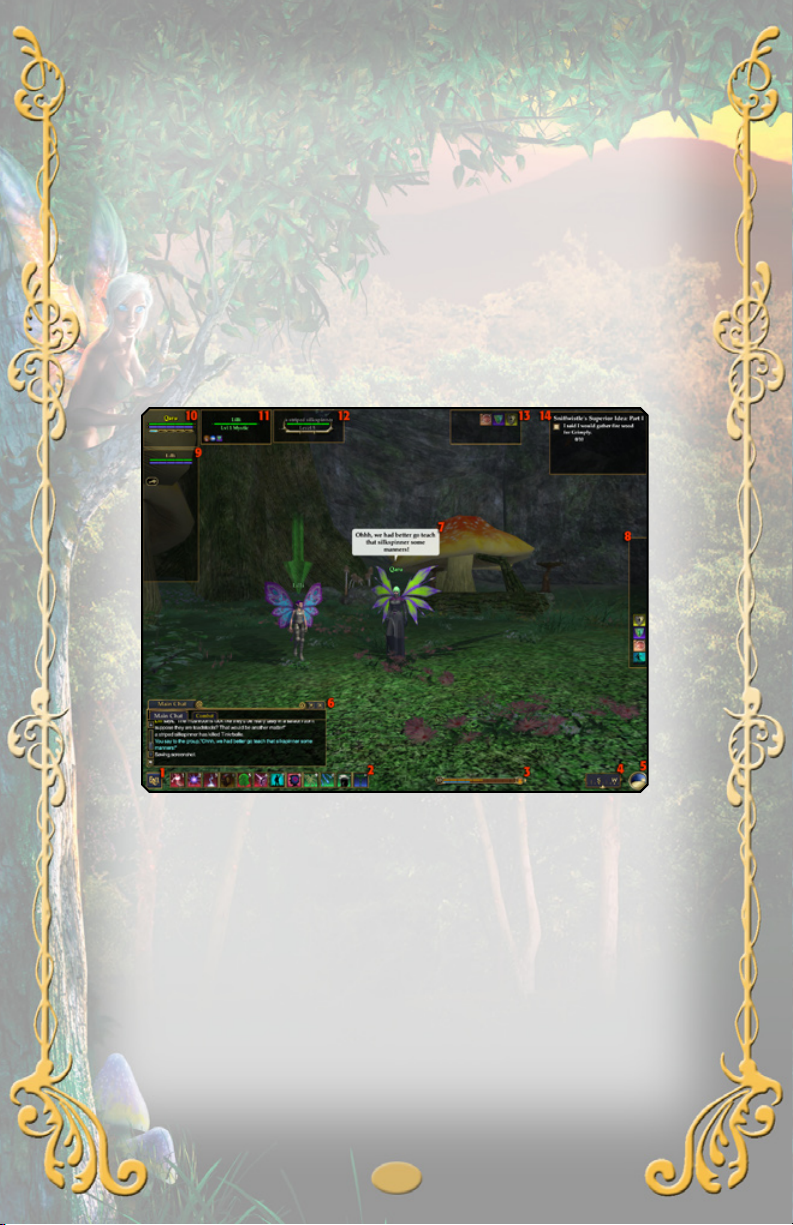
Main Game Screen
These are the basic elements you will find in main screen user interface. The
EverQuest II user interface is highly customizable to suit the individual. All windows
can be resized and moved to your liking.
1. EQII Menu Button. Click this button to get access to menus, controls, and other
actions. If you’re not sure how to do something, you can find it through this menu.
2. Hotkey Bar. Place spells, combat arts, and other actions in this bar for quick and
easy use.
3. Experience Meter. This meter tracks your progress toward your next level. The
gold bar tracks total experience and is divided into 10 blocks; when all blocks are
filled you will level up. The blue bar tracks progress toward the next full block in the
gold bar.
4. Compass. Displays your heading.
5. Clock. Displays the day and night cycles in the game and shows the time when you
move your mouse over it.
10
Page 11

6. Chat Window. Displays conversations and game text.
7. Dialog Bubble. When characters speak using the /say command, their text is
displayed in a dialog bubble.
8. Spell Effects. Displays effects that are currently affecting your character, such as
spells, diseases, combat arts, poisons, and others.
9. Group Window. Health and Power meters for other members of your group are
displayed here. In addition, there are two buttons in this box that will help you
find groups.
10. Character Condition Meters. This displays your character’s current Health,
Power, and Concentration.
11. Target Window. Displays information about your current target, such as
condition and relative strength to you.
12. Implied Target Window. This window appears when the character or creature
you have targeted has another being targeted. For example, if you target a group
member that is targeting an opponent, any beneficial spells you cast will land on your
group mate while hostile spells will land on the opponent.
13. Maintained Effects. Displays the spell or combat art effects you are currently
maintaining on yourself, friends, or enemies.
14. Quest Helper. Displays the currently selected quest in your Quest Journal and the
next goal to be completed in the quest.
Hotkeys
Hotkeys allow you to perform actions quickly. Each hotkey slot corresponds to a
number key, and the action in that slot will be executed when the key is pressed.
To assign an action to a hotkey, open your Knowledge Book by pressing the [K] key
and drag-and-drop the icon to a slot on the hotkey bar. If there is an action already
assigned to the slot, the new action will replace the previous action. The old action
will be attached to your mouse pointer for placement in another hotkey slot, or you
may delete it by clicking anywhere in the main world view area.
You may also create hotkeys from your inventory window by dragging-and-dropping
an item slot into a hotkey slot. This can allow for quick changes of weapons or quick
activation of equipped items with special usable effects, such as poisons and potions.
You may open and use additional hotkey banks. Right-click on the hotkey bar and
select “Open New Hot Bar.” These hotkey slots can be activated quickly using the
[Alt] key and the number for the secondary bank, and the [Ctrl] key plus the number
for the tertiary bank.
Changing the Size of Hotkey Icons
You can alter the size of your hotkey bars and icons by right-clicking on the hotkey
bar and selecting “Set Icon Size” from the context menu. Adjust the slider bar to
change the size of your icons.
11
Page 12
Custom Hotkeys: Macros
Macros allow you to define your own hotkeys. You can create and edit macros from
the Macros tab of the Socials window (press the [O] key). Click one of the open
slots; this will open the Edit Macro window.
You can set the macro’s name, icon, and up to three commands to perform when the
macro is executed. Enter commands in the three text fields. These fields take only one
command per text field (any more will be ignored). Click the Test button to check that
the macro functions as you intend.
Once created, you can execute a macro by clicking the button in the Socials window,
or dragging-and-dropping the icon into a hotkey slot. You can change an existing
macro by right-clicking on it and selecting “Edit.”
EQII Menu
The EQII Menu will help you navigate to any option, setting, or action you
might need in the game. If you’re not sure where to find something, check here.
Achievements. Opens up your class achievements UI window (default [L] key).
Inventory. Opens your inventory screen (default [I] key).
Persona. Opens your persona screen (default [P] key).
Knowledge. Opens your Knowledge Book, which lists all spells, combat arts,
tradeskills, and abilities (default [K] key).
Recipes. Opens the tradeskill window listing recipes your character knows
(default [N] key).
Quest Journal. Opens your Quest Journal where all your quests are tracked
(default [J] key).
Waypoints. Displays a list of locations or group members in your area. Select one to
see a light trail that will lead you to the target (default [Alt] +[W] key).
Map. Displays a map of your current location, if one is available (default [M] key).
Societies. Displays a list of tradeskill societies, their levels, members in each, and
other information. Societies you are a member of are highlighted in green.
Guild. Displays the guild window, if you are a member of a guild (default [U] key).
Socials. Displays a list of social actions and custom macros (default [O] key).
Community. Opens your Friends and Ignore lists (default [Y] key).
Options. Opens a window listing all options for adjusting the game settings, such as
graphics, sound, and key mappings. Explore the many ways that you can fine tune
user interface settings to suit your unique play style.
Claim Rewards. If you have special gifts awaiting you, such as veteran rewards,
check here to see what is available for you to claim.
Help. Opens the help window where you can find quick answers to your questions ingame and access Customer Service.
Report a Bug. Use this to report any game bugs.
12
Page 13

Camp (Logout). Use this when you want to exit EverQuest II. Camping takes 20
seconds to complete. Make sure you are in a safe location when you exit the game.
GAMEPLAY BASICS
This section will explain the basics of making your way through Norrath and building
your fame and fortune.
Starting Cities: Freeport, Qeynos & Kelethin
The devastation that followed the Shattering left three centers of civilization intact:
the cities of Qeynos and Freeport, and the recently rediscovered treetop citadel of
Kelethin. Each harbors citizens of differing philosophical outlooks.
Qeynos is a kingdom founded on order and valor. Populated by the surviving good
races and those who believe in a better future, the citizens of Qeynos seek to restore
prosperity to Norrath. The city is guided by the benevolent and influential Antonia
Bayle, descended from the great house that ruled the Kingdom of Qeynos in the past.
She regards herself not as a queen, but as a representative of her people’s will, and is
responsive to their needs. Her good nature and charisma inspire Qeynos’ residents to
greater achievements.
Freeport is ruled by the will of just one individual, the Overlord Lucan D’Lere.
His history is obscure, his power great, and his rule of Freeport uncontested. He
is merciless in maintaining and expanding his power. The Overlord’s influence
permeates all of Freeport, its citizens held in thrall through fear and their leader’s
self-aggrandizing manipulation of history. Many of the citizens of Freeport live in
squalor, and they are constantly reminded that the only reason they have survived
Norrath’s devastation is through the strong hand of the Overlord.
Kelethin was long forgotten and thought lost by most Norrathians after the Shattering.
The Fier’Dal left hundreds of years ago, and the once shy Fae folk moved in and
made the city their own. Here they continued to grow, change and develop a unique
culture, true to their origin as the children of Tunare, Mother of All. Queen Amree
rules the Fae with great wisdom and compassion born of the trials her peoples have
faced. Now at last new folk are coming to the verdant forest of the Faydark. They are
warmly welcomed by the Fae; Allies will be needed in the upcoming struggles.
Right-Click Context Menus
In any situation you find yourself, whether dealing with non-player characters,
doors, objects, abilities, and more, you can always find a list of actions and
information by right-clicking on them. This will open a context menu listing the
commands you can issue.
Moving Around
You control your character in two ways, using the keyboard or the mouse. You may
also use them in conjunction. The default keyboard commands for movement are the
[W], [A], [S], and [D] keys:
• [W] moves you forward
• [A] turns you to the left
• [D] turns you to the right
• [S] moves you backward
• [Page Up] tilts your view up
• [Page Down] tilts your view down
• The number pad will also direct your character using the [8], [4], [6], and [2] keys,
as will the directional arrow keys.
Mouselook
“Mouselook” allows you to use your mouse to look around your character and move
13
Page 14

through the world. It is particularly useful underwater, where up and down movement
is needed.
To move the camera view. Hold down the right mouse button and move the mouse.
The camera will circle around your character. Look up and down by moving the
mouse vertically.
To move. Hold the right mouse button, and press the left mouse button to move in the
direction the camera is facing.
To zoom camera view. On a mouse with a scroll wheel, roll the wheel toward you
to zoom out from your character. Roll the wheel forward to zoom in close to your
character. Rolling the wheel forward will eventually put you into the first-person
camera view. Pressing the default [F9] key will toggle between first-and-third person
camera views.
Auto-Follow
When grouped you can auto-follow another group member by right-clicking the
member and selecting “Follow” or typing /fol. Use of auto-follow is not recommended
in areas with narrow, twisting hallways, or near steep cliffs, water or lava.
Auto-Run
Auto-run keeps your character running without having to hold down the direction
keys. This is useful when traveling long distances on foot.
To toggle auto-run on, press the [Numlock] key. Press it again to stop, or press the
forward [W] or back [S] key.
While auto-running, you can change direction without stopping by pressing the left or
right turn keys, when using mouselook, hold down the right mouse button and move
the mouse right or left to turn.
Climbable Walls
In EverQuest II, you can scale some walls in the Desert of Flames, Kingdom of Sky
and Echoes of Faydwer zones. Watch for subtle visual clues such as climbing spikes,
a heavily scarred wall surface, or the flattened trunk of a tree.
You will automatically enter the stance necessary to traverse these special types of
terrain when you encounter them. Mounts will be dismissed when you start to climb.
When climbing walls, you move similarly to normal movement. For example, moving
forward will cause you to climb up, while moving back will make you climb down.
Jumping will disengage you from the vertical surface. You will fall when doing this,
so be sure you’re not too far from the ground!
You will be unable to fight while climbing. You may, however, still maintain spells and
be healed. Encounter lock will be broken if you begin a vertical climb during a battle.
Mariner’s Bells
You can get around cities and some outlying areas by using mariner’s bells. Ring
a mariner’s bell by right-clicking on it. A window will open with a list of places to
which you can travel. Select your destination and click the “Zone” button.
Walking Between Zones
When traveling to different locales on foot, you may come to gates or other portals.
Move your mouse pointer over them to see the name of the place (or “zone”) beyond
14
Page 15

it. Click on the portal to travel to your destination. Some outdoor zones have no
distinctive entries, and will automatically transport you as you cross the border.
Mounts
Mounts such as horses and flying carpets are available for purchase in some cities and
allow you to travel the world more quickly. The cost can be in coin or status points,
or possibly both depending on the quality of the mount. Mounts may also be rewards
for completed quests. When you acquire a mount, you will receive an item (such as a
horse whistle) that will call your mount. You may cast spells and fight while mounted.
Mounts will disappear when you cross water. Once you climb out on the other side,
the mount will reappear. Mounts cannot be used in most dungeons.
Griffin Towers, Carpets & Ships
There are many modes of travel in the world, such as griffin towers and flying
carpets. These can carry you quickly to locations within a zone, or even transport you
to other zones. Some griffin routes require the traveler to complete a short quest to
gain access the first time.
With the EverQuest® II Echoes of Faydwer™ expansion, a ship route has been
established between the Thundering Steppes, Nektulos Forest and Butcherblock
Mountains. The ship docks at each of these ports at regular intervals; simply board
the ship, and it will transport you.
Teleportation Spires and Cloud Transport
Spires (found in several zones in Norrath) can transport you to various places in the
EverQuest® II Kingdom of Sky™ expansion. You must have the expansion enabled
and hail the nearby Gate Caller Scion to receive a teleportation shard in order to use
the spires. Just remember that the Overrealm is dangerous for characters under Level
50. Kingdom of Sky also features unique cloud transports between floating isles. To
use one, right-click on the cloud at the station, and choose your destination from the
context menu.
Sprinting
Your character can run faster in short bursts using the Sprint ability. If you are forced
to flee a fight and yell for help, Sprint can help you put some distance between
yourself and a pursuing enemy. Sprinting consumes Power; if you run out of Power
you will slow down to your normal running speed.
Swimming
Your character can wade in shallow water, but when you enter deeper water, you
will automatically begin to swim. While underwater, a breath meter will appear on
your screen.
This measures how long you can stay underwater, holding your breath. Swim to
the surface to replenish your breath by looking up (using mouselook, or [Page Up]
on the keyboard) and moving forward. You will eventually break the surface of the
water and take a breath of air. Don’t wait too long to replenish your breath if you
are deep underwater — you may run out of air before reaching the surface and face
death by drowning.
Falling
Falling long distances hurts. If your character falls from a high position, he or she will
take damage. Some classes have a Safe Fall skill that allows them to minimize or even
negate falling damage. The Fae have a unique Feather Fall skill that works similarly.
Exiting the Game
To leave EverQuest II, you should “camp” your character. This safely logs your
15
Page 16
character out of the game world, and he or she will be in the same place when you
next return. The camping process takes 20 seconds.
To camp, click the EQII button and select “Camp” from the menu. You may also use
the /camp command. Camping will return you to the Character Selection screen. If
you want to completely exit the game, select “Camp to Desktop” or use the /camp
desktop command.
You may also instantly quit EverQuest II without the 20-second camping process;
however, your character will remain in the game world for a period of time after you
log out. Use the /quit command to exit the game in this way.
Note that when quitting without camping, because your character remains in the
game world for a period of time after you log out, your character is still vulnerable to
attack. Only quit when you are in a safe location.
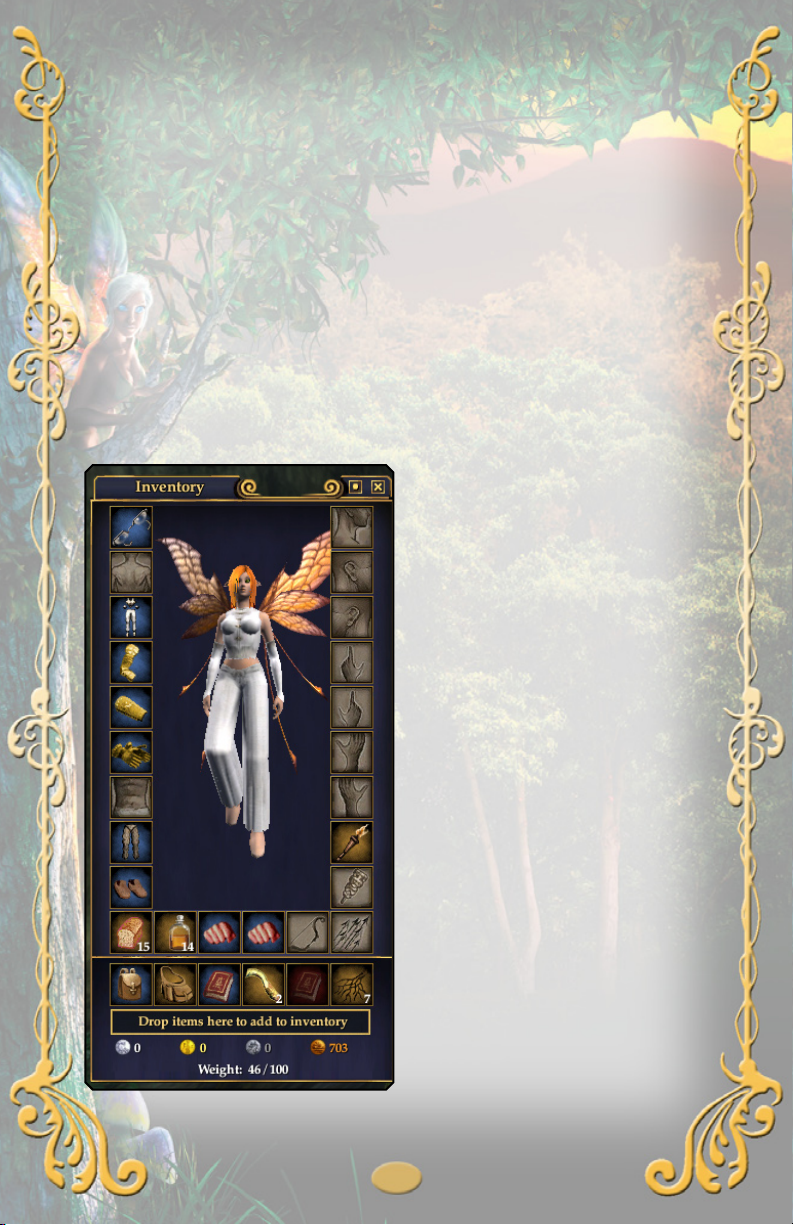
Inventory & Equipment
The inventory screen displays what your character carries and wears. Open your
inventory screen by pressing the [I] key. In the center of the window is an image of
your character, surrounded by equipment slots. Items placed in these slots will be
worn by your character in the indicated location.
Equipping Items
Equipment slots are located around your
character portrait. To equip an item,
drag-and-drop it on your portrait, or
double-click the item to have it placed
in an appropriate open slot. You may
also right-click on the item and select
“Equip” from the context menu. The
item will be equipped in the proper slot
(if you cannot equip the item, it will
return to an inventory slot).
To unequip an item drag-and-drop
it back into a general inventory slot,
double-click on it, or right-click it and
select “Unequip” from the context menu.
At the bottom of the inventory window
is your encumbrance. The number on the
left is how much weight you currently
carry, while the number on the right is
the maximum you can carry without
slowing down.
General Inventory
Beneath your character’s equipment
slots is a line of six slots that are your
inventory slots. These are items that your
character carries on his or her person
but has not equipped. Containers such
as bags or backpacks are kept here and
expand your character’s inventory space.
To automatically open all containers in
your inventory, press the [B] key.
16
Page 17

You can have items automatically placed into your inventory in an available slot
by dragging and dropping the item on the space labeled “Drop items here to add to
inventory” near the bottom of the inventory window.
Item Overflow
There may be times when you receive an item, such as a quest reward, but do not have
space in your inventory to hold it. The item will go into an “overflow” slot, appearing in
the lower left corner of your character’s inventory image. You cannot place items in this
slot yourself. Overflow items should be moved to your inventory when you have space
by dragging and dropping them into open slots. You will see a warning message on the
main screen alerting you that you have items in your overflow.
Carried Money
Your character’s carried money is shown in four denominations beneath the inventory
slots: platinum, gold, silver, and copper. To move money, click and hold a coin
denomination while dragging. If you wish to move just a single coin, hold the [Ctrl]
key while clicking and dragging. To move a specific portion of the coin carried, hold
the [Shift] key while clicking and dragging; a window will open in which you may
specify how much money you want to pick up.
In EverQuest II, currencies have the following values:
1 platinum = 100 gold = 10,000 silver = 1,000,000 copper
Weight Allowance
At the bottom of the inventory screen is your carried weight allowance and
encumbrance. It is displayed as a ration, with the number before the slash
representing the weight of what you currently carry, and the number after the slash
representing the maximum amount of weight your character can carry without
movement being hindered.
Attuning Items
Certain items you find as you adventure will require you to “attune” them before
equipping them. Attuning an item allows you, and only you, to use it. Once attuned,
an item can never be sold or given to another player character. Before attuning an
item, you will be prompted to confirm the process. Once an item is attuned, the only
way to dispose of it is to sell it to an NPC merchant or destroy it.
Mending Items
The wear-and-tear of dying takes a toll on your character’s equipment. Without
repairs, equipment can become unusable and will be automatically unequipped at 0%
durability. If you do not have room in your inventory for these items, they will be
stacked in your overflow inventory. Fortunately, items are never permanently broken.
Menders are located throughout the world and can repair your equipment for a fee.
Click on a mender and select the Repair tab. Your damaged items will be displayed,
as well as the cost to repair them.
To repair an item, select it and click the Repair button. You can also click the Repair
All button to repair everything at once. The amount for the repair will be deducted
from the money your character carries.
Persona
The persona window shows important statistics about your character, his or her
relationship to elements in the world, and allows you to set certain options and flags
for your character.
17
Page 18
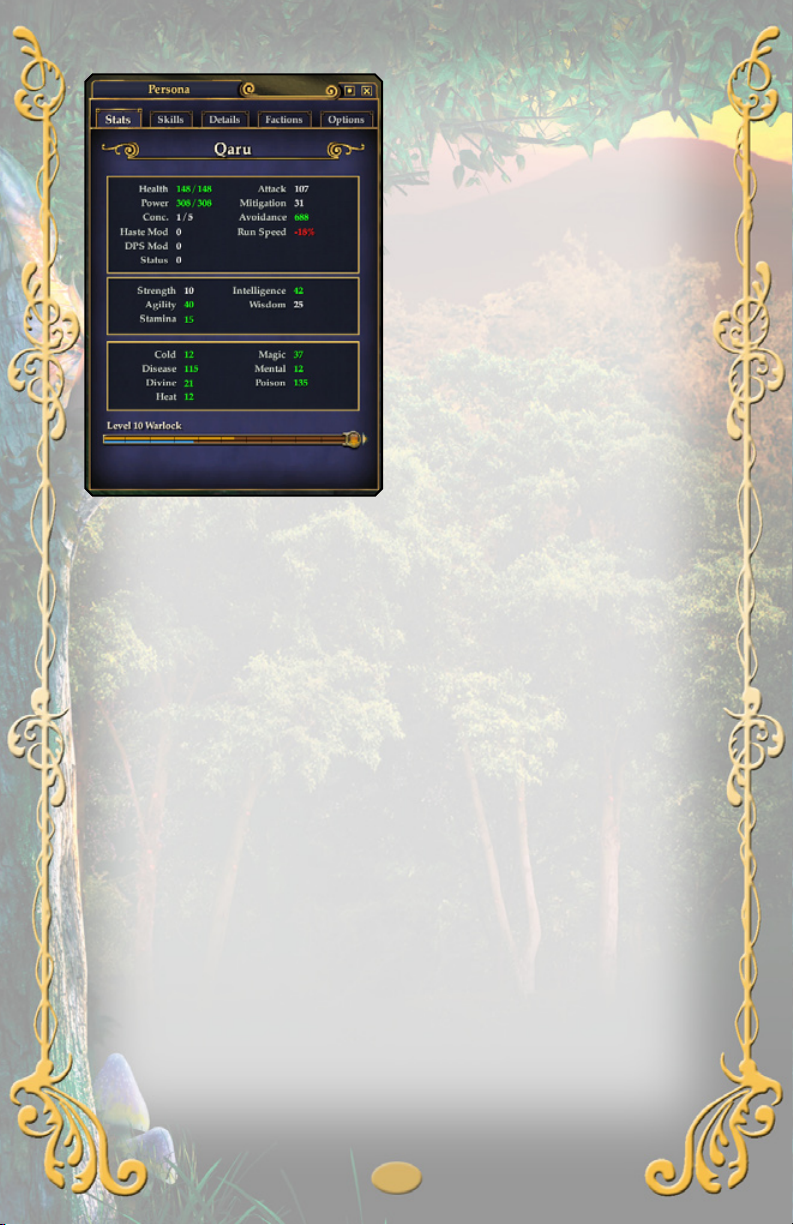
Stats
This tab displays vital information
about your character, such as physical
attributes, status points, and resistances.
Stats in green are being augmented by
spells, abilities, or equipment in some
fashion. Stats in red have been reduced
for some of the same reasons.
Skills
Your skills page includes your combat
proficiencies with different weapons, as
well as your avoidance ratings. Casting
classes also display their abilities in
various schools of magic.
Details
Here you can see and set details for your
character, such as the zone where your
house is and titles your character has
earned and can display. Your surname
may be set or changed from this tab. You
may also customize the voiceover sounds
your character makes when performing
emotes and while in combat.
Factions
Factions are organized groups or creatures in the world that you will encounter. The Faction
tab under Persona will show you how members of these factions will react to you.
Options
Checkboxes allow you to turn on or off these options for your character:
Character Flags
Anonymous. When checked, your character’s level and class will not appear on lists
using the /who command.
Roleplaying. When checked, this shows other players that you are roleplaying your
character. Your level and class will not appear on lists using the /who command.
Away From Keyboard. When checked, this lets other players know when you are
currently away from your keyboard and not able to respond. If you wish to leave a
message for players who send you tells, type /afk <message>.
Looking For Group. When checked, this lets other players know you are available to
join a group.
Looking For Work. When checked, this lets other players know you are available for
crafting/tradeskill tasks.
Graphics
Head Cover. Select display options for head covering from this menu.
Hide My Illusion Form. When checked, this will keep your character’s true form
visible even while under a spell effect that changes your character’s form.
Display Heraldry On Cloak. When checked, your guild’s heraldry will be displayed
on your cloak. When unchecked, the default appearance of your cloak is displayed.
18
Page 19

Privacy
Decline Invitations to Duel. When checked, requests from other players to duel will
automatically be rejected.
Decline Invitations to Trade. When checked, attempts to initiate a trade with your
character will automatically be rejected. This will also prevent unwanted tradeskill
commission invitations.
Decline Invitations to Join Groups. When checked, invitations to join groups will
automatically be rejected.
Decline Invitations to Join Raids. When checked, invitations to join in raids will
automatically be rejected.
Decline Invitations to Join Guilds. When checked, guild invitations will
automatically be rejected.
Chat Windows & Commands
The chat window displays descriptions of events in the game, communications from
other players, and non-player character dialogue. You can also issue commands
through the chat window.
To issue a chat command, press the [/] key or the [Enter] key to activate the command
line. You can customize your chat window and messages by right-clicking on the chat
window for a context menu of options:
Chat Options. Allows you to customize what messages appear in the window, the
font size, and more.
New Chat Window. Opens another customizable chat window.
Open Existing Chat Window. Opens the current chat window.
Add New Tab. Creates a new tabbed chat window within your window instead of
creating a new separate chat window.
Detach Current Tab. Separates a tabbed chat window, turning it into a separate
chat window.
Remove Current Tab. Deletes the current tabbed chat window.
Clear Chat Text. Clears the current chat window of all text.
Always Chat Here. Sets the current chat window as the default location your chat
commands will be issued through.
Window Settings. Allows you to set the appearance of the window, such as its opacity,
and lock it in its current location. The “Click through enabled” check box will lock the
window in place and allow you to click through it, onto objects behind it.
Lock Window. Locks the current window into place so it can’t be moved accidentally.
Chat Options
You can tailor your incoming chat by turning on and off different types of chat
channels and assigning specific channels to additional chat windows and tabs. Rightclick on your chat window and select “Chat Options.” Uncheck the channels and
types of messages you do not wish to receive in this window. Do the same for other
19
Page 20

chat windows or tabs to tailor what each window displays. For example, you can
create a chat window that only displays /tell messages sent directly to you.
The button in the lower left of the chat window that appears as a dialog bubble,
directly below the scroll bar, allows you to set your default communication channel:
Say (/say <message>). Broadcasts your message to all those nearby, within earshot.
A simple /s will also work. Say is the default chat setting when you begin. Unless you
change it, all messages you type after hitting [Enter] will see seen as /say.
Group (/gsay <message>). Messages are sent only to those who are currently in your
group. The command /g will also work.
Guild (/guildsay <message> <message>). Broadcasts your message only to guild
members. You only need type in /gu
Officer (/of <message>). Broadcasts your message to all officers in your guild.
Raid (/r <message>). Broadcasts your message to all members of your raid group.
Reply (r <message>)
Out of Character (/ooc <message>). Broadcasts your message to those who have
the Out of Character (OOC) channel toggled on. This channel is used for general
chatting with other characters in the same zone.
Additional Chat Commands
Auction (/au <message>). Broadcasts your message to all those who have the
Auction channel on.
Shout (/sh <message>). As the name implies, this broadcasts your message to all
characters in the same zone.
Chat Channels
Chat channels are custom, often temporary channels. Each channel is numbered
sequentially in the order that you joined it. To speak in a chat channel, type /<#>
<message>.
World Channels are permanent channels, automatically joined by your character
when you qualify. These include the city, class, tradeskill and level channels.
Regular chat channels are created by players and may be used for general chat or to
facilitate communications (for example) within guild alliances. To create or join such
a channel, type /join <nameofchannel>. It will be assigned a number in your list.
You cannot re-number your custom chat channels at this time. However, you can
leave them all, and then rejoin them in the order you wish to have them numbered.
You may leave a channel at any time by typing /leavechannel <#> or merely disable
it via Chat Options, by removing the checkmark by the channel name.
. Sends your message to the last character who sent you a /tell.
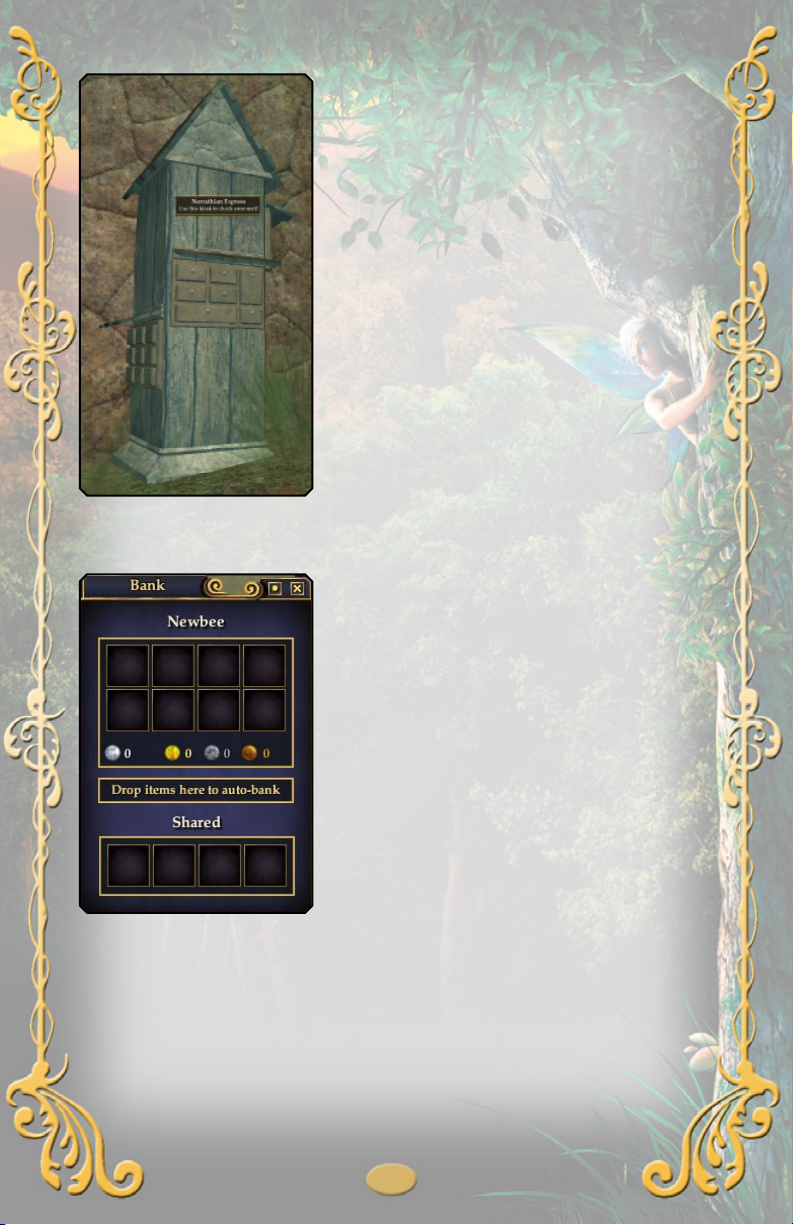
In-Game Mail System
You can send messages, and even coins and items, to other players in the game using
the Norrathian Express in-game mail system.
You can access the mail system by using the kiosks throughout the world. Right-click
the kiosk to open the mail window. The Inbox tab will display any messages you have
received. Click on a message to open the letter. If there are gifts attached to the letter,
click the Receive Gifts button to claim them; they will appear in your inventory. You
can reply to the sender by clicking the Reply button.
20
Page 21
Note: Messages are only stored for up to 30 realtime days, so be sure to check your mail. Messages
older than 30 days will automatically be deleted.
Click the Send tab to create a new message. Enter
the name of the character you wish to send the
message to in the “To:” field. You may also enter
the subject of the message in the “Subject:” field.
Click in the blank space and type your message.
If you wish to send an item with the message, dragand-drop the item into the space at the bottom of
the message. Only one item or stack of items may
be attached to each message. If you wish to send
coin, click the Give Coin… button and enter the
amount. Click the “Send” button when you are
ready to send the message.
Note that it does cost money to send messages, and
messages bearing gifts are more expensive to send.
Also, mail delivery is not instantaneous; it takes
approximately one half-hour for your message to
reach the recipient.
characters. Items designated as “Lore” cannot be mailed.
Banking
and-dropping in the same way.
Shared Bank Slots
The shared bank slots allow you to transfer some items and coins between your
characters on the same account. Items placed in these slots will appear in your other
characters’ shared bank slots, with limitations: Shared bank slots of characters of
one alignment are restricted to only those of the same alignment; for example, items
your evil character in Freeport places in shared bank slots will not appear in your
Mail travels freely between good and evil
Banks allow you to store money and items safely.
Bankers are usually located within cities. Click
on the banker NPC to open your bank window, or
right-click and select “Bank.”
To move items into and out of your bank, simply
drag-and-drop them into open slots. If you wish to
move an a specific number of items from a stack,
hold the [Shift] key while dragging-and-dropping;
enter the amount of the item you wish to move in
the window that opens. You can move one unit of a
stack by holding the [Ctrl] button while draggingand-dropping.
To open all containers in your bank vault, press
[Shift][B].
Items can be automatically placed in open slots in
your bank by dropping them on the space in the bank
window labeled “Drop items here to auto-bank.”
You can deposit coins in your bank by dragging-
21
Page 22
good Qeynos character’s shared bank slots, and vice versa. Also, items that cannot be
dropped or traded, or are designated as LORE, cannot be placed in shared bank slots.
Trading with Other Players
You can trade items and coins with other characters by right-clicking on them and
selecting “Trade” from the context menu. This will open a trade window.
Offer items to trade by dragging them into the top set of slots; offer coins by dragging
them into the upper row of coins. Beneath this area are displayed any items or coins
the other character is offering to trade to you.
Use:
click+drag to access all of the money of a given denomination
[Shift]+click+drag to choose a specific amount of coin
[Control]+click+drag to choose a single coin.
To finish a trade, press the
click the Accept button, the trade is completed. If either side wishes to make a change
to the offer the trade must be canceled and reinitiated. You may cancel a trade at any
time by pressing the Reject button.
Always examine the items the other party is offering in the trade window, to ensure
you are getting exactly what you want, BEFORE you press “Accept”.
Buying & Selling
You can find merchants who buy and sell goods throughout cities and even in the
wilderness. To engage a merchant, click on him or her, or right-click and select
“Merchant” from the context menu. This will open the merchant window. The money
you carry is displayed at the bottom of the window. Money kept in the bank cannot
be used in merchant transactions. You must first withdraw the coin from the bank in
order to spend it.
Click the Buy tab to see what the merchant has for sale. You can learn more about an
item for sale by right-clicking it and selecting “Examine” from the context menu. To
buy an item, select it and click the Buy button at the bottom of the window.
Items that you can use are listed in white text. Items that you cannot use due to level,
class, race or faction are listed in red text.
Click the Sell tab to see what items you may sell from your own inventory and the
amount of money the merchant is willing to pay you for each item. Items you have
equipped are not shown. If there are items that you don’t want to sell by accident,
select the item from the list and click on the “Not for sale” checkbox at the bottom of
the merchant window.
To sell an item, select it and click the Sell button. Some merchants are choosey about
the items they are willing to buy. You may need to look around to find a buyer for
certain items. Also keep in mind that not all merchants pay the same prices for goods,
and may offer different sums for the goods you are selling.
The Open Market
Once you own a living space of any type, you may open a store to sell items. To open
a store, first acquire a Market Bulletin Board. These are available from merchants
in your home town. Place it on the wall of your house. Right-click on it and select
“browse market” from the context menu. This opens the store window.
You can also access your store from any Broker in Norrath that is of the same
Accept button. When both characters involved in the trade
22
Page 23

alignment. Brokers are found in all major cities, and on the docks of Mara (Fallen
Dynasty).
The Store Window
The store window allows you to set prices, list items, browse prices, and begin
selling. There are three tabs in the window: Browse, Sell and Sales Log.
Searching the Market
The Browse tab allows you to search for all items currently listed on the market. Type
all or part of the name into the “Search” field and press “Find”. You may also conduct
an Advanced Search by pressing that button and selecting detailed criteria. You may
save your search criteria for items you frequently search for. Note that prices given do
not include the broker fee. You cannot buy directly from your home; you must find a
broker or travel to the seller’s residence, if it is listed.
Selling Items
When you are ready to open for business, press the Sell tab. At the upper left of this
window, you will see 2 to 6 merchandise slots. These are based on the maximum number
of vault slots that your residence supports. A basic residence has 2 slots. You may place
backpacks or boxes in these slots, or purchase special player-made Sales Displays.
A note on Sales Displays: If you sell from regular bags and boxes, PCs can only buy
your goods through a broker. Sales displays offer greater capacity than equivalent
tier bags and boxes, and you can sell directly to the public, effectively offering PCs a
discount (no broker fee) if they come to your home to buy.
Sales Displays come in many forms and sizes. If you’re selling general goods,
use a Salesman’s Crate. if you have a lot of crafted items of one type to sell, buy
the appropriate display for that item type, as these displays offer more space. For
instance, you can put any items in a Cedar Salesman’s Crate (max. cap. 44), but only
crafted food and drink in a Cedar Pantry (max. cap. 64), and only potions and poisons
in a Cedar Potion Cabinet (max cap. 64).
Once the sales display is in your Sell window, right-click on it and select “Place Sales
Display”. Then place the display in a location convenient for shoppers who come to
your home, so that they may buy directly from it. You may move the display as often
as you like without disturbing the contents.
Default access to your house will be set to “visitor” to allow prospective customers to enter.
23
Page 24

In the Sell window, click on the container you wish to place an item in, and then
drag the item from your inventory to the Drop to add item button. If you’re selling
stackable items, the interface will list up to 100 (5 stacks) on one line.
Your item now appears in the large window below. Under the Listed column, it will
say No, and a price will appear on the right side. This is the merchant resale value;
the price you can expect if you sell to a regular NPC merchant. (Not all items can be
sold to a merchant; their initial “value” will be set to 0.)
If you want to see what others are asking for the same item, select the item, and press
the “Search Broker” button at bottom. This takes you to the results on the “Browse” tab.
When you’ve decided on your selling price, return to the Sell tab, click on “Set Price”
to enter a value for the item and click “OK”. The item now has a new price and is
automatically listed for sale.
To unlist an item, select it and click on “Stop Selling Item”.
To remove an item, select it from the list and click on “Remove Item”. For stackable
items, the default is to remove one. Hold down the [Shift] key to select a specific
quantity to move, or hold down [Control] to remove an entire stack at a time.
Collecting Payment
As you sell items, monies will be collected in your Sell window, and will be visible
for each sales container as you click on it. To collect your earnings, click on the Take
Coin button for each container in turn.
Tracking Sales
The Sales Log tab will show what sales you have made during each selling session,
displaying who bought what, for what price and at what time. It will also show how much
total money you have made during the current session and since opening for business.
Markets and Brokers
Qeynos and Freeport each have open markets in which you can search items available
from vendors. Brokers are found in tradeskill workshops and in each of the four
main sections of the city. Brokers allow you to buy items from player character (PC)
vendors without having to visit that vendor’s shop in person. Brokers charge a 20%
fee for this service on top of the price the vendor charges. These brokers will display
items for sale by vendors in your current market (for example, if you’re in Qeynos,
you will see the Qeynos market).
Black market fences are also around, and these will sell you items that are available
in the opposing city’s market. These brokers charge a 40% service fee for items
bought through them.
To engage a broker, click on the NPC or right-click and select “Buy from broker”
from the context menu. As with other merchants, you may only use money on your
person to purchase items. Banked money must be withdrawn in order to be used.
Searching and Buying from the Market
When engaging a broker, you can search your local market for items. Click the
Browse tab. Enter all or part of the item name you are seeking and click the Search
button. You may also click on the Advanced Search button to set more detailed
criteria for your search. You can save frequently used searches to save time. You
can buy any listed item by selecting it from the results list and pressing the Buy
from Broker button (remember the broker will charge a fee for the service, which is
displayed at the bottom).
If a vendor’s residential address is given in the listing, you may travel there and
purchase from his sales display, thereby saving on the broker fee.
24
Page 25

Grouping with Other Players
Grouping with other characters allows you to tackle greater challenges and explore
more safely. To form a group, right-click on the person you would like to invite to
group with and select “invite to group,” or select the person and press [Control] + [I].
When you wish to leave a group as a member or disband the entire group as its leader,
type /disband. You will see members of your group and their Health and Power status
in the group box on your screen.
Looking for a Group
There are two buttons on your group window that will help you find members or
groups to join quickly. When you are not currently grouped you will see buttons that
will help you find groups.
This button will open the Community window to the Find People tab. Click the
Find Matches button for a list of characters currently seeking to join a group.
Click this button to announce globally that you are looking to join a group.
This will place your name on a list where characters who are looking for
group members can find you. An “LFG” tag will appear by your name. LFG is short
for “looking for group.” To turn off the LFG flag, click the LFG button again.
Group Settings
You can define how your group will function using the group settings. Right-click
on a group member and select “group options” from the context menu. This will
allow you to set how loot rewards from defeated enemies are taken and distributed
(the “Lotto” setting will allow group members to participate in a random drawing for
items found), who in a group can yell for help, and other settings.
Mentoring
When grouping with characters of widely varying levels, low-level members may
see “You are too low level to receive experience of quest rewards.” The high-level
character(s) can mentor the lower-level characters in order to remove the level gap.
To mentor a lower-level character, right-click on the character (or the character’s
name in the group window) and select “Mentor” from the context menu. Your level
now matches his. You retain all spells and abilities, but they are scaled down in power
to the lower level. You will gain 50% of normal experience while mentoring, while
the mentored character gains a 5% bonus to his experience.
Several group members can mentor the same character if they choose.
Raid Groups
A raid is an expedition mounted by more than one group of characters to face an
extraordinarily difficult challenge. They are called “raids” because they often entail
such heroic undertakings as storming the heavily defended lair of a powerful creature.
Being some of the most difficult encounters in the game, the rewards for success are
equally grand. A raid can consist of up to four groups.
To form a raid group, the leader of one group should right-click on any member of
another group and select “Invite to Raid” from the context menu. The leader of the
invited group will receive a request to accept or decline the raid invitation.
The raid display shows the name, level, class, and status of all members in the raid.
Characters are separated by their group, and each group has a color-coded background
to make it easier to differentiate between them. You can target any member of the raid
by clicking on their name. To remove a group from the raid, right-click on any member
of that group and select “Disband from Raid” from the context menu.
25
Page 26

The Raid Leader may move individuals from one group to another simply by clicking
and dragging on the name. The Raid Leader may also set loot settings as appropriate.
Housing
Your character can acquire a living space in your home city. This can be as small as a
room at the inn or as luxurious as a mansion. You can furnish your home with items,
host visitors, and even grant access to your home to other characters.
When you first enter your starting city — Qeynos, Freeport or Kelethin — you are
granted a room. You will be directed to your first room at the inn when you arrive in
your new city.
You must first right-click and go to “Access” in order to acquire your home, then
enter your room by selecting “Enter” from the context menu.
Granting Access
You can grant access to your house by right-clicking on the door to your house, or the
inn door, and selecting “Access” from the context menu.
Under the Access tab, you may pay rent and add characters to your list, assigning
them a level of authority within your house.
Visitor. The character can enter and leave the house at any time, but cannot move any
furnishings or affect house pets or gardening features.
Friend. The character can enter and leave at any time, move furnishings (but not
destroy or remove them) and interact with housing pets and gardening features.
Trustee. The character has all of the control options the owner has, including the
ability to pay rent and set access levels. He cannot, however, affect the access level of
the owner.
Placing Items in Your House
You can decorate your character’s living quarters with furniture, lighting and a host
of other amenities. To place an item of furniture from your inventory, right-click on
the item and select “Place.” An outline of the item will appear on your mouse pointer.
Move it to the location you wish to place it. The object is outlined in either green or
red; if it is red, you cannot place the item in its current location. Items may be rotated
with the middle mouse wheel before placement.
Customizing Your Home
You can change the appearance of the floor, trim, walls and ceiling. Hover your
cursor over the room feature until you see the hammer and saw icon. Right-click and
select “customize” to open the interface. You will see a list of “Available Options”,
each with a purchase price. Select your preference from the list and press “Purchase”.
The option will now appear in the top half of the window, as a purchased option.
Select the option and press the “Set” button, incurring a small additional fee. Once
purchased, you may switch between options as much as you like, for the cost of the
set fee alone.
Spells, Combat Arts & Other Abilities
All of your character’s special abilities can be found in your Knowledge Book. Press
the [K] key to open the Knowledge Book. All tradeskills, spells, combat arts, and
special abilities are displayed as icons.
Select the section of your Knowledge Book by clicking a button at the top of the
window. You can move around by dragging and dropping the icons wherever you
like, or use the Sort button to arrange abilities alphabetically, by type, or by level.
You can navigate through your Knowledge Book with the buttons in the lower
26
Page 27

right corner. Abilities may be
used directly from the book
by clicking their icons. If you
want more information about
an ability in your book, move
your mouse over the icon for a
brief description, or right-click
on it and select “Examine” from
the context menu for detailed
information.
Using Spells, Combat Arts and
Other Abilities
To use an ability, you should
first assign it a hotkey by
dragging-and-dropping it from
your Knowledge Book into an
open hotkey slot. To activate it, click on its icon or press the corresponding number
of the hotkey. You may also activate abilities directly from your Knowledge Book by
clicking on the icons in the book.
If an ability requires a target, make sure the target is selected before activating the
ability. For targeted abilities that have limited range, the button will show red if the
target is out of range.
After a combat art or spell is used, it will be “grayed out,” signifying that it is
unusable at the moment. This is known as the recast time. Once the recast time
elapses, you can use the spell or combat art again.
Spell and ability icons have a background color to designate targeting:
ACKGROUND AFFECTS
B
Red a single enemy target.
Blue all non-player creatures within range.
Green all enemies within a target encounter.
Yellow only the caster.
Gold a single targetted group member.
Purple all members within your group.
Concentration
Concentration determines how many spells your character can maintain at the same
time. The amount of Concentration a spell or ability requires, if any, is shown in its
description (select “Examine” from the right-click menu on its icon). Concentration is
tracked in the bar below your Power bar. There are five empty blocks that fill as you
use up Concentration. When all are filled, you cannot maintain additional abilities
until you expire others.
Canceling Effects
You can cancel a beneficial spell effect on yourself by right-clicking on the effect’s
icon in the effects window and selecting “Cancel” from the context menu. This will
remove the effect and free up Concentration slots it may have been using. Harmful
effects cast on you by opponents cannot be canceled.
27
Page 28

Interrupts and Fizzles
Spells can sometimes be difficult to complete in the heat of battle, and from time to
time you may be interrupted. When this happens, the spell is aborted but no Power is
consumed. You may immediately attempt to cast the spell again.
A fizzle is an unfortunate event that casters encounter from time to time. Whether it’s
a particularly new or powerful spell, or you’re just having bad luck, a spell can fizzle
uselessly. A small portion of Power is consumed, and the spell fails to go off. You
may retry the spell again immediately.
Minions and Pets
Certain characters are able to summon or charm creatures to assist them. These
minions are sometimes referred to as pets. Pets can be ordered to carry out actions by
using the pet command window and buttons.
Attack. Tell the pet to attack.
Back Off. Tell the pet to back off.
Protect Me. Toggle whether pet automatically attacks creatures that attack
you. The default is On.
Protect Yourself. Toggle whether pet automatically attacks creatures that
attack it. The default is On.
Follow. Tell the pet to follow you.
Stay. Tell the pet to stay here.
Dismiss. Destroy the pet. Note that if the pet was charmed, Dismiss will
release the pet from control, and it will likely attack you!
Improving Spell and Combat Art Ranks
Most spells and combat arts can be made more powerful with upgrades. Each has an
initial rank, which is a measure of power. New spells automatically granted to your
character are always of the beginning rank, Apprentice I. You can enhance the power
of your spells and combat arts by acquiring higher-rank versions of them.
There are three major ranks for spells and combat arts: Apprentice, Adept, and Master.
Each rank represents a significant increase in potency and effectiveness for the spell
or combat art. Apprentice scrolls are common, Adepts are uncommon, and Masters
are quite rare.
Within each rank there are four levels, I through IV. Each represents a slight increase
in potency over the previous one.
Apprentice I is the base strength of new spells and combat arts you receive as
you level up. Apprentice II spells and combat arts can be found for sale in shops.
28
Page 29

Apprentice III and IV spells are created through player character (PC) crafting.
Adept rank spells are more powerful. Adept I upgrades generally come as loot
from defeated enemies. Adept III spells are created through PC crafting using rare
components.
Master I spells are generally rewards for defeating particularly powerful foes;
however, certain spells can be “trained” up to Master II through special advancement
opportunities (see “Training” under Character Advancement).
Not all spells or combat arts will have ranks, as some spells don’t lend themselves to
an increase in potency.
Recovering Health & Power
Your character will naturally regenerate Health and Power over time. This rate of
regeneration can be greatly increased through spells and combat arts. Food and drink
can also increase Health and Power regeneration.
Food will increase your Health regeneration rate outside of combat, while drink
increases your Power regeneration outside of combat.
Food and drink comes in many varieties, regenerating varying amounts depending on
the level of character it is intended for. Higher level characters will be better served
consuming food and drink appropriate to their levels as these regenerate higher
amounts. The names of food and drink that are appropriate for your level will appear
white. If it is gray, it will not be as effective for you. Red food and drink is will not
work at their listed rates for you, as it is too far above your level to offer full benefits.
As mentioned, all benefits from food and drink are suspended during combat.
COMBAT
Combat in EverQuest II is a combination of automatic attacks and your strategic use
of spells and combat arts against enemies.
The first step in engaging in combat is to target your enemy and gauge its strength.
Click on the enemy you want to target. A ring will appear beneath it, and its name
and other important information will appear in your target window. The color of the
ring will reflect the target’s level relative to your own. You may also use the keyboard
shortcut [F8] to automatically target the enemy closest to you, or press the [TAB] key
to cycle through visible targets.
Multiple Enemy Encounters
Some enemies will be grouped with one another in an encounter, and when you select
one, others associated with it will be highlighted. Be careful, attacking one will result
in a response from the entire group.
Considering Enemy Reaction & Strength
After targeting your enemy, consider its reaction to you and whether it is wise to
challenge it. If the name of the enemy has a red outline around it, beware; this
creature will attack you first if you get close enough for it to notice you. Move your
mouse over the target window to see additional information in a pop-up window.
You should judge the strength of an enemy encounter in the following ways:
Single and Multiple Enemy Encounters
The first thing to consider is whether the encounter is a single enemy, or if it consists
of multiple enemies. Encounters with multiple enemies can be tough, especially if
you’re playing by yourself. Look around to make certain there aren’t any distant or
hidden members of the encounter.
29
Page 30

Normal, Heroic, and Epic Encounters
Next, consider whether the target is meant for solo characters and small groups, large
groups, or raids.
Encounters designed for solo characters and small groups have no label. They should
present a reasonable challenge to moderately equipped characters of the appropriate level.
Heroic encounters are best tackled by a single group of 4 to 6 characters. Following
the target’s level you will see the “Heroic” label.
Encounters that are Epic will be labeled as such in the target window. These should
only be challenged with multiple groups of characters in a raid. Following the “Epic”
designation you will see banners or a multiplier; for example, “Epic (x2)”. This
multiplier indicates the number of groups recommended.
Enemy Level vs. Player Level
Enemies have levels just like characters. Before attacking, consider whether it is high
enough to be worth attacking or if it might be well above your level and thus too
difficult to handle. Even though an encounter may be designed for a group or even a
solo character, this is a guide meant for characters near levels near the enemy’s level.
Enemy level is show in the target window beneath its health bar. The color of the
target’s name, as well as the targeting circle beneath it and the arrow above its head
will help you gauge the target’s level against your own.
Gray. No challenge for you; you will receive no reward for defeating this creature.
Gray creatures will never attack you first.
Green. A little challenge for you. You will receive a small experience reward for
defeating this creature.
Blue. A moderate challenge. You should be able to defeat the creature handily and
receive a decent experience reward.
White. Evenly matched with you; the fight could go either way, but success means a
good experience reward.
Yellow. Tough; there’s a good chance you will lose one-on-one, but if you pull it off
the experience reward will be worth the effort.
Orange. Very tough; it’s almost certain that this creature will defeat you.
Red. Extremely tough; in fact, it is so tough that you can’t accurately judge it. It could
be slightly tougher than orange, or vastly stronger. Your defeat is almost assured.
Up and Down Arrows
Some targets may have arrows above or below their names in the target window.
An arrow pointing down below the target’s name means it is slightly weaker than it
generally appears. An arrow pointing up above its name means the target is tougher
than it appears. There can be up to three arrows in these configurations, indicating
greater degrees of strength or weakness.
Beware of targets with three arrows pointing up! These encounters are very tough!
Attacking
To engage in melee combat with a targeted enemy, press the attack icon in your hotkey
bar or press the [~] key. Your character will draw an equipped weapon and attack the
targeted enemy if it is within melee range. Pressing the attack icon or [~] key again will
toggle melee combat off, and your character will put away his or her weapons.
30
Page 31

During melee, you can also use many of your spells and combat arts to tip
the fight to your advantage.
Damage dealt during combat will appear above you or your target with
these color designations:
Orange. Damage you inflict on your target
Red. Damage your character suffers
Gray. Damage inflicted by and on others
Assisting in Melee
When engaged in melee with multiple enemies, it is often wise for all members of the
group to concentrate their attacks on a single target. Sometimes the battle is so frantic
that it can be hard to determine quickly which target you should focus on. Assisting
can help you with this.
To assist, target a friend in your group who is attacking the enemy you want to attack.
A secondary target window will appear to display the enemy your friend is attacking.
Turn on your auto-attack using the [~] key and you will begin attacking the same
enemy as your friend, if it is within range. You may also do this to attack with ranged
weapons or spells the same enemy your friend has targeted.
If the target dies you will automatically stop attacking.
Ranged Attacks
Ranged attacks are toggled on by clicking the ranged attack icon, found
on the Abilities tab of your Knowledge Book. If you are in range of your
(if any), you will launch a ranged attack. You will continue to fire on the enemy as
long as the ranged attack is toggled on and the target is within range. If a target is too
close, you will not be able to attack with a ranged weapon.
Avoidance, Mitigation, and Resistance
During your adventures, your character will encounter a variety of harmful attacks
directed against him or her. These can include mundane attacks with weapons, and
exotic attacks. Your character has ratings that will help protect him or her from these
kinds of attacks. These are displayed in the Persona window (open with the [P] key).
The higher these ratings, the better the protection is. Resistances are raised through
spells and equipment.
Mitigation is a rating that helps reduce damage you take from physical attacks such
as weapons.
Avoidance rates your ability to dodge attacks, avoiding damage by not getting hit.
Resistances rate how well your character can withstand a variety of attacks beyond
the physical, such as poisons, magic, cold, and others.
Yelling for Help
If you get into trouble during a fight, you can yell for assistance. This will break the
encounter if it was locked, allowing others to intervene on your behalf, and will allow
your movement buffs as well as health and power regeneration improvements (such
as food and drink) to take effect again. You will not gain experience or loot from the
defeat of an enemy after you break your encounter with a yell for help.
You can yell for help using the /yell command, or by clicking the “Yell for Help”
hotkey found on the Abilities tab of your Knowledge Book. If in a group, the leader
may restrict who may yell for help.
target, have a ranged weapon equipped, and have the required ammunition
31
Page 32

Heroic Opportunities
You and those you group with may trigger special moves during combat that can
yield spectacular benefits. These special moves are called Heroic Opportunities, and
they require coordination to pull them off successfully.
Triggering a Heroic Opportunity
Each character can trigger Heroic Opportunities using a special ability gained at
Level 5. They are found in your Knowledge Book under Spells or Combat Arts,
depending on your archetype.
Scout. Lucky Break
Mage. Arcane Augur
Fighter. Fighting Chance
Priest. Divine Providence
When you use your ability to trigger a Heroic Opportunity, a set of icons will
appear in the lower right corner of your screen. These icons represent spells or
combat arts that will trigger the first step toward a Heroic Opportunity. Watch your
hotkey bar when these icons appear; spells or combat arts you have that match
Heroic Opportunity icons will flash to let you know they can be used to advance the
opportunity.
Most spells or combat arts have Heroic Opportunity icons associated with them. To see
which opportunity icon a spell or combat art has associated with it, right-click it in your
Knowledge Book and select “Examine.” You may also move your mouse pointer over a
spell or combat art to see Heroic Opportunity icons in the pop-up window.
Completing Heroic Opportunities
Once you have triggered a Heroic Opportunity and you or a group member initiates
the opportunity with the first spell or combat art, the graphic display will change
to a large wheel. This wheel will show the actions icons that must be activated to
complete the opportunity. Many involved actions from different player classes, so
coordinate with your group members.
The order in which the actions in the Heroic Opportunity wheel should be completed
is often important. Look for arrows at the center of the wheel to find out what
order the actions should be taken; for example, if the arrow curls clockwise, you
and your group must perform the actions called for in clockwise order around the
wheel to successfully complete the Heroic
Opportunity!
Note: You only have 20 seconds to complete
a Heroic Opportunity, so be ready and quick!
Scout Special:
Shifting Heroic Opportunities
A Scout has the unique ability to shift some
Heroic Opportunities to new ones. If a Heroic
Opportunity appears with the “coin” Scout
opportunity icon in the lower right of the
wheel, a Scout in the group can use a combat
art matching the coin icon and a new Heroic
Opportunity will appear—but only if the Scout
makes the move first; if anyone executes a
step in the opportunity before the Scout shifts
it, it cannot be changed by the Scout.
32
Page 33

Death
At some point in your character’s life, you are likely to come face to face with death.
When your character dies, he or she suffers some setbacks, but nothing a brave
adventurer cannot overcome.
Cost of Dying
Dying can be a tough process, and it takes its toll on your character. Several things
happen when your character is killed:
• Your equipment suffers damage from the ordeal.
• You accumulate experience debt.
• Your attributes, such as Agility and Health, are temporarily weakened.
You have two options for continuing. You may wait for a friend to resurrect your
character, or you can “revive,” which returns your character to the game world in a
designated location (in some cases you may choose the location where you revive).
Resurrection returns you to where you died, saving you a trip back to where you
were. In either case, you will accrue a small amount of experience debt.
Experience Debt
After dying, your character accumulates experience debt. This appears as a red bar at
the end of your gold experience bar. You do not lose any experience you have earned,
but the debt must be paid out of experience you gain going forward. As you earn
more experience, some goes toward your new level, and some pays off your debt.
When all your debt is gone, full experience once again goes toward attaining your
next level.
Equipment Damage
When killed, your character’s equipment suffers 10% damage. If left unrepaired, an
item’s durability can reach zero and become unusable. Find a mender, often located
in cities and towns, to repair your equipment. You can check the condition of your
equipment at any time by moving your mouse pointer over an item in your inventory.
Recovering from Death
You can bounce back from tragedy to overcome the effects of dying. None of the
detriments suffered through death are permanent. You will be weak temporarily after
death, whether you were revived or got a resurrection from another player character (PC).
This weakness will affect your statistics, but it will pass after a short period of time.
QUESTING
At the heart of EverQuest II is the quest. The inhabitants of Norrath are often in need of
help with a task or problem, and some will reward you handsomely for your assistance.
You may also discover items during your adventures that will unlock quests.
The Quest Journal
You can open your Quest Journal by pressing the [J] key. At the top are tabs for Active
quests, Collection quests, and Completed quests. If you are grouped, a fourth tab will
appear to show you quests that members of your group have in common with you.
Check boxes will mark off objectives of the quest as you complete them. When all
parts of a quest are checked, your journal will update with instructions on what you
should do next (for example, return to the original quest-giver to collect your reward).
When you complete a quest, it is moved to your completed quests page.
You can shorten your list of quests by hiding a quest entry. Select it and click the
“Hide” button. You may also delete a quest from your Quest Journal by selecting it
and clicking the “Delete” button. You can sort quests by current zone or type.
33
Page 34

Note: You can have a maximum of 75
active quests in your journal at one time.
You will receive a message telling you
that your journal is full if you attempt to
take any more quests before completing
some of those you already have.
Collection quests do not count against
the total.
The Quest Helper
The Quest Helper is a small display
shown in the top right corner by default
that tracks the current stage of the last
quest you selected in your quest journal.
The helper is shown by default, but you
can disable it if you like by unchecking
the “Show Quest Help” checkbox at the
bottom of the Quest Journal window.
Acquiring Quests
You can get quests by talking to non-player characters, examining items, or clicking
on special objects in the game world. Non-player characters that give quests close to
your level will have a feather icon above their heads.
When you are presented with a quest, you have the option to accept it or decline it.
You will see a brief description explaining the quest and displaying what rewards you
will be given for completing it.
Quests from Non-Player Characters
Talking to non-player characters, or NPCs, will often reveal
information about the area you are in. Many times, these
characters will have tasks they will ask you to perform. To
talk to an NPC, move your mouse pointer over the target. If
the pointer turns into a dialog bubble, click on the NPC to
begin a conversation. You may also right-click on the target
and select “Hail” from the context menu, or select the NPC
and press the [H] key to start the conversation.
As you talk with an NPC, you will have choices in how you
wish to respond. Click on your response. These responses
will affect how the NPC reacts to you, so consider them
carefully. If the NPC offers you a quest, a quest information
box will open asking if you would like to accept the quest.
To accept, click the Accept Quest button.
Quests from Items and Objects in the World
Some items you discover in the world as loot can grant
quests. Examine the item to trigger the quest dialog.
Some objects you encounter in the world, such as statues, buildings, carts—nearly
anything—can be a quest trigger. When you move your mouse over one of these
objects it will be highlighted and your mouse pointer will become a hand. Right-click
the object to start a quest dialog.
Collection Quests
Collection quests are special quests that are completed by collecting items from the
game world. Collection quests appear in your Quest Journal under the Collections
tab. These do not count toward your 75 quest maximum.
34
Page 35

Items for collection quests will appear on the ground in the game world. Some appear
as sparkles with a question mark above them. Others appear as bits of parchment on
the ground with an exclamation point above them. To pick them up click on them, or
right-click it and select “Harvest.”
When you have the item in your inventory, right-click on it and select “Examine”
from the context menu. If you haven’t collected the item in the past, your Quest
Journal will open. Click the Add button next to the collection quest you would like
to add the item to (some items can satisfy more than one quest, so you will be able to
choose which quest to apply the item to).
Betrayal Quests
Betrayal quests offer characters a chance to change their home city. These quests are
difficult, and should only be attempted by players willing to dedicate a significant
amount of time and effort. They are not intended for all players. It is recommended
that you be at least Level 15 before attempting betrayal.
City Seek Out Quest Name
Qeynos Cordun Brenland, Qeynos Harbor “Qeynos to Freeport — Exile”
Freeport Stilus Graphium, East Freeport “Freeport to Qeynos — Exile”
Completing Quests
Quests can be short or epic, multi-step journeys. As you work through the quest,
legs of the quest will be marked off in your quest journal. You will also get clues and
directions within each segment of a quest to help you reach the objective.
Waypoints and the Light Trail
If the current quest objective is in the zone you’re currently in, then there may be a
waypoint available for it. When that’s the case, the Waypoint button will appear at
the bottom of the zone’s map. Clicking the button will reveal a light trail leading to
the destination. This trail will appear when you are near your next objective and lead
you to it. Your target becomes a red dot on your map.
Asking for Directions from Non-Player Characters
Guards of your city may be able to help you find non-player characters (NPCs) you’re
looking for within the same zone. Clicking on a guard will open the “find NPC” box
with a field for entering the name of the NPC you are seeking. Type the name of
the NPC and click OK. If the guard knows the individual’s location, he or she will
point in their direction. A light trail will appear to lead you to the NPC. Asking for
directions to a different NPC will create a new waypoint, replacing the first one.
Quest Rewards
When you have completed all tasks in a quest, you may immediately receive a
reward for completing the quest, or your quest journal will update to tell you what
you should do next to complete the quest. Sometimes this involves returning to the
individual who originally assigned the quest to you. In these cases, when you return
to the one who gave you the quest, you are granted a reward.
A non-player character that can complete a quest for you will have a closed book
above its head. One which can be spoken to in order to advance a quest you currently
have will display a book with a quill together above its head.
A Quest Reward confirmation box appears at the end of a quest that lists the items or
money you are being given. Some quests will offer you a choice of rewards.
CRAFTING
Anyone can take up a crafting trade. Like adventuring, crafting is exciting and can be
35
Page 36

challenging. The rewards of mastery can assure one a place
in the history of Norrath alongside the world’s greatest
explorers. The creations of a master craftsman can achieve
an almost mythical status.
Tradeskill Arts
As you grow in skill as an Artisan, you will gain tradeskill
arts that can influence your crafting. They can push your
crafting skill to new heights of excellence to create true
masterpieces.
Tradeskill arts appear in your Knowledge Book on the
Tradeskill page, and their use is similar to spells or combat
arts. You can drag-and-drop the icons into your hotkey bar
for easy use during the crafting process.
Your Recipe Book
gathered so far. Open your book by pressing the [N] key.
Your recipes are shown with icons, the recipe name, and the level of difficulty.
Position your mouse pointer over a recipe’s icon and a pop-up window will display
the materials needed and other important details.
Throughout your time in Norrath you will encounter a variety of advanced manuals
with additional recipes. You can add recipes to your own repertoire by right-clicking
on a volume of new recipes in your inventory and selecting “Scribe” from the context
menu. This will consume the volume.
2. Select the recipe you wish to use and click the “Create” button. A window will
open displaying the list of components required by the recipe and whether or not you
have each.
Your recipe book is a master list of all the recipes you have
You can create filters to sort your recipes. Click the
Edit button. Set the any of the search criteria you
wish to use to filter your recipe list. For example,
you can filter based on a particular recipe book by
selecting the book from the list of scribed books
under “Recipe Book” on the filter screen. In the
Filter field at the top enter a name for your filter
and click the OK button. Your new filter will
appear on the main Recipe Book screen as a drop
down selection from the Filter menu.
The Crafting Process
To craft, you will need a recipe and the
materials called for in the recipe. You must
have these on your character and access to the
required device to start the process. Crafting
stations can be found in workshops throughout
cities, and include sewing tables, scribing desks,
lathes, workbenches, forges, chemistry tables
and stoves.
Follow these steps to craft:
1. Click on the device called for in your recipe.
36
Page 37

3. If all components are present, click the
“Begin” button.
4. You will see two bars at the top of the crafting
process window. These will track your overall
crafting progress.
5. Watch for crafting events to appear at the bottom
of the window. When they appear, counter them
by activating a tradeskill art from your Knowledge
Book that has the same icon. A successful counter
will change the event icon to a green square.
6. Use tradeskill arts to influence durability and
progress as you see fit, but monitor your Power
and Health in the process as these can be drained
by crafting.
7. You can halt the crafting process at any point
by clicking the Stop button to yield an item of
the quality reached during the process.
If you stop the process before the first level of
returned to you, but your fuel component is consumed.
The green bar displays the current item’s durability and the blue bar displays the
progress toward higher-level qualities of the item. The blue bar is marked along its
length to indicate the levels of quality achievable with this recipe. The green bar
is marked to show when you will lose a level of quality as durability drops. In the
lower part of the box are displayed the levels of quality. If this is the first time you
have attempted this recipe, these will be listed as “Unknown”; as you practice with
the recipe and reach higher levels of quality, they will change to display the quality.
Each of the quality levels has two bars next to it. These are similar to the two at the
top of the window. As you craft, the green durability bar is reduced. If it disappears,
that level of quality is lost (though it is sometimes possible to regain the lost level of
quality with skillful use of your tradeskill arts). Progress will continue until you fill
the blue progress bar of last quality level, or you stop the process at its current level.
Materials for Crafting
Raw components are harvested from sources such as roots, felled trees, and
unearthed stones around Norrath. Right-click on one and select “Harvest” to gather
raw components. There are skill levels associated with harvesting, which you will
increase through use. Different zones require varying skill levels and return varying
tiers, or levels, of harvested items.
Basic materials required in crafting are available from merchants inside your
workshop, such as coal, filament, and other items.
Workshops
There are several locations in both Qeynos and Freeport to access the crafting
stations. These usually appear as cellar doorways in the cities. There is a non-player
character near the entrance to each workshop who will sell the basic crafting books
appropriate to your tradeskill class and level.
In Kelethin, the tradeskill stations are located in various places around the citadel, not
in separate crafting zones.
quality has been reached, your components are
37
Page 38

CHARACTER ADVANCEMENT
As you explore Norrath, conquer enemies, and complete quests, your skills and
abilities will improve. There are many ways you can advance in EverQuest II,
including through levels, skill scores, as an Artisan, by improving spells and combat
arts, and others.
Gaining Experience & Leveling Up
Defeating enemies and completing quests earns you experience points. Experience
points add up and move your character up in levels. The higher level your character
is, the more powerful and effective he or she becomes.
The gold bar of your experience meter represents how much total experience you
have accumulated toward your next level. As each segment of the gold bar is filled,
your character receives a small boost with all health and power being instantly
replenished.
When the entire gold bar fills completely, you will gain a level and the bar will reset
to begin tracking progress to your next level. The blue bar beneath the gold bar tracks
your experience in one-gold-block segments. When the blue bar is filled, a single gold
block will have been filled.
When you level up you can gain more Health, more Power, improved stats, new
spells, combat arts, abilities, skills, racial bonuses, and more.
Improving Skills
As your character advances, his or her skills will also improve through use. When
you use a skill and it goes up in value, you will see a message alerting you to the
improvement. Higher skill scores improve the strength and effectiveness of actions,
spells, and combat arts that use that particular skill.
Advanced Training
You can further customize your character through a variety of advanced training
opportunities. At certain levels a “plus” button will appear on your screen. Click to
open a window that will allow you to pick a new ability from one of the following
categories.
Enemy Mastery
At certain levels, you may pick a type of enemy for which you have a
particular dislike and learn an enhanced attack that can be used against that
type of enemy to great effect.
Racial Traditions
As you level, you will begin to unlock certain advantages and abilities inherent to
your race. Racial traditions take many forms, some are activated similarly to your
other abilities, and some are permanent improvements to your character.
Advanced Training
At certain levels you will be able to choose one of your spells in which to specialize.
This will immediately increase its spell rank to Master II.
Personal Traits
Traits are natural improvements to your attributes and other statistics. For example,
you might choose the Clever trait, thereby increasing your Intelligence. Traits can
increase your
Health or Power, improve your rate of regeneration for either of these, and even make
you more resistant to magic, disease, or certain types of melee damage. Traits are
independent of your character’s race or profession.
38
Page 39

Achievements
The Achievements system offers a new way for you to improve your characters’
powers while individualizing them at the same time.
Achievement experience is earned in a variety of ways, including:
• Completing quests
• Defeating notorious enemies
• Obtaining rare treasures
• Exploring new places
• Gaining experience after reaching your level cap
Achievement experience can be earned by characters Level 10 and above. Each
exploration, notable enemy defeat, or treasure discovery will only count as an
achievement once. Characters that have reached the Level 70 cap will have a portion
of their earned experience applied to achievement experience.
As you gain achievement levels, you gain Achievement Points you can spend to
acquire new powers and abilities that will set your character apart from the crowd.
For example, Warriors may advance their training with a weapon of their choice,
learn new combat abilities, or customize their fighting style. Mages can gain greater
control of their arcane abilities, allowing them to adjust how they cast their spells to
suit their preference.
You can view your achievement abilities and your available Achievement Points by
pressing [L].
No one will be able to learn all of the specialties, so each choice makes your character
more unique. You can earn a maximum of 100 achievement points to spend between
the two trees, with up to 50 points in each.
Ability descriptions appear in a pop-up dialog box when you move your mouse pointer
over the ability icon. Each ability lists the current rank you have acquired for that
particular ability, the maximum rank you can achieve in that ability, and the cost to
purchase a new rank. The higher your rank in any ability, the better that ability functions.
To increase the rank of an ability, you must have the specified amount of
Achievement Points available to raise the ability’s rank. You cannot raise an ability’s
rank above its maximum.
To acquire a rank in an unlocked ability, click on it. You will be asked to confirm your
choice. Click Yes to confirm. The rank will be increased, or the ability added if it is new.
There are two separate tabs: one for your primary class (such as Rogue) and another
for your subclass (such as Brigand and Swashbuckler).
Class Achievement
Every parent class has five different achievement paths they may follow to customize
their character with brand new abilities. You may choose to specialize your training
in one path, becoming more advanced in that single specialty, or you may spread out
your advancement for broad-ranging abilities.
Abilities deeper in a tree will only become available when you have acquired the
preceding abilities in that line. There may also be other prerequisites that must be met
before access to a new ability is unlocked.
39
Page 40

You may invest a total of
50 points in your class
achievements.
Subclass Achievement
Adding to the depth of
customization your character
can develop, the subclass
achievement progression
concentrates on improving
existing skills for your
profession. You might be able
to hit harder, evade more, heal
faster, increase duration of a
spell type, or reduce casting
time on another.
As in the class achievements,
you must fulfill prerequisites
before moving further in
the tree. As you can see, the
subclass achievements have
a more web-like progression
alternative prerequisites. For instance, you must have “Whack” at Rank 3 or “Double
defeating a large number of a particular type of enemy. Titles are displayed next to
your character’s name, either before or after it. You can choose display titles from
your Persona window ([P]). Click the Details tab and use the pull-down menus to set
your titles.
Artisan Advancement
Successful crafting earns you tradeskill experience points. Tradeskill experience
works the same as adventuring experience. On your persona screen you will see the
tradeskill experience bar. When this fills completely, your Artisan level will increase.
pattern, allowing optional
Dagger” at Rank 3 to make
the Brigand enhancement
“Gouge” available.
You may invest a total of
50 points in your subclass
achievements.
Resetting Achievements
If you decide that you
would like to change your
achievement path, you may
click on Special: Reset
Achievements to regain all
points spent in that window.
You may then reassign them
as you like. Your class and
subclass achievements are
reset separately, and cannot
be transferred back and forth.
Titles
Your character can earn
titles for a variety of
achievements, such as
40
Page 41

Throughout the world you will discover manuscripts especially for your pursuits as an
Artisan. They contain tradeskill recipes not available in the manuscripts purchased from
merchants. Each manuscript’s recipe levels increase with each volume number. The
level at which you can scribe the recipes corresponds to the volume number of the book
(for example, you can scribe advanced tailoring volume 18 at Level 18). Over your life
as an Artisan, you must become certified to reach certain levels of expertise in your
craft. Seek out the individuals below to become certified in a more advanced trade.
Tradeskill Class Selection may commence at Level 9 and must be completed before
Level 10 can be reached.
Tradeskill Subclass Selection may commence at Level 19 and must be completed
before Level 20 can be reached.
City Tradeskill Class Selection Tradeskill Subclass Selection
Qeynos Alfred Ironforge, Qeynos Harbor Devona Ironforge, Qeynos Harbor
Freeport Alethea Augustine, West Freeport Matthias Zoe, West Freeport
Kelethin Ralika Mekkila, Kelethin Ralika Mekila, Kelethin
Artisan Classes and Subclasses
Craftsman. The Craftsman makes beverages, food, wooden weapons and shields,
and furniture. Craftsman subclasses include:
Provisioner. The Provisioner specializes in beverages and a great variety of foods.
Woodworker. The Woodworker specializes in wooden creations such as staves,
bows, shields, arrows, and instruments such as totems.
Carpenter. The Carpenter specializes in many different types of furniture and
fixtures used to decorate PC houses, as well as sales displays.
Outfitter. The Outfitter makes metal weapons and armor, as well as leather and cloth
armor. Outfitter subclasses include:
Armorer. The Armorer specializes in metal armor, such as platemail and chainmail.
Tailor. The Tailor specializes in cloth and leather armor.
Weaponsmith. The Weaponsmith specializes in metal weaponry, such as swords,
axes, daggers, and hammers.
Scholar. The Scholar deals in spell upgrades, combat art upgrades, jewelry,
talismans, potions, and poisons. Scholar subclasses include:
Jeweler. The Jeweler specializes in the creation of jewelry, talismans and scout class
combat art upgrades.
Sage. The Sage specializes in scrolls that upgrade spells for mage and priest classes.
Alchemist. The Alchemist specializes in the creation of potions and poisons, as well
as upgrades to fighter combat skills.
Artisan Secondary Skills
In addition to specializing in one of the tradeskill paths above, each character can
learn a secondary artisan skill, newly introduced in the EverQuest® II Echoes of
Faydwer™ expansion.
41
Page 42

Adornments. Allows creation of augmentations that may be applied to equipable
gear such as armor and weapons.
Tinkering. The Tinker makes various gadgets and trinkets for player use.
Transmuting. The Transmuter takes existing items and breaks them down into
useful components.
PVP (PLAYER VERSUS PLAYER)
Live Update #20 for EverQuest II, released in conjunction with Kingdom of Sky and
available to all EQII players, introduced traditional player versus player combat to the
game on a broad scale.
Player versus player (PvP) combat is available on new, dedicated servers with the
specialized PvP ruleset. There are two U.S. servers (one of these with the Station
Exchange™ feature enabled), as well as one each for UK, DE and FR players.
Gameplay on a PvP Server
The background conflict on PvP servers is the struggle between good (the residents
of Qeynos and Kelethin) and evil (the residents of Freeport). You hunt and battle
members of the opposing alignment to gain experience, status, faction and titles.
Further rewards become available at PvP merchants as you earn standing with your
city, and you may purchase rewards from these merchants.
All areas on a PvP server are open to player versus player engagement — nowhere is
completely safe, so be on your toes! You will, however, find relative safety within the
protective walls of your home city where you can rest and replenish supplies.
PvP Rules
While PvP servers are dangerous and intense worlds to live in, there are a few rules
that Norrathians must still abide by:
• Players under Level 10 are protected from and cannot initiate PvP combat.
• Players can only engage in PvP within city walls, including outlying districts, if
flagged for city PvP. See the “City PvP” section below for details.
• You cannot attack any character that is more than eight adventure levels below you
unless he attacks you first. Likewise you cannot be attacked by characters greater
than eight adventure levels higher than you.
Opposing characters’ names will have a red outline, indicating that they are a valid
hostile targets. Any characters +/- up to 8 levels are valid targets, and their names will
appear as a color based on the level difference:
Green 5-8 levels below you
Blue 1-4 levels below you
White equal level to you
Yellow 1-4 levels above you
Orange 5-8 levels above you
Gray more than 8 levels below you, no red outline around character name
Red more than 8 levels above you, no red outline around character name
Player Communication in PvP
On PvP servers, a language barrier exists between good characters (from Qeynos and
42
Page 43

Kelethin) and evil characters (from Freeport). Good characters speak the Antonican
language. Characters from Freeport speak Lucanic. Players on opposing sides will not
be able to understand each other’s speech.
This language barrier extends to all languages. No matter which language you choose
to communicate with — be it gnomish, draconic, oggish, or any other — characters
from the opposing city will not be able to understand you.
Players from opposing sides also:
• cannot join guilds or groups together, therefore they cannot communicate via guild
chat or group chat
• cannot send tells to each other
• cannot view the other side’s
• cannot join chat channels created by characters from the opposing side
• cannot view the opposing alignment’s presence in a zone using the /who command
• cannot send mail to each other through the Norrathian Express in-game mail system
• cannot trade items or coins
• cannot use the /duelbet command between each other (/duel still functions,
however)
PvP Combat
Combat between player characters will function somewhat differently in many
aspects than combat between player characters and monsters (this is known as player
versus environment, or PvE, combat). Note that the changes that are described below
only apply to PvP combat; PvE combat follows the standard ruleset on PvP servers.
Melee Combat. The default maximum range for melee combat has been increased.
Positional spells and combat arts that require the caster to be either behind or flanking
the opponent will work if either requirement is met.
Note: This is only the case against PCs.
Taunts and Threat Reduction. Taunts can change an enemy PC’s target in PvP and
even hold the enemy’s target on the taunter for short durations of time.
Spells that reduce threat or lower a target’s position on a creature’s threat list (such
as the Swashbuckler’s Evade combat art or Templar’s Placate spell) can force PCs to
completely lose their target focus.
Control Spells. Control spells, such as Snare, Root, Stun, Fear, Charm, Stifle,
Fascination, and Pacify cannot be refreshed on a PC target, and, for a short duration
after the effect expires, the affected PC will be immune to future effects of this type.
This immunity period is as long as the original duration of the spell.
For example, if you are rooted by an opposing PC for 10 seconds, you cannot be rerooted while you are still under the effect, and when the root breaks, you cannot be
rooted again for 10 seconds following the break.
Note: This immunity only applies to player cast spells of this type. You are not
immune to these spells cast by non-player characters.
Stealth and Invisibility. A character affected by invisibility or stealth will appear as
a shadowy outline if he or she comes within a short distance of a PC of an opposing
/auction, /ooc, /shout chat channels
43
Page 44

alignment. Outside this range, the invisible or stealthy PC remains unseen.
Players affected by abilities or spells that allow them to detect invisible or stealthy
characters, or that are significantly higher level than an invisible or stealthy PC, will
see opposing PCs as shadowy outlines as they normally would.
Zoning. Upon entering a zone, PCs will be immune to PvP engagement until they
initiate a hostile action or move. This will prevent unscrupulous players from
“camping” zone-in points to catch enemies in unfairly vulnerable positions.
Viewing PvP Spell and Combat Art Effects. A separate inspection option has been
included on PvP servers that will let you view how spells and combat arts function in
the PvP ruleset. You can view this through the right-click context menu.
City PvP
PvP within city walls works a little differently than it does in the outside world. A PC
cannot attack another within a city unless one is flagged for city PvP.
The rules for city PvP are as follows:
• Attacking any NPC in a safe zone (i.e., a city) flags the attacker for city PvP.
• Anyone flagged for city PvP can be attacked by anyone of the opposing alignment
in any zone, within the standard PvP rules governing engagement.
• Anyone that attacks a city PvP flagged PC also becomes flagged for city PvP.
• The city PvP flagging lasts for 15 minutes from the last hostile action taken against
a safe zone NPC or another PC flagged for city PvP.
PvP Death
Death during a PvP encounter will result in moderate experience debt. You will not
receive armor damage. Note, however, that if you are on any creature’s threat list at
the time of your PvP death, you will suffer standard PvE death penalties, including
armor damage.
PvP Rewards
Rewards for emerging triumphant from a PvP conflict vary depending on how the kill
took place:
Honorable Kills. Any kill of the opposing alignment that was first engaged while the
target was at full or nearly full health is considered an honorable kill. The first group
or solo PC that engaged the target will receive experience, status, and faction rewards.
Neutral Kills. Any kill of the opposing alignment that was first engaged while the
target had at least half health but not full or nearly full health is considered a neutral
kill. The first group or solo PC that engaged the target will receive moderate faction
gain, but no experience or status rewards.
Dishonorable Kills. Any kill of the opposing alignment that was first engaged
while the target is significantly hurt is considered a dishonorable kill. The results
of a dishonorable kill are detrimental, and include a loss of faction with both your
alignment and the opposing alignment. Losing faction with your own side in this way
can cause you to fall out of favor with your alignment and will restrict or remove any
access to the rewards system.
The Kill List
Honorably killing foes will place them on your character’s kill list. Any subsequent
honorable kills of the same PC will be counted as neutral kills until you have killed
10 other PCs. Neutral and dishonorable kills have no effect on the list.
44
Page 45

COMMUNITY
You will meet a lot of people as you play, and EverQuest II has many ways for you to
keep track of and interact with other players in the game.
Friends and Ignore Lists
You can keep track of your friends and block those who bother you by using the
Community tools. Click the EQII button and select “Community,” or press the [Y]
key to open the community window.
Friends List
When you make friends in EverQuest II, put them on your friends list by entering
their names in the Friend field and click the Add button. From then on, you will
be alerted when that friend logs in. You can remove characters from your list by
selecting their name and clicking the Remove Selected button. You may also type
/friend <name>.
Ignore List
If someone is bothering you, you can block them from sending you messages and
interacting with you by entering their name in the Ignore field and clicking the Ignore
button. You will receive no further messages from that character. You may type
/ignore <name> as well. You can remove characters from your list by selecting their
name and clicking the Remove Selected button.
Guilds
Guilds are associations of characters that cooperate to achieve many common goals.
These associations can be small groups of friends, organized Artisans, or enormous
“über guilds” that tackle some of the biggest challenges Norrath has to offer.
Forming a Guild
To form a guild, you must visit a guild registrar. Registrars are located in The
Freeport Observer in Freeport, The House of Lords in Qeynos, and the Tunarean
Court in Kelethin. The following requirements must be met to form a guild:
• Six unguilded characters present and grouped together, and
• 60 silver for the registration fee
You will be prompted for a name for the guild (subject to an inappropriate word filter).
The leader and officers are the only members of a guild who can invite new members.
To invite members, use the /invite <character name>
Guild Levels
A guild can become stronger through the actions of its members, unlocking benefits as the
guild grows in prominence. A guild levels up as its members complete guild writs for status
points and sell special status point items found while adventuring. Each time a guild member
earns status points, the guild as a whole gains experience. Guild leveling is very similar to
character leveling. At the bottom of the Guild Window is a guild experience meter.
Guild Status Points
Guild Status Points are status points held collectively by the guild and determine the
level of the guild. These are accumulated through the completion of writs, completing
special quests, and by defeating certain epic foes.
Writs
A writ can be obtained by anyone with a guild affiliation from Heralds located
within a city. Writs are duties a guild performs for a city or other faction in order to
gain prominence through Guild Status Points. Upon completion of a writ, instead of
adventure experience, the experience is added to the guild member’s individual Status
command.
45
Page 46

Points, as well as to the Guild Status Points pool. There are solo and group (heroic)
writs available.
As the Guild gains levels, special writs become available: raids for the guild to
complete for additional experience. These are given out by the City Registrar, and
accessed via a magical doorway nearby.
Guild Administration In-Game
The guild window lets leaders and members interact with the guild as a whole. Also,
from here the guild leader may do special leader-only actions. To open the guild
window, press [U].
There are eight tabs in the guild window:
Main. This tab displays general details about the guild, as well as recent events in the guild.
Members. Displays a roster of guild members that can be filtered and sorted.
Events. Displays a complete list of guild events and allows designated members to
administer the list.
Ranks. Shows rank titles and permissions, which can be changed by the guild leader
and designated officers.
Event Filters. Filters for the tracking of list of guild events.
Bank Settings. Allows the guild leader and designated members to change how
members can use the guild bank.
Bank Log. Displays transactions in the guild bank.
Recruiting. Displays the Guild Description that will be seen by those seeking a guild.
Basic Guild Commands
/guildsay <text>. Speak in the guildchat channel
46
Page 47

/guild invite <character>. Invite a character to join the guild (leader and designated
officers only)
/guild remove <character>. Remove a character from the guild (only the leader and
designated officers can remove other characters, but a character can remove himself
with this command)
/guild promote <character>. Promote a member to officer status or an officer to
leader status (only someone of higher rank with permissions can do this)
/guild demote <character>. Demote an officer to member status or a leader to officer
status (only someone of equal or higher rank with permissions can do this)
The Guild Bank
The guild bank allows members to store and withdraw items and coins. You can
access the guild bank by right-clicking on a banker NPC and selecting “guild bank”
from the context menu.
To deposit or withdraw items, simply drag-and-drop them into available slots. To
deposit or withdraw coins, click the Deposit Coin or Withdraw Coin button and enter
the amount you would like to deposit.
There are four different guild bank tabs, each with separate bank slots and coin banks.
The guild leader and officers can place
limits on how each guild rank can use
a guild bank, as well as any limits on
deposits and withdrawals.
As a guild advances in level,
additional rows of guild bank slots
become available.
Station Players™
Station Players is an online service
that connects players to the EQII
community. Station Players offers an
array of free and premium features that
merge the Web and your EverQuest II
experience in exciting new ways.
What is Station Players?
Station Players links you to the
EverQuest II community and gives
about the evolving world of Norrath. EverQuest II subscribers may get access to
some of these great features:
Guild Websites. As a subscriber to EverQuest II, you automatically receive access to
your guild website.
Server and Class Community Areas. Your server has its own community area that
will keep you up-to-date on news and events, and offers special features like.
Characters of the Day and Guilds of the Day
Character Profile Page. Show off your character’s equipment, statistics and more.
you access to a wealth of information
47
Page 48

Want More? Try Station Players Advanced Features
Station Players takes Web and game integration to an unprecedented level. Pick and
choose optional advanced features at an additional fee to get access to these extensive
tools and resources:
Advanced Character Profiles. Your character’s history is tracked by Station Players.
View your achievements, advancement, and items, and even allow others to witness
your greatness!
Advanced Item Lists. Both Artisans and adventurers discover incredible items
everyday in EverQuest II, and Station Players displays detailed statistics of each
while immortalizing the discoverer by name!
Advanced Guild Tools. Your guild is as close as the Web: Chat directly with your
guild and see who’s online right now through the Web. Plus, follow your guild’s
successes in your guild Wall of Fame.
Screenshot and Image Storage. You can store your own visual records on
StationPlayers.com. With the optional advanced features subscription, you can upload
up to 50 images and screenshots or 10 MB for others to view.
The tools and services on Station Players are unmatched when it comes to
immortalizing your characters and guild and bringing players together. Please visit
www.stationplayers.com for more detailed information and pricing options and to try
out the future of online gaming on the Web!
Guild Web Support: Station Players
As part of your EverQuest II subscription, guild leaders will have access to Web
space for a guild page and administrative tools to help you organize your guild. You
can find these at www.stationplayers.com.
EVERQUEST® II ECHOES OF FAYDWER™
Long ago, Faydwer was a continent filled with magic. The cities were places of
legend and renown. Then came the rending, the shattering and the withdrawal of the
Gods … the many peoples of Faydwer scattered to the winds, seeking shelter from the
events that raged on about them. Most became refugees and settled on the sundered
continents of Karan and D’Lere, where they began to rebuild lives and civilizations
far from their ancestral home.
Yet longing never ceased in the hearts and souls of the exiles, even as generations
passed. No Dwarf, Elf or Gnome could deny hoping that Faydwer had survived, and
that one day, perhaps, they could return.
Now at last the continent has been rediscovered. Unlike Antonica, Faydwer survived
the Cataclysm largely intact, but much changed. The great cities of Faydwer are but
an introduction to the continent. Let us visit them now …
The mighty city of Kaladim, ancestral home of the stout Dwarven race, where the
smithys’ mighty hammers rang day and night, and ale flowed like water. Now its great
stone halls are home to Bugbears, a strange, heavyset and primitive race, who share
the undermountain city with a curious alliance of goblins, Kobolds and a priestly sect
of Ratonga among others … followers of Brell, all. The power of the Underfoot runs
as strongly through Kaladim as it ever has.
Ak’Anon, where Gnomes explored every niche of the arcane arts and created all
manner of fabulous contraptions, the likes of which have never been seen before
48
Page 49

or since. When the Gnomes fled the city, the clockworks they left behind achieved
sentience and formed their own society. They are not evil, but seek to keep their home,
renamed Klak’Anon, free of the infestation of flesh and blood creatures.
The elegant city of Felwithe, where the High Elves studied and practiced their purely
beneficent magics. Through the wearing effects of centuries of war and destruction,
coupled with insidious rumors and fear-mongering by the agents of evil, the once
noble Koada’Dal became first isolationistm and eventually corrupt and xenophobic.
After “purifying” their race, they now style themselves “Renda’Dal.” The beauty of
the city, now called New Tunaria, is a mere veneer that hides the dark madness of
the High Council. Many rumors are whispered about the fate of the true ruler, Queen
Lenya Thex, but none dare pursue them.
The treetop citadel of Kelethin, where Wood Elves lived in communion with nature
and developed an unmatched knowledge of the lore of the land. The city has survived
several vicious wars, and remains the heart of all that is good in Faydwer. A new race
of beauty and light, the Fae, kept hopes alive in Kelethin.
Many other interesting areas await the brave adventurer, such as the haunted
desolation of the Loping Plains, the palpable power of evil that permeates
Mistmoore, the unique geology and fauna of Steamfont, and the powerful stronghold
of the Faydwer Orc tribes, Crushbone. There is something for all levels to enjoy
discovering.
It cannot be pure chance that the rediscovery of this magical continent coincided with
the stirrings of the Gods on the mortal plane once more; the struggle for balance in
this land is just beginning … Welcome to Faydwer.
Traveling to Faydwer
A ship route has been established between Thundering Steppes, Nektulos Forest and
the Butcherblock Mountains. There are than 20 new and exciting zones to explore,
spread across every level range.
New Playable Race: The Fae
The Fae are a new playable race available in the Echoes of Faydwer expansion. Small
and lithe, these creatures have innate high agility, wisdom and intelligence, leading
many to become scouts, priests and magic wielders. Mischievous and funloving, they
have wings of countless hues and shades of color which reflect their many moods.
The ancestors of the Fae were present in Faydwer in ancient times, and known to the
Wood Elves, with whom they allied in the later wars. Legend has it that the Fae were
created from beautiful woodland flowers by Tunare herself. When they began to learn
more of the world, they were affected by her influence and began to grow in spirit,
mind and body. They are now much larger than other Fay folk in Norrath and have a
fully developed culture based on maintaining harmony with nature.
Although they have wings, Fae cannot fly in the sense that birds can. Instead, they use
their wings to gently glide above the ground, or safely float down small drops. With
time, many Fae learn additional skills in Gliding that help them safely traverse paths
that others may find dangerous.
Alignment
The Fae are creations of the goddess Tunare, and they never forgot her, even when all
the gods withdrew from Norrath. For this reason, all Fae are considered “good” and
begin life in Kelethin. They may not begin training as an evil class. All Fae begin life
in the Nursery near Kelethin.
New Starting City: Kelethin
The fabled treetop citadel of the Feir’Dal, or Wood Elves, Kelethin has stood for
49
Page 50

many centuries. In ancient times, when the tumult of war and the tide of destruction
became too great, almost all elven folk fled their sanctuary within the Greater
Faydark Forest for other lands. The Fae remained, and against great odds, made the
city their own. Kelethin became the place where the Fae folk developed their culture,
building on their own knowledge as well as that learned earlier from the Feir’Dal.
The Fae who rule Kelethin are a Matriarchal society. Queen Amree is welcoming
to the many strangers who now traverse her lands, while her heir, the Princess
Saphronia, is less tolerant of the outlanders whom she instinctively distrusts. The Fae
are loosely allied to the brownies of Lesser Faydark, who consider Amree their queen
as well, although they maintain their own highly bureaucratic government.
Kelethin offers all the advantages of other large cities, including housing, banking,
brokers, a wide variety of merchants and services, city registrar and writ givers. It is
the central hub of Faydwer.
Young Fae buds always start life in the Nursery near Kelethin.
Players who are of the ancestral Faydwer races may also choose to begin life in
Kelethin: Dwarves, Gnomes, Wood Elves, Half Elves and High Elves.
Kelethin, the Fae and PvP
Kelethin and its inhabitants are devoted followers of Tunare, and as such, are of good
alignment. Evil players must tread carefully here, particularly on PvP servers.
The Return of the Gods
Cataclysmic events heralded the rending of the Norrath of old. Wars raged between
mortals and the Gods, with the very Planes of Power — the seat of the Gods —
besieged in the name of greed and supremacy. Finally the balance of the mortal world
was distorted beyond repair and the land itself began to rend and tear apart. In a final
mysterious event, the shrouded moon Luclin itself exploded, remaining in the sky as
a symbol of all things torn asunder. At the urging of Quellious, the Gods themselves
finally withdrew from Norrath and remained silent for hundreds of years.
With the passing of time, many thought the Gods dead, or a myth that had never
really existed; yet there were always some in the Shattered Lands who could feel their
distant presence, and never gave up their faith.
Through supplication, summons, dark ritual and prayers of hope, the immortals
have been called back to the lands to which they are bound. So many unimaginably
powerful and opposing forces; will you choose a diety to follow?
Abilities and Altars
You will quest to prove your faith, and those who are true of heart and purpose can
earn blessings and miracles. Each Tier offers a new quest, with five in total. The first
quest begins at Level 20.
Miracles are instant or short-duration abilities that have very powerful effects.
Blessings are usually of a longer duration, and increase abilities, augment skills or
call forth a servant of the diety to aid you. Both miracles and blessings are on a 60minute timer.
In order to use specially bestowed abilities, you will be required to expend some
of the favor you gained from serving your diety. Favor may be increased again by
making offerings to your God or by praying at your altar. Each character will receive
an altar for personal use; this is placed in your house.
Altars are of differing qualities, and better ones are available as you advance in faith. To
50
Page 51

use the altar, place it in your house and pray by right-clicking on it. This will bring up
the altar interface. Within this window, you will see blessings on the left and miracles
on the right. Mouse over the icons to learn about the abilities and what they require.
Revoking or Changing Faith
You may only serve one diety at a time.
If you wish to stop serving your current God, you must go to your diety’s altar, rightclick on it, and renounce your faith. You will immediately lose all favor with the God,
but you are free to choose a new one, or to remain without.
The Deities
Each of the Gods has an avatar, a mortal entity imbued with divine power, which will
appear in Norrath if worshipers collect enough favor. The avatar will usually remain on
the mortal plane for 3-5 days, granting their devoted followers a small buff; the buff is
increased in duration should you travel to stand in the presence of your God’s avatar.
There are some who may wish to destroy the holy avatars, a difficult challenge
indeed. The followers of Innoruuk, for instance, might think to serve their dark lord
well by mounting a raid to destroy the avatar of his nemesis, Tunare.
A warning to those in a raid who worship the target diety: should you attack as well,
you will be cursed with Apostasy (a divine stun lasting 9 seconds), and immediately
lose all favor, blessings and miracles, even those already cast. In addition to a
massive blow to faction, you will be afflicted with divine censure for 24 hours. The
Gods do not look favorably on such betrayal.
Brell Serilis, The Duke of Below (neutral). Revered as the primary god of the
Dwarves as well as many Gnomes, Halflings, and Gnolls, Brell is the god of the deep
earth. Solidity of purpose and strength in action are the hallmarks of his followers.
The stout of heart must talk with those who dwell in the Dwarven Outpost south of
Kaladim if they hope to prove themselves worthy of service to Brell.
Cazic Thule, The Lord of Fear (evil). Known long ago as “The Faceless”, Cazic has
been called back to Norrath by his devoted followers. There is great power as well
as danger in Fear; those who wish to learn the ancient, dark ways of terror should
discourse with Danak Dhorentath in the Butcherblock Mountains.
Innoruuk, The Prince of Hate (evil). The heart of evil, Innoruuk twists even the
most pure of spirit to pure evil. It was he who created the Teir’Dal, the Dark Elves, by
torturing and warping the captive king and queen of the Koada’Dal, the High Elves.
Players who wish to sample the power of hate — perhaps at the cost of their own
souls — should find Xilania Nevagon in Greater Faydark.
Mithaniel Marr, The Truthbringer (good). Many were the knights in Norrath who
once followed the bright banner of Mithaniel Marr, and he has returned to sound the
call once more. Honor, in word and deed, rule in the hearts of the many valorous
souls who wish to swear fealty to this noble God. They must seek out Bayden
Cauldhorn in Kelethin to learn their destiny.
Quellious, The Tranquil (good). Worshipping the child goddess who personifies the
balance of all things, the followers of Quellious are not afraid to use force to defend
themselves and others from evil. The Tranquil is the natural opposite of Rallos Zek.
Revered by ancient orders of monks for millenia, now many in Norrath also wish to
learn the Tranquil path of inner peace. If you are one of these, speak to her devoted
servant, Pacificator Merrek, in Butcherblock.
Rallos Zek, The Warlord (evil). Nothing pleases this energetic God more than the
sound of pitched battle, steel upon steel, armies stretching to the horizon. Rallos has
51
Page 52

no stomach for weaklings and seeks only power through might. The Ogres and Orcs
are his children, but he calls all who love the heat of the fray to his side. Victory and
destruction are the only goals in his soul. To seek service in his ranks, speak with
Tychus Zekbringer in Butcherblock.
Solusek Ro, The Burning Prince (neutral). All Mages of Norrath can trace the root
of their powers to the bright fires of magic that ceaselessly roil in Solusek. He holds
the power of ethereal fire in his soul, and countless generatons of mortals have sought
to learn from his greatness. If you are not afraid of the all-consuming conflagration he
represents, seek out Civean Il’Pernod, along the cliffs of Butcherblock.
Tunare, The Mother of All (good). Generous and beautiful of spirit, Tunare is the
goddess of nature and growth. Hers are the viridian woods and sun-dappled vales, her
people, the Elves: Feir’Dal and Koada’Dal as well as the exquisite Fae. In time, many
races came to revere this gentle but powerful diety. Should you wish to begin the path of
her worship, converse with Eva Coinno’thes, the High Priestess of Growth, in Kelethin.
Guild Advancement
With the discovery of Faydwer, Guilds may advance to Level 60, opening up
additional guild bank slots. New status rewards are available, including an advanced
armored mount at Guild Level 60.
New Titles
Two new advanced titles, Count and Countess, are available for those who gain
enough reputation with their cities and have reached Guild Level 60.
Guild Heraldry
Long awaited heraldic cloaks make their appearance in Echoes of Faydwer. Guilds
will be able to choose a unique design that can never be used by others, for a onetime registration fee.
Guild Heraldry Designers may be
found at City Registry offices in
Qeynos, Freeport and Kelethin. The
guild leader (or others he designates
via the permissions in the guild
interface, default [U]) will rightclick on a Guild Heraldry Designer
and choose “change heraldry.”
After making selections appropriate
to the guild’s level, the leader will
click on “Accept” and will pay the
heraldric registration fee. Clicking
on “Close” will leave the interface
with no changes made and no
money paid.
Guilds will unlock different degrees
of cloak customization as they
advance in level:
UILD LEVEL CUSTOMIZATION
G
Guild Level 15 icon and color, background color
Guild Level 30 add border color and pattern
Guild Level 60 add background pattern
52
Page 53

Once a guild has a cloak choice registered, the leader may designate which ranks are
allowed to display heraldry. Thereafter, members will display guild colors on cloaks
provided they have selected “Display Heraldry” in the Persona window (default [P]),
under “Options.”
Any changes to the guild heraldry, no matter how minor, will incur the levelappropriate charges listed above.
Equipment
Cloaks. In addition to Guild Heraldry, cloaks will be available through certain quests,
as item drops from encounters and player-made by Tailors.
Second Earring Slot. A second earring slot has been added to the equipment slots.
Quests
There are more than 350 new quests for you to discover throughout Faydwer.
New Heritage Quests and Title
and a new title, “The Artifact Raider,” for completion of 30 in total.
New Collection Quests. As with previous expansions, new collections have been
added, but this time, there is an added twist … if you obtain Gnomish Collection
Goggles from the Collector in Kelethin, you will be able to detect the rare, normally
invisible blue glowies. You must first prove yourself worthy by completing an expert
collection quest!
Achievements and Training
A second page of achievements has been added for each adventure subclass,
along with 50 more points to earn, for a total of 100. Full details under Alternate
Achievements in the gameplay section of he manual.
Enemy Masteries. There are many new foes to challenge you in Faydwer. You will
be able to gain new Enemy Masteries to help combat them.
At Level 35, choose between Bugbear, Kobold and Minotaur.
At Level 49, choose between Brownie, Clockwork and Werewolf.
Class Changes: Teleportation
Druids and Sorcerers are rediscovering the lost art of teleportation. The secret to their
success lies in Faydwer.
Druids (Furies and Wardens) can transport people via their sacred Druid rings, while
Sorcerers (Wizards and Warlocks) can open portals for friends to travel through.
Tradeskill Changes: New Tradeskills and Commissions
New Secondary Tradeskills. Any character with a tradeskill level of 10 or higher
may explore an additional tradeskill with Echoes of Faydwer, as Norrathians
rediscover the arts of Tinkering and Transmuting.
It is important to note that you may only choose Tinkering or Transmuting, not both.
This secondary skill is developed in addition to the primary crafting skill. Your
maximum skill in Tinkering or Transmuting is tied to that achieved with your primary
tradeskill. Thus, if you have a skill of 140 in Woodworking, you may raise your
secondary tradeskill to 140 as well.
All players with existing tradeskills can now create adornments to augment equipable items.
. Echoes of Faydwer offers 5 new Heritage Quests,
53
Page 54

Tinkering
A Tinker can assemble useful gadgets which will enable characters to feign death,
reduce falling damage, breathe underwater, and so forth.
You must first reach at least Level 10 in your chosen primary tradeskill profession,
then speak to a Tinkering trainer to obtain the skill. You may purchase new
“Tinkering” reaction icons which will be scribed in your knowledge book (default
[K], tradeskills tab).
Tinkers practise their arts on the Workbench crafting station.
Transmuting
The skilled Transmuter can take a valuable item and break it down into magical
components that may then be used to create adornments. Only truly exceptional items
can be used for transmuting, such as: treasured, legendary or fabled items, adept I/III
spells and master crafted items.
Items that cannot be transmuted include non-rare player-crafted items, collectibles,
mounts, consumables, furniture, containers, attuned items and certain treasured items
obtained through quests.
Once you reach Level 10 or higher in your chosen primary tradeskill profession,
speak to a Transmuting trainer to obtain the skill. You will gain a new “Transmute”
ability in your knowledge book (default [K], abilities tab). Activate the transmutation
icon by clicking on it. Your mouse cursor attains a blue color, indicating that you are
ready to transmute an object.
Find an item in your inventory that is within your transmuting level range. For
instance, you must be at least Level 23 in transmuting before you can transmute a
Level 23 item.
Click on the item you wish to transmute to start the process. When complete, the original
item will disappear and the component you extracted will be added to your inventory.
Different tiers of items will result in different tiers, or grades, of components, which
may then be used in equivalent tier adornment recipies.
Transmuting can be undertaken anywhere, and does not require a crafting station.
A treasured item will yield a fragment or powder.
A master crafted item will result in a fragment or powder, with a rare chance for an infusion.
A legendary item will be transmuted into a powder or infusion.
A fabled item will provide an infusion or, less commonly, a vial of mana.
NOTE: occasionally, a transmute may result in two components instead of one.
All components can be freely traded and sold through the broker.
Adornments
Certain adornments may be created by any tradeskill class, including Tinkers and
Transmuters. Appropriate recipe books can be purchased from the Transmuting Merchant.
Creating an adornment uses the existing tradeskill process, at a Chemistry table. Your
knowledge book (default [K]) will have reaction counters for Transmuting that you
can use during the process.
Once the adornment is created, it is applied to the desired item by the owner of that item.
54
Page 55

In this way, an adornment may be added to an item that is already attuned to the owner.
There is no skill required for this action; anyone can add an adornment to an item.
One adornment at a time may be placed on an item. It will augment effects already
naturally present on the item.
If a second adornment is applied, it will replace the previous one. Adornments cannot
be removed once fused with the item.
Adornments scale up for the purposes of application, but not down. That is, you may
place a Level 2 adornment on a Level 6 weapon, but you cannot place a Level 6
adornment on a Level 2 weapon.
Both components and adornments may be freely traded and sold through the broker.
Tradeskill Commissions
With Tradeskill Commissions, you may have a crafter create an item for you, on the
spot, with materials you provide, in a secure trade environment.
The crafter must be within range of his chosen workstation. He selects a recipe from
directly to the customer’s inventory, and payment, if any, goes directly to the crafter.
his recipe list, then targets the customer
before clicking on the “Create” button
in the recipe list. This will bring up the
“Commissions Work” window for both
parties.
The customer will see the recipe, the
ingredient slots, the byproduct and
payment options. The customer may place
the components that he is providing (if
any) into the appropriate slots, as well as
any payment requested by the crafter.
Once both parties have agreed on the
options within the window, they each
press “Accept” to the agreement (or
“Reject” to cancel).
The customer can watch the progress
bar moving toward completion as the
product is being created by the crafter.
As soon as the item is complete, it goes
EVERQUEST® II KINGDOM OF SKY™
EverQuest II Kingdom of Sky introduced many new features to EverQuest II, including:
• Increased level cap for adventurers to 70
• Increased level cap for guilds to 50
• More than 30 new items for your house
• Fashionable new items, including profession hats, helmets, and pauldrons that give
your character a unique look
• Over 25 exotic new creatures to encounter
• New quests, including heritage and signature quests, as well as 30 new collection quests
55
Page 56

• Eye-popping and challenging new zones to explore
• New titles for characters and guild members
• All new items for purchase with status points, including raid and group expendable items
• Brand new Artisan recipes
The Overrealm
High above the mightiest peaks of Norrath, new realms have been discovered. Hidden
from the eyes of most of Norrath’s inhabitants for centuries, this Overrealm exists
as enormous hunks of land suspended in the air and is home to aviaks and creatures
never-before seen. It is the splintered and warring dragons, however, who rule it.
Driven by lust for power, religious zealotry, and consuming rage, the most ancient
creatures in all of Norrath are the undisputed masters of the skies.
Harla Dar is the high priestess of the Awakened and fanatical follower of an unknown
dragon god.
Lord Vyemm is the military and scientific leader who desires the subjugation of Norrath.
Gorenaire and Talendor, twin chromatic dragons, plot and scheme against each other
and their enemies in their bids for power.
Tarinax is the powerful and mysterious undead guardian of a fabled dragon necropolis.
The Barren Sky (Realm of Dawn)
The Barren Sky rests over Norrath under an eternal dawn. The sun always peeks
over the horizon of this arid environment. Winds race over the defiant pillars of rock
and enormous chains that make up most of the islands. The Barren Sky is patrolled
by aviak flocks loyal to the Empire of The Awakened. These aviaks have formed an
alliance with the dragons that predates the Overealm’s creation. The eagle aviaks
are in conflict with the predominant aviak flock of this zone, the Vultak, a breed of
vulture aviaks. It is not uncommon to find the two skirmishing in the Barren Sky.
The chromatic dragons Talendor and Gorenaire rule this realm of avians and grand
palaces. These two fiercely bickering dragons plot and scheme against one another as
often as they do against their enemies in their struggle for personal power among the
Awakened and for dominance over all of Norrath.
The Bonemire (Realm of Night)
A gloomy realm of monolithic rocks, The Bonemire bears a dark and forgotten
history. Torn from an unknown area in the Plane of Sky, the islands of The Bonemire
are desolate and barren. Spires rise from the surface and shadowy shapes flitter in the
darkness surrounding them. Pools of sickly purple fluid congeal on the surface of the
islands and are home to all forms of horrifying mutated creatures.
On these islands are the remains of long forgotten dragons, half-buried in the rock
around them. The Doomwing Legion, followers of the Awakened Cult, is sometimes
found here excavating the bones of long dead dragons for ancient and powerful relics.
The militarily and scientifically minded dragon Lord Vyemm rules this realm from
his lair inside The Halls of Fate. Against orders, he believes the time is right to bring
the full might of his army against an unsuspecting world. He knows only with the aid
of the other draconic rulers can he succeed, and thus far his efforts are counter to the
orders and wishes of Harla Dar and her god.
Tenebrous Tangle (Realm of Twilight)
The Tenebrous Tangle rests in perpetual twilight. Exotic foliage shrouds much of the
floating isles of this realm. These islands are the religious foundation of the Empire
56
Page 57

of The Awakened. Sacred stone monuments and temples are clutched by unyielding
vines and roots. This region is the home of the Temple of Scale and as such is
considered holy ground by many of the Awakened. The High Priestess Harla Dar and
her fanatically devoted followers fiercely protect this realm from intruders, including
those that would try to usurp her authority or contradict her wishes. Following the
orders of her worshiped draconic god, Harla Dar holds her powerful forces in check
until the time is right to descend upon Norrath in a holy crusade.
Arenas & Champions
Two new arenas within the Overrealm of Norrath have been discovered and are now
being used by the most elite of champions.
New champions native to the realms of sky have emerged, as well. These may be
used by characters in the Arenas for a unique twist on friendly combat.
EVERQUEST® II DESERT OF FLAMES™
The Desert of Ro has been unreachable for centuries, cut off by the impassible Sea
of Sand — or so it has been thought. The means and methods to reach the lost and
ancient desert have been developed by the Deathfist Orcs, and now the attentions
of the inhabitants of both Qeynos and Freeport have been drawn to the exotic and
parched realms of the Desert of Flames.
You will discover exciting new content and features in Desert of Flames. Set in a
desert realm, you will be faced with fierce new enemies such as sand giants and
encounter magical new locations, like the strange and contentious city of Maj’Dul.
You will be able to continue developing your characters to Level 60 in Desert of
Flames, and you will even be able to engage in new player-versus-player action!
Level Advancement
In the Desert of Flames expansion, your character will be able to continue his or her
adventure class advancement beyond Level 50, all the way to Level 60. You will learn
new spells and combat arts, and continue to increase your character’s power.
Artisan characters also have increased advancement opportunities beyond Level 50.
They, too, are able to advance to Level 60 in their chosen tradeskill, earning new
recipes and skills.
Guilds
Player guilds gain new advancement options in Desert of Flames. Guilds may now
progress to Level 40, unlocking new features for their organization.
Arenas
You may engage other PCs in combat in special arenas within the
expansion. You can battle in instanced arena zones as your character, or as non-player
characters you control.
You may enter arena play through the city of Maj’Dul.
All movement and camera view controls are the same within arenas as in the rest of
EverQuest II.
Joining an Arena
When entering an arena, you may choose to join a battle or start one of your own. You
will see a list of arenas you may currently join and the settings for each, such as whether
it is fought with NPC arena champions or your character, victory conditions, etc.
Arena difficulties are set at five level increments (5, 10, 15, etc.). To join an arena,
your NPC arena champion must be the exact level of the battle specified. If joining
with your character, he or she must be at least the level of the arena; characters of
Desert of Flames
57
Page 58

higher level than the arena will be “mentored” down (using the mentoring system of
EverQuest II) to the appropriate level.
Battles are divided into two teams, red and blue, as indicated by the color of their
overhead name. Each team may have up to four groups of six PCs each.
To enter an arena, click “Join Arena.”
Creating an Arena
You may create your own arena by clicking “Create Arena” from the main arena entry
window. When starting your own game you will input a name of the game, and enter
a password if you only want those with the password to enter. Leave the password
field blank if you want the game to be open to all PCs.
You will have several options for your battle:
Combatants. Select the types of champions to allow in the battle: player characters,
standard NPCs, or unique NPCs.
Game type. The type of battle to be played
Time limit
other victory conditions, this option will not be available.
The creator of a game may kick PCs from his or her game by right-clicking on the PC
and selecting “kick” from the context menu.
Arena Types
There are several types of battle you may choose from when creating a game:
Team Deathmatch. Two sides, either team play or mano a mano, fight until only one
remains.
Defend the Idol. Each team has an idol that they must protect. To win, you must
destroy the other team’s idol.
Capture the Flag. Each team vies for control of the opposing team’s flag.
You may pick from a variety of maps to fight on, based on the battle type chosen.
At the end of a battle you will be shown statistics, such as you number of kills and deaths.
Arena Champions Mode
In this mode, you will pick an NPC to be your champion in the arena. When entering
a battle, you will see a list of eligible characters to pick from for this battle.
You will then prepare your champion by selecting spells, abilities, and equipment you
would like to bring into the arena for your champion to use. Once in the arena, you
will not be able to change these settings; however, you may still view and manage
your Book of Knowledge.
Click “Play” to enter the arena.
. Sets the time limit for the battle. If the battle type chosen establishes
58
Page 59

CUSTOMER SUPPORT
If you encounter a problem while playing EverQuest II, click the EQII button and
select “Help.” This will open the EverQuest II Help window that will answer many
questions you may have about the game.
You can access additional help information from our Knowledge Base of common
questions and answers. Click on the Petition button at the bottom of the Help window
(or type /petition in the chat line). A window will open which will direct you to the
web-based customer service center. Click on Go to Website to continue, or Contact
Customer Support Later to cancel.
Using the Knowledge Base
The Knowledge Base is a collection of answers to frequently asked questions, and
it may give you the immediate answer you seek. When you arrive at the Customer
Service center, you will always start at the Knowledge base tab.
Activate the appropriate categories in the drop boxes offered, type in one or more
keywords in the “Search Text” field, and click Search. This will find any articles
about the keywords you enter. You can view an article by selecting it from the list.
You can also access the Knowledge Base on the Web at www.station.sony.com/kb or
by using the “Search the Knowledge Base” field at the top of most Station Web pages.
Creating a Customer Service Ticket
If you can’t find the answers you seek in the Knowledge Base articles or require
assistance with an in-game problem, you can send your question to a customer
service representative. Click on the “In Game Support” tab.
Product & Category. Choose the appropriate categories from the drop-down menus,
then fill in the remaining information to the best of your ability. If you launched your
query from within the game, you will see that a lot of the information is already filled
in for you.
Subject. Enter a short phrase to summarize your situation, such as “stuck in place” if
your character has become wedged in behind some rocks or other obstruction.
Question. Enter details about your problem. Use complete sentences, avoid
abbreviations, and include as much detail as possible, including who, what, why,
when and where. The more information you are able to provide, the easier it will be
for a customer service representative to research your issue.
Attach Documents to Question. You may send saved files, screenshots or other
materials to support your petition. In most cases, these will not be required. Use the
browse button to find the document(s) that you wish to include.
Continue. When you are finished, click on “Continue” to submit the question.
A new page will appear, with the heading, “Your Question has been Submitted.” You
will see a reference number for your question.
Viewing or Adding to Your Question
To see if you’ve received a reply to a previously submitted ticket, check the Service
History tab in the Knowledge Base window. Remember, you can return to this page
at any time from within the game via /petition.
Click on “Questions” to check the status of your question, or to provide additional
information. Find the question at the bottom of this page and click on the text under
the “Subject” column to open your question. Below your original question, you will
59
Page 60

see a button, “Update Question.” Click on this to add additional information or to
follow up on an unresolved issue.
Your Question history remains after an issue has been marked as “solved,” for your
convenience and reference.
Click on “Notifications” to see if a customer service representative has responded to
your Question. If so, you may click on the Subject text to open the question and read
the response. If the customer service representative requires more information, or the
situation changes, click on the “Update Question” button to provide more input.
Each time a customer service representative responds to your question, you will
receive an email of the full response at the address registered to your SoE Station
account; please keep this email address updated.
For the latest information on updates, please visit the official
www.EverQuest2.com.
Technical & Billing Support
In your web browser, go to www.EverQuest2.com, click on “Support.” A page will
appear with a list of all SoE games. By the EverQuest II icon, click on “Technical and
Billing” to be taken to the Knowledge Base.
Due to variations in today’s hardware and software, please do the following basic
checks before contacting SOE Customer Service:
• Search our Knowledge Base for an answer to your question.
• Check that you have installed the proper version of DirectX and all hardware
drivers (for sound/video cards).
• Check that you’re using supported sound and video cards.
• Check that your computer is properly connected to the Internet through your
Internet Service Provider.
If you still have technical or billing issues, please choose the “Email Support” or
“Chat Support” tab.
E-mail Support
You may contact Sony Online Entertainment regarding technical and billing issues
by e-mailing via the “Email Support” tab at the Knowledge Base. Please provide
as much detail as possible in your Question Data. We will respond to your issue as
quickly as possible; however, response times may vary depending on the volume of
e-mails received by the Customer Service Department.
Live Chat
You may contact Sony Online Entertainment for Live Chat Support. Fill in
the required fields and enter a detailed summary of your issue in the “Problem
Description” field. Click on “Submit Request” and your query will be placed in a
queue for a support representative. You will be able to see your position in the queue
in a small window that appears. We will try to respond as soon as possible, but
response times will vary depending on the volume of requests submitted. Live Chat
is available Monday through Friday from 7:00am to 7:00pm Pacific Standard Time,
except holidays.
Phone Support (Billing and Technical Issues Only)
You may contact Sony Online Entertainment for telephone support at (858) 537-0898
during normal business hours. Please visit www.EverQuest2.com/support for the
most current support hours and contact information.
EverQuest II website at
60
Page 61

CREDITS
EverQuest II Team
Senior Producer/Creative Director
Scott Hartsman
Producer
Sandra Powers
Project Manager
Oliver J. Smith
Associate Producers
Steve George, Jennifer Gerull, Barbara Saito, Erik Theisz
Lead Artist, Characters
Chad Haley
Lead Artist, Environments
Timothy Heydelaar
Lead Game Designer
Jason Roberts
Lead Programmer
Don Neufeld
Audio Lead
Cat Neri
Artists, World Builders, and Animators
Michael Bacon, Francesa Castellanos, Maria DelCasino, Niraj Desai, Patrick Ho, Jeff
Jonas, Steve Kim, Sung Kim, Ben Lazarro, Joe Marullo, Amanda McCarter, James
McClure, Chris Myers, Urban McLafferty, Brandan McDonald, Kelsey McNair, Tom
Moon, Stacey Norman, Vu Nguyen, Rick Randolph, Rosie Cosgrove Rappaport,
Evan Sampson, Thomas Sincich, Rich Sjoberg, Alfonso Villar, Dok Whitson
Additional Art
Aaron Carlson, Brad Constantine, Kacey Helms
Design Supervisor, Echoes of Faydwer
Akil Hooper
Design Supervisors
Kyle R. Hill, Stephen M. Pierce
Game Designers
Peter Chang, Steve Danuser, Tony Garcia, Jeremy Gess, Noah Holmes, Jason Huck,
Ellery Jones, Christopher Junior, Caroline Kingwell, Steven Kramer, Tracy A.
Seamster, Elizabeth Sigmund, Ben Skelly, Adam Stevens, Jared Sweatt, W. Roger
Uzun, Noel Douglas Walling, Joel White
Additional Game Design
Nathan McCall
Programming
Brian Belfield, Chris Kozak, Joshua Kriegshauser, Robert Mitchell, Eric Swanson,
Nandy Szots, John Tessin
Additional Programming
Michael Roca, Greg Spence
61
Page 62

SOGA Team
Producer
Bryan Yueh
Associate Producer
FengTing Tsou
Project Management
Lihan Chen, Andy Lee
Character and Monster Design
Hisanowo
Environment Concept Design
Tao Lin
Designer
Jam Huang
3D Artwork and Animation
Sean Liu
Argus Hung
Aurora Lu
Joan Lee
Yu Sheng Lin
Ming Chi Sung
Rick Lai
Jolie Chen
Lilian Yeh
Weili Huang
Art Director
Kazuhiro Kurihara
Assistant to Art Director
Maggie Chen
Process Architecture and Management
Stephen Wang
SOGA General Manager
John Laurence
Special Thanks
Charles Gan, Celina Lee, Smith Wu, Serena Chen, Tetsuhiro Akiyama, Yu Yo Zheng,
Jashua Lee, Rick Lai, Toshiaki Tsuji, Suan Yuan Chou, Cosmos Chen, Ting Huang,
Simon Lin, Caty Juan, Gary Chen, Michael Lin, Cindy Flower, Dean Claassen ,
Lilian Yeh, Leo Yin, Ken Wang
Music, Sound & Video
Audio Director
Glenn Stafford
VO Coordinator
Joy Kosenski
Music
Inon Zur
62
Page 63

Studio Management
Vice President, Development
John Donham
Studio One Executive Assistant
Bianca Diaz
Studio Art Director
Joe Shoopack
Community Management
Director, Global Community Relations
Alan Crosby
Community Relations Manager
Ryan Shwayder
Community Content Manager
Adam Stevens
Community Relations Coordinator
Aimee Rekoske
Community Relations Representatives
Vanessa Barrera, Midori Kosaka, Joel Sasaki, Susan Rummani
Customer Service & Quality Assurance
Vice President of Global Customer Service and Quality Assurance
George Scotto
Executive Director of Quality Assurance
Tony Rado
Executive Director, Global Customer Service
Brad Wilcox
Quality Assurance Manager
Rob Thompson
Quality Assurance Supervisors
Andy Lamp, Chris Fritchoff, Ryan Wells, Ryan Antonelli, Taylor Haley
Technical Liaisons
Andrew Baker, David Avram
Senior Quality Assurance Lead for EverQuest II
Tiffany Sanchez
Quality Assurance Assistant Lead for EverQuest II
James Karras
Quality Assurance Analysts
Kevin Moyer, Geoffrey Olmstead, Daniel Hosford, Jason Cracchiolo, Brett Scheinert,
Michelle Schade, Kris Kleinow, Tim McLaughlin, James Rackliffe, Darlene Girts,
David Marsh, Tim Erskine, Savi Fossi, Yoko Brush, Gwendolyn Threatt
Compatibility Lab Assistant Lead
Jason Zimmerman
63
Page 64

Compatibility Lab
Josh Potter, Kevin DeBolt, Ryan Boyle, Brandon Padilla, Jason Peffley
International Quality Assurance Manager
Gary Matthews
International Quality Assurance Asst. Lead
Jay Lauterwasser
Special Thanks to the iEnergizer, Inc. QA Department.
Customer Service Manager
Richard A. Schmelter
Customer Service Supervisors / Lead GMs
Joseph D. Paolinelli, Michael Woods
Customer Service Representatives / Game Masters
Tony Cooke, Janice Bagley, John Borders, Ryan Bacalski, Amy Leo, Jason
Leo, Michael Wagner, Charles Mastrangelo
Sales & Marketing
Senior Vice President, Sales & Marketing
Torrie Dorrell
Senior Vice President, Sales
Don Vercelli
Vice President Marketing
Michael Lustenberger
Senior Global Brand Manager
Laura Naviaux
Senior Director, Corporate Communications
Chris Kramer
Marketing Services Manager
Jennifer Belfield
Public Relations Manager
Michael Shelling
Associate Marketing Research Manager
Robert Liguori
Marketing Specialist
Ari Ziegel
Public Relations Coordinator
Taina Rodriguez
Marketing Services Coordinator
Lauren Zeiger
Business Development
Director, Business Development
Louis Figueroa
64
Page 65

Technical Operations
Vice President, Operations
Michael Bowen
Project Management
Dennis Gaudinez, and Eric Weiss
Director of SOE Security
Bryan Blank
Director of Operations
Jeremy Johnson
Associate Manager, Operations
David Prestin
Operations Team Leads
Steven Davis Thomas Delzer, and Eric Flynn
Operations Team
Ben Cohee, Ben Cole, Ron Corning, Manuel Deramos, Robert Maul, Gary
Neffendorf, Chris Richard, Roger Sewell, Chris Trichel, and Jesus Zarzosa
Director of Production Systems
Mark Preston
Manager of Production Systems
Deon Mitton
Production Systems Team
Thomas Jackson, Sid Jaffee, Kirk Lightfoot, and Kevin Ying
Network Engineering Team
Brett Hawn, Travis Neidens, and Steve Scheck
Director of Office Systems
Jeff Bolaris
Office Systems Team
Lisa Doleshal, Domenico Scaduto, Felicity Santo, Jeremy Siprelle, Loren G. Skeels,
and Nate Wright
Manager of Operational Engineering
Ted Garrington
Operational Engineering Developers
Timothy Arland, Ogi Boras, Chad Folz, Greg Herzbrun, Matthew Reynolds, David
Taylor, Gordon Tetlow, and Clint Urbanek
Platform Services
SVP of Technology
Chris Yates
Administrative Assistant
Rowena Luansing
Executive Director, Platform Operations
David Dhunjishaw
65
Page 66

Director of Web Development
Gregory Short
Web Development Team
Kyle Blackman, Tim Cox, Monte Greene, Sean White
Platform QA Manager
Enrico Bernardo
Platform QA Team
Ben Babeshkin, David Bennett, Carl Flaherty, Derek Freese, Eleonor Larsson, Karen
Leslie, Wilson Oen, Thanh Nguyen, Bethany Rockey, Vien Truong
Project Management
Bonnie Davison, Robin Goldie, Wendy Kim, Jenné McPherson, Amy Oilman,
Kumiko Yuasa
Director, Engineering
Narayanan Gopala
Application Engineering Team
Anthony Aarobone, David Almilli, Bob Bamford, Mark Brennan, Paul Christenson,
William Cox, Aaron Dressin, German Eichberger, Todd Feak, Jake Fear, Matt
Houser, Manali Joshi, David Keene, Andres March, Michael Miljour, Tina Ngo, Chris
Sheddy, Phil Sunbury, Rob Thomas, John Van Roekel, Mike Walters
Systems Engineering Team
Phil Bouchard, Grat Crabtree, Michael Falcon, Thomas Farthing, Dan Gorman, Pablo
, Herrero, Jeff Jones, William Kemper, Robert Kline, Wei Li, Tavish Margers, Hoa
Nguyen, Chris Rosa, Chris Rosner, Rick Smith, Casey Winn, Chunying Xie
Creative Director, Product Design
Nathan Pearce
Creative Design Team
Tony Kodis, Eric Schmitter
Director of Database Services
David Manifold
Database Services Team
Warren Bartolome, Donyl Cruz, KAthryn Graham, David Green, Eric Ho, Aaron
Hollenberg, Beth Howie, Mahesh Kalyanetti, Sherry Liu, John McGovern, Archana
Pansuria, Taylor Steil, Marjorie Vaccaro, Aaron Valdes, Nick Verenini
International Operations
Executive Director, International Operations
Matt Sivertson
Localization Managers
David Kim, Raymond Nguyen Tan Truong, Stacey Sofia-McDaniel, James Whisenant
Technical Lead for International Operations
Robert McEntee
Localization Team
Katty Bashir, Bernard Dambron, Stacy Griebel, Jacky Ho, Devon Kim, Duy Le,
Christopher Lee, Lina Liang, Bill Mauer , Jason Polk, Adriano Vasco
66
Page 67

Localization Interns
Frank Mitchell, Marigar Napilot, Chang Pak
Product Development
Director of Technology
Rich Lawrence
Research & Development
Kyle Forbes, Andi Smithers
Project Management
Bruce A. Ferguson, Mike Gaylord, Ty Keith
Legal Department
Vice President, Legal and Business Affairs
Rick Herman
Staff Counsel
Kelly Conway
Legal Coordinator & Contracts Administrator
Olivia Malmstrom
Executive Staff
Chairman of the Board
Yair Landau
President
John Smedley
Chief Operating Officer
Russell Shanks
Chief Financial Officer
John Needham
Chief Technology Officer
Adam Joffe
Sr. Vice President of Legal and Business Affairs
Andy Zaffron
Executive Assistants
Marsha Gygax, Pam Impson, Christine Lena
Special Thanks
The EverQuest II development team would also like to say thank you to our families
and friends for all of their support. Without their support, Echoes of Faydwer would
not be possible.
67
Page 68

©
2006 Sony Online Entertainment LLC. EverQuest, SOE and the SOE logo are a registered trademark and Kingdom of Sky and
Echoes of Faydwer are trademarks of Sony Online Entertainment LLC in the U.S. and/or other countries. Software platform
logo (™ and ©) IEMA 2004. The ratings icon is a registered trademark of the Entertainment Software Association. Uses Granny
Animation. Copyright ©1999-2003 by RAD Game Tools, Inc. Uses Miles Sound System, Copyright © 1991-1999 by RAD Game
Tools, Inc. Uses Bink Video. Copyright (C) 1997-2006 by RAD Game Tools, Inc. Portions of this software are copyright 19982001 Criterion Software Ltd. and its licensors. Portions of this software are based in part on the work of the FreeType team.
MUSIC BY LAURA KARPMAN. Portions of Voice Over Casting, Recording and Editing by Soundelux Design Music Group.
Motion Capture data provided by House of Moves Motion Capture Studios, LLC. The NVIDIA logo and “The way it’s meant
to be played” logo are registered trademarks or trademarks of NVIDIA Corporation. All other trademarks and trade names are
properties of their respective owners. All Rights Reserved.
USER AGREEMENT AND SOFTWARE LICENSE
Please remember to review the current terms and conditions of the EverQuest II User Agreement and Software License. Thank you.
EVERQUEST® II USER AGREEMENT AND SOFTWARE LICENSE
THIS AGREEMENT DESCRIBES THE TERMS ON WHICH SONY ONLINE ENTERTAINMENT LLC (“
YOU ACCESS TO AN ACCOUNT (THE “ACCOUNT”) TO PLAY THE EVERQUEST II FANTASY ONLINE ROLE
PLAYING COMPUTER GAME AND ITS EXPANSION PACKS (INDIVIDUALLY AND COLLECTIVELY, THE “GAME”).
BY PRESSING THE “I ACCEPT” BUTTON, YOU ACCEPT THE TERMS AND CONDITIONS BELOW. BY PRESSING
THE “DECLINE” BUTTON, YOU DECLINE OUR OFFER, IN WHICH CASE YOU SHOULD CONTACT YOUR PLACE
OF PURCHASE REGARDING ITS RETURN POLICY FOR THE APPLICABLE PRODUCT. If you have any questions
regarding these terms and conditions, please contact customer service at eq2support@soe.sony.com.
Certain servers have been designated as enabled for transactions through Station Exchange – all such transactions and eligibility
to participate in them are also governed by the Station Exchange Service Agreement (the “Exchange Agreement”). You agree
that SOE retains the unfettered right to modify its games and all aspects of characters, items and coin (collectively, “Virtual
Goods”) therein. You acknowledge that SOE has been, is, and will be constantly making changes to its games. You further
acknowledge that SOE can and will, in its discretion, modify features, functions or abilities of any element of the game or
any Virtual Goods (which may, among other things, make the Virtual Goods substantially more effective or functional, or less
effective or functional, more common or less common, or eliminated entirely).
YOU PROMISE, THEREFORE, THAT YOU WILL NEVER ASSERT OR BRING ANY CLAIM OR SUIT AGAINST
SOE, ITS LICENSOR(S), ANY SONY COMPANY, OR ANY EMPLOYEES OF ANY OF THE ABOVE, WHICH IS
RELATED TO OR BASED ON (I) A CLAIM THAT YOU “OWN” ANY VIRTUAL GOODS IN ANY GAME, (II) A
CLAIM FOR THE “VALUE” OF VIRTUAL GOODS IF SOE DELETES THEM (AND/OR TERMINATES YOUR
ACCOUNT(S)) IF YOU OR ANYONE ACTING IN CONCERT WITH YOU VIOLATES ANY PROVISION OF
THE EXCHANGE AGREEMENT, THIS AGREEMENT, THE GAME’S RULES OF CONDUCT, SOE’S TERMS
OF SERVICE AND/OR SOE’S PRIVACY POLICY (ALL OF WHICH ARE POSTED AT A LINK AT WWW.
EVERQUEST2.COM), (III) A CLAIM FOR THE “VALUE” OF VIRTUAL GOODS THAT YOU MAY LOSE IF SOE
DOES ANYTHING THAT IT IS ENTITLED TO DO PURSUANT TO ANY PROVISION OF THE EXCHANGE
AGREEMENT, THIS AGREEMENT, THE GAME’S RULES OF CONDUCT, SOE’S TERMS OF SERVICE AND/OR
SOE’S PRIVACY POLICY, OR FOR ANY MALFUNCTIONS AND/OR “BUGS” IN THE GAME, AND/OR (IV)
A CLAIM THAT THE “VALUE” OF ANY VIRTUAL GOODS HAS INCREASED OR DECREASED BY VIRTUE
OF ANY GAME MODIFICATION THAT SOE HAS MADE OR WILL MAKE . ALL OF THE ABOVE APPLIES
WHETHER ON AN EXCHANGE ENABLED SERVER OR ON A NON-EXCHANGE ENABLED SERVER.
1. Accounts are available only to adults or, in their discretion, their minor child. If you are a minor, your parent(s) or guardian(s)
must complete the registration process, in which case they will take full responsibility for all obligations under this Agreement.
By clicking the “I Accept” button and providing us with a credit card number, you represent that you are an adult and are either
accepting this Agreement on behalf of yourself or your child. You may not transfer or share your Account with anyone, except
that if you are a parent or guardian, you may permit one child to use the Account instead of you (in which case you may not
use that Account). You are liable for all activities conducted through the Account, and parents or guardians are liable for the
activities of their child. Corporations and other entities are not eligible to procure Accounts.
2. To play the Game, you must (a) purchase or receive through an SOE-authorized promotional offer (such as an authentic disc
bundled with a game magazine) the Game CD-ROM or DVD-ROM (the “CD-ROM”) or applicable files which we may make
available for direct download, which includes software required for the Game (the “Software”), (b) have a fully paid Account,
and (c) have at least the minimum system requirements to operate the Game and an Internet connection (both of which we do
not provide) to access your Account. In addition to any fees described herein, you are responsible for paying all applicable taxes
(including those we are not required to collect) and for all hardware, software, service and other costs you incur to access your
Account. Neither this Agreement nor your Account entitles you to any subsequent releases of the Software, nor to any expansion
packs or similar ancillary products, without paying applicable charges. You understand that we may update or otherwise enhance
the Software at any time and in doing so incur no obligation to furnish such updates to you pursuant to this Agreement. You
understand that online games evolve over time and, accordingly, system requirements to play the Game may change over time.
SOE”) OFFERS
68
Page 69

3. We may amend this Agreement at any time in our sole discretion. Amendments shall be communicated to you at the time you
log into your Account. Such amendments shall be effective whenever we make the notification available for your review.
4. Upon registration, you must select a password. You may not disclose your password to any third party. We never ask you for
your password by telephone, in-game communication, live-chat or email, and you should not disclose it this way if someone
asks you to do so. Although we may offer a feature that allows you to “save” or “remember” your password on your hard drive,
please note that by using this feature third parties may be able to access your computer and thus your Account.
5. We describe our fees and billing procedures at a hotlink located at www.everquest2.com, which are incorporated by reference
and are subject to change at any time. All fees are stated in U.S. Dollars unless otherwise specified. All fees are prepaid and
non-refundable. Upon your acceptance of these terms, we have the right to automatically charge your credit card the Account fee
plus any applicable taxes we are required to collect, and you authorize us to do so. Thereafter, each time your Account comes up
for renewal, we have the right to charge your credit card the then-current renewal rate plus any applicable taxes we are required
to collect, and you authorize us to do so. If we are unable to process your credit card at a renewal period, your Account may
be immediately terminated. If we make a Game Card available and you use a Game Card to pay for your Account, the Game
Card shall activate your Account for the period stated on the Game Card and, thereafter, you will either need to provide a valid
credit card (in which case your credit card will subsequently be charged as referenced above) or purchase another Game Card
for subsequent subscription periods, or your Account will be closed. You may terminate your Account at any time through the
Account registration process. If you terminate your Account during your initial free period, if any, your account will be closed at
the end of the free period and you will not be billed. If you terminate your Account during any subscription cycle, your Account
will be closed at the end of the then-current cycle and you will not be billed again unless you affirmatively reopen the Account.
We do not give full or partial refunds for subscription periods that you have purchased.
6. We may terminate this Agreement (including your Software license and your Account) and/or suspend your Account
immediately and without notice: (i) if you violate any provision of this Agreement; (ii) infringe any third party intellectual
property rights; (iii) if we are unable to verify or authenticate any information you provide to us; (iv) upon game play, chat or
any player activity whatsoever which we, in our sole discretion, determine is inappropriate and/or in violation of the spirit of the
Game; (v) upon any violation of the Station Terms of Service and/or the Game Rules of Conduct and/or (vi) upon any violation
of the Exchange Agreement. If we terminate this Agreement or suspend your Account under these circumstances, you will lose
access to your Account for the duration of the suspension and/or the balance of any prepaid period without any refund. We may
also terminate this Agreement if we decide, in our sole discretion, to discontinue offering the Game, in which case we may
provide you with a prorated refund of any prepaid amounts.
7. Subject to the terms of this Agreement, we hereby grant to you a non-exclusive, non-transferable, revocable license to use
the Software solely in connection with playing the Game via an authorized and fully-paid Account. You may not copy (except
to make one necessary back-up copy), distribute, sell, auction, rent, lease, loan, modify or create derivative works, adapt,
translate, perform, display, sublicense or transfer all or any portion of the Software. You may not copy any of the written, digital
or electronic materials accompanying the Software unless we expressly permit you to do so in writing, and then only to the
extent permitted. You may not reverse engineer, disassemble or decompile the Software except to the extent that this restriction
is expressly prohibited by applicable law. The Software may contain license management software that restricts your use of the
Software.
8. We and our suppliers shall retain all rights, title and interest, including, without limitation, ownership of all intellectual
property rights relating to or residing in the CD-ROM, the Software and the Game, all copies thereof, and all game character
data in connection therewith. You acknowledge and agree that you have not and will not acquire or obtain any intellectual
property or other rights, including any right of exploitation, of any kind in or to the CD-ROM, the Software or the Game,
including, without limitation, in any artwork, music, character(s), item(s), coin(s) or other material or property, and/or any
compilation or copyrightable arrangement of any of the above (collectively, “Rights”), and that all such property, material, items
and Rights are exclusively owned by us – except solely as SOE may permit you to exploit Virtual Goods in connection with
Station Exchange.
9. You may not use any software to modify the Software to change Game play. You may not create, facilitate, host, link to or
provide any other means through which the Game may be played by others, such as through server emulators. You may not decrypt
or modify any data transmitted between client and server and you may not use, post, host or distribute macros, “bots” or other
programs which would allow unattended game play or which otherwise impact game play. You may not take any action which
imposes an unreasonable or disproportionately large load on our infrastructure. Except in connection with Station Exchange and
subject to all of the provisions of the Station Exchange Service Agreement, you may not buy, sell or auction (or host or facilitate
the ability to allow others to buy, sell or auction) any Game account, characters, items, coin or copyrighted material or any other
intellectual property owned or controlled by us or our licensors without first obtaining our express written permission.
10. To obtain an Account, you will be required to choose both a login name and a player name. While you are encouraged to use
a pseudonym, especially if you are a minor, you may not pick a name that violates anyone’s trademarks, publicity rights or other
proprietary rights.
11. As part of your Account, you can upload content to our servers in various forms, such as in the selections you make for the
Game, in-game posts and chat, and in chat rooms and similar user-to-user areas (collectively, your “
shall not: (a) infringe any third party intellectual property, other proprietary or publicity/privacy rights; (b) violate any law or
regulation; (c) be defamatory, profane, obscene, child pornographic or harmful to minors; or (d) contain any viruses, trojan
horses, worms, time bombs, cancelbots or other computer programming routines that are intended to damage, detrimentally
interfere with, surreptitiously intercept or expropriate any system, data or personal information. We may take any action with
respect to your Content if we believe it may create liability for us or may cause us to lose (in whole or in part) the services of
our ISPs or other suppliers. You hereby grant to us a worldwide, perpetual, irrevocable, royalty-free, sublicenseable (through
multiple tiers) right to exercise all rights of any kind or nature associated with your Content, including, without limitation, all
intellectual property rights, and all ancillary and subsidiary rights thereto, in any languages and in any media now known or not
currently known.
12. We cannot ensure that your private communications and other personally identifiable information will not be disclosed
to third parties. For example, we may be forced to disclose information to the government or third parties under certain
circumstances, or third parties may unlawfully intercept or access transmissions or private communications. Additionally, we
can (and you authorize us to) disclose any information about you to private entities, law enforcement or other government
officials as we, in our sole discretion, believe necessary or appropriate to investigate or resolve possible problems or inquiries.
You agree that we may communicate with you via telephone, email and any similar technology for any purpose relating to the
Game, the Software and any services or software which may in the future be provided by us or on our behalf. You expressly
permit SOE to upload CPU, operating system, video card, sound card and memory information from your computer to analyze
Content”). Your Content
69
Page 70

and optimize your Game experience, improve and maintain the Game and/or provide you with customer service. Furthermore,
if you request any technical support, you consent to our remote accessing and review of the computer you load the Software
onto for purposes of support and debugging. You may choose to visit www.everquest2.com, www.station.sony.com, or other
SOE web sites if such web sites offer services such as an EverQuest II game-themed chat room or other services of interest
to you. You are subject to the terms and conditions, privacy customs and policies of SOE while on such web sites and in
connection with use of your Account and the Game, which terms and conditions, policies and customs are incorporated herein
by this reference. Since we do not control other web sites and/or privacy policies of third parties, different rules may apply to
their use or disclosure of the personal information you disclose to others. Solely for the purpose of patching and updating the
Game and/or Software and ensuring the integrity of the Game, you hereby grant us permission to (i) upload Game-related file
information and data from the Game directory and (ii) download Game files to you. You acknowledge that any and all character
data is stored and is resident on our servers, and any and all communications that you make within the Game (including, but
not limited to, messages solely directed at another player or group of players) traverse through our servers, may or may not be
monitored by us or our agents, you have no expectation of privacy in any such communications and expressly consent to
such monitoring of communications you send and receive. You acknowledge and agree that we may transfer Game and
your Account information (including your personally identifiable information and personal data) to the United States or
other countries or may share such information with our licensees and agents in connection with the Game.
13. SOE warrants to the original consumer purchaser only that the media furnished in this product will be free from defects
in materials and workmanship under normal use for a period of ninety (90) days from the date of purchase (as evidenced by
your receipt). If the media furnished in this product proves to be defective, and provided that the original consumer purchaser
returns the media to SOE in accordance with the instructions in this paragraph, SOE will replace the defective media: (a) free
of charge to the original consumer purchaser, if the media proves to be defective within the ninety (90) day period following
the date of purchase, or (b) for a fee of $5.00 per Compact Disc (“CD”), if the media proves to be defective after the expiration
of the ninety (90) day warranty period, provided that the request is made within a reasonable time from purchase, and SOE
continues to distribute the CD commercially. To obtain a replacement CD, please return the defective CD only, postage prepaid,
to Sony Online Entertainment LLC, 8928 Terman Court, San Diego, CA 92121, accompanied by proof of date of purchase, a
description of the defect, and your name and return address, as well as a check for $5.00 per CD made payable to Sony Online
Entertainment LLC if after expiration of the warranty period. SOE will mail a replacement to you within 180 days of receiving
your order.
EXCEPT FOR THE LIMITED 90 DAY WARRANTY ON THE MEDIA AS SET FORTH ABOVE, WE PROVIDE THE
CD-ROM, THE SOFTWARE, THE ACCOUNT, THE GAME AND ALL OTHER SERVICES “AS IS.” WE AND OUR
SUPPLIERS EXPRESSLY DISCLAIM ALL WARRANTIES OR CONDITIONS OF ANY KIND, EXPRESS, IMPLIED OR
STATUTORY, INCLUDING WITHOUT LIMITATION THE IMPLIED WARRANTIES OF TITLE, NONINFRINGEMENT,
MERCHANTABILITY AND FITNESS FOR A PARTICULAR PURPOSE. Without limiting the foregoing, we do not ensure
continuous, error-free, secure or virus-free operation of the CD-ROM, the Software, the Game, your Account or continued
operation or availability of any given server. Some states do not allow limitations as to how long an implied warranty lasts and/
or exclusions or limitations of consequential damages, so the above limitations and/or exclusions of liability may not apply to
you. This warranty gives you specific legal rights and you may also have other legal rights which vary from state to state.
We are not liable for any delay or failure to perform resulting from any causes beyond our reasonable control. Further, we cannot
and do not promise or ensure that you will be able to access your Account whenever you want, and there may be extended
periods of time when you cannot access your Account. You assume the entire risk as to the results and performance of the
Software and the Game in connection with your hardware and software, and you assume the entire cost of all servicing, repair
and/or correction of your hardware and software.
14. IN NO EVENT SHALL WE, OUR PARENT, OUR LICENSORS, OUR AFFILIATES OR OUR SUPPLIERS, AND EACH
OF OUR AND THEIR RESPECTIVE OFFICERS, DIRECTORS, EMPLOYEES AND AGENTS, BE LIABLE TO YOU OR
TO ANY THIRD PARTY FOR ANY LOST PROFITS OR SPECIAL, INCIDENTAL, INDIRECT OR CONSEQUENTIAL
DAMAGES (HOWEVER ARISING, INCLUDING NEGLIGENCE) ARISING OUT OF OR IN CONNECTION WITH
THE POSSESSION, USE, OR MALFUNCTION OF THE SOFTWARE, YOUR ACCOUNT, THE GAME, OR THIS
AGREEMENT, INCLUDING, WITHOUT LIMIATION, DAMAGE TO PROPERTY AND—TO THE EXTENT PERMITTED
BY APPLICABLE LAW—DAMAGES FOR PERSONAL INJURY, EVEN IF WE, OUR LICENSORS AND EACH OF OUR
RESPECTIVE AFFILIATES, OFFICERS, DIRECTORS, EMPLOYEES AND AGENTS HAVE BEEN ADVISED OF THE
POSSIBILITY OF SUCH DAMAGES OR LOSS. THE LIABILITY OF SOE, OUR LICENSORS OR ANY OF OUR OR
THEIR RESPECTIVE PARENT OR AFFILIATED COMPANIES TO YOU OR ANY THIRD PARTIES IS LIMITED TO $100.
YOU AGREE TO WAIVE ANY RIGHT TO EQUITABLE RELIEF INCLUDING, WITHOUT LIMITATION, INJUNCTIVE
RELIEF AGAINST SOE, ITS LICENSORS, THEIR PARENTS OR AFFILIATES, OFFICERS, DIRECTORS, EMPLOYEES
AND AGENTS TO ENFORCE THE TERMS HEREOF; HOWEVER, THE FOREGOING SHALL NOT PRECLUDE SOE
AND/OR ITS LICENSORS FROM SEEKING ANY INJUNCTIVE RELIEF. Some states do not allow the foregoing limitations
of liability, so they may not apply to you.
15. You shall comply with all applicable laws regarding your use of the Software, the CD-ROM, your access to your Account
and your playing of the Game. Without limiting the foregoing, you may not download, use or otherwise export or re-export the
Software except in full compliance with all applicable laws and regulations, including, without limitation, the laws of the United
States.
16. This Agreement is governed in all respects by the substantive laws of the State of Delaware and of the United States of
America. Notwithstanding the foregoing, Section 17(b) below shall be governed by the Federal Arbitration Act. The UN
Convention on Contracts for the International Sale of Goods is expressly disclaimed. Our failure to act with respect to a
breach by you or others does not waive our right to act with respect to subsequent or similar breaches. You may not assign or
transfer this Agreement or your rights hereunder, and any attempt to the contrary is void. This Agreement sets forth the entire
understanding and agreement between us and you with respect to the subject matter hereof. Except as provided in section 3
herein, this Agreement may not be amended except in a writing signed by both parties.
17. Resolution of Disputes
In order to expedite and control the cost of disputes, you and SOE agree that any legal or equitable claim relating to this
Agreement (referred to as “Claim”) will be resolved as follows:
a. Informal Resolution
You and SOE agree that we will first try to resolve any Claim informally. Accordingly, neither of us may start a formal
proceeding (except for Claims involving any violation of the federal trademark or copyright laws, or for injunctive relief) for at
70
Page 71

least 30 days after one of us notifies the other of a Claim in writing. SOE will send its notice to your billing address, with a copy
via email to your email address. You will send your notice to Sony Online Entertainment, 8928 Terman Court, San Diego, CA
92121 Attn: Legal Department.
b. Formal Resolution – US Residents
(1) Agreement to Arbitrate.
Except as provided in Section 17(b)(3) below, if we cannot resolve a Claim informally, we agree that any and all Claims
either of us asserts shall be resolved solely through binding arbitration. The arbitration will be conducted under the rules of
the Judicial Arbitration and Mediation Service (“JAMS”) that are in effect at the time the arbitration is initiated, including the
rules for the exchange of non-privileged and relevant information, and under the rules set forth in this Agreement. If there is a
conflict between JAMS rules and the rules set forth in this Agreement, the rules set forth in this Agreement will govern. If you
initiate the arbitration, you agree to pay a fee of $125 or, if less and you tell SOE in writing, the amount that you would pay to
initiate a lawsuit against SOE in the appropriate court of law in your state. Other fees will be paid in accordance with JAMS
rules. The arbitration will be held at a location in your hometown area (meaning, the closest JAMS dispute resolution center to
your hometown) unless you and SOE both agree to another location. In the arbitration proceeding, the arbitrator must follow
applicable law, and any award may be challenged if the arbitrator fails to do so. Forms and other information on filing such a
Claim can be found at www.jamsadr.com.
BY AGREEING TO ARBITRATE AS SET FORTH HEREIN, YOU UNDERSTAND THAT WE ARE BOTH WAIVING
OUR RIGHT TO SUE IN COURT AND HAVE A JURY TRIAL.
(2) Special Rules.
You and SOE agree that the type of arbitration in which we both agree to participate is between SOE and you as an individual.
YOU AND SOE ARE AGREEING THAT NEITHER OF US WILL UTILIZE OR ATTEMPT TO UTILIZE CLASS
ACTION ARBITRATION PROCEDURES IN ANY ARBITRATION.
(3) Exceptions.
Notwithstanding the foregoing, (i) any Claim involving a violation of the federal trademark or copyright laws, or a Claim for
injunctive relief, may be decided only by a federal court (or, for injunctive relief, federal or state court) in the County of San
Diego, State of California, and (ii) neither you nor SOE shall be precluded from filing a Claim in small claims court for disputes
within the small claims court jurisdictional level.
c. Formal Resolution – International Residents
Both parties submit to personal jurisdiction in California and further agree that any Claim shall be exclusively brought in the
County of San Diego, State of California, United States of America, in the appropriate state or federal court.
d. Severability
You and SOE agree that if Section 17(b)(1) is found to be unenforceable by a court of competent jurisdiction, it shall be severed
from this Agreement and – in that event -- you and SOE agree to submit to personal jurisdiction in California and agree that any
Claim shall be exclusively brought in the appropriate state or federal court in the County of San Diego, State of California. You
and SOE also agree that if Section 17(b)(2) is found to be unenforceable by a court of competent jurisdiction, then – regardless
of the enforceability of Section 17(b)(1) -- any class action Claim shall be exclusively brought in the appropriate state or federal
court in the County of San Diego, State of California and you agree to submit to personal jurisdiction in California.
18. All services hereunder are offered by Sony Online Entertainment LLC, located at 8928 Terman Court, San Diego,
California 92121. Our phone number is (858) 537-0898. Current rates for using the Game may be obtained from a hotlink at
www.everquest2.com, and such rates are subject to change at any time. If you are a California resident, you may have this
same information emailed to you by sending a letter to the foregoing address with your email address and a request for this
information.
The Complaint Assistance Unit of the Division of Consumer Services of the Department of Consumer Affairs may be contacted
in writing at 400 R Street, Sacramento, CA 95814, or by telephone at (800) 952-5210.
Parental control protections (such as computer hardware, software, or filtering services) are commercially available that may
assist you in limiting access to material that is harmful to minors. If you are interested in learning about these protections,
information is available at http://www.worldvillage.com/wv/school/html/control.htm or other similar sites providing information
on such protections.
The Software is a “commercial item” if acquired under agreement with the U.S. Government or any contractor therewith in
accordance with 48 CFR 12.212 of the FAR and, if acquired for Department of Defense (DoD) units, 48 CFR 227-7202 of the
DoD FAR Supplement, or any succeeding similar regulations.
71
 Loading...