


®
Player Manual

Section I |
|
Table of Contents |
|
Section I Introduction...................................................................................................................................................................... |
3 |
Section II Interface Reference.............................................................................................................................................. |
7 |
Main Menu ................................................................................................................................................................................ |
8 |
Adventure Map .................................................................................................................................................................... |
13 |
Heroes and the Hero Screen ................................................................................................................................ |
23 |
Skills .................................................................................................................................................................................................. |
33 |
Combat ............................................................................................................................................................................................ |
40 |
Towns ............................................................................................................................................................................................... |
49 |
Magic System ......................................................................................................................................................................... |
55 |
Kingdom Overview ................................................................................................................................................................ |
57 |
Multiplayer ............................................................................................................................................................................. |
59 |
Section III World Reference ............................................................................................................................................ |
63 |
Spell Reference .................................................................................................................................................................... |
63 |
Town and Creature Reference ............................................................................................................................ |
81 |
Individual Heroes .............................................................................................................................................................. |
118 |
Section IV Appendices .......................................................................................................................................................... |
134 |
Keyboard Shortcuts ...................................................................................................................................................... |
134 |
Mplayer.com ........................................................................................................................................................................ |
135 |
HEAT ........................................................................................................................................................................................... |
137 |
Troubleshooting .................................................................................................................................................................. |
138 |
Customer Support .......................................................................................................................................................... |
141 |
Index ................................................................................................................................................................................................ |
142 |
90-Day Limited Warranty .................................................................................................................................. |
144 |
© 1999 The 3DO Company. All Rights Reserved. Heroes of Might and Magic, Heroes, Might and Magic, New World Computing, 3DO, and their respective logos, are trademarks and/or service marks of The 3DO Company in the U.S. and other countries. All other trademarks belong to their respective owners. New World Computing is a division of The 3DO Company.
The software and related manual for this 3DO product are copyrighted. No portion of this product may be photocopied, scanned, translated, reproduced, copied or reduced to any tangible or electronic medium or machine-readable form, or publicly performed or displayed, without the prior written consent of The 3DO Company. The owner of this product is entitled to use the software and related manual for his or her own use, but is not entitled to reproduce and distribute any copies of the software or manual to any other individual or entity; nor to rent or lease this product or any copy thereof to any third party.
Uses Bink Video Technology. © 1997-1998 by RAD Game Tools, Inc. Uses Miles Sound System. © 1991-1998 by RAD Game Tools, Inc.
Windows, the Windows logo and DirectX are trademarks and/or registered trademarks of the Microsoft Corporation.
2 |
Edwin E. Steussy, Publisher. |
Tom Ono, Author. Amy Yancey, Coordinator. |

Introduction
Dear Heroes of Might and Magic® fans,
When I sat down to create King’s Bounty®, the precursor to Heroes of Might and Magic,
never in my wildest dreams did I imagine it would grow into the phenomenon the series has become. I had just finished Might and Magic® II. At the time, King’s Bounty was state of
the art: 16 colors and used up both sides of the floppy disk. I had one programmer and one artist to make my design real, and it took us about a year to finish.
Nine years later, the Heroes™ III game is state of the art. The Heroes III game has 65,000 colors and fills an entire CD. I had over 30 people work on the project: programmers, artists, voice actors, and level designers, and it took us about 18 months to finish.
King’s Bounty, although crude by today’s standards, was a lot of fun to play. Players
recruited troops, maintained armies, and fought battles on tactical maps with a variety of fantastic monsters. The Heroes III game does the same, only the graphics are much fancier
and the animations are far smoother. In addition, some fundamental game play changes have happened since then, giving the player options and tactics magnifying the scope of the game tremendously.
The leap from King’s Bounty to the Heroes I game was the single largest change, both in terms of technology and game play. I looked at what I thought had gone right with King’s Bounty, mixed in our fans’ wish lists and the capabilities of more modern computers, and got
down to work. After a seemingly endless series of false starts, dead ends, and programming troubles, we shipped the game and held our breath.
The Heroes I game shipped quietly enough, but enthusiasm for the game was strong and grew
stronger as time passed. It took us a while to realize we had a genuine hit on our hands, but when we did, we started work on the Heroes II game immediately. This time, we were armed
with a ton of fan mail suggestions and an existing game that we could build from. Nevertheless, what seemed to be a simple improvement to a finished game was fraught with complications, and I agonized over design decisions and game balance considerations.
After a year’s worth of design wrangling, we got down to business and the Heroes II game shipped in time for Christmas. I noticed that everyone in the office was playing the game -
even people working on different projects - and knew from past experience what a good sign this was. The Heroes II game turned out to be one of our most popular games ever.
Now we’ve shipped the Heroes III game. We’ve had a lot of fun designing and making this game, and once again, everyone in the office is playing it. I’m confident the Heroes III game is going
to be a smashing success! We hope you have as much fun playing it as we’ve had making it!
Sincerely,
Jon Van Caneghem
Creator and Designer
Heroes of Might and Magic I-III
Might and Magic I-VII
King’s Bounty
3

Section I
Commander,
I hope this letter finds you well and has reached you before you set sail with Queen Catherine to Erathia. I regret these trying times. The duties forced upon me have made it impossible for me to see you off in person.
First, let me congratulate you on your commission. I am glad
— no, thankful — Catherine has someone of your character and abilities among her entourage. I do not hold such an unqualified opinion of some who travel with you. I know you are more at home on the battlefield than in the company of the royal court, but let me remind you, the strategies and tactics employed there are every bit as complex and potentially deadly, as any found in military conflict. No, I don’t have any real proof of any particular disloyalty or treachery — just a feeling.
It is unfortunate your first visit to Erathia could not be made in happier times — it is a land of beauty and stability. Or at least it has been, under Nicolas Gryphonheart’s rule. He was a great king and a dedicated ally. I will remember him best as a man of strength and fairness, both qualities have bred
4
Introduction
true in our dear Catherine. You know she has not ruled out the possibility foul play was involved in his death. Do not be too quick to dismiss her thoughts as those of a grieving daughter. True, she is saddened but has not lost hold of her wisdom.
Hah! Listen to me and my gloominess! Just watch your back as a favor to a friend made cynical and suspicious by age. I’m sure I’m just seeing things in the worst possible light. A vocational habit. Perhaps I have been at this job too long.
Farewell, friend. I look forward to your return, to a good cup of tea by the fire, and to the recounting of your journey’s tale. May the seas be calm and the wind steady in your sails.
Best Regards,
Wilbur Humphrey, Regent of Enroth
5

Section I
How to Use this Manual
This manual is divided into three main sections. This section, the Introduction, contains the background
story, features information, installation instructions, and “getting started” hints. The second section, Interface Reference, details the workings of the game’s various interfaces. The third section, World Reference, is full of descriptive and statistical information about the locations, creatures, heroes, and spells you will encounter as you play. The Appendices contain additional information about Internet
gaming services, Troubleshooting, 3DO Customer Support, The 3DO Company 90-Day Warranty, and an extensive index.
If you are new to the world of Heroes of Might and Magic, fear not! The game is rich in detail, true,
but it belongs to a series long applauded for ease of use. Furthermore, you can play the in-game tutorial specifically designed to introduce you to the basic concepts of the Heroes III game gameplay. Refer to the Interface Reference and World Reference for more detailed information as you play.
If you are familiar with the Heroes II game, you may feel comfortable diving right into the game. In the Interface Reference, discussion of each of the game’s major interfaces (for example, the Adventure Map)
begins with an overview. Read each overview, then the following sections for a more detailed explanation about particular features. You will find the World Reference helpful as you encounter new spells, town
features, and creatures.
Manual Conventions
This manual assumes you are using a standard keyboard and two-button mouse, and you are familiar with their use. It will also assume you have a minimal understanding of the Microsoft Windows® 95/98 operating systems. If you don’t understand any of the following terms, you may want to take a few minutes and run through the tutorial materials that come with Windows 95/98:
mouse pointer left-click right-click double-click pull-down menu dialog box
The manual will use the term “click” to replace “left-click.”
6

Interface Reference
Section II
Interface Reference
Starting Play
Before you begin a Heroes III gaming session, you must choose what type of game you want to play. The New Game Menu allows you to choose between single, campaign, and multiplayer scenarios. You
may also choose to resume a previously saved game or play the tutorial.
Launching Heroes of Might and Magic III
Once the program is installed you may start the game by inserting the Heroes III game CD into your CD-ROM drive and clicking the Play button on the following screen. When you do this, the company
credit animations and introductory movie will play. You may bypass these by clicking the mouse button at any time. You may also start the game by choosing the Heroes III game shortcut created in your Start
Menu.
Full Screen Vs. Windowed Display
During your gaming session, you may hit the F4 key to switch between full screen and windowed display modes. In full screen mode, the Heroes III game fills your entire video display at 800 x 600 pixel res-
olution. In this mode, you may press Alt-TAB to minimize the game screen and display the Windows Desktop. To return to the game from the Desktop, select it from your Taskbar.
In windowed display mode, the game appears in a standard Desktop window. Since the game displays at 800 x 600 resolution, it is recommended this mode only be used when running Windows at 1024 x 768 or higher resolution. In windowed display mode, you gain the following pull-down menu commands:
|
|
|
|
|
|
File |
Display |
Help |
|
|
Quit: Closes the program |
Full Screen (F4): Switches |
On Line Manual: Starts the help |
|
|
|
the display to full screen mode |
system |
|
|
|
|
About: Displays copyright |
|
|
|
|
information about the game |
|
|
|
|
|
|
|
|
|
|
|
|
|
|
|
|
7

Section II
Main Menu |
|
New Game Menu |
|
|
|
|
|
|
|
|
|
The Main Menu displays after the introductory animations play. To choose an option from the menu, move the mouse cursor over a button and click.
New Game: Choose this to start a game from the beginning. Clicking this button sends you to the New Game Menu, where you can select between single player scenario, multiplayer, or campaign games.
Load Game: While you are playing the Heroes III game, you can save games in progress. Choose this option to resume a previously saved game.
High Score: When you complete a single scenario or campaign, you receive a score based on your performance. Click this button to display a list of the top scores.
Credits: Click this button to see the list of people responsible for bringing you the Heroes III game.
Quit: Click this button to close the program and return to Windows.
The New Game Menu appears when you click the New Game button on the Main Menu. From this menu you can start a single, multiplayer, or campaign scenario from the beginning.
Single Scenario: Click this button to start a single scenario. Single scenarios are played on one map against the computer and are completed by meeting a set of mission conditions.
Multiplayer: You may play the Heroes III game against other human players across the Internet, other network connections, or on a single computer. Press this button to display the Multiplayer Game Type Selector. For more information about multiplayer games, see Multiplayer (pg. 59).
Campaign: Choose this button to display the selection of campaign games. Campaign games are linked scenarios marking climactic events in longer stories. They are played against the computer.
Tutorial: A special tutorial scenario has been created to help you learn the game. To play it, click this button. You will need to consult the online tutorial guide as you play.
Back: Click this button to return to the Main Menu.
8
Interface Reference
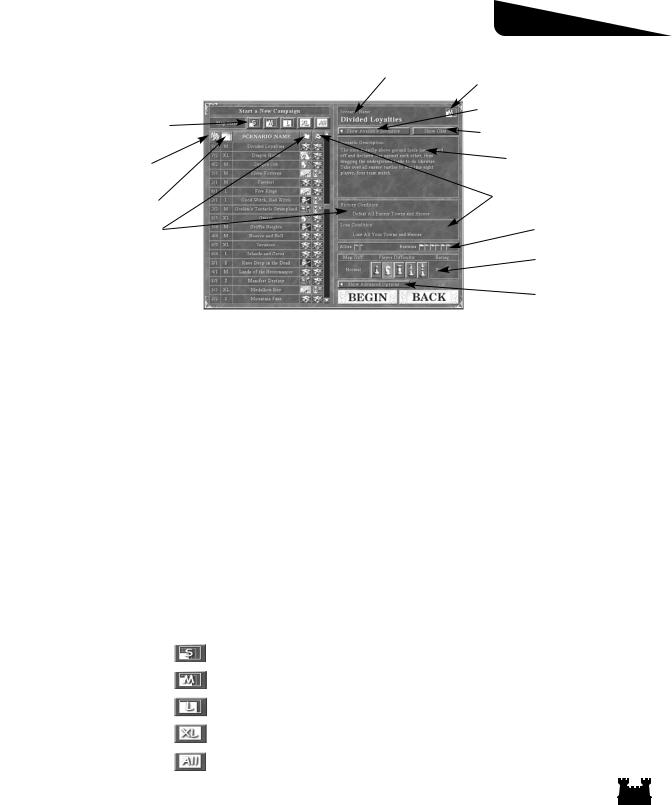
Scenario Selector |
Current Map |
|
|
|
Current Map Size |
|
|
Show Available Scenarios |
|
|
|
Size Filter Buttons |
|
Show/Hide Chat (Multiplayer Only) |
|
|
|
# of Total Players/ |
|
Scenario Description |
|
|
|
Human Players |
|
|
Map Size |
|
Loss Conditions |
|
|
|
Victory Conditions |
|
Enemy/Ally Display |
|
|
|
|
|
Difficulty Settings |
|
|
Show Advanced Options |
|
|
|
Before you can start a single player or multiplayer game, you must choose which scenario you want to play. This is done using the Scenario Selector. Here you may also set the game difficulty and choose
which forces you want to control in a single player game. In a multiplayer game, the host assigns players to their forces (see Multiplayer, pg. 59).
You may toggle the display of available scenarios by clicking the Show Available Scenarios button. You can move the list up and down using the scroll bar along the right side of the list. When you click on a scenario’s name, it becomes highlighted and its scenario description and win/loss conditions are displayed. The difficulty settings control the strength of the computer opponent’s starting resources and artificial intelligence.
To start the highlighted scenario, click the Begin button. Click the Back button to return to the Main Menu.
Size of Map
Maps may be small, medium, large, or extra large in size. Size refers to the tile dimension of the Adventure Map a scenario is played on. While many factors affect length of play, this can be used as a
rough gauge of how long it will take to complete a scenario, with larger maps taking more time. The Map List Box’s display may be constrained to a list of maps of a certain size by using the Size Filter buttons
located directly above it.
|
|
|
|
|
|
Size Filter Button |
Map Size Displayed |
Tile Dimension |
|
|
|
S (small) |
36 x 36 |
|
|
|
|
|
|
|
|
M (medium) |
72 x 72 |
|
|
|
|
|
|
|
|
L (large) |
108 x 108 |
|
|
|
|
|
|
|
|
XL (extra large) |
144 x 144 |
|
|
|
|
|
|
|
|
All of the Above |
All of the Above |
|
|
|
|
|
|
|
|
|
|
|
9

Section II
Victory/Loss Conditions
Usually, you can win a scenario by taking all enemy castles and defeating all enemy heroes. Some scenarios have special victory conditions you can complete to win. You lose a scenario if you control no towns when your last hero is defeated. Some scenarios have additional loss conditions.
Special Victory Conditions
|
|
|
|
|
Acquire a Specific Artifact |
You must find a specific artifact. Win by placing the |
|
|
|
artifact in one of your heroes’ backpacks. |
|
|
|
|
|
|
Accumulate Creatures |
Your kingdom must acquire X number of creatures. |
|
|
|
|
|
|
Accumulate Resources |
Your kingdom must acquire X amount of a specific resource. |
|
|
|
|
|
|
Upgrade a Specific Town |
The hall and castle of a given town must be upgraded to a |
|
|
|
specified level. |
|
|
Build a Grail Building |
You must find the Grail and build a grail building in one of |
|
|
|
your towns. |
|
|
Defeat a Specific Hero |
You must defeat a specified hero. |
|
|
|
|
|
|
Capture a Specific Town |
You must occupy a specified town. |
|
|
|
|
|
|
Defeat a Specific Creature |
You must defeat a specified wandering monster. |
|
|
|
|
|
|
Flag All Creature Generators |
You must control all the creature generators on the map. |
|
|
|
|
|
|
Flag All Mines |
You must control all the mines on the map. |
|
|
|
|
|
|
Transport a Specific Artifact |
You must acquire a specific artifact and transport it to a |
|
|
|
specified town. |
|
|
|
|
|
|
|
|
|
Special Loss Conditions
|
|
|
|
|
Lose a Specific Hero |
You lose if the specified hero is defeated. |
|
|
|
|
|
|
Lose a Specific Town |
You lose if the specified town is occupied by an enemy. |
|
|
|
|
|
|
Time Limit |
You lose if you have not won the scenario within the |
|
|
|
specified number of days. |
|
|
|
|
|
|
|
|
|
10
Interface Reference
Chatting
If you are participating in a multiplayer game, you can turn on and off the display of network chat by pressing the Show/Hide Chat button. When Chat is on, chat messages are shown in the Scenario
Description box. You can send a chat message by typing it in the box directly below this button.
Handicap
Player Flag Button
Legal Player
Player Name |
Starting Bonus |
|
|
Starting Town |
|
Starting Hero |
|
Player Turn Duration |
|
Advanced Options
To display the Advanced Options, click the Show Advanced Options button. This will display the available options for each opponent in the currently selected scenario. For each game, the scenario’s
designer defines each opponent as playable by a human or the computer (CPU). Slots displaying “Human or CPU” may be played by either. Any available human slot has a Player Flag button
adjacent to the associated slot, on the far left of the window. In a multiplayer game, the host assigns players to each available slot by repeatedly clicking the Player Flag button, cycling through the available players. At the start of the scenario, any player not assigned to a slot is dropped from the game. All unassigned slots will be played by the computer.
Often, you can choose an opponent’s starting town type, starting hero, and/or starting bonus. If you can, arrows appear on the sides of the town, hero, and starting bonus pictures. If you can set the starting town
type, which town you choose will affect what heroes and starting bonuses are available. Click on the Handicap button to cycle through player handicap settings. Handicap will affect a player’s starting
resources.
You may also set the Player Turn Duration limit by moving the slider at the bottom of the Advanced Options display. This controls how long human player turns can last (when not in combat).
11
Section II
Campaign Games
Campaign games are scenarios linked together by a story line told from either a good, neutral, or evil perspective. To start a campaign, click the Campaign button on the Main Menu and then select from
the available campaigns displayed on the following screen. When you complete all of the initially displayed campaigns, new campaign choices appear. After you choose a campaign, the Campaign Scenario Startup Screen displays.
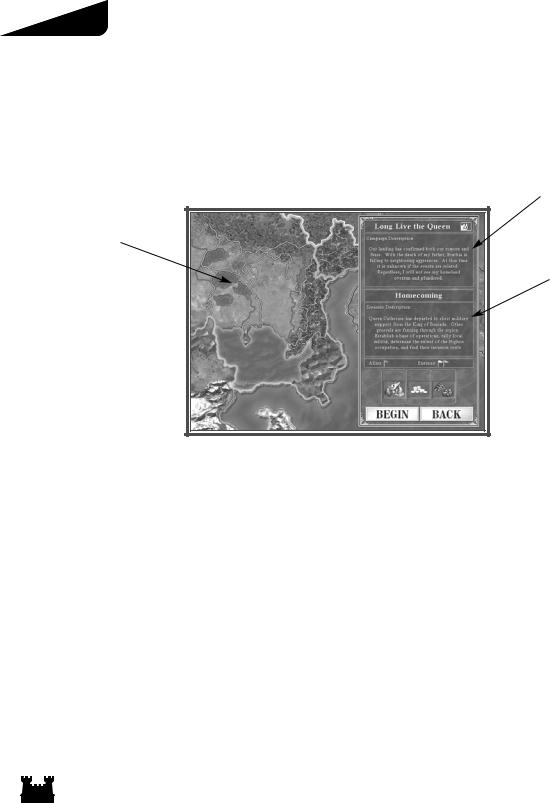
Campaign Scenario Startup Screen |
Campaign Information |
Invasion Map
Scenario Information
Legal Territory 
Starting Bonus
 Options
At various points in campaign story lines, you may choose which conflict you want to involve yourself in. If this is the case, more than one territory on the invasion map will be highlighted. Click on a highlighted area to choose a scenario. Information about the chosen scenario will be displayed in the Scenario Information box.
In most scenarios, you will be able to select starting bonus options. Once you are satisfied with your scenario and bonus selections, click the Begin button to start the campaign scenario. In order to advance the story of the campaign, you must win the scenario. If you lose, you can replay the scenario.
12

Interface Reference
Adventure Map
Each Heroes III game scenario takes place in a part of Erathia. The relevant portion of the land is represented on the Adventure Map. At the beginning of each scenario, you can only see the areas of the land within view of your towns and heroes; the rest is shrouded from you. As you send your heroes exploring, the map is revealed along their path of travel. Subterranean gates act as passages to the subterranean level. This underground territory is displayed on its own map, which is also revealed as your heroes travel.
As you explore the map, you will discover treasures, wandering creatures, valuable resources, and a wide variety of permanent locations. While there are a multitude of different types of permanent locations, among those you encounter will be mines, which can provide you with steady streams of resources; abandoned ruins to explore; and creature dwellings where you may recruit troops for your heroes’ armies.
You will also encounter heroes and towns belonging to opponents - either human or computer. More often than not, your scenario mission objectives will require you to make war with other heroes. Combat
between your heroes and other heroes, wandering monsters, and town garrisons takes place on the Combat Screen (see Combat, pg. 40). When you conquer enemy towns, they become part of your territorial holdings, adding their many benefits to your cause (see Towns, pg. 49).
This section describes the Adventure Map screen interface for campaign and single-player games. For explanations of the particular interface differences encountered in multiplayer games see Multiplayer
(pg. 59).
Game Play
On each Erathian day, players can move their forces and manage their territories in turns. This does not happen simultaneously—rather, each player, starting with you (the human player) takes a turn, and then passes on play to the next player. Once all players have had their turn, the current day ends and a new day begins.
At the beginning of each day, mines and cities you control add to your resources. Resources represent
gold and raw materials you may spend to improve your towns, recruit troops, and perform other actions. Town buildings producing creatures do so on the first day of the week (see Towns, pg. 49). The current
date appears at the lower right corner of the Adventure Map screen.
13
Section II
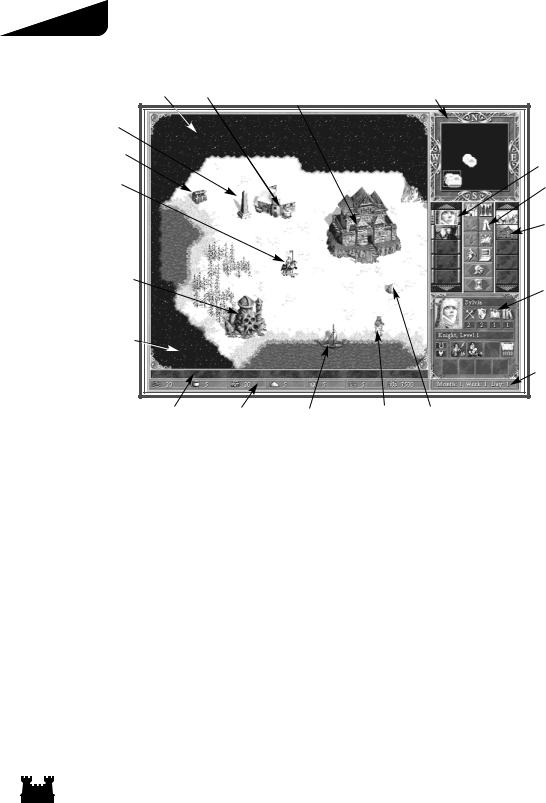
Adventure Map View
Adventure Map |
Resource Mine |
Town |
|
World Map |
|
Obelisk |
|
|
|
|
|
Treasure |
|
|
|
|
|
Hero |
|
|
|
|
|
Subterranean Gate |
|
|
|
|
|
Shroud |
|
|
|
|
|
Rollover Bar |
Resource Bar |
Ship |
Wandering Monsters |
Loose Resource |
|
Hero Selector Buttons
Control Buttons
Town Selector Buttons
Status Window
Date
The Adventure Map
You may scroll the Adventure Map in the direction you want by moving the cursor to the screen’s edges and corners (diagonal scrolling). The red box displayed in the World Map indicates what portion of the map is shown in the Adventure Map display. Clicking in the World Map centers this box at the cursor. You may also drag the box around the World Map.
Identifying text appears in the Rollover Bar as you move the cursor over map features. You may rightclick on anything appearing on the Adventure Map to display further information.
Heroes
You may have up to eight heroes on the Adventure Map at any given time; if you have more than eight heroes in the field, any extras must be commanding town garrisons (see Towns, pg. 49). Heroes on the
Adventure Map carry their player’s flag color.
Heroes travel with their armies, made up of creatures arranged in groups called troops. Each troop can hold one or more creatures, but all the creatures in the troop must be of the same creature type. A hero’s army must have at least one troop and can include up to seven. In battle, a hero leads the battle by commanding their army rather than fighting directly.
14
Interface Reference
Selecting a Hero
The Hero Selector buttons on the right side of the Adventure Screen are used to select your individual heroes. Clicking a hero’s button selects the hero and centers the Adventure Map display on
that hero. If you have more than five heroes, you may need to click the scroll buttons to display a hero’s selector button. Double-clicking on a Hero Selector button brings up a hero’s Hero Screen (see
Heroes and the Hero Screen, pg. 23).
On the left side of each Hero Selector button is a green bar which shrinks as the hero’s movement allowance is used up. The blue bar on the right side of each button measures what percentage of the hero’s
spell points he or she has left. Spell points are spent when a hero casts spells. For more information, see
Magic System (pg. 55).
Moving Your Hero
When you click on the Adventure Map at a location the currently selected hero can move to, a line of arrows, indicating the path the hero must follow, is drawn from the hero to that location now marked by an X. If the location is within the hero’s movement limit for the current day, then the arrows and X appear in green. If the hero cannot reach the location in one move, brown arrows indicate the length that must be traveled in the next or subsequent turns. You may change the destination by clicking a different spot on the map.
Click the X to move the currently selected hero along the path. You may also click on the Move Hero control button to move the currently selected hero down the path. If you want to halt a moving hero in mid-movement, click on the Adventure Map. The current path will remain, but the hero will stop moving. You may resume the hero’s movement or select a new destination.
Movement Allowance
How far a given hero can move is determined by the speed of the slowest creature in their army. Creature speed statistics are listed in the Town and Creature Reference (pg. 81). Distances on the Adventure Map are measured in tiles.
Movement Allowance Table
Slowest Creature Speed |
Movement Allowance |
Super Slow - Extra Slow |
15 tiles |
Slow |
16 tiles |
Swift - Extra Swift |
17 tiles |
Very Swift |
18 tiles |
Ultra Swift - Super Swift |
19 tiles |
Quick - Super Fast |
20 tiles |
15
Section II
Terrain and Roads
Some terrain is difficult to travel across and reduces the distance a hero can move. Roads increase this distance. A hero with the Pathfinding secondary skill (see Secondary Skills, pg. 35) is able to reduce the
effects of difficult terrain. This chart explains the effects of terrain on movement:
Terrain Movement Costs
|
|
Larger numbers mean slower travel. |
|
|
Terrain Type |
Normal |
Basic Pathfinding |
Advanced Pathfinding |
Expert Pathfinding |
Dirt |
100% |
100% |
100% |
100% |
Grass |
100% |
100% |
100% |
100% |
Lava |
100% |
100% |
100% |
100% |
Subterranean |
100% |
100% |
100% |
100% |
Cobblestone Road |
50% |
50% |
50% |
50% |
Dirt Road |
75% |
75% |
75% |
75% |
Gravel Road |
65% |
65% |
65% |
65% |
Rough |
125% |
100% |
100% |
100% |
Sand |
150% |
125% |
100% |
100% |
Snow |
150% |
125% |
100% |
100% |
Swamp |
175% |
150% |
125% |
100% |
Example: A hero with Pikemen (Extra Slow) would have a starting movement allowance of 15 tiles. However, over the difficult terrain of snow, this hero would only move 10 tiles. With Basic Pathfinding, the movement allowance of this hero would increase to 12 tiles over snow, and with Advanced Pathfinding, 15 tiles over snow.
Boats
Heroes need boats to move on water. Boats may be: built in Castle, Necropolis, and Fortress towns located on shores, with shipyards; summoned using the Summon Boat spell; built at Adventure Map shipyards; or found elsewhere on the Adventure Map—perhaps abandoned by another hero.
Boarding or disembarking from a boat takes the remainder of a hero’s movement allowance for the current day. To put a hero on a boat, click on an unoccupied boat. To disembark a hero, move the boat carrying that hero to a valid shore location, indicated by the anchor icon. Boat movement is made at a hero’s full movement allowance. A boat can only carry one hero and their army at a time.
The Subterranean Level
Some maps contain a subterranean level. Heroes may enter subterranean gates to pass between the surface and the underground. Pressing the Elevation Toggle control button switches the Adventure
Map’s view between the two levels.
16

Interface Reference
Adventure Locations
Towns
Towns provide many benefits to the player in control of them. The town hall for each town you control adds a quantity of gold to
your daily resource pool. At your towns, your heroes may recruit troops, replenish their spell points, and learn new spells. For more information, see Towns (pg. 49) and the Town and Creature Reference section (pg. 81).
Your Towns
You may select any of your towns by clicking its Town Selector button. When a town is selected, it is centered in the Adventure Map and its Town Selector button is highlighted. Clicking on a town or its highlighted Town Selector button a second time displays the town’s Town Screen (see Towns, pg. 49).
Your heroes may visit towns you control. To direct a hero to do this, move your hero to a town’s front gate and the cursor will change to a rearing horse. Click, and the hero will enter the town, and the town’s Town Screen will be displayed. If the town has a Mage Guild, the hero will learn any new spells available that he is able to learn, and his spell points will be replenished after staying for one day (see Magic System, pg. 55). Only one hero at a time may visit a given town.
Enemy and Neutral Towns
Towns controlled by other players appear on the Adventure Map with that player’s flag colors and are identified in the same color on the World Map. Neutral towns, those not controlled by any player, appear gray on the World Map. Right-clicking on these towns will display limited information on that town.
When you move the cursor over the front gates of enemy and neutral towns, the sword icon appears indicating they will be defended by any garrison forces present (see Towns, pg. 49). When you defeat a town’s defenses, the town flies your flag color and becomes part of your territory. You can immediately make use of the town and draw from its benefits. If no defenders are present, you may simply take the town by having a hero enter it.
Resource Mines and Loose Resources
When you build structures in your towns or recruit creatures, you use resources—gold, wood, ore, crystal, gems, mercury, and sulfur. Many other game situations also use them. While there are many ways to collect resources, the main means of acquiring them is to control resource mines and find loose resources. When a hero visits a mine, it becomes flagged with the hero’s color and begins producing resources for the hero’s player, adding to the player’s resource pool on a daily basis. Loose resources are “picked up” by the hero who visits them. They disappear from the map and are immediately added to the controlling player’s resource pool.
17
Section II
Treasure Chests and Artifacts
Heroes may also pick up treasure chests and artifacts. Artifacts are items, usually magical, that provide
their owner with special powers and abilities. When a hero visits an artifact, it disappears from the map and is added to their inventory (see Heroes, pg. 23). Treasure chests are surprise boxes containing gold,
minor artifacts, or experience.
Other Structures
There are many different types of Adventure Map structures you will encounter. Some of these will convey special benefits to the heroes who visit them. Some will be places to explore, full of danger and/or hidden rewards. Others will provide resources, useful information, or artifacts. While you will need to discover the individual qualities of many of these buildings, some of the buildings you are most likely to encounter are listed here.
Border Guards and Gates: Border Guard Towers occasionally appear at borders. In order to pass by a Guard Tower, you will need to visit a local Keymaster’s Tent of the same color.
Creature Dwellings: Some structures are the living places of creatures you may recruit to your cause. Their dwellings may be found on the Adventure Map. Before the creatures serve your cause, you may need to prove your worthiness by facing them in combat. Once you succeed, the dwelling will fly your flag, associated towns may receive a creature bonus, and you can recruit troops there. The supply of available recruits will be replenished once a week.
Obelisks: On some maps, the Grail is hidden. Clues to its location can be found at obelisks.
Wandering Creatures: You may find your hero’s way blocked by wandering creatures allied to no particular player. In order to pass by them, you will need to deal with them. Usually, this means defeating them in combat. Sometimes the creatures will be favorable to
your cause and will offer to join you, or they may do so |
|
Wandering Creature Population Labels |
|
|
because they are awed by your power. Others, realizing |
|
Label |
Population |
|
they have no chance of defeating you, may flee. |
|
|
||
|
Few |
1-4 |
|
|
Right-clicking on a wandering creature graphic will tell |
|
Several |
5-9 |
|
you the type of creatures camped at the spot and a |
|
Pack |
10-19 |
|
rough estimate of their numbers. |
|
Lots |
20-49 |
|
|
|
Horde |
50-99 |
|
Wandering monster troops are randomly assigned a |
|
Throng |
100-249 |
|
hostility value from one to ten. Monsters with |
|
Swarm |
250-499 |
|
|
Zounds |
500-999 |
|
|
higher hostility values are more likely to attack. A |
|
Legion |
1000+ |
|
wandering monster troop will be more likely to avoid |
|
|
|
|
|
|
|
|
|
|
|
|
|
|
combat with hero armies stronger than they or composed of the same creature types. Heroes with the Diplomacy secondary skill will be attacked less often.
18
Interface Reference
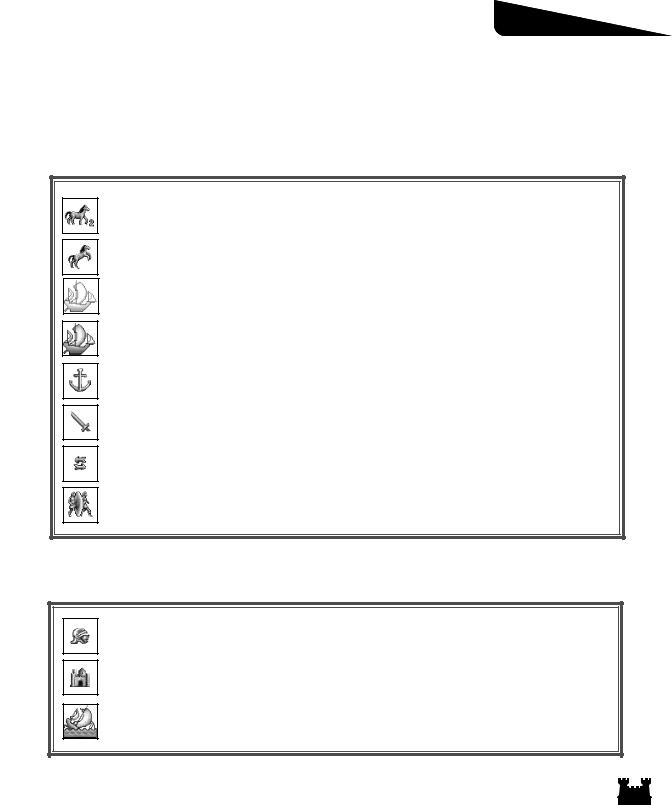
Adventure Map Cursors
Movement Cursors
Clicking on the map where these icons appear will draw a movement path from the current hero to the desired location.
The current hero can move to this spot in the number of turns indicated in the lower right. (If no number appears on a movement cursors, the hero can move to the target spot during the current turn.)
Appears when the cursor moves over an adventure location, like a building or mine, the current hero can visit.
If the current hero is on land, and this cursor appears over a boat, then the hero may enter the boat.
Appears over a water location a hero on a boat may visit.
Indicates a shore location where a hero may land a boat and disembark.
Indicates wandering monsters, enemy towns, enemy garrisons, and enemy heroes a hero may attack.
Appears over heroes the current hero may trade with. When the hero is reached, the Hero Trading screen is displayed (see Hero Trading, pg. 32)
Appears when you cast the Dimension Door spell. To teleport the casting hero to the new location, click the destination in the Adventure Map Window.
Selection Cursors
These icons are used to select the current town or hero.
Appears over the current hero or over any of your heroes when a town is selected. Clicking selects the current hero, or displays the Hero Screen if the hero is already selected.
Appears over your towns. Clicking selects the current town or, if the town is already selected, displays the Town Screen.
Appears when you cast the Scuttle Boat spell. Click on the boat you wish to cast the spell on.
19
Section II
Control Buttons
Kingdom Overview
Quest Log 
Move Hero
Adventure Options
Next Hero
End Turn
Elevation Toggle |
Sleep/Wake Hero |
Cast Spell |
System Options |
Kingdom Overview: This button displays the Kingdom Overview (see Kingdom Overview, pg. 57).
Elevation Toggle: This button toggles the Adventure Map display between the surface and subterranean levels.
Quest Log: Click this button to display the Quest Log.
Sleep/Wake Hero: This button puts the current hero in sleep mode. A sleeping hero is passed over
during the Next Hero selection. Wake heroes by selecting them (on the Adventure Map or with their Hero Selector button) and clicking this button.
Move Hero: If the current hero has a movement path laid, pressing this button will move them along their path to the extent of their movement allowance.
Cast Spell: If the current hero has a spell book, this button will display their spell book so they can cast Adventure Spells (see Magic System, pg. 55).
Adventure Options: Click this button to display the Adventure Options (pg. 21). You may click thebutton to close this display.
System Options: Click this button to display the System Options menu. You can close the menu by clicking the Return To Game button.
Next Hero: Clicking this button will select the next awake hero with any movement points down the list.
End Turn: Click this button to end your turn and allow your opponents to take theirs.
20
Interface Reference
Adventure Options
View World: This button displays a large scale view of the map in the Adventure Map display. Click on the Zoom buttons to change the view scale. Click the Puzzle Map button to switch to a view of the Puzzle Map, or to exit the display.
Puzzle Map: This button displays the Puzzle Map, which shows the location of the Grail. When your heroes visit Obelisks, parts of the map are revealed. When the map is fully displayed, you will see an X marking the spot where the Grail is buried.
Dig: In order to recover the Grail, a hero must dig it out of the ground. Click this button to direct the current hero to dig at their location. Digging takes a full day, so the hero must not yet have moved during the current turn.
Scenario Information: Click this button to display information about the current scenario.
Replay Opponent Turn: If you press this button, you can see a replay of your opponents’ last turns.
System Options
towards any destination you click on.
Hero Speed: Select one of these buttons to set the movement animation speed of your heroes.
Enemy Speed: These buttons control the movement animation speed of your enemies. You may also choose to hide your enemies’ movements from you.
Map Scroll Speed: These buttons control how fast the map view scrolls.
Video Quality: Selects high or low quality video playback.
Show Move Path: Toggles display of hero movement paths. If you turn the paths off, your heroes will move immediately
Move Hero Reminder: This toggles on and off the Move Hero Reminder which normally displays at the end of a turn, if you have any sleeping heroes or heroes with movement points left.
Quick Combat: When this option is on, the game resolves combat for you without displaying the Combat Screen.
21

Section II
Video Subtitles: Toggles subtitles for videos on and off.
Town Building Outlines: When the cursor moves over buildings in the Town Screen, buildings you can click on may be outlined. These buttons turn on and off the outline display.
Spellbook Animation: Turns on and off the page turn animations in the spell book display.
Disk Options
Load Game: This button displays the Load Game menu. Loading a new game will end the current game.
Save Game: This button displays the Save Game menu to save your current game. Restart Scenario: Click this button to start the current scenario from the beginning.
Main Menu: Click this button to return to the Main Menu. This will end the current game. Quit to Desktop: Click this button to close Heroes III and return to Windows.
Return to Game: Click this button to close the System Options menu and return to play.
Sound Options
Music Volume: This control sets the game’s music playback volume. Clicking the volume controls to the left reduces the volume, clicking to the right increases it.
Effects Volume: This control allows you to set the game’s sound effect playback volume.
Informational Displays
The Resource Bar
The Resource Bar shows how much of each of the game’s resources you currently have.
Rollover Bar
A Rollover Bar is at the bottom of most game menus and interface displays. As you move the cursor over the screen, displayed text identifies what the cursor is currently over.
Right-Click Information
You may right-click on most game or interface items to display further information about the item. These displays remain in view as long as you hold down the right mouse button.
Status Window Information
Information about the currently selected hero, town, or resource, as well as number of towns and allies, appears in the box at the lower right corner. You may click on this box to toggle between the various displays available.
22
Interface Reference
Heroes and the
Hero Screen
Actions in the Heroes III game are performed by heroes. Heroes explore the land, sea, and underground. They gather treasures, resources, and other artifacts. They secure towns and Adventure Map structures, adding them to your territory. Heroes travel with troops recruited at towns and other locations. With these armies they can engage in battles against your enemies or lead the defense of your towns. As heroes explore and battle, they gain experience points. When they have enough experience points, they go up a level. At each level, heroes gain new skills and increase their abilities at skills they already possess.
In most scenarios, you start with at least one hero under your command. You can gather more heroes to your cause by recruiting them in your town taverns. Heroes may be stationed in your town garrisons or may roam the lands of Erathia. Garrisoned heroes lead troops stationed in a town’s garrison if the town is attacked by an enemy hero. You can have one garrisoned hero per town and up to eight roaming heroes at any one time.
Hero Types
There are sixteen different types of heroes—two for each of the eight town types. One type specializes in the use of magic, the other is more battle-oriented. Heroes of all types may be recruited in any town.
23

Section II
Castle Heroes
Knight: Knights are brave and noble warriors dedicated to good and righteousness. While they can learn magic skills, they are by far more dedicated to the pursuit of martial knowledge.
Cleric: Clerics are members of the fighting forces of their holy orders. They pursue a range of knowledge, both martial and mystical.
Dungeon Heroes
Overlord: Overlords build dungeon lairs to protect their gains acquired through conquest. Ruling through intimidation, they tend to be warriors who know the value of magic. They often wear armor designed to enhance the ferocity of their appearance.
Warlock: Warlocks learn magic for the power it gives them to achieve dark and selfish goals. More than any other hero, they focus on the pursuit of magical knowledge over other values. Warlocks often flaunt their power, using magic to alter their features.
Fortress Heroes
Beastmaster: Through physical force and intimidation, Beastmasters build their realms by subjugating those dwelling nearby,. As a consequence, they are little interested in the pursuit of mystical knowledge. Beastmasters often costume themselves in the likeness of vicious swamp creatures.
Witch: Witches are adept at the use of magic powered by rare ingredients gathered from swamplands. Learning this knowledge takes a focus that allows for little advancement of military knowledge.
Inferno Heroes
Demoniac: Demoniacs are people (often ex-Heretics) who have been completely possessed by one or more demons. Though they have a natural predisposition to gaining magical power, Demoniacs also acquire balancing military skills as well.
Heretic: Heretics aim to harness demonic forces to their bidding. While they tend to train themselves with warrior skills, they must also know enough magic to control their infernal allies. Heretics can often be recognized by the number of protective wards and markings they wear to ward off demonic attacks.
24

Interface Reference
Necropolis Heroes
Death Knight: Death Knights are knights resurrected as liches. While they maintain their former martial learnings, their new forms open them more freely to the learning of magic.
Necromancer: Necromancers are magic users seduced by the easy power of death magic. The price of their art is its practice slowly drains life from its wielders—eventually transforming them into liches.
Rampart Heroes
Ranger: Rangers are warriors born of the woods, skilled at hunting and tracking. Their dedication to the protection of the wilderness leads them to pursue a wide range of knowledge, concentrating on martial and outdoor skills.
Druid: Druids are mystics who draw their power from a harmonic relationship with the land. While they pursue their mystical knowledge, their outdoor living causes them to acquire a balance of physical skills.
Stronghold Heroes
Barbarian: Barbarians are little concerned with anything outside the pursuit of military might. Consequently, they advance most quickly in attack based skills and slowly in all others. Barbarians wield massive weapons and wear little armor.
Battle Mage: Battle Mages are Barbarians with limited spellcasting abilities. While they advance their ability at magic, they also study the arts of war. Battle Mages often wear trophies, gathered from slain foes, from which they derive additional power.
Tower Heroes
Alchemist: Alchemists are skilled in physical and chemical magic, particularly so in the building and animation of golems. Working their craft builds muscular strength, which makes Alchemists ready learners of military skills as well. Their armor is composed of rare metal alloys created through their skill in alchemy.
Wizard: Wizards are dedicated pursuers of mystical and magical knowledge. While they may lend little to the direct military aspect of a battle, they are likely to turn the tide in their favor with use of mighty arcane forces. Wizards seldom wear any armor, relying on their control of magic to protect them.
25
Section II
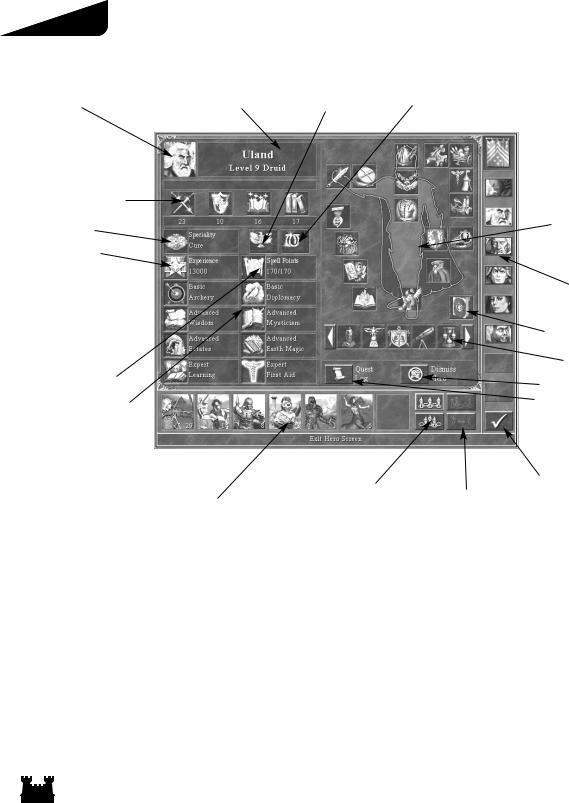
The Hero Screen
Hero Portrait |
Hero Name, Level, Class |
Morale |
Luck |
Primary Skills |
|
|
|
|
|
|
|
|
|
Specialty |
|
|
|
Paper Doll |
|
|
|
|
|
Experience |
|
|
|
|
|
|
|
|
Hero Selector |
|
|
|
|
View Spell Book |
|
|
|
|
Backpack |
Spell Points |
|
|
|
Dismiss Hero |
|
|
|
|
|
Secondary Skills |
|
|
|
View Quest Log |
|
|
|
|
|
|
|
|
|
|
|
Army Formation Selector |
Exit |
|
Hero’s Army |
Split Army |
||
|
Information about each hero you control can be viewed on their individual Hero Screen. The Hero Screen can be displayed from the Adventure Map screen by double-clicking on a hero’s Hero Selector
button or by double-clicking on the hero directly on the map. The Hero Screen is also used to organize the hero’s items and armies.
26
Interface Reference
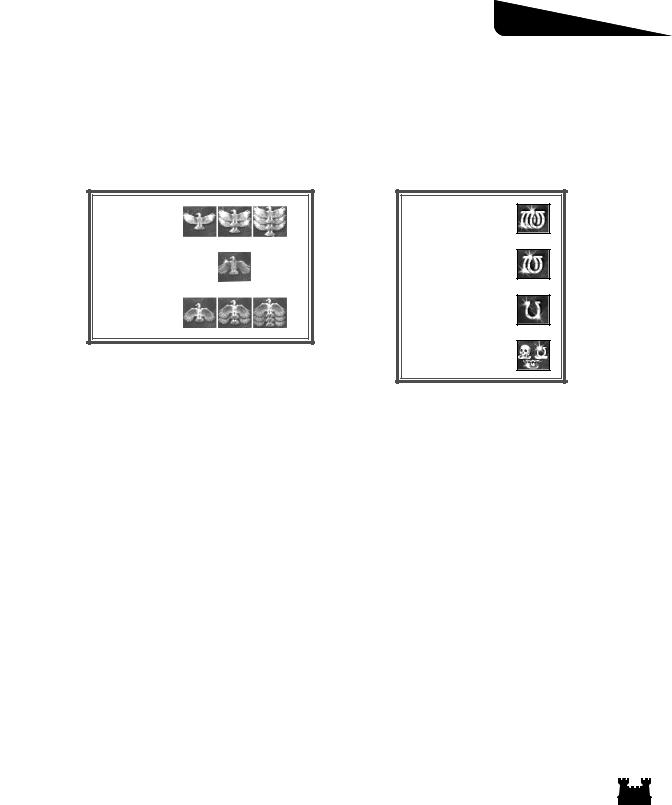
Morale |
Luck |
This icon represents the basic morale rating of the hero’s army. In combat, low morale can cause
creatures to freeze. High morale can allow them extra attacks (see Combat, pg 40). Click on the
icon to display a list of morale-affecting factors.
This icon represents the current basic luck rating of the hero’s army. Good luck increases a
creature’s chance to do maximum damage (see Combat, pg. 40). Click on the icon to display a
list of factors modifying the army’s luck.
High Morale
Normal Morale
Low Morale
Excellent Luck
Good Luck
Positive Luck
Neutral Luck
Specialty
Each hero has a special ability. Click on this icon to display information about it.
Experience
Displays the hero’s current experience points. Click the icon to display the hero’s current level and the experience points needed to reach the next level (see Skills, pg. 33).
Spell Points
This displays the hero’s current and maximum spell points. (For example, “15/20” means that the hero
currently has 15 spell points out of a maximum of 20). Click the icon for a more verbose display (see
Magic System, pg. 55).
Primary Skills
These icons display your hero’s four primary skills—Attack, Defense, Power, and Knowledge (see Skills pg. 33).
Secondary Skills
Each hero can have up to eight different secondary skills. Icons representing these skills are displayed in these slots. Each skill can be performed at a basic, advanced, or expert level (see Skills, pg. 33). Click on
each icon to display information about the skill.
27
Section II
Hero’s Army
These seven slots display the troop stacks in the hero’s army. Each troop stack portrait has a number
indicating how many creatures are in each slot. The slot a troop stack occupies affects where the troop appears on the battlefield (see Combat, pg. 40). There are several things you can do with this display to
manage your hero’s army.
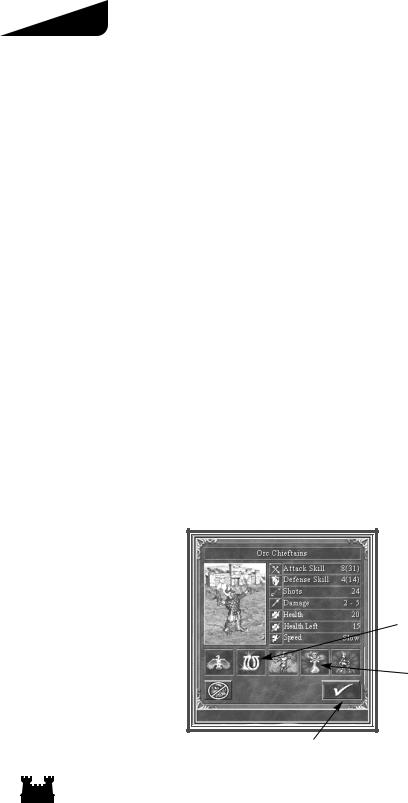
Displaying Creature Information
Clicking on a highlighted troop stack displays its creature information as follows.
Portrait: This is a picture of the creature as it will appear on the battlefield. The number in the lower right corner is the number of creatures in the troop. Above the portrait is the creature’s name.
Attack: This is the creature’s attack rating. The number in parenthesis represents the rating as affected by the hero’s Attack skill and other factors.
Defense: This is the creature’s defense rating. In parenthesis is its rating as affected by modifying factors.
Shots: Creatures with ranged attacks have a limited number of shots. This displays how many are left. If there is no number here, then the creature has no ranged attack.
Damage: This shows the range of damage the creature does when it attacks. Health: This shows the creature’s maximum health points.
Health Left: This shows how many health points the top creature in the troop has left. Speed: This is the creature’s speed rating.
Morale: This shows the creature’s current, individual morale rating.
Luck: This is the creature’s current, individual luck rating.
Affecting Spells: Spells currently cast on the creature are shown here.
Name 
Portrait 
Luck
Number of Creatures 
Morale
Affecting Spells
Dismiss Army 
Close
28
Interface Reference
Dismissing a Troop
If you wish to remove a troop from the hero’s army, display the troop’s Creature Information window and then click the Dismiss Troop button. All heroes in the field must have at least one troop, so you
cannot dismiss a hero’s last troop.
Upgrading a Troop
Each creature is available in a basic and upgraded version. If a hero visits a town capable of generating a creature’s upgraded version, you may upgrade any basic level creatures by pressing the Upgrade Troop
button.
Combining Two Troops of Like Creatures
If you have two troops containing identical creatures, you can combine them into one troop. Do this by highlighting one troop, then clicking on the second one. The creatures in the first troop will be absorbed into the second.
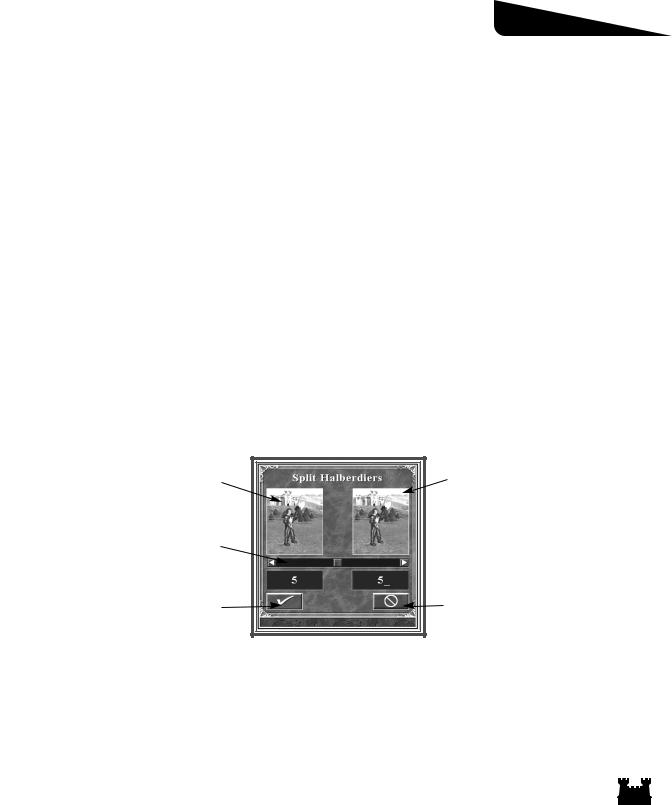
Splitting Troops
You can take a troop with two or more creatures in it, and split it into two troops. To do this, highlight the troop, click the Split Troop button, and then click on an empty troop slot or troop of like creatures.
The Split Troop control will appear.
To split the current troop, move the slider control to the right. As you do so, creatures will be transferred from the originating troop. Click when you are satisfied, or click the Cancel button to cancel the
operation.
Originating Troop |
New Troop |
Slider
Split |
Cancel |
Move a Troop to an Empty Troop Slot
To move a troop from its current troop slot to an empty one, click on the troop to highlight it, and then click on the slot you want to move it to.
29
Section II
Switch the Positions of Two Troops
To have two different troops trade their troop slot positions, click on one of the troops to highlight it, and then click on the second troop.
Loose Formation |
Tight Formation |
Tactics Formation |
Army Formation Selector
You may choose how a hero’s troops are arrayed on the battlefield using the Army Formation Selection buttons. Choosing Loose Formation will cause the troops to be arrayed in a loose line, while choosing Tight Formation will array them in a tight line. If a hero has the Tactics secondary skill, the Tactics Formation button turns on and off the Tactics formation option. When Tactics formation is on, the hero’s armies can be moved about the battlefield prior to the beginning of a battle (see Combat, pg. 40).
Dismiss Hero
Click this button if you wish to dismiss the displayed hero. If you do this, the hero will leave your service. He or she may later appear for hire in one of your town taverns, or may end up in the service of one of your enemies.
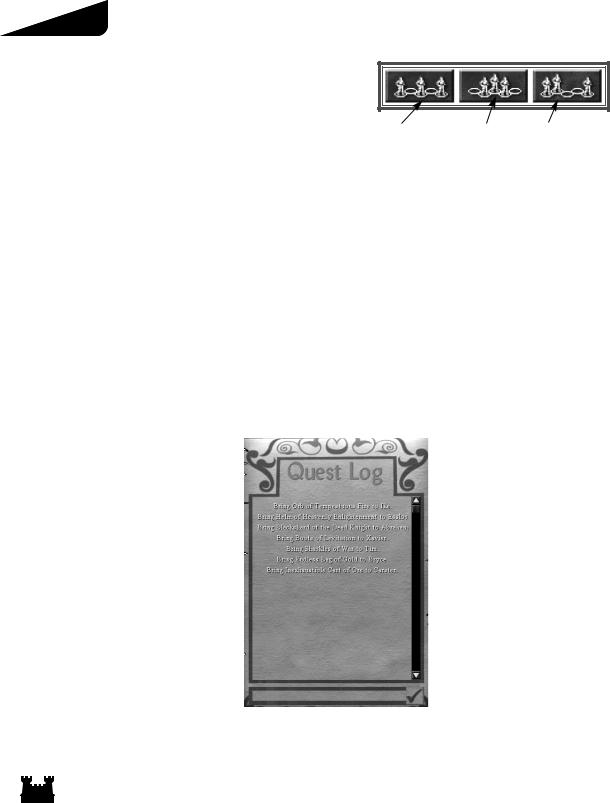
View Quest Log
Click on this icon to display the Quest Log. The text displayed lists quests your heroes have accepted. The quest log scrolls up/down using a scroll bar.
30
 Loading...