


3000K YUM
CONTROLLER
Manual Operation
Frymaster, a member of the Commercial Food Equipment Service Association, recommends using CFESA Certified Technicians.
|
24-Hour Service Hotline 1-800-551-8633 |
06/2015 |
|
|
|
www.frymaster.com |
E-mail: service@frymaster.com |
*8196647* |
|
NOTICE
IF, DURING THE WARRANTY PERIOD, THE CUSTOMER USES A PART FOR THIS MANITOWOC FOOD SERVICE EQUIPMENT OTHER THAN AN UNMODIFIED NEW OR RECYCLED PART PURCHASED DIRECTLY FROM FRYMASTER DEAN, OR ANY OF ITS AUTHORIZED SERVICE CENTERS, AND/OR THE PART BEING USED IS MODIFIED FROM ITS ORIGINAL CONFIGURATION, THIS WARRANTY WILL BE VOID. FURTHER, FRYMASTER DEAN AND ITS AFFILIATES WILL NOT BE LIABLE FOR ANY CLAIMS, DAMAGES OR EXPENSES INCURRED BY THE CUSTOMER WHICH ARISE DIRECTLY OR INDIRECTLY, IN WHOLE OR IN PART, DUE TO THE INSTALLATION OF ANY MODIFIED PART AND/OR PART RECEIVED FROM AN UNAUTHORIZED SERVICE CENTER.
NOTICE
This appliance is intended for professional use only and is to be operated by qualified personnel only. A Frymaster Dean Authorized Servicer (FAS) or other qualified professional should perform installation, maintenance, and repairs. Installation, maintenance, or repairs by unqualified personnel may void the manufacturer’s warranty.
NOTICE
This equipment must be installed in accordance with the appropriate national and local codes of the country and/or region in which the appliance is installed.
NOTICE TO OWNERS OF UNITS EQUIPPED WITH COMPUTERS
U.S.
This device complies with Part 15 of the FCC rules. Operation is subject to the following two conditions: 1) This device may not cause harmful interference, and 2) This device must accept any interference received, including interference that may cause undesired operation. While this device is a verified Class A device, it has been shown to meet the Class B limits.
CANADA
This digital apparatus does not exceed the Class A or B limits for radio noise emissions as set out by the ICES-003 standard of the Canadian Department of Communications.
Cet appareil numerique n’emet pas de bruits radioelectriques depassany les limites de classe A et B prescrites dans la norme NMB-003 edictee par le Ministre des Communcations du Canada.
 DANGER
Prior to movement, testing, maintenance and any repair on your Frymaster fryer, disconnect ALL electrical power from the fryer.
NOTICE
The instructions in this manual for using a bulk oil system for filling and discarding oil are for a Frontline or RTI systems. These instructions may not be applicable to other bulk oil systems.

CHAPTER 1: K3000 CONTROLLER INSTRUCTIONS
1.1Using the K3000
ON/OFF
Press ON/OFF button fryer heats to setpoint or idle temperature and displays: COOL or DROP.
Cooking
Fryer displays COOL or DROP
COOL display: Press product button; fryer heats to setpoint and displays DROP.
Press product button and drop product.
DROP display: Press product button and drop product. (Product buttons 1-5 and 11-15 start cooks on the left display. Products 6-10 and 16-20 start cooks on the right display.)
DONE display: Press product button to cancel alarm.
Press and hold product button to cancel cook cycle.
Responding to Polish Prompt
Controller displays Polish Now, alternating with Yes No.
Press Yes (button under Yes display) and the polish cycle launches. Controller displays Cool after polish cycle.
Controller Button Navigation
Product: Active when adjacent LED is lit. Press to launch cook cycle. Press and hold to stop a launched cook cycle. Press at end of cook cycle to halt alarm.
Scan: Press once, all product buttons are lit; Select Product displayed. Press product button to view product name. Press Scan again to repeat. Press Scan twice to return to normal operation.
Left/Right Arrows: Navigate options in left display.
Up/Down Arrows: Navigate options in right display. Press the up/down arrow simultaneously to change to a second language if one is selected in setup.
Exit Cool: Set fryer’s cook cycle exit temperature to 250°F (121°C) or setpoint.
Thermometer: Fryer ON: Press and release for setpoint/left; vat temp/right.
Thermometer: Fryer OFF: Press to display temperature, time, date, system version, K3000 version and circuit board versions.
Checkmark: Fryer OFF: Press and hold 3 seconds: Scroll filter usage; Press and hold 10 seconds: Product setup.
Checkmark: Fryer ON: Respond to prompts.
Filter: Press and release: Cooks remaining to filter cycle. Press and hold: Filter options: Filter and Dispose.
1-1
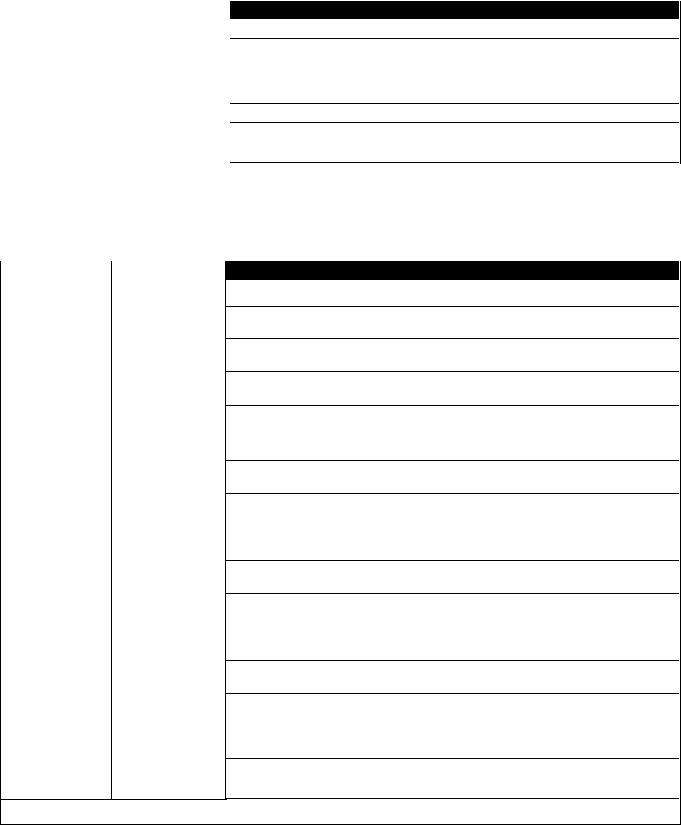
1.2 Navigating Controller
Press and hold the checkmark button for 10 seconds produces the setup mode, which first displays Product Setup. Follow the steps below to navigate the options
Left Display |
Right Display |
Action |
OFF |
OFF |
Press and hold until Product Setup is displayed. |
|
|
Press to scroll: Vat Setup, Tech Mode, and Exit. With the desired selection |
Product Setup |
Blank |
|
|
|
displayed, press . |
Product Setup |
Blank |
Product setup (entering and editing menu items) is described on page 1-10 through |
|
|
1-13. |
vat setup |
Blank |
Vat Setup is described on page 1-4. |
Tech Mode |
Blank |
Tech Mode is described on page 1-6. |
|
|
Press Scan button three times to return the Controller to OFF. |
Exit |
Exit |
1.3 Viewing Operational Stats
The K3000 collects and stores information on the cook cycles and filter cycles. This data is accessed in the info mode, which is accessed by pressing the checkmark button. The steps to view the data are detailed below:
|
|
Left Display |
Right Display |
|
|
OFF |
OFF |
|
|
Oil stats |
Blank |
|
|
Total cooks - |
Number |
last dispose |
|
Total heads—last |
Number |
dispose |
|
Last dispose |
date |
|
|
TEMP > 300F— |
Number Hrs |
TODAY |
|
TEMP > 300f– |
Number Hrs |
Since dispose |
|
TEMP > 300F—1 |
Number Hrs |
back |
|
TEMP > 300f—2 |
Number Hrs |
baCK |
|
FILTERS—since |
Number |
dispose |
|
Filters—1 back |
Number |
|
|
Filters—2 back |
Number |
|
|
Polishes—since |
Number |
dispose |
|
Polishes—1 back |
Number |
|
|
Polishes—2 back |
Number |
|
|
Reset oil stats |
Yes no |
Reset oil stats |
Enter code |
Continued on the following page
Action
Press and hold until INFO MODE is displayed. Release and press .
Press to scroll: Oil Stats, Filter Stats, Review Usage, Last Load. With the desired stats displayed, press .
Press . (This is the number of cooks since the last dispose.)
Press . (This is the number of heads cooked since the last dispose.)
Press . (This is the date of the last dispose.)
Press . (This is the number of hours the temperature of the oil rose above 300°F during operation today.)
Press . (This is the number of hours the oil temperature was above 300°F since oil disposal.)
Press . (This is the number of hours the oil temperature was above 300°F since the previous oil disposal.)
Press . (This is the number of hours the oil temperature was above 300°F since two oil disposals ago.)
Press . (This is the number of filters since oil disposal.)
Press . (This is the number of filters that have occurred since the previous oil disposal.)
Press . (This is the number of filters that have occurred since two oil disposals ago.)
Press . (This is the number of polishes since oil disposal.)
Press . (This is the number of polishes that have occurred since the previous oil disposal.)
Press . (This is the number of polishes that have occurred since two oil disposals ago.)
Press to scroll or to reset oil stats. Enter 3228.
1-2
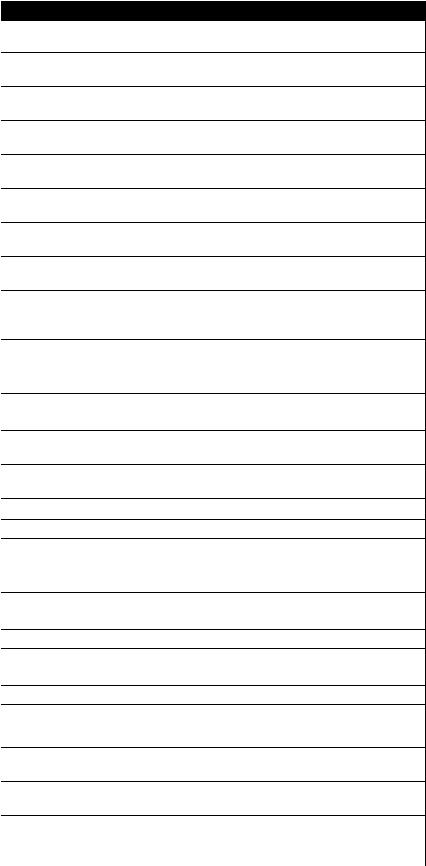
1.3 Viewing Operational Stats cont.
|
Left Display |
|
|
Right Display |
|
|
|
|
|
||
|
|
|
|
|
|
|
complete |
|
Blank |
||
|
|
|
|
||
|
Exit |
|
Exit |
||
|
|
|
|
||
|
Filter Stats |
|
Blank |
||
|
|
|
|
||
|
MON |
|
date |
||
|
|
|
|||
|
Filtered |
Number and day |
|||
|
|
|
|||
|
Flt bpsd |
Number and day |
|||
|
|
|
|
||
|
Cooks |
|
Number and day |
||
|
|
|
|
||
|
Heads |
|
Number and day |
||
|
|
|
|||
|
FLT AVG |
Number and day |
|||
|
|
|
|
||
|
REVIEW USAGE |
|
Blank |
||
|
|
|
|
||
|
USAGE SINCE |
|
Blank |
||
|
DATE |
|
TIME |
||
|
TOTAL COOKS |
|
Number |
||
|
QUIT COOKS |
|
Number |
||
|
|
|
|
||
|
On HOURS |
|
Number |
||
|
|
|
|
||
|
Reset usage |
|
Yes no |
||
|
|
|
|
||
|
Reset usage |
|
Enter code |
||
|
Complete |
|
Blank |
||
|
Exit |
|
Exit |
||
|
|
|
|
||
|
Last load |
|
Blank |
||
|
Product |
|
Product name |
||
|
Started |
|
Time |
||
|
Actual time |
|
Number Minutes |
||
|
Progtime |
|
Number Minutes |
||
|
Max temp |
|
Number |
||
|
Min temp |
|
Number |
||
|
Avg temp |
|
Number |
||
|
|
|
|
||
|
Heat on |
|
Number |
||
|
|
|
|
||
|
Ready |
|
Yes or no |
||
|
|
|
|
||
|
Exit |
|
Exit |
||
|
|
|
|
|
|
Action
Press button once to return to menu, or Scan button once to return the Controller to OFF.
Press to scroll: Filter Stats, Review Usage, Last Load. With the desired stats displayed, press .
Press to scroll seven days of data. With the desired date displayed, press .
Press to scroll number of times the vat was filtered in the seven -day period. Press .
Press to scroll number of times the filter prompt was bypassed in the seven-day period. Press .
Press to scroll number of cook cycles that occurred in the seven-day period. Press .
Press to scroll number of heads that were cooked in the seven-day period. Press .
Press to scroll average number of daily filter cycles that occurred in the seven-day period. Press . Press button once to return to menu, or Scan button once to return the Controller to OFF.
Press to scroll: Filter Stats, Review Usage, Last Load. With the desired stats displayed, press .
Press . (This is the date and time of the last usage reset.)
Press . (This is the total number of cooks since the last usage reset.)
Press . (This is the total amount of cooks that were cancelled since the last reset usage.)
Press . (This is the total amount of hours the fryer was on since the last reset.)
Press to scroll or to reset oil stats usage. Enter 3228.
Press to scroll: Filter Stats, Review Usage, Last Load. With the desired stats displayed, press or press Scan to return the Controller to OFF.
Press .
Press . (This is the product last cooked.) Press . (This is the time the last cook started.)
Press . (This is the actual cook time including flex time.) Press . (This is the actual programmed cook time.)
Press . (This is the maximum temperature of the oil during the last cook.) Press . (This is the minimum temperature of the oil during the last cook.) Press . (This is the average temperature of the oil during the last cook.)
Press . (This is the percentage of the cook time the heat source was on during the last cook.)
Press . (If the fryer was back to proper temperature before the cook cycle was started.)
Press to scroll: Filter Stats, Review Usage, Last Load. With the desired stats displayed, press or press Scan button to return the Controller to OFF.
1-3

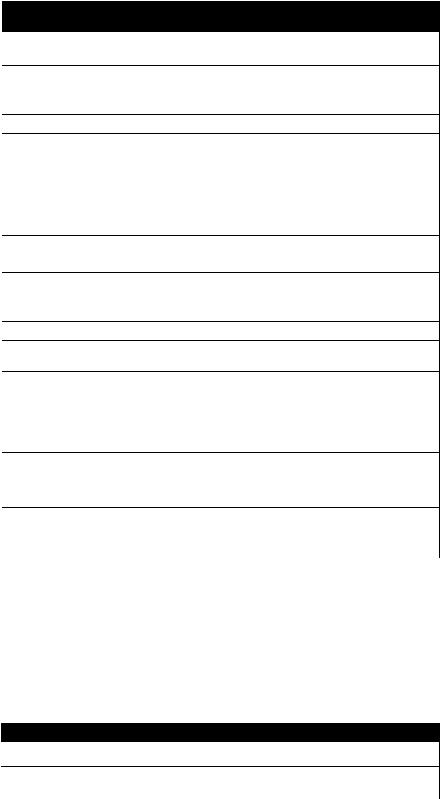
1.4 K3000 Setup Mode
Setup mode allows the Controller to be set for language displays, vat sizes, and temperature range displays. Follow the steps below to enter and navigate Vat Setup.
Vat Set Up
|
|
Left Display |
Right Display |
|
|
OFF |
OFF |
|
|
Product Setup |
Blank |
|
|
Vat setup |
Enter code |
System |
Blank |
|
|
Language |
English |
2nd language |
English |
|
|
Locale |
Non-ce |
ENERGY |
Gas |
type |
KJ3 Full |
System volume |
9 |
Tempr format |
F |
|
|
Exit Melt Tempr |
100F |
|
|
Setback tempr |
250F |
|
|
Fresh oil |
None |
|
|
waste |
NONE |
|
|
DRAIN SWITCH |
NO |
RECOVERY |
DISABLED |
ALARM |
|
Exit |
Exit |
OFF |
OFF |
|
|
Time/date |
Blank |
Time entry |
time |
Date format |
Mm/dd/yy |
|
|
Enter date |
date |
Exit |
Exit |
Continued on the following page
Action
Press and hold until Product Setup is displayed.
Press to scroll to Vat setup and press . Product setup is described on pages 1-10 through 1-13.
Enter 3228.
Press button or press to scroll to Time/Date, Filter, E-Log, Change Password or Edit Alarm Names. With desired choice displayed, press . If SYSTEM is not chosen skip to the relevant selection.
Press to scroll to choice and press .
Press to scroll to choice and press . (This option allows another language to be toggled easily from the front panel (ex. Spanish as a second language.)).
Press to scroll to choice Non-CE or CE and press . Press to scroll to choice Gas or Electric and press .
Press to scroll choices: the choices are: Gas-KJ3/CF-FULL, 118G/D63 FULL, H55 FULL, H55 SPLIT, MJ45 FULL, MJ45 SPLIT, HV75 FULL, HV105 FULL, 114/HD50 FULL, HD60 FULL, HD65 FULL D80 FULL, 11814 FULL and MJ35 FULL, . Electric- 118E/RE80 FULL, FPRE117 FULL, FPRE117 SPLIT, FPRE114 FULL and FPRE114 SPLIT, 11817 FULL, FPRE122 FULL, FPRE122 SPLIT FPC128 FULL, FPC128 SPLIT and FPC136 FULL. With the vat size of the fryer controlled by the Controller displayed, press .
Sets sound level for Controller. Enter level, 1-9 (0=Lowest/ 9=Loudest). Press .
Press to scroll choices: F for Fahrenheit; |
C for Celsius. Press . |
Use numbered buttons to change default setting (use 10 for 0). Press . (This is the temperature for the fryer to exit the melt cycle.) Default is 100F (38C).
Use numbered buttons to change default setting (use 10 for 0). Press . (This is the temperature during setback or idle mode.) Default is 250F (121C).
Press to scroll choices JIB, Bulk-RTI, Bulk-F (Frontline) or None. Press . NOTE:
All fryers except OCF should be set to NONE.
Press to scroll choices JIB, Bulk-RTI, Bulk-F (Frontline) or None. Press . NOTE:
All fryers except OCF should be set to NONE.
Press to scroll choices YES and NO. (This is if a drain switch is installed.) Press .
Press to scroll choices DISABLED and ENABLED. (This is a recovery alarm that locks out the fryer if the fryer does not heat properly. The default is disabled). Press .
Press button. None required. Press .
Use numbered buttons to change time (use 10 for 0). Press .
Press to scroll choices. With the date format displayed, press . Use numbered buttons to change date (use 10 for 0). Press .
Press button once and press to scroll to System, Time/Date, Filter, E-Log, Change Password or Edit Alarm Names. With desired choice displayed, press or press the Scan button once to return the Controller to OFF.
1-4

1.4 K3000 Setup Mode cont.
Left Display |
Right Display |
Action |
|
|
|
DST SETUP |
This is daylight savings time setup. In the United States, daylight savings time begins each year at 2:00 A.M. |
|
|
on the second Sunday in March, with clocks moving ahead one hour. Daylight savings time ends each year at |
|
|
2:00 A.M. on the first Sunday in November, with clocks moving back one hour. For the two states and |
|
|
international locations, which do not use DST, set to disabled. |
|
OFF |
OFF |
Press and hold until Product Setup is displayed. |
|
|
|
Product Setup |
Blank |
Press to scroll to Vat setup and press . |
|
|
Enter 3228. |
Vat setup |
Enter code |
|
|
|
Press to scroll choices DISABLED and ENABLED. Press . (This enables or |
DST |
ENABLED |
|
|
|
disabled daylight savings time. Default is enabled.) If disabled is chosen, pressing the |
|
|
button, displays exit. Press the exit scan button three times to exit. |
DST START |
3 |
Enter the daylight savings time starting month using the 1-10 keys. (Default is US |
MONTH |
|
government starting month “3”.) Press . |
DST START |
2 |
Enter the daylight savings time starting Sunday using the 1-10 keys. (Default is US |
SUNDAY |
|
government starting Sunday “2”.) Press . |
DST END MONTH |
11 |
Enter the daylight savings time ending month using the 1-10 keys. (Default is US |
|
|
government ending month “11”.) Press . |
DST END |
1 |
Enter the daylight savings time ending Sunday using the 1-10 keys. (Default is US |
SUNDAY |
|
government ending Sunday “1”.) Press . |
EXIT |
Exit |
Press button once and press to scroll to System, Time/Date, Filter, E-Log or Change |
|
|
Password. With desired choice displayed, press or press the Exit/Scan button three |
|
|
times to return the controller to OFF. |
filter |
Blank |
Press . |
Global filter |
20 |
Press . (Changes the total number of cooks that occur before a filter prompt. The default |
count |
|
is 20.) |
Eod filter time |
21:00 |
Use numbered buttons to change end of day filter alert time. Press . |
|
|
Press to scroll to choice and press . (This enables or disables the polish timer.) |
1 polish timer |
EnableD |
|
|
|
Use numbered buttons to change time (use 10 for 0). (This is the time the first polish |
1 polish time |
08:00 |
|
|
|
prompt will occur each day. The default is 8:00 AM.) Press . |
1 polish |
30 |
Use numbered buttons to change (use 10 for 0). (This is the duration, in minutes for a |
duration |
|
polish. The default if 30 minutes.) Press . |
1 polish delay |
00:00 |
Use numbered buttons to change time (use 10 for 0). (This is the amount of time which an |
time |
|
operator can delay the start of a polish.) Press . After the delay the operator must |
|
|
polish. |
1 polish start |
300F |
Use numbered buttons to change temperature (use 10 for 0). (This is the temperature |
tempr |
|
required for a polish to begin.) Press . |
2 polish timer |
enabled |
Press to scroll to choice and press . (This enables or disables the second polish |
|
|
timer.) |
2 polish time |
14:00 |
Use numbered buttons to change time (use 10 for 0). (This is the time the second polish |
|
|
prompt will occur each day.) Press . |
2 polish |
30 |
Use numbered buttons to change (use 10 for 0). (This is the duration, in minutes for a |
duration |
|
polish. The default if 30 minutes.) Press . |
2 polish delay |
01:00 |
Use numbered buttons to change time (use 10 for 0). (This is the amount of time which an |
time |
|
operator can delay the start of the second polish. The default is one hour.) Press . After |
|
|
the delay the operator must polish. |
Continued on the following page |
|
|
1-5
1.4 K3000 Setup Mode cont.
|
Left Display |
|
|
Right Display |
|
|
|
|
|
|
|||
|
|
|
|
|
|
|
|
2 polish start tempr |
|
|
300F |
||
|
|
|
|
|
|
|
|
Exit |
|
|
|
Exit |
|
|
|
|
|
|
|
|
|
E-Log |
|
|
|
Blank |
|
|
NOW |
|
|
|
Time/date |
|
|
A |
E# |
|
|
Time/date |
|
|
|
|
|
|
|
|
|
Exit |
|
|
|
Exit |
|
|
|
|
|
|
|
|
|
C-Log |
|
|
|
Blank |
|
|
|
|
|
|
|
|
|
Exit |
|
|
|
Exit |
|
|
|
|
|
|
|
|
|
Change password |
|
|
|
Blank |
|
|
Product setup |
|
|
|
Current code |
|
|
|
|
|
(1724) |
|
|
|
Vat setup |
|
|
|
Current code |
|
|
|
|
|
(3228) |
|
|
|
Exit |
|
|
|
Exit |
|
|
|
|
|
|
|
|
|
Edit alarm names |
|
|
|
Blank |
|
|
Alarm 1 |
|
|
NUM1 |
||
|
|
|
|
|
|
|
|
Exit |
|
|
|
Exit |
|
|
|
|
|
|
|
|
Action
Use numbered buttons to change temperature (use 10 for 0). (This is the required temperature for the second polish to begin.) Press .
Press button once and press to scroll to System, Time/Date, Filter, E- Log, Change Password or Edit Alarm Names. With desired choice displayed, press or press the Scan button once to return the Controller to OFF.
Press . (This is a log of the ten most recent error codes.) Press . (Current time and date)
Errors listed A-J. Press to scroll through errors. If no errors exist, pressing will display No Errors.
Press button once and press to scroll to System, Time/Date, Filter, E- Log, Change Password or Edit Alarm Names. With desired choice displayed, press or press the Scan button once to return the Controller to OFF.
Press . (This is a reserved internal data collection feature that only exists in pressure fryers.)
Press button once and press to scroll to System, Time/Date, Filter, E- Log, Change Password or Edit Alarm Names. With desired choice displayed, press or press the Scan button once to return the Controller to OFF.
Press .
Use numbered buttons to change code (use 10 for 0). Press .
Use numbered buttons to change code (use 10 for 0). Press .
Press button once and press to scroll to System, Time/Date, Filter, E- Log, Change Password or Edit Alarm Names. With desired choice displayed, press or press the Scan button once to return the Controller to OFF.
Press .
Enter or edit alarm name with letter buttons. Press . Continue scrolling through names up to alarm 10. (Ex. Shake, Stir, etc.)
Press button once and press to scroll to System, Time/Date, Filter, E- Log, Change Password or Edit Alarm Names. With desired choice displayed, press or press the Scan button once to return the Controller to OFF.
1.5 Navigating Filter Menu
The K3000 has five functions in the Filter Menu: Filter, Clean, Dispose, Fill Vat from Pan and Drain to Pan. They are accessed by pressing and holding the Filter button until FILTER is displayed. The first matrix below steps through the initial navigation. Navigation of the functions are covered in separate matrices. The Controller must be on and at setpoint to use all the functions of the filter menu. If the fryer is not at setpoint the Controller displays WAIT FOR FILTER.
Entering Filter Mode
|
|
Action |
Left Display |
Right Display |
|
DROP |
DROP |
Press and hold the filter button until Filter is displayed. |
|
|
Press to scroll to choices: Filter, Dispose and Exit. With the desired choice |
filter |
Blank |
|
|
|
displayed press . Follow the instructions below to navigate the modes. |
1-6
 Loading...