


OPERATOR’S MANUAL
UNIVERSAL HOLDING CABINET (UHC)
2 and 4-Slot Models
MANUFACTURED BY
P.O. BOX 51000
SHREVEPORT, LOUISIANA 71135-1000
PHONE 1-318-865-1711
1-800-24 FRYER
Universal Holding Cabinet |
1-1 |
|
|
|
||
Power Up |
2-1 |
|
|
|
||
Operational Overview |
3-1 |
|
|
|
||
Operator Mode |
4-1 |
|
|
|
||
Timer Operation |
5-1 |
|
|
|
||
Cook More Prompts |
6-1 |
|
|
|
||
Switching Between Breakfast. Lunch, Clean Mode and Slot Off |
7-1 |
|
|
|
||
Slot Temperature Display |
8-1 |
|
|
|
||
Temperature Alarms |
9-1 |
|
|
|
||
Product Selection |
10-1 |
|
|
|
|
|
Program Mode |
10-1 |
|
|
|
|
|
Page Selection |
10-2 |
|
|
|
|
|
Meal Selection |
10-3 |
|
|
|
|
|
Exiting Program Mode |
10-5 |
|
|
|
|
|
Example of Production Selection Change |
10-6 |
|
|
|
|
|
Entering and Editing Product Information |
11-1 |
|
|
|
|
|
Entering Password |
11-1 |
|
|
|
|
|
Entering Product Name |
11-1 |
|
|
|
|
|
Entering Product Holding Time |
11-3 |
|
|
|
|
|
Enter Meal Usage |
11-4 |
|
|
|
|
|
Display Adjustments |
12-1 |
|
|
|
|
|
Change Display Time |
12-1 |
|
|
|
|
|
Change Display Intensity |
12-1 |
|
|
|
|
|
Change F° to C° |
12-1 |
|
|
|
||
Troubleshooting Guide |
13-1 |
|
|
|
|
|
Appendices |
14-1 |
|
|
|
|
|
Appendix A: Food Item Default Settings |
14-1 |
|
|
|
||
Appendix B: Cleaning and Preventive Maintenance |
14-2 |
|
||||
Appendix C: SOC for Universal Holding Cabinet |
14-5 |
|
|
|||
Appendix D: Production Charts |
14-5 |
|
|
|||
Appendix E: Quick Reference Guide |
14-6 |
|
|
|||
Appendix F: Typical Setups/Stacked Arrangements |
14-7 |
|
||||
Frymaster L.L.C., 8700 Line Avenue 71106, 5489 Campus Drive 71129 |
|
||
|
P.O. Box 51000, Shreveport, Louisiana 71135-1000 |
|
|
|
PHONE 318-865-1711 |
FAX 318-219-7135 |
|
PRINTED IN THE UNITED STATES |
SERVICE HOTLINE 1-800-24-FRYER |
819-5537 10/00 |
|
*8195537*
1 Universal Holding Cabinet
The Frymaster Universal Holding Cabinet (UHC) developed and manufactured exclusively for McDonald’s, is a short-term holding device to extend the freshness of a wide variety of cooked products. The UHC meets all McDonald’s standards for safety, efficiency, and cleanliness.
1.1Warranty Statement
A.Frymaster L.L.C. makes the following limited warranties to the original purchaser only for this equipment and replacement parts:
1.1.1Warranty Provisions – Universal Holding Cabinet
A.Frymaster L.L.C. warrants all components against defects in material and workmanship for a period of two years.
B.All parts, with the exception of fuses, are warranted for two years after installation date of cabinet
C.If any parts, except fuses, become defective during the first year after installation date, Welbilt will also pay straight-time labor costs to replace the part, plus up to 100 miles/160 km of travel (50 miles/80 km each way).
1.1.2Parts Return
A.All defective in-warranty parts must be returned to a Frymaster Authorized Factory Service Center within 60 days for credit. After 60 days, no credit will be allowed.
1.2.3Warranty Exclusions
•This warranty does not cover equipment which has been damaged due to misuse, abuse, alteration, or accident such as:
•Improper or unauthorized repair;
•Failure to follow proper installation instructions and/or scheduled maintenance procedures as prescribed in your MRC cards;
•Improper maintenance;
•Damage in shipment;
•Abnormal use;
•Removal, alteration, or obliteration of the rating plate;
This warranty also does not cover:
•Transportation or travel over 100 miles/160 km (50 miles/80 km each way), or travel time over two hours;
•Overtime or holiday charges;
•Consequential damages (the cost of repairing or replacing other property that is damaged), loss of time, profits, use or any other incidental damages of any kind.
1-1
There are no implied warranties or merchantability or fitness for any particular use of purpose.
For international warranty, the above procedures apply, except that the customer is responsible for freight and duty charges.
PARTS ORDERING AND SERVICE INFORMATION
Parts orders may be placed directly with your local Frymaster Factory Authorized Service Center (FASC)/Distributor. A list of Frymaster FASC/Distributors was included with the cabinet when shipped from the factory. If you do not have access to this list, please contact the Frymaster Service Department at 1-800-24-FRYER or 1-318-865-1711.
Please note that orders for wire/plastic trays, stacking kits, carts and casters should be placed with your local Kitchen Equipment Supplier (KES). Frymaster does not supply these accessory items.
To speed up your order, the following information is required:
Model Number_____________________________________
Serial Number_____________________________________
Voltage___________________________________________
Item Part Number___________________________________
Quantity Needed____________________________________
Service may be obtained by contacting your local Frymaster Authorized Service Center/Distributor. Service information may be obtained by calling the Frymaster Service Department. The following information will be needed in order to assist you quickly and efficiently:
Model Number_____________________________________
Serial Number______________________________________
Nature of the
Problem___________________________________________________________________
Also any other information which may be helpful in solving your service problem.
RETAIN AND STORE THIS MANUAL IN A SAFE PLACE FOR FUTURE USE.
1-2
1.2 Product Trays
There are 3 product tray sizes. See Appendices A and C for specific product volumes and recommended holding sizes and times. Use the tray that is designed for the specific product described below:
A.1/3-size plastic tray – Holds meat and egg products that are grilled (hamburger patties, bacon, eggs, sausage, etc.) There are two important procedures to remember when storing grilled products:
•The product should not be drained when picked up from the grill.
•The product is stacked when placed in the proper tray. 10-1 and sausage patties can be stacked up to six high. Eggs (except scrambled), grilled chicken and 4-1 patties can be stacked up to three high.
B.1/2-size wire tray – holds fried products (McNuggets, McChicken, Filet-O-Fish, etc.) Remember this important procedure when storing fried products:
•Fried products are to be placed on the wire rack. The rack should be placed on a crumb tray. No tray liners are required for these trays.
C.Full-size plastic tray – holds baked products (biscuits, muffins, etc.) Follow these procedures for baked products:
•After the biscuits have been removed from the biscuit oven, remove the wrapper and open the cardboard box.
•Put a tray liner in the tray and slide the biscuits onto the liner. The biscuit trays can hold up to 30 frozen biscuits, 20 scratch biscuits or 20 muffins.
Important Operational Tips
When placing a tray into the cabinet, make sure the slot line on the tray handle lines up with the edge of the slot.
Discard cracked or damaged trays.
When removing portions from a tray, slide the tray only as far as needed, then quickly return the tray to the slot line.
1-3
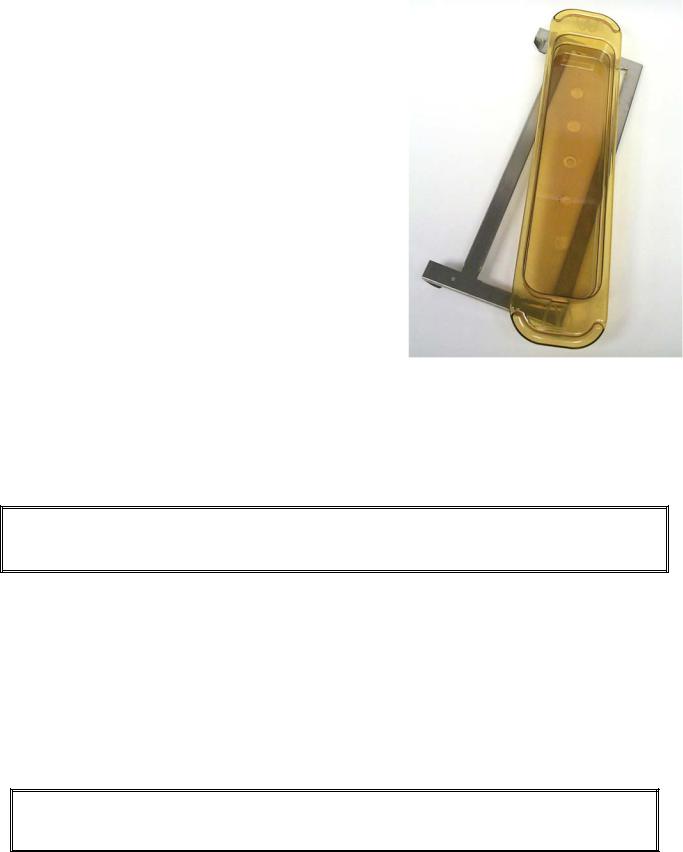
1.3 Install Grill Clip
The grill clip is shipped in the accessory package and is designed to hold the 1/3-size grill tray. It attaches to the grill to make transfer from the grill to the UHC faster and safer.
•Position the front of the grill clip under the lip of the grill.
•Lower the back of the clip until the grooves rest over the grill bar. The grill clip should firmly seat on the front of the grill. If the clip doesn’t fit snuggly, simply loosen the four nuts under the clip and slide it in or out as needed to tighten against the bar. Tighten the nuts after the clip is properly adjusted.
The grill clip attaches to the grill and holds grilled product in a UHC tray, making transfer to the holding cabinet easier.
1.4 Installation of 4” Legs
 CAUTION
Use caution when handling the cabinet or tilting the unit to/from the floor to install the legs. Maneuvering the cabinet should be accomplished by at least two people.
A.Carefully place the Universal Holding Cabinet on its right side (direction is determined with you facing the front of the unit), exposing the base of the cabinet.
B.Mount the leg pads to the bottom of the base using the 16-¼"-20 x ½" long screws and lockwashers provided.
C.Screw the leg into the mounted leg pad until fully tight.
D.Carefully turn the UHC upright until the unit stands on its legs. Perform Step 2, Power Up.
IF THE UHC IS INSTALLED WITH THE COUNTERTOP OPTION, ENSURE THE AREA WHERE THE UHC BASE AND COUNTERTOP MEET IS PROPERLY SEALED WITH A FOOD GRADE TYPE SEALANT.
1-4

2 Power Up
ALL ELECTRICALLY OPERATED APPLIANCES MUST BE ELECTRICALLY GROUNDED IN ACCORDANCE WITH LOCAL CODES, OR IN THE ABSENCE OF LOCAL CODES, WITH NATIONAL ELECTRIC CODE, ANSI/NFPA NO. 70-1990.
A.Power Requirements:
•Voltage – 208/240 VAC
•2620 Watts @ 208V – 3420 Watts @ 240V
•Frequency – 50/60 Hertz
•Single Phase
•20 amp Service
THIS APPLIANCE IS EQUIPPED WITH A THREE-PRONG GROUNDING PLUG FOR YOUR PROTECTION AGAINST SHOCK HAZARD AND MUST BE PPLUGGED INTO A PROPERLY GROUNDED THREE-PRONG RECEPTACLE. DO NOT CUT OR REMOVE THE GROUNDING PRONG FROM THIS PLUG.
B.Plug the Universal Holding Cabinet into the power source.
C.Place the power switch in the ON position. All control displays will illuminate green approximately 2 seconds after the power switch is activated.
D.Monitor the temperature of the slots. The time it takes the slot(s) to heat from ambient (room) temperature to a 155°F (68°C) setpoint should be approximately 15 minutes. It should take approximately 25 minutes to reach a 200°F (93°C) setpoint. If setpoint is not consistently achieved within these limits, call your local Factory Authorized Service Center for repair.
2-1

3 Operational Overview
The Universal Holding Cabinet (UHC) has either four slots that can hold up to three trays of product per slot or two slots, which hold up to three trays. Each slot has a controller that indicates the holding time and product selection for each tray position.
Universal Holding Cabinet (UHC)
The operator enters information into the controller via the display and keypad shown below. Each product selection has a temperature setpoint and product holding time. All product timers run independently. The slot temperature is controlled by the temperature setpoint of the leftmost product entry in each slot as viewed from the front of the cabinet. Product selections that have a holding temperature different that the leftmost product selection will not be available for entry into that slot’s configuration.
Most UHC’s have a front and rear display for each slot. All operator mode selections can be made from either display. Program changes can only be made from the front display. A Special Point of Distribution (SPOD) cabinet has only a front controller for each slot.
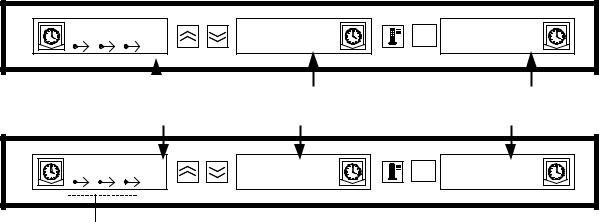
UHC Controller (Front Display and Keypad)
Timer keys (Left, Center, and Right) start and stop the timer associated with each tray position. The timer keys also turn off audible alarms.
Displays (Left, Center, and Right) show product selection and holding time for each tray position. The displays also provide programming information in program mode.
Left Timer Key |
Center Timer Key |
Right Timer Key |
SAUS |
SAUS |
ENTER |
SAUS |
|
MENU |
||||
PAGE |
||||
|
|
|
Left Display |
Center Display |
Right Display |
|
|
Menu Key |
UP/DOWN Arrow Keys |
Temperature/Enter |
|
|
|
/Page Key |
MENU key is used to select meal transitions (breakfast to lunch), Clean Mode operation and to turn individual slots on or off. The MENU key also provides access to program mode.
TEMPERATURE/ENTER/PAGE key has three functions. 1) Display slot temperature information; 2) Enter operational changes; and 3) Select Page parameters in program mode.
Up and Down ARROW keys are used to increase/decrease variables or change selections.
UHC Controller (Rear |
Left Timer Key |
Center Timer Key |
Right Timer Key |
Display and Keypad, |
|
|
|
Traditional UHC Only) |
|
|
|
|
SAUS |
SAUS |
SAUS |
|
Left Display |
Center Display |
Right Display |
3-1
4 Operator Mode
Operator Mode is the normal operating mode of the controller when all slots are at the proper temperature and no alarm conditions exist. Product information and holding time is displayed.
4.1 Display of Product Information
In Operator Mode the slot display indicates the following:
1.The product selection for a tray location.
2.The holding time remaining (in minutes) for active timers.
An active timer alternately displays the product selection and the time remaining. Inactive timers display only product selection.
4.2 Product Information and the Use First Display
The Operator Mode indicates product selection and holding time status by changing the display intensity.
The “Use First Display” indicates the product with the least amount of holding time remaining. There are two levels of display intensity used to indicate product status.
1.Brighter level of display intensity and running dots indicate the “use first” product selection.
2.Lower level of display intensity indicates:
a.An active timer that is not the product selection with the least holding time remaining.
b.An inactive timer where only the product selection is displayed.
Timer Status Indicators
SAUS |
SAUS |
ENTER |
SAUS |
MENU |
|||
|
|
PAGE |
|
Use-First Timer |
|
|
Active Timer |
Inactive Timer |
|
||||
Higher Intensity |
Lower Intensity |
Lower Intensity |
||
12 |
20 |
ENTER |
SAUS |
MENU |
|||
|
|
PAGE |
|
Running Dots
4-1

5 Timer Operation
5.1 Starting A Timer
Press the Timer key above the tray position to start a timer. The timer will time down from a preset value and alternately display product selection and the holding time remaining. If more than one tray of a product selection is timing, the location of the product with the least remaining holding time is indicated by the Use First display status.
|
|
ENTER |
|
|
SAUS |
SAUS |
MENU |
SAUS |
|
PAGE |
||||
|
|
|
Press TIMER key to start a timer
|
|
ENTER |
|
|
60 |
SAUS |
MENU |
SAUS |
|
PAGE |
||||
|
|
|
Active display alternately indicates holding time and product selection
|
|
ENTER |
|
|
SAUS |
SAUS |
MENU |
SAUS |
|
PAGE |
||||
|
|
|
5.2 Stopping A Timer
Press the Timer key above the slot position to turn off an active timer. The timer stops timing and the display changes to the inactive timer status. If more than one tray of a product selection is timing, use first indication changes to next active timer.
Timer to Stop |
Next Shortest Time |
Inactive Timer |
|
|
ENTER |
|
|
SAUS |
SAUS |
MENU |
SAUS |
|
PAGE |
||||
|
|
|
Active display alternately indicates holding time and product selection
|
|
ENTER |
|
|
19 |
24 |
MENU |
SAUS |
|
PAGE |
||||
|
|
|
Press TIMER key to stop timer
|
|
ENTER |
|
|
SAUS |
SAUS |
MENU |
SAUS |
|
PAGE |
||||
|
|
|
Use-First indication changes to next active timer
5-1
 Loading...