


OPERATOR’S GUIDE
Infusion Workstation
®
Base Intensive
Introduction
Base Intensive Orchestra® offers a unique solution in CCU, ICU and anaesthesia. The Base Intensive Orchestra®:
Brings additional performances.
Facilitates and secures drug programming.
Uses a multi-channel infusion pump potentialities.
Summarises the infusion data at patient bed.
Communicates, via a unique serial cable, parameters to a centralised system of PDMS (Patient Data Management System).
User interface is underlined by the color screen and an ergonomic command for more safeties and user friendliness.
According to the number of intravenous infusions needed, at any combination, from 1 to 8 Module MVP or Module MVP+ or Module DPS or Module DPS Visio or Module DPS+ (up to 14 or 16 Modules if Base Intensive is connected to Base A) can be fitted onto the Base Intensive Orchestra®.
The use of this material requires great care. The user must be able to handle the instrument properly and must know how to fully operate.
Please read the operator’s guide carefully before putting the device into use.
Prior to any use of Modules with the Base Intensive Orchestra®, please refer to the Module DPS, Module DPS Visio, Module DPS+, Module MVP and Module MVP+ Orchestra® Operator’s Guides.
Table of contents |
|
Operations for use ................................................................. |
2 |
Infusion modes....................................................................... |
6 |
Two channel relay.................................................................. |
7 |
History..................................................................................... |
10 |
OPTIONS menu ...................................................................... |
11 |
Safety features ....................................................................... |
14 |
Base Intensive - Performances............................................. |
15 |
Base Intensive – Technical characteristics......................... |
16 |
Precautions to be taken......................................................... |
17 |
Guidance and manufacturer's declaration on electromagnetic |
|
environment ........................................................................... |
18 |
Maintenance recommendations ........................................... |
20 |
Function with the internal battery ........................................ |
21 |
Accessories ............................................................................ |
21 |
Conditions of guarantee........................................................ |
22 |
Useful addresses ................................................................... |
24 |
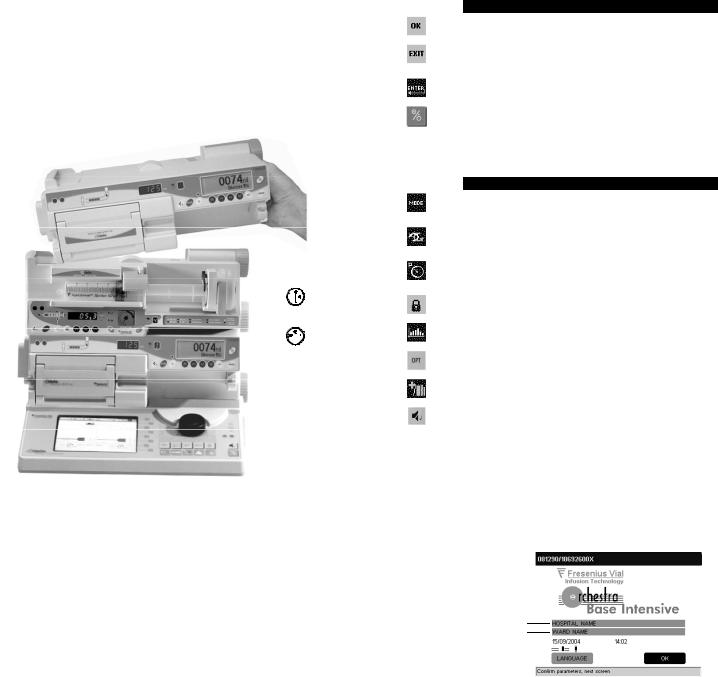
Operations for use
Installation of Modules (Module
DPS, Module DPS Visio, Module DPS+, Module MVP, Module MVP+ Orchestra®) on the Base
Intensive
We recommend you partially or completely recharge the battery when you receive the devices or in the case of prolonged storage so as to prevent all risk of premature discharge.
Special attention must be paid to the stability of the Base Intensive when several Modules are used.
From the 4th Module onwards, the Base must be equipped with a Multifix to ensure rigidity (see « accessories » page 21).
The Base Intensive can be used on mains  or battery
  (red indication because looks like an alarm, normal functioning of Base Intensive is on mains).
Note: connect device to mains as soon as possible to recharge Base and Modules’ batteries.
1.Connect the power supply cord to the Base Intensive and to the mains source. The mains power indicator lights up  .
.
2.Install the Modules on the Base Intensive or on another Module already installed and turn the locking handle to locked position.
Use of keyboard and rotary knob
Parameter selection and modification
Parameter selections and modifications are done with the rotary knob and the keyboard selection keys.
To move from an item to another, use the rotary knob.
To select an item, press the rotary knob or the  key.
key.
To modify a value of the selected item, use the rotary knob.
To confirm the modification, press the rotary knob or the  key.
key.
Symbols |
Parameter selection and modification |
|
Confirm parameters and go to next screen. |
|
|
|
Exit from an item or a screen without saving the |
|
modifications. |
|
|
|
Confirm a selection or a value under modification. |
|
|
|
Base Intensive power on and off. |
Module fixing point Locking handle
Locked position
|
Unlocked position |
||
|
|
|
|
Other functions
Symbols |
Other available functions |
|
Selection of particular Module DPS infusion modes |
|
functions. |
|
|
|
Access to the 2 channel relay program with Module |
|
DPS. |
|
|
|
Access to infusion pressure information and |
|
authorized parameters adjustment. |
|
|
|
Allows locking of Base Intensive keyboard. |
|
|
|
Access to history data. |
|
|
|
Access to OPTIONS menu. |
|
|
|
Access to the visualisation of drug library parameters. |
|
|
|
Silence alarm. |
Ex. : Module DPS and Module MVP
3.Quick check: see protocol page 14. This test is recommended before use or when the device has not been used for a long time. This test allows a complete alarms and safety features check.
Welcome screen
When Base Intensive is put into use for the first time, complete the following items:
Free items.
Ex.: Hospital, department
If necessary, select language with the rotary knob.
1395-6_nu_base_int_v3_2_is_120606.doc
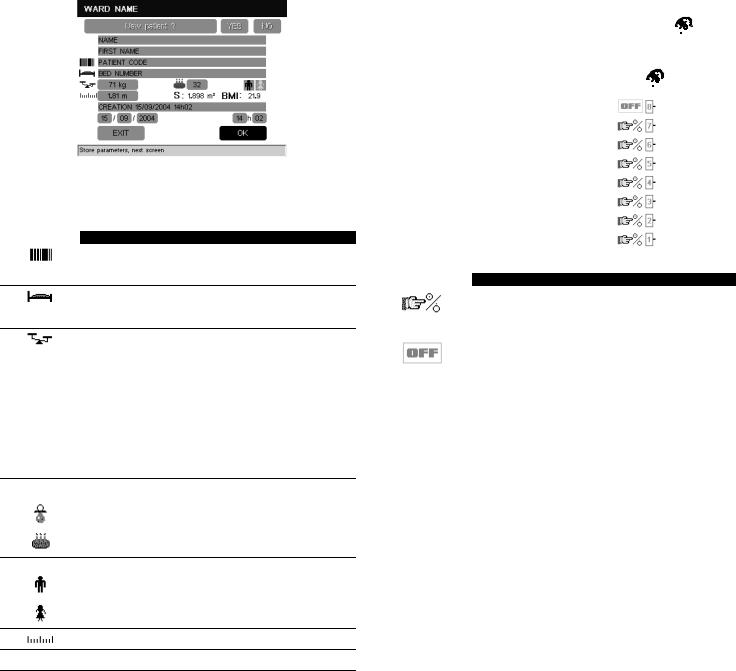
Patient screen |
Module DPS switching on |
Note: It is recommended to use codes to identify the patient since the Base Intensive memorizes the patient infusion history. This allows to guarantee patient anonymity according to the law in force.
Symbols |
Function |
Patient code
Patient identification with a 30 characters code.
Bed/room number
Bed/room identification with a 30 characters code.
Patient weight
The weight must be entered when you select a new patient.
This value is used when flow rate units and volume are calculated by weight.
From 250 g to 1 kg, 10 g increment.
From 1 to 10 kg, 100 g increment. From 10 to 250 kg, 1 kg increment.
Patient age
Adjustment from 1 to 24 months, 1 month increment
Adjustment from 2 to 150 years, 1 year increment.
Patient sex
Male
Female
Patient’s height: from 0,20 to 2,50 m, 1 cm increment.
SCalculated body surface.
BMI |
Body Mass Index. |
Note: the hour and date adjustment is possible only when you select a new patient (ex: summer or winter time change).
When Base Intensive is connected to the mains, Module DPS can be
switched on from their own respective keyboards by pressing the 


 key or from the Base Intensive by pressing the
  key.
key.
When Base Intensive is working on its battery, Module DPS can be switched on only from their own keyboards by pressing the 


 key.
key.
Symbols |
Module DPS Orchestra® switching on conditions |
|
Module can be switched on from the Base Intensive |
|
Orchestra® or from its keyboard when the Base |
|
Intensive is connected to the mains. |
|
|
|
Module can be switched on only from its own keyboard |
|
when the Base Intensive is connected to the mains. |
1395-6_nu_base_int_v3_2_is_120606.doc
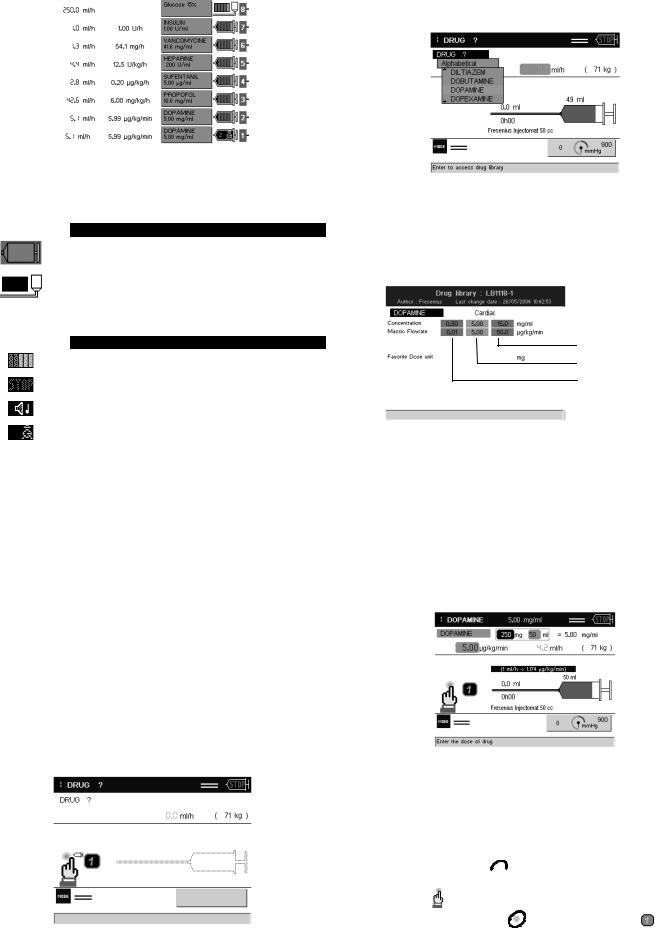
Summary screen
When a Module is switched on without any drug program, the messageis displayed. This message means that no drugs have been programmed via the Base Intensive or that this drug is not identified at the new connection.
Symbols |
Modules type |
|
Module DPS |
|
|
|
Module MVP |
Note: The flashing symbol  reminds the user that syringe selection and confirmation must be done from the Module DPS keyboard.
Drug programming
1.Selecting the drug enables access to the programmed drug library.
2.Select the drug name from the alphabetical list or from the family name.
It is possible, at any time, to recall the drug preprogrammed values from the library pressing the  key.
key.
Symbols |
Modules status |
|
Infusion |
|
|
|
Pause |
|
|
|
Alarm |
|
|
|
Module DPS awaiting for a 2 channel relay |
|
(See page 8) |
Drug programming and infusion start
To program a drug:
1.Select the channel number with the  keys.
keys.
2.Select or confirm the installed syringe.
3.Select or confirm the drug.
4.Adjust infusion parameters.
5.Start the infusion.
Note : in order to improve infusion start, it is recommended to prime the infusion line until a drip appears.
Syringe selection
To reach the syringe programming screen:
1.Install a syringe.
2.Select and confirm syringe on the Module DPS (Please refer to the Module DPS Operator’s Guide, page 2).
superior limits
usual values
inferior limits
Important:
The Base Intensive integrates a drug library as example. Prior to any use, the authorized personnel must check that usual drug values correspond to the protocols used.
Prior to any use of the Base Intensive, it is necessary to carefully read Drug’Lib Operator’s Guide to modify or confirm the drugs parameters.
Parameters adjustment and infusion start
Values indicated per default are the usual values defined in the drug library.
1.Check that the drug name is the one contained in the syringe of the selected channel.
2.Confirm or adjust, if necessary, the drug dilution value contained in the syringe.
3.Confirm or adjust, if necessary, the dose rate value according to the desired administration.
4.Start infusion pressing the  key of the Module DPS.
Note: The symbol |
and |
displayed alternatively reminds the user that |
|
infusion start is made pressing the |
key of the Module DPS . |
||
1395-6_nu_base_int_v3_2_is_120606.doc
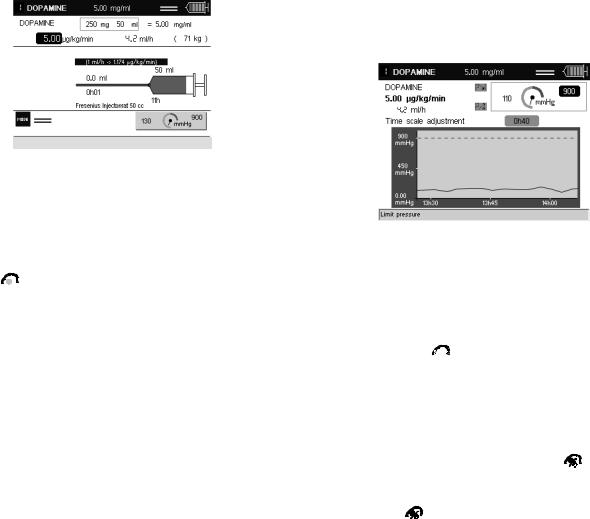
Flow rate modifications and information during infusion
The infusion rate, in the selected unit, can be modified from the Base Intensive.
Rate (in ml/h) can be modified from the Module keyboard. Information about rate is automatically updated on Base Intensive.
Flow rate program
To modify the infusion rate from the Base Intensive :
1.Select the channel pressing the  key.
key.
2.Press the  key or the rotary knob.
3.Adjust flow rate value with the rotary knob.
4.Press the  key or the rotary knob to confirm the modification.
5.Press the 


 Module’s key to confirm the new flow rate has been done.
During a rate modification on the Base Intensive, pressing the  key will revert back to the initial value.
Notes:
At syringe change:
the name and concentration of the last selected drug are proposed per
default,
if the selected drug name is not modified, then the total infused volume is cumulated in the programming screen of the selected channel.
Infusion pressure adjustment and display
Pressure limit value programming and drops in pressure activation are made directly from the Base Intensive for a Module DPS only.
For the use of these functions on the Modules, please refer to the Module Operator’s Guides.
To adjust pressure parameters from the Base Intensive:
1.Select the channel pressing the  key.
key.
2.Press the  key to have access to the adjustment screen:
It is also possible to modify the pressure alarm threshold, either in 3 pre-set threshold mode or one variable threshold mode depending on the Module DPS configuration.
Infusion stop
To stop infusion, press the 


 key from the Module.
Turning off the Modules
When no Module is infusing, turning off the Modules can be done by pressing
the  key from the Base Intensive or by pressing the


 key from the
Module.
When a Module is infusing on the Base Intensive, turning off the Modules is done by pressing the 


 key from the Module for more than 2 seconds.
Turning off the Base Intensive
Turning off the Base Intensive is done by pressing the  key. Some information messages may be displayed when turning off.
1395-6_nu_base_int_v3_2_is_120606.doc
Infusion modes
Continuous mode
Continuous mode is the default mode run by the Base Intensive.
Bolus mode
Bolus programming and activation are possible when a channel is in continuous infusion or after the injection of a loading dose.
1.Select the channel pressing the  key.
key.
2.Press the  key to have access to the Modes selection screen.
3.Select the Bolus mode  .
.
4.Adjust the bolus dose value to be infused as well as the duration. The volume to be infused as well as the infusion flow rate (in ml/h) of the Module DPS are automatically recalculated.
5.Check bolus parameters.
6.Start bolus infusion selecting the START icon and confirm on the Module DPS. In case of a pre-program, select the STORE icon to confirm parameters storage.
When bolus has been delivered, the Module DPS returns to its initial status (stop or infusion), bolus programming parameters are stored when there is a new programming.
Loading dose + continuous mode
Loading dose programming and starting followed by a continuous flow rate are possible after a drug selection and before starting the infusion.
1.Select the channel and the drug.
2.Press the  key to have access to the Modes selection screen.
3.Select the Loading dose + Continuous Mode  .
.
4.Adjust the loading dose value as well as its duration. The Module DPS volume to be infused and infusion flow rate (in ml/h) are automatically recalculated.
5.Adjust the maintenance flow rate value.
6.Start the loading dose infusion selecting the START icon. You can stop the loading dose infusion, at any time, pressing the STOP key of the Module DPS or with the STOP icon of the Base Intensive. It can be reused selecting the START icon.
At the end of the loading dose infusion, the Module DPS infuses at the programmed maintenance flow rate.
In case you use a drug that does not require any administration adjustment (if minimum dilution is the same as the maximum dilution and the typical dilution), the Base Intensive displays automatically the loading dose screen.
Note: Access to CONTINUOUS, BOLUS, LOADING DOSE + CONTINUOUS modes can be locked or unlocked by user with a code to be accessed from the summary screen.
1395-6_nu_base_int_v3_2_is_120606.doc

Two channel relay
The use of the 2 channel relay is particularly recommended to avoid any infusion discontinuity, for example, in case of infusion of cardio-vascular or short half-life anaesthetic drugs.
Principle
The 2 channel relay consists in associating two channels that will infuse, either one after the other a same drug at the same administration.
In case of different concentrations for the same drug, the flow rate (in ml/h) calculation will be done automatically to respect the prescribed dose.
Installation of the two syringes can be done simultaneously only if the syringe of the second channel in relay has been validated after the activation of the 2 channel relay.
Pressing the PRIME/BOLUS 

 key is mandatory for the channel in relay so as to improve the two channel relay performances.
In case the second syringe is installed later, the user will preprogram a prealarm « relay not ready » to be informed from 5 minutes to 1 hour before the end of infusion of the first syringe in order to complete the relay.
Recommendations to operate a 2 channel relay
The respect of these recommendations is mandatory when infusing hemodynamically unstable patients.
Orchestra® Infusion Workstation installation
Place Base Intensive at the same level or lower than the patient. Use Module DPS from position 1 to position 6 only.
Syringes to be used
Adapt syringe size to the selected flow rate: flow rate < 0.5 ml/h : 5 and 10 cc syringes,
0.5 ml/h < flow rate < 1 ml/h : 5, 10 and 20 cc syringes,
flow rate > 1 ml/h : any syringe size, i.e. 5, 10, 20, 50/60 cc. Please refer to Module DPS syringe list.
2-channel relay syringe installation
Up to 24 hours before the infusion starts.
Always check that the selected syringe corresponds to the installed syringe.
Make sure that the infusion line is not connected to the patient when priming.
Prime till a drop appears at the end of the infusion line.
Patient connection
Use catheters with low priming volume and reduced compliance.
Unidirectional valves are authorised while anti-siphon valves are not (the open pressure can generate infusion delay).
Carefully respect the cautions applying to continuous infusion of vaso-active drugs (dedicated access route, avoid discontinuous injection, …).
1395-6_nu_base_int_v3_2_is_120606.doc

Two channel relay program
1.Program a drug from the library on a channel. Adjust, if necessary, the infusion parameters and start infusion.
2.Press the  key to reach the screen for selection of the channel to be associated.
3. Power on the channel to be associated :
either from the Base Intensive with the  key.
key.
or directly on the Module DPS and select the number of the channel to be associated with the  key.
key.
4.Syringe installation on the channel relay:
a.Install the syringe containing the same drug as the one programmed during the relay.
b.Select then confirm the syringe type.
e. At the end of the 2-channel relay program, the Module DPS displays the drug name alternatively with the message. Once the 2-channel relay is programmed, the flow rate may be modified at any time.
c. "PRIME - Check patient is not connected to the syringe" message
displays on the Base Intensive. On the Module DPS, the |
|
||
message displays alternatively with the drug name . |
|
||
Press the PRIME/BOLUS |
key of the Module DPS to be in prime |
||
mode ( |
message displays on the Module DPS). Press a |
||
second time and maintain pressed the PRIME/BOLUS 

 key to make the purge. Prime till a drop appears at the end of the infusion line.
Important: make sure that the patient is not connected to the syringe during the priming phase.
d.Confirm the drug name pressing the 


 key of the Module DPS. If necessary, adjust concentration.
1395-6_nu_base_int_v3_2_is_120606.doc
 Loading...