


Electrolux
EFS - Dishwashing Systems Platform
Electrolux Professional
SERVICE MANUAL
CONTENTS: This document contains the instructions to set electronic board parameters via user interface for following dishwashers:
EDITION: 01.2014
Valid for firmware versions: 0.23 and higher.
WARNING:
All the safety regulations and procedures to be followed by the Specialised Technician/Technical Assistance performing electrical, mechanical or electronic maintenance operations are contained in the instruction manual supplied with the machine: refer to this document before operating. This applies for anyone carrying out operations using these documents. The specialised technician must wear personal protection equipment suitable for the work being performed (e.g. gloves, safety glasses and shoes, suitable clothing, etc.) and use appropriate tools, equipment and auxiliary means.
DOC. NO. 5956.68V.00 |
P. 1 / 38 |

Electrolux
EFS - Dishwashing Systems Platform
Electrolux Professional
DOC. NO. 5956.68V.00 |
P. 2 / 38 |

Electrolux
EFS - Dishwashing Systems Platform
Electrolux Professional
INDEX
1 |
KEYBOARDS |
|
Pag. |
4 |
|
|
1.1 |
DESCRIPTION OF CONTROL PANEL |
Pag. |
4 |
|
|
1.2 |
SERVICE/ MAINTENANCE COMMANDS |
Pag. |
4 |
|
2 |
MANUAL ACTIVATION OF DETERGENT AND RINSE AID DISPENSERS |
Pag. |
5 |
||
|
2.1 |
DETERGENT DISPENSER ACTIVATION |
Pag. |
5 |
|
|
2.2 |
RINSE AID DISPENSER ACTIVATION |
Pag. |
5 |
|
3 |
RINSE PUMP MANUAL ACTIVATION |
Pag. |
5 |
||
4 |
ACCESSING THE PARAMETERS MENU |
Pag. |
5 |
||
5 |
USER PARAMETERS |
Pag. |
8 |
||
|
5.1 |
DISPENSERS PARAMETERS - DETERGENT AND RINSE AID DOSAGE |
Pag. |
8 |
|
|
|
5.1.1 Peristaltic tube fitting and replacement instructions |
Pag. |
10 |
|
|
5.2 |
COUNTERS |
Pag. |
12 |
|
6 |
FACTORY PARAMETERS |
Pag. |
14 |
||
|
6.1 |
BOILER PARAMETERS |
Pag. |
14 |
|
|
6.2 |
TANK PARAMETERS |
Pag. |
16 |
|
|
6.3 |
CYCLE SETTING |
Pag. |
17 |
|
|
|
6.3.1 |
Wash cycle diagram |
Pag. |
18 |
|
|
6.3.2 Cycle 1 parameters |
Pag. |
19 |
|
|
|
6.3.3 Cycle 2 parameters |
Pag. |
19 |
|
|
|
6.3.4 Cycle 3 parameters |
Pag. |
19 |
|
|
|
6.3.5 Drain/Cleaning cycle parameters |
Pag. |
19 |
|
|
6.4 |
OTHER PARAMETERS |
Pag. |
21 |
|
|
|
6.4.1 |
Dishwashing parameters |
Pag. |
21 |
|
|
6.4.2 Read Only parameters |
Pag. |
21 |
|
|
|
6.4.3 Communication and HACCP parameters |
Pag. |
21 |
|
|
|
6.4.4 |
Configuration parameters |
Pag. |
22 |
|
|
6.4.5 Delime cycle parameters (Delime) |
Pag. |
22 |
|
|
|
6.4.6 Energy saving device parameters (ESD) |
Pag. |
25 |
|
|
|
6.4.7 Water softener parameters |
Pag. |
25 |
|
7 |
DEFAULT VALUES |
Pag. |
26 |
||
8 |
MAIN BOARD CONFIGURATION |
Pag. |
27 |
||
|
8.1 |
CODE -> Prog. TABLE |
Pag. |
27 |
|
|
8.2 |
PROGRAMMING SHEETS |
Pag. |
28 |
|
|
8.3 |
USER INTERFACE AND MAIN BOARD CONNECTORS |
Pag. |
34 |
|
|
|
8.3.1 |
Connectors layout |
Pag. |
34 |
9 |
ALARM MESSAGES AND TROUBLESHOOTING |
Pag. |
34 |
||
|
9.1 |
MAIN MALFUNCTIONS NOT DUE TO THE MAIN BOARD |
Pag. |
34 |
|
|
9.2 |
ALARMS THAT STOP THE DISHWASHER |
Pag. |
35 |
|
|
|
9.2.1 Alarm codes for automatic hood type dishwashers |
Pag. |
36 |
|
|
9.3 |
ALARMS THAT DON'T STOP THE DISHWASHER |
Pag. |
37 |
|
INDEX OF FIGURES AND TABLES
Table 1 ACCESSING THE PARAMETERS MENU |
Pag. |
7 |
|
Table 2 ACCESSING THE DISPENSERS PARAMETERS |
Pag. |
9 |
|
Table 3 |
ACCESSING THE COUNTERS |
Pag. |
13 |
Table 4 |
ACCESSING THE BOILER PARAMETERS |
Pag. |
15 |
Table 5 |
ACCESSING THE TANK PARAMETERS |
Pag. |
17 |
Table 6 |
ACCESSING THE CYCLE PARAMETRS |
Pag. |
20 |
DOC. NO. 5956.68V.00 |
P. 3 / 38 |
Electrolux
EFS - Dishwashing Systems Platform
Electrolux Professional
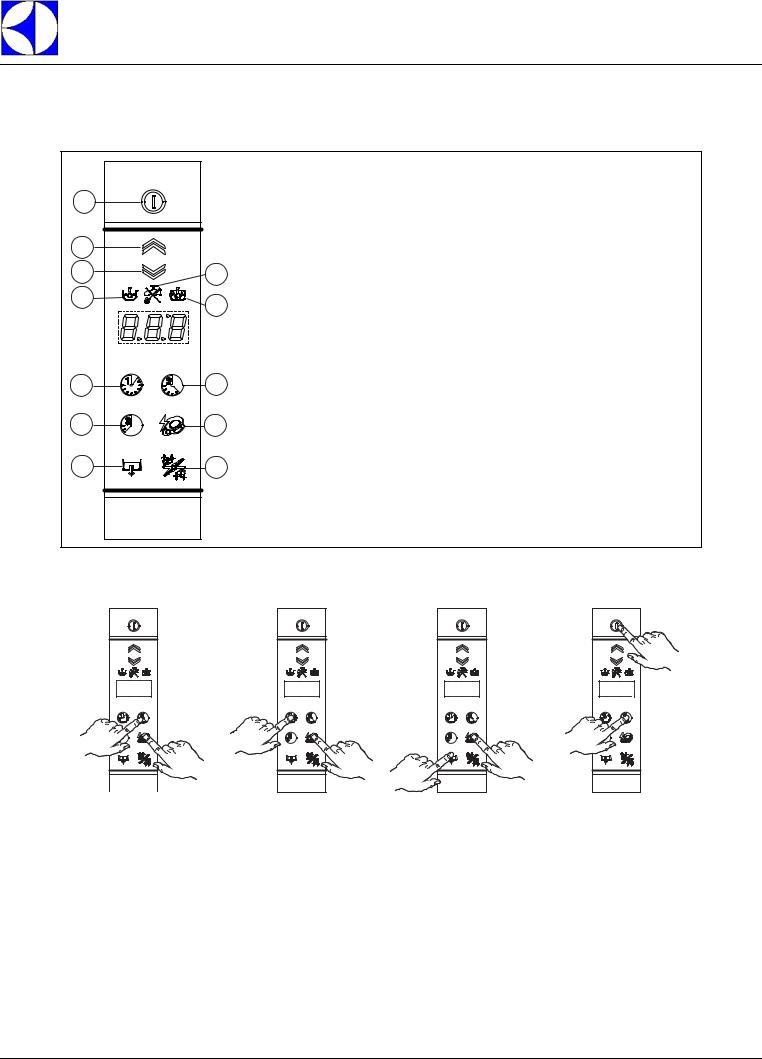
1 KEYBOARDS
1.1DESCRIPTION OF CONTROL PANEL
|
|
Key |
|
||
A |
|
A |
= On / Off |
||
|
B |
= Open hood |
|||
|
|
C |
= Close hood |
||
B |
|
D |
= |
“Tank temperature” indicator light |
|
|
E |
= |
“Water tap” indicator light |
||
C |
E |
||||
F |
= |
“Boiler temperature” indicator light |
|||
D |
F |
G |
= Wash cycle 1 |
||
H |
= Wash cycle 2 |
||||
|
|||||
|
|
I |
= Wash cycle 3 |
||
|
|
L |
= |
High Productivity or ETL-Sanitization |
|
|
|
M |
= |
Drain / self-cleaning cycle |
|
G |
H |
N |
= |
Delime cycle (this function can only be activated by a specialised |
|
|
|
technician) |
|||
I |
L |
|
|
|
|
M |
N |
|
|
|
|
1.2SERVICE/ MAINTENANCE COMMANDS
dEt |
Fig. 1 Detergent
dispenser Manual
Activation
rAi ---
Fig. 2 Rinse Aid |
Fig. 3 Rinse Pump |
Dispenser Manual |
Manual Activation (used |
Activation |
to EMPTY BOILER) |
63°C |
Fig. 4 Accessing the
parameters menu
DOC. NO. 5956.68V.00 |
P. 4 / 38 |
Electrolux
EFS - Dishwashing Systems Platform
Electrolux Professional
2 MANUAL ACTIVATION OF DETERGENT AND RINSE AID DISPENSERS
When replacing detergents may be necessary activate the dispensers to fill hoses.
2.1DETERGENT DISPENSER ACTIVATION
dEt |
Switch on the dishwasher.
Press and hold down wash cycle 2 (“H” - Par. 1.1 DESCRIPTION OF CONTROL PANEL) and “L” key (Par. 1.1 DESCRIPTION OF CONTROL PANEL), after two 'beep' the detergent dispenser starts work for 20 sec.
2.2RINSE AID DISPENSER ACTIVATION
rAi
Switch on the dishwasher.
Press and hold down wash cycle 1 (“G” - Par. 1.1 DESCRIPTION OF CONTROL PANEL) and “L” key (Par. 1.1 DESCRIPTION OF CONTROL PANEL), after two 'beep' the rinse aid dispenser starts work for 40 sec.
3 RINSE PUMP MANUAL ACTIVATION
Use this function to empty the boiler (if the dishwasher is not to be used for a long time, for maintenance operation: ex. before replacing main board).
|
Switch on the dishwasher. |
|
Close the door and press and hold down Drain / self-cleaning cycle (“M” |
|
- Par. 1.1 DESCRIPTION OF CONTROL PANEL) and “L” key (Par. 1.1 |
|
DESCRIPTION OF CONTROL PANEL). A buzzer signal indicates the |
--- |
rinse pump activation and the display shows three blinking lines. Three |
beeps indicate the cycle end. |
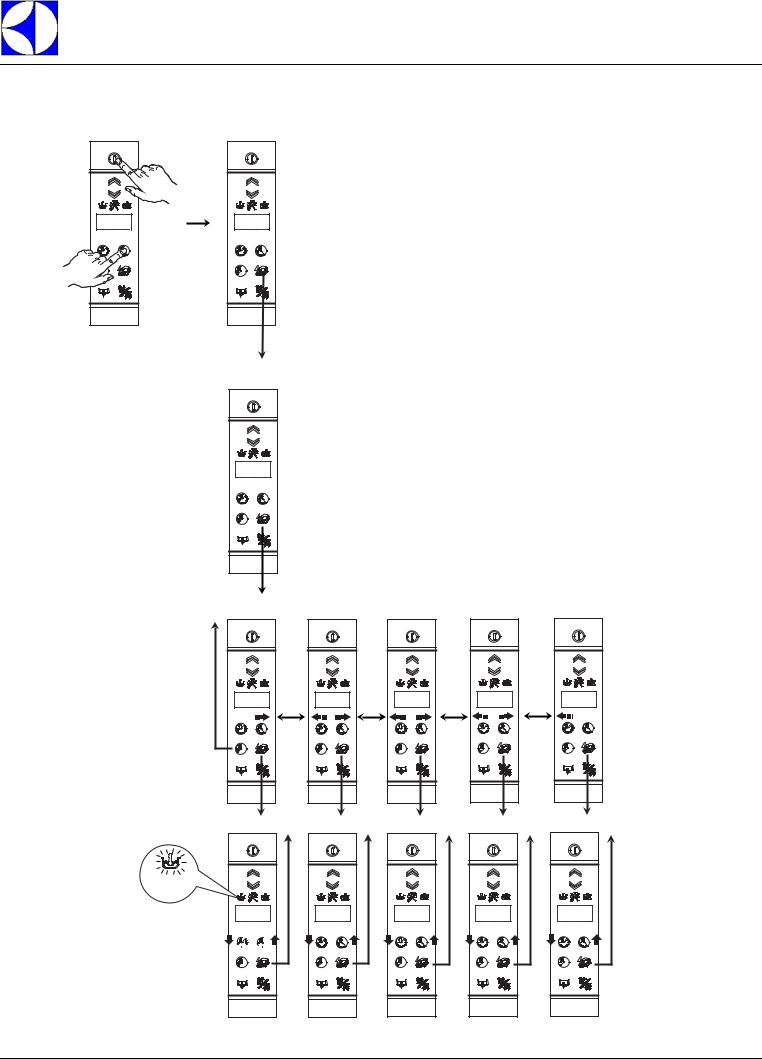
4 ACCESSING THE PARAMETERS MENU
DOC. NO. 5956.68V.00 |
P. 5 / 38 |

Electrolux
EFS - Dishwashing Systems Platform
Electrolux Professional
The parameters are divided into two families: user parameters and factory parameters.
In the family there are parameters for adjusting the detergent and rinse aid dispensers and the counters (wash cycles, drain/cleaning cycles, etc. ).
In the family there are all parameters that determine dishwasher operation: boiler and tank working temperature, duration of the phases of each cycle, etc.
To access the parameters menu, the unit must be in standby mode: switch on the unit and check that no cycles are selected. In the programming phase it is advisable to keep the hood open to avoid starting a cycle if the two buttons are not pressed together (see point 2 in the following example).
Example:
With reference to Table 1 ACCESSING THE PARAMETERS MENU assuming the boiler temperature parameter is to be modified.
1.Switch the dishwasher off and then on again;
2.Enter the parameter mode by pressing and holding down the On/ff buttons (“A” - Par. 1.1 DESCRIPTION
OF CONTROL PANEL) and wash cycle 2 (“H” - 1.1 DESCRIPTION OF CONTROL PANEL) for approx. 5 sec. The display shows the message ;
3.Press the wash cycle 2 (“H” - Par. 1.1 DESCRIPTION OF CONTROL PANEL) button to go to the family;
4.Press the button (“L” - 1.1 DESCRIPTION OF CONTROL PANEL) to access the boiler parameters family;
5.Press the button (“L” - Par. 1.1 DESCRIPTION OF CONTROL PANEL) again to display the boiler temperature parameter ;
6.Press the button (“L” - Par. 1.1 DESCRIPTION OF CONTROL PANEL) again to display the boiler temperature parameter value;
7.Use wash cycle 1 (“G” - Par. 1.1 DESCRIPTION OF CONTROL PANEL) and wash cycle 2 (“H” - Par. 1.1 DESCRIPTION OF CONTROL PANEL) to modify the parameter value; use the wash cycle 1 button to decrease the value and the wash cycle 2 button to increase it;
NOTE: If the tank LED is on, the parameter value corresponds to the factory-set value.
8.Press the button (“L” - Par. 1.1 DESCRIPTION OF CONTROL PANEL) to confirm the value and return to the display of parameters.
NOTE: To exit the parameter mode and return to the display of the families, press wash cycle 3 (“I” - Par. 1.1 DESCRIPTION OF CONTROL PANEL).
Similarly it is possible to change the other values; afterwards, switch the machine off and then on again.
DOC. NO. 5956.68V.00 |
P. 6 / 38 |

Electrolux
EFS - Dishwashing Systems Platform
Electrolux Professional
Table 1 ACCESSING THE PARAMETERS MENU
(keep the buttons pressed User parameters |
Factory parameters |
for approx. 5 sec.) |
|
63°C |
USr |
Dispensers parameters |
Counters |
FAC |
Boiler parameters |
Tank parameters |
diS |
Cnt |
boi |
dIn |
|
55 |
- |
+ |
rIn |
Bt°C |
|
|
Default |
|
|
11 |
|
76 |
- |
+ |
- |
+ |
btH |
|
2 |
- |
+ |
tub |
DOC. NO. 5956.68V.00 |
P. 7 / 38 |
Electrolux
EFS - Dishwashing Systems Platform
Electrolux Professional
5 USER PARAMETERS
5.1DISPENSERS PARAMETERS - DETERGENT AND RINSE AID DOSAGE
In this paragraph is explained how to set the dosage for the detergent and rinse aid dispensers. For each dispenser there are two parameters: the initial dosage and the dosage during cycle execution.
By changing the parameter is possible to set the desiered unit of measure ( =g/l or =seconds). If
= need to set he parameters on the concentration in g/l, while if = parameters correspond to the activation times in seconds.
Sym. |
Parameter Description |
Unit |
Min |
Max |
Factory Default |
|
|
|
|
|
|
|
Dispensers unit of measure ( =g/l or =seconds) |
- |
- |
- |
|
|
|
|
|
|
|
|
Initial Detergent Dosage (during filling tank) |
[g/l] |
0 |
4,00 |
2,00 |
|
|
[s] |
0 |
240 |
55 |
|
|
|
|
|
|
|
Initial Rinse Aid Dosage (starts when tank filled) |
[g/l] |
0 |
1,00 |
0,12 |
|
|
[s] |
0 |
180 |
11 |
|
|
|
|
|
|
|
Detergent Dosage During Cycle Execution (during wash phase) |
[g/l] |
0 |
4,00 |
2,00 |
|
|
[s] |
0 |
182 (*) |
5 |
|
|
||||
|
|
|
|
|
|
|
Rinse Aid Dosage During Cycle Execution (when refilling boiler) |
[g/l] |
0 |
1,00 |
0,12 |
|
|
[s] |
0 |
62 (*) |
2 |
|
|
|
|
|
|
(*) Note for external dispensers (if: = ):
•if the detergent dispenser works when WASHING PUMP is being activated; at the
same time voltage is supplied between connectors L17–L19 (main terminal box);
•if the detergent dispenser works when LOADING EV is being activated to re-fill boiler
level; at the same time voltage is supplied between connectors L17–L19 (main terminal box);
•if the rinse aid dispenser works when LOADING EV is being activated to re-fill boiler
level; at the same time voltage is supplied between connectors L18–L19 (main terminal box);
•if the rinse aid dispenser works when WASHING PUMP is being activated; at the
same time voltage is supplied between connectors L18–L19 (main terminal box).
- For electrical connections refer to electric diagram
Example
Suppose there is connected an external detergent dispenser with a probe into the tank. A typical setting could be:
•the dispenser is not activated during filling tank;
•the dispenser is supplied during washing phase and the probe automatically dose the right
detergent amount.
DOC. NO. 5956.68V.00 |
P. 8 / 38 |
Electrolux
EFS - Dishwashing Systems Platform
Electrolux Professional
Table 2 ACCESSING THE DISPENSERS PARAMETERS
(keep the buttons pressed for approx. 5 sec.)
63°C |
USr
Dispensers parameters
diS
dun |
Default
G-L
- 
 +
+
dIn |
|
200. |
- |
+ |
rIn |
|
012. |
- |
+ |
dEt |
|
200. |
- |
+ |
rAi |
|
012. |
- |
+ |
DOC. NO. 5956.68V.00 |
P. 9 / 38 |
Electrolux
EFS - Dishwashing Systems Platform
Electrolux Professional
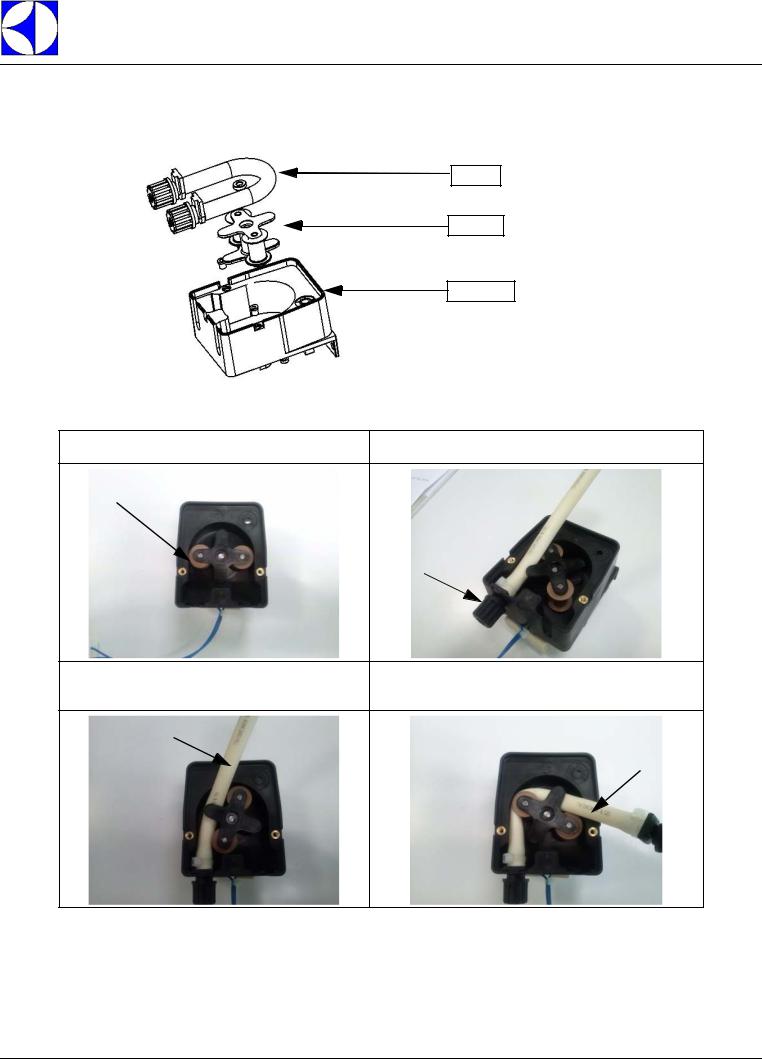
5.1.1 Peristaltic tube fitting and replacement instructions
Described below is the procedure for inserting and removing the tubes from the peristaltic pumps, in case of tube replacement.
An exploded view of the parts involved in the tube fitting and removal operations is given below.
Tube
Ruoller
Front box
STEP 1 - FITTING THE TUBE
1. Position the roller. |
2. Insert the tube of the suction part, turning the roller |
|
clockwise. |
3.Keep the tube in the seat in the housing and continue turning the roller clockwise, being careful not to damage the tube.
4.Keep the tube in the seat in the housing and continue turning the roller clockwise.
DOC. NO. 5956.68V.00 |
P. 10 / 38 |
Electrolux
EFS - Dishwashing Systems Platform
Electrolux Professional
5. Turn the roller a full 360°.
6.Make sure to fit the union in the special seat (delivery).
STEP 2 - REMOVING THE TUBE
1. Position the roller as shown in the figure. 2. Lift the tube at the suction part and turn the roller at the same time. Guide the tube, keeping it raised, and turn the roller.
3. Remove the tube.
DOC. NO. 5956.68V.00 |
P. 11 / 38 |

Electrolux
EFS - Dishwashing Systems Platform
Electrolux Professional
5.2COUNTERS
This Parameter Family collects cycle counters and water consumption counters.
For water consumption counters a flow meter must be installed. See (calibration parameter) into section (6.4 OTHER PARAMETERS).
Sym. |
Parameter Description |
Unit |
Min |
Max |
Factory |
|
Default |
||||||
|
|
|
|
|
||
|
|
|
|
|
|
|
|
Performed total cycles (counter is NOT resettable by the user). |
- |
- |
- |
- |
|
|
|
|
|
|
|
|
|
Performed cycles (partial counter is resettable by user via the “ ” |
- |
- |
- |
- |
|
|
parameter). |
|||||
|
|
|
|
|
||
|
|
|
|
|
|
|
|
Counts m3 of water consumption (counter is NOT resettable by the |
- |
- |
- |
- |
|
|
user). Works only if the flow meter is installed (integrated in the air gap |
|
|
|
|
|
|
for machines with watersoftener). |
|
|
|
|
|
|
Counts liters of water consumption (counter is NOT resettable by the |
[l] |
- |
- |
- |
|
|
user). Works only if the flow meter is installed (integrated in the air gap |
|
|
|
|
|
|
for machines with watersoftener). |
|
|
|
|
|
|
Together with “ ” parameter (m3), This parameter gives the total |
|
|
|
|
|
|
water consumption of the machine. |
|
|
|
|
|
|
Litres counters |
[l] |
- |
- |
- |
|
|
Counts the litres of water and is resettable by user (see parame- |
|
|
|
|
|
|
ter below). |
|
|
|
|
|
|
Works only if the flow meter is installed (integrated in the air gap for |
|
|
|
|
|
|
machines with water softener). |
|
|
|
|
|
|
Parameter to reset together counters: and |
- |
- |
- |
- |
|
|
To reset put 1 this parameter, switch off and then on again: and |
|
|
|
|
|
|
will show zero. |
|
|
|
|
|
|
|
|
|
|
|
|
|
Drain/Cleaning cycles performed. |
- |
- |
- |
- |
|
|
Similar to but counts Cleaning Cycles. |
|
|
|
|
|
|
|
|
|
|
|
|
|
Delime cycles counter. |
- |
- |
- |
- |
|
|
|
|
|
|
|
|
|
Number of executed washing cycles after last Delime cycle. |
- |
- |
- |
- |
|
|
This counter is reset after each Delime cycle. |
|
|
|
|
DOC. NO. 5956.68V.00 |
P. 12 / 38 |
 Loading...