


CaFamosa
Kaffee-Espresso-Vollautomat Fully Automatic Espresso-Maker
Macchina per espresso completamente automatica Volautomatische koffieen espressomachine Täysin automaattinen espressokahviasema
Gebrauchsanweisung
Operating instructions
Istruzioni per l’uso
Gebruiksaanwijzing
Käyttöohje

1 |
|
|
B |
|
|
A |
|
C |
|
|
|
|
|
D |
|
|
E |
O |
|
|
G |
|
F |
H |
|
|
|
|
|
L |
|
|
M |
|
J |
N |
|
|
|
|
|
|
|
K |
|
P |
|
A |
J |
|
B |
K |
|
C |
L |
|
D |
M |
|
E |
N |
|
|
|
|
F |
O |
|
G |
|
|
H |
P |
|
|
2 |
3 |
2 |
|
|

4 |
5 |
6 |
7 |
8 |
9/A |
9/B |
10 |
11/A |
11/B |
12 |
13 |
|
|
3 |
14 |
15/A |
15/B |
16/A |
16/B |
17 |
|
18/A |
|
18/B |
19/A |
|
19/B |
|
20 |
21 |
|
22 |
|
23 |
4 |
|
|
|
|

g
gFeatures (Figure 1)
AFresh Water Tank, Lid
BFiller Opening for Ground Coffee with Lid
CCup Rack
DBean Container with Lid (inside: grinding texture adjustment)
ESelector Dial for Steam and Hot Water
FSwivelling Nozzle for Steam and Hot Water
GHeight Adjustable Outlet
HSpouts
JDrip Grille
KDrip Catcher
LSpent Coffee Drawer with Spent Coffee Container
MFloat
NRating Plate (on the underside of the appliance)
OControls and Indicators (see Figure 2)
PMeasuring Spoon
Controls (Figure 2)
APower Indicator: Illuminates when the appliance is switched on
BMain Switch: Switches the appliance on and off
CIndicator For 1 Cup of Strong Coffee
DIndicator For 1 Cup of Normal Coffee
EButton For 1 Cup of Coffee
FButton For 2 Cups of Coffee
GIndicator For Ground Coffee
HButton For Ground Coffee
JIndicator For “Flushing“
KButton For Flushing
LIndicator For “Cleaning“
MIndicator For “Descaling“
NIndicator For “Water Tank“
OIndicator For Emptying or Refitting The “Drip Catcher and Spent Coffee Container“
PSelector Dial For Amount of Water per Cup
Indicator illuminates:  Indicator flashes:
Dear customer,
Please read these operating instructions through carefully. Above all, observe the safety instructions! Please keep these operating instructions for later reference, and pass them on to any subsequent owners of the appliance.
The form and function of your AEG coffee machine guarantee you
•straightforward operation and
•excellent, individual taste
•with the easiest of maintenance and care.
The excellent, individual taste is achieved by
•The pre-brewing system: prior to the actual brewing process, the ground coffee is moistened to extract its full aroma,
•The individually adjustable quantity of water per cup that can be varied between a small espresso and a large “frothy“ coffee,
•The grinding texture that can be adjusted to suit the roasting of the beans,
•The facility to choose between normal or strong coffee,
•And last but not least, through the guaranteed crema, that small crown of froth that makes an espresso incomparable for connoisseurs.
Incidentally: The time that the water is in contact with the ground coffee is considerably shorter for espressos than for conventional filter coffee. As a result, less bitterness is released from the coffee, it is this that makes espresso coffee so much pleasanter!
18

g
Table of Contents
Safety Instructions
1.Before Using for the First Time
1.1.Setting Up the Appliance
1.2.Cable Compartment (Figure 3)
1.3.Adjusting the Water Hardness
1.4.Adjusting the Safety Cut-Out
2.Prior to Making Coffee
2.1.Filling the Water Tank (Figure 4)
2.2.Filling the Bean Container (Figure 5)
2.3.Adjusting the Grinding Texture (Figure 6)
2.4.Switching On the Appliance (Figure 7)
2.5.“Flushing“ the Appliance (Figure 8)
3.Making Coffee
3.1.Adjusting the Amount of Water (Figure 9/B)
3.2.One Cup of Normal Coffee from Beans (Figure 10)
3.3.One Cup of Strong Coffee from Beans (Figure 11/A)
3.4.One Cup of Extra Strong Coffee from Beans (Figure 11/B)
3.5.Two Cups of Normal Coffee from Beans (Figure 12)
3.6.One or Two Cups of Coffee from Ground Coffee (Figure 13, 14)
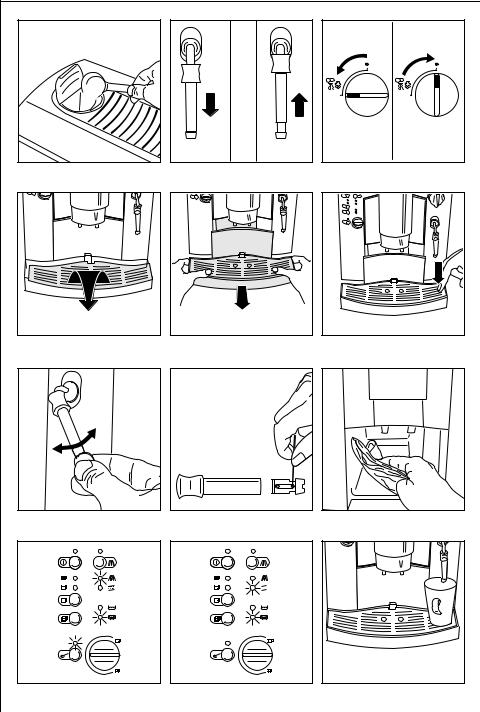
4.Frothing Milk (for Cappuccino) (Figure 15, 16)
5.Preparing Hot Water (Figure 16)
6.Switching Off the Appliance
7.Emptying the Water Tank, Drip Catcher and Spent Coffee Container (Figure 17, 18)
8.Cleaning
8.1.Exterior Cleaning (Figure 19, 20)
8.2.Internal Cleaning: “Clean“ Indicator Illuminates (Figure 21)
9.Descaling the Appliance: “Descale“ Indicator Illuminates (Figure 22, 23)
10.What to do if ...
11.Protecting the Environment
12.In the Case of Need for Service
1 Safety Instructions
•The appliance may only be connected to a mains supply on which the voltage, type of supply, and frequency match the information given on the rating plate (see underside of the appliance)!
•Never allow children to operate the appliance unsupervised.
•Never bring the mains lead into contact with the hot parts of the appliance.
•Never pull the plug from the socket by means of the mains lead!
•Do not use the appliance if:
–the mains lead is damaged or
–the housing shows visible signs of damage.
•The coffee outlet, swivelling nozzle, and cup rack will become hot during use due to the nature of their functions. Keep children away!
•Only fill the water tank with cold water, do not use hot water, milk or other liquids.
•Do not place frozen or caramelised coffee beans in the bean container, only use roasted coffee beans! Remove any foreign bodies from the coffee beans. Otherwise the guarantee will be void.
•Only put ground coffee in the ground coffee filler opening.
•Observe the cleaning and descaling instructions.
•Prior to maintaining or cleaning, switch off the appliance and unplug it from the mains!
•Never immerse the appliance in water.
•Do not allow any liquid to enter the housing via the ventilation holes on the cup rack.
•Do not wash the parts of the appliance in a dishwasher.
•Do not leave the appliance switched on longer than necessary.
•Do not expose the appliance to the weather.
19
 Loading...