Denon DSD-500 Owners Manual

DSD-500
SPEAKER DOCK
Owner’s Manual
Preparations
Operations
Informations
nSAFETY PRECAUTIONS
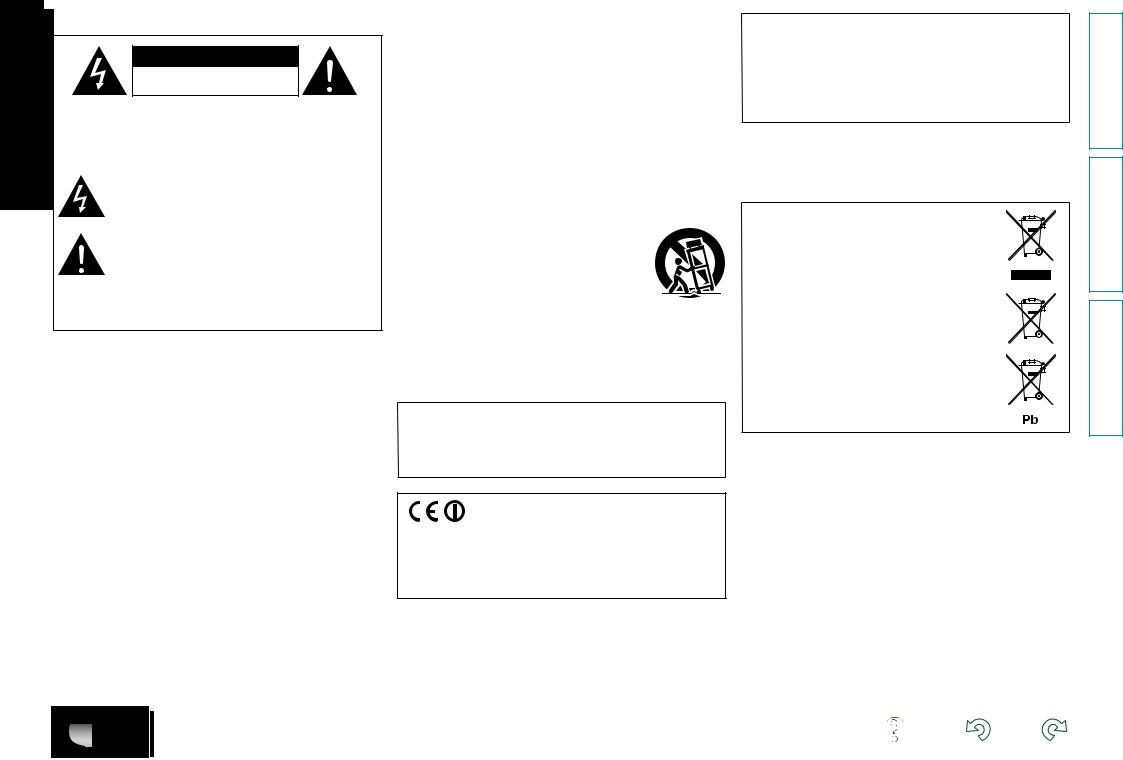
CAUTION
RISK OF ELECTRIC SHOCK
DO NOT OPEN
CAUTION:
TO REDUCE THE RISK OF ELECTRIC SHOCK, DO NOT REMOVE COVER (OR BACK). NO USER-SERVICEABLE PARTS INSIDE. REFER SERVICING TO QUALIFIED SERVICE PERSONNEL.
The lightning flash with arrowhead symbol, within an equilateral triangle, is intended to alert the user to the presence of uninsulated “dangerous voltage” within the product’s enclosure that may be of sufficient magnitude to constitute a risk of electric shock to persons.
The exclamation point within an equilateral triangle is intended to alert the user to the presence of important operating and maintenance (servicing) instructions in the literature
accompanying the appliance.
WARNING:
TO REDUCE THE RISK OF FIRE OR ELECTRIC SHOCK, DO NOT EXPOSE THIS APPLIANCE TO RAIN OR MOISTURE.
IMPORTANT SAFETY
INSTRUCTIONS
1.Read these instructions.
2.Keep these instructions.
3.Heed all warnings.
4.Follow all instructions.
5.Do not use this apparatus near water.
6.Clean only with dry cloth.
7.Do not block any ventilation openings.
Install in accordance with the manufacturer’s instructions.
8.Do not install near any heat sources such as radiators, heat registers, stoves, or other apparatus (including amplifiers) that produce heat.
9.Protect the power cord from being walked on or pinched particularly at plugs, convenience receptacles, and the point where they exit from the apparatus.
10.Only use attachments/accessories specified by the manufacturer.
11.Use only with the cart, stand, tripod, bracket, or table
specified by the manufacturer, or sold with the apparatus. When a cart is used, use caution when moving the cart/ apparatus combination to avoid injury from tip-over.
12. Unplug this apparatus during lightning storms or when unused for long periods of time.
13.Refer all servicing to qualified service personnel.
Servicing is required when the apparatus has been damaged in any way, such as power-supply cord or plug is damaged, liquid has been spilled or objects have fallen into the apparatus, the apparatus has been exposed to rain or moisture, does not operate normally, or has been dropped.
14.Batteries shall not be exposed to excessive heat such as sunshine, fire or the like.
CAUTION:
To completely disconnect this product from the mains, disconnect the plug from the wall socket outlet.
The mains plug is used to completely interrupt the power supply to the unit and must be within easy access by the user.
R&TTE Directive 1999/5/EC
This product may be operated in the following countries; |
|
|||
|
|
|
|
|
AT |
BE |
CZ |
DK |
FI |
FR |
DE |
GR |
HU |
IE |
IT |
NL |
PL |
PT |
SK |
ES |
SE |
GB |
NO |
CH |
Indoor use only.
•DECLARATION OF CONFORMITY
We declare under our sole responsibility that this product, to which this declaration relates, is in conformity with the following standards: EN60065, EN55013, EN55020, EN61000-3-2, EN61000-3-3, EN300328, EN301489-01, EN301489-17 and EN50371.
Following the provisions of Low Voltage Directive 2006/95/EC and EMC Directive 2004/108/EC, the EC regulation 1275/2008 and its frame work Directive 2009/125/EC for Energy-related Products (ErP).
DENON EUROPE
Division of D&M Germany GmbH
An der Kleinbahn 18, Nettetal,
D-41334 Germany
A NOTE ABOUT RECYCLING:
This product’s packaging materials are recyclable and can be reused. Please dispose of any materials in accordance with the local recycling regulations.
When discarding the unit, comply with local rules or regulations.
Batteries should never be thrown away or incinerated but disposed of in accordance with the local regulations concerning battery disposal.
This product and the supplied accessories, excluding the batteries, constitute the applicable product according to the WEEE directive.
Preparations
Operations
Informations
I
nNOTES ON USE
WARNINGS
•Avoid high temperatures.
Allow for sufficient heat dispersion when installed in a rack.
•Handle the power cord carefully.
Hold the plug when unplugging the cord.
•Keep the unit free from moisture, water, and dust.
•Unplug the power cord when not using the unit for long periods of time.
•Do not obstruct the ventilation holes.
•Do not let foreign objects into the unit.
•Do not let insecticides, benzene, and thinner come in contact with the unit.
•Never disassemble or modify the unit in any way.
•Ventilation should not be impeded by covering the ventilation openings with items, such as newspapers, tablecloths or curtains.
•Naked flame sources such as lighted candles should not be placed on the unit.
•Observe and follow local regulations regarding battery disposal.
•Do not expose the unit to dripping or splashing fluids.
•Do not place objects filled with liquids, such as vases, on the unit.
•Do not handle the mains cord with wet hands.
•When the switch is in the OFF (STANDBY) position, the equipment is not completely switched off from MAINS.
•The equipment shall be installed near the power supply so that the power supply is easily accessible.
•Do not keep the battery in a place exposed to direct sunlight or in places with extremely high temperatures, such as near a heater.
1.IMPORTANT NOTICE: DO NOT MODIFY THIS PRODUCT
This product, when installed as indicated in the instructions contained in this manual, meets R&TTE directive requirements. Modification of the product could result in hazardous Radio and EMC radiation.
2.CAUTION
•Separation distance of at least 20 cm must be maintained between this product and all persons.
•This product and its antenna must not be co-located or operating in conjunction with any other antenna or transmitter.
n CAUTIONS ON INSTALLATION
z
zz
z
Wall
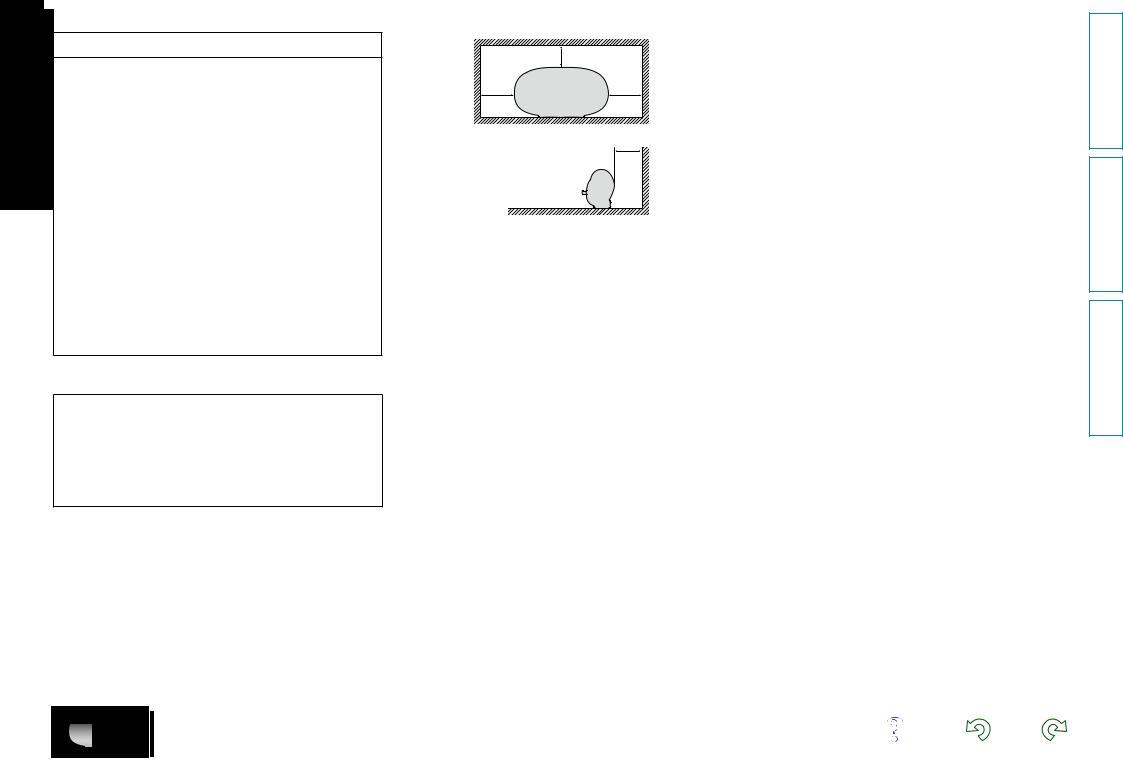
zz For proper heat dispersal, do not install this unit in a confined space, such as a bookcase or similar enclosure.
•More than 0.3 m is recommended.
•Do not place any other equipment on this unit.
II
Preparations
Operations
Informations
Getting started
Thank you for purchasing this DENON product. To ensure proper operation, please read this owner’s manual carefully before using the product. After reading them, be sure to keep them for future reference.
Contents
Getting started···············································································1 Accessories···················································································1 Features························································································2 Cautions on handling·····································································2 Remote operation··········································································3
Preparations·············································································4
Connections···················································································5 Connecting the power cord···························································5 Connecting a USB memory device···············································5 Connecting a portable player·························································5 Connecting an iOS device·····························································6
Connecting to a home network (LAN)·········································7 Required system···········································································7 Network connections and settings················································8
Operations···············································································12
Playback························································································13 Preparations················································································13 Operations possible during playback···········································13 Various memory functions··························································14 Playing an iOS device··································································14 AirPlay function···········································································15 Listening to internet radio···························································17 Playing a USB memory device····················································18 Playing a portable player······························································19 Playing back files stored on PC or NAS with Cocoon App
(Music server)··············································································20 How to make detailed settings··················································22 Menu map···················································································22 Setting the language (Language)·················································23 Setting the clock (Clock)······························································23 Setting the volume limit (Max Vol Level)·····································25 Setting the network (Network Info.)············································25
Accessories
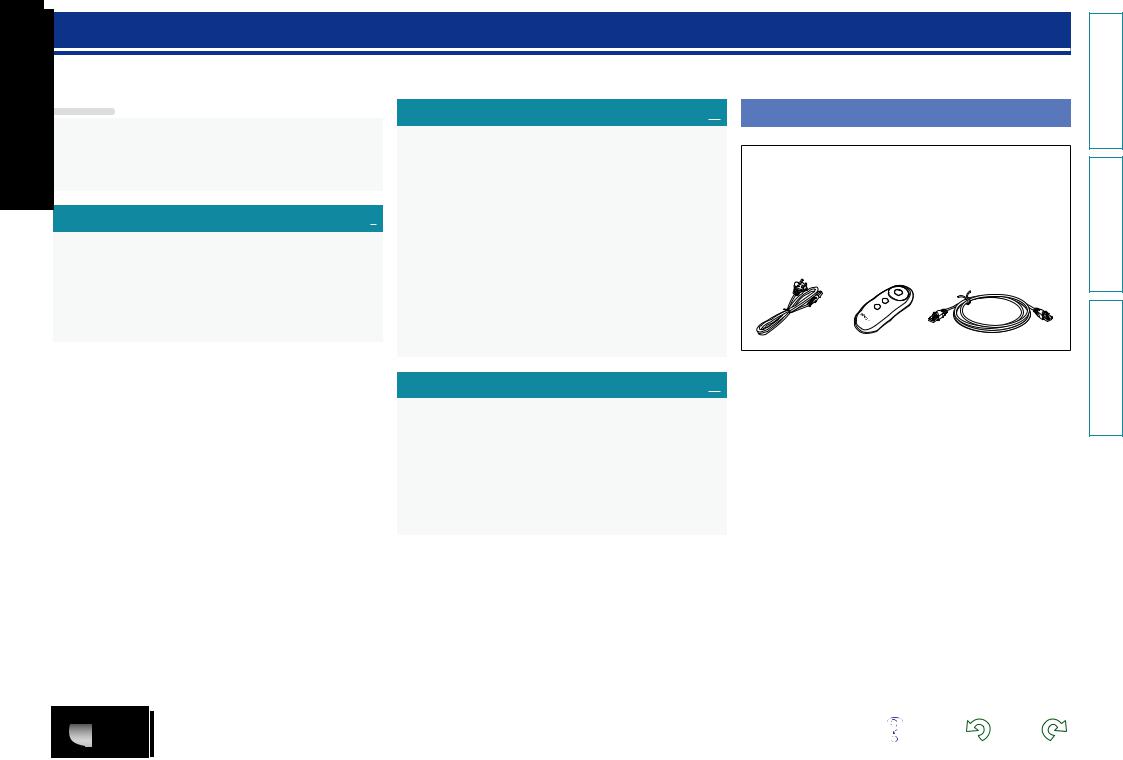
Check that the following parts are supplied with the product.
q Quick Setup Guide................................................................... |
|
1 |
w CD-ROM (Owner’s manual)..................................................... |
1 |
|
e Safety Instructions................................................................... |
|
1 |
r Service network list................................................................. |
|
1 |
t Power cord............................................................................... |
|
1 |
y Remote control unit................................................................. |
|
1 |
u R03/AAA batteries................................................................... |
|
2 |
i Ethernet cable (CAT-5)............................................................. |
|
1 |
t |
y |
i |
Informations···········································································27
Part names and functions···························································28 Front panel··················································································28 Rear panel···················································································28 Remote control unit·····································································29 Other information········································································30 Trademark information································································30 Explanation of terms···································································31 Troubleshooting··········································································33 Resetting the microprocessor·····················································35 Specifications···············································································36
Preparations
Operations
Informations
1
Features
Equipped with a Dock that supports iPhone®, iPod touch® and iPad® (vpage 6)
This unit employs a slide type Dock that comes out when you push its front. By storing the Dock within this unit when you do not use it, this unit becomes compact.
You can charge iPhone, iPod touch, or iPad at the same time while playing back music.
Compatible with the AirPlay® function (vpage 15)
You can enjoy comfortable streaming playback of music from iPhone, iPod touch and iPad.
Received song and artist names appear on the display.
Compatible with “Cocoon App” for performing basic operations of the unit with an iPhone, iPod touch and iPad (vpage 3)
Equipped with Wi-Fi capabilities including Wi-Fi Protected Setup (WPS) (vpage 9)
Compatible with the Internet radio (vpage 17)
Also equipped with the Music Server function that plays back audio content on the network (vpage 20)
In addition to music files stored on PC and music servers on the network, you can enjoy various audio sources on the Internet such as the Internet radio.
Equipped with an organic EL display with great visibility
High contrast with low power can be achieved. Song and artist names are clearly displayed.
Cautions on handling
•Before turning the power on
Check once again that all connections are correct and that there are no problems with the connection cables.
•Power is supplied to some of the circuitry even when the unit is set to the standby mode. When going on vacation or leaving home for long periods of time, be sure to unplug the power cord from the power outlet.
•About condensation
If there is a major difference in temperature between the inside of the unit and the surroundings, condensation (dew) may form on the operating parts inside the unit, causing the unit not to operate properly.
If this happens, let the unit sit for an hour or two with the power turned off and wait until there is little difference in temperature before using the unit.
•Cautions on using mobile phones
Using a mobile phone near this unit may result in noise. If that occurs, move the mobile phone away from this unit when it is in use.
•Moving the unit
Turn off the power and unplug the power cord from the power outlet. Next, disconnect the connection cables to other system units before moving the unit.
•About care
•Wipe the cabinet and control panel clean with a soft cloth.
•Follow the instructions when using a chemical cleaner.
•Benzene, paint thinner or other organic solvents as well as insecticide may cause material changes and discoloration if brought into contact with the unit, and should therefore not be used.
2
Preparations
Operations
Informations
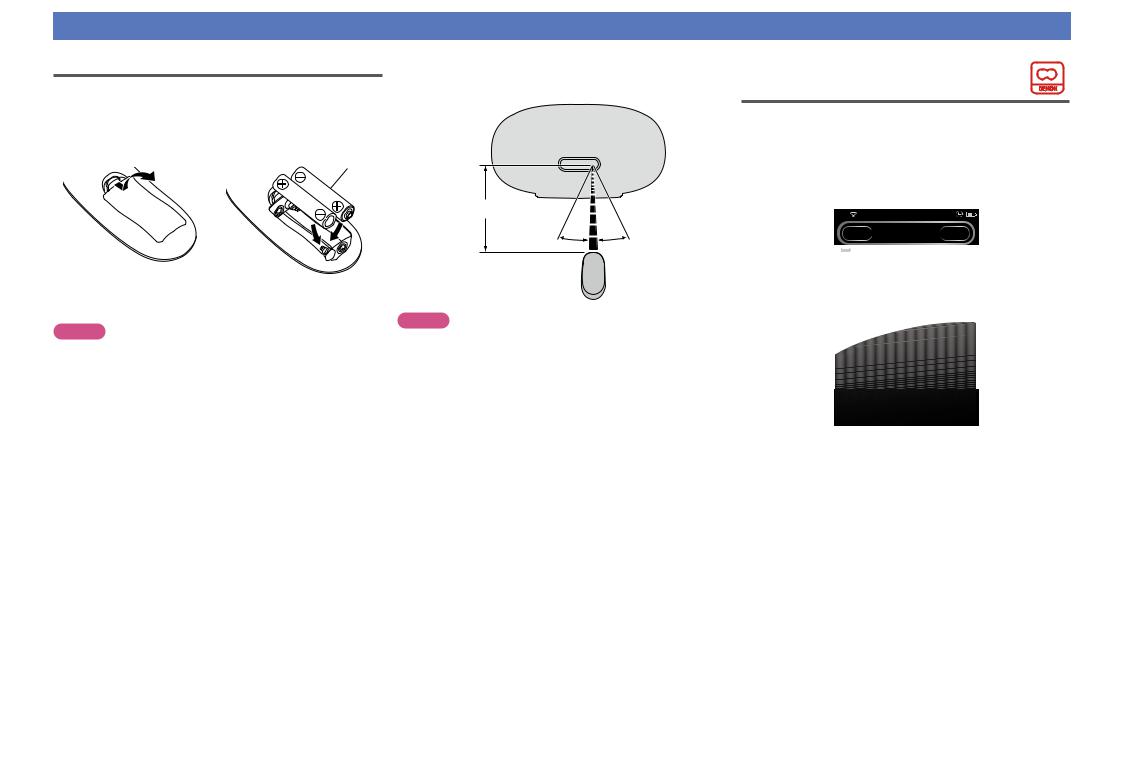
Remote operation
About the remote control unit
nnInserting the batteries
q Remove the rear lid in the direction of the arrow and remove it.
wLoad the two batteries properly as indicated by the marks in the battery compartment.
R03/AAA
e Put the rear cover back on.
NOTE
•Insert the specified batteries in the remote control unit.
•Replace the batteries with new ones if the set does not operate even when the remote control unit is operated close to the unit. (The supplied batteries are only for verifying operation. Replace them with new batteries at an early date.)
•When inserting the batteries, be sure to do so in the proper direction, following the q and w marks in the battery compartment.
•To prevent damage or leakage of battery fluid:
•Do not use a new battery together with an old one.
•Do not use two different types of batteries.
•Do not attempt to charge dry batteries.
•Do not short-circuit, disassemble, heat or dispose of batteries in flames.
•Do not keep the battery in a place exposed to direct sunlight or in places with extremely high temperatures, such as near a heater.
•If the battery fluid should leak, carefully wipe the fluid off the inside of the battery compartment and insert new batteries.
•Remove the batteries from the remote control unit if it will not be in use for long periods.
•Used batteries should be disposed of in accordance with the local regulations regarding battery disposal.
•The remote control unit may function improperly if rechargeable batteries are used.
nnOperating range of the remote control unit
Point the remote control unit at the remote sensor when operating it.
Approx. 7 m
30° 30°
NOTE
•The set may function improperly or the remote control unit may not operate if the remote control sensor is exposed to direct sunlight, strong artificial light from an inverter type fluorescent lamp or infrared light.
•When using 3D video devices that transmit radio communication signals (such as infrared signals etc) between the various units (such as the monitor, 3D glasses, 3D transmitter unit etc), the remote control unit may not operate due to interference from those radio communication signals. If this occurs, adjust the direction and distance of the 3D communication for each unit, and check that the remote control unit operation is not affected by these signals.
Cocoon App
Cocoon App is DENON’s proprietary application developed for iPhone, iPod touch and iPad.
With Cocoon App, you can use iPhone, iPod touch and iPad to:
•Operate this unit
•Manually make the wireless LAN settings on this unit (vpage 9)
•Change preset Internet radio stations (vpage 17)
iPod |
15:05 |
Cocoon 1
SLEEP TIMER
00:29 min
Music Player |
Internet Radio |
iDevice |
AUX |
Music Server |
Tuneln |
|
|
•Bidirectional communication is performed.
•The Cocoon App can be downloaded for free from the App Store.
Preparations
Operations
Informations
3
Preparations
Preparations
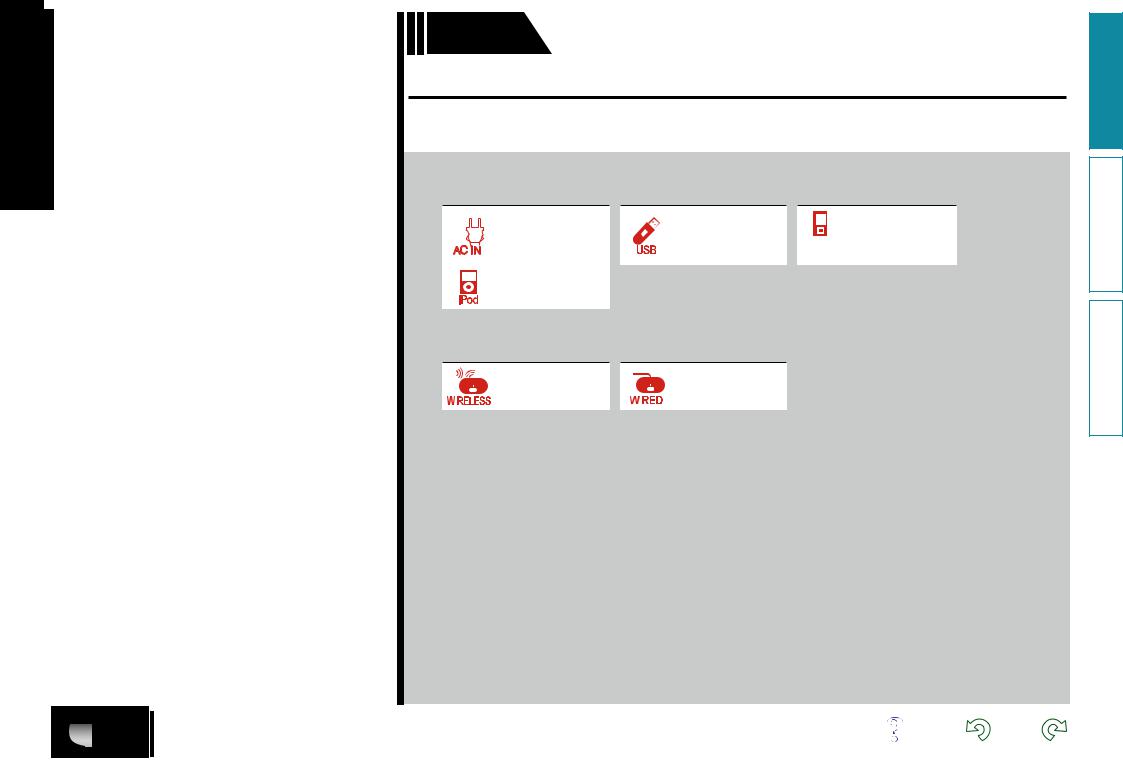
Here, we explain the connections methods for this unit.
FConnections vpage 5
|
|
|
|
|
|
|
vpage 5 |
|
vpage 5 PORTABLE vpage 5 |
||
|
|
|
|
|
|
|
|
||||
|
|
|
|
|
|
|
|
||||
|
|
|
|
|
|
|
|
||||
|
|
|
|
|
|
|
|
||||
|
|
|
|
|
|
|
|
|
|
|
PLAYER |
|
|
|
|
|
|
|
|
|
|
|
|
|
|
|
|
|
|
|
vpage 6 |
|
|
|
|
|
|
|
|
|
|
|
|
|
|
|
|
FConnecting to a home network (LAN) vpage 7
|
|
|
|
vpage 9 |
|
|
|
|
|
|
vpage 10 |
|
|
|
|
|
|
|
|
|
|
||
|
|
|
|
|
|
|
|
|
|
|
|
|
|
|
|
|
|
|
|
|
|
|
|
4
Preparations
Operations
Informations
Connections
NOTE
•Do not plug in the power cord until all connections have been completed.
•When making connections, also refer to the owner’s manual of the other components.
•Do not bundle power supply cords together with connection cables. Doing so can result in humming or noise.
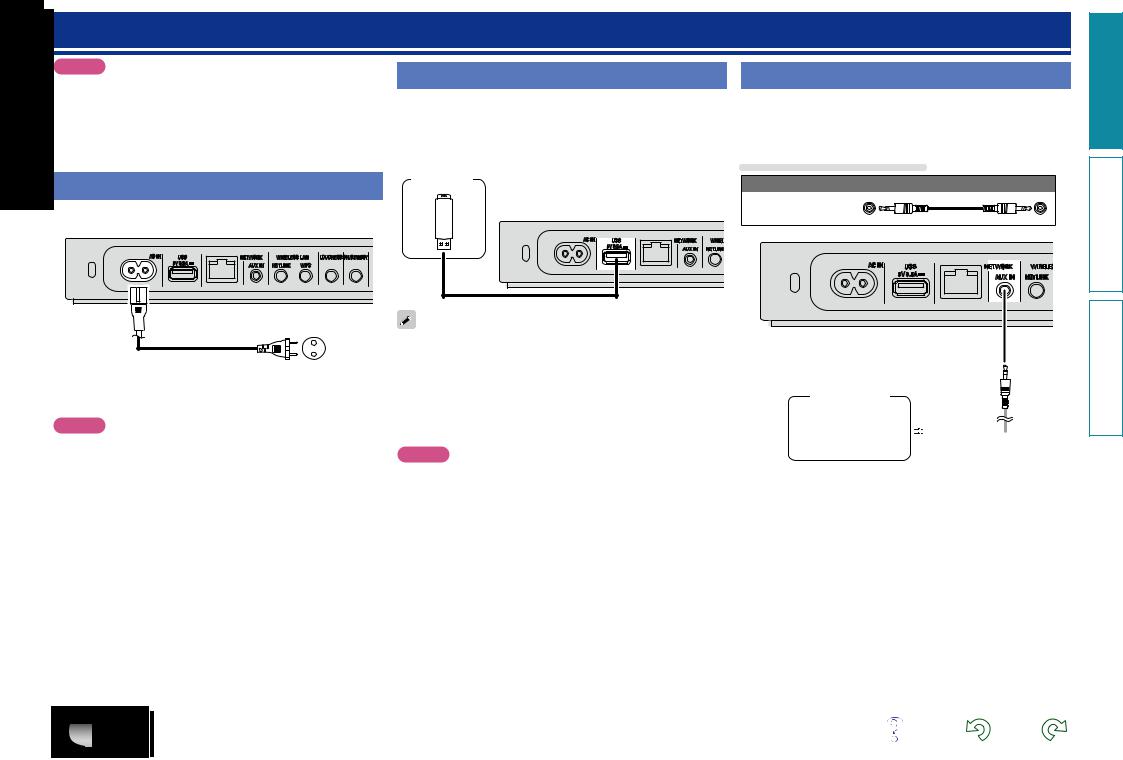
Connecting the power cord
When all of the connections are completed, insert the power plug into
Connecting a USB memory device
•You can enjoy music stored on a USB memory device.
•For operating instructions see “Playing a USB memory device” (vpage 18).
USB memory device
AC IN |
USB |
NETWORK |
WIREL |
|
5V 0.5A |
AUX IN |
NETLINK |
|
|
AC IN |
USB |
NETWORK |
WIRELESS LAN |
LOUDNESS ON/STANDBY |
|
5V 0.5A |
AUX IN |
NETLINK WPS |
|
|
|
|
Connecting a portable player
•If a portable player is connected via the AUX IN jack of the unit, music from the portable player can be played.
•For operating instructions see “Playing a portable player” (vpage 19).
Cables used for connections
Audio cable (sold separately)
Stereo mini plug cable
AC IN |
USB |
NETWORK |
WIRELE |
|
5V 0.5A |
AUX IN |
NETLINK |
|
|
Power cord (Supplied)
To household power outlet (AC 230 V, 50/60 Hz)
NOTE
•Only use the supplied power cord.
•Be sure the power cord is unplugged from the power outlet before connecting or disconnecting it to the AC inlet.
•If the USB memory device is divided into multiple partitions, only the top partition can be selected.
•This unit is compatible with MP3 files conforming to “MPEG-1 Audio Layer-3” standards.
•DENON does not guarantee that all USB memory devices will operate or receive power. When using a portable USB connection type HDD of the kind to which an AC adapter can be connected to supply power, use the AC adapter.
NOTE
•Note that DENON will accept no responsibility whatsoever for any problems arising with the data on a USB memory device when using this unit in conjunction with the USB memory device.
•USB memory devices will not work via a USB hub.
•It is not possible to use this unit by connecting the unit’s USB port to a PC via a USB cable.
•Do not use an extension cable when connecting a USB memory device. This may cause radio interference with other devices.
Portable
Audio
HEADPHONE 

Preparations
Operations
Informations
5
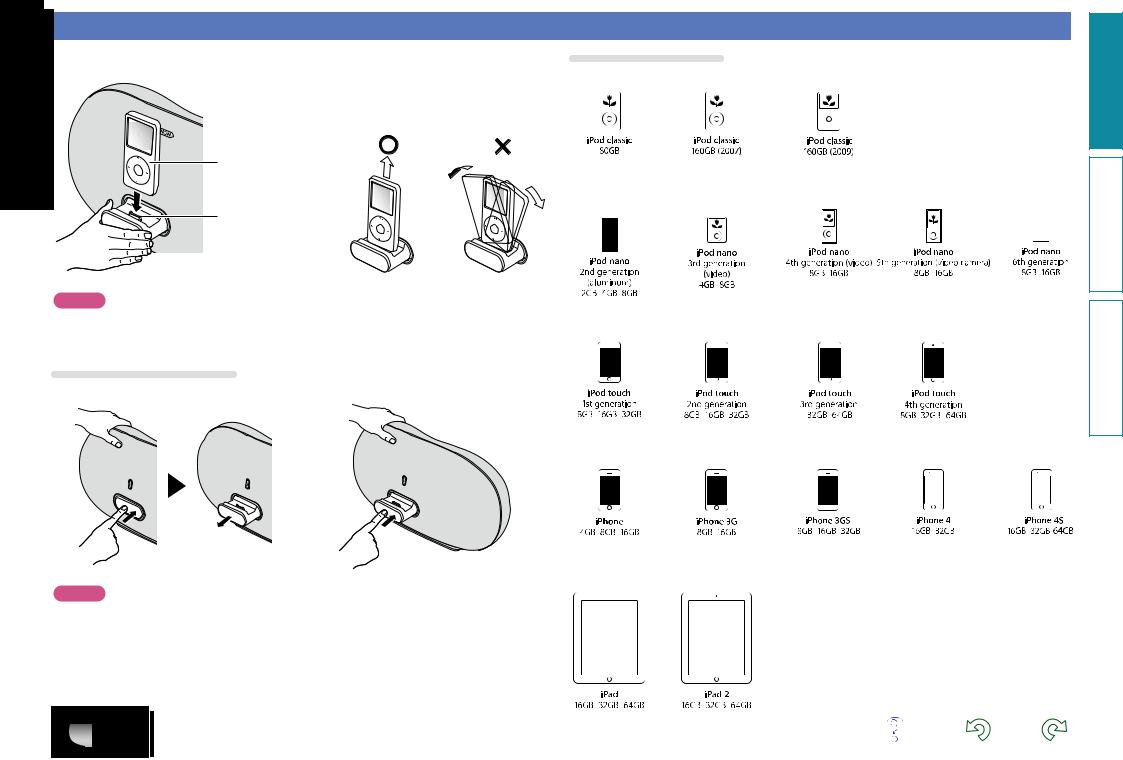
Connecting an iOS device
•You can enjoy music stored on an iOS device.
•For operating instructions see “Playing an iOS device” (vpage 14)
Dismantling
iPod
Dock connector
NOTE
•Depending on the type of iOS device and the software version, some functions may not operate.
•Note that DENON will accept no responsibility whatsoever for any problems arising with the data on an iOS device when using this unit in conjunction with the iOS device.
How to eject/store the Dock
q Push the front of the Dock, and it comes out. |
w Push it again to store within this unit. |
NOTE
•When ejecting/storing the Dock, hold the upper part of this unit with your hand to prevent this unit from moving or tipping over.
•When iPhone or iPod touch is not connected to this unit, store the Dock within this unit.
Supported iPod models
• iPod / iPod classic
• iPod nano
• iPod touch
• iPhone
• iPad
(as of July 2012)
6
Preparations
Operations
Informations
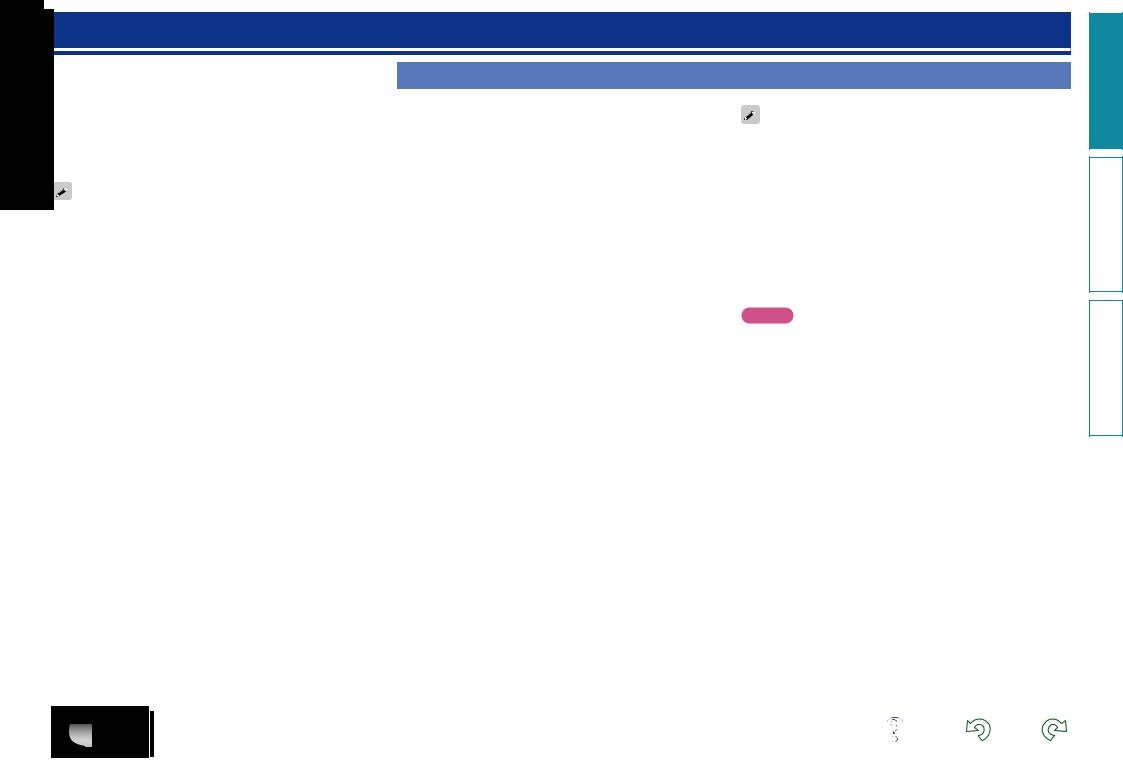
Connecting to a home network (LAN)
When this unit is connected to your home network (LAN), you can enjoy various audio sources via the network.
•Streaming playback from iPhone, iPod touch or iPad with AirPlay
•Internet radio
•Music files on music servers
Furthermore, you can operate this unit by using Cocoon App on iPhone, iPod touch or iPad.
To check for any firmware update available for improving this unit, etc., see “Firmware Update” (vpage 26) in the menu.
Required system
nnBroadband internet connection
nnModem
Device that connects to the broadband circuit and conducts communications on the Internet.
A type that is integrated with a router is also available.
nnRouter
When using this unit, we recommend you use a router equipped with the following functions:
•Built-in DHCP server
This function automatically assigns IP addresses on the LAN.
•Built-in 100BASE-TX switch
When connecting multiple devices, we recommend a switching hub with a speed of 100 Mbps or greater.
•When using with a wireless LAN, prepare a broadband router with built-in access point.
nnEthernet cable (supplied)
(CAT-5 or greater recommended)
•Use only a shielded STP or ScTP LAN cable which is available at retailer.
•The normal shielded-type Ethernet cable is recommended. If a flat-type cable or unshielded-type cable is used, other devices could be affected by noise.
•If you have an Internet provider contract for a line on which network settings are made manually, make the settings at “When “DHCP” is set to “Off” on your router” (vpage 10).
•With this unit, it is possible to use the DHCP and Auto IP functions to make the network settings automatically.
•When using this unit with the broadband router’s DHCP function enabled, this unit automatically performs the IP address setting and other settings.
When using this unit connected to a network with no DHCP function, make the settings for the IP address, etc., at “When “DHCP” is set to “Off” on your router” (vpage 10).
•When setting manually, check the setting contents with the network administrator.
NOTE
•A contract with an ISP is required to connect to the Internet.
No additional contract is needed if you already have a broadband connection to the Internet.
•The types of routers that can be used depend on the ISP. Contact an ISP or a computer shop for details.
•DENON assumes no responsibility whatsoever for any communication errors or troubles resulting from customer’s network environment or connected devices.
•This unit is not compatible with PPPoE. A PPPoE-compatible router is required if you have a contract for a type of line set by PPPoE.
•Do not connect an NETWORK connector directly to the LAN port/ Ethernet connector on your computer.
•To listen to audio streaming, use a router that supports audio streaming.
7
Preparations
Operations
Informations
Network connections and settings
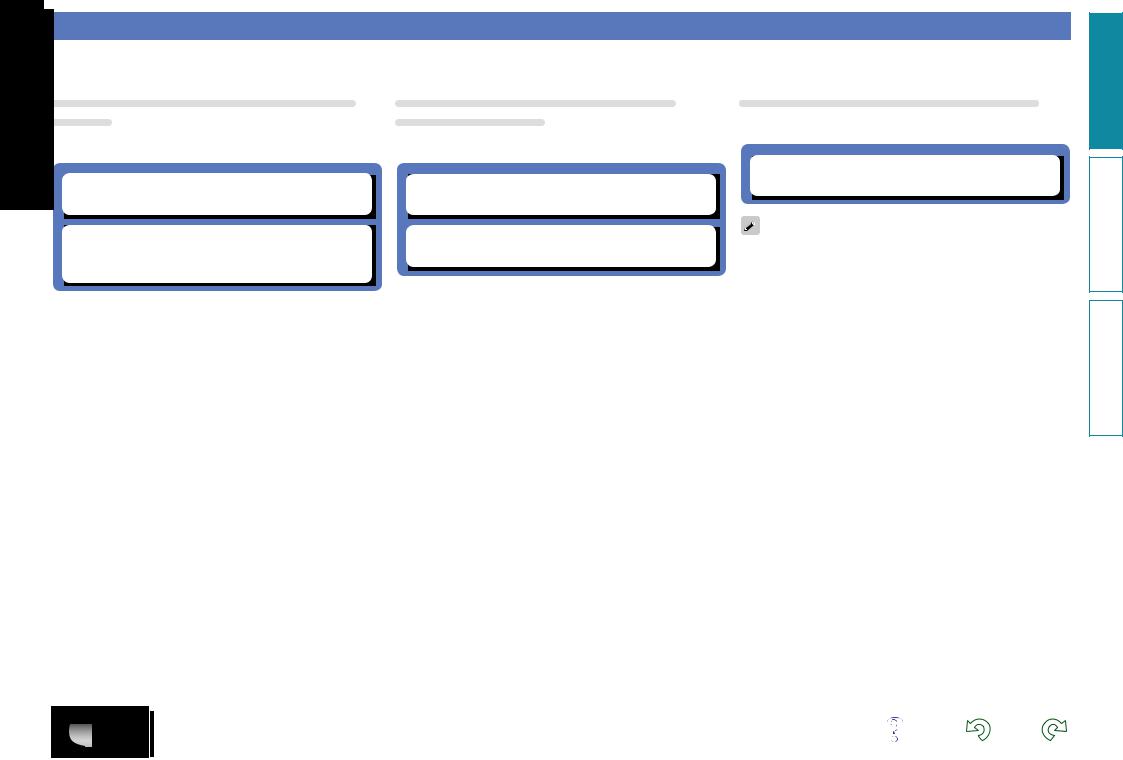
There are two types of network connections available – wired and wireless. Select either of them according to your router functions and operating environment.
Using a router equipped with the wireless LAN function
Connect this unit to your router wirelessly. Connection procedures differ according to the type of your router.
nn When your router is equipped with a WPS button
(vpage 9)
nn When your router is not equipped with a WPS button and you are using iPhone, iPod touch or iPad
(vpage 9)
Using a router that is not equipped with the wireless LAN function
Connect this unit to your router with an Ethernet cable. Connection procedures differ according to your router settings.
nn When “DHCP” is set to “On” on your router
(vpage 10)
nn When “DHCP” is set to “Off” on your router
(vpage 10)
Using PC to make network settings of this unit
You can also use your PC to make network settings of this unit without iPhone, iPod touch or iPad.
nn When this unit is connected to your PC through wireless LAN (vpage 11)
“WPS” stands for Wi-Fi Protected Setup, a standard for making it easy to make security settings required when connecting wireless LAN devices.
8
Preparations
Operations
Informations
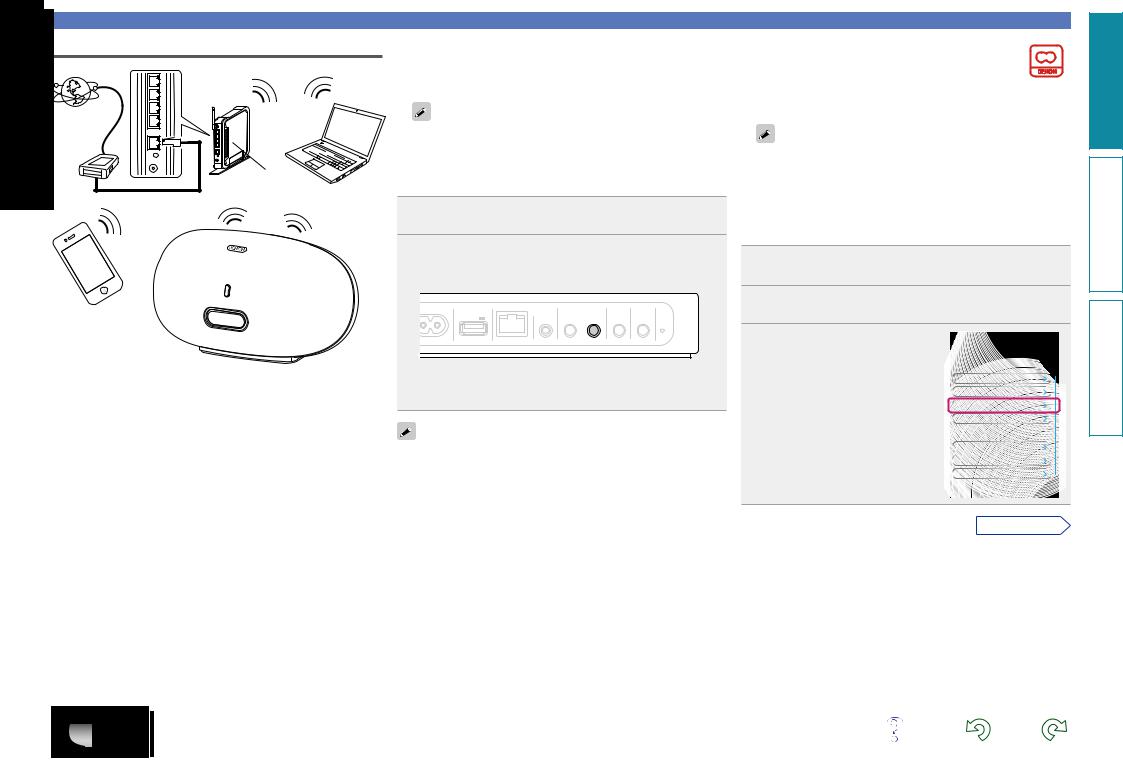
Wireless LAN |
nnWhen your router is equipped with a WPS |
|
button |
|
|
|
By just pressing the WPS button on your router and this unit, the |
|
|
|
PC |
wireless LAN connection settings are made. |
|
|
|
|
|
|
Internet |
|
|
|
|
|
|
|
• Before turning this unit on, make sure that an Ethernet cable is |
|
Modem |
|
|
|
not connected to this unit. If a cable is connected, have this unit |
|
|
|
|
enter the power standby mode and disconnect the cable. |
|
Router with |
|
• After the unit is turned on, it takes approximately 30 seconds for |
|
|
|
|
the WPS button on this unit to be available. |
|
|
access point |
|
|
|
To WAN side |
|
1 Press the WPS button of the router. |
||
|
|
|||
|
|
|
||
|
|
|
2 |
Press WPS on the rear panel. |
|
|
|
“Connecting” is displayed, and the unit starts connecting to |
|
|
|
|
|
the LAN. |
iPhone, iPod touch and iPad
AC IN |
USB |
NETWORK |
WIRELESS LAN |
LOUDNESS ON/STANDBY |
|
|
5V 0.5A |
AUX IN |
NETLINK |
WPS |
|
|
|
|
|||
•When the connection is made successfully, “Succeeded” appears.
•If the connection cannot be established, “Connection Failed” is displayed. Perform steps 1 – 2 again.
•If this unit is still not connected to the network after this procedure, manually enter the PIN code of WPS (vpage 25).
Network connections and settings
nnWhen your router is not equipped with
a WPS button and you are using iPhone, iPod touch or iPad
Use the DENON application “Cocoon App” to make the wireless LAN connection settings.
•“Cocoon App” is free.
•Before turning this unit on, make sure that an Ethernet cable is not connected to this unit. If a cable is connected, have this unit enter the power standby mode and disconnect the cable.
•To make the connection settings by using PC without iPhone, iPod touch or iPad, see “Using PC to make network settings of this unit” (vpage 11).
1Download “Cocoon App” to your iPhone, iPod touch or iPad from App Store.
2Start the application.
3When the “SETUP” screen is
displayed, tap “NetLink”.  BACK SETUP
• “Scanning network for devices” |
App Setting |
|
is displayed. |
Device |
DSD500 Bed Room |
|
Theme |
|
|
NetLink |
|
|
Language |
English |
|
DSD500 Bed Room Setting |
|
|
Clock |
Auto |
|
Network Settings |
|
|
Volume Settings |
|
vSee overleaf
Preparations
Operations
Informations
9
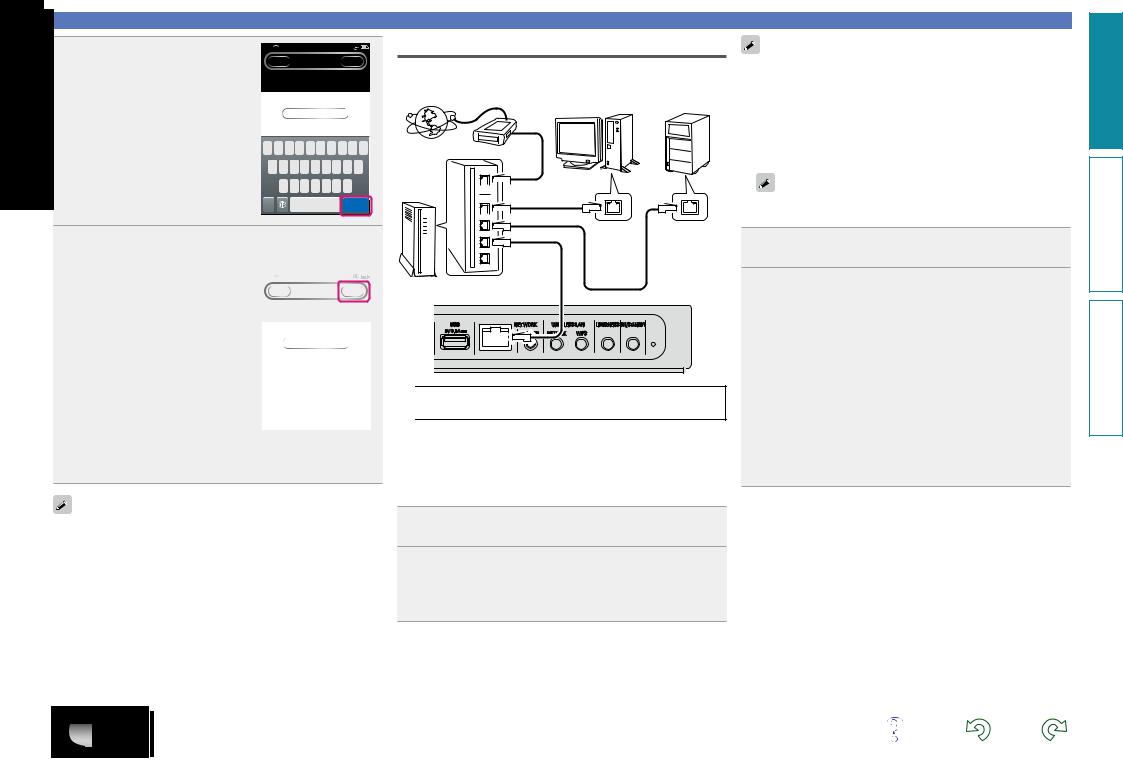
4 Enter the encryption key.
q Enter the encryption key of your router that is connected to your iPod, iPhone or iPad.
w Tap “Join”.
iPod 21:12
21:12
BACK |
NETLINK |
JOIN |
Access Point
Cocoon
Enter Password
Q M E R T Y U I O P
A S D F G H J K L
 Z X C V B N M
123 |
space |
Join |
Place your iPod, iPhone or iPad in the dock of this |
||||
5 unit (vpage 6). |
|
|
|
|
Tap “JOIN”. |
|
|
|
|
6 The network settings are copied to |
iPod |
15:10 |
|
|
BACK |
NETLINK |
JOIN |
|
|
|
|
|||
this unit from your iPod, iPhone or |
|
Access Point |
|
|
iPad and this unit is connected to |
|
Cocoon |
|
|
the network. |
|
Enter Password |
|
|
|
|
|
|
|
•When this unit could not connect to the network, the application displays an error message. Perform steps 1 – 6 again.
The wireless network name (SSID) and encryption method used for this unit are the same as those set for the connected iPod, iPhone or iPad.
Wired LAN
|
|
NAS |
|
Internet |
Modem |
(Network Attached |
|
Storage) |
|||
|
PC |


 To WAN side


 To LAN port
To LAN port |
Router |
Ethernet cable |
|
(Supplied) |
LAN port/ |
LAN port/ |
Ethernet |
Ethernet |
connector |
connector |
USB |
NETWORK |
WIRELESS LAN |
LOUDNESS ON/STANDBY |
|
5V 0.5A |
AUX IN |
NETLINK |
WPS |
|
|
|
|||
For connections to the Internet, contact an ISP (Internet Service Provider) or a computer shop.
nnWhen “DHCP” is set to “On” on your router
When using this unit with the broadband router’s DHCP function enabled, this unit automatically performs the IP address setting and other settings.
1 Connect the supplied Ethernet cable by referring to the above figure.
2 Press X to turn on power to the main unit.
•When this unit could not connect to the network, perform steps 1 and 2 again.
10
Network connections and settings
You may need to set the network connection manually, depending on the provider you use. To set the connection manually, use the setting procedure of “When “DHCP” is set to “Off” on your router”.
nnWhen “DHCP” is set to “Off” on your router
This section explains the settings when connecting this unit to a network that does not have a DHCP function.
To configure the settings manually, check the setting details with your network administrator.
1 Complete steps 1 – 4 in “When this unit is connected to your PC through wireless LAN” (vpage 11).
2 On the page that appears, set the information necessary for the network connection.
q Click “Profile Configuration” on the upper left part of the page.
w Click “ADVANCE SETTING”. e Enter required items.
r When settings are completed, click “Apply”.
tConnect the Ethernet cable.
•“Connecting” is displayed, and the unit starts connecting to the LAN.
•When the connection is made successfully, “Succeeded” appears.
•If the connection cannot be established, “Connection Failed” is displayed. Turn this unit off and on.
If this unit is still not connected to the network after this procedure, complete steps 1 – 2 again.
Preparations
Operations
Informations
 Loading...