


 Loading...
DVD VIDEO PLAYER
DVD-2800II
OPERATING INSTRUCTIONS |
INSTRUCCIONES DE OPERACION |
||
BEDIENUNGSANLEITUNG |
GEBRUIKSAANWIJZING |
||
MODE D’EMPLOI |
BRUKSANVISNING |
||
ISTRUZIONI PER L’USO |
|
|
|
|
|
|
|
|
|
|
|
|
|
|
|
|
|
|
|
|
|
|
|
|
|
|
|
|
|
|
|
|
|
|
|
|
|
|
|
|
|
|
|
|
|
|
|
|
|
|
|
|
|
|
|
|
|
|
|
DISPLAY
POWER
OP/CL
TOP MENU |
MENU |
SUBTITLE |
AUDIO
ANGLE
|
|
|
|
|
ENTER |
|
|
|
|
|
|
+ |
|
|
+ |
|
|
|
|
SKIP |
|
|
SLOW/SEARCH |
|
|
|
|
- |
RETURN |
- |
|
B |
|
|
|
1 |
2 |
|
3 |
|
|
|
|
|
|
|
|
|
|
|
|
4 |
5 |
|
6 |
|
PLAY |
STOP |
|
|
|
|
|
|
|
|
|
7 |
8 |
|
9 |
|
1 |
2 |
8 |
9 |
|
|
|
|
|
|
|
0 |
+10 |
CLEAR |
|
|
STILL / PAUSE |
|
|
|
|
|
|
HDCD |
3 |
|
6 |
7 |
|
|
|
PROGRESSIVE SCAN |
|
|
|
|
|
|
|
|
|
|
|
|
PROG/DIRECT |
CALL |
RANDOM |
|
OPEN/CLOSE |
|
|
|
|
|
|
¢ON / STANDBY |
5 |
|
|
|
|
A-B REPEAT |
NTSC/PAL |
|
|
|
|
SET UP |
REPEAT |
||
|
DVD |
|
|
V.S.S. |
|
|
|
£OFF |
|
|
|
|
|
|
|
REMOTE SENSOR |
DVD-2800II |
DVD VIDEO PLAYER |
|
|
REMOTE CONTROL UNIT |
|
RC-546 |
|
B |
FOR ENGLISH READERS |
PAGE |
004 |
~ PAGE |
026 |
FÜR DEUTSCHE LESER |
SEITE |
027 |
~ SEITE |
085 |
POUR LES LECTEURS FRANCAIS |
PAGE |
027 |
~ PAGE |
086 |
PER IL LETTORE ITALIANO |
PAGINA 027 |
~ PAGINA 087 |
||
PARA LECTORES DE ESPAÑOL |
PAGINA 088 |
~ PAGINA 147 |
||
VOOR NEDERLANDSTALIGE LEZERS |
PAGINA 088 |
~ PAGINA 148 |
||
FOR SVENSKA LÄSARE |
SIDA |
088 |
~ SIDA |
149 |
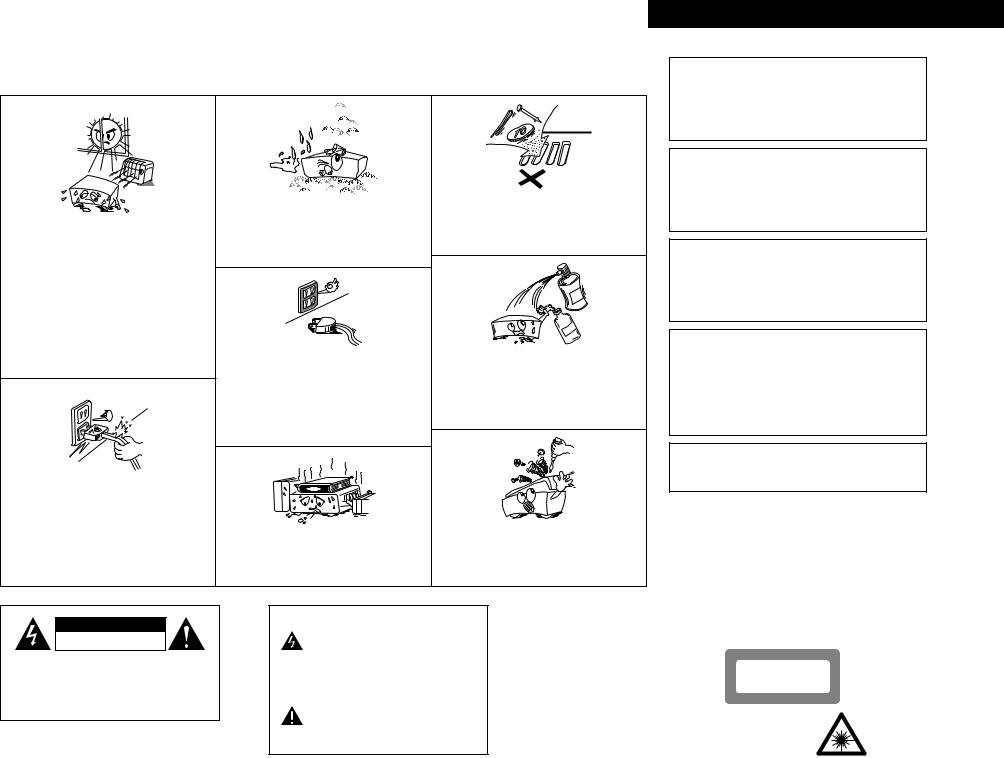
NOTE ON USE / HINWEISE ZUM GEBRAUCH /
OBSERVATIONS RELATIVES A L’UTILISATION / NOTE SULL’USO
•Avoid high temperatures.
Allow for sufficient heat dispersion when installed on a rack.
•Vermeiden Sie hohe Temperaturen.
Beachten Sie, daß eine ausreichend Luftzirkulation gewährleistet wird, wenn das Gerät auf ein Regal gestellt wird.
•Eviter des températures élevées
Tenir compte d’une dispersion de chaleur suffisante lors de l’installation sur une étagère.
•Evitate di esporre l’unità a temperature alte.
Assicuratevi che ci sia un’adeguata dispersione del calore quando installate l’unità in un mobile per componenti audio.
•Handle the power cord carefully.
Hold the plug when unplugging the cord.
•Gehen Sie vorsichtig mit dem Netzkabel um.
Halten Sie das Kabel am Stecker, wenn Sie den Stecker herausziehen.
•Manipuler le cordon d’alimentation avec précaution. Tenir la prise lors du débranchement du cordon.
•Manneggiate il filo di alimentazione con cura.
Agite per la spina quando scollegate il cavo dalla presa.
•Keep the set free from moisture, water, and dust.
•Halten Sie das Gerät von Feuchtigkeit, Wasser und Staub fern.
•Protéger l’appareil contre l’humidité, l’eau et lapoussière.
•Tenete l’unità lontana dall’umidità, dall’acqua e dalla polvere.
•Unplug the power cord when not using the set for long periods of time.
•Wenn das Gerät eine längere Zeit nicht verwendet werden soll, trennen Sie das Netzkabel vom Netzstecker.
•Débrancher le cordon d’alimentation lorsque l’appareil n’est pas utilisé pendant de longues périodes.
•Disinnestate il filo di alimentazione quando avete l’intenzione di non usare il filo di alimentazione per un lungo periodo di tempo.
*(For sets with ventilation holes)
•Do not obstruct the ventilation holes.
•Die Belüftungsöffnungen dürfen nicht verdeckt werden.
•Ne pas obstruer les trous d’aération.
•Non coprite i fori di ventilazione.
•Do not let foreign objects in the set.
•Keine fremden Gegenstände in das Gerät kommen lassen.
•Ne pas laisser des objets étrangers dans l’appareil.
•E’ importante che nessun oggetto è inserito all’interno dell’unità.
•Do not let insecticides, benzene, and thinner come in contact with the set.
•Lassen Sie das Gerät nicht mit Insektiziden, Benzin oder Verdünnungsmitteln in Berührung kommen.
•Ne pas mettre en contact des insecticides, du benzène et un diluant avec l’appareil.
•Assicuratevvi che l’unità non venga in contatto con insetticidi, benzolo o solventi.
•Never disassemble or modify the set in any way.
•Versuchen Sie niemals das Gerät auseinander zu nehmen oder auf jegliche Art zu verändern.
•Ne jamais démonter ou modifier l’appareil d’une manière ou d’une autre.
•Non smontate mai, nè modificate l’unità in nessun modo.
CAUTION
RISK OF ELECTRIC SHOCK
DO NOT OPEN
CAUTION: TO REDUCE THE RISK OF ELECTRIC SHOCK, DO NOT REMOVE COVER (OR BACK). NO USER SERVICEABLE PARTS INSIDE. REFER SERVICING TO QUALIFIED SERVICE PERSONNEL.
The lightning flash with arrowhead symbol, within an equilateral triangle, is intended to alert the user to the presence of uninsulated “dangerous voltage” within the product’s enclosure that may be of sufficient magnitude to constitute a risk of electric shock to persons.
The exclamation point within an equilateral triangle is intended to alert the user to the presence of important operating and maintenance (servicing) instructions in the literature accompanying the appliance.
ITALIANO FRANCAIS DEUTSCH ENGLISH
•DECLARATION OF CONFORMITY
We declare under our sole responsibility that this product, to which this declaration relates, is in conformity with the following standards:
EN60065, EN55013, EN55020, EN61000-3-2 and EN61000-3-3. Following the provisions of 73/23/EEC, 89/336/EEC and 93/68/EEC Directive.
•ÜBEREINSTIMMUNGSERKLÄRUNG
Wir erklären unter unserer Verantwortung, daß dieses Produkt, auf das sich diese Erklärung bezieht, den folgenden Standards entspricht:
EN60065, EN55013, EN55020, EN61000-3-2 und EN61000-3-3. Entspricht den Verordnungen der Direktive 73/23/EEC, 89/336/EEC und 93/68/EEC.
•DECLARATION DE CONFORMITE
Nous déclarons sous notre seule responsabilité que l’appareil, auquel se réfère cette déclaration, est conforme aux standards suivants:
EN60065, EN55013, EN55020, EN61000-3-2 et EN61000-3-3. D’après les dispositions de la Directive 73/23/EEC, 89/336/EEC et 93/68/EEC.
•DICHIARAZIONE DI CONFORMITÀ
Dichiariamo con piena responsabilità che questo prodotto, al quale la nostra dichiarazione si riferisce, è conforme alle seguenti normative:
EN60065, EN55013, EN55020, EN61000-3-2 e EN61000-3-3.
In conformità con le condizioni delle direttive 73/23/EEC, 89/336/EEC e 93/68/EEC.
QUESTO PRODOTTO E’ CONFORME AL D.M. 28/08/95 N. 548
ATTENZIONE: QUESTO APPARECCHIO E’ DOTATO DI
DISPOSITIVO OTTICO CON RAGGIO LASER.
L’USO IMPROPRIO DELL’APPARECCHIO PUO’ CAUSARE
PERICOLOSE ESPOSIZIONI A RADIAZIONI!
CLASS 1 LASER PRODUCT
LUOKAN 1 LASERLAITE
KLASS 1 LASERAPPARAT
ADVARSEL: USYNLIG LASERSTRÅLING VED ÅBNING, NÅR
SIKKERHEDSAFBRYDERE ER UDE AF FUNKTION.
UNDGÅ UDSAETTELSE FOR STRÅLING.
VAROITUS! LAITTEEN KÄYTTÄMINEN MUULLA KUIN TÄSSÄ KÄYTTÖOHJEESSA MAINITULLA TAVALLA SAATTAA ALTISTAA KÄYTTÄJÄN TURVALLISUUSLUOKAN 1 YLITTÄVÄLLE NÄKYMÄTTÖMÄLLE LASERSÄTEILYLLE.
VARNINGOM APPARATEN ANVÄNDS PÅ ANNAT SÄTT ÄN I DENNA BRUKSANVISNING SPECIFICERATS, KAN ANVÄNDAREN UTSÄTTAS FÖR OSYNLIG LASERSTRÅLNING SOM ÖVERSKRIDER GRÄNSEN FÖR LASERKLASS 1.
,,CLASS 1
LASER PRODUCT,,
2
ENGLISH DEUTSCH FRANCAIS ITALIANO ESPAÑOL NEDERLANDS SVENSKA
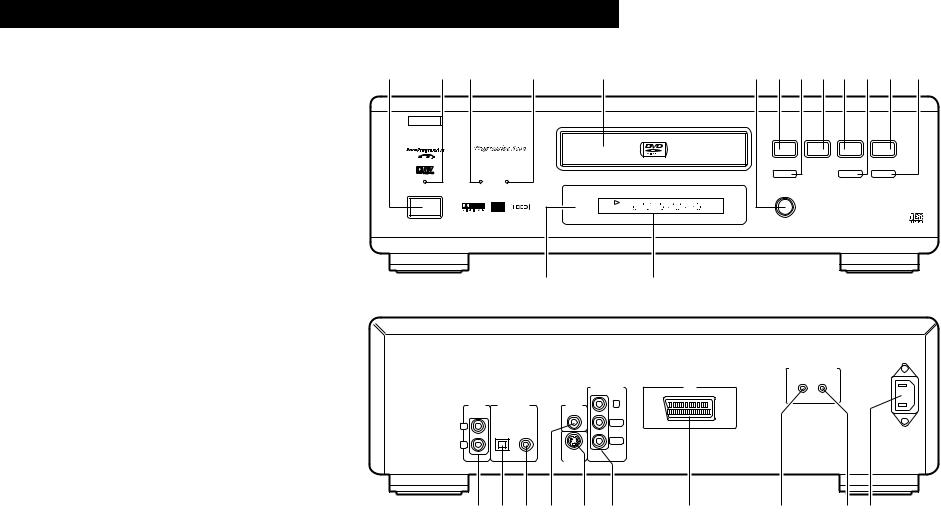
FRONT PANEL
FRONTPLATTE PANNEAU AVANT PANNELLO FRONTALE PANEL DELANTERO VOORPANEEL
FRONT PANELEN
q |
w e |
r |
t |
y u i o !0!1!2!3 |
|||
|
B |
|
|
|
|
|
|
|
|
|
|
PLAY |
STOP |
|
|
|
|
|
|
1 |
2 |
8 |
9 |
|
STILL / PAUSE |
|
|
HDCD |
3 |
6 |
7 |
PROGRESSIVE SCAN |
|
|
|
|
OPEN/CLOSE |
|
|
¢ON / STANDBY |
5 |
|
|
|
DVD |
|
|
£OFF |
|
|
|
|
REMOTE SENSOR |
|
DVD VIDEO PLAYER DVD-2800II |
|
|
|
!4 !5
REAR PANEL
RÜCKWAND
PANNEAU ARRIERE
IL PANNELLO POSTERIORE
PANEL TRASERO |
|
|
|
COMPONENT |
|
|
|
VIDEOOUT |
|
|
|
|
|
|
ACHTERPANEEL |
AUDIO |
DIGITAL OUT |
VIDEO |
Y |
OUT |
(PCM/BITSTREAM) |
OUT |
|
|
BAKSIDAN |
|
|||
L |
OPTICAL COAXIAL |
|
PB/CB |
|
|
|
|||
|
|
|
|
|
|
R |
|
|
PR/CR |
|
|
|
|
|
|
|
|
S-VIDEO |
|
|
|
|
OUT |
|
!6!7!8!9 @0@1
•As an aid to better understanding the operation method, the illustrations used in this manual may differ from the actual system.
•Als Hilfestellung zum besseren Verständnis der Betriebsmethode, erlauben wir uns den Hinweis, daß sich die Abbildungen in dieser Bedienungsanleitung leicht von dem aktuellen System unterscheiden.
•Pour faciliter la compréhension de la méthode de fonctionnement, les illustrations utilisées dans ce manuel peuvent être différentes de celles de la chaîne réelle.
•Per rendere la spiegazione del metodo operativo più facile, le illustrazioni usate in questo libretto delle istruzioni possono differire dal sistema stesso.
•Como ayuda a un mejor entendimiento del método de funcionamiento, las ilustraciones utilizadas en este manual puede diferir del sistema real.
•Als bijkomende hulp om de bedieningsmethode beter te begrijpen, is het mogelijk dat de afbeeldingen die in deze handleiding zijn gebruikt verschillen van het eigenlijke systeem.
•Illustrationerna i bruksanvisningen hjälper dig försaå de olika funktionerna. Studera dem noga. (Vissa illustrationer kan skilja sig lite grann från din apparat.)
AC IN
REMOTE CONTROL
ROOM TO ROOM
AV1
IN OUT
@2 @3 @4@5
@2 For only European model
@2 Nur für europäisches Modell
@2 Pour le modèle d’Europe seulement
@2 Solo per modelli europei
@2 Sólo para el modelo europeo
@2 Alleen voor Europees model
@2 Endast på Europa-modellen
In some cases, the model name used in the text and illustrations in the operating instructions is abbreviated and reads “DVD-2800” instead of “DVD-2800II”.
In einigen Fällen wird der im Text und in den Illustrationen der Bedienungsanleitung verwendete Modellname abgekürzt und als “DVD-2800” statt “DVD-2800II” bezeichnet.
Dans certains cas, il est possible que le nom du modèle utilisé dans le texte et les images du mode d’emploi soit abrégé en “DVD-2800” au lieu de “DVD-2800II”.
In alcuni casi, il nome del modello usato nel testo e nelle illustrazioni delle istruzioni operative viene abbreviato e si visualizza “DVD-2800” invece di “DVD-2800II”.
En algunos casos, el nombre del modelo utilizado en el texto y en las ilustraciones del las instrucciones de funcionamiento está abreviado y se visualiza “DVD-2800” en lugar de “DVD-2800II”.
In sommige gevallen is de modelnaam in de tekst en in de afbeeldingen van de bedieningshandleiding afgekort tot “DVD-2800” in plaats van “DVD-2800II”.
Ibland är modellnamnet förkortat till ”DVD-2800” istället för ”DVD-2800II” i texten och illustrationerna i bruksanvisningarna.
3
ENGLISH
IMPORTANT TO SAFETY |
— TABLE OF CONTENTS — |
WARNING:
TO PREVENT FIRE OR SHOCK HAZARD, DO NOT EXPOSE THIS APPLIANCE TO RAIN OR MOISTURE.
CAUTION:
1.Handle the power supply cord carefully
Do not damage or deform the power supply cord. If it is damaged or deformed, it may cause electric shock or malfunction when used. When removing from wall outlet, be sure to remove by holding the plug attachment and not by pulling the cord.
2.Do not open the top cover
In order to prevent electric shock, do not open the top cover.
If problems occur, contact your DENON DEALER.
3.Do not place anything inside
Do not place metal objects or spill liquid inside the DVD video player.
Electric shock or malfunction may result.
Please, record and retain the Model name and serial number of your set shown on the rating label.
Model No. DVD-2800II |
Serial No. |
NOTE:
This DVD video player uses the semiconductor laser. To allow you to enjoy music at a stable operation, it is recommended to use this in a room of 10°C (50°F) — 35°C (95°F).
Copyrights
2It is prohibited by law to reproduce, broadcast, rent or play discs in public without the consent of the copyright holder.
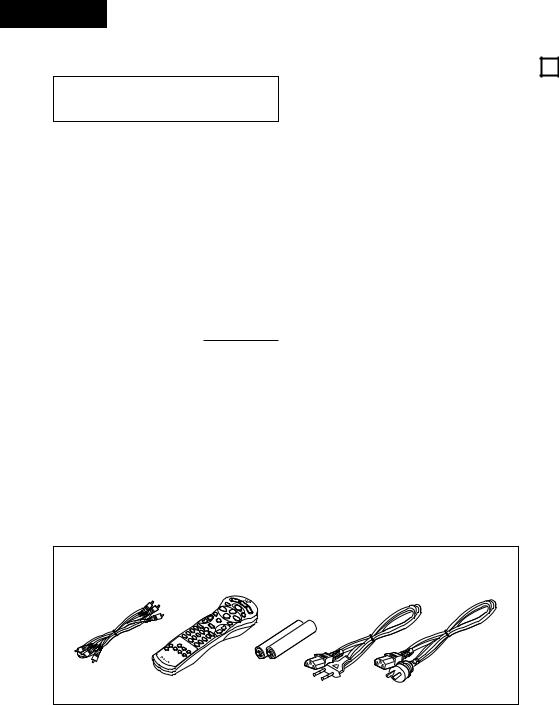
• ACCESSORIES
z Features........................................................................ |
4 |
x Discs ............................................................................ |
5 |
c Cautions on Handling Discs ........................................... |
5 |
v Connections ............................................................. |
6~8 |
b Part Names and Functions ......................................... |
8, 9 |
n Remote Control Unit................................................ |
9, 10 |
m Loading Discs.............................................................. |
10 |
, Playback................................................................ |
11, 12 |
. Using the On-Screen Display ....................................... |
13 |
⁄0Adjusting the Picture Quality........................................ |
13 |
⁄1Playing Repeatedly ...................................................... |
14 |
⁄2Playing Tracks in the Desired Order.............................. |
15 |
⁄3Playing the Tracks in Random Order............................. |
15 |
⁄4MP3 Playback ............................................................. |
16 |
⁄5Using the Multiple Audio, Subtitle |
|
and Angle Functions .............................................. |
17, 18 |
⁄6Using the Menus................................................... |
18, 19 |
⁄7Changing the Default Settings ............................... |
19~25 |
⁄8Troubleshooting .......................................................... |
26 |
⁄9Main Specifications ..................................................... |
26 |
Please check to make sure the following items are included with the main unit in the carton:
q Audio video cord …………………………………………1 |
r AC cord ……………………………………………………1 |
||
w Remote control unit (RC-546) |
|
…………………………1 |
t Operating instructions ……………………………………1 |
e R03/AAA batteries…………………………………………2 |
y Service station list …………………………………………1 |
||
q |
w |
e |
r |
1FEATURES
1.Progressive Scan circuit “Pure ProgressiveTM” (NOTE 1)
The DVD-2800II is equipped with a high precision Progressive Scan circuit “Puer Progressive” allowing it to reproduce movies and other images on DVDs with a quality near that of the original.
2.12-bit/108 MHz video D/A converter (NOTE 2)
The DVD-2800II uses a video D/A converter that conducts D/A conversion of all video signals at 12 bits and allows 4X oversampling in the progressive mode to achieve the high quality picture that DVDs are meant to provide. In addition, NSV technology reduces noise upon D/A conversion.
3.HDCD® (High Definition Compatible Digital) decoder (NOTE 3)
HDCD is an encoding/decoding technology that greatly reduces the distortion occurring at the time of digital recording while maintaining compatibility with the conventional CD format. HDCD allows 24-bit data to be converted into the 16-bit data of current CDs with no loss in sound quality.
4.CD-R/RW playback compatibility
The DVD-2800II can also play CD-R and CD-RW discs (new recording media).
5.High precision 96 kHz 24-bit D/A converter
The DVD-2800II is equipped with a 24-bit D/A converter for faithful D/A conversion of the high quality 24-bit data. This further enhances such aspects of audio performance as the S/N ratio, dynamic range and distortion and makes full use of the possibilities for high quality sound provided by a high number of bits and high sampling rates.
6.Dolby Digital bitstream output compatibility (NOTE 4)
The DVD-2800II is compatible with Dolby Digital bitstream output. When a Dolby Digital decoder is connected, the three-dimensional sense and positioning of the sound is recreated extremely naturally, resulting in a strong sense of presence, as if you were in a movie theater or concert hall.
7.DTS bitstream output compatibility (NOTE 5)
The DVD-2800II is compatible with DTS bitstream output, an optional audio format for DVD video. DTS sound can be enjoyed by connecting a commercially available DTS decoder and AV amplifier.
8.Many convenient functions
(1)Multiple audio function
Selection of up to 8 audio languages.
(The number of languages offered differs from DVD to DVD.)
(2)Multiple subtitle function
Selection of up to 32 subtitle languages.
(The number of languages offered differs from DVD to DVD.)
(3)Multiple angle function
The angle of view can be changed.
(For DVDs on which multiple angles are recorded.)
(4)Playback disable function
This function can be used to disable playback of DVDs you do not want children to watch.
NOTES:
1.“Pure Progressive” is a trademark of Silicon Image, Inc.
2.“NSV” is a trademark of Analog Devices, Inc.
3. ®,HDCD®, High Definition Compatible Digital® and Pacific MicrosonicsTM are either registered trademarks or trademarks of Pacific Microsonics, Inc. in the United States and/or other countries. HDCD system manufactured under license from Pacific Microsonics, Inc. This product is covered by one or more of the following: In the USA: 5,479,168, 5,683,074, 5,640,161, 5,808,574, 5,838,274, 5,854,600, 5,864,311, 5,872,531, and in Australia: 669114. Other patents pending.
4.Manufactured under license from Dolby Laboratories. “Dolby” and the double-D symbol are trademarks of Dolby Laboratories. Confidential unpublished work. ©1992 – 1997 Dolby Laboratories. All rights reserved.
5.“DTS” is a trademark of Digital Theater Systems, Inc.
For European model |
For Oceanian model |
4
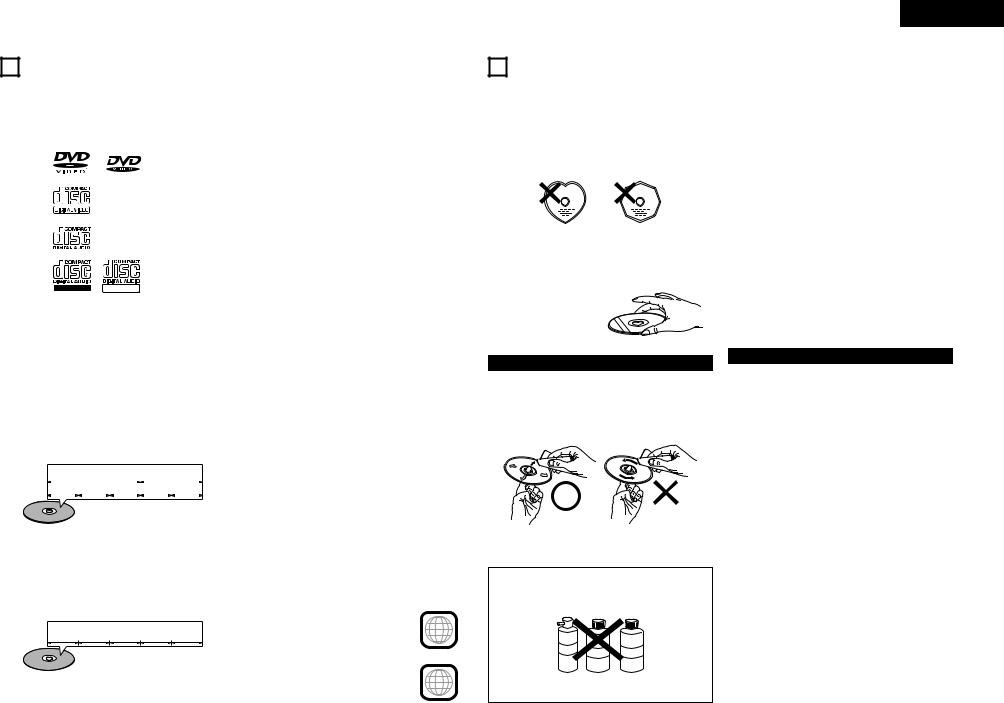
2DISCS
•The types of discs listed on the table below can be used on the DVD-2800II. The marks are indicated on the disc labels or jackets.
Usable |
|
|
|
Mark (logo) |
|
Recorded signals |
Disc |
|
2 The following types of discs cannot be played on |
|||||||
discs |
|
|
|
|
size |
|
the DVD-2800II: |
|
||||||||
|
|
|
|
|
|
|
|
|
|
|
|
|
|
|||
|
|
|
|
|
|
|
|
|
|
|
|
|
|
|
• For European model: |
|
DVD video |
|
|
|
|
|
|
|
|
|
Digital audio + |
12 cm |
|
|
|||
|
|
|
|
|
|
|
|
|
|
DVDs with region numbers other than “2” or “ALL” |
||||||
DVD audio |
|
|
|
|
|
|
|
|
|
digital video |
|
|
||||
|
|
|
|
|
|
|
|
|
|
|
For Oceanian, South American model: |
|
||||
(NOTE 1) |
|
|
|
|
|
|
|
|
|
(MPEG2) |
8 cm |
|
|
|||
|
|
|
|
|
|
|
|
|
|
|
|
|
|
|
DVDs with region numbers other than “4” or “ALL” |
|
|
|
|
|
|
|
|
|
|
|
|
|
|
|
|
||
|
|
|
|
|
|
|
|
|
|
Digital audio + |
12 cm |
|
• DVD audio discs (NOTE 1) |
|
||
Video CD |
|
|
|
|
|
|
|
|
|
digital video |
|
|
• DVD-R/RW |
|
||
|
|
|
|
|
|
|
|
|
|
|
|
|||||
|
|
|
|
|
|
|
|
|
|
(MPEG1) |
8 cm |
|
• DVD-ROM/RAMs |
|
||
|
|
|
|
|
|
|
|
|
|
|
|
|
|
|
||
|
|
|
|
|
|
|
|
|
|
|
|
|
|
|
• DVD+RW / DVD+R |
|
|
|
|
|
|
|
|
|
|
|
|
|
|
|
|
|
|
|
|
|
|
|
|
|
|
|
|
|
|
|
12 cm |
|
• SACD |
|
CD |
|
|
|
|
|
|
|
|
|
|
|
|
|
• DVD-ROMs (Only MP3 file can be played) |
|
|
|
|
|
|
|
|
|
|
|
|
|
|
|
|
|
||
|
|
|
|
|
|
|
|
|
|
|
|
|
|
• CVD / SVCD / VSDs |
|
|
CD-R |
|
|
|
|
|
|
|
|
|
Digital audio |
|
|
|
|||
CD-RW |
|
|
|
|
|
|
|
|
|
|
MP3 |
|
|
• CDVs (Only the audio part can be played.) |
|
|
(NOTE 2) |
|
|
|
|
|
|
|
|
|
|
|
|
|
|
• CD-Gs (Only the audio is output.) |
|
|
|
|
|
|
|
|
|
|
|
|
|
|
8 cm |
|
|
|
|
|
|
|
|
|
|
|
|
|
|
|
|
|
• Picture CDs |
|
|
|
|
Recordable |
ReWritable |
|
|
|
|
|
|
|
||||||
|
|
|
|
|
|
|
|
|
|
|
|
|
|
|
• Photo CDs (NEVER play such discs on the DVD- |
|
|
|
|
|
|
|
|
|
|
|
|
|
|
|
|
||
NOTE 1: Video part which based on DVD-video specification |
|
2800II.) |
|
|||||||||||||
|
If you attempt to play photo CDs, the data on the disc |
|||||||||||||||
only can be played. |
|
|
|
|
|
|
||||||||||
|
|
|
|
|
|
|
|
|||||||||
NOTE 2: According to recording quality, some CD-R/RW |
|
|
|
|||||||||||||
cannot be played. |
|
|
|
|
|
|
|
|
|
|
|
|||||
2 Disc terminology |
|
|
|
|
|
|
|
|
|
|
|
|||||
• Titles and chapters (DVD-videos) |
|
|
|
|
|
|
• Playback control (video CDs) |
|
||||||||
DVD-videos are divided into several large sections called |
|
Video CDs including the words “playback control” on the |
||||||||||||||
“titles” and smaller sections called “chapters”. |
|
|
disc or jacket are equipped with a function for displaying |
|||||||||||||
Numbers are allotted to these sections. These numbers |
|
menus on the TV screen for selecting the desired position, |
||||||||||||||
are called “title numbers” and “chapter numbers”. |
|
|
displaying information, etc., in dialog fashion. |
|
||||||||||||
For example: |
|
|
|
|
|
|
|
|
|
|
|
|
In this manual, playing video CDs using such menus is |
|||
|
|
|
|
|
|
|
|
|
|
|
|
referred to “menu playback”. |
|
|||
|
|
|
|
|
|
|
|
|
|
|
|
|
|
|
|
|
|
|
|
Title 1 |
|
|
|
|
Title 2 |
|
|
Video CDs with playback control can be used on the DVD- |
|||||
|
|
|
|
|
|
|
|
|
2800II. |
|
||||||
|
|
|
|
|
|
|
|
|
|
|
|
|
|
|
|
|
|
Chapter 1 |
|
Chapter 2 Chapter 3 |
Chapter 1 |
Chapter 2 |
|
|
|
|
|||||||
|
|
|
|
|
|
|
|
|
|
|
|
|
|
NOTE: |
|
|
|
|
|
|
|
|
|
|
|
|
|
|
|
|
|
||
|
|
|
|
|
|
|
|
|
|
|
|
|
|
• This DVD video player is designed and |
|
|
|
|
|
|
|
|
|
|
|
|
|
|
|
|
|
manufactured to respond to the Region |
|
• Tracks (video and music CDs) |
|
|
|
|
|
|
Management Information that is recorded |
|
||||||||
|
|
|
|
|
|
on a DVD disc. |
|
|||||||||
Video and music CDs are divided into sections called |
|
|
||||||||||||||
|
If the Region number described on the DVD |
|
||||||||||||||
“tracks”. |
|
|
|
|
|
|
|
|
|
|
|
|
|
|||
|
|
|
|
|
|
|
|
|
|
|
|
disc does not correspond to the Region |
|
|||
Numbers are allotted to these sections. These numbers |
|
|
||||||||||||||
|
number of this DVD video player, this DVD |
|
||||||||||||||
are called “track numbers”. |
|
|
|
|
|
|
|
|||||||||
|
|
|
|
|
|
video player cannot play this disc. |
|
|||||||||
|
|
|
|
|
|
|
|
|
|
|
|
|
|
|
|
|
For example: |
|
|
|
|
|
|
|
|
|
|
|
|
|
|
||
|
|
|
|
|
|
|
|
|
|
|
|
|
|
|
For European model: |
2 |
|
|
Track 1 |
|
|
Track 2 |
|
|
Track 3 |
Track 4 |
Track 5 |
|
|
The Region number for this DVD video |
|||
|
|
|
|
|
|
|
|
|
||||||||
player is 2.
For Oceanian, South American model:
The Region number for this DVD video |
4 |
|
|
player is 4. |
|
ENGLISH
3 CAUTIONS ON HANDLING DISCS
Discs |
|
Cautions on Handling Discs |
Only the discs including the marks shown on page 5 can be played on the DVD-2800II.
Note, however, that discs with special shapes (heart-shaped discs, hexagonal discs, etc.) cannot be played on the DVD2800II. Do not attempt to play such discs, as they may damage the player.
•Do not get fingerprints, grease or dirt on discs.
•Be especially careful not to scratch discs when removing them from their cases.
•Do not bend discs.
•Do not heat discs.
•Do not enlarge the center hole.
•Do not write on the labeled (printed) side with a ball-point pen or a pencil.
•Water droplets may form on the surface if the disc is moved suddenly from a cold place to a warm one. Do not use a hairdryer, etc., to dry the disc.
Holding Discs |
|
Cautions on Storing Discs |
||
Avoid touching the surface of discs when loading and |
• Always eject discs after playing them. |
|||
unloading them. |
• Keep discs in their cases to protect them from dust, |
|||
|
|
scratches and warping. |
||
Be careful not to get |
• Do not put discs in the following places: |
|||
1. |
Places exposed to direct sunlight for long periods of time |
|||
fingerprints on the signal |
||||
2. |
Humid or dusty places |
|||
surface (the side which shines |
||||
in rainbow colors). |
3. |
Places exposed to heat from heaters, etc. |
||
Cleaning Discs
2Fingerprints or dirt on the disc may lower sound and picture quality or cause breaks in playback. Wipe off fingerprints or dirt.
2Use a commercially available disc cleaning set or a soft cloth to wipe off fingerprints or dirt.
Wipe gently from the middle |
Do not wipe with a circular |
outwards. |
motion. |
NOTE:
•Do not use record spray or antistatic. Also do not use volatile chemicals such as benzene or thinner.
Cautions on Loading Discs
•Only load one disc at a time. Loading one disc on top of another may result in damage or scratch the discs.
•Load 8 cm discs securely in the disc guide, without using an adapter. If the disc is not properly loaded, it may slip out of the guide and block the disc tray.
•Be careful not to let your fingers get caught when the disc tray is closing.
•Do not place anything but discs in the disc tray.
•Do not load cracked or warped discs or discs that have been fixed with adhesive, etc.
•Do not use discs on which the adhesive part of cellophane tape or glue used to attach the label is exposed, or discs with traces of tape or labels that have been peeled off. Such discs may get stuck inside the player, resulting in damage.
Record Thinner |
Benzene |
spray |
|
5
ENGLISH
4 CONNECTIONS
NOTES:
• Read the manuals of all the components when making |
• Be sure to connect the left and right channels properly, L |
connections. |
(left) to L, R (right) to R. |
• Keep the power cord unplugged until all connections have |
• Plug the power cord securely into the power outlet. |
been completed. |
Incomplete connection may result in noise. |
• If the power is on when connections are made, noise may |
• Binding the power cord together with connection cords |
be generated and damage the speakers. |
may result in humming or noise. |
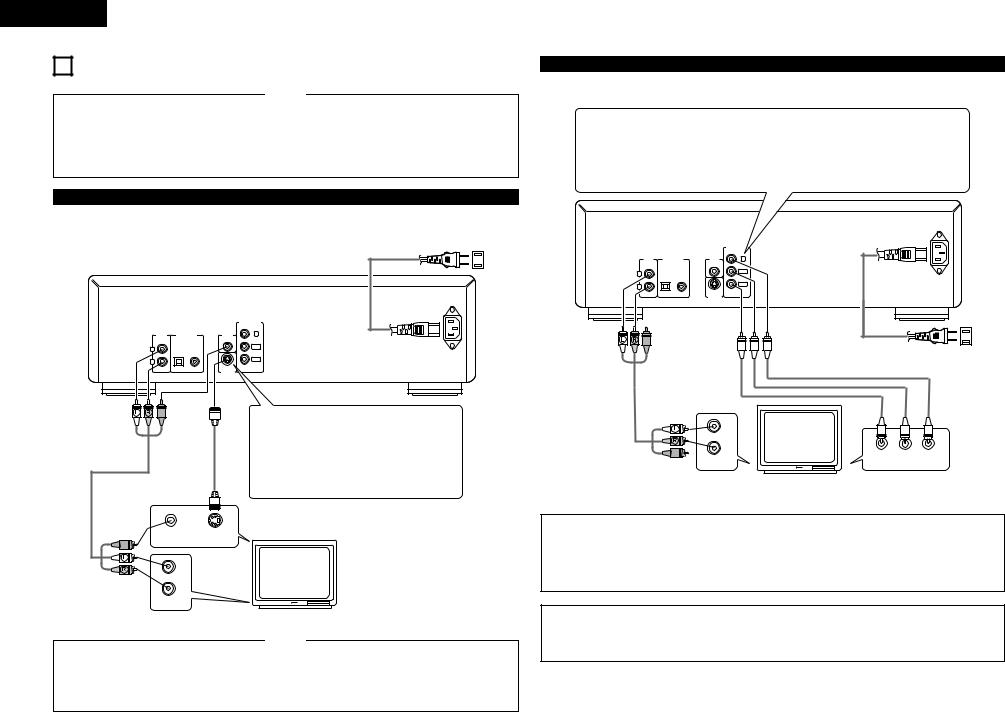
(1) Connecting a TV
(2) Connecting to a TV or Monitor Equipped with Color Component Input Connectors
Color component output connectors (PR/CR, PB/CB and Y)
The red (PR/CR), blue (PB/CB) and brightness (Y) signals are output independently, achieving more faithful reproduction of the colors.
• The color component input connectors may be marked differently on some TVs or monitors (PR, PB and Y/R-Y, B-Y and Y/CR, CB and Y, etc.). For details, refer to the TV’s operating instructions.
Connect in this way if your TV is compatible with Progressive Scan.
• Use the included audio video cord to connect the TV’s video input connector and audio input connectors to the DVD-2800’s
VIDEO OUT or S-VIDEO OUT and AUDIO OUT.
|
|
|
|
To power outlet |
|
|
|
|
|
|
|
AUDIO |
DIGITAL OUT |
VIDEO |
Y |
DVD-2800 |
|
|
|
OUT |
(PCM/BITSTREAM) |
OUT |
|
|
|
|
|
|
|
|
|
|
|
|
|
L |
OPTICAL COAXIAL |
|
PB/CB |
|
|
|
|
|
|
|
|
|
|
|
|
R |
|
|
PR/CR |
|
|
|
|
|
|
|
|
|
|
|
|
|
|
S-VIDEO |
|
|
|
|
|
AC IN |
|
OUT |
|
|
|
|
COMPONENT |
|
|
|
|
|
|
|
VIDEOOUT |
DVD-2800 |
|
|
|
AUDIO |
DIGITAL OUT |
VIDEO |
Y |
|
|
|
|
OUT |
(PCM/BITSTREAM) |
OUT |
|
|
|
|
|
L |
OPTICAL COAXIAL |
|
PB/CB |
|
|
|
|
|
|
|
|
|
|
|
|
R |
|
|
PR/CR |
|
|
|
|
|
|
|
|
|
|
|
|
|
|
S-VIDEO |
|
|
|
|
|
|
|
OUT |
|
|
|
|
|
AC IN
To power outlet
S-Video output connector
The video signals are divided into color (C) and brightness (Y) signals, achieving a clearer picture.
If the TV is equipped with an S-Video input connector, we recommend connecting it to the DVD-2800’s S- Video output connector using a commercially available S-Video connection cord.
TV
VIDEO IN S-VIDEO IN
L
R
AUDIO IN
NOTES:
• Connect the DVD-2800’s video outputs to the TV either |
• Set the “TV TYPE” in “VIDEO SETUP” in “SETUP“ to |
directly or through an AV amplifier. Do not connect it via a |
comply with your TV's video format. When the TV is PAL |
VCR (video cassette recorder). Some discs contain copy |
formated, set to PAL. (See page 22.) |
prohibit signals. If such discs are played via a VCR, the |
|
copy prohibit system may cause disturbance in the picture. |
|
TV
L
R
PR/CR PB/CB Y
AUDIO IN |
COMPONENT VIDEO IN |
NOTES:
•Use the three commercially available video cords to connect the DVD-2800’s color component output connectors to the TV or monitor.
•Set the “TV TYPE“ in “VIDEO SETUP“ in “SETUP“ to comply with your TV's video format. When the TV is PAL formated, set to PAL. (See page 22.)
•Set the “VIDEO OUT” in “VIDEO SETUP” in “SETUP” to comply with Progressive TV. (NTSC formated only)
CONSUMERS SHOULD NOTE THAT NOT ALL HIGH DEFINITION TELEVISION SETS ARE FULLY COMPATIBLE WITH THIS PRODUCT AND MAY CAUSE ARTIFACTS TO BE DISPLAYED IN THE PICTURE. IN CASE OF 525 PROGRESSIVE SCAN PICTURE PROBLEMS, IT IS RECOMMENDED THAT THE USER SWITCH THE CONNECTION TO THE “STANDARD DEFINITION” OUTPUT.
6
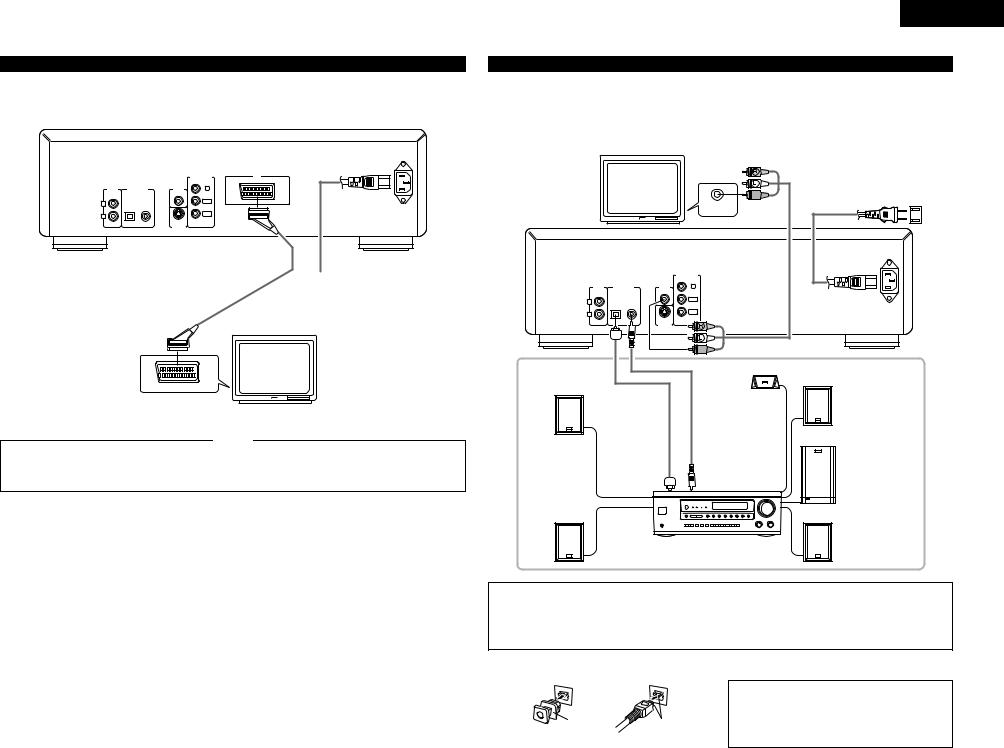
(3)Connecting to a TV with 21-pin SCART Terminal (For only European model)
•Use the commercially 21-pin SCART cable to connect the TV’s 21-pin SCART terminal to the DVD-2800’s 21-pin SCART terminal (AV1).
DVD-2800
AC IN
|
|
|
COMPONENT |
AV1 |
|
|
|
VIDEOOUT |
|
|
|
|
|
|
AUDIO |
DIGITAL OUT |
VIDEO |
Y |
|
OUT |
(PCM/BITSTREAM) |
OUT |
|
|
L |
OPTICAL COAXIAL |
|
PB/CB |
|
|
|
|
|
|
R |
|
|
PR/CR |
|
|
|
|
|
|
|
|
S-VIDEO |
|
|
|
|
OUT |
|
|
To power outlet
TV
21-pin SCART terminal
NOTES:
• Some discs contain copy prohibit signals. If such discs are |
• Set the “TV TYPE“ in “VIDEO SETUP“ in “SETUP“ to |
played via a VCR, the copy prohibit system may cause |
comply with your TV's video format. When the TV is PAL |
disturbance in the picture. |
formated, set to PAL. (See page 22.) |
ENGLISH
(4) Connecting to a AV amplifier with a Built-in decoder
When DVDs recorded in Dolby Digital or DTS are played, Dolby Digital or DTS bitstream signals are output from the DVD player’s digital audio output connectors. If a Dolby Digital or DTS decoder is connected, you can achieve sound with the power and sense of presence of a movie theater or concert hall.
TV
To power outlet
VIDEO IN
DVD-2800
AC IN
|
|
|
|
COMPONENT |
|
|
|
|
VIDEOOUT |
AUDIO |
DIGITAL OUT |
VIDEO |
Y |
|
OUT |
(PCM/BITSTREAM) |
OUT |
|
|
L |
OPTICAL |
COAXIAL |
|
PB/CB |
|
|
|
|
|
R |
|
|
|
PR/CR |
|
|
|
|
|
|
|
|
S-VIDEO |
|
|
|
|
OUT |
|
Front speaker (right)
Front speaker (left)
Center speaker
|
Subwoofer |
|
Digital audio input |
Digital audio input |
|
connector |
connector (COAXIAL) |
|
(OPTICAL) |
|
|
Surround speaker |
Surround speaker (right) |
|
(left) |
||
|
||
AV amplifier with a built-in decoder |
||
|
(AV control center) |
|
NOTES:
•Set the “TV TYPE“ in “VIDEO SETUP“ in “SETUP“ to comply with your TV's video format. When the TV is PAL formated, set to PAL. (See page 22.)
•Harsh noise that could harm your ears or damage the speakers is generated when a DVD recorded in DTS is played while using a decoder, etc., that is not DTS-compatible.
2 Connecting an optical fiber cable (commercially available) to the digital audio input connector (OPTICAL)
|
|
NOTE: |
|
|
• Store the dust cap in a safe place, and be careful not to |
|
|
lose it. |
Dust cap |
Line up in proper direction |
When not using the terminal, attach the cap to protect |
Remove the dust cap, line up the cable in the proper directly, |
the terminal from dust. |
|
|
||
then insert it securely as far as it goes.
7
ENGLISH
2 Sound output from the DVD-2800’s digital audio output connectors
|
|
|
|
Sound output |
Refear to |
Digital audio data output |
|
Audio recording format |
|||||
|
page |
|||||
|
|
|
||||
|
|
|
|
|
|
|
|
|
Dolby Digital |
Digital out : Normal |
|
Dolby Digital bitstream |
|
|
|
|
|
|
||
|
|
Digital out : PCM conversion |
23 |
2 channels PCM data (48 kHz/16 bit) |
||
|
|
|
|
|||
|
|
|
|
|
|
|
|
|
|
DTS |
Digital out : Normal |
DTS bitstream |
|
|
|
|
|
|||
|
|
|
|
|
|
|
|
|
|
Digital out : PCM conversion |
|
DTS bitstream |
|
|
|
|
|
|
||
|
|
|
|
|
|
|
DVD video |
|
MPEG audio |
Digital out : Normal |
23 |
2 channel PCM data (48 kHz/16 bit) |
|
|
|
|
||||
|
|
|
||||
DVD audio |
|
|
|
Digital out : PCM conversion |
|
2 channel PCM data (48 kHz/16 bit) |
(video part only) |
|
|
|
|
|
|
|
|
|
|
LPCM conversion mode :OFF |
|
48 kHz/16 bit ~ 24 bit PCM |
|
|
|
48 kHz |
|
|
|
|
PCM |
|
LPCM conversion mode :ON |
|
48 kHz/16 bit PCM |
|
|
|
|
|
|||
|
|
|
|
|
|
|
|
|
96 kHz |
LPCM conversion mode :ON |
23 |
48 kHz/16 bit PCM |
|
|
Linear |
|
||||
|
|
|
|
|
|
|
|
|
CP : ON |
LPCM conversion mode :OFF |
|
No output data (when copy protected) |
|
|
|
|
|
|
|
|
|
|
|
CP : OFF |
LPCM conversion mode :OFF |
|
96 kHz PCM (when not copy protected) |
|
|
|
|
|
|
|
Video CD |
|
MPEG 1 |
|
|
44.1 kHz/16 bit PCM |
|
|
|
|
|
|
|
|
Music CD |
|
Linear PCM |
|
|
44.1 kHz/16 bit PCM |
|
|
|
|
|
|
|
|
MP3 CD |
|
|
MP3 |
|
|
32 ~ 48 kHz/16 bit PCM |
|
|
|
|
|
|
|
•Linear PCM audio is the signal recording format used for music CDs.
While the signals are recorded at 44.1 kHz/16 bit for music CDs, for DVDs they are recorded at 48 kHz/16 bit to 96 kHz/24 bit, providing higher sound quality than music CDs.
•When “OFF” is selected, digital signals are not output from the digital audio output at this time.
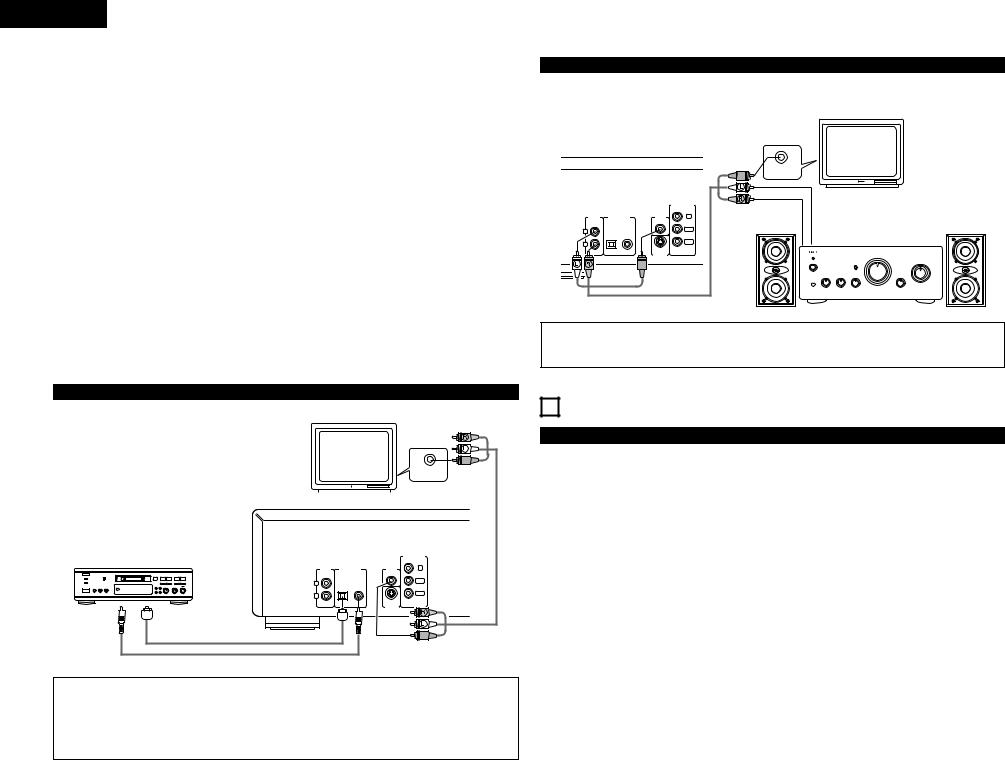
(5)Connecting to a Digital Recorder (MD Recorder, DAT Deck, etc.)
Set the “AUDIO SETUP” default setting as shown below. |
TV |
||
(See page 23.) |
|
|
|
• “DIGITAL OUT” → “PCM” |
|
|
|
“LPCM SELECT” → “ON” |
|
|
|
Playing DVDs with incorrect settings may result noise that |
|
|
|
could damage your ears or the speakers. |
|
|
|
• Set the “TV TYPE“ in “VIDEO SETUP“ in “SETUP“ comply |
|
|
|
with your TV's video format. When the TV is PAL formated, |
|
|
|
|
|
|
|
set to PAL. (See page 22.) |
|
|
|
AUDIO |
DIGITAL OUT |
VIDEO |
OUT |
(PCM/BITSTREAM) |
OUT |
B |
|
|
L |
OPTICAL COAXIAL |
|
|
|
|
R |
|
|
|
|
S-VIDEO |
|
|
OUT |
VIDEO IN |
DVD-2800 |
COMPONENT |
VIDEOOUT |
Y |
PB/CB |
PR/CR |
Digital audio input connector (OPTICAL)
Digital audio input connector (COAXIAL)
NOTES:
In some cases, track numbers may not be assigned automatically when conducting digital recording onto a connected component while playing a CD on the DVD-2800.
•When conducting digital recording onto an MD recorder, use the editing function to divide the tracks after recording is completed.
•When conducting digital recording onto a CD recorder, set the CD recorder’s recording setting to manual and assign the track numbers (track marks) manually during recording.
(6) Connecting to a Stereo Component
TV
DVD-2800
|
|
|
|
COMPONENT |
|
|
|
|
VIDEOOUT |
AUDIO |
DIGITAL OUT |
VIDEO |
Y |
|
OUT |
(PCM/BITSTREAM) |
OUT |
|
|
L |
OPTICAL |
COAXIAL |
|
PB/CB |
|
|
|
|
|
R |
|
|
|
PR/CR |
|
|
|
|
|
|
|
|
S-VIDEO |
|
|
|
|
OUT |
|
VIDEO IN
Stereo component
NOTE:
•Set the “TV TYPE“ in “VIDEO SETUP“ in “SETUP“ to comply with your TV's video format. When the TV is PAL formated, set to PAL. (See page 22.)
5 PART NAMES AND FUNCTIONS
(1) Front Panel
See page 3.
qPower button
•Press once to turn the power on.
•Press again to set to the “OFF” position and turn the power off.
•Set the power to the standby mode by pressing the POWER button on the remote control unit while the power is on.
•Turn the power on from the standby mode by pressing the POWER button on the remote control unit.
wPower indicator
•This indicator lights when the power is on and when the power is in the standby mode.
eHDCD indicator
•This indicator lights when playing discs recorded in HDCD® format. (NOTE 1)
rProgressive Scan indicator
•Lights when progressive is selected as the video output.
tDisc tray
•Load discs here. (See page 10.)
•Press the OPEN/CLOSE button y to open and close the disc tray.
•The disc tray is also closed when the PLAY button u is pressed.
yOPEN/CLOSE button (5 OPEN/CLOSE)
•Press this button to open and close the disc tray. (See page 10.)
uPLAY button (1 PLAY)
• Press this button to play the disc. (See page 11.)
iSTILL/PAUSE button (3 STILL/PAUSE)
•Press this button to pause images or music and to play images frame by frame. (See page 12.)
oSTOP button (2 STOP)
• Press this to stop the disc. (See page 12.)
!0 Skip button (8)
•Press this to move back to the beginning of the current track (or chapter).
•Press again to move back to the beginning of the previous track (or chapter). (See page 12.)
!1 Slow/Search button (6)
•Press this to set the slow play mode and to search in the reverse direction. (See page 12.)
!2 Skip button (9)
•Press this to move ahead to the beginning of the next track (or chapter). (See page 12.)
!3 Slow/Search button (7)
•Press this to set the slow play mode and to search in the forward direction. (See page 12.)
!4 Remote control sensor !5 Display
•Information on the disc that is currently playing is shown on the display. (See page 9.)
8

NOTE:
 ®,HDCD®, High Definition Compactible Dgital® and Pacific MicrosonicsTM are either registered trademarks or trademarks of Pacific Microsonics, Inc. in the United States and/or other countries. HDCD system manufactured under license from Pacific Microsonics, Inc. This product is covered by one or more of the following: In the USA: 5,479,168, 5,683,074, 5,640,161, 5,808,574, 5,838,274, 5,854,600, 5,864,311, 5,872,531, and in Australia: 669114. Other patents pending.
(2) Rear Panel
!6 Audio output connectors (AUDIO OUT) !7 Digital audio output connector (OPTICAL)
•Connect using an optical fiber cable (available in stores).
•Digital data is output from this connector.
!8 Digital audio output connector (COAXIAL)
•Connect using an audio cord. Connect a commercially available 75 Ω/ohms pin-plug cord.
•Connect using the included audio video cord.
!9 Video output connector (VIDEO OUT)
• Connect using the included audio video cord.
@0 S-Video output connector (S-VIDEO OUT)
•Connect using an S-Video connection cord (available in stores).
@1 Component video output connectors (COMPONENT)
• Connect using video cords (available in stores).
@2 21-pin SCART terminal (AV 1) (For only European model)
•Connect using a 21-pin SCART cable (available in stores).
@3 Control input connector (ROOM TO ROOM / IN)
•This is the input connector for wired remote control. Consult your DENON dealer if you wish to use this connector.
@4 Control output connector (ROOM TO ROOM / OUT)
•This is the output connector for wired remote control. Consult your DENON dealer if you wish to use this connector.
@5 Power input (AC IN)
• Connect to AC power supply using the included AC cord.
(3) Display
Lights during playback, flashes when the resume play memory function is activated.
Lights in the repeat play mode.
Lights in the still/pause mode.
DVD |
ANGLE |
|
PROG. |
96kHz 24bit |
The title and elapsed track time are displayed here during playback.
The title/chapter number is displayed here for
DVDs, the track number for video and music CDs.
Lights during playback of 24-bit linear PCM sound.
Lights during playback of linear PCM sound with a sampling frequency of 96 kHz.
ENGLISH
6 REMOTE CONTROL UNIT
2 The DVD-2800 can be controlled from a distance using the included remote control unit (RC-546).
(1) Inserting Batteries
q Remove the remote control unit’s rear cover.
wPlace two R03/AAA batteries in the battery compartment in the direction indicated by the marks.
e Close the rear cover.
Cautions On Batteries
•Use R03/AAA batteries in this remote control unit.
•Replace the batteries with new ones approximately once a year, though this depends on the frequency with which the remote control unit is used.
•If the remote control unit does not operate from close to the main unit, replace the batteries with new ones, even if less than a year has passed.
•The included battery is only for verifying operation. Replace it with a new battery as soon as possible.
•When inserting the batteries, be careful to do so in the proper direction, following the < and > marks in the remote control unit’s battery compartment.
•To prevent damage or battery fluid leakage:
•Do not use a new battery with an old one.
•Do not use two different types of batteries.
•Do not short-circuit, disassemble, heat or dispose of batteries in flames.
•Remove the batteries when not planning to use the remote control unit for a long period of time.
•If the batteries should leak, carefully wipe off the fluid from the inside of the battery compartment, then insert new batteries.
(2) Using the Remote Control Unit
Approx. 7 meters
30° 
30° 
•When operating the remote control unit, point it at the remote control sensor as shown on the diagram.
•The remote control unit can be used from a direct distance of approximately 7 meters. This distance will be shorter, however, if there are obstacles in the way or if the remote control unit is not pointed directly at the remote control sensor.
•The remote control unit can be operated at a horizontal angle of up to 30° with respect to the remote control sensor.
Lights in the programmed play mode.
Lights during playback of multiple angles discs.
Lights when a DVD is loaded in the disc tray.
NOTES:
•It may be difficult to operate the remote control unit if the remote control sensor is exposed to direct sunlight or strong artificial light.
•Do not press buttons on the main unit and on the remote control unit at the same time. Doing so will result in malfunction.
9
ENGLISH
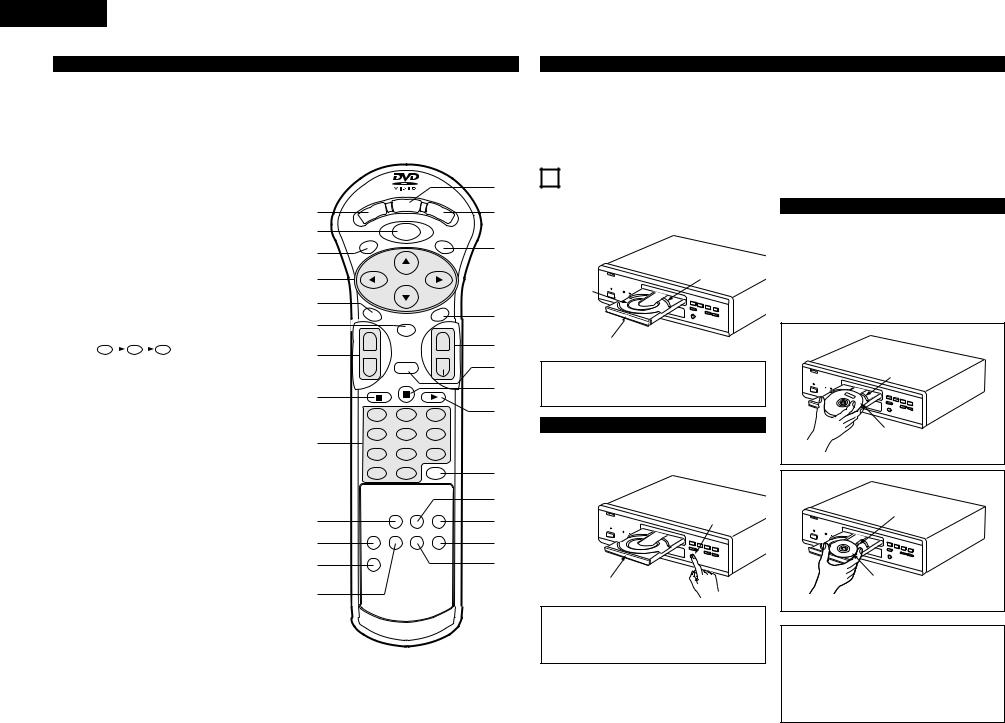
(3) Names and Functions of Remote Control Unit Buttons
qPOWER button (POWER)
Press this to switch the power between on and standby.
w MENU button (MENU)
e TOP MENU button (TOP MENU) r Cursor buttons (Cursor)
Use the •and ªbuttons to select in the vertical direction.
Use the 0and 1buttons to select in the horizontal direction.
t AUDIO button (AUDIO)
For DVDs, press this to switch the audio language. For |
q |
||||||
video CDs, press this to switch the channel between |
|||||||
“LR”, “L” and “R”. |
|
w |
|||||
y ENTER button (ENTER) |
|||||||
e |
|||||||
Press the ENTER button to select the item selected with |
|||||||
|
|||||||
the cursor buttons. |
|
|
|||||
u SKIP buttons (SKIP) |
|
r |
|||||
i STOP button (2) |
|
||||||
|
|
||||||
o Number buttons |
|
t |
|||||
Use these to input numbers. |
|||||||
|
|||||||
Use the +10 button to input numbers of 10 or over. |
y |
||||||
Example: To input 25 |
|
||||||
+10 |
|
+10 |
|
|
5 |
u |
|
|
|
|
|
||||
!0 PROGRAM/DIRECT button (PROG/DIRECT) |
|
||||||
Press this to switch between the normal play, |
i |
||||||
programmed play. |
|
||||||
|
|
||||||
!1 SET UP button (SET UP) |
|
||||||
!2 V.S.S. button (V.S.S.) |
|
||||||
Sets the virtual surround sound. (Functions when playing |
o |
||||||
DVDs recorded in Dolby Digital with two or more |
|||||||
channels.) |
|
|
|
|
|
|
|
!3 REPEAT button (REPEAT) |
|
||||||
Press this to play tracks repeatedly |
|
||||||
!4 DISPLAY button (DISPLAY) |
|
||||||
Press this to display the ON-SCREEN. |
|
||||||
!5 OPEN/CLOSE button (OP/CL) |
!0 |
||||||
!6 SUBTITLE button (SUBTITLE) |
|||||||
Press this to switch the DVD’s subtitle language. |
!1 |
||||||
!7 ANGLE button (ANGLE) |
|||||||
Press this to switch the angle. |
!2 |
||||||
!8 SLOW/SEARCH buttons (SLOW/SEARCH) |
|||||||
|
|||||||
!9 RETURN button (RETURN) |
!3 |
||||||
Press this to return to the previous menu screen. |
|||||||
@0 STILL/PAUSE button (3) |
|
||||||
@1 PLAY button (1)
@2 CLEAR button (CLEAR)
Press this to clear numbers that you have input.
@3 CALL button (CALL)
Press this to check the program contents.
@4 RANDOM button (RANDOM)
Press this to play the tracks on the video or music in random order.
@5 NTSC/PAL button (NTSC/PAL)
Use this to switch the set’s video output format (NTSC/PAL).
@6 A-B REPEAT button (A-B REPEAT)
Use this to repeat sections between two specific points.
|
DISPLAY |
POWER |
OP/CL |
TOP MENU |
MENU |
SUBTITLE |
AUDIO |
|
|
ANGLE |
|
ENTER |
|
|
+ |
|
|
+ |
SKIP |
|
|
SLOW/SEARCH |
- |
RETURN |
- |
|
1 |
2 |
|
3 |
4 |
5 |
|
6 |
7 |
8 |
|
9 |
0 |
+10 |
CLEAR |
|
|
PROG/DIRECT |
CALL |
RANDOM |
SET UP |
REPEAT |
A-B REPEAT |
NTSC/PAL |
V.S.S. |
|
|
|
REMOTE CONTROL UNIT
RC-546
B
IMPORTANT SETUP INFORMATION
This set has the following presettings: “DISC SETUP”, “OSD SETUP”, “VIDEO SETUP”, “AUDIO SETUP”, “RATINGS” and “OTHER SETUP”.
These presettings have been preset upon shipment from the factory. If you wish to change them to suit your specific purposes, refer to pages 19 to 25.
!4
!5
!6
!7
!8
!9
@0
@1
@2
@3
@4
@5
@6
7 LOADING DISCS
2Set discs in the disc tray with the labeled (printed) side facing up.
12 cm disc guide
8 cm disc guide
Disc tray
NOTE:
•Do not move the DVD-2800 while a disc is playing. Doing so may scratch the disc.
(1) Opening and Closing the Disc Tray
q Turn on the power.
w Press the OPEN/CLOSE button.
OPEN/CLOSE button
Disc tray
NOTES:
•Be sure to turn on the power before opening and closing the disc tray.
•Do not strike on the button with a pencil, etc.
(2)Loading Discs
•Pick up the disc carefully so as not to touch the signal surface and hold it with the labeled side facing up.
•With the disc tray fully open, set the disc in the disc tray.
•Set 12 cm discs in the outer tray guide (Figure 1), 8 cm discs in the inner tray guide (Figure 2).
•Press the OPEN/CLOSE button. The disc is automatically loaded.
•The disc tray can also be closed automatically to load the disc by pressing the PLAY button.
Figure 1 |
Outer disc tray |
12 cm disc |
Figure 2 |
Inner disc tray |
8 cm disc |
NOTES:
•If your foreign object is caught in the disc tray during closing, simply press the OPEN/CLOSE button again and the tray will open.
•Do not press the disc tray in by hand when the power is off. Doing so will damage it.
•Do not place foreign objects in the disc tray. Doing so will damage it.
10
8PLAYBACK
(1)Playback
1 |
3 |
5 |
B
PLAY |
STOP |
|
|
1 |
2 |
8 |
9 |
STILL / PAUSE
3 |
6 |
7 |
OPEN/CLOSE
5
DVD
PCM AUDIO TECHNOLOGY / DVD VIDEO PLAYER DVD-2800
|
2,4 |
|
|
Turn on the power. |
¢ON / STANDBY |
|
|
|
1 |
• Press the power button, the power indicator lights and |
|
the power turn on. |
£ |
|
|
• When standby mode, press the POWER button of |
|
|
remote control unit. |
Main unit |
|
|
OPEN/CLOSE
5
2 |
Press the OPEN/CLOSE button to open the disc tray. |
Main unit
3 |
Set the disc in the disc tray. |
|
|
OPEN/CLOSE |
|
|
|
5 |
|
|
Press the OPEN/CLOSE button. |
Main unit |
|
|
• For many interactive DVDs and video CDs with |
||
|
|
|
|
4 |
playback control, a menu screen appears. In this case |
Example: For DVDs with |
|
use the procedure in step 6 to select the desired item. |
menu screens |
||
|
|
||
|
Interactive DVDs are DVDs including multiple angles, |
TOP MENU |
|
|
stories, etc. |
||
|
Apple |
|
|
|
|
Banana |
|
|
|
Orange |
Strawberry |
|
|
Peach |
Pineapple |
MENU |
|
|
2,4 |
DISPLAY |
O |
|
|
POWER |
|
P/CL |
|
TOP MENU |
|
SUBTITLE |
|
6
AUDIO |
|
ANGLE |
7 |
|
ENTER |
|
++
- |
RETURN |
- |
5
1 2 3
4 5 6
7 8 9
0 +10
POWER
Main unit
OP/CL
Remote control unit
OP/CL
Remote control unit
Example: For video CDs with playback control
1.Opening
2.1st movement
3.2nd movement
4.3rd movement
5.Ending
ENGLISH
PLAY
|
|
1 |
|
|
5 |
Press the PLAY button. |
|
|
|
|
|
Main unit |
Remote control unit |
|
|
Use the cursor buttons (•, ª, 0 and 1) to select the |
|
|
|
|
desired item. |
|
|
|
|
• For some discs there is a second menu screen. If so, |
|
|
|
6 |
press the 9 button to display the next menu screen. |
|
|
|
(See the disc’s jacket.) |
|
|
|
|
|
The cursor buttons (•, ª, 0 and 1) do not work for |
|
|
|
|
video CDs. Use the number buttons to select the |
|
|
Remote control unit |
|
desired item. |
|
|
|
|
|
|
|
ENTER |
|
Press the ENTER button. |
|
|
|
|
• The desired item is selected and playback starts. |
|
|
Remote control unit |
|
• You can return to the menu screen by pressing the |
|
|
|
7 |
Example: When “Apple” is |
|
||
TOP MENU/MENU button while the DVD is playing, |
|
|||
selected |
|
|||
|
though this depends on the disc. |
TOP MENU |
|
|
|
• Press the RETURN button during playback of a video |
|
||
|
CD to return to the menu screen. |
Apple |
Banana |
Apple |
|
|
|||
|
|
Orange |
Strawberry |
|
|
|
Peach |
Pineapple |
|
|
NOTES: |
|
|
|
• If |
appears on the TV screen while buttons are being |
• Do not place more than one disc in the disc tray. |
||
|
|
|
||
operated, that operation is not possible on the DVD-2800 |
• The disc keeps turning while the menu screen is |
or with that disc. |
displayed on the TV screen. |
|
|
• Set the disc in the disc guide. |
|
11

ENGLISH
PLAY button |
STOP button |
SKIP button
B
PLAY |
STOP |
|
|
1 |
2 |
8 |
9 |
STILL / PAUSE
3 |
6 |
7 |
|
OPEN/CLOSE |
|
|
|
5 |
|
|
|
DVD |
|
|
|
|
PCM AUDIO TECHNOLOGY / DVD VIDEO PLAYER |
DVD-2800 |
|
STILL/PAUSE button
SLOW/SEARCH button
|
|
DISPLAY |
OP/CL |
|
|
POWER |
|
|
|
|
TOP MENU |
MENU |
SUBTITLE |
|
|
AUDIO |
|
ANGLE |
|
|
|
ENTER |
|
|
SKIP button |
+ |
|
+ |
SLOW/SEARCH buttons |
- |
RETURN |
- |
||
STOP button |
1 |
2 |
3 |
STILL/PAUSE button |
|
PLAY button |
|||
|
4 |
5 |
6 |
|
|
7 |
8 |
9 |
|
|
0 |
+10 |
|
|
(2) Stopping Playback
During playback, press the STOP button on the main unit or the remote control unit, playback stops and wall paper is displayed. Resume play memory function
•With the DVD-2800, when the STOP button is pressed, that position is stored in the memory. At this time, “1” flashes on the display. (DVD only)
•When the PLAY button is pressed after pressing the STOP button, playback resumes from the position at which it was stopped. (DVD only)
•The resume play memory function is canceled if the disc tray is opened or the STOP button is pressed a second time. (DVD only)
•After 30 minutes in the stop mode, the DVD-2800’s power automatically turns off and the standby mode is set. (Auto Power Off)
•If you do not want to continue playing the disc, to save electricity either press the POWER button on the main to turn the power off or press the POWER button on the remote control unit to set the power to the standby mode.
STOP
2
Main unit Remote control unit
The resume play memory function only works for discs for which the elapsed time is shown on the display during playback.
(3) Playing Still Pictures (Pausing)
STILL / PAUSE |
|
3 |
|
During playback, press the STILL/PAUSE button on the main unit or |
|
the remote control unit. |
|
• Press the PLAY button to resume normal playback. |
|
Main unit |
Remote control unit |
(4) Forward/Reverse Searching
During playback, press one of the SLOW/SEARCH buttons on the main unit or the remote control unit.
6 / – : Reverse direction
7/ + : Forward direction
•When pressed again, the search speed increases (in four steps).
•Press the PLAY button to resume normal playback.
|
|
+ |
6 |
7 |
SLOW/SEARCH |
|
|
- |
|
Main unit |
Remote control unit |
NOTE:
•In some cases the menu screen may reappear when one of the SLOW/SEARCH buttons is pressed during menu playback on a video CD.
(5) Skipping to the Beginning of Chapters or Tracks
During playback, press one of the skip buttons on the main unit or the remote control unit.
8 / – : Reverse direction
9/ + : Forward direction
•A number of chapters or tracks equal to the number of times the button is pressed is skipped.
•When the skip back button is pressed once, the pickup returns to the beginning of the currently playing chapter or track.
Playing position
Chapter/Track |
Chapter/Track |
Chapter/Track |
Chapter/Track |
|
|
|
|
Reverse direction , / Forward direction (direction of playback)
|
|
+ |
8 |
9 |
SKIP |
|
|
- |
|
Main unit |
Remote control unit |
NOTE:
•In some cases the menu screen may reappear when one of the SKIP buttons is pressed during menu playback on a video CD.
(6) Playing Frame by Frame (for DVDs and video CDs only)
During playback, press the STILL/PAUSE button on the main unit or |
STILL / PAUSE |
|
the remote control unit. |
3 |
|
|
|
|
• The picture moves forward one frame each time the button is |
|
|
pressed. |
|
|
• Press the PLAY button to resume normal playback. |
Main unit |
Remote control unit |
(7) Slow Playback (for DVDs and video CDs only)
In the still mode, press one of the SLOW/SEARCH buttons on the main unit or the remote control unit.
6 / – : Reverse direction
7/ + : Forward direction
•When pressed again, the slow play speed increases. For video CDs there are three steps.
•Press the PLAY button to resume normal playback.
•If the STILL/PAUSE button is pressed when playing a disc in the slow play mode in the reverse direction, press the SLOW/SEARCH button again.
|
|
+ |
6 |
7 |
SLOW/SEARCH |
|
|
|
|
|
- |
|
Main unit |
Remote control unit |
NOTE:
• Reverse slow play is not possible on video CDs.
(8) Using the V.S.S. (Virtual Surround Sound) function (only for DVDs)
2Using the V.S.S. (Virtual Surround Sound) function gives the sound a sense of expansion and allows you to achieve surround effects even when only front speakers (left and right) are used. For discs with surround signals, the V.S.S. function not only gives the sound expansion, it also makes it seem as if sound is coming from the sides, even though there are no speakers there.
|
V.S.S. |
During playback, press the V.S.S. button on the remote control unit. |
Remote control unit |
NOTES:
•This function only works with DVDs containing two or more channels of Dolby Digital signals.
•Note that for some discs the effect will be weak or there will be no effect.
•For some discs the sound may be distorted. If so turn the V.S.S. function off.
•Turn off other surround functions (the TV’s surround mode, etc.).
•The effect is best when listening at a distance from the TV equal to 3 to 4 times the distance of the left and right speakers (distance A).
Distance A
Speaker Speaker
3 to 4 times distance A
Listening position
12
ENGLISH
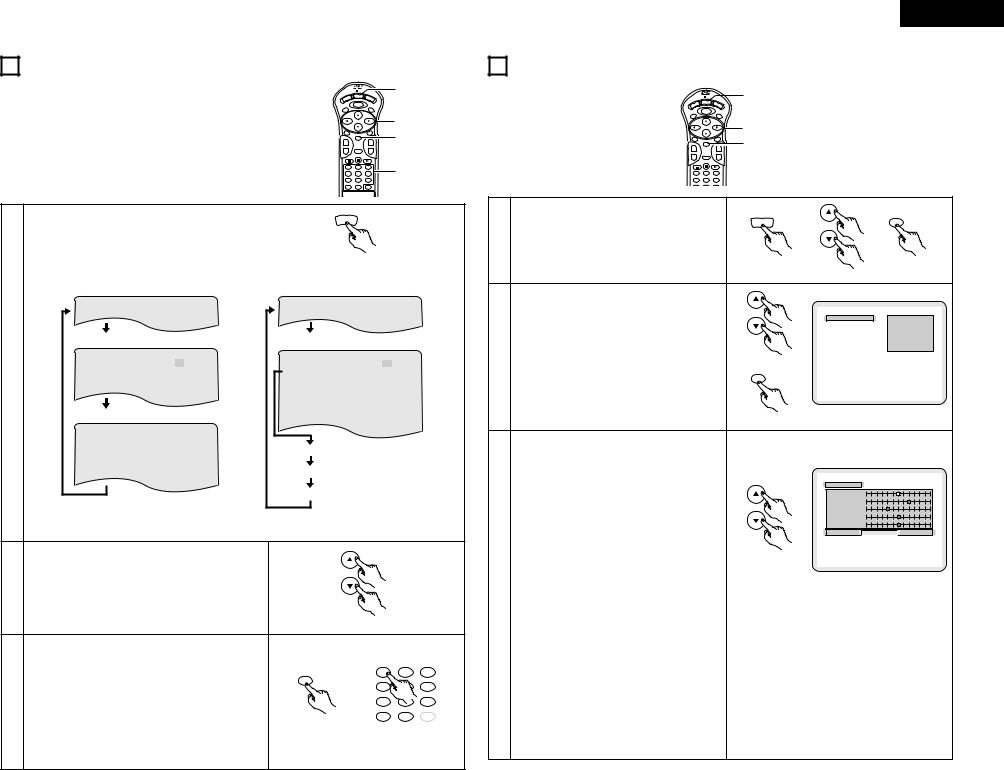
9 USING THE ON-SCREEN DISPLAY |
10 ADJUSTING THE PICTURE QUALITY |
2 Use this function to display and change information on the disc |
|
1 |
(titles, chapters, time, etc.) |
|
DISPLAY |
POWER |
OP/CL |
|
|
MENU |
|
|
TOP MENU |
SUBTITLE |
|
|
|
|
2 |
|
AUDIO |
|
ANGLE |
3 |
|
+ |
ENTER |
+ |
|
|
- |
RETURN |
- |
|
|
1 |
2 |
3 |
3 |
|
4 |
5 |
6 |
|
|
7 |
8 |
9 |
|
|
0 |
+10 |
|
|
In the play mode, press the DISPLAY button. |
DISPLAY |
|
|
|
• The On-Screen Display appears. |
|
|
|
|
|
|
|
|
|
• The picture on the TV screen switches each time |
|
|
|
|
the button is pressed. |
|
|
|
|
• The items displayed differ from disc to disc. |
Remote control unit |
|
||
|
|
|||
Example: For DVDs |
Example: For video and music CDs |
|
||
• Normal playback screen |
• Normal playback screen |
|
|
|
• |
Disc information screen |
• |
Disc information screen |
|
||
|
|
|
|
|||
1 |
T I T L E |
|
0 1 / 0 5 |
TRACK |
|
0 2 / 1 0 |
CHAP T E R |
|
0 2 / 0 8 |
S I NGL E |
E L AP SE D |
0 1 : 2 6 |
|
|
T I T L E E L APSE D |
0 : 2 6 : 1 1 |
P I C TUR E MODE |
S TANDARD |
||
|
P I C TURE MODE |
|
S TANDARD |
R E P EAT |
|
OF F |
|
|
|
|
A–B RE P EAT |
OF F |
|
|
|
|
|
P L AY MODE |
NORMAL |
|
• |
Disc information screen |
|
AUD I O MODE |
L / R |
||
|
AUD I O |
OUTPUT |
D I G I T AL |
|||
|
|
|
|
|||
|
SUBT I T L E |
0 1 / 0 3 |
ENGL I SH |
|
|
|
|
|
ON |
|
S I NGL E |
REMA I N |
0 3 : 1 7 |
|
AUD I O |
0 1 / 0 3 |
ENG |
|||
|
|
|
|
|||
|
|
DOL BY |
D 3 / 2.1 |
|
|
|
|
AUD I O OUTPUT |
D IG I T AL |
TOTAL |
E L AP S ED |
0 6 : 1 5 |
|
|
|
|
|
TOTAL |
REMA I N |
3 2 : 0 5 |
• For the on-screen display for video CDs and regular CDs, only the disc time changes.
2 |
Use the • and ª cursor buttons to select the item you wish to |
change. |
|
|
• The selected item is displayed with a yellow frame. |
Remote control unit
Use the number buttons to change the item.
•Time search is possible by pressing the DISPLAY button, selecting the title time using the cursor buttons, inputting the
|
time using the number buttons, then pressing the ENTER |
1 |
2 |
3 |
|
button. |
ENTER |
|
|
|
4 |
|
6 |
|
3 |
• When the title or chapter is selected with the cursor buttons, |
7 |
|
9 |
the title number or chapter number is selected with the |
|
|||
0 |
|
|
||
|
number buttons and the ENTER button is pressed, playback |
+10 |
CLEAR |
|
|
starts from the title number or chapter number you have input. |
Remote control unit |
|
|
|
For video CDs and regular CDs, when the track number is |
|
|
|
|
input with the number buttons, playback starts from the track |
|
|
|
|
number you have input. |
|
|
|
 1
1
|
DISPLAY |
|
POWER |
O |
P/CL |
|
||
TOP MENU |
MENU |
SUBTITLE |
|
|
|
|
|
1, 3 |
|
|
|
AUDIO |
|
ANGLE |
2, 4 |
|
|
|
+ |
ENTER |
+ |
|
|
|
|
- |
RETURN |
- |
|
|
|
|
1 |
2 |
3 |
|
|
|
|
4 |
5 |
6 |
|
|
|
|
Press the DISPLAY button, use the • and ª cursor |
DISPLAY |
|
ENTER |
||
1 |
|
|
|
|||
buttons to select the “PICTURE MODE”, then press |
|
|
|
|||
|
the ENTER button. |
|
|
|
|
|
|
|
|
|
Remote control unit |
|
|
|
Use the • and ª cursor buttons to select the picture |
|
|
|
||
|
memory, then press the ENTER button. |
|
|
P I CTURE MODE |
STANDARD |
|
|
• The display switches as follows: |
|
|
|||
|
|
|
|
|
MEMORY 1 |
|
|
STANDARD Æ MEMORY 1 Æ MEMORY 2 Æ |
|
|
|
|
MEMORY 2 |
|
|
|
|
|
MEMORY 3 |
|
|
MEMORY 3 Æ MEMORY 4 Æ MEMORY 5 |
|
|
|
|
MEMORY 4 |
2 |
|
|
|
|
MEMORY 5 |
|
|
|
|
|
|
||
STANDARD (Factory default) |
|
|
Remote control unit |
|
|
|
|
When this is selected, both the picture quality and |
|
|
|||
|
|
|
|
|||
|
function are reset to normal. |
|
|
ENTER |
|
|
|
MEMORY 1 to MEMORY 5 |
|
|
|
|
|
|
Picture quality settings you have adjusted can be |
|
|
|
||
|
stored here. |
|
|
Remote control unit |
|
|
|
|
|
|
|
|
|
|
Select the item to change using •and ªbuttons |
|
|
|
|
|
|
• CONTRAST, BRIGHTNESS, SHARPNESS, HUE and |
|
|
|
||
|
GAMMA can be adjusted as you like. |
|
|
|
|
|
|
CONTRAST (-6 ~ +6) |
|
|
|
|
|
|
Adjusts the contrast of the image. |
|
|
MEMORY 1 |
|
|
|
BRIGHTNESS (0 ~ +12) |
|
|
|
|
|
|
|
|
CONTRAST |
0 |
|
|
|
Adjusts the picture’s brightness. |
|
|
|
||
|
|
|
BRIGHTNESS |
+ 8 |
|
|
|
SHARPNESS (-6 ~ +6) |
|
|
SHARPNESS |
- 2 |
|
|
Adjusts the sharpness of the picture. |
|
|
HUE |
0 |
|
|
|
|
GAMMA |
0 |
|
|
|
HUE (-6 ~ +6) |
|
|
|
||
|
|
|
BLACK LEVEL |
LIGHTER |
DARKER |
|
|
Adjusts the balance of the green and red. (This does |
|||||
|
|
|
|
|||
|
not affect Progressive Scan images.) |
|
|
|
|
|
|
GAMMA (-6 ~ +6) |
|
|
Remote control unit |
|
|
|
Select this if dark portions of the picture are too dark |
|
|
|
||
|
or bright portions are too bright. |
|
|
|
|
|
3 |
(This does not affect Interlaced images.) |
|
|
|
|
|
• Black Level |
|
|
|
|
|
|
|
|
|
|
|
|
|
|
To select the black level of the picture, “LIGHTER” or |
|
|
|
||
|
“DARKER”. |
|
|
|
|
|
|
LIGHTER |
|
|
|
|
|
|
The black level of the picture is selected to the lighter |
|
|
|
||
|
one. |
|
|
|
|
|
|
Select this setting normally when the player is |
|
|
|
||
|
connected to a TV set through the VIDEO OUT |
|
|
|
||
|
connector or S-VIDEO OUT connector or AV 1 |
|
|
|
||
|
connector. |
|
|
|
|
|
|
DARKER |
|
|
|
|
|
|
The black level of the picture is selected to the darker |
|
|
|
||
|
one. |
|
|
|
|
|
|
Select this setting normally when the player is |
|
|
|
||
|
connected to a TV set through the COMPONENT VIDEO |
|
|
|
||
|
OUT (Y, PB/CB, PR/CR) connector.(Factory preset) |
|
|
|
|
|
13
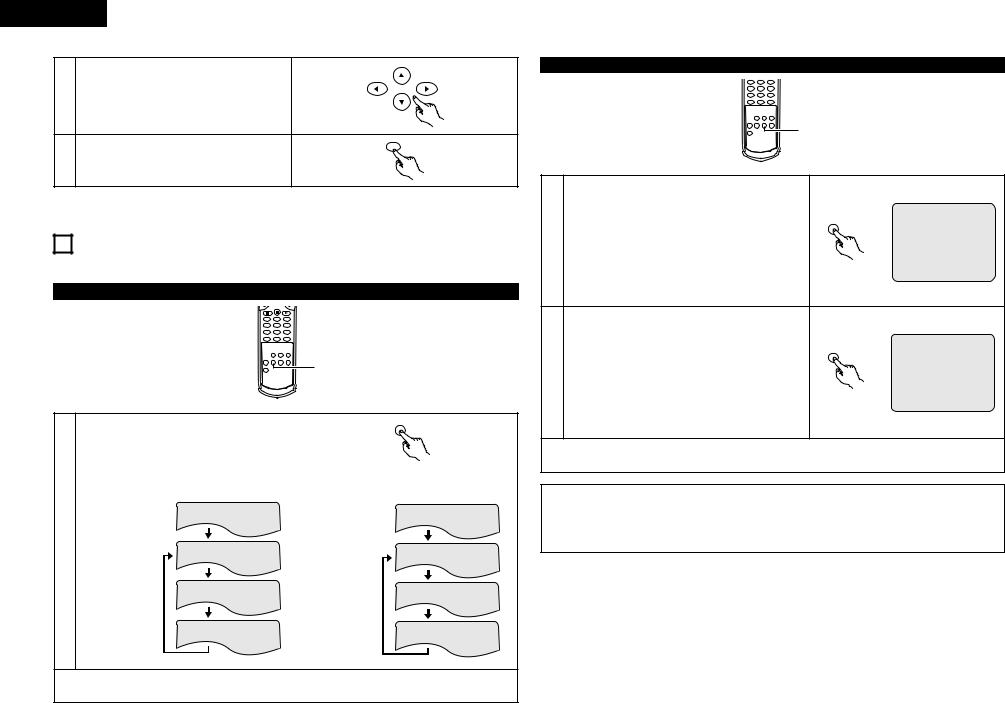
ENGLISH
4 |
Use the •,ª,0 and 1 cursor buttons to select the |
|
picture quality adjustment item then to adjust its level. |
Remote control unit |
|
|
|
ENTER |
5 |
Press the ENTER button. |
|
• All the adjustments are stored in the memory. |
Remote control unit |
11 PLAYING REPEATEDLY
2 Use this function to play your favorite audio or video sections repeatedly.
Playing Repeatedly (Repeat Playback)
1 |
2 |
3 |
4 |
5 |
6 |
7 |
8 |
9 |
0 |
+10 |
|
|
|
|
|
1 |
|
|
|
|
|
|
|
REMOTE CONTROL UNIT |
|
|
|
|
|
|
|
RC-546 |
|
|
|
|
|
|
|
B |
|
|
|
In the play mode, press the REPEAT button. |
|
|
REPEAT |
|
|||
|
|
|
|
||||
• The display on the TV screen switches each time the button is |
|
|
|
||||
pressed, and the corresponding repeat play or stop mode is |
|
|
|
||||
set. |
|
|
|
|
|
|
|
|
|
|
|
|
|
Remote control unit |
|
q For DVDs |
|
|
w For video and music CDs |
|
|||
• |
Normal playback |
|
|
• |
Normal playback |
|
|
1 |
Chapter repeated |
CHAP TE R REP EAT |
• |
Track repeated |
TRACK |
REP EAT |
|
• |
|
|
|
|
|||
• |
Title repeated |
T I T L E |
REPEAT |
• |
Entire disc |
D I SC |
R EP EAT |
|
|
||||||
|
|
|
|
|
repeated |
|
|
• |
Repeat playback |
RE PEAT |
OF F |
• |
Repeat playback |
REP EAT OF F |
|
|
|
||||||
|
|
|
|
||||
|
canceled |
|
|
|
canceled |
|
|
To return to normal playback:
Return to normal playback by pressing the button REPEAT button until “REPEAT OFF” appears on the TV screen.
Playing a Certain Section Repeatedly (A-B Repeat Playback)
1 2 3
4 5 6
7 8 9
0 +10
1,2
REMOTE CONTROL UNIT
RC-546
B
A TO B SE T A
A-B REPEAT
1 |
During playback, press the A-B REPEAT button. |
• This sets start point A. |
Remote control unit
A TO B SE T B
A-B REPEAT
Press the A-B REPEAT button again.
2 • This sets end point B, and repeat playback of the A-B section starts.
Remote control unit
To return to normal playback:
Press the A-B REPEAT button until “A TO B CANCELED” appears on the TV screen.
NOTES:
•Repeat playback may not work for some DVDs.
•The repeat playback and A-B repeat playback functions will not work for DVDs and video CDs for which the elapsed time is not shown on the display during playback.
•In some cases, subtitles may not be displayed near the A and B points during A-B repeat playback.
14
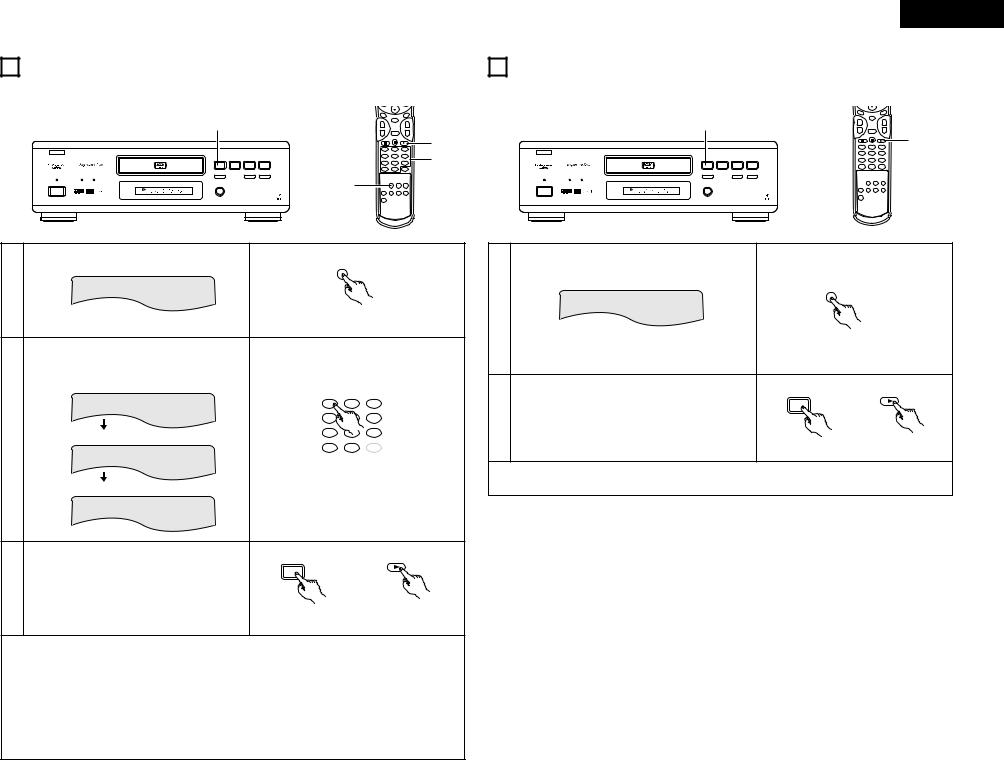
12 PLAYING TRACKS IN THE DESIRED ORDER
2Use this function with video and music CDs to play the tracks in the desired order. This function does not affect with DVD.
|
|
|
|
AUDIO |
|
ANGLE |
|
3 |
|
|
|
|
ENTER |
|
|
|
|
|
+ |
|
+ |
|
|
|
|
|
|
- |
RETURN |
- |
|
|
|
|
|
1 |
2 |
3 |
3 |
B |
|
|
|
|
|||
|
|
|
|
|
|
2 |
|
|
|
|
|
4 |
5 |
6 |
|
PLAY |
STOP |
|
|
|
|
|
|
1 |
2 |
8 |
9 |
7 |
8 |
9 |
|
|
|
|
|
0 |
+10 |
|
|
STILL / PAUSE |
|
|
|
|
|
|
|
3 |
|
6 |
7 |
|
|
|
|
OPEN/CLOSE |
1 |
5 |
|
DVD |
|
|
PCM AUDIO TECHNOLOGY / DVD VIDEO PLAYER DVD-2800 |
REMOTE CONTROL UNIT
RC-546
B
ENGLISH
13 PLAYING TRACKS IN THE RANDOM ORDER
2Use this function with video and music CDs to play the tracks in random order. This function does not affect with DVD.
2 |
|
|
|
B |
|
|
|
PLAY |
STOP |
|
|
1 |
2 |
8 |
9 |
STILL / PAUSE |
|
|
|
3 |
|
6 |
7 |
OPEN/CLOSE
5
DVD
PCM AUDIO TECHNOLOGY / DVD VIDEO PLAYER DVD-2800
AUDIO |
ANGLE |
ENTER
++
-RETURN -
2
1 2 3
4 5 6
7 8 9
0 +10
 1
1
REMOTE CONTROL UNIT
RC-546
B
In the stop mode, press the PROG/DIRECT button once.
• The program selection screen appears.
PROG/DIRECT
1 |
P ROGRAM |
P 0 1 : _ _ |
0 0 : 0 0 |
|
|
|
Remote control unit
Use the number buttons to select the track number you want to program.
EX: To program track 5 and track 12:
Press 5 (number button)
|
PROGRAM |
P 0 1 : 0 5 |
0 3 : 1 2 |
2 |
3 |
|
|
|
1 |
||
|
|
|
4 |
|
6 |
2 |
Press +10 (number button) |
7 |
|
9 |
|
|
|
|
|||
|
PROGRAM |
P 0 2 : 1 _ |
0 |
+10 |
CLEAR |
|
0 3 : 1 2 |
|
|
||
|
|
|
Remote control unit |
||
|
Press 2 (number button) |
|
|
|
|
|
P ROGRAM |
P 0 2 : 1 2 |
0 6 : 3 2 |
|
|
|
|
|
PLAY |
|
|
|
|
|
1 |
|
|
3 |
Press the PLAY button. |
|
|
|
|
• Playback of the tracks in the programmed order begins. |
|
|
|||
|
|
|
Main unit |
|
Remote control unit |
To return to normal playback:
Press the STOP button to stop programmed playback, then press the PROG/DIRECT button. Now press the PLAY button to start normal playback from the beginning of the disc.
To clear tracks from the program:
Press the STOP button. The program play screen appears. Press the CLEAR button to clear the last track in the program.
To clear the entire program:
The entire program is cleared when the power is turned off or the disc is ejected.
Also, when the STOP button is pressed to stop programmed playback and the PROG button is pressed, the entire program is cleared.
To check the programmed contents, press the CALL button. The programmed contents are displayed step by step.
Up to 30 tracks can be programmed.
In the stop mode, press the RANDOM button.
• The random play screen appears.
RANDOM
RANDOM ON
1
Remote control unit
PLAY
|
1 |
|
2 |
Press the PLAY button. |
|
• The tracks start playing in random order. |
|
|
|
Main unit |
Remote control unit |
To return to normal playback:
Press the STOP button to stop random playback, then press the RANDOM button once.
15
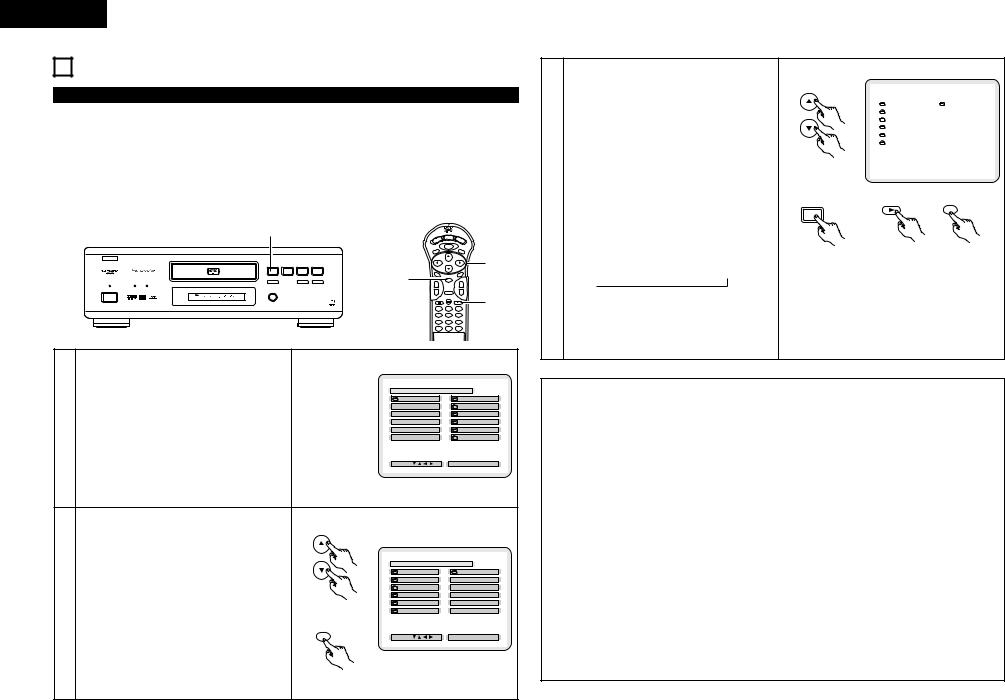
ENGLISH
14 MP3 PLAYBACK
Listening to MP3 CD, CD-Rs and CD-RWs
2There are many music distribution sites on the internet from which music files in MP3 format can be downloaded. Music downloaded as instructed on the site and written onto a CD-R/RW disc can be played on the DVD-2800.
If music recorded on commercially available music CDs is converted on a computer into MP3 files using an MP3 encoder (conversion software), the data on a 12 cm CD is reduced into about 1/10 the amount of the original data. Thus, when written in MP3 format, the data of about 10 music CDs can fit onto a single CD-R/RW disc. A single CD-R/RW disc can contain over 100 tracks.
*Values when 5-minute tracks are converted with a standard bit rate of 128 kbps into MP3 files and using a CD-R/RW disc with a capacity of 650 MB.
|
3 |
|
|
|
|
|
DISPLAY |
OP/CL |
|
|
|
|
|
|
|
POWER |
|
|
|
|
|
|
|
|
|
TOP MENU |
MENU |
SUBTITLE |
|
|
B |
|
|
|
|
|
|
2, 3 |
|
|
PLAY |
STOP |
|
|
|
|
|
||
|
1 |
2 |
8 |
9 |
|
|
|
|
|
|
|
|
|
|
2, 3 |
AUDIO |
|
ANGLE |
|
|
3 |
|
6 |
7 |
+ |
|
+ |
|
|
|
STILL / PAUSE |
|
|
|
|
|
ENTER |
|
|
|
OPEN/CLOSE |
|
|
|
|
|
|
|
|
|
5 |
|
|
|
|
- |
|
- |
|
|
|
|
|
|
|
RETURN |
|
||
|
DVD |
|
|
|
|
|
|
3 |
|
|
|
|
PCM AUDIO TECHNOLOGY / DVD VIDEO PLAYER DVD-2800 |
|
1 |
2 |
|
||
|
|
|
|
|
|
3 |
|
||
|
|
|
|
|
|
4 |
5 |
6 |
|
|
|
|
|
|
|
7 |
8 |
9 |
|
|
|
|
|
|
|
0 |
+10 |
|
|
|
Load the CD-R/RW disc on which the MP3 format |
|
|
|
|
|
|
|
|
|
music files have been written into the DVD-2800.(See |
|
|
|
|
|
|
|
|
|
page 11.) |
|
|
|
|
D I SC |
I NFORMAT I ON B |
||
|
• When the disc is loaded in the DVD-2800, the disc |
|
|
|
ROOT |
|
|
ROOT |
0 |
|
|
|
|
|
|
|
FOL DE R NAME 1 |
1 |
|
|
information screen appears. |
|
|
|
|
|
|
||
|
|
|
|
|
|
|
FOL DE R NAME 2 |
2 |
|
1 |
|
|
|
|
|
|
|
FOL DE R NAME 3 |
3 |
• If there are multiple folders, proceed to step 2. |
|
|
|
|
|
|
FOL DE R NAME 4 |
4 |
|
|
|
|
|
|
|
FOL DE R NAME 5 |
5 |
||
|
• If there are no folders on the disc (if the disc only |
|
|
|
|
|
|
||
|
|
|
|
PLAY MODE |
: NORMAL |
|
|
|
|
|
contains MP3 files), proceed to step 3. |
|
|
|
S INGLE ELAPSED |
: - - : - - |
|
|
|
|
|
|
|
|
|
|
|
|
|
|
|
|
|
|
SEL ECT : |
|
DEC I S ION : ENTER BUTTON |
|
|
All the folders recorded on the disc are displayed. (The folders are not displayed by layer.)
Use the • and ª cursor buttons to select the folder |
|
|
|
|
|
containing the file(s) you want to play, then press the |
|
|
|
|
|
ENTER button. |
|
|
D I SC |
I NFORMAT I ON B |
|
|
|
ROOT |
|
ROOT |
0 |
|
|
FOL DE R NAME 1 |
MP3 FILE NAME 1 |
1 |
|
• If there are multiple folders, proceed to step 2. |
|
FOL DE R NAME 2 |
MP3 FILE NAME 2 |
2 |
|
|
FOL DE R NAME 3 |
MP3 FILE NAME 3 |
3 |
||
2 |
|
FOL DE R NAME 4 |
MP3 FILE NAME 4 |
4 |
|
|
Remote control unit |
FOL DE R NAME 5 |
MP3 FILE NAME 5 |
5 |
|
To change the folder |
|
PLAY MODE |
: NORMAL |
|
|
|
S INGLE ELAPSED |
: - - : - - |
|
|
|
Use the • and ª cursor buttons to select “ROOT” at |
ENTER |
SEL ECT : |
|
DEC I S ION : ENTER BUTTON |
|
the upper right of the screen, then press the ENTER |
|
|
|
|
|
button. The screen in step 1 reappears. Select the |
|
|
|
|
|
desired folder. |
|
|
|
|
|
|
Remote control unit |
|
|
|
|
Use the • and ª cursor buttons to select the MP3 file you want to play, then press the PLAY button or ENTER button.
• Playback starts.
The display can be switched between the single elapsed time and the single remaining time by pressing the DISPLAY button.
Programmed playback is not possible with MP3 discs.
To change the MP3 file
Press the STOP button, then use the • and ª cursor buttons to reselect the desired MP3 file.
3 To set the random play mode
In the stop mode, press the RANDOM button. Then press the PLAY button or ENTER button.
To set the repeat mode
The repeat mode changes each time the REPEAT button is pressed.
NORMAL Æ TRACK REPEAT Æ FOLDER REPEAT
≠
To return to the initial disc information screen
Press the STOP button, use the • cursor button to select “ROOT” at the upper right of the screen, then press the ENTER button.
The screen in step 1 reappears.
|
D I SC |
I NFORMAT I ON |
B |
|||
|
|
|
|
|
|
|
ROOT |
|
|
ROOT |
0 |
||
|
|
|
|
|
||
FOL DE R NAME 1 |
|
MP3 FILE NAME 1 |
1 |
|||
|
|
|
|
|
||
FOL DE R NAME 2 |
|
MP3 FILE NAME 2 |
2 |
|||
|
|
|
|
|
||
FOL DE R NAME 3 |
|
MP3 FILE NAME 3 |
3 |
|||
|
|
|
|
|
||
FOL DE R NAME 4 |
|
MP3 FILE NAME 4 |
4 |
|||
|
|
|
|
|
||
FOL DE R NAME 5 |
|
MP3 FILE NAME 5 |
5 |
|||
PLAY MODE |
: NORMAL |
|
|
|
|
|
S INGLE ELAPSED |
: 0 0 : 0 1 |
|
|
|
|
|
Remote control unit
PLAY
ENTER
1
main unit Remote control unit
NOTES:
•The DVD-2800 is compatible with the “MPEG-1 Audio Layer 3” standards (sampling frequency of 32, 44.1 or 48 kHz). It is not compatible with such other standards as “MPEG-2 Audio Layer 3”, “MPEG-2.5 Audio Layer 3”, MP1, MP2, etc.
•It may not be possible to play some CD-R/RW discs due to disc properties, dirt, warping, etc.
•The digital signals output when playing MP3 files are MP3 signals converted into PCM, regardless of whether the audio output presetting is set to “normal” or “PCM conversion”. The signals are output with the same sampling frequency as that of the music source.
•In general, the higher an MP3 file’s bit rate, the better the sound quality. On the DVD-2800, we recommend using MP3 files recorded with bit rates of 128 kbps or greater.
•MP3 files may not be played in the expected order, since the writing software may change the position of the folders and the order of the files when writing them on the CD-R/RW.
•Manual search and programmed playback are not possible with MP3 discs.
•When writing MP3 files on CD-R/RW discs, select “ISO9660 level 1” as the writing software format. This may not be possible with some types of writing software. For details, refer to the writing software’s usage instructions.
•With the DVD-2800 it is possible to display folder names and file names on the screen like titles. The DVD-2800 can display up to 11 characters, consisting of numbers, capital letters, and the “_” (underscore) mark.
•If recorded in a format other than “ISO9660 level 1”, normal display and playback may not be possible. In addition, folder and file names including other symbols will not be displayed properly.
•Be sure to add the extension “.MP3” to MP3 files. Files cannot be played if they have any extension other than “.MP3” or if they have no extension. (with Macintosh computers, MP3 files can be played by adding the extension “.MP3” after the file name consisting of up to 8 capital or numbers and recording the files on the CD-R/RW.)
•Do not apply stickers, tape, etc., to either the label side or the signal side of CD-R/RW discs. If adhesive gets on the surface of a disc, the disc may get stuck inside the DVD-2800 and be impossible to eject.
•The DVD-2800 is not compatible with packet write software.
•The DVD-2800 is not compatible with ID3-Tag.
•The DVD-2800 is not compatible with play lists.
16
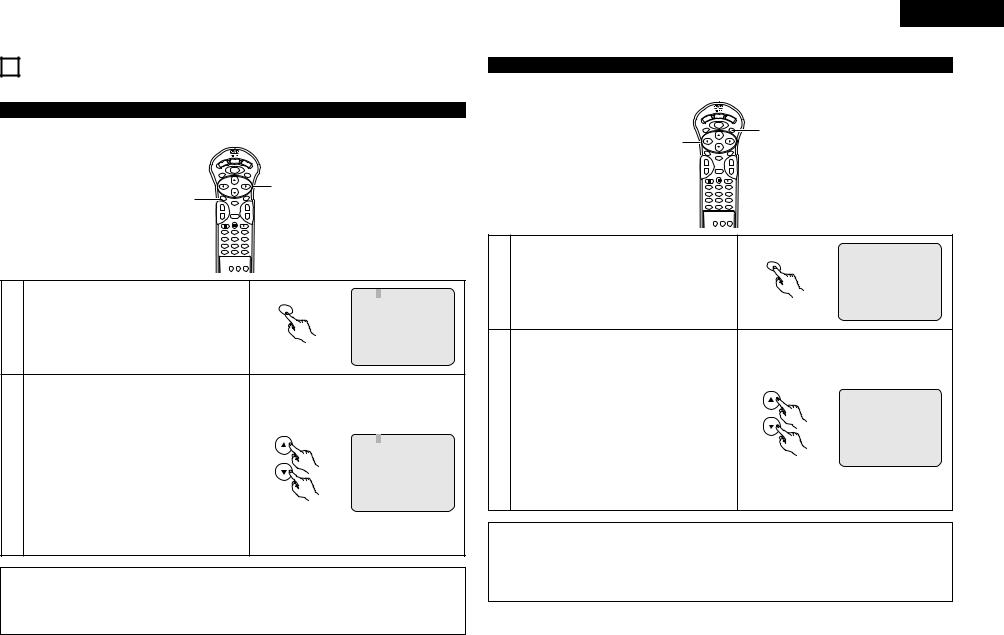
15USING THE MULTIPLE AUDIO, SUBTITLE AND ANGLE FUNCTIONS
Switching the Audio Language (Multiple Audio Function)
2 With DVDs containing multiple audio language signals, the audio language can be switched during playback.
|
|
DISPLAY |
|
POWER |
OP/CL |
|
|
MENU |
|
TOP MENU |
SUBTITLE |
|
|
2 |
1 |
AUDIO |
ANGLE |
|
ENTER |
++
- |
RETURN |
- |
1 2 3
4 5 6
7 8 9
0 +10
AUD I O 1 / 3 : DOL BY D 3 / 2 . 1 ENG
AUDIO
1 |
During playback, press the AUDIO button. |
• The current audio language number is displayed. |
Remote control unit
AUD I O 2 / 3 : DOL BY D 3 / 2 . 1 F RA
2 |
Use the • and ª cursor buttons to select the desired |
language. |
|
|
• The display turns off when the AUDIO button is pressed. |
Remote control unit
NOTES:
•If the desired language is not set after pressing the • and ª cursor buttons several times, the disc does not include that language.
•The language selected in the default settings (see page 20) is set when the power is turned on and when the disc is replaced.
ENGLISH
Switching the Subtitle Language (Multiple Subtitle Function)
2 With DVDs containing multiple subtitle language signals, the subtitle language can be switched during playback.
|
DISPLAY |
|
POWER |
OP/CL |
|
|
MENU |
1 |
TOP MENU |
SUBTITLE |
|
2 |
|
|
|
|
|
AUDIO |
ANGLE |
|
ENTER
++
- |
RETURN |
- |
1 2 3
4 5 6
7 8 9
0 +10
SUBT I T L E |
0 1 |
/ 0 3 : ENG |
SUBTITLE
1 |
During playback, press the SUBTITLE button. |
• The current subtitle language number is displayed. |
Remote control unit
SUBT I T L E |
0 2 |
/ 0 3 : F RA |
Use the • and ª cursor buttons to select the desired language.
2 • The display turns off when the SUBTITLE button is pressed.
Remote control unit
NOTES:
•If the desired language is not set after pressing the • and ª cursor buttons several times, the disc does not include that language.
•The subtitle language set with the default settings (see page 20) is set when the power is turned on and when the disc is replaced. If that language is not included on the disc, the disc’s default language is set.
•When the subtitle language is changed, several seconds may be required for the new language to appear.
17
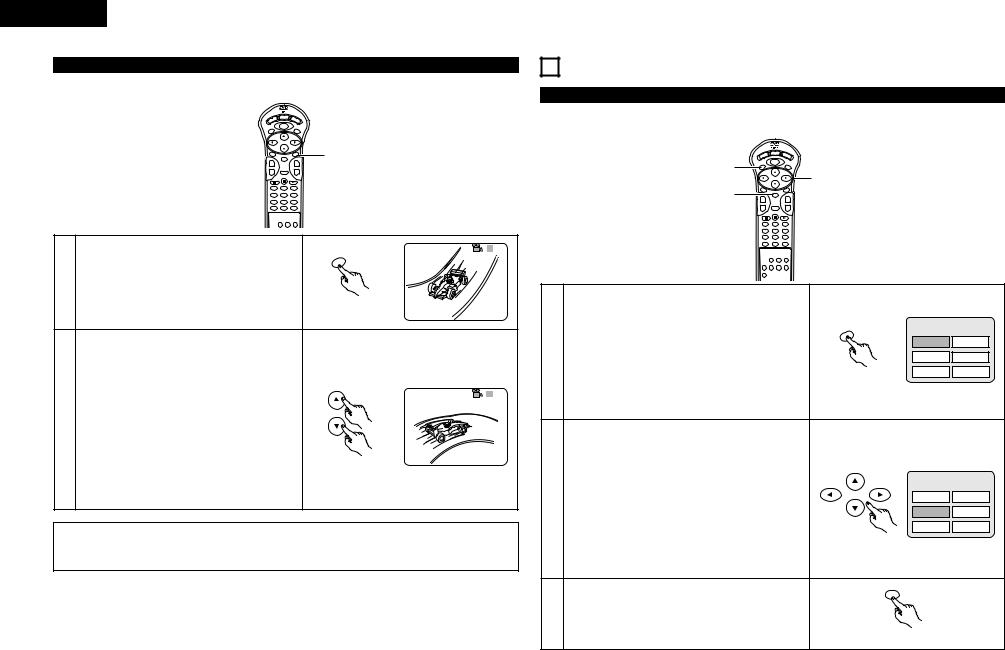
ENGLISH
Switching the Angle (Multiple Angle Function)
16 USING THE MENUS
2 With DVDs containing multiple angle signals, the angle can be switched during playback.
Using the Top Menu
2 For DVDs containing multiple titles, the desired title can be selected and played from the top menu.
DISPLAY
ER POW
OP/CL
MENU
TOP MENU |
SUBTITLE |
2
AUDIO |
ANGLE |
1 |
ENTER |
|
++
- |
RETURN |
- |
1 2 3
4 5 6
7 8 9
0 +10
3 / 5
ANGLE
1 |
During playback, press the ANGLE button. |
• The current angle number is displayed. |
Remote control unit
4 / 5
2 |
Use the • and ª cursor buttons or the number buttons to |
select the desired angle. |
|
|
• The display turns off when the ANGLE button is pressed. |
Remote control unit
NOTES:
•The multiple angle function only works with discs on which multiple angles are recorded.
•At scenes where multiple angles are recorded, the angle can be switched.
|
|
DISPLAY |
|
POWER |
OP/CL |
1 |
|
MENU |
TOP MENU |
SUBTITLE |
|
|
2 |
|
|
|
|
3 |
AUDIO |
ANGLE |
|
ENTER |
++
- |
RETURN |
- |
1 2 3
4 5 6
7 8 9
0 +10
Example:
|
TOP MENU |
TOP MENU |
|
1 |
During playback, press the TOP MENU button. |
Apple |
Banana |
|
|
||
• The top menu appears. |
Orange |
Apple |
|
|
Remote control unit |
Peach |
Pineapple |
Example:
When “Orange” is selected
|
Use the cursor or number buttons to select the desired title. |
TOP MENU |
||
2 |
Apple |
Banana |
||
• If you select the title number using the number buttons, skip |
||||
|
|
|||
|
step 3 below. |
Orange |
Strawberry |
|
|
|
Peach |
Pineapple |
|
|
|
Remote control unit |
|
|
|
|
ENTER |
|
|
3 |
Press the ENTER button. |
|
|
|
• Playback starts. |
|
|
||
|
• Playback also starts if the PLAY button is pressed. |
|
|
|
|
|
Remote control unit |
|
|
18
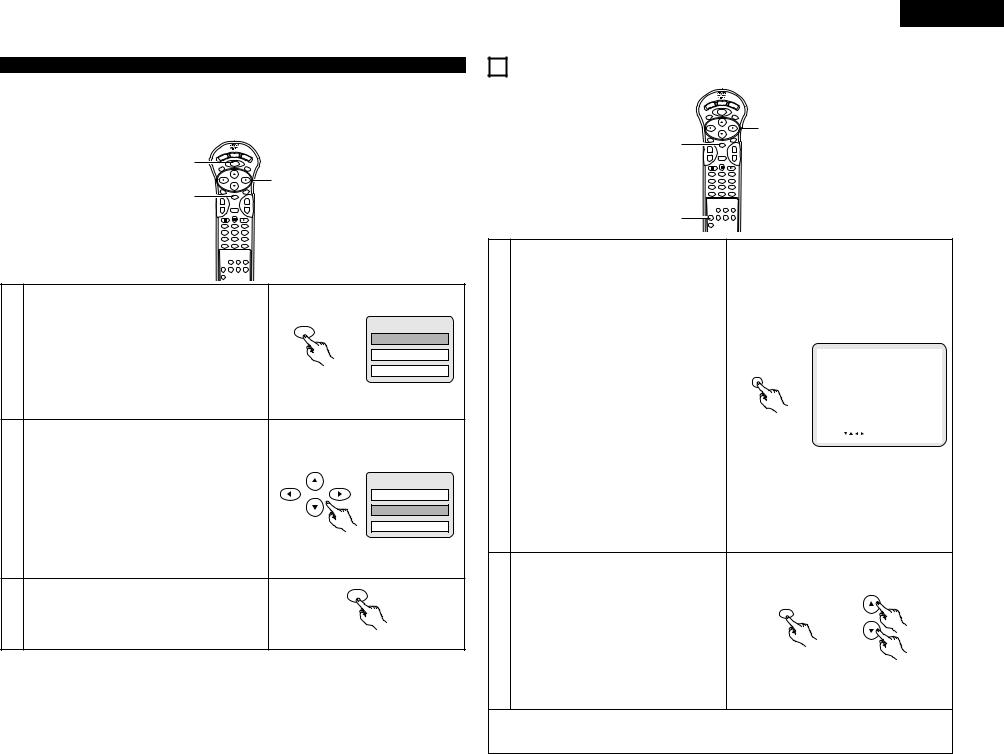
Using the DVD Menu
2Some DVDs include special menus called DVD menus.
For example, DVDs with complex contents may contain guide menus, and DVDs with multiple languages may contain audio and subtitle language menus.
These menus are called “DVD menus”.
Here we describe the general procedure for using DVD menus.
|
|
DISPLAY |
1 |
POWER |
OP/CL |
|
MENU |
|
TOP MENU |
SUBTITLE |
|
|
|
2 |
3 |
AUDIO |
ANGLE |
|
ENTER |
++
- |
RETURN |
- |
1 2 3
4 5 6
7 8 9
0 +10
|
|
|
Example: |
|
|
|
DVD MENU |
|
|
MENU |
|
|
During playback, press the MENU button. |
|
1. SUB TITLE |
1 |
|
2. AUDIO |
|
• The DVD menu appears. |
|
||
|
|
Remote control unit |
3. ANGLE |
|
|
|
|
|
Example: |
|
|
|
“AUDIO” is selected |
|
|
Use the cursor or number buttons to select the desired item. |
DVD MENU |
|
2 |
1. SUB TITLE |
||
• If you select the item using the number buttons, skip step 3 |
|||
|
|||
|
below. |
2. AUDIO |
|
|
|
3. ANGLE |
|
|
|
Remote control unit |
|
|
|
MENU |
|
3 |
Press the ENTER button. |
|
|
• The selected item is set. |
|
||
|
• If more menus appear, repeat steps 2 and 3. |
|
|
|
|
Remote control unit |
ENGLISH
17 CHANGING THE DEFAULT SETTINGS
|
DISPLAY |
POWER |
OP/CL |
|
MENU |
TOP MENU |
SUBTITLE |
 2
2
2 |
AUDIO |
|
ANGLE |
|
ENTER |
|
|
+ |
|
+ |
|
|
- |
RETURN |
- |
|
1 |
2 |
3 |
|
4 |
5 |
6 |
|
7 |
8 |
9 |
|
0 |
+10 |
|
1 |
|
|
|
In the stop mode, press the SETUP button.
• The setup (default settings) screen appears.
1.DISC SETUP
Use this to set the language to be used when playing the disc.
If the set language is not offered on that disc, the discs default language is set.
2.OSD SETUP
Use this to set the language for the default setting screen and messages displayed on the TV screen
|
(“PLAY”, etc.). |
|
|
|
SE TUP MENU - - MA I N PAGE |
B |
|||
|
|
|
|
|
|
|
|
|
|
|
|
|
|
1 |
. D I SC SE TUP |
|
|||
|
|
SET UP |
|
|
|
|
|
|
|
|
3. VIDEO SETUP |
|
|
2 |
. OSD SE TUP |
|
|||
|
|
|
|
|
|
|
|
|
|
|
Use this to set the DVD-2800's screen mode. |
|
|
3 |
. V I DEO SE TUP |
|
|||
1 |
|
|
|
|
|
||||
|
|
4 |
. AUD I O SE TUP |
|
|||||
(TV aspect, TV type and AV1 video output.) |
|
|
|
|
|
||||
|
|
5 |
. RAT I NGS |
|
|||||
|
|
|
|
|
|
|
|
||
|
4. AUDIO SETUP |
|
|
6 |
. OTHER SE TUP |
|
|||
|
|
|
|
|
|||||
|
Remote control unit |
|
> E X I T SE TUP |
|
|||||
|
Use this to set the DVD-2800's audio output mode. |
D I SC SETUP |
|||||||
|
|
||||||||
|
(Digital and LPCM output settings.) |
|
SEL ECT : |
|
|
DEC I S ION : ENTER BUTTON |
|||
|
|
|
|
|
|
|
|
|
|
5.RATINGS
Use this to disable playback of adult DVDs so that children cannot watch them. Note that playback of adult DVDs cannot be disabled if the rating level is not recorded on the DVD, but that it is possible to disable playback of all DVDs.
6.OTHER SETUP
These include special settings CAPTIONS and COMPRESSION.
|
Use the • and ª cursor buttons to select the desired |
|
|
setting item, then press the ENTER button. |
|
|
Select “1. DISC SETUP”. (See page 20.) |
ENTER |
2 |
Select “2. OSD SETUP”. (See page 21.) |
|
Select “3. VIDEO SETUP”. (See page 22.) |
|
|
|
Select “4. AUDIO SETUP”. (See page 23.) |
|
|
Select “5. RATINGS”. (See page 24.) |
|
|
Select “6. OTHER SETUP” (See page 25) |
Remote control unit |
|
|
To exit the setup mode
At the setup screen in step 1 on page 19, use the • and ª cursor buttons to select “EXIT SETUP”, then press the ENTER button. It is also possible to quit by pressing the SETUP button on the remote control unit.
19
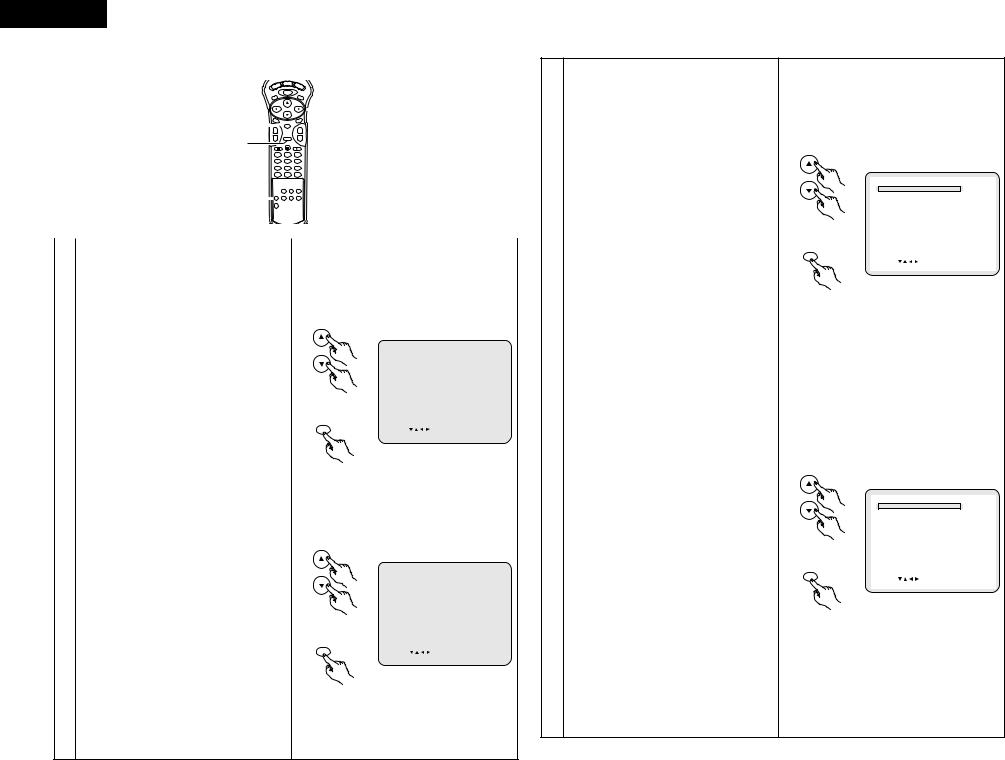
ENGLISH
When “1. DISC SETUP” is selected |
|
|
|
|
|
|
|
|
|
|
|
|
|
|
To exit the dialog mode |
|
|
|
|
|
DISPLAY |
OP/CL |
|
|
|
|
|
|
|
Use the • and ª cursor buttons to select “DISC |
|||
|
|
POWER |
|
|
|
|
|
|
|
|
|
SETUP”, then press the ENTER button. |
||||
|
|
TOP MENU |
MENU |
SUBTITLE |
|
|
|
|
|
|
|
|||||
|
|
|
|
|
|
|
|
2, 3, 4 |
|
|
|
|
|
|
|
Press RETURN button, you can go back to the |
|
2, 3, 4 |
AUDIO |
|
|
|
|
|
|
|
|
|
|
|
previous screen. |
||
|
|
|
|
|
|
|
|
|
|
|
||||||
|
|
|
ANGLE |
|
|
|
|
|
|
|
|
|||||
|
|
|
|
|
+ |
|
|
|
|
|
|
|
|
|
|
|
|
+ |
|
ENTER |
|
|
|
|
|
|
|
|
|
|
|||
|
3, 4 |
- |
|
|
|
- |
|
|
|
|
|
|
|
|
|
w When “2. SUBTITLE” is selected: |
|
|
RETURN |
|
|
|
|
|
|
|
|
|
|
||||
|
|
|
|
|
|
|
|
|
|
|
|
|
|
|
ENGLISH (Factory default) |
|
|
|
1 |
2 |
3 |
|
|
|
|
|
|
|
|
|
Select this when you want to play the DVD with the |
||
|
|
4 |
5 |
6 |
|
|
|
|
|
|
|
|
|
subtitles in English. |
||
|
|
7 |
8 |
9 |
|
|
|
|
|
|
|
|
|
|||
|
|
0 |
+10 |
|
|
|
|
|
|
|
|
|
|
FRENCH |
||
|
|
|
|
|
|
|
|
|
|
|
|
|
|
|
|
|
|
1 |
|
|
|
|
|
|
|
|
|
|
|
|
|
|
Select this when you want to play the DVD with the |
|
|
|
|
|
|
|
|
|
|
|
|
|
|
|
subtitles in French. |
|
|
|
|
|
|
|
|
|
|
|
|
|
|
|
|
||
|
|
|
REMOTERC-546 |
|
|
|
|
|
|
|
|
|
|
SPANISH |
||
|
|
|
|
CONTROL UNIT |
|
|
|
|
|
|
|
Select this when you want to play the DVD with the |
||||
|
|
|
B |
|
|
|
|
|
|
|
|
|
|
|||
|
|
|
|
|
|
|
|
|
|
|
|
|
|
|
|
subtitles in Spanish. |
|
|
|
|
|
|
|
|
|
|
|
|
|
|
|
|
GERMAN |
1 |
|
|
|
|
|
|
|
|
|
|
|
|
|
|
|
|
See page 19. |
|
|
|
|
|
|
|
|
|
|
|
|
|
|
Select this when you want to play the DVD with the |
|
|
|
|
|
|
|
|
|
|
|
|
|
|
|
|
subtitles in German. |
|
2 |
|
|
|
|
|
|
|
|
|
|
|
|
|
|
||
|
|
|
|
|
|
|
|
|
|
|
|
|
|
|
||
|
|
|
|
|
|
|
|
|
|
|
|
|
|
|
ITALIAN |
|
|
|
|
|
|
|
|
|
|
|
|
|
|
|
|
|
|
|
|
|
|
|
|
|
|
|
|
|
|
|
|
|
|
Select this when you want to play the DVD with the |
|
Use the • and ª cursor buttons to select the desired |
|
|
|
|
|
|
|
|
|
|
|
|
subtitles in Italian. |
||
|
setting, then press the ENTER button. |
|
|
|
|
|
|
|
|
|
|
|
|
|
|
DUTCH |
|
1. DIALOG |
|
|
|
|
|
|
|
|
|
|
|
|
|
|
Select this when you want to play the DVD with the |
|
|
|
|
|
|
|
|
|
|
|
|
|
|
|
subtitles in Dutch. |
|
|
Use this to set the language of the sound output |
|
|
|
|
|
|
|
|
|
|
|
|
|||
|
|
|
|
|
|
|
|
|
|
|
|
|
OFF |
|||
|
from the speakers. |
|
|
|
|
|
|
|
|
|
|
|
|
|
|
|
|
|
|
|
|
|
|
|
|
|
|
|
|
|
|
Select this if you do not want to display the subtitles. |
|
|
|
|
|
|
|
|
|
|
|
|
|
|
|
|
|
|
|
2. SUBTITLE |
|
|
|
|
|
|
|
|
|
D I SC SE TUP |
B |
|
|
(For some discs it is not possible to turn off the |
|
|
|
|
|
|
|
|
|
|
|
|
|
|
|
|
||
|
|
|
|
|
|
|
|
|
1 . D I AL OG |
|
ENGL I SH |
|
|
|||
|
Use this to set the language of the subtitles |
|
|
|
|
|
|
|
|
|
|
|
|
subtitle display.) |
||
|
|
|
|
|
|
|
2 . SUBT I T L E |
|
F RENCH |
|
|
|||||
|
|
|
|
|
|
|
|
|
|
|
|
|
||||
|
displayed on the TV. |
|
|
|
|
|
|
|
|
3 . D I SC MENUS |
|
ENGL I SH |
|
|
|
|
|
|
|
|
|
|
|
|
|
|
|
|
|
|
|
||
3 |
|
|
|
|
|
|
|
|
|
> MA I N PAGE |
|
|
|
|
4 |
To exit the subtitle mode |
3. DISC MENUS |
|
|
|
|
|
|
|
|
|
|
|
|
|
|||
|
|
|
|
Remote control unit |
|
|
|
|
|
|
Use the • and ª cursor buttons to select “DISC |
|||||
|
Use this to set the language of the menus recorded |
|
|
|
|
|
|
|
|
|
||||||
|
|
|
|
|
|
|
|
|
|
|
|
|
SETUP”, then press the ENTER button. |
|||
|
on the disc (top menu, etc.). |
|
|
|
|
|
|
|
|
D I SC LANGUAGE (D I ALOG) |
|
|
|
|
|
|
|
|
|
|
|
|
|
|
|
|
|
|
|
|
Press RETURN button, you can go back to the |
||
|
|
|
|
|
|
|
|
|
|
|
|
|
|
|
||
|
|
|
|
|
|
|
|
|
|
|
|
|
|
|
|
|
|
|
|
|
|
|
|
ENTER |
|
SEL ECT : |
DEC I S ION : ENTER BUTTON |
|
|
previous screen. |
|||
|
To exit the disc setup mode |
|
|
|
|
|
|
|
|
|
|
|
|
|
|
|
|
|
|
|
|
|
|
|
|
|
|
|
|
|
|
||
|
|
|
|
|
|
|
|
|
|
|
|
|
|
|
|
|
|
Use the • and ª cursor buttons to select “MAIN |
|
|
|
|
|
|
|
|
|
|
|
|
e When “3. DISC MENUS” is selected: |
||
|
PAGE”, then press the ENTER button. |
|
|
|
|
|
|
|
|
|
|
|
|
|
|
|
|
|
|
|
|
|
|
|
|
|
|
|
|
|
|
|
|
|
Press RETURN button, you can go back to the |
|
|
Remote control unit |
|
|
|
|
|
|
|
ENGLISH (Factory default) |
||||
|
previous screen. |
|
|
|
|
|
|
|
|
|
|
|
|
|
|
Select this when you want to display the menus in |
|
• The screen returns to as it was in step 1. |
|
|
|
|
|
|
|
|
|
|
|
|
|
|
English. |
|
|
|
|
|
|
|
|
|
|
|
|
|
|
|
|
FRENCH |
|
|
|
|
|
|
|
|
|
|
|
|
|
|
|
|
Select this when you want to display the menus in |
|
Use the • and ª cursor buttons to select the desired |
|
|
|
|
|
|
|
|
|
|
|
|
|||
|
|
|
|
|
|
|
|
|
|
|
|
|
French. |
|||
|
setting, then press the ENTER button. |
|
|
|
|
|
|
|
|
|
|
|
|
|
|
SPANISH |
|
q When “1. DIALOG” is selected: |
|
|
|
|
|
|
|
|
|
|
|
|
|
|
|
|
|
|
|
|
|
|
|
|
|
|
|
|
|
|
Select this when you want to display the menus in |
|
|
ENGLISH (Factory default) |
|
|
|
|
|
|
|
|
|
|
|
|
|
|
|
|
|
|
|
|
|
|
|
|
|
|
|
|
|
|
Spanish. |
|
|
Select this when you want to play the DVD with the |
|
|
|
|
|
|
|
|
|
|
|
|
GERMAN |
||
|
|
|
|
|
|
|
|
|
|
|
|
|
||||
|
sound in English. |
|
|
|
|
|
|
|
|
|
|
|
|
|
|
|
|
|
|
|
|
|
|
|
|
|
|
D I AL OG |
B |
|
|
Select this when you want to display the menus in |
|
|
|
|
|
|
|
|
|
|
|
|
|
|
|
|
|
|
|
FRENCH |
|
|
|
|
|
|
|
|
1 . D I AL OG |
|
ENGL I SH |
|
|
German. |
|
|
|
|
|
|
|
|
|
|
|
|
F RENCH |
|
|
|||
|
Select this when you want to play the DVD with the |
|
|
|
|
|
|
|
|
SPAN I SH |
|
|
ITALIAN |
|||
|
|
|
|
|
|
|
|
|
GE RMAN |
|
|
|||||
|
sound in French. |
|
|
|
|
|
|
|
|
> D I SC SE TUP |
|
ITALIAN |
|
|
Select this when you want to display the menus in |
|
|
|
|
|
|
|
|
|
|
|
|
|
|
||||
|
SPANISH |
|
|
|
|
|
|
|
|
> MA I N PAGE |
|
DUTCH |
|
|
||
4 |
|
|
|
|
Remote control unit |
|
|
|
|
|
|
|
Italian. |
|||
Select this when you want to play the DVD with the |
|
|
|
|
|
|
|
|
|
|
|
|
DUTCH |
|||
|
sound in Spanish. |
|
|
|
|
|
|
|
|
DIALOG -- > ENGLISH |
|
|
|
|
|
Select this when you want to display the menus in |
|
|
|
|
|
|
|
ENTER |
|
|
|
|
|
|
|
||
|
GERMAN |
|
|
|
|
|
|
SEL ECT : |
DEC I S ION : ENTER BUTTON |
|
|
|||||
|
|
|
|
|
|
|
|
|
|
|
|
|
|
|
Dutch. |
|
|
|
|
|
|
|
|
|
|
|
|
|
|
|
|
||
|
Select this when you want to play the DVD with the |
|
|
|
|
|
|
|
|
|
|
|
|
|
||
|
sound in German. |
|
|
|
|
|
|
|
|
|
|
|
|
|
|
To exit the disc menus mode |
|
ITALIAN |
|
|
|
|
Remote control unit |
|
|
|
|
|
|
|
Use the • and ª cursor buttons to select “DISC |
||
|
Select this when you want to play the DVD with the |
|
|
|
|
|
|
|
|
|
|
|
|
SETUP”, then press the ENTER button. |
||
|
sound in Italian. |
|
|
|
|
|
|
|
|
|
|
|
|
|
|
Press RETURN button, you can go back to the |
|
DUTCH |
|
|
|
|
|
|
|
|
|
|
|
|
|
|
previous screen. |
Select this when you want to play the DVD with the sound in Dutch.
Remote control unit
ENTER
Remote control unit
Remote control unit
ENTER
Remote control unit
SUB T I T L E B
|
|
|
ENGL I SH |
|
|
|
F RENCH |
2 . SUBT I T L E |
|
||
|
|
|
SPAN I SH |
|
|
|
GE RMAN |
> D I SC SE TUP |
|
|
ITALIAN |
|
|
|
|
> MA I N PAGE |
|
|
DUTCH |
SUBTITLE -- > FRENCH |
|
|
OF F |
|
|
|
|
|
|
|
|
SEL ECT : |
|
DEC I S ION : ENTER BUTTON |
|
D I SC MENUS B
|
|
|
ENGL I SH |
|
|
|
F RENCH |
|
|
|
SPAN I SH |
3 . D I SC MENUS |
|
|
GE RMAN |
|
|
|
|
> D I SC SE TUP |
|
|
ITALIAN |
|
|
|
|
> MA I N PAGE |
|
|
DUTCH |
DISC MENUS -- > ENGLISH |
|
|
|
|
|
|
|
SEL ECT : |
|
DEC I S ION : ENTER BUTTON |
|
20
ENGLISH
When “2. OSD SETUP” is selected
|
|
Use the • and ª cursor buttons to select the desired |
DISPLAY |
OP/CL |
setting, then press the ENTER button. |
POWER |
w When “2. WALL PAPER” is selected: |
|
TOP MENU |
SUBTITLE |
|
MENU |
|
|
2, 3, 4 |
AUDIO |
|
+ |
ENTER |
|
3, 4 |
- |
RETURN |
|
|
|
|
1 |
2 |
|
4 |
5 |
|
7 |
8 |
|
0 |
+10 |
1 |
|
|
1
See page 19.
2
Use the • and ª cursor buttons to select the desired setting, then press the ENTER button.
1.OSD LANGUAGE
Use this to set the language for the default setting screen and messages displayed on the TV screen (“PLAY”, etc.)
2.WALL PAPER
3 |
Use this to select the image to be shown on the |
|
|
|
screen in the stop mode and CD play mode. |
To exit the osd setup mode
Use the • and ª cursor buttons to select “MAIN PAGE”, then press the ENTER button.
Press RETURN button, you can go back to the previous screen.
• The screen returns to as it was in step 1.
Use the • and ª cursor buttons to select the desired setting, then press the ENTER button.
qWhen “1. OSD LANGUAGE” is selected:
ENGLISH (Factory default)
Select this to set the OSD language to English.
FRANÇAIS
Select this to set the OSD language to French.
4 |
ESPAÑOL |
Select this to set the OSD language to Spanish. |
|
|
DEUTSCH |
|
Select this to set the OSD language to German. |
To exit the osd language mode
Use the • and ª cursor buttons to select “OSD SETUP”, then press the ENTER button.
Press RETURN button, you can go back to the previous screen.
 2, 3, 4
ANGLE
+
-
3
6
9
BLUE (Factory default)
Select this to display a blue background on the TV display.
4 PICTURE
Select this to display the wallpaper on the TV display.
To exit the wall paper mode
Use the • and ª cursor buttons to select “OSD SETUP”, then press the ENTER button.
Press RETURN button, you can go back to the previous screen.
|
|
|
OSD |
SE TUP |
B |
|
|
|
|
|
|
|
|
1 |
. OSD |
LANGUAGE |
|
ENGL I SH |
||
|
|
|
|
|
|
|
2 |
. WAL L |
PAPER |
|
BLU E |
||
|
|
|
|
|
||
> MA I N |
PAGE |
|
|
|
|
|
Remote control unit
OSD LANGUAGE
ENTER |
SEL ECT : |
DEC I S ION : ENTER BUTTON |
Remote control unit
|
|
|
OSD LANGUAGE B |
|
1 . OSD |
L ANGUAGE |
ENGL I SH |
|
|
|
F RANÇA I S |
|
> OSD |
SE TUP |
ESPAÑOL |
|
DEUTSCH |
||
|
> MA I N PAGE |
||
|
|
||
Remote control unit |
|
|
|
|
OSD LANGUAGE -- > ENGLISH |
|
|
ENTER |
SEL ECT : |
|
DEC I S ION : ENTER BUTTON |
Remote control unit
|
|
WAL L |
PAP ER B |
|
2 . WAL L |
PAP E R |
BL UE |
|
> OSD |
SE TUP |
P I C TURE |
|
> MA I N |
PAGE |
|
Remote control unit |
|
|
|
|
WA L L PAPER - - > BLUE |
|
|
ENTER |
SEL ECT : |
DEC I S I ON : ENTER BUTTON |
|
Remote control unit
21

ENGLISH
When “3. VIDEO SETUP” is selected
|
DISPLAY |
OP/CL |
|
POWER |
|
|
MENU |
|
|
TOP MENU |
SUBTITLE |
|
|
2, 3, 4 |
2, 3, 4 |
AUDIO |
ANGLE |
+ |
+ |
|
|
ENTER |
|
3, 4 |
- RETURN |
- |
|
|
1 2 3
4 5 6
7 8 9
0 +10
1
REMOTE CONTROL UNIT
RC-546
1
See page 19.
2
Use the • and ª cursor buttons to select the desired setting, then press the ENTER button.
1.TV ASPECT
Use this to set the shape of your TV’s screen.
2.TV TYPE
Use this to set your TV’s video format (NTSC, PAL or MULTI).
3.VIDEO OUT
Use this to select either the progressive image
|
output or interlace image output. |
|
|
|
|
|
||
|
|
|
|
V I DEO SE TUP |
B |
|||
|
|
|
|
|
|
|
|
|
|
4. AV1 VIDEO OUT (For only European model) |
|
1 . T V |
ASP EC T |
|
|
WI DE ( 1 6 : 9 ) |
|
|
|
|
|
|
|
|
|
|
|
To select whether composite video signals or S |
|
2 . TV |
TYP E |
|
|
NTSC |
|
|
|
|
|
|
|
|
|
|
|
video signals or RGB signals will be output from the |
|
3 . V I DE O OU T |
|
|
P ROGRESS I VE |
||
|
|
|
|
|
|
|
|
|
|
AV1 SCART terminals. |
|
4 . AV 1 |
V I DEO OUT |
|
|
S - V I DE O |
|
3 |
|
|
|
|
|
|
|
|
Remote control unit |
5 . V I DEO MODE |
|
|
V I DE O |
||||
5. VIDEO MODE |
|
|
|
|
|
|
||
|
6. PROGRESSIVE MODE |
|
|
MODE 1 |
||||
|
|
|
|
|
|
|
|
|
|
To play DVD video, select the desired video mode |
|
> MA I N PAGE |
|
|
|
|
|
|
|
|
|
|
|
|
|
|
|
(“VIDEO”, “FILM” or “AUTO”). |
|
T V ASPECT |
|
|
|
|
|
|
6. PROGRESSIVE MODE |
ENTER |
SEL ECT : |
|
|
DEC I S I ON : ENTER BUTTON |
||
|
Select the film source and video source detection |
|
|
|
|
|
|
|
|
method recorded on the DVD. |
|
|
|
|
|
|
|
|
Normally select “MODE 1” (level detection mode). |
|
|
|
|
|
|
|
|
(only valid for progressive output during DVD video |
Remote control unit |
|
|
|
|
|
|
|
playback) |
|
|
|
|
|
|
|
|
|
|
|
|
|
|
|
|
To exit the video setup mode
Use the • and ª cursor buttons to select “MAIN PAGE”, then press the ENTER button.
Press RETURN button, you can go back to the previous screen.
• The screen returns to as it was in step 1.
Use the • and ª cursor buttons to select the desired setting, then press the ENTER button.
qWhen “1. TV ASPECT” is selected:
4:3 PS
|
Select this to play wide DVDs in the pan & scan |
|
|
|
|
|
TV ASP E C T B |
||
|
|
|
|
|
|
|
|
|
|
|
mode (with the sides of the picture cut off). Discs |
|
|
1 . TV ASPE C T |
|
|
4 : 3 P S |
||
|
|
|
|
|
|
|
4 : 3 L B |
||
|
for which pan & scan is not specified are played in |
|
|
|
|
|
|
WI DE ( 1 6 : 9 ) |
|
|
the letter box mode. |
|
|
|
|
|
|
|
|
4 |
4:3 LB |
|
|
|
|
|
|
||
Remote control unit |
> V I DEO SE TUP |
|
|
|
|||||
|
|
|
|
|
|
||||
Select this to play wide DVDs in the letter box mode |
> MA I N PAGE |
|
|
|
|||||
|
|
|
|
|
|
|
|
|
|
|
(with black strips at the top and bottom). |
|
|
|
|
|
|
|
|
|
WIDE (16:9) (Factory default) |
|
|
T V ASPECT - - > WIDE (16 : 9) TV |
|
|
|
||
|
|
|
|
|
|
|
|
|
|
|
Select this to play wide DVDs in the full-screen mode. |
ENTER |
SEL ECT : |
|
DEC I S I ON : ENTER BUTTON |
||||
|
To exit the TV aspect mode |
|
|
|
|
|
|
|
|
|
Use the • and ª cursor buttons to select “VIDEO |
|
|
|
|
|
|
|
|
|
SETUP”, then press the ENTER button. |
|
|
|
|
|
|
|
|
|
Press RETURN button, you can go back to the |
Remote control unit |
|
|
|
|
|
|
|
|
previous screen. |
|
|
|
|
|
|
||
|
|
|
|
|
|
|
|
|
|
wWhen “2. TV TYPE” is selected:
MULTI (Factory default)
Select this when your TV is compatible with both the NTSC and PAL formats.
If you play the disc recorded NTSC format, signal from video output terminal will be switched to NTSC is selected, output format is fixed to NTSC.
NTSC
Select this when your TV’s video format is NTSC. If NTSC is selected, output format is fixed to NTSC.
PAL
Select this when your TV’s video format is PAL. If PAL is selected, output format is fixed to PAL.
To exit the TV type mode
Use the • and ª cursor buttons to select “VIDEO SETUP”, then press the ENTER button.
Press RETURN button, you can go back to the previous screen.
eWhen “3. VIDEO OUT” is selected: (NOTE)
PROGRESSIVE (Factory default)
Select this when using the DVD-2800 connected to a progressive type TV.
INTERLACED
Select this when using the DVD-2800 connected to an interlace type TV.
To exit the video out mode
Use the • and ª cursor buttons to select “VIDEO SETUP”, then press the ENTER button.
Press RETURN button, you can go back to the previous screen.
4 r When “4. AV1 VIDEO OUT” is selected:
VIDEO (Factory default)
Composite video signals will be output from the AV1 SCART terminal.
S-VIDEO
S video signals will be output.
RGB
RGB signals will be output.
To exit the AV1 video output mode
Use the • and ª cursor buttons to select “VIDEO SETUP”, then press the ENTER button.
Press RETURN button, you can go back to the previous screen.
tWhen “5. VIDEO MODE” is selected:
VIDEO (factory default)
This mode is best suited for playing discs containing video material.
FILM
This mode is best suited for playing discs containing film material or video material recorded with the progressive scan method.
AUTO
The set identifies the type of material on the disc being played (film or video) and selects the mode automatically. This mode is suited for playing discs containing both film and video material.
To exit the video mode
Use the • and ª cursor buttons to select “VIDEO SETUP”, then press the ENTER button.
Press RETURN button, you can go back to the previous screen.
|
|
TV |
T YP E |
B |
|
|
|
|
MUL T I |
|
2 . TV T YPE |
|
NT SC |
|
|
|
PAL |
||
|
|
|
|
|
Remote control unit |
> V I DEO |
SE TUP |
|
|
> MA I N |
PAGE |
|
|
|
|
|
|
||
ENTER |
T V T Y P E - - > NTSC T V |
|
|
|
|
|
|
||
|
SEL ECT : |
DEC I S I ON : ENTER BUTTON |
||
Remote control unit |
|
|
|
|
|
|
V I DEO OUT |
B |
|
|
3 . V I DEO |
OUT |
PROGRESS I VE |
|
|
|
|
I NT E R L AC E D |
|
Remote control unit |
> V I DEO |
SE TUP |
|
|
|
> MA I N |
PAGE |
|
|
ENTER |
|
|
|
|
|
VI DEO OUT - - > PROGRESSIVE |
|
|
|
|
SEL ECT : |
DEC I S I ON : ENTER BUTTON |
||
Remote control unit |
|
|
|
|
|
|
AV1 V I DEO OUT |
B |
|
|
4 . AV 1 V I DEO OUT |
|
V I DEO |
|
Remote control unit |
S - V I DEO |
|||
> V I DEO |
SE TUP |
|
RGB |
|
|
> MA I N PAGE |
|
|
|
ENTER |
|
|
|
|
|
AV1 V I DEO OUT - - > S-V I DEO |
|
|
|
|
SEL ECT : |
DEC I S I ON : ENTER BUTTON |
||
Remote control unit |
|
|
|
|
|
|
V I DEO |
MODE |
B |
Remote control unit |
5 . V I DEO MODE |
|
V I DEO |
|
|
> V I DEO |
SE TUP |
|
F I L M |
|
|
AUTO |
||
|
> MA I N PAGE |
|
||
ENTER |
|
|
||
|
|
|
|
|
|
V I DEO MODE- - > V I DEO |
|
|
|
|
SEL ECT : |
DEC I S I ON : ENTER BUTTON |
||
Remote control unit
NOTE:
If stripes of noise appear on the picture or the picture is unclear when playing a specific DVD video disc, try changing the video mode.
NOTE:
•For the component output only, it is possible to switch between interlace image output and progressive image output. It is not possible to specify progressive image output for the Video output connectors or S-Video output connector.
22

ENGLISH
yWhen “PROGRESSIVE MODE” is selected:
MODE 1 (level detection mode) (Factory default)
This is a mode for high precision detection of the source type from the level of the video signals recorded on the DVD.
For DVDs on which the flag (identification signal) data is recorded incorrectly, the picture quality may decrease when flag detection is conducted.
This mode is effective in such cases.
MODE 2 (flag detection mode)
4 This is a mode for detecting the source type from the source flag (identification signal) recorded on the DVD.
In dark scenes, distinguishing between video signals and noise signals with level detection is difficult and the picture quality may decrease.
This mode is effective in such cases.
To exit the progressive mode
Use the • and ª cursor buttons to select “VIDEO SETUP”, then press the ENTER button.
Press RETURN button, you can go back to the previous screen.
When “4. AUDIO SETUP” is selected
|
|
DISPLAY |
|
POWER |
|
|
TOP MENU |
MENU |
|
|
|
2, 3, 4 |
AUDIO |
|
+ |
ENTER |
|
3, 4 |
- |
RETURN |
|
|
|
|
1 |
2 |
|
4 |
5 |
|
7 |
8 |
|
0 |
+10 |
1 |
|
|
1
See page 16.
2
Use the • and ª cursor buttons to select the desired setting, then press the ENTER button.
1.DIGITAL OUT
Use this to select the digital output’s signal format.
2.LPCM SELECT (96 kHz / 48 kHz)
Use this to set the digital audio output when playing
3 |
DVDs recorded in linear PCM audio. |
|
To exit the audio setup mode
Use the • and ª cursor buttons to select “MAIN PAGE”, then press the ENTER button.
Press RETURN button, you can go back to the previous screen.
• The screen returns to as it was in step 1.
|
|
PROGRESSIVE MODE B |
|
Remote control unit |
6. PROGRESSIVE MODE |
MODE 1 |
|
> V I DEO |
SE TUP |
MODE 2 |
|
|
> MA I N |
PAGE |
|
|
V I DEO MODE- - > V I DEO |
|
|
ENTER |
SEL ECT : |
|
DEC I S I ON : ENTER BUTTON |
|
|
|
|
Remote control unit
Use the • and ª cursor buttons to select the desired setting, then press the ENTER button.
qWhen “1. DIGITAL OUT” is selected:
NORMAL
Select this to listen to the digital audio output signals output from the digital audio output terminals (optical/coaxial) when playing DVDs recorded in Dolby Digital or DTS.
PCM
Select this to listen to the digital audio output signals output from the digital audio output terminals (optical/coaxial) when playing DVDs recorded in linear PCM.
OFF
When “OFF” is selected, analog signals are output from the set’s analog audio output.
Digital signals are not output from the digital audio output at this time.
To exit the digital out mode
Use the • and ª cursor buttons to select “AUDIO SETUP”, then press the ENTER button.
Press RETURN button, you can go back to the previous screen.
4 w When “2. LPCM SELECT (96 kHz / 48 kHz)” is selected:
This setting is valid when “NORMAL” or “PCM” is selected for “1. DIGITAL OUT”.
OP/CL
SUBTITLE
2, 3, 4
ANGLE
+
-
Remote control unit
3
6
9
OFF (Factory default)
Only linear PCM audio signals recorded at 48 kHz/16 bits are output from the digital output terminals. When playing DVDs containing 48 kHz/20 or 24 bit or 96 kHz linear PCM audio signals, nothing is output from the digital output terminals.
For DVDs on which no copyright protection measures are taken, however, the audio signals are output in the format in which they were recorded.
ON (96 kHz / 48 kHz)
When playing DVDs containing 48 kHz/20 or 24 bit or 96 kHz linear PCM audio signals, the signals are converted into 48 kHz/16 bit signals and output from the digital output terminals.
(In consideration of copyrights, the actual PCM audio digital output is under 48 kHz/16 bits.)
Remote control unit
ENTER
To exit the LPCM select mode
Use the • and ª cursor buttons to select “AUDIO SETUP”, then press the ENTER button.
Press RETURN button, you can go back to the previous screen.
|
|
|
|
|
|
|
|
|
|
|
AUD I O SE TUP |
B |
|||
|
|
|
|
|
|
|
|
1 |
. D I G I T AL OUT |
|
|
NORMA L |
|
||
|
|
|
|
|
|
|
|
|
2 |
. L PCM S E L E CT |
|
|
O F F |
|
|
|
|
|
|
|
|
|
|
|
|
( 9 6 k H z - - > 4 8 k H z ) |
|
|
|
|
|
|
|
|
|
|
|
|
|
|
> MA I N PAGE |
|
|
|
|
|
|
|
D I G I TAL OUT |
|
|
|
|
|
|
|
|
|
|
|
|
||
|
SEL ECT : |
|
DEC I S I ON : ENTER BUTTON |
|
|||
|
|
|
|
|
|
|
|
Remote control unit
Remote control unit
ENTER
Remote control unit
Remote control unit
ENTER
Remote control unit
|
|
D I G I TAL |
OUT |
B |
||
|
|
|
|
|
|
|
1 . D I G I TAL OU T |
|
|
|
NORMA L |
||
|
|
|
|
|
PCM |
|
|
|
|
|
|
O F F |
|
|
|
|
|
|
||
> AUD I O |
SE TUP |
|
|
|
|
|
|
|
|
|
|
||
> MA I N |
PAGE |
|
|
|
|
|
D I G I TAL OUT - - > NORMA L
SEL ECT : |
DEC I S I ON : ENTER BUTTON |
|
|
|
L PCM SE L E C T |
B |
||
|
|
|
|
|
||
2 . L PCM S E L EC T |
|
|
|
O F F |
||
|
|
|
|
|
ON |
|
|
( 9 6 k H z - - > 4 8 k H z ) |
|
|
|
|
|
|
|
|
|
|
|
|
> |
AUD I O |
SE TUP |
|
|
|
|
|
|
|
|
|
||
> |
MA I N |
PAGE |
|
|
|
|
LPCM SEL ECT - - > OFF
SEL ECT : |
DEC I S I ON : ENTER BUTTON |
23
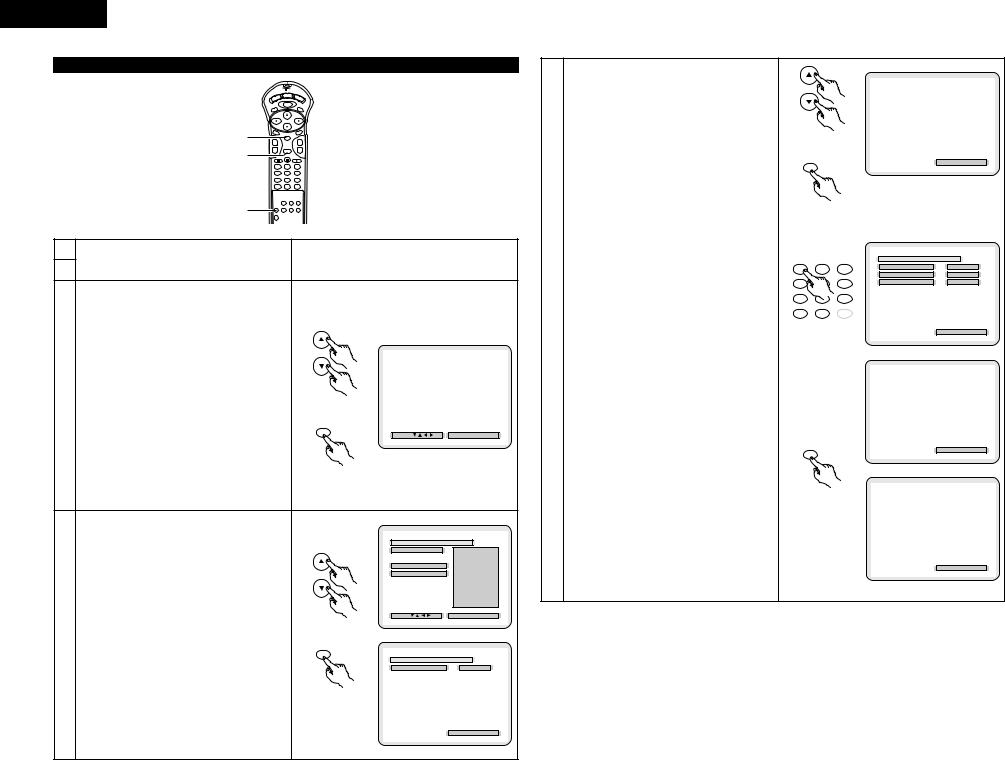
ENGLISH
When “5. RATINGS” is selected
|
DISPLAY |
POWER |
OP/CL |
|
MENU |
TOP MENU |
SUBTITLE |
2, 3, 4 |
AUDIO |
|
+ |
ENTER |
|
3, 4 |
- |
RETURN |
|
|
|
|
1 |
2 |
|
4 |
5 |
|
7 |
8 |
|
0 |
+10 |
1 |
|
|
1
See page 19.
2
Use the • and ª cursor buttons to select the desired setting, then press the ENTER button.
1.RATING LEVEL
Use this to restrict playback of adult DVDs you do not want children to view. Note that even with adult DVDs, viewing cannot be restricted unless the restriction level is recorded on the disc.
It is however possible to disable playback of all DVDs.
3 2. PASSWORD CHANGE
Use this to change the password.
The set’s password is set to “0000” by default.
To exit the rating setup mode
Use the • and ª cursor buttons to select “MAIN PAGE”, then press the ENTER button.
Press RETURN button, you can go back to the previous screen.
• The screen returns to as it was in step 1.
Use the • and ª cursor buttons to select the desired setting, then press the ENTER button.
qWhen “1. RATING LEVEL” is selected:
Level 0
|
Select this to disable playback of all DVDs. |
|
|
Use this for example to disable playback of adult |
|
|
DVDs on which the rating level is not recorded. |
|
|
Level 1 |
|
|
Select this to play only DVDs for children. (Adult and |
|
|
general audience DVDs cannot be played.) |
|
4 |
Level 2 to Level 8 |
|
Select this to play DVDs for general audiences and |
||
|
||
|
children. Adult DVDs cannot be played. |
|
|
NO LIMIT (Factory default) |
|
|
Select this to play all DVDs. |
Use the number buttons to input a 4-digit password, then press the ENTER button.
The set's password is set to "0000" by default.
Do not forget the password.
The setting cannot be changed without inputting the correct password.
 2, 3, 4
ANGLE
+
-
3
6
9
4
|
|
|
RA T I NGS |
B |
|
|
|
|
|
1 |
. RAT I NG L E V E L |
NO L IM I T |
||
|
|
|
|
|
2 |
. PASSWORD CHANGE |
|
XXXX |
|
|
|
|
|
|
> MA I N PAGE |
|
|
|
|
Remote control unit
RAT I NG LEVEL
ENTER |
SEL ECT : |
DEC I S I ON : ENTER BUTTON |
|
Remote control unit
|
RA T I NG LEVEL |
B |
1 . RAT I NG L E V E L |
0 (LOCK ALL) |
|
|
1 |
|
> RAT I NGS |
2 |
|
3 |
|
|
> MA I N PAGE |
|
|
4 |
|
|
|
5 |
|
|
6 |
|
|
7 |
|
|
8 |
|
RAT ING LEVEL - - > NO LIMIT |
NO L IMI T |
|
|
|
|
SEL ECT : |
DEC I S I ON : ENTER BUTTON |
|
Remote control unit |
|
|
ENTER |
|
|
|
PASSWORD |
B |
CUR RENT PAS SWOR D
Remote control unit
PL EASE ENTER PASSWORD
DEC I S I ON : ENTER BUTTON
wWhen “2. PASSWORD CHANGE” is selected:
Use the number buttons to input a 4-digit password, then press the ENTER button.
Do not forget the password.
The setting cannot be changed without inputting the correct password.
The set’s password is set to “0000” by default.
Remote control unit
ENTER
Remote control unit
1 |
2 |
3 |
4 |
5 |
6 |
7 |
8 |
9 |
0 |
+10 |
CLEAR |
Remote control unit
ENTER
Remote control unit
|
PASSWORD |
B |
||
|
|
|
|
|
CUR RENT PAS SWOR D |
|
|
XXXX |
|
PRESS ENTER TO CONT INUE
DEC I S I ON : ENTER BUTTON
PASSWORD B
OL D PAS SWOR D
NEW PAS SWORD
CONF I RM PASSWORD
PL EASE ENTER OLD PASSWORD
DEC I S I ON : ENTER BUTTON
|
|
PASSWORD |
B |
||
|
|
|
|
|
|
OL D PAS SWOR D |
|
|
XXXX |
|
|
|
|
|
|
||
NEW PAS SWORD |
|
|
|
|
|
|
|
|
|
|
|
CONF I RM PASSWORD |
|
|
|
|
|
PL EASE ENTER NEW PASSWORD
DEC I S I ON : ENTER BUTTON
|
|
PASSWORD |
B |
||
|
|
|
|
|
|
OL D PAS SWOR D |
|
|
XXXX |
|
|
|
|
|
|
||
NEW PAS SWORD |
|
|
|
XXXX |
|
|
|
|
|
|
|
CONF I RM PASSWORD |
|
|
|
|
|
PL EASE REENTER PASSWORD
DEC I S I ON : ENTER BUTTON
24
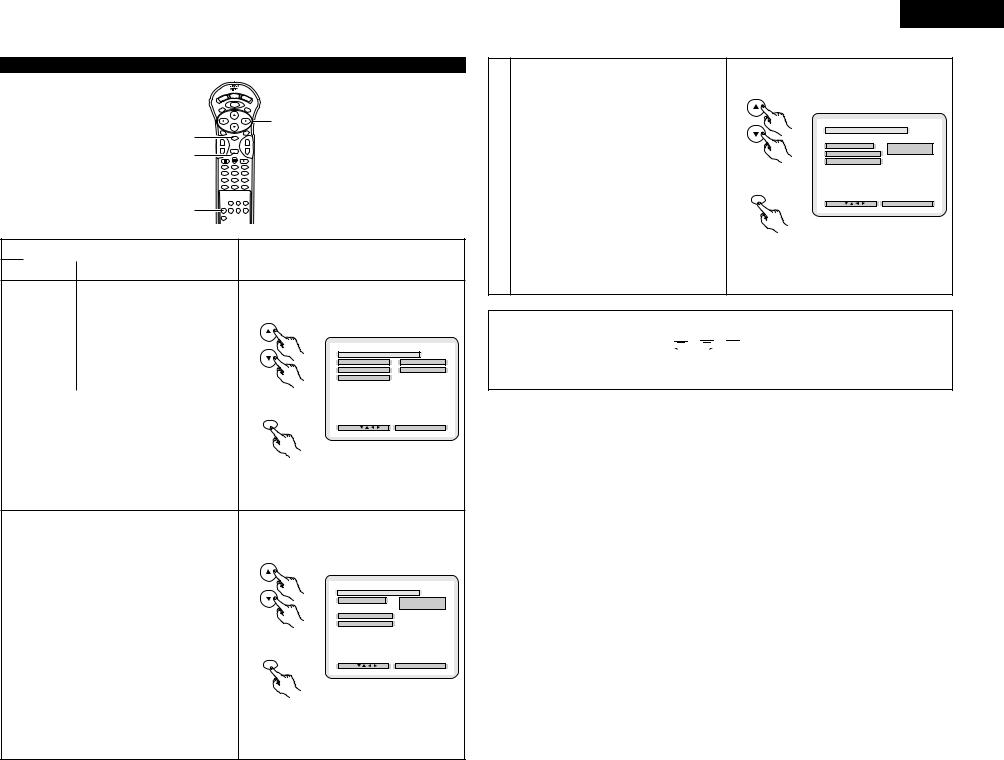
When “6. OTHER SETUP” is selected
2, 3, 4 3, 4
1
|
DISPLAY |
POWER |
OP/CL |
|
MENU |
TOP MENU |
SUBTITLE |
2, 3, 4
AUDIO |
ANGLE |
ENTER
++
- |
RETURN |
- |
1 2 3
4 5 6
7 8 9
0 +10
1
See page 19.
2
Use the • and ª cursor buttons to select the desired setting, then press the ENTER button.
|
1. CAPTIONS |
|
|
|
Use this to set whether or not to display the closed |
|
OTHE R S E TUP B |
|
captions recorded on DVDs. |
|
|
|
1 . CAP T I ONS |
OF F |
|
|
2. COMPRESSION |
2 . COMPR E SS I ON |
OF F |
|
> MA I N PAGE |
|
|
3 |
Use this to set the dynamic range output when |
|
|
playing discs. |
Remote control unit |
|
|
|
To exit the other setup mode |
CLOSED CAPTION |
|
|
Use the • and ª cursor buttons to select “MAIN |
ENTER |
DEC I S I ON : ENTER BUTTON |
|
SEL ECT : |
||
|
PAGE”, then press the ENTER button. |
|
|
|
Press RETURN button, you can go back to the |
|
|
|
previous screen. |
Remote control unit |
|
|
• The screen returns to as it was in step 1. |
|
|
|
|
|
Use the • and ª cursor buttons to select the desired setting, then press the ENTER button.
q When “1. CAPTIONS” is selected:
|
OFF (Factory default) |
|
|
|
|
Select this when you do not want to display the |
|
|
CAP T I ONS B |
|
|
1 . CAP T I ONS |
O F F |
|
|
captions on the screen when playing DVDs |
|
||
|
|
|
O N |
|
|
containing English captions |
|
> OTHER S E TUP |
|
|
ON |
|
> MA I N PAGE |
|
4 |
|
|
|
|
Select this to display the captions on the screen |
Remote control unit |
|
|
|
|
when playing DVDs containing English captions. |
|
|
|
|
|
|
CLOSED CAPT ION - - > OFF |
|
|
To exit the captions mode |
ENTER |
SEL ECT : |
DEC I S I ON : ENTER BUTTON |
|
|
|
|
|
|
Use the • and ª cursor buttons to select “OTHER |
|
|
|
|
SETUP”, then press the ENTER button. |
|
|
|
|
Press RETURN button, you can go back to the |
Remote control unit |
|
|
|
previous screen. |
|
|
|
|
|
|
|
|
|
• The screen returns to as it was in step 1. |
|
|
|
ENGLISH
wWhen “2. COMPRESSION” is selected:
OFF (Factory default)
Select this for the standard range.
ON
Select this to achieve powerful sound even when the volume is low. This setting is suited for watching
4 |
DVDs late at night with the volume low. (This setting |
is only valid for DVDs recorded in Dolby Digital.) |
To exit the compression mode
Use the • and ª cursor buttons to select “OTHER SETUP”, then press the ENTER button.
Press RETURN button, you can go back to the previous screen.
• The screen returns to as it was in step 1.
|
COMP R E SS I ON B |
2 . COMPR E SS I ON |
O F F |
> OTHER S E TUP |
O N |
> MA I N PAGE |
|
Remote control unit |
|
COMPRESSI ON - - > OFF |
|
ENTER |
DEC I S I ON : ENTER BUTTON |
SEL ECT : |
Remote control unit
NOTES:
•An English caption decoder is required to display English captions.
•DVDs with caption signals are indicated by the 


 ,
, 


 ,
,  , mark.
English captions cannot be displayed when playing DVDs which do not contain caption signals.
•The characters in which the captions are displayed (capital letters, small letters, italics, etc.) depend on the DVD and cannot be selected with the DVD-2800.
25

ENGLISH
18 TROUBLESHOOTING
Check again before assuming the player is malfunctioning.
2Are all the connections correct ?
2Are you following the instructions in the manual ?
2Are the amplifier and speakers operating properly ?
If the DVD-2800 does not seem to be functioning properly, check the table below. If this does not solve the problem, the DVD2800 may be damaged. Turn off the power, unplug the power cord from the power outlet, and contact your store of purchase or nearest DENON sales office.
Symptom |
|
Check |
Page |
|
|
|
|
|
|
Power does not turn on. |
• |
Plug the power cord securely into the power outlet. |
6 |
|
|
|
|
|
|
Playback does not start when |
• |
Is there condensation on the disc or player ? (Let stand for 1 or 2 hours.) |
— |
|
PLAY button is pressed. |
• |
Discs other than DVDs, video CDs and music CDs cannot be played. |
5 |
|
Playback stops immediately. |
• |
Disc is dirty. Wipe off the dirt. |
5 |
|
|
|
|
|
|
Picture does not appear. |
• |
Check the connections. |
6 |
|
• |
Set the TV’s input to “video”. |
— |
||
|
||||
|
|
|
|
|
Sound is not produced or |
• |
Check the connections. |
6 |
|
• |
Properly set the input of the TV, stereo, etc. |
— |
||
sound quality is poor. |
||||
• |
Check the “DIGITAL OUT” and “COMPRESSION” settings. |
23, 25 |
||
|
||||
|
|
|
|
|
Menu playback of video CD’s |
• |
Menu playback is not possible with anything but video CDs with playback control. |
11 |
|
is not possible. |
|
|
|
|
|
|
|
|
|
Picture is disturbed during the |
• |
Some disturbance is normal. |
— |
|
search operation. |
|
|
|
|
|
|
|
|
|
Buttons do not operate. |
• |
Some operations are disabled for some discs. |
11 |
|
|
|
|
|
|
No subtitles are displayed. |
• |
Subtitles are not displayed for DVDs not containing subtitles. |
— |
|
• |
Subtitles are turned off. Turn the subtitles setting on. |
17 |
||
|
||||
|
|
|
|
|
|
• |
The audio (or subtitle) language does not switch for discs which do not include multiple audio (or |
— |
|
Audio (or subtitle) language |
|
subtitle) languages. |
|
|
does not switch. |
• |
For some discs the audio (or subtitle) language cannot be switched when the operation to switch it |
17 |
|
|
|
is performed, but can be switched on the menu screens. |
|
|
|
|
|
|
|
Angle does not switch. |
• |
The angle cannot be switched for DVDs which do not contain multiple angles. In some cases |
18 |
|
|
multiple angles are only recorded for specific scenes. |
|
||
|
|
|
||
|
|
|
|
|
Playback does not start when |
• |
Check the “RATINGS SETUP” setting. |
24 |
|
the title is selected. |
|
|
|
|
|
|
|
|
|
The password for rating level |
• |
While the player is in the stop mode, hold the player's SKIP (8) button and the STILL/PAUSE |
— |
|
has been forgotten. |
|
button down simultaneously and then hold the OPEN/CLOSE button down for longer than |
||
|
|
|||
Reset all the setting to |
|
3 seconds (until “Initialized” disappears from the TV monitor). |
|
|
Factory Preset. |
|
The lock will be released and all default settings and picture settings will return to the default values. |
|
|
|
|
|
|
|
The disc is not played with the |
• |
The disc does not play with the selected audio or subtitle language if that audio or subtitle language |
20 |
|
audio or subtitle language set |
|
is not included on that DVD. |
|
|
as the default setting. |
|
|
|
|
|
|
|
|
|
Picture is not displayed in 4:3 |
• |
Set the “TV ASPECT” default setting to the proper setting for the connected TV. |
22 |
|
(or 16:9). |
|
|
|
|
|
|
|
|
|
Menu screen messages for |
• |
Check the default setting for the disc language’s menu language. |
20 |
|
the desired language do not |
|
|
|
|
display. |
|
|
|
|
|
|
|
|
|
|
• |
Check that the batteries are inserted in the proper “<” and “>” directions. |
9 |
|
Remote control unit does not |
• |
The batteries are dead. Replace them with new batteries. |
9 |
|
• |
Point the remote control unit at the remote control sensor when operating it. |
9 |
||
operate. |
||||
• |
Operate the remote control unit within a distance of 7 meters from the remote control sensor. |
9 |
||
|
||||
|
• |
Remove the obstacle between the remote control unit and remote control sensor. |
9 |
|
|
|
|
|
19 MAIN SPECIFICATIONS
Signal system: |
NTSC/PAL |
|
|
|
Applicable discs: |
(1) DVD-video discs |
|
|
|
|
1-layer 12 cm single-sided discs, 2-layer 12 cm single-sided discs, 2-layer 12 cm double-sided |
|||
|
discs (1 layer per side) |
|
|
|
|
1-layer 8 cm single-sided discs, 2-layer 8 cm single-sided discs, 2-layer 8 cm double-sided discs |
|||
|
(1 layer per side) |
|
|
|
|
(2) Compact discs (CD-DA, Video CD) |
|
||
|
12 cm discs, 8 cm discs |
|
|
|
S-Video output: |
Y output level: 1 Vp-p (75 Ω/ohms) |
C output level: 0.3 Vp-p |
||
|
Output connectors: S connectors, 1 set / AV 1 connector, 1 set |
|||
Video output: |
Output level: 1 Vp-p (75 Ω/ohms) |
|
||
|
Output connector: Pin-plug jacks, 1 set / AV 1 connector, 1 set |
|||
Component output: |
Y output level: 1 Vp-p (75 Ω/ohms) |
|
||
|
PB/CB output level: 0.7 Vp-p (75 Ω/ohms) |
PR/CR output level: 0.7 Vp-p (75 Ω/ohms) |
||
|
Output connector: Pin jack, 1 set |
|
||
RGB output: |
Output level: 0.7 Vp-p (75 Ω/ohms) |
|
||
|
Output connector: AV 1 connector, 1 set |
|
||
Audio output: |
Fixed output level: 2 Vrms, 1 set |
|
||
|
Output connector: Pin jack, 1 set / AV 1 connector, 1 set |
|||
Audio output properties: |
(1) Frequency response |
|
|
|
|
q DVDs (linear PCM) |
: |
2 Hz to 22 kHz (48 kHz sampling) |
|
|
|
: 2 Hz to 44 kHz (96 kHz sampling) |
||
|
w CDs |
: |
2 Hz to 20 kHz |
|
|
(2) S/N ratio |
|
|
|
|
q DVDs |
: |
115 dB |
|
|
w CDs |
: |
115 dB |
|
|
(3) Total harmonic distortion |
|
|
|
|
q DVDs |
: |
0.0018% |
|
|
w CDs |
: |
0.0018% |
|
|
(4) Dynamic range |
|
|
|
|
q DVDs |
: |
108 dB |
|
|
w CDs |
: |
100 dB |
|
Digital audio output: |
Optical digital output |
: |
Optical connector, 1 set |
|
|
Coaxial digital output |
: |
Pin jack, 1 set |
|
Power supply: |
AC 230 V, 50 Hz |
|
|
|
Power consumption: |
18 W |
|
|
|
Maximum external |
|
|
|
|
dimensions: |
434 (width) x 132 (height) x 339 (depth) mm |
(including protruding parts) |
||
Mass: |
6.5 kg |
|
|
|
2Remote control unit: |
RC-546 |
|
|
|
Type: |
Infrared pulse |
|
|
|
Power supply: |
DC 3 V, 2 R03/AAA batteries |
|
||
This product incorporates copyright protection technology that is protected by method claims of certain U.S. patents and other intellectual property rights owned by Macrovision Corporation and other rights owners. Use of this copyright protection technology must be authorized by Macrovision Corporation, and is intended for home and other limited viewing uses only unless otherwise authorized by Macrovision Corporation. Reverse engineering or disassembly is prohibited.
Design and specifications are subject to change without notice in the course of product improvement.
26
Loading...