


STEREO CASSETTE TAPE DECK
DRW-695
OPERATING INSTRUCTIONS BEDIENUNGSANLEITUNG MODE D’EMPLOI ISTRUZIONI PER L’USO
INSTRUCCIONES DE OPERACION GEBRUIKSAANWIJZING
BRUKSANVISNING INSTRUÇÕES DE OPERAÇÃO
B DOUBLE CASSETTE DECK DRW 695 |
EJECT |
EJECT |
|
|
|
|
|
H GH SPEED DUBB NG SYSTEM |
RESET |
RESET |
H GH SPEED DUBBING SYSTEM |
|
COUNTER |
COUNTER |
|
|
MEMORY |
MEMORY |
|
|
REMOTE SENSOR |
REC PAUSE |
|
|
|
PLAY |
PLAY |
|
|
|
|
|
REC REC MUTE |
AUTO REVERSE |
DOLBY NR |
|
|
AUTO REVERSE |
|
B OFF C |
|
D RECTION |
CD SYNCHRO |
|
DIRECTION |
|
||
|
MPX |
NORMAL |
H GH |
|
|
|
DUBB NG SPEED |
PHONES |
B AS F NE |
NPUT LEVEL |
||
¢ON £STANDBY |
O F |
|
|
|
|
|
|
|
T MER |
REV MODE |
|
|
|
|
|
|
|
|
|
- |
+ |
M N |
MAX |
FOR ENGLISH READERS |
PAGE |
2 |
~ 13 |
FÜR DEUTSCHE LESER |
SEITE |
2 |
~ 4, 14 ~ 22 |
POUR LES LECTEURS FRANCAIS |
PAGE |
2 |
~ 4, 23 ~ 31 |
PER IL LETTORE ITALIANO |
PAGINA 2 |
~ 4, 32 ~ 39 |
|
PARA LECTORES DE ESPAÑOL |
PAGINA 2 |
~ 4, 32, 40 ~ 46 |
VOOR NEDERLANDSTALIGE LEZERS |
PAGINA 2 |
~ 4, 32, 47 ~ 53 |
FÖR SVENSKA LÄSARE |
SIDA 2 |
~ 4, 32, 54 ~ 60 |
PARA LEITORES PORTUGUESES |
PÁGINA 2 |
~ 4, 32, 61 ~ 67 |

PORTUGUÊS SVENSKA NEDERLANDS ESPAÑOL ITALIANO FRANCAIS DEUTSCH ENGLISH
IMPORTANT TO SAFETY
WARNING:
TO PREVENT FIRE OR SHOCK HAZARD, DO NOT EXPOSE THIS APPLIANCE TO RAIN OR MOISTURE.
Please, record and retain the Model name and serial number of your
set shown on the rating label. |
|
Model No. DRW-695 |
Serial No. |
CAUTION:
•The ventilation should not be impeded by covering the ventilation openings with items, such as newspapers, tablecloths, curtains, etc.
•No naked flame sources, such as lighted candles, should be placed on the apparatus.
•Please be care the environmental aspects of battery disposal.
•The apparatus shall not be exposed to dripping or splashing for use.
•No objects filled with liquids, such as vases, shall be placed on the apparatus.
CAUTION
RISK OF ELECTRIC SHOCK
DO NOT OPEN
CAUTION:
TO REDUCE THE RISK OF ELECTRIC SHOCK, DO NOT REMOVE COVER (OR BACK). NO USER-SERVICEABLE PARTS INSIDE. REFER SERVICING TO QUALIFIED SERVICE PERSONNEL.
The lightning flash with arrowhead symbol, within an equilateral triangle, is intended to alert the user to the presence of uninsulated “dangerous voltage” within the product’s enclosure that may be of sufficient magnitude to constitute a risk of electric shock to persons.
The exclamation point within an equilateral triangle is intended to alert the user to the presence of important operating and maintenance (servicing) instructions in the literature accompanying the appliance.
• DECLARATION OF CONFORMITY |
• DECLARACIÓN DE CONFORMIDAD |
|
We declare under our sole responsibility that this product, to |
Declaramos bajo nuestra exclusiva responsabilidad que este |
|
which this declaration relates, is in conformity with the |
producto al que hace referencia esta declaración, está |
|
following standards: |
conforme con los siguientes estándares: |
|
EN60065, EN55013, EN55020, EN61000-3-2 and EN61000-3-3. |
EN60065, EN55013, EN55020, EN61000-3-2 y EN61000-3-3. |
|
Following the provisions of 73/23/EEC, 89/336/EEC and |
Siguiendo las provisiones de las Directivas 73/23/EEC, |
|
93/68/EEC Directive. |
89/336/EEC y 93/68/EEC. |
|
• ÜBEREINSTIMMUNGSERKLÄRUNG |
• EENVORMIGHEIDSVERKLARING |
|
Wir erklären unter unserer Verantwortung, daß dieses Produkt, |
Wij verklaren uitsluitend op onze verantwoordelijkheid dat dit |
|
auf das sich diese Erklärung bezieht, den folgenden Standards |
produkt, waarop deze verklaring betrekking heeft, in |
|
entspricht: |
overeenstemming is met de volgende normen: |
|
EN60065, EN55013, EN55020, EN61000-3-2 und EN61000-3-3. |
EN60065, EN55013, EN55020, EN61000-3-2 en EN61000-3-3. |
|
Entspricht den Verordnungen der Direktive 73/23/EEC, |
Volgens de bepalingen van de Richtlijnen 73/23/EEC, |
|
89/336/EEC und 93/68/EEC. |
89/336/EEC en 93/68/EEC. |
|
• DECLARATION DE CONFORMITE |
• ÖVERENSSTÄMMELSESINTYG |
|
Nous déclarons sous notre seule responsabilité que l’appareil, |
Härmed intygas helt på eget ansvar att denna produkt, vilken |
|
auquel se réfère cette déclaration, est conforme aux standards |
detta intyg avser, uppfyller följande standarder: |
|
suivants: |
EN60065, EN55013, EN55020, EN61000-3-2 och EN61000-3-3. |
|
EN60065, EN55013, EN55020, EN61000-3-2 et EN61000-3-3. |
Enligt stadgarna i direktiv 73/23/EEC, 89/336/EEC och |
|
D’après les dispositions de la Directive 73/23/EEC, 89/336/EEC |
93/68/EEC. |
|
et 93/68/EEC. |
• DECLARAÇÃO DE CONFORMIDADE |
|
• DICHIARAZIONE DI CONFORMITÀ |
||
Declaramos sob nossa exclusiva responsabilidade que este |
||
Dichiariamo con piena responsabilità che questo prodotto, al |
produto, ao qual esta declaração corresponde, está em |
|
quale la nostra dichiarazione si riferisce, è conforme alle |
conformidade com as seguintes normas: |
|
seguenti normative: |
EN60065, EN55013, EN55020, EN61000-3-2 e EN61000-3-3. |
|
EN60065, EN55013, EN55020, EN61000-3-2 e EN61000-3-3. |
De acordo com o estabelecido nas Directivas 73/23/EEC, |
|
In conformità con le condizioni delle direttive 73/23/EEC, |
89/336/EEC e 93/68/EEC. |
|
89/336/EEC e 93/68/EEC. |
|
|
|
|
2

ENGLISH DEUTSCH FRANCAIS ITALIANO ESPAÑOL NEDERLANDS SVENSKA PORTUGUÊS
FRONT PANEL |
PANEL FRONTAL |
|
|
|
FRONTPLATTE |
VOORPANEEL |
|
|
|
PANNEAU AVANT |
FRAMSIDA |
|
|
|
PANNELLO ANTERIORE |
PAINEL FRONTAL |
|
|
|
|
t |
w |
w t |
|
!2 !1 |
!4 e |
!7 |
e |
!1 !2 |
B DOUBLE C SSETTE DECK DRW 695 |
EJECT |
EJECT |
|
|
|
|
|
H GH SPEED D BB NG SYSTEM |
RESET |
RESET |
HIGH SPEED DUBBING SYSTEM |
|
COUNTER |
COUNTER |
|
|
MEMORY |
MEMORY |
|
|
REMOTE SENSOR |
REC PAUSE |
|
|
PLAY |
PLAY |
|
|
|
|
|
|
|
|
|
REC/REC MUTE |
AUTO REVERSE |
DOLBY NR |
|
|
|
|
|
|
AUTO REVERSE |
|
B OFF C |
|
|
|
|
DIRECTION |
|
CD SYNCHRO |
|
DIRECTION |
|
|
|
|
|||
|
MPX |
NORMAL |
H GH |
|
|
|
|
|
|
|
DUBB NG SPEED |
PHONES |
BIAS FINE |
NPUT LEVEL |
|||
|
¢ON £STANDBY |
REC OFF PLAY |
RELAY |
|
|
|
|
|
|
|
|
|
|
|
|
||
|
|
TIMER |
REV MODE |
|
|
|
|
|
|
|
|
|
|
- |
+ |
M N |
MAX |
y r |
u !3 |
!6 q |
!5 i o !0 !6 |
PRECAUTIONS FOR INSTALLATION
For heat dispersal, leave at least 10 cm of space between the top, back and sides of this unit and the wall or other components.
SICHERHEITSMASSNAHMEN BEIM EINBAU
Lassen Sie zur Wärmeverteilung mindestens 10 cm Raum zwischen der Oberseite, der Rückseite und den Seiten des Gerätes und der Wand oder anderen Komponenten.
PRECAUTIONS D’INSTALLATION
Afin de disperser la chaleur, laisser un espace d’au moins 10 cm entre le haut, l’arrière les côtés de cet appareil et le mur ou un autre composant.
PRECAUZIONI PER L’INSTALLAZIONE
Per consentire una buona dispersione del calore, lasciate uno spazio di almeno 10 cm tra le parti superiore, posteriore e laterali di quest’unità e le parete o gli altri componenti.
10cm or more
10cm oder mehr
10cm ou plus
10cm o più
PRECAUCIONES A TOMAR DURANTE LA INSTALACIÓN
Para que el calor se disipe, deje por lo menos 10 cm de espacio entre las partes superior, posterior y laterales de esta unidad y la pared u otros componentes.
VOORZORGSMAATREGELEN VOOR INSTALLATIE
Laat voor een goede warmteafvoer minstens 10 cm ruimte tussen de boven-, achteren zijkanten van dit toestel en de muur of andere elementen.
OBSERVERA VID INSTALLATIONEN
För god värmeavledning, bör du lämna ett utrymme på minst 10 cm ovanför, bakom och på sidorna av apparaten och väggen eller andra komponenter.
PRECAUÇÕES DE INSTALAÇÃO
Para a dissipação do calor, deixar pelo menos 10 cm de espaço entre o topo, a parte de trás e os lados desta unidade e a parede ou outros componentes.
10cm o más
10cm of meer
10cm eller mer
10cm ou mais
|
Wall |
|
Wand |
|
Mur |
B |
Parete |
|
Pared |
|
Muur |
|
Vägg |
|
Parede |
3
ENGLISH DEUTSCH FRANCAIS ITALIANO ESPAÑOL NEDERLANDS SVENSKA PORTUGUÊS
NOTE ON USE / HINWEISE ZUM GEBRAUCH / OBSERVATIONS RELATIVES A L’UTILISATION / NOTE SULL’USO / NOTAS SOBRE EL USO / ALVORENS TE GEBRUIKEN / OBSERVERA / OBSERVAÇÕES QUANTO AO USO
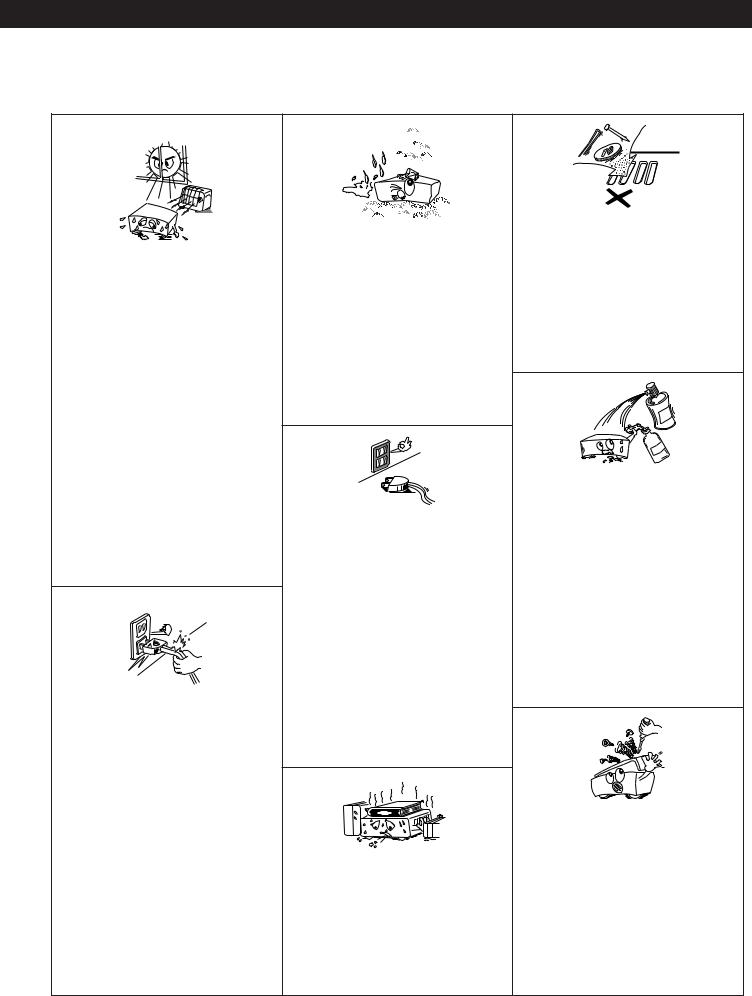
•Avoid high temperatures.
Allow for sufficient heat dispersion when installed on a rack.
•Vermeiden Sie hohe Temperaturen.
Beachten Sie, daß eine ausreichend Luftzirkulation gewährleistet wird, wenn das Gerät auf ein Regal gestellt wird.
•Eviter des températures élevées
Tenir compte d’une dispersion de chaleur suffisante lors de l’installation sur une étagère.
•Evitate di esporre l’unità a temperature alte. Assicuratevi che ci sia un’adeguata dispersione del calore quando installate l’unità in un mobile per componenti audio.
•Evite altas temperaturas.
Permite la suficiente dispersión del calor cuando está instalado en la consola.
•Vermijd hoge temperaturen.
Zorg voor een degelijk hitteafvoer indien het apparaat op een rek wordt geplaatst.
•Undvik höga temperaturer.
Se till att det finns möjlighet till god värmeavledning vid montering i ett rack.
•Evite temperaturas altas.
Conceda suficiente dispersão de calor quando o equipamento for instalado numa prateleira.
•Handle the power cord carefully.
Hold the plug when unplugging the cord.
•Gehen Sie vorsichtig mit dem Netzkabel um. Halten Sie das Kabel am Stecker, wenn Sie den Stecker herausziehen.
•Manipuler le cordon d’alimentation avec précaution.
Tenir la prise lors du débranchement du cordon.
•Manneggiate il filo di alimentazione con cura. Agite per la spina quando scollegate il cavo dalla presa.
•Maneje el cordón de energía con cuidado. Sostenga el enchufe cuando desconecte el cordón de energía.
•Hanteer het netsnoer voorzichtig.
Houd het snoer bij de stekker vast wanneer deze moet worden aanof losgekoppeld.
•Hantera nätkabeln varsamt.
Håll i kabeln när den kopplas från el-uttaget.
•Manuseie com cuidado o fio condutor de energia.
Segure a tomada ao desconectar o fio.
•Keep the set free from moisture, water, and dust.
•Halten Sie das Gerät von Feuchtigkeit, Wasser und Staub fern.
•Protéger l’appareil contre l’humidité, l’eau et la poussière.
•Tenete l’unità lontana dall’umidità, dall’acqua e dalla polvere.
•Mantenga el equipo libre de humedad, agua y polvo.
•Laat geen vochtigheid, water of stof in het apparaat binnendringen.
•Utsätt inte apparaten för fukt, vatten och damm.
•Mantenha o aparelho livre de qualquer umidade, água ou poeira.
•Unplug the power cord when not using the set for long periods of time.
•Wenn das Gerät eine längere Zeit nicht verwendet werden soll, trennen Sie das Netzkabel vom Netzstecker.
•Débrancher le cordon d’alimentation lorsque l’appareil n’est pas utilisé pendant de longues périodes.
•Disinnestate il filo di alimentazione quando avete l’intenzione di non usare il filo di alimentazione per un lungo periodo di tempo.
•Desconecte el cordón de energía cuando no utilice el equipo por mucho tiempo.
•Neem altijd het netsnoer uit het stopkontakt wanneer het apparaat gedurende een lange periode niet wordt gebruikt.
•Koppla ur nätkabeln om apparaten inte kommer att användas i lång tid.
•Desligue o fio condutor de força quando o aparelho não tiver que ser usado por um longo período.
(For sets with ventilation holes)
•Do not obstruct the ventilation holes.
•Die Belüftungsöffnungen dürfen nicht verdeckt werden.
•Ne pas obstruer les trous d’aération.
•Non coprite i fori di ventilazione.
•No obstruya los orificios de ventilación.
•De ventilatieopeningen mogen niet worden beblokkeerd.
•Täpp inte till ventilationsöppningarna.
•Não obstrua os orifícios de ventilação.
•Do not let foreign objects in the set.
•Keine fremden Gegenstände in das Gerät kommen lassen.
•Ne pas laisser des objets étrangers dans l’appareil.
•E’ importante che nessun oggetto è inserito all’interno dell’unità.
•No deje objetos extraños dentro del equipo.
•Laat geen vreemde voorwerpen in dit apparaat vallen.
•Se till att främmande föremål inte tränger in i apparaten.
•Não deixe objetos estranhos no aparelho.
•Do not let insecticides, benzene, and thinner come in contact with the set.
•Lassen Sie das Gerät nicht mit Insektiziden, Benzin oder Verdünnungsmitteln in Berührung kommen.
•Ne pas mettre en contact des insecticides, du benzène et un diluant avec l’appareil.
•Assicuratevvi che l’unità non venga in contatto con insetticidi, benzolo o solventi.
•No permita el contacto de insecticidas, gasolina y diluyentes con el equipo.
•Laat geen insektenverdelgende middelen, benzine of verfverdunner met dit apparaat in kontakt komen.
•Se till att inte insektsmedel på spraybruk, bensen och thinner kommer i kontakt med apparatens hölje.
•Não permita que inseticidas, benzina e dissolvente entrem em contacto com o aparelho.
•Never disassemble or modify the set in any way.
•Versuchen Sie niemals das Gerät auseinander zu nehmen oder auf jegliche Art zu verändern.
•Ne jamais démonter ou modifier l’appareil d’une manière ou d’une autre.
•Non smontate mai, nè modificate l’unità in nessun modo.
•Nunca desarme o modifique el equipo de ninguna manera.
•Nooit dit apparaat demonteren of op andere wijze modifiëren.
•Ta inte isär apparaten och försök inte bygga om den.
•Nunca desmonte ou modifique o aparelho de alguma forma.
4

Thank you very much for purchasing the DENON component stereo cassette tape deck.
DENON proudly presents this advanced tape deck to audiophiles and music lovers as a further proof of DENON's non-compromising pursuit of the ultimate in sound quality. The high quality performance and easy operation are certain to provide you with many hours of outstanding listening pleasure.
— TABLE OF CONTENTS — |
|
FEATURES .……………………………………………………………………………5 |
|
CONNECTION ...………………………………………………………………………5 |
|
NAMES AND FUNCTIONS OF PARTS..…………………………………………6, 7 |
|
CASSETTE TAPES ……………………………………………………………………7 |
|
AUTOMATIC TAPE SELECTION ........................................................................ |
7 |
PLAYBACK .……………………………………………………………………………8 |
|
RELAY PLAY .....................………………………………………………………8 |
|
MUSIC SEARCH SYSTEM ...……………………………………………………8 |
|
RECORDING………………………………………………………………………9 |
|
PROPER RECORDING LEVEL ...................................................................... |
9 |
RECORDING BIAS ADJUSTMENT ............................................................... |
9 |
REC/REC MUTE AND REC PAUSE BUTTON .............................................. |
9 |
DIMMER ADJUSTMENT ............................................................................. |
9 |
DUBBING.....…………………………………………………………………………10 |
|
SYNCHRONIZED RECORDING FUNCTION .................................................... |
10 |
TAPE COUNTER AND MEMORY STOP .......................................................... |
11 |
TIMER RECORDING/PLAYBACK ..................................................................... |
11 |
DOLBY B AND C NOISE REDUCTION SYSTEM ............................................. |
12 |
DOLBY HX-PRO HEADROOM EXTENSION SYSTEM .................................... |
12 |
MAINTENANCE ............................................................................................... |
12 |
TROUBLESHOOTING ...................................................................................... |
13 |
SPECIFICATIONS ............................................................................................ |
13 |
ENGLISH
Please check to make sure the following items are included with the main unit in the carton:
(1) |
Operating Instructions |
...........................................................................1 |
(2) |
Connection Cords .................................................................................. |
2 |
(3) |
Mini-Plug Cable ...................................................................................... |
1 |
(4) |
Service Station List ................................................................................. |
1 |
FEATURES
2Computer Controlled Mechanism
2Dual Power Supply
2Dolby HX-Pro Headroom Extension System
2Dolby B & C Noise Reduction Systems
2Manual Bias Adjustment Control
2Dual Computing Tape Counter with 4-Digit Readout and Memory Stop
2Music Search System
2FL Peak Level Meters
2Auto Tape Selector
22-Speed Dubbing
2Relay Playback
2Synchronized Recording
2Timer Play and Timer Recording
2Optional Remote Controllable
2Tape Lighting
CONNECTION
• Leave your entire system (including this cassette deck) turned off until all connections between the deck and other components have been completed.
|
Receiver or amplifier |
DRW-695 |
|
WHITE |
PB REC |
WHITE |
|
L |
|
L |
|
R |
|
R |
WHITE |
LINE |
WHITE |
|
|
|
|
|
|||
RED |
TAPE 1 |
RED |
OUT IN |
|
||
|
|
|
||||
|
L |
|
L |
|
||
|
|
|
L |
|
||
|
|
|
R |
R |
R |
|
|
|
|
LINE L NE |
|
||
|
|
|
|
OUT N |
RED |
SYNCHRO |
|
|
|
RED |
|
|
|
This jack is for the synchronized recording function only.
Do not plug in microphones, headphones nor other plugs.
2Connecting the Deck to an Amplifier
•Before connecting the deck to your amplifier, please review your amplifier's instruction manual.
•Use the white plugs for the left channel and red plugs for the right channel.
2Tape Dubbing
•Many stereo amplifiers and receivers have tape dubbing circuitry so that tape duplication can be performed between two or more tape decks. Review your amplifier's instruction manual for a full explanation of this mode of operation.
2Connecting Headphones
To listen through headphones, plug your headphones into the PHONES jack.
Power plug |
|
AC 230 V 50 Hz |
Power cord |
(Plug into a power outlet) |
(for U.K. model) |
2Installation Precautions
If the deck is placed near an amplifier, TV or tuner, noise (induced hum) or beat interference may result, especially during FM or AM reception. If this occurs, place the deck further away from other components or reorient its position.
Caution:
A mechanical sound is heard the first time the power switch is set to “ON” after the power cord is plugged into an outlet. This is the sound of the cassette mechanism being set to the proper operating state, and is normal. (When using an AC outlet on a receiver or amplifier, used an “UNSWITCHED” outlet.)
5

ENGLISH
NAMES AND FUNCTIONS OF PARTS
qPower Operation Switch (¢ ON £ STANDBY)
•Press this once to turn the cassette deck’s power on. Press again to set the cassette deck to the standby mode.
•The deck remains in a stand-by (non-operative) mode for approximately 2 seconds after it is switched on.
Caution:
Whenever the Power Operation switch is in the STANDBY state, the apparatus is still connected on AC line voltage.
Please be sure to unplug the cord when you leave home for, say, a vacation.
iDubbing Speed Buttons (DUBBING SPEED)
•Pressing the NORMAL button starts regular speed dubbing from deck A to deck B. Press the HIGH button to perform dubbing at double speed. See page 10.
o Bias Fine Control (BIAS FINE)
(For Normal, CrO2 and Metal tape)
•Use this control to fine-adjust the bias. Standard bias is obtained at the center click-stop position. See page 9.
!0 Input Level Control (INPUT LEVEL)
•This knob adjusts the recording input level. It affects the level in both channels. See page 9.
wEject Button ( 5 )
•Press this button to open the cassette compartment cover. When the tape is running, press the STOP ( 2 ) button first to stop tape transport, then press the Eject button.
eCounter Reset Button (COUNTER RESET)
• Press this button to reset the tape counter to zero.
rMPX Filter Button (MPX)
•The MPX FILTER button should be used to prevent interference with the Dolby NR circuit when making Dolby NR encoded recordings of FM stereo programs.
•When making Dolby NR encoded recordings from any program source other than FM stereo, leave this button in the “OFF” position.
tCounter Memory Button (MEMORY)
•When this button is pressed during forward tape travel (  ), fast rewinding ( 6 ) will stop automatically at the tape counter position “‚‚‚‚”.
•When this button is pressed during reverse tape travel (  ), fast forwarding ( 7 ) will stop automatically at the tape counter position “ ‚‚‚‚ ”. See page 11.
yDolby NR Switch (DOLBY NR)
•To record or playback tapes with Dolby B or C-type noise reduction, set this switch to “B” or “C”. Turn it “OFF” when not using the Dolby NR system.
uReverse Mode Switch (REV. MODE)
• Select the type of tape transport. The reverse mode can be set to
 (one side),
  (continuous playback), RELAY (relay playback).
!6 Tape Transport Buttons
!1 Tape Lighting
•The tape lighting makes it possible to clearly check the amount of tape remaining.
!2 Cassette Compartment Cover
•If the cover is not closed completely, the tape transport buttons will remain inoperative.
!3 Headphone Jack (PHONES)
•For private music enjoyment without disturbing others, or for monitoring a recording, a headphone set may be connected to this
jack. Use a headphone with an impedance rating of 8 to 1200 Ω/ohms.
!4 Remote Sensor (REMOTE SENSOR)
•With DRW-695 the remote control unit is not included.
•Each of “PLAY, FF, REW, STOP, REC PAUSE and REC/REC MUTE” functions can be remote controlled with wireless handset of the receiver (DRA Series receivers). For details refer to the DRA Series operating instructions.
NOTE:
Note that only the A deck can be operated with remote control units which have no A/B selector button.
!5 Timer Switch (TIMER)
•This switch is provided for use with an optional audio timer for unattended recording or morning-alarm playback.
•For non-timer operation, this switch should be set in the “OFF” position. See page 11.
PLAY |
Play Button |
Press to playback tape. |
|
|
|
|
|
2 |
Stop Button |
Press to stop the tape in any mode. |
|
|
|
|
|
6 |
Fast Rewind Button |
Press for fast rewind. |
|
|
|
|
|
7 |
Fast Forward Button |
Press for fast forwarding. |
|
|
|
|
|
4 |
Rec/Rec Mute |
Press the REC/REC MUTE ( 4 ) button and PLAY button simultaneously to start recording. If only |
|
the REC/REC MUTE ( 4 ) button is pressed, the deck enters the Recording Pause mode. Pressing |
|||
REC/REC MUTE |
|||
Button |
this button in the Recording Pause mode will start Auto Rec Mute, and a 5-second silent space is |
||
(Deck B only) |
|||
|
recorded onto the tape. See page 9. |
||
|
|
||
|
|
|
|
3 |
|
Press this button to enter the recording pause mode from the recording or recording mute mode. |
|
REC PAUSE |
Rec Pause Button |
||
This button can only be used during recording. See page 9. |
|||
(Deck B only) |
|
||
|
|
||
|
|
|
|
0 1 |
Direction Button |
Changes the tape transport direction from forward “1” to reverse “0” and vice versa. |
|
|
|
|
6

!7 Display
Indicators with an encircled number light up when the corresponding button is pressed.
|
|
|
|
Deck A Tape Transport Indicators |
|
|
|
|
|
|||||||||||
|
|
|
|
|
|
|
|
|
Peak Level Meter |
|
|
|
|
|
||||||
|
|
|
|
|
|
|
|
|
Indicates the recording and playback signal |
|||||||||||
|
|
|
|
|
|
|
|
|
levels for the left and right channels. |
|
|
|||||||||
|
|
|
|
|
|
|
|
|
|
|
|
|||||||||
dB |
-40 -30 -20 |
-10 -5 |
-3 -1 |
0 +1 +3 +5 +10 |
|
|
||||||||||||||
L |
|
|
|
|
|
|
|
|
|
|
|
|
|
|
|
|
|
|
|
|
|
|
|
|
|
|
|
|
|
|
|
|
|
||||||||
R |
|
|
|
|
|
|
|
|
HIGH |
|
|
|
|
|
|
|
|
|||
|
|
|
|
|
|
|
|
|||||||||||||
|
|
|
|
|
|
|
|
|||||||||||||
|
|
|
|
|
|
|
|
|
|
|
|
|
|
|
|
|
|
|||
|
|
|
|
|
|
|
|
|
|
|
|
|
|
|
|
|
|
|||
|
|
|
|
|
|
|
|
|
|
|
|
|
|
|
||||||
|
|
|
|
|
|
|
|
|
|
|
|
|
|
|
|
|
|
|||
MEMO |
DUB |
|
|
|
|
|
|
|
|
|||||||||||
|
|
|
|
|
|
|
|
|||||||||||||
|
MPX |
|
|
SYNC |
|
|
|
MEMO |
|
|||||||||||
|
|
|
|
|
|
|
Deck A Tape Counter |
|
|
|
|
Deck B Tape Counter |
||||||||
|
|
|
|
|
|
|
|
|||||||||||||
|
|
|
|
|
|
MPX Filter Indicator |
|
|
|
|
|
|
Dubbing Speed Indicators |
|||||||
|
|
|
|
|
|
|
|
|
|
|
|
|||||||||
|
|
|
Remote Control Indicator |
|
|
|
|
|
Synchro Rec Indicator (See page 10 ) |
|||||||||||
|
|
|
|
|
|
|
|
|||||||||||||
Deck A Memory Indicator |
|
|
|
|
|
|
|
|
|
|
|
|||||||||
ENGLISH
Deck B Tape Transport Indicators
Deck B Memory Indicator
CASSETTE TAPES
2 Handling Precautions
•C-120 and C-150 tapes
C-120 and C-150 cassette tapes use extremely thin tape that can easily get caught in the capstan or pinch roller. Do not use such cassette tapes.
•Tape Slack
Before putting a tape into the deck, take up any slack with a pencil or your finger tip. This precaution prevents the tape from becoming entangled around the capstan or pinch roller.
A
2 Storage Precautions
•Do not store cassette tapes in a place where they will be subject to:
•Extremely high temperature or excessive moisture
•Excessive dust
•Direct sunlight
•Magnetic fields (near TV sets or speakers)
•To eliminate tape slack, store your cassettes in cassette cases with hub
stops
2 Accidental Erasure Prevention
•All cassettes have erasure prevention tabs for each side. To protect valuable recordings from accidental or inadvertent erasure, remove the tab for the appropriate side with a screwdriver or another tool.
•To record on a tape whose erasure prevention tabs have been removed, cover the tab holes with adhesive tape.
Side A
Erasure prevention tab for side A
Erasure prevention tab for side B
AUTOMATIC TAPE SELECTION
This Stereo Cassette Deck contains an automatic tape selector which automatically selects the optimum bias and equalization for the tape in use. This is accomplished by detection of the tape type detections holes in the cassette housing.
•If a tape without tape type detection holes is used, the deck will be set for normal tapes.
Detection holes
for metal tape
Detection holes for chrome tape
7
ENGLISH
PLAYBACK
•The operations described below apply to deck A and deck B alike.
•Switch on your amplifier or receiver.
•Set the Tape Monitor switch on your amplifier or receiver to the TAPE position.
•The numbers in the illustration below depict the order in which operation steps are carried out.
q Press the POWER switch q to the ON ( ¢ ) position.
w Press the EJECT ( 5 ) button w to open the cassette compartment cover
!2.
e Load the cassette tape and close the cassette compartment cover !2.
rWhen listening to a tape that has been recorded with Dolby noise reduction, set the DOLBY NR switch y to match the system used at the
time of recording.
DOLBY NR
B OFF C
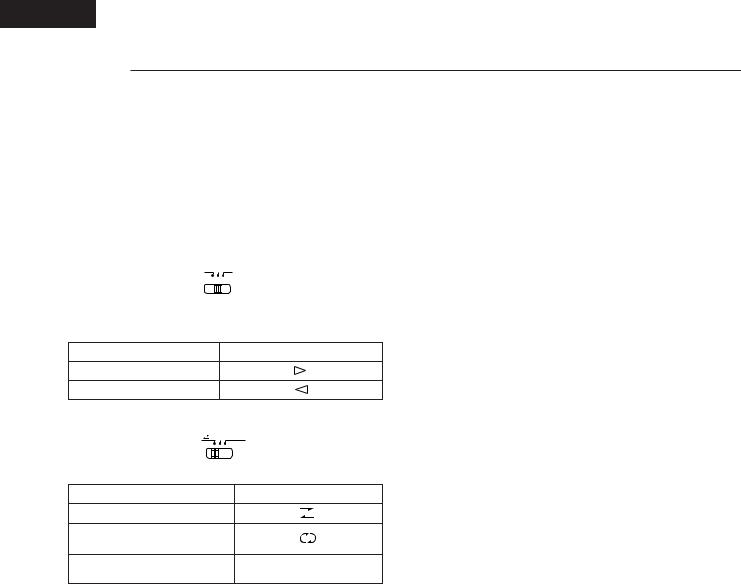
tPress the Direction ( 0 1 ) button !6to select the direction of tape transport.
Transport Direction |
Indicator |
Forward
Reverse
y Select the type of tape transport with the REVERSE MODE switch u.
 RELAY
RELAY
REV. MODE
Mode |
Switch position |
To listen to one side only
To listen to repeat playback of both sides
To listen to continuous play back of
RELAY
both sides and both decks.
u Press the PLAY button !6to begin playback.
iPress the stop ( 2 ) button !6to stop the playback.
•In the continuous playback mode (REVERSE MODE set to  ), playback of both tape sides will be repeated 5 times and then stop
automatically.
•If different types of Dolby noise reduction are used for record and playback, playback response will be adversely effected.
•When power is turned off during tape transport, it may not be possible to remove the cassette by pressing the EJECT ( 5 ) button. In this case, turn on power again before you press the EJECT ( 5 ) button.
2RELAY PLAY (continuous playback of the tapes in deck A and deck B)
•Load a cassette tape into deck A and B, and set the Dolby NR button correctly.
q REVERSE MODE set to “RELAY” u.
w Press the PLAY button !6of the deck you first wish to listen to.
eTo stop relay play, press the stop ( 2 ) button !6of the deck currently playing the tape.
•Relay play will play decks A and B in succession for 5 cycles, upon which playback stops. When playback starts from deck B, when switching to deck A. the first deck A playback cycle will be counted as the second cycle. The completion of 5 cycles will always be at the opposite side of the tape in deck B.
2 MUSIC SEARCH SYSTEM
The music search system detects blank sections (lasting for at least 4 seconds) between selections in order to locate the beginning of selections in the forward or reverse direction.
1.To advance from the current selection to the beginning of the next selection (CUE):
Press the PLAY button, keep it pressed in, and press the Fast Forward ( 7 ) button when the tape is travelling in the forward (  ) direction.
Press the PLAY button, keep it pressed in, and press the Fast Rewind ( 6 ) button when the tape is travelling in the reverse (  ) direction.
The tape transport indicator flashes.
The deck will skip the rest of the current selection and automatically resume play from the beginning of the next selection.
2.To repeat playback from the beginning of the current selection (REVIEW): Press the PLAY button, keep it pressed in, and press the Fast Rewind ( 6 ) button when the tape is travelling in the forward (  ) direction.
Press the PLAY button, keep it pressed in, and press the Fast Forward ( 7 ) button when the tape is travelling in the reverse (  ) direction.
The tape transport indicator flashes.
The deck will rewind the tape to the beginning of the current selection and automatically resume play from that point.
This is very convenient for repeating playback of the current selection.
Notes on Music Search Operation:
The search functions operates by detecting comparatively long, blank sections approximately 4 to 5 seconds long, in between recorded selections. Therefore, the system may not operate normally in the following cases:
•Recordings with discontinuous speech or conversation.
•Recordings with long periods of pianissimo (softly played music).
•Recordings with long silences.
•Blank sections with a high level of noise.
•Blank sections shorter than 4 seconds.
•If noise-emitting appliances, such as electric razors, drills, refrigerators, etc., are operated nearby.
•REV close to the beginning of the program or CUE close to the ending.
8

RECORDING (DECK B only)
•Switch on your amplifier or receiver and the source component.
•Set the Tape Monitor switch on your amplifier or receiver to the SOURCE position.
q Press the POWER switch q to the ON ( ¢ ) position.
wLoad the cassette tape w, !2.
(Check that the erasure prevention tabs of the cassette housing have not been broken off.)
eMove the DOLBY NR switch y and select the Dolby NR type that suits the recording.
DOLBY NR
B OFF C
r Press the Direction ( 0 1 ) button !6to select the direction of tape transport.
t Select the type of tape transport with the REVERSE MODE button u.
Mode |
Switch position |
To record on only one side
To continuously record
or RELAY
on both sides
yPress the REC/REC MUTE ( 4 ) button !6to set the recording pause mode. The 4 3 indicator will light up.
uAdjust the recording level with the INPUT LEVEL control !0while watching the Peak Level Meter.
iPress the PLAY button !6to start the recording.
The PLAY (  or
or  ) and the 4 indicator will light during recording.
oTo pause the recording, press the REC PAUSE ( 3 ) button !6, Press the PLAY button !6to resume recording.
!0 To stop recording, press the stop ( 2 ) button !6.
Caution:
•Be sure to press the stop ( 2 ) button to stop recording before turning off the power or unplugging the power supply cord.
•Be careful not to erase important recordings by mistake. Inadvertent start of recording will happen in the following cases:
1.If the PLAY button is pressed while the 4 indicator lights, recording starts.
2.If the PLAY and REC/REC MUTE ( 4 ) button are pressed at the same time, recording starts.
The best way to avoid accidental erasure is to break off the two erasure prevention tabs on the cassette housing.
2PROPER RECORDING LEVEL
A too high recording level can saturate the tape and cause distortion. On the other hand, if the recording level is set too low, soft passages will be marked by residual noise. A proper recording level is the single most important factor for making well balanced recordings.
Guideline for maximum recording level
TYPE I (Normal) |
0 dB level on peaks |
|
|
TYPE II (CrO2) |
+1 dB level on peaks |
|
|
TYPE IV (Metal) |
+3 dB level on peaks |
|
|
Note: The optimum recording level differs depending on the program source and the type of tape used.
ENGLISH
2RECORDING BIAS ADJUSTMENT
For best recording results, monitoring during recording and comparing different recordings using your own judgement are essential.
The DRW-695 is equipped with a BIAS FINE control to assist you in setting the proper bias for different types and brands of tape. At the center stopclick position, the deck is set to the reference bias level for Normal, CrO2 and Metal tape. If the resulting recording in this position has too much or too little high frequency content, adjusting the BIAS FINE control can be useful to achieve better results.
BIAS FINE
- + 
If the high frequencies (treble sounds) are to be boosted, turn the BIAS FINE control counter-clockwise to decrease the bias current. Turn the control clockwise to increase bias current.
By the use of this control, you can record tapes with a frequency response that will perfectly match your listening taste.
|
Counterclockwise |
LEVEL (dB) |
|
|
|
OUTPUT |
Clockwise |
|
|
|
|
|
FREQUENCY (Hz) |
2 REC/REC MUTE AND REC PAUSE Button
1.To record a 5-second blank section during recording:
Press the REC/REC MUTE ( 4 ) button. A 5-second blank will recorded and the deck will enter the recording be standby mode.
2.To record a 5-second blank section during the recording standby mode: Press the REC/REC MUTE ( 4 ) button from the recording standby mode. A 5 second blank will be recorded and the deck will enter the recording standby mode again.
3.To cancel recording of blank space:
Press the REC PAUSE ( 3 ) button. Blank space recording will be cancelled and the deck enters the recording standby mode.
4.To extend the blank section with another 5 seconds or more:
Simply press the REC/REC MUTE ( 4 ) button and the blank section will be increased with another 5 seconds.
2 DIMMER ADJUSTMENT
With the DRW-695, the brightness of the display can be adjusted in seven steps.
To make the display brighter, press the B deck’s fast forward ( 7 ) button while holding in the B deck’s STOP button.
To make the display dimmer, press the fast rewind ( 6 ) button while holding in the STOP button.
The display is initially set to the maximum brightness.
9

ENGLISH
DUBBING (from deck A to deck B)
•Switch on the amplifier or receiver.
•Set the Tape Monitor switch on your amplifier or receiver to the TAPE position.
q Press the POWER switch q to the ON ( ¢ ) position.
w Load the cassette tape to be played in deck A and the one to be recorded in deck B w, !2.
e Select the type of tape transport with the REVERSE MODE switch u.
|
|
|
|
RELAY |
|
|
|
REV. MODE |
|||
|
|
|
|
|
|
Reverse mode |
|
|
|
|
Operation |
|
|
||||
|
Dubbing is performed only for one side. |
||||
|
The decks stop when either deck A or B reaches the |
||||
|
end of the tape. |
||||
|
|
||||
|
The tape direction is reversed on each deck when they |
||||
|
reach the end of the tape. |
||||
|
(This is convenient for dubbing to a tape with a |
||||
|
different length.) |
||||
During dubbing of the side facing you, the deck that first reaches the end of the tape will stand by until the other deck reaches the end of the tape, then both
RELAY
decks will reverse the tape direction together. (Depending on the manufacturer, the length of tapes having the same recording time may differ somewhat. Setting this mode permits the arrangement of the beginning portion of the opposite side of the tape.)
rTo begin normal speed dubbing, press the DUBBING SPEED NORMAL button i. The DUB indicator will light at this time.
To high speed dubbing, press the DUBBING SPEED HIGH button i. The HIGH indicator will light at this time.
t To stop dubbing, press the stop ( 2 ) button !6of deck A or deck B.
•When deck A is in the playback mode and deck B is in the stop condition, setting deck B to the recording pause mode will engage the normal speed dubbing pause mode. Dubbing is then started by pressing the PLAY button.
•When dubbing, the recording level and the Dolby NR recording will be the same as those of the playback tape, regardless of the positions of the INPUT LEVEL control and the DOLBY NR button.
•When listening to the playback sound during normal speed dubbing, the DOLBY NR switch remains off even if it is pressed.
•The playback sound cannot be heard during high speed dubbing.
•Operation using the REC/REC MUTE ( 4 ) and REC PAUSE ( 3 ) buttons of deck B is permitted during normal speed dubbing.
•Buttons other than the stop ( 2 ) button cannot be used during high speed dubbing.
SYNCHRONIZED RECORDING FUNCTION
•Convenient synchronized recording can be performed when used in combination with a DENON CD player equipped for the synchronized recording function.
•SYNCHRO Jack Connection Connect the SYNCHRO Jack with a DENON CD player which is equipped with a SYNCHRO jack, then make a synchronized recording. Use the connection cord supplied with this cassette deck.
•Switch on your amplifier or receiver and the CD player.
•Set the tape Monitor switch on your amplifier or receiver to the source position.
qLoad the tape onto which you want to record into deck B, the disc you want to record into the CD player.
wFollowing the recording instructions on page 9, set the Dolby NR mode, the direction, the reverse mode and the input level.
e Set the CD player to the stop or pause mode.
rPress the REC/REC MUTE ( 4 ) button and REC PAUSE ( 3 ) button simultaneously. The cassette deck and CD player are automatically set to the synchronized recording mode. The “SYNC” indicator lights on the cassette deck and the synchronized recording mode is indicated on the CD
player.
(For details, refer to the CD player’s operating instructions.)
tTo stop synchronized recording, press the stop button on deck B and stop button on CD.
The synchronized recording mode is cancelled for both the cassette deck
and CD player.
yTo stop synchronized recording temporarily, press the stop button on the CD player. A 5-second blank space is created on the tape, after which the recording pause mode is set. The “SYNC” indicator flashes.
To resume synchronized recording, press the PLAY button on the CD player.
CD PLAYER
LINE OUT |
SYNCHRO |
|
|
|
|
R |
L |
|
DRW-695 |
Power supply outlet |
|
|
L |
|
|
R |
|
|
LINE LINE |
SYNCHRO |
|
OUT IN |
|
Notes:
•If synchronized recording is started when the CD player is in a mode other than the stop or pause mode or when no disc is set, the “SYNC” indicator on the cassette deck flashes and the recording pause mode is set until synchronized recording is possible on the CD player.
•In the synchronized recording mode, only the STOP button on deck B will function.
Caution:
•Do not set the cassette deck to the synchronized recording mode when the CD player is in the play mode. Also, do not turn off the power of the cassette deck or the CD player during synchronized recording. Doing so can result in malfunction.
•During the editing operation, when using the editing functions on the CD player, be sure to select a tape with a sufficiently long recording time.
For the CD player’s editing functions, refer to the CD player’s operating instructions.
10
ENGLISH
TAPE COUNTER AND MEMORY STOP
|
dB -40 -30 -20 -10 |
-5 -3 -1 |
0 +1 +3 +5 +10 |
|
|
L |
|
|
|
RESET |
R |
|
|
RESET |
COUNTER |
|
HIGH |
|
COUNTER |
|
MEMO |
DUB |
|
|
MEMORY |
MPX |
SYNC |
MEMO |
MEMORY |
|
|
|
|
REC PAUSE |
|
PLAY |
|
PLAY |
|
|
|
|
|
REC/REC MUTE |
|
DIRECTION |
|
DIRECTION |
CD SYNCHRO |
1)Operation of the Tape Counter
(1)Press the RESET button to reset the counter to “ ‚‚‚‚ ”.
(2)By using the PLAY, FF, or REW functions, the reading of the counter will change to indicate index position.
•During recording and playback operations, the counter is useful for noting the location of existing programs or positions where recording is to be started.
•The reading of this counter does not correspond with that of any other deck.
(3) Deck A and Deck B have the memory of their own counter.
2)MEMORY STOP Operation
(1)During recording or playback, the Memory Stop feature can be used to locate a particular point on the tape. Press the COUNTER RESET button at the desired point.
(2)Then Press the COUNTER MEMORY button, the MEMO indicator lights.
(3)When the Fast Rewind ( 6 ) button is pressed during forward tape travel (  ), or the Fast Forward ( 7 ) button is pressed during reverse tape travel (
  ), the tape is rapidly rewound (or advanced) until the counter indication of “ ‚‚‚‚ ” is reached.
•The Memory Stop feature will rewind or forward the tape to within –5 counts in the forward (  ) direction (from “ ‚‚‚‚ ” to “

 ”) and to within +5 counts in the reverse (
  ) direction (from “ ‚‚‚‚ ” to “ ‚‚‚fi”). After this, several seconds are required for corrective
operations.
•The Memory Stop function operates independently in both directions for deck A and deck B.
Caution:
If the memory stop operation is performed after repeated fast-forwarding or rewinding, the tape may not stop at the proper position.
TIMER RECORDING/PLAYBACK
Timer recording/playback can be made using any audio timer available on the market.
DRW-695
|
LINE |
|
|
OUT IN |
|
L |
L |
L |
R |
R |
R |
|
L NE L NE |
SYNCHRO |
|
OUT N |
Amplifier
|
|
|
|
|
Tuner |
L |
TUNER |
PB REC |
L |
R |
L |
L |
L |
A |
|
||
|
|
SP |
|
||
R |
R |
R |
R |
B |
|
|
L |
TAPE 1 |
|
|
OUT PUT |
|
|
|
|
|
L |
|
R |
|
|
|
R |
|
|
|
|
|
Lch |
Rch |
On timer recording/playback |
Speaker System |
|
• |
Timer recording procedure |
2. |
Turn “on” the power switch of each appliance. |
|
|
|
|
|
|
|||||||
1. |
Make sure the connections are correct, especially the power supply |
3. |
Load the pre-recorded tape to be played back. |
|
|
|
|
|
|
|||||||
|
connections. |
4. |
Set the Dolby NR switches to the appropriate positions. |
|
|
|
|
|
|
|||||||
2. |
Turn “on” the power switch of each appliance. |
5. |
Select the type of tape transport with the REVERSE MODE switch u. |
|||||||||||||
3. |
Tune the desired station on the tuner. |
6. |
Set the monitor switch of the Amplifier to the TAPE position. |
|
|
|
|
|
|
|||||||
4. |
Load the tape for recording. (Make sure the erase prevention tab is not |
7. |
Press the PLAY ( 1 ) button and playback the tape; adjust the playback |
|||||||||||||
|
broken off; if it is, cover the hole with plastic tape). |
|
level. |
|
|
|
|
|
|
|||||||
5. |
Set the Dolby NR switch to the appropriate position. |
|
Press the stop ( 2 ) button. |
|
|
|
|
|
|
|||||||
6. |
Select the type of tape transport with the REVERSE MODE switch u. |
8. |
Set the timer switch (TIMER) to the “PLAY” side. |
REC OFF PLAY |
||||||||||||
|
|
|
|
|
|
|||||||||||
7. |
Make sure the monitor switch to the SOURCE position. |
|
|
|
|
|
|
|
|
|||||||
8. |
Adjust the recording input level. |
|
|
TIMER |
||||||||||||
9. |
Set the starting position of the tape. |
|
|
|||||||||||||
|
|
|
|
|
|
|
|
|||||||||
10. Set the timer switch (TIMER) to the “REC” side. |
REC OFF PLAY |
|
|
|
|
|
|
|
|
|||||||
|
|
|
|
|
|
9. Set the audio timer to the desired time. The audio timer will turn the power |
||||||||||
|
|
|
|
|
|
|
|
|||||||||
|
|
|
TIMER |
|
supply on at the desired time. |
|
|
|
|
|
|
|||||
|
|
|
|
|
|
|
|
|
|
|
||||||
|
|
|
|
|
|
|
|
|
* With the above procedures, timer playback can be accomplished. |
|||||||
|
|
|
|
|
|
|
|
|
||||||||
11. Set the audio timer to the desired time. The audio timer will turn the power |
|
When the preset time comes, the power is supplied and playback will |
||||||||||||||
|
start. |
|
|
|
|
|
|
|||||||||
|
supply on at the desired time. |
|
|
|
|
|
|
|
||||||||
|
|
|
|
|
|
|
|
|
||||||||
|
* With the above procedures, timer controlled recording can be made. |
Notes: |
|
|
|
|
|
|
||||||||
|
When the preset time comes, the power is supplied and the FM |
|
|
|
|
|
|
|||||||||
|
• Please read the operating instructions for the timer before use. |
|
|
|
|
|
|
|||||||||
|
broadcast can be recorded. |
|
|
|
|
|
|
|||||||||
|
• If the timer recording or playback is not desired, be sure to switch the timer |
|||||||||||||||
|
|
|
|
|
|
|
|
|||||||||
• |
Timer playback procedure |
|
switch (TIMER) to “OFF”. |
|
|
|
|
|
|
|||||||
• |
When using timers that allow several “on/off” operations, timer start |
|||||||||||||||
1. |
Make sure the connections are correct, especially the power supply |
|||||||||||||||
|
functioning can continue an unlimited number of times until the tape in the |
|||||||||||||||
|
|
|
|
|
|
|
|
|
||||||||
connections. |
machine is finished. |
|
11

ENGLISH
DOLBY B AND C NOISE REDUCTION SYSTEM
2The Dolby noise reduction system substantially reduces the tape background noise (hiss) inherent in the cassette medium. Dolby B NR is most widely in use. However Dolby C NR is a much more recent development and represents significant improvements over Dolby B NR.
2Tape background noise consists primarily of high frequency information, which is particularly annoying during soft passages. The Dolby NR system increases the level of low volume midand high-frequency signals during recording and reduces the level of these signals by an identical amount during playback. As a result, the playback signal is identical to the original source, but the level of background noise generated by the tape is greatly reduced.
2The operating principle of Dolby C NR is similar to that of Dolby B NR except for the encoding/decoding response curves. The noise reduction effect obtained with Dolby C NR is up to 20 dB, compared to 10 dB with Dolby B NR. In addition, Dolby C NR uses an anti-saturation network and spectral skewing circuitry for a significant improvement in the dynamic range of the midto high-frequencies.
DOLBY HX-PRO HEADROOM EXTENSION SYSTEM
This deck is equipped with the Dolby HX-PRO headroom extension system. Since the system functions automatically during recording, no switching operation or adjustment is required. The system is effective with any type of Normal, CrO2 and Metal tape.
The Dolby HX-PRO headroom extension system functions during recording to raise the saturation level in the treble range. Therefore, most of the treble range components distorted or lost during recording on conventional cassette decks are more faithfully recorded on the new DENON cassette deck.
Features of the Dolby HX-PRO Headroom Extension System
(1)Performance of Normal and CrO2 tapes can be improved to very close of that offered by Metal tape.
(2)The dynamics in the treble range are improved significantly.
(3)Since no decoding is necessary during playback, the improved sound can be enjoyed on any type of tape deck, including portable players and car audio systems.
(4)The system functions whether the Dolby B/C NR system is engaged or not.
MAINTENANCE
2Head Cleaning
After long usage, tape coating or dust may adhere to the heads, causing deterioration of sound. Therefore, the parts depicted in the illustration should be cleaned regularly. Use a cotton swab moistened with a tape head cleaning solution (such as alcohol).
Notes:
1.Some cleaning cassettes on the market have strong abrasive effects and may scratch the heads. Always use cotton swabs instead of cleaning cassettes.
2.Since the use of metal tape is apt to collect more dust on the heads, the heads should be cleaned more often to enjoy the best possible sound.
2Cleaning the Pinch Rollers and Capstans
If the pinch rollers or capstans accumulate dust, tape transport may become unstable, as a result from slippage, during recording or playback. The tape can also be damaged if it gets entangled in the capstan.
Clean these parts with a cotton swab or a soft cloth moistened with a tape head cleaning solution (such as alcohol).
2Demagnetizing the Heads
The heads will become magnetized after long usage or if strongly magnetized objects are brought near them. The result is a generation of noise, loss of the high frequency range, and in extreme cases erasure of treble components on pre-recorded tapes in combination with added noise. Thus, the heads should be demagnetized at regular intervals. (Head demagnetizers are separately available from your dealer.)
2How to Demagnetize the Tape Heads
1.Turn off the power.
2.Turn on the demagnetizer while it is at least 30 cm away from the heads. Bring the demagnetizer near the heads and slowly move it in small circles four or five times in front of each head, making sure you do not touch them.
3.Slowly move the demagnetizer away and turn it off when it is at least 30 cm away from the heads.
12

ENGLISH
TROUBLESHOOTING
Check the following before you draw the conclusion that your Stereo Cassette Deck is malfunctioning.
1.Are all the connections correct?
2.Are all system components being operated correctly in accordance with the operating instructions?
3.Are the speakers and amplifier/receiver functioning correctly?
If the tape deck still does not function properly, check the symptom against the list below. If the symptom does not correspond to the check list, please contact your DENON dealer.
Problem |
|
Cause |
|
Remedy |
|
|
|
|
|||
|
• Power cord is disconnected. |
• Check power cord. |
|||
Tape does not run |
• |
Tape is loose. |
• |
Tighten tape with a pencil, etc. |
|
• |
Cassette is not loaded properly. |
• |
Load cassette properly. |
||
|
|||||
|
• Defective cassette. |
• Replace cassette. |
|||
|
|
|
|||
Tape is not recorded when REC/REC MUTE (4) |
• No cassette is loaded. |
• Load cassette. |
|||
button is pressed. |
• Erase prevention tabs are broken off. |
• Cover holes with adhesive tape. |
|||
|
|
|
|
|
|
|
• |
Heads, capstan or pinch roller are dirty. |
• |
Clean them. |
|
Sound is warbled and distorted. |
• Tape is wound too tight. |
• Fast forward or rewind to loosen tape winding. |
|||
• |
Recording input level is too high. |
• |
Adjust recording input level. |
||
|
|||||
|
• Tape is worn out and has “drop-outs”. |
• Replace tape. |
|||
|
|
|
|||
|
• Tape is worn. |
• Replace them. |
|||
Excessive noise |
• |
Heads, capstan or pinch roller are dirty. |
• |
Clean them. |
|
• Heads are magnetized. |
• Demagnetize heads. |
||||
|
|||||
|
• |
Recording input level is too low. |
• |
Adjust recording input level. |
|
|
|
|
|||
High frequency range (treble) is emphasized. |
• Dolby NR switch is set improperly. |
• Set Dolby NR Switch properly. |
|||
|
|
|
|||
High frequency range (treble) is lost. |
• Heads are dirty. |
• Clean them. |
|||
• Tape is worn. |
• Replace tape. |
||||
|
|||||
|
|
|
|||
|
• If the POWER switch is turned off either during |
• Turn the POWER switch ON ( ¢ ) again, and then |
|||
|
|
recording or playback and the unit is stopped, |
|
press the STOP ( 2 ) button. |
|
The cassette tape cannot be removed. |
|
there may be cases when the cassette cannot be |
• Now, press the EJECT ( 5 ) button to remove the |
||
|
|
removed, even if the EJECT ( 5 ) button is |
|
cassette tape. |
|
|
|
pressed. |
|
|
|
|
|
|
|
|
|
SPECIFICATIONS
Type |
Vertical tape loading; 4-track 2-channel |
Input |
|
|
stereo double cassette deck |
LINE |
80 mV (–20 dBm) input level at maximum |
Heads |
Play back head x 1 recording/playback head x 1 |
|
Input impedance: 50 kΩ /kohms unbalanced |
|
Erase head (Double-gap ferrite) x 1 |
Output |
|
Motors |
DC servo motor x 2 |
LINE |
775 mV (0 dB) output level at maximum |
Tape Speed |
4.8 cm/sec. |
|
(with 47 kΩ /kohms load, recorded level of |
Fast Forward, |
|
|
200 pwb/mm) |
Rewind Time |
Approx. 110 sec. with a C-60 cassette |
PHONES |
1.2 mW output level at maximum |
Recording Bias |
Approx 105 kHz |
|
(optimum load impedance 8 Ω /ohms ~ 1.2 kΩ/kohms |
Overall S/N Ratio |
|
Power Supply |
50 Hz, voltage is shown on rating label |
(at 3% THD level) |
Dolby C NR on: more than 74 dB (CCIR/ARM) |
Power Consumption |
14 W |
Overall Frequency |
|
Dimensions |
434 (W) x 135 (H) x 263 (D) mm |
Response |
20 ~ 17,000 Hz ±3 dB (at –20 dB, Metal tape) |
Weight |
4.0 kg |
Channel Separation |
More than 40 dB (at 1 kHz) |
|
|
Wow & Flutter |
0.08% WRMS, ±0.14% w. peak |
|
|
* Above specifications and design are subject to change without prior notice.
Manufactured under license from Dolby Laboratories.
HX Pro headroom extension originated by Bang and Olufsen.
“Dolby”, “HX Pro”, and the double-D symbol are trademarks of Dolby Laboratories.
13

DEUTSCH
Wir danken Ihnen für den Kauf des DENON Stereo-Cassettendecks.
Voller Stolz präsentiert DENON allen Audiofans und Musikliebhabern dieses fortschrittliche Cassettendeck, das ein weiterer Beweis für das kompromißlose Streben von DENON nach vollkommener Klangqualität ist. Aufgrund der hochqualitativen Leistungsfähigkeit und der leichten Bedienung dieses Gerätes werden Sie beim Zuhören viele Stunden lang Ihre Freude haben.
Überprüfen Sie, daß die nachstehend aufgeführten Teile im Karton des Hauptgerätes enthalten sind:
(1) |
Bedienungsanleitung ............................................................................. |
1 |
(2) |
Anschlußkabel ........................................................................................ |
2 |
(3) |
Mini Steckerkabel .................................................................................. |
1 |
(4) |
Servicestation-Liste................................................................................. |
1 |
— INHALT — |
|
MERKMALE.…………………………………………………………………………14 |
|
ANSCHLUSS ...………………………………………………………………………14 |
|
BEZEICHNUNGEN DER TEILEN UND |
|
IHRE FUNKTIONEN ..........................…………………………………………15, 16 |
|
CASSETTENBÄNDER ………………………………………………………………16 |
|
AUTOMATISCHER BANDSORTENWÄHLER ................................................. |
16 |
WIEDERGABE.………………………………………………………………………17 |
|
FOLGE-WIEDERGABE ...………………………………………………………17 |
|
TITELSUCHLAUF-SYSTEM ……………………………………………………17 |
|
AUFNAHME ....………………………………………………………………………18 |
|
RICHTIGER AUFNAHMEPEGEL ................................................................ |
18 |
EINSTELLUNG DER AUFNAHME- |
|
VORMAGNETISIERUNG............................................................................. |
18 |
AUFNAHME/AUFNAHMESTUMMSCHALTUNG |
|
UND AUFNAHME PAUSETASTE ............................................................... |
18 |
DIMMER-EINSTELLUNG ........................................................................... |
18 |
ÜBERSPIELEN ………………………………………………………………………19 |
|
SYNCHRONISIERTE AUFNAHMEFUNKTION ................................................ |
19 |
BANDZÄHLWERK UND SPEICHERSTOPP .................................................... |
20 |
ZEITGESCHALTETE AUFNAHME / WIEDERGABE ........................................ |
20 |
DOLBY B UND C RAUSCHUNTERDRÜCKUNGSSYSTEM ............................. |
21 |
DOLBY HX-PRO SYSTEM ZUR ERWEITERUNG DES |
|
AUSSTEUERUNGSMARGINALS ..................................................................... |
21 |
WARTUNG ....................................................................................................... |
21 |
FEHLERSUCHE ............................................................................................... |
22 |
TECHNISCHE DATEN ...................................................................................... |
22 |
MERKMALE
2Computergesteuerter Mechanismus
2Duale Stromversorgung
2Dolby HX-Pro Aussteuerungssystem
2Dolby B und C Rauschunterdrückungssystem
2Steuerung der manuellen Vormagnetisierungseinstellung
2Doppel-Computerzählwerk mit 4-stelliger Anzeige und Speicherstopp
2Titelsuchlauf
2FL Spitzenpegelmesser
2Automatischer Bandsortenwähler
2Überspielen mit 2 Geschwindigkeiten
2Folge Wiedergabe
2Synchronaufnahme
2Timer-Wiedergabe und Timer-Aufnahme
2Auf Wunsch mit Fernsteuerung
2Bandbeleuchtung
ANSCHLUSS
•Lassen Sie Ihr gesamtes System (einschließlich dieses Cassettendeck) so lange ausgeschaltet, bis alle Anschlüsse zwischen dem Cassettendeck und den anderen Komponenten vorgenommen worden sind.
Empfänger oder Verstärker |
DRW-695 |
||
WEISS |
PB REC |
WEISS |
|
L |
|
L |
|
R |
|
R |
WEISS |
LINE |
WEISS |
|
|
|
|
|
|||
ROT |
TAPE 1 |
ROT |
OUT IN |
|
||
|
|
|
||||
|
L |
|
L |
|
||
|
|
|
L |
|
||
|
|
|
R |
R |
R |
|
|
|
|
LINE L NE |
|
||
|
|
|
|
OUT N |
ROT |
SYNCHRO |
|
|
|
ROT |
|
|
|
Diese Buchse ist ausschließlich für Synchronaufuahmen vorgesehen.
Schließen Sie weder Mikrophonoder Kopfhörer-noch andere Stecker an diese Buchse an.
Netzstecker |
|
230V AC 50 Hz (In eine |
Netzkabel |
Netzsteckdose einstecken) |
(für Modelle für Großbritannien) |
2Anschluß des Cassettendecks an den Verstärker
•Sehen Sie sich vor dem Anschluß des Cassettendecks an Ihren Verstärker noch einmal die Bedienungsanleitung für den Verstärker an.
•Verwenden Sie die weißen Stecker für den linken und die roten Stecker für den rechten Kanal.
2Überspielen von Cassettenbändern
•Viele Stereo-Verstärker und Empfänger sind mit einer Schaltung zum Bandüberspielen ausgestattet, so daß ein Überspielen zwischen zwei oder mehreren Cassettendecks möglich ist. Beziehen Sie sich für weitere Erläuterungen über diese Betriebsart auf die Bedienungsanleitung für Ihren Verstärker.
2Anschluß von Kopfhörern
Schließen Sie den Stecker Ihrer Kopfhörer an diese PHONES-Buchse an, wenn Sie sich Musik über Kopfhörer anhören möchten.
2Vorsichtsmaßnahmen bei der Aufstellung
Wenn das Cassettendeck in der Nähe eines Verstärkers, TV oder Tuners aufgestellt wird, können Geräusche (induziertes Netzbrummen) oder Interferenzen – besonders beim UKW-/MW-Empfang – die Folge sein. Stellen Sie das Cassettendeck in einem derartigen Fall weiter entfernt von anderen Komponenten auf oder verändern Sie die Position des Cassettendecks.
Vorsicht:
Wenn der Netzschalter zum ersten Mal auf “ON” geschaltet wird, nachdem das Stromkabel an einer Steckdose angeschlossen wurde, ist ein mechanisches Geräusch zu hören. Dieses Geräusch ist normal. Es entsteht, wenn der Cassettenmechanismus in den richtigen Betriebszustand geschaltet wird.
(Bei Verwendung einer Wechselstromsteckdose an einem Receiver oder Verstärker wird eine ungeschaltete Steckdose (“UNSWITCHED”) benutzt).
14

DEUTSCH
BEZEICHNUNGEN DER TEILEN UND IHRE FUNKTIONEN
qNetzschalter (¢ ON £ STANDBY)
•Diese Taste drücken, um das Cassettendeck einzuschalten, dann erneut drücken, um das Cassettendeck in den Standby-Modus einzustellen.
•Das Cassettendeck bleibt für ca. 2 Sekunden, nach dem es eingeschaltet wurde, in Bereitschaftsposition.
Vorsicht:
Auch wenn der Netzschalter auf “STANDBY” steht, bleibt das Gerät an den Wechselstromkreis angeschlossen.
Wenn Sie z. B. auf Urlaub gehen, achten Sie bitte darauf, daß das Netzkabel gezogen wird.
iGeschwindigkeitstasten für das Überspielen (DUBBING SPEED)
•Wenn Sie die NORMAL-Taste drücken, beginnt das Überspielen mit normaler Geschwindigkeit von Cassettendeck A auf Cassettendeck B. Wenn Sie die HIGH-Taste (Schnell) drücken, wird bei doppelter Geschwindigkeit überspielt. Sehen Sie Seite 19.
o Regler für die Feineinstellung der Vormagnetisierung (BIAS FINE)
(Für normale, Chromoder Metall-Cassettenbänder)
•Nehmen Sie mit diesem Regler die Feineinstellung der Vormagnetisierung vor. In der Mittelposition ist die StandardVormagnetisierung erreicht. Sehen Sie Seite 18.
wAuswurftaste ( 5 )
•Drücken Sie diese Taste, um den Cassettenfachdeckel zu öffnen. Wenn das Cassettenband läuft, drücken Sie zunächst die Stopptaste ( 2 ), um den Bandtransport zu stoppen, und betätigen Sie dann die Auswurftaste.
eBandzählwerk-Rückstelltaste (COUNTER RESET)
•Drücken Sie diese Taste, um das Bandzählwerk auf null zurückzustellen.
rMPX filter-Taste (MPX)
•Den MPX-Taste verwendet man, um bei Aufnahme von UKWStereoprogrammen Interferenz durch die Dolby Rauschverminde- rungs-Schaltung mit aktivierter Dolby-NR-Funktion zu verhindern.
•In allen anderen Fällen von Aufnahmen mit Dolby-NR-Funktion außer bei der Aufnahme von UKW-Sterosendungen läßt man den Taste in der “OFF” Stellung.
tZählwerk-Speichertaste (MEMORY)
•Wenn diese Taste während des Bandlaufes in Vorlaufrichtung (  ) gedrückt wird, stoppt der Schnell-Rücklauf ( 6 ) automatisch, wenn das Bandzählwerk die Position “‚‚‚‚” erreicht hat.
•Wenn diese Taste während des Bandlaufes in Rücklaufrichtung (  ) gedrückt wird, stoppt der Schnell-Vorlauf ( 7 ) automatisch, wenn das Bandzählwerk die Position “ ‚‚‚‚ ” erreicht hat. Sehen Sie Seite 20.
yDolby NR-Schalter (DOLBY NR)
•Stellen Sie diesen Schalter für die Aufnahme oder Wiedergabe von Bändern, die mit dem Dolby-Rauschunterdrückungssystem B oder C aufgenommenen worden sind, auf “B” oder “C”.
uReverse-Modus-Schalter (REV. MODE)
•Wählen Sie die Bandtransportart aus. Die Reverse-betriebsart kann auf  (eine Seite),
  (Dauerwiedergabe), RELAY (Relay Play) geschaltet werden.
!0 Eingangspegel-Regler (INPUT LEVEL)
•Stellen Sie mit diesem Regler den Eingangspegel ein. Der Pegel beider Kanäle wird gleichermaßen von der Einstellung beeinflußt. Sehen Sie Seite 18.
!1 Bandbeleuchtung
•Durch die Bandbeleuchtung kann genau überprüft werden, wieviel Band noch verbleibt.
!2 Cassettenfachdeckel
•Wenn der Cassettenfachdeckel nicht vollständig geschlossen ist, sind die Bandlauftasten nicht bedienbar.
!3 Kopfhörerbuchse (PHONES)
•Für das Genießen von Musik, ohne dabei andere zu stören oder für das Mitanhören einer Aufnahme, kann an diese Buchse ein Paar
Kopfhörer angeschlossen werden. Verwenden Sie Kopfhörer mit einer Nennimpedanz won 8 bis 1200 Ω/Ohm.
!4 FERNBEDIENUNGSSENSOR
•Die Fernbedienung gehört nicht zum Lieferumfang de DRW-695.
•Über den drahtlosen Handapparat des Receivers (der DRA-Serie) können die Funktionen “PLAY, FF, REW, STOP, REC PAUSE und REC/REC MUTE” ferngesteuert werden. Nähere Einzelheiten können Sie in den Bedienungsanleitungen für die DRA-Seriengeräte nachlesen.
HINWEIS:
Beachten Sie, daß ausschließlich das A Deck mit Fernbedienungsgeräten ohne A/B Wahltaste ferngesteuert werden kann.
!5 Timer-Schalter (TIMER)
•Dieser Schalter ermöglicht zeitgeschalteten Betrieb für unbeaufsichtigte Aufnahme und Musikwecken.
•Außer für zeitgeschalteten Betrieb sollte der Schalter in Stellung OFF belassen werden. Sehen Sie Seite 20.
!6 Bandlauftasten
PLAY |
Wiedergabetaste (PLAY) |
Für die Wiedergabe drücken. |
|
|
|
|
|
2 |
Stopptaste (STOP) |
Zum Stoppen des Cassettenbandes in jeder Betriebsart drücken. |
|
|
|
|
|
6 |
Schnellrücklauftaste (REW) |
Für den Schnell-Rücklauf drücken. |
|
|
|
|
|
7 |
Schnellvorlauftaste (FF) |
Für den Schnellvorlauf drücken. |
|
|
|
|
|
|
|
Drücken Sie für den Aufnahmebeginn die Aufnahme-/Aufnahmestummschalt-Taste (REC/REC |
|
4 |
Aufnahme-/Stummschalttaste |
MUTE) ( 4 ) und die Wiedergabetaste gleichzeitig. Wenn Sie nur die Aufnahme-/Aufnahme- |
|
Stummschalt-Taste (REC/REC MUTE) ( 4 ) drücken, setzt sich das Gerät in die Aufnahme- |
|||
REC/REC MUTE |
|||
(RECORD/MUTE) |
Pausenbetriebsart. Wenn Sie diese Taste aus der Aufnahme-Pausenbetriebsart heraus drücken, |
||
(nur cassetten deck B) |
|||
|
beginnt die automatische Aufnahme-Stummschaltung und eine Leerstelle von 5 Sekunden wird auf |
||
|
|
||
|
|
das Cassettenband mit aufgenommen. Sehen Sie Seite 18. |
|
|
|
|
|
3 |
Aufnahme-/Pausentaste |
Drücken Sie diese Taste, um die Aufnahme-Pausenbetriebsart von der Aufnahmeoder Aufnahme- |
|
REC PAUSE |
/Stummschaltbetriesart zu erreichen. Diese Taste kann nur während der Aufnahme betätigt werden. |
||
(REC/PAUSE) |
|||
(nur cassetten deck B) |
Sehen Sie Seite 18. |
||
|
|||
|
|
|
|
0 1 |
Richtungstaste |
Ändert die Bandlaufrichtung von Vorlauf “1” zu Rücklauf “0”, und umgekehrt. |
|
|
|
|
15

DEUTSCH
!7 Anzeige
Wenn die entsprechende Taste gedrückt wird, leuchten eingekreiste Nummern auf der Anzeige auf.
Bandlaufrichtungsanzeigen für Deck A
Spitzenpegelmesser
Zeigt die Aufnahmeoder Wiedergabesignalpegel für die linken und rechten Kanäle an.
dB -40 -30 -20 -10 -5 -3 -1 0 +1 +3 +5 +10 L 


R
|
HIGH |
|
MEMO |
DUB |
|
MPX |
SYNC |
MEMO |
Deck A Bandzählwerk |
Deck B Bandzählwerk |
|
MPX-Fitter-Anzeige |
|
Überspielgeschwindigkeits-Anzeigen |
Fernbedienungsanzeige |
|
Anzeige für Synchron-Aufnahme, siehe Seite 19. |
Deck A Speicheranzeige |
|
|
Bandlaufrichtungsanzeigen für Deck B
Deck B Speicheranzeige
CASSETTENBÄNDER
2 Vorsichtsmaßnahmen für die Handhabung von Cassettenbändern
•C-120 und C-150 Cassettenbänder
C-120 und C-150-Cassetten haben ein sehr dünnes Band, das sich leicht um die Tonwellen und die Andruckrollen wickeln kann. Wir raten daher von der Benutzung solcher C-120 und C-150-Cassetten ab.
•Bandschlaufen
Beseitigen Sie vor dem Einlegen eines Cassettenbandes alle Bandschlaufen mit einem Bleistift oder Ihrer Fingerspitze. Dadurch wird verhindert, daß sich das Band um die Tonwelle oder die Andruckrolle wickelt.
A
AUTOMATISCHER BANDSORTENWÄHLER
Dieses Stereo-Cassettendeck beinhaltet einen automatischen Bandsortenwähler, der automatisch die optimale Vormagnetisierung und Entzerrung für das zur Anwendung kommende Cassettenband auswählt. Dies wird durch die Erkennung der sich im Cassettengehäuse befindlichen Erkennungsöffnungen ermöglicht.
2 Vorsichtsmaßnahme für die Aufbewahrung von Cassettenbänder
•Bewahren Sie Cassettenbänder nicht an Orten auf, an denen Sie folgendem ausgesetzt sind:
•Extrem hoher Temperatur oder extremer Feuchtigkeit
•Außergewöhnlich viel Staub
•Direktem Sonnenlicht
•Magnetfeldern (in der Nähe von Fernsehgeräten oder Lautsprechern)
•Bewahren Sie Cassetten zur Vorbeugung von Bandschlaufen in Cassettenhüllen mit Spulstopps auf.
2 Schutz vor versehentlichem Löschen
•Alle Cassetten haben für jede Seite Löschschutzlaschen. Um wertvolle Aufnahmen vor versehentlichem oder irrtümlichem Löschen zu schützen, entfernen Sie die Lasche für die entsprechende Seite mit einem Schraubenzieher oder einem anderen Werkzeug.
•Um auf ein Cassettenband aufnehmen zu können, dessen Löschschutzlaschen herausgebrochen sind, überkleben Sie die durch das Herausbrechen entstandenen Öffnungen mit Klebeband.
Seite A
Löschschutzlasche für Seite A
Löschschutzlasche für Seite B
•Wenn eine Cassette ohne Erkennungsöffnungen zur Anwendung kommt, wird das Cassettendeck für die Verwendung herkömmlicher Cassettenbänder eingestellt.
Erkennungsöffnungen |
|
für Metall- |
|
Cassettenbänder |
Erkennungsöffnungen für |
|
|
|
Chrom-Cassettenbänder |
16

DEUTSCH
WIEDERGABE
•Die nachfolgend beschriebenen Bedienungen beziehen sich sowohl auf das Cassettendeck A als auch auf das Cassettendeck B.
•Schalten Sie Ihren Verstärker oder Empfänger ein.
•Stellen Sie den Cassettenband-Überwachungsschalter Ihres Verstärkers oder Empfängers auf die Position TAPE.
•Die in der nachfolgenden Abbildung zeigen die Reihenfolge auf, in der die Bedienungsschritte ausgeführt werden.
q Drucken Sie den Netzschalter q auf die Position ON ( ¢ ).
w Drücken Sie die Auswurftaste (EJECT) ( 5 ) w, um den Cassettenfachdeckel !2zu öffnen.
e Legen Sie das Cassettenband ein und schließen Sie den Cassettenfachdeckel !2.
r Stellen Sie den DOLBY NR-Schalter y beim Anhören von Cassettenbändern auf die gleiche Position wie bei der Aufnahme des Bandes.
DOLBY NR
B OFF C
tDrücken Sie die Richtungstaste ( 0 1 ) !6, um die Bandlaufrichtung auszuwählen.
Bandlaufrichtung |
Anzeige |
Vorwärts
Rückwärts
yWählen Sie die Bandlaufrichtung mit dem Reverse-Modus-Schalter (REVERSE MODE) u aus.
 RELAY
RELAY
REV. MODE
Betriebsart |
Schalterposition |
Zum Anhören von nur einer Seite
Für die wiederholte Wiedergabe beider Seiten
Für die fortlanfende Wiedergabe
RELAY
beider Seiten und beider Decks
uDrücken Sie die Wiedergabetaste PLAY !6, um mit der Wiedergabe zu beginnen.
iDrücken Sie die Stopptaste ( 2 ) !6, um die Wiedergabe zu unterbrechen.
•Im Dauerwiedergabebetrieb (REVERSE MODE ist auf  gestellt), wird die Wiedergabe beider Bandseiten 5 Mal wiederholt und
anschließend automatisch gestoppt.
•Wenn für die Aufnahme und Wiedergabe verschiedene DolbyRauschunterdrückungssysteme verwendet werden, so wirkt sich dies negativ auf die Wiedergabe aus.
•Wenn der Netzanschluß während dem Bandtransport abgeschaltet wird, kann es passieren, daß es nicht möglich ist. die Cassette durch Betätigen der Auswurftaste (EJECT) ( 5 ) zu entfernen. Schalten Sie den Netzanschluß in diesem Falle wieder ein, bevor die Auswurftaste ( 5 ) gedrückt wird.
2FOLGE-WIEDERGABE (fortlaufende Wiedergabe der in Cassettendeck A und B eingelegten Cassettenbänder)
•Legen Sie sowohl in das Cassettendeck A als auch in das Cassettendeck B ein Cassettenband ein und stellen Sie den Dolby NR-Taste auf die richtige Position.
q Einstellung der REVERSE-Betriebsart auf “RELAY” u.
w Drücken Sie die Wiedergabetaste !6des Cassettendecks, dem Sie zuerst zuhören möchten.
eUm die Folge-Wiedergabe zu stoppen, drücken Sie die Stopptaste (STOP) ( 2 ) !6des gegenwärtig wiedergebenen Cassettendecks.
•Wird die Folge-Wiedergabe aktiviert, so werden die in Cassettendeck A und B eingelegten Cassettenbänder fünfmal nacheinander wiedergegeben. Danach stoppt dann die Wiedergabe. Wenn die Wiedergabe vom Cassettendeck B aus beginnt, so wird beim Schalten auf Cassettendeck A die erste Wiedergabe des in Deck A eingelegten Cassettenbandes als zweite Wiedergabe gezählt. Die fünfmalige Wiedergabe endet immer auf der entgegengesetzten Seite des in Cassettendeck B eingelegten Cassettenbandes.
2 TITELSUCHLAUF-SYSTEM
Das Musiksuchsystem erkennt leere Abschnitte (von mindestens 4 Sekunden Länge) zwischen ausgewählten Titeln, um den Beginn ausgewählter Titel beim Vorbeziehungsweise Rücklauf ausfindig zu machen.
1.Um von dem aktuellen Titel zum Anfang des nächsten zu springen (CUE): Drücken Sie die Wiedergabe-Taste (PLAY), halten Sie die Taste gedrückt
und drücken Sie die Schnellvorlauf-Taste ( 7 ), wenn sich das Band vorwärts (  ) bewegt.
Drücken Sie die Wiedergabe-Taste (PLAY), halten Sie die Taste gedrückt und
drücken Sie die Schnellrücklauf-Taste ( 6 ), wenn sich das Band rückwärts (  ) bewegt.
Die Cassetten-Transportanzeige blinkt.
Das Deck überspringt den Rest des aktuellen Ti tels und setzt die Wiedergabe automatisch am Anfang des nächsten Titels fort.
2.Um die Wiedergabe vom Anfang des aktuellen Titels zu wiederholen: Drücken Sie die Wiedergabe-Taste (PLAY), halten Sie die Taste gedrückt und
drücken Sie die Schnellrücklauf-Taste ( 6 ), wenn sich das Band vorwärts (  ) bewegt.
Drücken Sie die Wiedergabe-Taste (PLAY), halten Sie die Taste gedrückt
und drücken Sie die Schnellvorlauf-Taste ( 7 ), wenn sich das Band rückwärts (  ) bewegt.
Die Cassetten-Transportanzeige blinkt.
Das Deck spult das Band an den Anfang des aktuellen Titels zurück und setzt die Wiedergabe automatisch fort.
Das ist sehr vorteilhaft für die wiederholte Wiedergabe des aktuellen Titels.
Hinweise zum Titelsuchlauf
Die Suchlauf-Funktion arbeitet, indem vergleichsweise lange Leerstellen – von ca. 4 bis 5 Sekunden Länge – zwischen den einzelnen Musiktitetn erkannt werden. Daher arbeitet das System gegebenenfalls unter folgenden Umständen nicht ordnungsgemäß:
•Bei Aufnahmen mit sprachlichen Unterbrechungen oder Gesprächen.
•Aufnahmen mit langanhaltenden Klavierpassagen (sanft gespielte Musik).
•Aufnahmen mit langen Ruhepausen.
•Leerstellen mit einem hohen Geräuschpegel.
•Leerstellen sind kürzer als 4 Sekunden.
•Wenn sich in der Nähe dieses Gerätes geräuscherzeugende Einrichtungen wie elektrische Rasierer, Bohrmaschinen. Kühltruhen usw. befinden.
•Schneller Rücklauf mit Ton (REV) kurz nach Anfang des Programms oder schneller Vorlauf mit Ton (CUE) kurz vor Ende des Programms.
17

DEUTSCH
AUFNAHME (nur Deck B)
•Schalten Sie Ihren Verstarker oder Empfänger sowie die EingangsquellenKomponente ein.
•Stellen Sie den Cassettenband-Überwachungsschalter Ihres Verstärkers oder Empfängers auf die Position SOURCE.
q Drücken Sie den Netzschalter q auf die Position ON ( ¢ ).
wLegen Sie ein Cassettenband ein w, !2.
(Überprüfen Sie, daß die Löschschutzlaschen des Cassettengehäuses nicht herausgebrochen sind.)
eStellen Sie den DOLBY NR-Schalter y auf die für die Aufnahme geeignete Position.
DOLBY NR
B OFF C
r Drücken Sie die Richtungstaste ( 0 1 ) !6, um die Bandlaufrichtung auszuwählen.
tWählen Sie die Bandlaufrichtung mit dem Reverse-Modus-Schalter (REVERSE MODE) u aus.
Betriebsart |
Schalterposition |
Aufnahme auf nur eine Seite
Fortlaufende Aufnahme auf
oder RELAY
beide Seiten
yDrücken Sie die Aufnahme- /Aufnahme-Stummschalttaste (REC/REC MUTE) ( 4 ) !6, um das Gerät in Pausenbetriebsart zu setzen. Die 4 3-
Anzeige leuchtet auf.
uStellen Sie den Aufnahmepegel mit dem Eingangspegelregler (INPUT LEVEL) !0ein, während Sie sich den Spitzenpegelmesser betrachten.
iDrücken Sie die Wiedergabetaste !6, um mit der Aufnahme zu beginnen. Die Wiedergabeanzeige (PLAY) (  oder
oder  ) und die 4-Anzeige leuchten während der Aufnahme.
oDrücken Sie die Aufnahme-Pausentaste (REC PAUSE) ( 3 ) !6, um die
Aufnahme zeitweilig zu unterbrechen. Drücken Sie die Wiedergabetaste !6, um die Aufnahme fortzusetzen.
!0 Drücken Sie die STOP-Taste ( 2 ) !6, um die Aufnahme abzubrechen.
Vorsicht:
•Drücken Sie unbedingt die Stopptaste ( 2 ), um die Aufnahme zu stoppen, bevor die Stromversorgung ausgeschaltet oder das Netzkabel abgezogen wird.
•Achten Sie darauf, daß Sie keine wichtigen Aufnahmen aus Versehen löschen. Eine unbeabsichtigte Aufnahme findet unter nachfolgend aufgeführten Umständen statt:
1.Wenn die Wiedergabetaste gedrückt wird, während die 4-Anzeige leuchtet.
2.Wenn gleichzeitig die Wiedergabetaste und die Aufnahme- /Aufnahme-
Stummschalttaste (REC/REC MUTE) ( 4 ) gedrückt werden.
Am einfachsten verhindern Sie ein unbeabsichtigtes Löschen, indem Sie die Löschschutzlaschen des Cassettengehäuses herausbrechen.
2RICHTIGER AUFNAHMEPEGEL
Ein zu hoher Aufnahmepegel kann das Cassettenband sättigen und Verzerrungen verursachen. Auf der anderen Seite kann es bei einem zu niedrig eingestellten Aufnahmepegel bei sanften Musikpassagen zu Bandrauschen kommen. Ein richtig eingestellter Aufnahmepegel ist einfach der wichtigste Faktor für die Erstellung von gutbalancierten Aufnahmen.
Richtlinien für einen maximalen Aufnahmepegel
TYPE I (Normal) |
0 dB Spitzenpegel |
|
|
TYPE II (Chrom) |
+1 dB Spitzenpegel |
|
|
TYPE IV (Metall) |
+3 dB Spitzenpegel |
|
|
Hinweis: Der optimale Aufnahmepegel differiert abhängig von der Eingangsquelle und der Art des verwendeten Cassettenbandes.
2EINSTELLUNG DER AUFNAHME-VORMAGNETISIERUNG
Um beste Aufnahmeergebnisse erzielen zu können, ist die Überwachung während der Aufnahme und der Vergleich verschiedener Aufnahmen nach Ihrer eigenen Beurteilung von wesentlicher Bedeutung.
Der DRW-695 ist mit einem Vormagnetisierungsregler für die Feineinstellung (BIAS EINE) ausgestattet, um Ihnen bei der Einstellung der richtigen Vormagnetisierung für Cassettenbänder verschiedener Art und unterschiedlicher Fabrikate behilflich zu sein. Wenn sich der Regler in der Mittelposition befindet, so ist das Cassettendeck auf den BezugsVormagnetisierungspegel für normale, Chromund Metall-Cassettenbänder eingestellt. Hat die Aufnahme bei dieser Reglerstellung zu viel oder zu wenig Frequenzen, so können Sie durch Einstellung des Vormagnetisierungsreglers für die Feineinstellung (BIAS FINE) bessere Aufnahmeergebnisse erzielen.
BIAS FINE
- + 
Wenn die hohen Frequenzen (Höhen) verstärkt werden solen, drehen Sie den Vormagnetisierungsregler für die Feineinstellung (BIAS FINE) entgegen des Uhrzeigersinns, um den Vormagnetisierungsstrom zu senken. Drehen Sie den Regler im Uhrzeigersinn, um den Vormagnetisierungsstrom zu erhöhen.
Durch Anwendung dieses Reglers können Sie Cassettenbänder mit einem Frequenzgang aufnehmen, der Ihrem Geschmack perfekt entspricht.
(dB) |
Entgegen des Uhrzeigersinns |
||
|
|
||
AUSGANGSPEGEL |
|
|
|
Im Uhrzeigersinn |
|||
|
|||
|
|
|
|
|
FREQUENZ (Hz) |
||
2AUFNAHME/AUFNAHMESTUMMSCHALTUNG (REC/REC MUTE) UND AUFNAHME PAUSENTASTE (REC PAUSE)
1.Aufnahme einer Leerstelle von 5 Sekunden Länge:
Drücken Sie die Aufnahme- /Aufnahmestummschalt-Taste (REC/REC MUTE) ( 4 ). Eine 5 sekundenlange Leerstelle wird aufgenommen, und das Cassettendeck setzt sich in Aufnahmebereitschaft.
2.Aufnahme einer Leerstelle von 5 Sekunden, während sich das Cassettendeck in Aufnahmebereitschaft befindet:
Drücken Sie die Aufnahme- /Aufnahmestummschalt-Taste (REC/REC MUTE) ( 4 ), während sich das Cassettendeck in Aufnahmebereitschaft befindet. Eine 5 sekundenlange Leerstelle wird aufgenommen und das Cassettendeck setzt sich erneut in Aufnahmebereitschaft.
3.Löschen der Aufnahme von Leerstellen:
Drücken Sie die Aufnahme-Pausentaste (REC PAUSE) ( 3 ). Die Aufnahme von Leerstellen wird gelöscht und das Cassettendeck setzt sich in Aufnahmebereitschaft.
4.Ausdehnen der Leerstelle um weitere 5 Sekunden:
Drücken Sie einfach die Aufnahme- /Aufnahmestummschalt-Taste (REC/REC MUTE) ( 4 ). Die Leerstelle vergrößert sich um weitere 5 Sekunden.
2 DIMMER-EINSTELLUNG
Beim DRW-695 kann die Helligkeit der Anzeige auf sieben verschiedene Stufen gestellt werden.
Um die Anzeige heller zu machen, drücken Sie die Taste für den schnellen Vorlauf (fast forward) ( 7 ) am Cassettendeck B während Sie die STOPTaste des Cassettendecks B gedrückt halten.
Um die Anzeige dunkler zu machen, drücken Sie die Taste für den schnellen Rücklauf (fast rewind) ( 6 ) während Sie die STOP-Taste gedrückt halten.
Die Anzeige ist am Anfang auf die größte Helligkeit eingestellt.
18
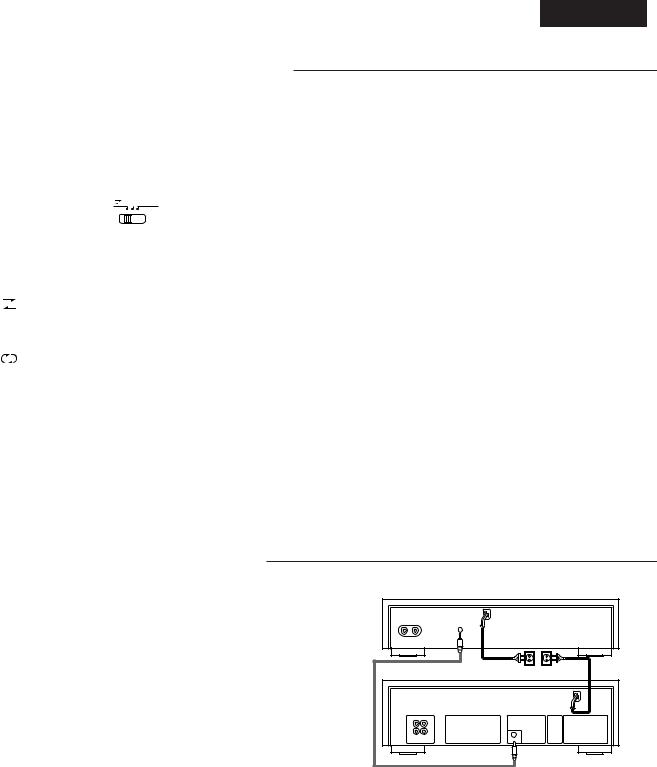
DEUTSCH
ÜBERSPIELEN (von Cassettendeck A auf Cassettendeck B)
•Schalten Sie den Verstärker oder Empfänger ein.
•Stellen Sie den Cassettenband-Überwachungsschalter Ihres Verstärkers oder Empfängers auf die Position TAPE.
q Drücken Sie den Netzschalter q auf die Position ON ( ¢ ).
wLegen Sie ein bespieltes Cassettenband in Cassettendeck A und ein unbespieltes Cassettenband für die Aufnahme in Cassettendeck B ein w,
!2.
eWählen Sie die Bandlaufrichtung mit dem Reverse-Modus-Schalter (REVERSE MODE) u aus.
 RELAY
RELAY
|
REV. MODE |
|
|
|
|
Umkehr-Betriebsart |
Bedienung |
|
|
|
|
|
Es wird nur auf eine Seite aufgenommen. |
|
|
Die Cassettendecks stoppen, wenn entweder |
|
|
Cassettendeck A oder Cassettendeck B das Bandende |
|
|
erreicht hat. |
|
|
|
|
|
Die Bandlaufrichtung jedes Cassettendecks wird |
|
|
umgekehrt, wenn das Bandende erreicht ist. (Dies ist |
|
|
besonders nützlich, für das Überspielen auf ein |
|
|
Cassettenband mit unterschiedlicher Spieldauer). |
|
|
|
|
|
Während der Aufnahme auf die Ihnen zugewandte |
|
|
Seite, bleibt das Cassettendeck, das zuerst das |
|
|
Bandende erreicht, solange stehen, bis auch das |
|
RELAY |
andere Cassettendeck das Bandende erreichen konnte. |
|
Dann werden die Bandlaufrichtungen beider |
||
(Folge- |
||
Cassettendecks umgekehrt. Abhängig vom Hersteller |
||
Wiedergabe) |
||
können Cassettenbänder mit gleicher Spieldauer |
||
|
||
|
unterschiedlich lang sein. Durch Einstellung dieser |
|
|
Betriebsart fangen beide Cassettenbänder gleichzeitig |
|
|
an. |
|
|
|
rFür das Überspielen mit normaler Geschwindigkeit, drücken Sie die Taste
zum Überspielen mit normaler Geschwindigkeit (DUBBING SPEED NORMAL) i. Zu diesem Zeitpunkt leuchtet die DUB-Anzeige.
Drücken Sie die Taste zum Überspielen mit Hoch-Geschwindigkeit
(DUBBING SPEED HIGH) i, um das Schnell-Überspielen zu starten. Zu diesem Zeitpunkt leuchtet die HIGH-Anzeige.
tDrücken Sie die Stopptaste ( 2 ) !6des Cassettendecks A oder B, um das Überspielen abzubrechen.
•Wenn sich Cassettendeck A in der Wiedergabe-Betriebsart befindet und Cassettendeck B in Pausenzustand, so wird die Pausenbetriebsart des Überspielens bei normaler Geschwindigkeit aktiviert. Das Überspielen beginnt, wenn Sie die Wiedergabetaste drücken.
•Beim Aufnehmen sind, unabhängig von der Stellung des INPUT LEVELReglers (Eingangslautstärke) und der Taste DOLBY NR, die Aufnahmelautstärke und die DOLBY-Rauschunterdrückung genauso wie bei der abgespielten Cassette.
•Wenn während der Aufnahme bei normaler Geschwindigkeit der Wiedergabeton gehört wird, bleibt der DOLBY NR-Schalter ausgeschaltet, auch wenn er betätigt wird.
•Während des Überspielens mit Hoch-Geschwindigkeit kann der Ton nicht mitangehört werden.
•Die Aufnahme- /Aufnahme-Stummschalttaste (REC/REC MUTE) ( 4 ) und die Aufnahme-Pausentaste (REC PAUSE) ( 3 ) des Cassettendecks B können während des Überspielens betätigt werden.
•Während des Überspielens mit Hoch-Geschwindigkeit ist lediglich die STOP-Taste ( 2 ) bedienbar.
SYNCHRONISIERTE AUFNAHMEFUNKTION
•Mit einem für die Synchronaufnahme-Funktion ausgerüsteten CD-Spieler von DENON lassen sich gute Ergebnisse bei Synchronaufnahmen erzielen.
•Synchron-Buchsen (SYNCHRO) -Anschluß
Verbinden Sie die Synchron-Buchse (SYNCHRO) mit einem CD-Spieler von DENON, der mit einer Synchron-Buchse (SYNCHRO) ausgestattet ist. Beginnen Sie anschließend mit der Synchronaufnahme. Verwenden Sie das mit diesem Cassettendeck mitgelieferte Verbindungskabel.
•Schalten Sie Ihren Verstärker oder Empfänger und den CD-Spieler ein.
•Stellen Sie den Band-Kontroll-Schalter Ihres Verstärkers oder Empfängers auf die Quellen-Position “Source”.
q Legen Sie das Band, auf dem Sie aufnehmen möchten, in Deck B, bzw. die CD, auf der Sie aufnehmen möchten, in den CD-Spieler ein.
wStellen Sie unter Beachtung der Aufnahmeanleitungen auf Seite 18 den NR Dolby-Betrieb, die Bandrichtung, die Umkehr-Betriebsart und den
Eingangspegel ein.
e Schatten Sie den CD-Spieler in die Stopoder Pause-Betriebsart.
rDrücken Sie die Aufnahme- /Aufnahmestummschalt-Taste (REC/REC MUTE) ( 4 ) und gleichzeitig die Aufnahme-Pausen-Taste (REC PAUSE) ( 3 ). Das Cassettendeck und der CD-Spieler werden dann automatisch auf Synchronaufnahmebetrieb eingestellt. Die “SYNC” Anzeige des Cassettendecks leuchtet und der Synchronaufnahmebetrieb wird auf dem CD-Spieler angezeigt.
(Weitere Informationen können Sie der Bedienungsanleitung für Ihren CDSpieler entnehmen).
tUm die Synchronaufnahme anzuhalten, drücken Sie die Stop-Taste am Cassettendeck B und die Stop-Taste am CD-Spieler.
Die Synchronaufnahme-Betriebsart wird dann sowohl für das Cassettendeck als auch für den CD-Spieler aufgehoben.
yDrücken Sie die Stop-Taste des CD-Spielers, um die Synchronaufnahme vorübergehend zu unterbrechen. Das Band wird 5 Sekunden lang nicht mehr überspielt; anschließend wird in die Aufnahmepause-Betriebsart geschaltet. Die “SYNC” Anzeige blinkt auf.
Drücken Sie zur Fortsetzung der Synchronaufnahme die Wiedergabe-Taste (PLAY) des CD-Spielers.
CD-SPIELER
LINE OUT |
SYNCHRO |
|
|
|
|
R |
L |
|
DRW-695 |
Netzstecker |
|
|
L |
|
|
R |
|
|
LINE LINE |
SYNCHRO |
|
OUT IN |
|
Hinweis:
•Wenn Synchronaufnahmen eingeleitet werden und der CD-Spieler nicht in den Stopoder Pausebetrieb geschaltet ist oder wenn keine CD eingelegt wurde, leuchtet die “SYNC” Anzeige des Cassettendecks und die Aufnahmepause-Betriebsart bleibt solange eingestellt, bis Synchronaufnahmen auf dem CD-Spieler möglich sind.
•Im Synchronaufnahme-Modus funktioniert nur die STOP-Taste am Cassettendeck B.
Vorsicht:
•Schalten Sie das Cassettendeck nicht auf die SynchronaufnahmeBetriebsart, wenn der CD-Spieler im Wiedergabebetrieb arbeitet. Während einer Synchronaufnahme darf das Cassettendeck oder der CD-Spieler nicht ausgeschaltet werden, da sonst Betriebsstörungen auftreten können.
•Achten Sie bei der Bearbeitung darauf, daß die Aufnahmezeit des Bands ausreicht, wenn Sie die Edit-Funktionen des CD-Spielers benutzen.
Weitere Informationen über die Edit-Funktionen des CD-Spielers finden Sie in der Bedienungsanleitung für Ihren CD-Spieler.
19

DEUTSCH
BANDZÄHLWERK UND SPEICHERSTOPP
|
dB -40 -30 -20 -10 |
-5 -3 -1 |
0 +1 +3 +5 +10 |
|
|
L |
|
|
|
RESET |
R |
|
|
RESET |
COUNTER |
|
HIGH |
|
COUNTER |
|
MEMO |
DUB |
|
|
MEMORY |
MPX |
SYNC |
MEMO |
MEMORY |
|
|
|
|
REC PAUSE |
|
PLAY |
|
PLAY |
|
|
|
|
|
REC/REC MUTE |
|
DIRECTION |
|
DIRECTION |
CD SYNCHRO |
1)Betrieb des Bandzählwerks
(1)Zum Rückstellen des Bandzählwerks auf “ ‚‚‚‚ ” die Rückstelltaste (RESET) drücken.
(2)Bei Verwendung der Funktionen Wiedergabe, Schnellvorlauf order
Rücklauf zeigt der Zählerstand die jeweilige Bandposition an.
•Das Bandzählwerk ist eine praktische Einrichtung, mit der man bei Aufnahme oder Wiedergabe die Anfänge von aufgenommenen Stücken bzw. die Stelle, ab der die nächste Aufnahme starten soll, notieren kann.
•Das Zählformat dieses Bandzählwerks ist nicht mit dem anderer Decks kompatibel.
(3)Cassettendeck A und Cassettendeck B verfügen über den Speicher ihrer eigenen Zählwerke.
2)Speicherstopp-Betrieb (MEMO STOP)
(1)Während der Aufnahme beziehungsweise der Wiedergabe kann die Memory Stop-Funktion benutzt werden, um eine bestimmte Stelle des Bandes wiederzufinden. Betätigen Sie an der gewünschten Stelle die COUNTER RESET-Taste.
(2)Betätigen Sie dann die COUNTER MEMORY-Taste. Die MEMO-Anzeige leuchtet auf.
(3)Wenn die Schnellrücklauf-Taste ( 6 ) während des Bandlaufes in Vorlaufrichtung (  ) betätigt wird, oder bei Betätigung der
Schnellvorlauf-Taste ( 7 ) während des Bandlaufes in Rücklaufrichtung (  ), wird das Cassettenband schnell zurückgespult (oder vorgespult), bis die Bandzählwerk-Anzeige “ ‚‚‚‚ ” erreicht hat.
•Die Speicherstopp-Funktion spult das Cassettenband bis zu –5- Zähleinheiten in der Vorlaufrichtung (  ) (von “ ‚‚‚‚ ” auf “

 ”) und bis zu +5-Zählraten in der Rücklaufrichtung (
  ) (von “ ‚‚‚‚ ” auf
“ ‚‚‚fi”) vor oder zurück. Anschließend werden mehrere Sekunden für
Korrekturmaßnahmen benötigt.
•Die Speicherstopp-Funktion arbeitet unabhängig in beide Richtungen für Cassettendeck A und Cassettendeck B.
Vorsicht:
Wenn die Speicherfunktion nach mehrmaligem Schnell-Vor- oder Rücklauf gestoppt wird, kann es vorkommen, daß das Band nicht an der richtigen Position anhält.
ZEITGESCHALTETE AUFNAHME/WIEDERGABE
Mit Hilfe eines im Handel erhältlichen Audio-Timers ist auch zeitgeschaltete Aufnahme und wiedergabe möglich.
DRW-695
|
LINE |
|
|
OUT IN |
|
L |
L |
L |
|
|
|
R |
R |
R |
|
L NE L NE |
SYNCHRO |
|
OUT N |
Verstärker
|
|
|
|
|
Tuner |
L |
TUNER |
PB REC |
L |
R |
L |
A |
|
||||
L |
L |
|
|||
|
|
SP |
|
||
R |
R |
R |
R |
B |
|
|
L |
TAPE 1 |
|
|
OUT PUT |
|
|
|
|
|
L |
|
R |
|
|
|
R |
|
|
|
|
|
Wandsteckdose
Timer |
|
AM |
|
Links |
Rechts |
Stromversorgung über den Timer |
Lautsprecher |
|
•Timergeschaltete Aufnahme
1.Überzeugen Sie sich, daß alle Anschlüsse (insbesondere der Netzkabel) korrekt ausgeführt sind.
2.Die Netzschalter aller beteiligten Komponenten einschalten.
3.Am Tuner den gewünschten Sender einstellen.
4.Die Cassette für die Aufnahme einsetzen (Darauf achten, daß die Löschschutzlamelle nicht ausgebrochen ist. Gegebenenfalls die freigelegte Öffnung mit Klebeband überkleben.
5.Den Dolby-NR-Schalter wunschgemäß einstellen.
6.Wählen Sie die Bandlaufrichtung mit dem Reverse-Modus-Schalter (REVERSE MODE) u aus.
7.Überzeugen Sie sich, daß der Monitorschalter auf
SOURCE gestellt ist.
8. Die Aufnahme mit dem Eingangspegelregler aussteuern.
9. Das Tonband zum gewünschten Startpunkt vorspulen. 10. Den Timerschalter (TIMER) auf die “REC” -Seite stellen.
11.Am Audio-Timer die Startzeit einstellen. Der Timer schaltet dann zur gewählten Zeit die Stromversorgung ein.
* Die obigen Einstellungen ermöglichen unbeaufsichtigtes Mitschneiden von UKW-Programmen. Die Aufnahme startet, sobald der Timer zur eingestellten Zeit den Strom einschaltet.
• Timergeschaltete Wiedergabe
1.Überzeugen Sie sich. daß alle Anschlüsse (insbesondere der Netzkabel) korrekt ausgeführt sind.
2.Die Netzschalter aller beteiligten Komponenten einschalten.
3.Die abzuspielende Cassette einsetzen.
4.Die für die Cassete geeignete Dolby-NR-Einstellung wählen.
5.Wählen Sie die Bandlaufrichtung mit dem Reverse-Modus-Schalter (REVERSE MODE) u aus.
6.Den Monitorschalter des Verstärkers auf TAPE stellen.
7.Die Wiedergabe mit der PLAY-Taste ( 1 ) starten und die Lautstärke passend einstellen.
Betätigen Sie die Stopp-Taste ( 2 ).
8. Den Timer-Schalter auf die “PLAY” -Seite stellen.
9.Am Audio-Timer die gewünschte Startzeit einstellen. Der Timer schaltet dann zur gewählten Zeit die Stromversorgung ein.
* Die obigen Einstellungen ermöglichen timergeschaltetes Musikwecken. Die Wiedergabe startet, sobald der Timer zur eingestellten Zeit den Strom einschaltet.
Hinweise:
•Vor der Benutzung eines Timers bitte dessen Bedienungsanleitung lesen.
•Vergessen Sie nicht, daß der Timer-Schalter außer für zeitgeschaltete Aufnahme oder Wiedergabe ausgeschaltet sein sollte (OFF).
•Wenn am Timer mehrere Ein-/Ausschalt-Zyklen programmierbar sind, kann der Betrieb über diesen bis zum Erreichen des Bandendes beliebig oft gestartet werden.
20
DEUTSCH
DOLBY B UND C RAUSCHUNTERDRÜCKUNGSSYSTEM
2Das Dolby Rauschunterdrückungssystem reduziert die von Natur aus bei Cassetten vorkommenden Hintergrundgeräusche (Bandlaufgeräusche) weitgehend. Dolby B NR das am meisten verbreitete System. Eine neuere Entwicklung jedoch ist das System Dolby C NR, das gegenüber Dolby B NR eine beteutende Verbesserung erfahren hat.
2Band-Hintergrundgeräusche bestehen in erster Linie aus hohen Frequenzen, die besonders während sanfter Musikpassagen lästig sind. Das Dolby NR System erhöht den Pegel der leisen Mittelund Hochfrequenzsignale während der Aufnahme und reduziert den Pegel dieser Signale bei der Wiedergabe um den gleichen Betrag. Als Ergebnis ist das Wiedergabesignal identisch mit der Original-Eingangsquelle, aber der Pegel der durch das Band erzeugten Hintergrundgeräusche wurde erheblich reduziert.
2Das Arbeitsprinzip von Dolby C NR ist das gleiche wie von Dolby B NR, mit Ausnahme der Empfindlichkeitskurven für die Kodierung/Dekodierung. Der mit Dolby C NR erzielte Rauschunterdrückungseffekt liegt bei 20 dB, im Vergleich zu 10 dB mit Dolby B NR. Darüberhinaus wendet Dolby C NR eine Anti-Sättigungsnetzschaltung und eine spektrale Schrägstellschaltung an. Dadurch wird eine erhebliche Verbesserung des Dynamikbereiches der mittleren und hohen Frequenzen erreicht.
DOLBY HX-PRO SYSTEM ZUR ERWEITERUNG DES AUSSTEUERUNGSMARGINALS
Dieses Cassettendeck ist mit einem System zur Er weiterung des Austeuerungsmarginals ausgestattet. Da dieses System während der Aufnahme automatisch aktiviert wird, ist ein Schalten oder Einstellen nicht erforderlich. Dieses System ist für alle normalen, Chromund MetallCassettenbänder effektiv.
Das Dolby HX-PRO System zur Erweiterung des Aussteuerungsmarginals arbeitet während der Aufnahme, um den Sättigungspegel im Höhenbereich zu erhöhen. Aus diesem Grund, werden die meisten der Höhenbereiche, die während der Aufnahme mit einem herkömmlichen Cassettendeck verzerrt wurden oder verlorengingen, mit dem neuen DENON Cassettendeck naturgetreu aufgenommen.
Merkmale des Dolby HX-PRO Systems zur Er weiterung des Aussteuerungsmarginals
(1)Die Leistung von normalen und Chrom-Cassettenbändern kann soweit verbessert werden, daß sie fast der mit Metallbändern erreichten Leistung entspricht.
(2)Die Dynamiken in den hohen Bereichen werden erheblich verbessert.
(3)Da während der Wiedergabe keine Dekodierung erforderlich ist, kann der verbesserte Klang von jedem beliebigen Cassettendeck aus genossen werden, einschließlich von tragbaren Spieler und Autoradiosystemen.
(4)Die Funktion dieses Systems ist unabhängig davon, ob das Dolby B/C NR System aktiviert ist oder nicht.
WARTUNG
2Reinigung der Tonköpfe
Nach längerem Gebrauch bilden sich Ablagerungen oder Staub auf den Tonköpfen, was eine Verschlechterung der Klangqualität zur Folge hat. Aus diesem Grunde sollte die in der Abbildung dargestellten Teile regelmäßig gereinigt werden. Befeuchten Sie ein Wattestäbchen mit einer Reinigungsflüssigkeit für Tonköpfe (wie Alkohol) und wischen Sie die Teile ab.
Hinweis:
1.Einige im Handel erhältliche Reinigungscassetten haben eine starke Scheuerwirkung und können die Tonköpfe zerkratzen. Verwenden Sie für die Reinigung immer Wattestäbchen an Stelle von Reinigungscassetten.
2.Da die Staubbildung auf den Tonköpfen bei der Verwendung von Metallcassetten besonders stark ist, sollten die Tonköpfe öfter gereinigt werden, um den bestmöglichen Klang genießen zu können.
2Reinigung der Andruckrolle und Tonwelle
Wenn sich auf den Andruckrollen oder Tonwelten Staub ansammelt, wird der Bandtransport unstabil. Dies ist das Ergebnis des Rutschens während der Aufnahme oder Wiedergabe. Darüberhinaus kann das Cassettenband beschädigt werden, wenn es sich um die Tonwelle wickelt.
Reinigen Sie diese Teile mit einem in Reinigungsflüssigkeit für Tonköpfe befeuchteten Wattestäbchen oder sanftem Tuch (wie Alkohol).
2Entmagnetisierung der Tonköpfe
Die Tonköpfe werden bei längerem Gebrauch, oder wenn sich stark magnetisierende Gegenstände in ihrer Nähe befinden, magnetisiert. Rauschen und Abfallen der Höhen sind die Folge. Im Extremfall werden sogar die Höhen auf vor-aufgenommenen Cassettenbändern gelöscht, an deren Stelle dann Geräusche zu hören sind.
Daher sollten die Tonköpfe in regelmäßigen Abständen gereinigt werden (Tonkopf-Entmagnetisierer sind bei Ihrem Händler erhältlich).
2Entmagnetisieren der Tonköpfe
1.Schalten Sie den Strom aus.
2.Schalten Sie den Entmagnetisierer ein, während er sich mindestens 30 cm entfernt von den Tonköpfen befindet. Bringen Sie den Entmagnetisierer in die Nähe der Tonköpfe und bewegen Sie ihn in kleinen Kreisen vier-oder fünfmal vor jedem Tonkopf. Achten Sie darauf, daß Sie dabei die Tonköpfe nicht berühren.
3.Langsam entfernen Sie den Entmagnetisierer und schatten ihn aus wann er von den Tonköpfen durch einen Abstand von zum mindesten 30 cm.
21
 Loading...