


HHP 2000
PANNELLO ELETTRICO RADIANTE
ELECTRIC PANEL HEATER
PANNEAU RAYONNANT ÉLECTRIQUE
ELEKTRO-RADIA TOREN
ELEKTRISCHE PANEELRADIATOR
PLACA ELÉCTRICA RADIANTE
PAINEL ELÉCTRICO RADIANTE
∏§∂∫∆ƒπ∫√ £∂ƒª∞¡∆π∫√ ™øª∞
ELEKTRISK RADIATOR
ELEKTRISK PANELOVN
ELRADIA TOR
SÄHKÖKÄYTTÖINEN LÄMPÖPATTERI
ELEKTROMOS LAPRADIÁTOR
ELEKTRYCZNY GRZEJNIK OLEJOWY
ùùããÖÖääííêêààóóÖÖëëääÄÄüü ààááããììóóÄÄûûôôÄÄüü èèÄÄççÖÖããúú
ELEKTRICK¯ SÁLAV¯ PANEL
ELEKTRIČNA GRIJALICA
PANELOV¯ ELEKTRICK¯ VYÎAROVAâ TEPLA
ÖÖããÖÖääííêêààóóÖÖëëääàà ààááããööóóÇÇÄÄôô èèÄÄççÖÖããÖÖçç
êêÄÄÑÑààÄÄííééêê
PANOU ELECTRIC RADIANT
Istruzioni per l’uso
Instructions for use
mode d’emploi
Bedienungsanleitung
Gebruiksaanwijzingen
Instruções de utilização
Instruções de utilização
√‰ËÁ›Â˜ ¯Ú‹Û˘
Brugsvejledning
Bruksanvisning
Käyttöohjeet
Használati utasítás
Instrukcja obs∏ugi
аМТЪЫНˆЛЛ ФУ ˝НТФОЫ‡Ъ‡ˆЛЛ
Használati utasítás
Návod na pouÏitie
Upute za uporabu
Návod km pouÏití
ì͇Á‡ÌËfl Á‡ ÛÔÓÚ·‡
Instrucţiuni de folosire
10
ELECTRICAL CONNECTION (U.K. ONLY)
A) If your appliance comes fitted with a plug, it will incorporate a 13 Amp fuse. If it does not fit your socket, the plug should
be cut off from the mains lead, and on appropriate plug fitted, as below. WARNING: Very carefully dispose of the cut off
plug after removing the fuse: do not insert in a 13 Amp socket elsewhere in the house as this could cause a shock hazard.
With alternative plugs not incorporating a fuse, the circuit must be protected by a 15 Amp fuse. If the plug is a moulded-on
type, the fuse cover must be re-fitted when changing the fuse using a 13 Amp Asta approved fuse to BS 1362. In the event
of losing the fuse cover, the plug must NOT be used until a replacement fuse cover can be obtained from your nearest elec-
trical dealer. The colour of the correct replacement fuse cover is that as marked on the base of the plug.
B) If your appliance is not fitted with a plug, please follow the instructins provided below:
WARNING - THIS APPLIANCE MUST BE EARTHED
IMPORTANT
The wires in the mains lead are coloured in accordance with
the following code:
Green and yellow Earth
Blue Neutral
Brown Live
As the colours of the wires in the mains lead may not corre-
spond with the coloured markings identifying the terminals in
your plug, proceed as follows:
The green and yellow wire must be connected to the terminal
in the plug marked with the letter E or the earth symbol
or coloured green or green and yellow.
The blue wire must be connected to the terminal marked with
the letter N or coloured black.
The brown wire must be connected to the terminal marked
with the letter L or coloured red.
N
E
L
1.0 m
0.7 m
0.6 m
0.7 m
0.6 m
fig.1
Abb.1
ÂÈÎ.1
rys. 1
obr. 1
fig.2
Abb.2
ÂÈÎ.2
rys. 2
obr. 2
1
2
3
fig.3
Abb.3
ÂÈÎ.3
rys. 3
obr. 3
138 mm
Selettore funzione
Sélecteur fonction
Functiekiezer
Funktionswahlschalter
Selector de funciones
Selector de funções
Funkcióválasztó
Pokr´t∏o wyboru funkcji
èÂÂÍβ˜‡ÚÂθ
ÂÊËχ ‡·ÓÚ˚
Funktionsvælger
Seleksjonstast
Funktionsväljare
Toiminnon valitsin
Dugme za odabir
funkcija
Ovládaã funkcií
аБ·Л‡ЪВОВМ ‰ЛТН
ÙÛÌ͈ËË
Selector funcţiuni
Termostato
Thermostat
Thermostat
Termostato
Termóstato
∂ÈÏÔÁ‹
ıВЪМФЫЩ¿ЩЛ
Lämmönsäädin
Termosztát
íÂÏÓ„ÛÎflÚÓ
íÂÏÓÒÚ‡Ú
Lampada spia
Pilot lamp
Voyant lumineux
Kontrolllampe
Controlelampje
Piloto
Luz piloto
∂У‰ВИОЩИО‹ П˘¯У›·
Kontrollampe
Kontrollampa
Varsellampe
Merkkivalo
Jelzőlámpa
Lampka kontrolna
„íäčęŕňîđíŕß ëŕěŕ
Kontrolky
Kontrolna lampica
Svetelná kontrolka
äÓÌÚÓÎ̇ ·ÏÔ‡
Întrerupător luminos
fig.4
Abb.4
ÂÈÎ.4
rys. 4
obr.4
fig.5
Abb.5
ÂÈÎ.5
rys. 5
obr. 5
3
4
5

4
FUNZIONAMENTO ED USO DEL PANNELLO ELETTRICO RADIANTE
Grazie per aver scelto questo pannello radiante Dè Longhi. Leggere attentamente questo libretto di
istruzioni prima di utilizzare il pannello radiante. In questo modo si otterranno ottimi risultati con la
massima sicurezza.
1. Istruzioni generali
Togliere il pannello dall’imballaggio. Verificare che né il pannello né il cavo siano stati danneggiati
durante il trasporto. Non utilizzare il pannello se è danneggiato. Il pannello può essere usato a
pavimento o a parete. Non montare i piedini se viene montato a parete.
2. Collegamento elettrico
- Prima di collegare l’apparecchio alla presa di corrente, verificare che la tensione presente sia la
stessa indicata nella targhetta dei dati tecnici dell’apparecchio e che l’impianto elettrico sia adat-
to alla potenza indicata sulla targhetta stessa.
- Se si usano più apparecchi contemporaneamente, è importante assicurarsi che il circuito elettri-
co abbia potenza a sufficienza.
- Collegare l’apparecchio solamente a prese dotate di una efficiente messa a terra.
- Questo apparecchio è conforme alla Direttiva CEE 89/336 sulla compatibilità elettromagnetica.
3. Utilizzo a pavimento
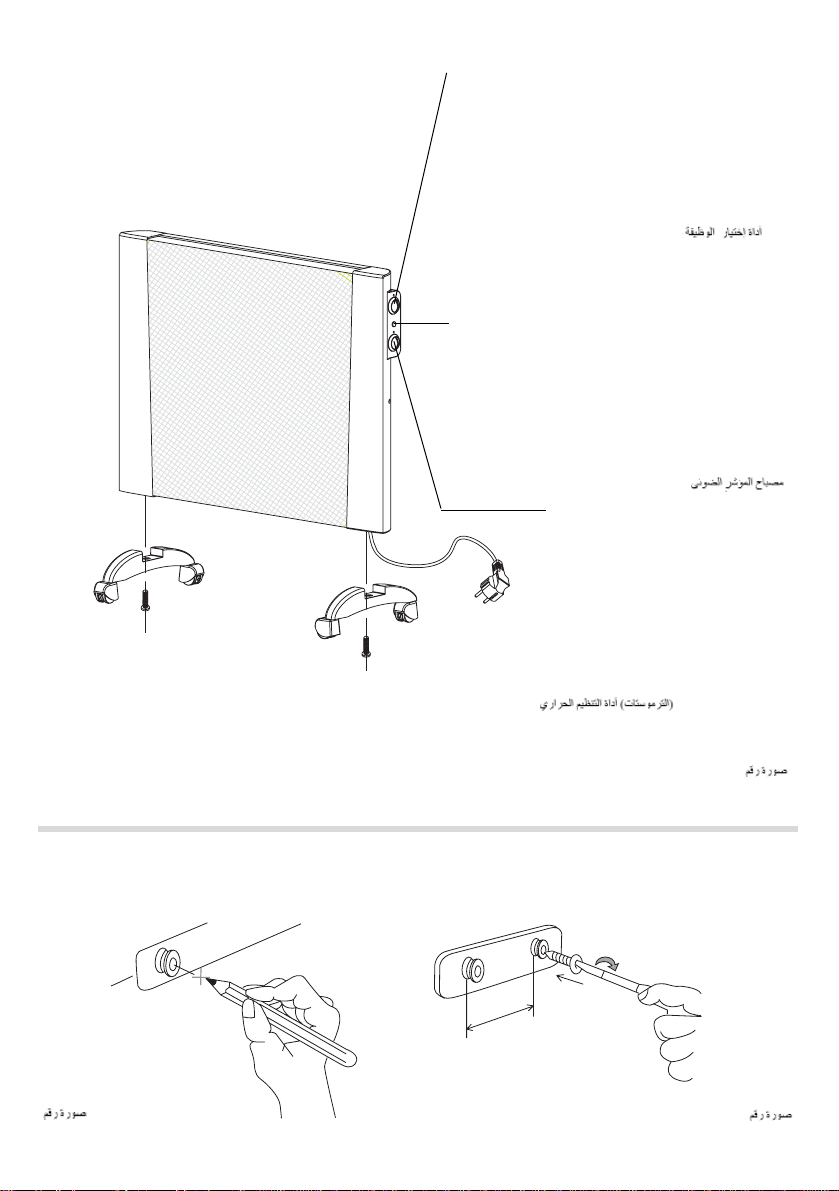
Per montare i piedini all’apparecchio procedere come segue:
Fissare i piedini con le viti in dotazione (vedi figura 3).
4. Installazione a parete
Per il montaggio a parete seguire le seguenti istruzioni:
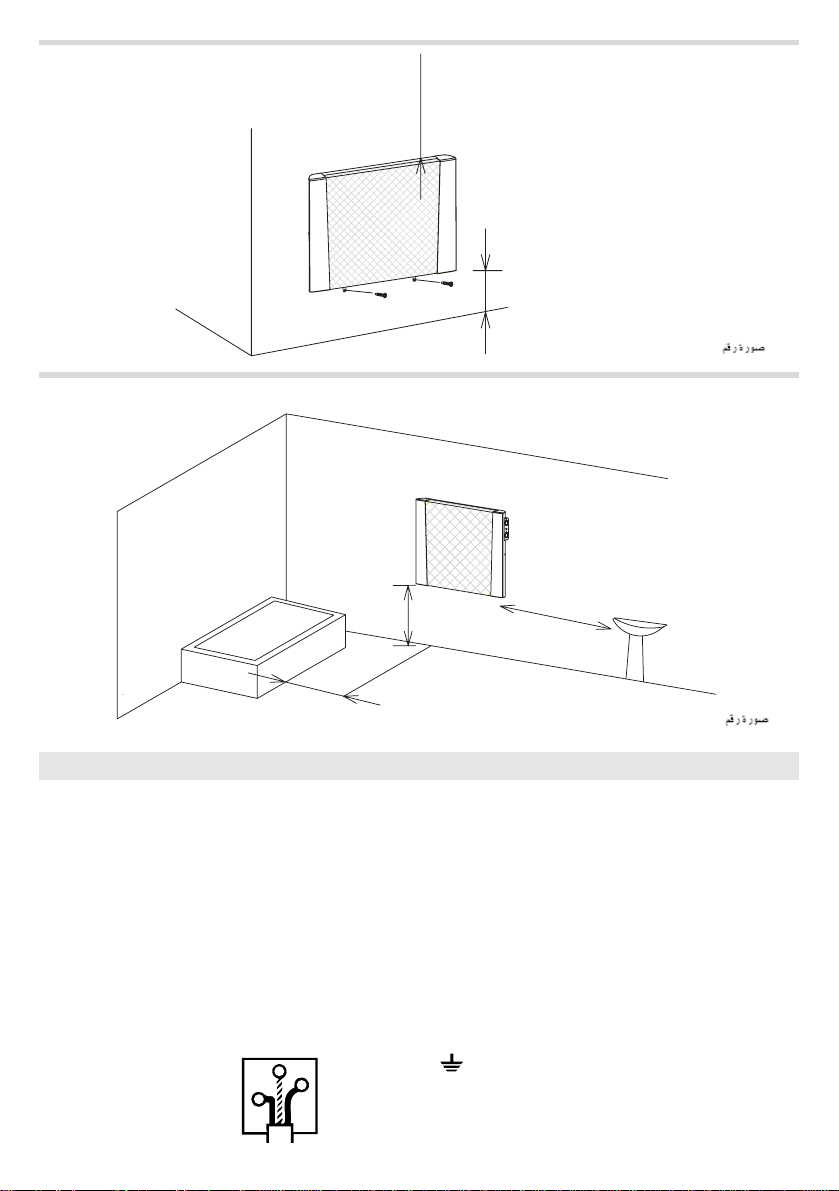
Praticare i fori nella parete rispettando le distanze minime indicate in fig.1.
Se l’apparecchio viene usato in una stanza da bagno, onde evitare pericoli, deve essere installato come
rappresentato in fig. 2.
Il kit per montaggio a parete comprendere:
1 supporto
4 x Viti
4 x Tasselli (0,6x30)
1. Scegliere il punto di installazione del pannello assicurandosi che:
a. Non sia situato direttamente sotto una presa di corrente.
b. Sia la spina che la presa siano facilmente raggiungibili dopo l’installazione.
c. Nè i cavi elettrici né altri tubi possano essere danneggiati.
d. Tende o altro materiale infiammabile sia ben lontano dal pannello
Prendere nota delle distanze minime sotto riportate:
2. Prima di forare la parete, segnare i punti esatti come rappresentato in fig.4.
3. Per pareti in mattoni, utilizzare una punta da cemento da 6 mm, forare e inserire i tasselli in
dotazione. (Per cartongesso o controrivestimenti suggeriamo di individuare i montanti in legno e
di usare delle viti da legno da 6 direttamente nel legno o di usare fissaggi specifici.
Per qualsiasi altro tipo di parete chiedere il consiglio di uno specialista.)
4. Fissare il supporto con le 2 viti in dotazione (fig.5).
5. Appendere il pannello al supporto.
6. Segnare i 2 punti di fissaggio inferiore (vedi figure 1). Rimuovere l’apparecchio, praticare i fori e inserire i
tasselli. A questo punto riposizionare l’apparecchio sul supporto superiore e fissare la parte inferiore del-
l’apparecchio con le due viti rimanenti.
5. Funzionamento e uso.
Modelli a due potenze
- Ruotare la manopola del termostato in senso orario fino alla posizione 6.
- Funzionamento a potenza min.: ruotare il selettore funzioni in posizione 1 (si accende la lampada spia).
- Funzionamento a potenza max.: ruotare il selettore funzioni in posizione 2.
- Spegnimento: ruotare il selettore funzioni in posizione “0”.
I
5
6. Funzionamento e uso.
Modelli monopotenza
- Ruotare la manopola del termostato in senso orario fino alla posizione 6.
- Ruotare il selettore funzioni in posizione 1 (si accende la lampada spia).
- Spegnimento: ruotare il selettore funzioni in posizione “0”.
7. Regolazione del termostato (per entrambe i modelli)
Quando l’ambiente avrà raggiunto la temperatura desiderata, spostare lentamente il termostato fino
allo spegnimento della spia luminosa (o fino alla posizione segnalata da un “click”) e non oltre. La
temperatura così fissata verrà automaticamente regolata e mantenuta costante dal termostato.
8. Manutenzione
Prima di eseguire qualsiasi intervento di manutenzione, staccare il pannello dalla presa di corrente
ed aspettare che si sia raffreddato. Il pannello non richiede alcuna manutenzione particolare.
E’ sufficiente spolverarlo con un panno morbido ed asciutto. Mai utilizzare polveri abrasive o sol-
venti. Se necessario, togliere concentrazioni di sporcizia con un aspirapolvere.
9. Avvertenze
- Mai utilizzare il pannello vicino a vasche da bagno, lavandini, docce o piscine.
- Mai utilizzare il pannello per asciugare la biancheria.
- Mai mettere il cavo d’alimentazione in cima al pannello quando questo è caldo.
- Utilizzare il pannello solo in posizione verticale.
- Se il cavo di alimentazione è danneggiato, esso deve essere sostituito dal costruttore o dal suo servizio
assistenza tecnica o comunque da una persona con qualifica similare, in modo da prevenire ogni ris-
chio.
- Suggeriamo di non mettere il pannello in corrente d’aria in quanto forti correnti possono com-
promettere l’efficienza dell’apparecchio.
- Si sconsiglia l’uso di prolunghe in quanto, durante il funzionamento del pannello potrebbero sur-
riscaldarsi.
- Come per tutti gli apparecchi elettrici, anche se le istruzioni tendono a prevedere quante più
eventualità possibili, occorre comunque attenzione e buon senso quando si utilizza l’apparec-
chio specialmente se ci sono bambini.
- Posizionare l’apparecchio in modo che la spina e la presa di corrente siano facilmente rag-
giungibili anche dopo l’installazione.
- Non usare questo apparecchio in una stanza la cui superficie è inferiore a 4 m
2
.
L’apparecchio è dotato di un dispositivo anti-ribaltamento che spegne l’apparecchio in caso di
caduta. Per avviare nuovamente l’apparecchio è sufficiente rimetterlo in posizione verticale.
Un dispositivo di sicurezza interrompe il funzionamento dell’apparecchio in caso di surriscal-
damento accidentale. Per ripristinare il funzionamento, è necessario staccare la spina dalla
presa per alcuni minuti, eliminare la causa del surriscaldamento, quindi reinserire la spina.
IMPORTANTE: Al fine di evitare surriscaldamenti, non coprire in nessun caso l'apparecchio
durante il funzionamento, poiché ciò provocherebbe un pericoloso aumento di temperatura.
AVVERTENZA: per evitare i rischi connessi al resettaggio accidentale dell’interruttore a relé ter-
mico, questo apparecchio non deve essere alimentato tramite un dispositivo di accensione/spe-
gnimento esterno, come un timer, né collegato ad un circuito che venga acceso e spento rego-
larmente dal fornitore di energia.
AVVERTENZE PER IL CORRETTO SMALTIMENTO DEL PRODOTTO AI SENSI DELLA DIRETTIVA EUROPEA
2002/96/EC.
Alla fine della sua vita utile il prodotto non deve esser smaltito insieme ai rifiuti urbani.
Può essere consegnato presso gli appositi centri di raccolta differenziata predisposti dalle
amministrazioni comunali, oppure presso i rivenditori che forniscono questo servizio.
Smaltire separatamente un elettrodomestico consente di evitare possibili conseguenze
negative per l’ambiente e per la salute derivanti da un suo smaltimento inadeguato e per-
mette di recuperare i materiali di cui è composto al fine di ottenere un importante rispar-
mio di energia e di risorse.
Per rimarcare l’obbligo di smaltire separatamente gli elettrodomestici, sul prodotto è
riportato il marchio del contenitore di spazzatura mobile barrato.

6
HOW TO USE YOUR ELECTRIC PANEL HEATER
Thank you for choosing this Dè Longhi heater. Please read this instruction booklet carefully before
using this heater. By doing so, you will obtain optimum results with maximum safety.
1. General instructions
Remove the heater from the packaging. Check that neither the heater nor the power cable has
been damaged during transport. Do not operate the heater if damaged. Your heater is suitable for
either freestanding or wall mounting usage. Do not assemble the feet if wall mounting.
2. Electrical connection
- Before plugging the appliance into the mains, check that your supply voltage is the same as that
shown on the rating plate of the appliance and that the electric installation is suitable to the power
shown on the rating plate.
- If using more than one appliance at a time, it is important to ensure that the power supply is ade-
quate to cope with the power requirements.
- This appliance complies with EEC Directive 89/336 relating to electromagnetic compatibility.
3. Free standing operation
To fit the feet to the appliance, proceed as follows:
Fix the foot with the relevant screws, as shown in fig.3.
4. Installation wall-mounting
To wall-mount, proceed as follows:
Drill holes in the wall, as shown in Fig.1, paying particular attention to the minimum distances indicated.
When the appliance is used in bathroom, remember to position it outside the areas in which the pre-
sence of water may represent a source of danger (fig.2).
The wall mounting kit should contain:
1 support
4 x Screws
4 x Wall plugs ( ø 6 x 30)
1. Select position for siting the heater ensuring that:
a. It is not located directly below a power socket outlet.
b. The plug and power outlet can be easily reached after installation.
c. No electric cables or other tubes could be damaged.
d.Keep away from curtains or inflammable materials. Also note the minimum undermentioned
distances:
2. Before drilling the wall, mark out a template following carefully the dimensions as shown in fig.4.
3. For solid brick block walls, use a 6 mm masonry drill and drill according to the marks you have
made and then insert the wall plugs provided.
(For plasterboard we suggest, locating the studding and using No 6 woodscrews directly into the
wood, or special plasterboard fixings. For other wall types please seek specialist advice).
4. Fix the support by means of the the 2 screws provided. (fig.5).
5. Hang the heater on the support.
6. Mark out the 2 lower fixing points (see fig.1). Remove the appliance, drill the lower holes and insert the wall
plugs. Now, you can hang the heater to the support and fix the lower part of the appliance with the 2 remain-
ing screws.
5. Functioning and use. (T wo power levels model)
-Turn the thermostat knob in a clockwise direction until it reaches the 6 setting.
- Minimum power: turn the function knob to setting 1 (the pilot light will come on).
- Maximum power: tur n the function knob to setting 2.
- Switching off: turn the function knob to setting“0”.
GB
7
6. Functioning and use. (One power level models)
-Turn the thermostat knob in a clockwise direction until it reaches the 6 setting.
-Turn the function knob to setting 1 (the pilot light will come on).
- Switching off: turn the function knob to the “0” setting.
7. Adjusting the thermostat (both models)
The switches and thermostat should be maintained until the desired room temperature has been rea-
ched. Now move the thermostat back gradually until the red pilot lamps go out (or until you hear a
‘click’).The thermostat can then remain at this setting.
8. Maintenance
Before carrying out any maintenance, unplug the heater from the mains and wait for it to cool. The
heater requires no particular maintenance. It is sufficient to remove the dust with a soft, dr y cloth.
Never use abrasive powders or solvents. If necessary remove concentrated areas of dirt with a
vacuum cleaner.
9. Warnings
- Do not use the heater in the vicinity of bathtubs, washbasins, showers or swimming pools.
- Never use the heater to dry laundr y.
- Never place the power cable on top of the heater while it is hot.
- Only use the heater in an upright position.
- If the supply cord is damaged, it must be replaced by the manufacturer, its service agent or sim-
ilarly qualified persons in order to avoid a hazard.
-We recommend that you not place the heater in a draught, because strong draughts of air may
adversely affect the equipment’s operational ef ficiency.
- IMPORTANT: Never for any reason cover the appliance during operation as this could lead to
dangerous overheating.
- The use of an extension lead is not recommended, as overheating of the extension lead may occur dur-
ing the operation of the heater.
- This appliance is filled with a precise quantity of oil and repairs which require it to be opened must
be carried out exclusively by the manufacturer or an authorised service centre. In the case of oil leaks,
contact the manufacturer or the authorised service centre.
- When scrapping the appliance, respect legislation on the disposal of oil.
- As with any electrical appliance, whilst the instructions aim to cover as many eventualities as pos-
sible, caution and common sense should be applied when operating your appliance, particular-
ly in the vicinity of young children.
- Position the appliance so that the plug and the outlet can be easily reached even after installation.
- Do not use the appliance in rooms less than 4 m
2
in area.
The appliance is fitted with a tilt-switch which turns the appliance off if it should fall over.
To restart the appliance, simply place it upright again.
The appliance is fitted with a safety device which will switch the appliance off in case of acci-
dental overheating. To reset, disconnect the plug from the power socket for a few minutes, remo-
ve the cause of overheating then plug the appliance in again.
WARNING: In order to avoid overheating, never under any circumstances cover the
appliances during operation,as this would lead to dangerous overheating.
CAUTION: In order to avoid a hazard due to inadvertent resetting of the thermal cutout, this applian-
ce must not be supplied through an external switching device, such as a timer, or connected to a cir-
cuit that is regularly switched on and off by the utility.
IMPORTANT INFORMATION FOR CORRECT DISPOSAL OF THE PRODUCT IN ACCORDANCE WITH
EC DIRECTIVE 2002/96/EC.
At the end of its working life, the product must not be disposed of as urban waste.
It must be taken to a special local authority differentiated waste collection centre or to a dea-
ler providing this service. Disposing of a household appliance separately avoids possible
negative consequences for the environment and health deriving from inappropriate dis-
posal and enables the constituent materials to be recovered to obtain significant savings
in energy and resources.As a reminder of the need to dispose of household appliances
separately, the product is marked with a crossed-out wheeled dustbin.

8
FONCTIONNEMENT ET UTILISATION DU PANNEAU RAYONNANT ÉLECTRIQUE
Nous vous remercions d’avoir choisi ce panneau rayonnant Dé Longhi. Lisez attentivement cette
notice avant d’utiliser votre panneau rayonnant. Vous pourrez ainsi obtenir d’excellents résultats en
toute sécurité.
1. Instructions générales
Déballez le panneau. Assurez-vous que ni l’appareil ni le câble n’ont subi de dégâts pendant le
transport. Évitez d’utiliser le panneau s’il est abîmé. Le panneau est prévu pour l’installation en con-
sole ou murale. Pour cette dernière, ne montez pas les pieds.
2. Raccordement électrique
-Avant de brancher l’appareil sur la prise de courant, vérifiez si la tension de secteur correspond
à celle indiquée sur la plaque signalétique du panneau et si l’installation électrique supporte la
puissance indiquée sur cette plaque.
- Si vous utilisez plusieurs appareils en même temps, assurez-vous que le circuit électrique est suff-
isamment puissant.
- Branchez le radiateur exclusivement sur des prises munies d’une mise à la terre efficace.
- Cet appareil est conforme à la Directive CEE 89/336 sur la compatibilité électromagnétique.
3. Installation en console
Pour monter les pieds, procédez de la façon suivante:
Fixez les pieds avec les vis fournies dans l’emballage (voir figure 3)
4. Fixation murale
Pour la fixation murale, procédez de la façon suivante
Percez les trous dans le mur en respectant les distances minimales indiquées fig. 1.
Si l’appareil est utilisé dans une salle de bains, installez-le comme l’indique la fig. 2 pour ne pas
courir de risques. Le kit pour la fixation murale comprend:
1 support
4 Vis
4 Chevilles (Ø 6 x 30)
1. Choisissez le point où installer le panneau, en vous assurant que:
a. il n’est pas situé juste au-dessous d’une prise de courant.
b. Une fois l’installation terminée, la fiche et la prise seront d’accès facile.
c. Ni les câbles ni les autres tuyaux ne pourront être abîmés.
d. Les rideaux ou autres matières inflammables sont éloignés.
Notez les distances minimales indiquées ci-dessous:
2. Avant de percer le mur, marquez les points exacts comme l’indique la fig. 4.
3. Pour les murs en briques, utilisez un foret à béton de 6 mm, percez et introduisez les chevilles
fournies avec l’appareil. (Pour le placoplâtre ou autres revêtements similaires, nous suggérons de
trouver les montants en bois et d’y enfoncer directement des vis de 6 à bois ou d’utiliser des fix-
ations spécifiques. Pour tout autre type de mur, demandez conseil à un spécialiste.
4. Fixez le support avec les 2 vis fournies avec l’appareil (fig. 5).
5. Accrochez le panneau au support.
6. Marquez les 2 points de fixation inférieure (voir fig. 1) Retirez l’appareil, percez les trous et intro-
duisez les chevilles. Remettez l’appareil sur le support supérieur et fixez la partie inférieure de
l’appareil avec les deux vis restantes.
5. Fonctionnement et utilisation
Modèles à deux puissances
-Tournez le bouton du thermostat dans le sens des aiguilles d’une montre jusqu’à la position 6.
- Fonctionnement à la puissance min: tournez le sélecteur de fonctions sur 1 (la lampe témoin s’al-
lume)
- Fonctionnement à la puissance max: tournez le sélecteur de fonctions sur 2.
- Arrêt: tournez le sélecteur de fonctions sur “0”.
F

9
6. Fonctionnement et utilisation
Modèles à une seule puissance
-Tournez le bouton du thermostat dans le sens des aiguilles d’une montre jusqu’à la position 6.
-Tournez le sélecteur de fonctions sur 1 (la lampe témoin s’allume)
- Arrêt: tournez le sélecteur de fonctions sur “0”.
7. Réglage du thermostat (pour les deux modèles)
Une fois que la pièce aura atteint la température désirée, tournez lentement le thermostat jusqu’à ce
que le témoin lumineux s’éteigne (ou jusqu’au clic) et pas au-delà. La température ainsi fixée sera
automatiquement réglée et maintenue constante par le thermostat.
8. Entretien
Avant toute opération d’entretien, débranchez le panneau et attendez qu’il refroidisse. Le panneau
n’exige aucun entretien particulier.
Il suffit de le dépoussiérer avec un chiffon doux et sec. Évitez les poudres abrasives et les solvants.
Si besoin est, aspirez la saleté concentrée.
9. Recommandations
- Évitez d’utiliser le panneau à proximité de baignoires, lavabos, douches et piscines.
- Évitez d’utiliser le panneau comme sèche-linge.
- Évitez de poser le câble d’alimentation sur le panneau quand celui-ci est chaud.
- Utilisez le panneau exclusivement à la verticale.
- Afin de ne courir aucun risque, si le câble d’alimentation est détérioré, faites-le remplacer par le
constructeur, dans un centre de ser vice après-vente agréé ou par un électricien qualifié.
- Nous conseillons de ne pas placer le panneau dans un courant d’air car les courants forts
risquent de compromettre l’efficacité de l’appareil.
-Les rallonges sont déconseillées car elles pourraient surchauffer pendant le fonctionnement du
panneau.
- Comme pour tous les appareils électriques, le but de cette notice est d’envisager le plus grand
nombre de situations possibles. Il faut cependant toujours utiliser l’appareil avec prudence et bon
sens, surtout en présence d'enfants.
- Positionnez l’appareil de telle manière que, l’installation terminée, la fiche et la prise restent
facilement accessibles
- N’utilisez pas cet appareil dans une pièce de moins de 4 m
2
.
L’appareil est doté d’un dispositif anti-renversement qui l’arrête en cas de chute. Pour faire repar-
tir l’appareil, il suffit de le remettre debout.
Un dispositif de sécurité arrête l’appareil en cas de surchauffe accidentelle. Pour remettre l’ap-
pareil en marche, débranchez-le quelques minutes, supprimez la cause de la surchauffe et
rebranchez-le.
IMPORTANT: afin d'éviter tout risque de surchauffe, ne jamais couvrir l'appareil pendant son
fonctionnement, car cela provoquerait une dangereuse augmentation de température.
ATTENTION: afin d’éviter les risques liés à une remise à zéro accidentelle de l’interrupteur à
relais thermique, cet appareil ne doit pas être alimenté par un dispositif de marche/ arrêt exter-
ne (minuterie) ni branché sur un circuit régulièrement allumé et éteint par le fournisseur d’éner-
gie.
AVERTISSEMENTS POUR L'ÉLIMINATION CORRECTE DU PRODUIT AUX TERMES DE LA DIRECTIVE
EUROPÉENNE 2002/96/EC.
Au terme de son utilisation, le produit ne doit pas être éliminé avec les déchets urbains.
Le produit doit être remis à l'un des centres de collecte sélective prévus par l'administra-
tion communale ou auprès des revendeurs assurant ce service.
Éliminer séparément un appareil électroménager permet d'éviter les retombées négatives
pour l'environnement et la santé dérivant d'une élimination incorrecte, et permet de récu-
pérer les matériaux qui le composent dans le but d'une économie importante en termes
d'énergie et de ressources.Pour rappeler l'obligation d'éliminer séparément les appareils
électroménagers, le produit porte le symbole d'un caisson à ordures barré.

10
BETRIEB UND GEBRAUCH DES ELEKTRO-RADIATORS
Wir danken Ihnen für die Wahl dieses De’ Longhi Heizgerätes. Lesen Sie bitte vor dem Gebrauch
des Heizpaneels diese Bedienungsanleitung aufmerksam durch. Nur so erreichen Sie optimale
Ergebnisse und höchste Gebrauchssicherheit.
1.Allgemeine Hinweise
Das Heizgerät auspacken und überprüfen, dass weder das Gerät noch das Kabel während des
Transpor ts beschädigt worden sind. Bei Beschädigung des Heizgerätes, dieses nicht benutzen. Das
Heizgerät kann sowohl freistehend als auch wandmontiert verwendet werden. Bei Wandmontage
brauchen die Füße nicht montiert werden.
2. ELEKTRISCHER ANSCHLUSS
-Vor Anschluss des Gerätes an das Stromnetz, überprüfen Sie bitte, dass die vorhandene Spannung mit
der auf dem Leistungsschild des Gerätes angegebenen Spannung übereinstimmt und dass die elektrische
Anlage über eine auf dem Leistungsschild des Gerätes angemessene Leistung verfügt.
- Bei dem gleichzeitigen Gebrauch von mehreren Geräten, ist es wichtig, sicherzustellen, dass der
Stromkreis eine ausreichende Leistung aufweist.
- Den Heizkörper nur an Steckdosen mit einer effizienten Erdung anschließen.
- Dieses Gerät entspricht der EWG-Richtlinie 89/336 über die elektromagnetische Kompatibilität.
3. Freistehender Gebrauch
Zur Befestigung der Füße am Gerät, wie folgt vorgehen:
Die Füße mit den mitgelieferten Schrauben befestigen (siehe Abbildung 3).
4. Wandmontage
Zur Wandmontage wie folgt vorgehen:
Beim Bohren der Löcher in die Wand die in Abb. 1 angegebenen Mindestabstände beachten.
Beim Gebrauch des Gerätes in Badezimmern sollte es wie in Abb. 2 dargestellt installiert werden, um
eventuelle Gefahren zu vermeiden.
Der Wandmontage-Set enthält folgende Teile:
1 Halterung
4 x Schrauben
4 x Wanddübel (0,6x30)
1. Die Position für die Installation des Radiators wählen und dabei sicherstellen, dass:
a. dieser nicht direkt unter einer Steckdose angebracht wird.
b. sowohl der Stecker als auch die Steckdose nach der Installation leicht zugänglich sind.
c. weder die elektrischen Kabel noch andere Rohrleitungen beschädigt werden können.
d. dieser entfernt von Vorhängen oder sonstigen entflammbaren Materialien installiert wird.
Berücksichtigen Sie zudem die in der Beschreibung angegebenen Mindestabstände:
2. V or Durchführung der Bohrungen an der Wand, die exakten Bohrpunkte wie in Abb. 4 dargestellt
markieren.
3. Für Backsteinwände einen 6 mm Mauerwerkbohrer verwenden, die Löcher bohren und die
Wanddübel einstecken. (Für Gipskarton oder Unterverkleidungen empfehlen wir, die Position der
Holzstreben festzustellen und Holzschrauben Nr. 6 direkt im Holz oder eigens für Gipskarton
geeignete Befestigungen zu verwenden. Für jeden anderen Wandtyp wenden Sie sich zwecks
Beratung an einen Fachmann.)
4. Mit den 2 mitgelieferten Schrauben die Halterung befestigen (Abb. 5).
5. Den Radiator an der Halterung einhängen.
6. Die 2 unteren Befestigungspunkte markieren (siehe Abbildung 1). Dann das Gerät wieder
abnehmen, die Löcher bohren und die Wanddübel einstecken. Nun können Sie das Gerät wieder
an der oberen Halterung einhängen und den unteren Geräteteil mit den restlichen zwei
Schrauben befestigen.
5. Betrieb und Gebrauch
Modelle mit zwei Leistungsstufen
- Den Drehknopf des Thermostats nach rechts auf Position 6 drehen.
- Heizbetrieb auf Mindestleistungsstufe: Den Funktionswählschalter auf Position 1 drehen (die
Kontrolllampe leuchtet auf).
- Heizbetrieb auf Höchstleistungsstufe: Den Funktionswählschalter auf Position 2 drehen.
- Ausschalten: Den Funktionswählschalter auf Position “0“ drehen.
D
11
6. Betrieb und Gebrauch
Modelle mit einer Leistungsstufe
- Den Drehknopf des Thermostats nach rechts auf Position 6 drehen.
- Den Funktionswählschalter auf Position 1 drehen (die Kontrolllampe leuchtet auf).
- Ausschalten: Den Funktionswählschalter auf Position “0“ drehen.
7. Einstellung des Thermostats (für beide Modelle)
Sobald die gewünschte Raumtemperatur erreicht worden ist, den Drehknopf des Thermostats lang-
sam drehen, bis sich die Kontrolllampe ausschaltet (oder bis Sie ein Klicken vernehmen). Auf keinen
Fall weiter drehen. Die auf diese Weise eingestellte Temperatur wird dann durch den Thermostat
automatisch geregelt und konstant gehalten.
8. Wartung
Vor jedem Wartungseingriff, das Heizgerät außer Spannung setzen und abkühlen lassen. Das
Heizgerät bedarf keiner besonderen Wartungseingriffe.
Es reicht, es mit einem weichen und trockenen Tuch abzustauben. Niemals Scheuer- oder
Lösungsmittel verwenden. Nötigenfalls können Sie besonders staubige Stellen mit einem Staubsauger
reinigen.
9. Hinweise
- Das Heizgerät niemals in der Nähe von Badewannen, Wasch- bzw. Spülbecken, Duschen oder
Swimming-pools verwenden.
- Das Heizgerät niemals zum Trocknen von Wäsche benutzen.
- Das Speisekabel niemals auf das Heizgerät legen, wenn dieses heiß ist.
- Das Heizgerät nur in aufrechter Position verwenden.
- Bei Beschädigung des Speisekabels muss dieses vom Hersteller selbst, von einem autorisierten,
technischen Kundendienst oder einem qualifizierten Elektriker ausgewechselt werden, um jedes
Risiko auszuschließen.
- Wir empfehlen, das Heizgerät nicht in Luftzüge zu stellen, da starker Zug die Effizienz des
Gerätes beeinträchtigen kann.
- Es wird von dem Gebrauch von V erlängerungskabeln abgeraten, da sich das Heizgerät während
des Betriebs überhitzen könnte.
- Auch wenn die Bedienungsanleitungen im Allgemeinen alle möglichen Situationen vorsehen,
muss bei dem Gebrauch dieses Gerätes, wie bei allen
elektrischen Geräten, stets mit besonderer Vorsicht und gesundem Menschenverstand vorgegan-
gen werden, insbesondere dann, wenn Kinder in der Nähe sind.
- Das Gerät so aufstellen, dass der Stecker und die Steckdose auch nach der Installation leicht
zugänglich sind.
- Das Gerät nicht in Räumen mit einer Fläche unter 4 m
2
aufstellen bzw. betreiben.
Das Gerät ist mit einer Kippsicherung ausgestattet, welche das Gerät bei Umkippen bzw.
Umfallen sofort ausschaltet. Zur Wiederinbetriebsetzung des Gerätes, dieses einfach wieder
senkrecht aufstellen.
Das Gerät ist mit einer Sicherheitsvorrichtung ausgestattet, die bei unbeabsichtigter Über-
hitzung den Gerätebetrieb unterbricht. Zum Wiederinbetriebsetzung des Gerätes den Stecker
einige Minuten lang aus der Steckdose ziehen, die Ursache der Überhitzung beseitigen und dann
den Stecker wieder einstecken.
Wichtig: Zum Vermeiden von Überhitzungen, das Gerät während des Betriebs niemals
abdecken, da dies zu einer gefährlichen Temperaturerhöhung führen könnte.
VORSICHT: Zum Vermeiden von Risiken, die durch ein unbeabsichtigtes Rücksetzen des Thermorelais
entstehen können, darf dieses Gerät auf keinen Fall mit einer externen Ein-/Ausschaltvorrichtung,
wie zum Beispiel einem Timer, verbunden sein, noch an einen Kreis angeschlossen werden, der vom
Energiezulieferer regelmäßig ein- und ausgeschaltet wird.
WICHTIGER HINWEIS FÜR DIE KORREKTE ENTSORGUNG DES PRODUKTS IN ÜBEREINSTIMMUNG MIT DER EG-
RICHTLINIE 2002/96/EG.
Am Ende seiner Nutzzeit darf das Produkt NICHT zusammen mit dem Siedlungsabfall beseitigt werden.
Es kann zu den eigens von den städtischen Behörden eingerichteten Sammelstellen oder zu den
Fachhändlern, die einen Rücknahmeservice anbieten, gebracht werden.
Die getrennte Entsorgung eines Haushaltsgerätes vermeidet mögliche negative Auswirkungen auf die
Umwelt und die menschliche Gesundheit, die durch eine nicht vorschriftsmäßige Entsorgung bedingt
sind. Zudem ermöglicht wird die Wiederverwertung der Materialien, aus denen sich das Gerät zusam-
mensetzt, was wiederum eine bedeutende Einsparung an Energie und Ressourcen mit sich bringt.
Zur Erinnerung an die V erpflichtung, die Elektrohaushaltsgeräte getrennt zu beseitigen, ist das Produkt
mit einer Mülltonne, die durchgestrichen ist, gekennzeichnet.

12
WERKING EN GEBRUIK VAN DE ELEKTRISCHE PANEELRADIATOR
Wij danken u voor de aanschaf van deze paneelradiator van Dè Longhi. Lees aandachtig deze
gebruiksaanwijzingen door alvorens de paneelradiator in gebruik te nemen. Op deze manier wor-
den de beste resultaten in combinatie met de grootste gebruiksveiligheid verkregen.
1. Algemene aanwijzingen
Haal de paneelradiator uit de verpakking en controleer of het paneel en het netsnoer niet tijdens het
transport beschadigd zijn. Gebruik de paneelradiator niet wanneer hij beschadigd is. De paneelra-
diator kan op de vloer worden gezet of aan de muur worden bevestigd. In dit laatste geval worden
de pootjes niet gemonteerd.
2. Elektrische aansluiting
- Controleer, alvorens het apparaat op een stopcontact aan te sluiten, of de netspanning overeen-
komt met de spanning aangeduid op het plaatje met technische gegevens van het apparaat en of
de elektrische installatie geschikt is voor het vermogen aangeduid op dit plaatje.
- Indien gelijktijdig meerdere apparaten worden gebruikt, is het belangrijk te controleren of het
elektriciteitsnet de nodige capaciteit heeft.
- Sluit de paneelradiator alleen aan op stopcontacten die van een doeltreffende aardleiding voor-
zien zijn.
- Dit apparaat is conform de EG-richtlijn 89/336 inzake elektromagnetische compatibiliteit.
3. Gebruik op de vloer
Monteer de pootjes als volgt op het apparaat:
Bevestig de pootjes met de bijgeleverde schroeven (zie figuur 3).
4. Installatie op de wand
Ga voor installatie op de wand als volgt te werk:
Maak de gaten in de muur met inachtneming van de minimumafstanden aangegeven in fig. 1.
Als het apparaat wordt gebruikt in een badkamer, moet het om gevaren te voorkomen geïnstalleerd wor-
den zoals getoond in fig. 2. De kit voor wandinstallatie bevat:
1 steun
4 x schroeven
4 x pluggen (0,6x30)
1. Kies het punt van installatie van het paneel en controleer of:
a. Het apparaat niet onmiddellijk onder een stopcontact wordt geplaatst.
b. De stekker en het stopcontact na de installatie makkelijk bereikbaar zijn.
c. Geen elektrische kabels of andere leidingen worden beschadigd.
d. Gordijnen of ander brandbaar materiaal ver van het paneel ver wijderd zijn.
Houd rekening met de hieronder aangegeven minimumafstanden:
2. Teken, alvorens in de muur te boren, de exacte punten af zoals getoond in fig. 4.
3. Gebruik voor bakstenen muren een boorpunt voor cement van 6 mm, boor het gat en breng de
bijgeleverde pluggen in. (Voor gipsplaten of andere bekledingen, is het raadzaam de opstaande
elementen in hout te identificeren en de houtschroeven n° 6 of specifieke bevestigingselementen
te gebruiken. Vraag voor elk ander type wand, het advies van een specialist).
4. Bevestig de steun met de 2 bijgeleverde schroeven (fig. 5).
5. Hang het paneel aan de steun.
6. Teken de onderste 2 bevestigingspunten af (zie figuur 1). Verwijder het apparaat, boor de gaten
en breng de pluggen in. Plaats nu het apparaat weer op de bovenste steun en bevestig het onder-
ste gedeelte van het apparaat met de twee resterende schroeven.
5. Werking en gebruik.
Modellen met twee vermogens
- Draai de knop van de thermostaat rechtsom naar stand 6.
- Werking met min. vermogen: draai de functieschakelaar naar stand 1 (het controlelampje gaat bran-
den).
-Werking met max. vermogen: draai de functieschakelaar naar stand 2.
- Uitschakeling: draai de functieschakelaar naar stand “0”.
NL
13
6. Werking en gebruik
Modellen met één vermogen
- Draai de knop van de thermostaat rechtsom naar stand 6.
- Draai de functieschakelaar naar stand 1 (het controlelampje gaat branden).
- Uitschakeling: draai de functieschakelaar naar stand “0”.
7. Regeling van de thermostaat (voor beide modellen)
Verplaats, wanneer in het vertrek de gewenste temperatuur is bereikt, de thermostaat langzaam tot-
dat het controlelampje uitgaat (of tot de stand waar een “klik” wordt gehoord) en niet verder. De op
deze manier ingestelde temperatuur wordt automatisch door de thermostaat geregeld en constant
gehouden.
8. Onderhoud
Koppel vóór elke onderhoudsbeurt de paneelradiator van het stopcontact af en wacht tot hij afge-
koeld is. De paneelradiator vereist geen bijzonder onderhoud.
Het is voldoende af te stoffen met een zachte en droge doek. Maak nooit gebruik van schurende pro-
ducten of oplosmiddelen. Verwijder, indien nodig, opgehoopt vuil met een stofzuiger.
9. Waarschuwingen
- Gebruik de paneelradiator nooit in de buurt van badkuipen, wastafels, douches of zwembaden.
- Gebruik de paneelradiator nooit om wasgoed te drogen.
- Leg het netsnoer nooit boven op de paneelradiator wanneer deze warm is.
- Gebruik de paneelradiator alleen in verticale positie.
- Als het netsnoer beschadigd raakt, moet het vervangen worden door de fabrikant, door zijn tech-
nische servicedienst of door iemand met gelijksoortige vakkennis, om elk risico te voorkomen.
- Wij adviseren om de paneelradiator niet bloot te stellen aan sterke luchtstromen, omdat deze de
doeltreffendheid van het apparaat nadelig kunnen beïnvloeden.
- Het gebruik van verlengsnoeren wordt afgeraden, omdat deze tijdens de werking van de paneel-
radiator kunnen oververhitten.
- Zoals voor alle elektrische apparaten geldt, ook al houden de gebruiksaanwijzingen met zoveel
mogelijk situaties rekening, is het noodzakelijk voorzichtig te zijn en het gezond verstand te
gebruiken bij het gebruik van dit apparaat, vooral in aanwezigheid van kinderen.
- Plaats het apparaat op zodanige wijze dat de stekker en het stopcontact ook na de installatie
makkelijk bereikbaar zijn.
- Gebruik dit apparaat niet een kamer met een oppervlak van minder dan 4 m
2
.
Het apparaat is voorzien van een valbeveiliging die het apparaat uitschakelt als het mocht
omvallen. Zet het apparaat weer rechtop om het opnieuw te starten.
Een veiligheidsvoorziening onderbreekt de werking van het apparaat in geval van onver-
wachtse oververhitting. Om de werking te hervatten, moet de stekker enkele minuten uit het stop-
contact worden gehaald, de oorzaak van oververhitting worden geëlimineerd en de stekker weer
ingebracht worden.
BELANGRIJK: Om oververhitting te voorkomen, mogen de apparaten tijdens hun werking onder
geen beding afgedekt worden, aangezien dit gevaarlijke oververhitting kan veroorzaken.
WAARSCHUWING: om risico’s te voorkomen die verband houden met het onbedoeld resetten
van de thermische beveiliging, mag dit apparaat niet gevoed worden via een externe inschakel-
/uitschakelinrichting, zoals een timer, noch aangesloten zijn op een circuit dat regelmatig aan-
en uitgeschakeld wordt door de energieleverancier.
BELANGRIJKE INFORMATIE VOOR DE CORRECTE VERWERKING VAN HET PRODUCT IN OVER-
EENSTEMMING MET DE EUROPESE RICHTLIJN 2002/96/EC
Aan het einde van zijn nuttig leven mag het product niet samen met het gewone huishoude-
lijke afval worden verwerkt.Het moet naar een speciaal centrum voor gescheiden afvalinza-
meling van de gemeente worden gebracht, of naar een verkooppunt dat deze service ver-
schaft. Het apart verwerken van een huishoudelijk apparaat voorkomt mogelijke negatieve
gevolgen voor het milieu en de gezondheid die door een ongeschikte verwerking ontstaan
en zorgt ervoor dat de materialen waaruit het apparaat bestaat teruggewonnen kunnen wor-
den om een aanmerkelijke besparing van energie en grondstoffen te verkrijgen. Om op de
verplichting tot gescheiden verwerking van elektrische huishoudelijke apparatuur te wijzen,
is op het product het symbool van een doorgekruiste vuilnisbak aangebracht.

14
FUNCIONAMIENTO Y USO DE LA PLACA ELÉCTRICA RADIANTE
Gracias por haber elegido esta placa radiante De Longhi. Lea detenidamente este manual de instruc-
ciones antes de utilizar la placa radiante. De esta forma, obtendrá óptimos resultados con la máxi-
ma seguridad.
1. Instrucciones generales
Saque la placa del embalaje. Compruebe que no se hayan estropeado la placa ni el cable durante
el transporte. No use la placa si estuviese estropeada. Puede usar la placa en el suelo o con insta-
lación mural. No monte los pies si la utiliza con instalación mural.
2. Conexión eléctrica
- Antes de enchufar el aparato a la corriente, compruebe que la tensión de la red doméstica cor-
responda a la indicada en la placa de los datos técnicos del aparato y que la instalación eléctri-
ca sea apta para la potencia indicada en la placa.
- Si usa varios aparatos contemporáneamente, es impor tante que se asegure de que la potencia
del circuito eléctrico sea suficiente.
- Enchufe el aparato solamente a enchufes equipados con una puesta a tierra eficiente.
- Este aparato es conforme a la Directiva CEE 89/336 sobre la compatibilidad electromagnética.
3. Utilización en el suelo
Para montar los pies del aparato, efectúe las siguientes operaciones:
Fije los pies con los tornillos incluidos en el equipamiento (consulte la figura 3).
4. Instalación mural
Para el montaje mural, siga estas instrucciones:
Taladre la pared respetando las distancias mínimas indicadas en la fig. 1.
Si usa el aparato en un cuarto de baño, para evitar peligros, deberá instalarlo siguiendo las indicaciones
de la figura 2. El kit para el montaje mural incluye:
1 soporte
4 x tornillos
4 x Tacos (Ø 6 x 30)
1. Elija el punto de instalación para la placa y asegúrese de que:
a. No esté situada directamente debajo de un enchufe de corriente.
b. Pueda acceder fácilmente tanto a la clavija como al enchufe después de la instalación.
c. Ni los cables eléctricos ni otros tubos puedan estropearse.
d. Cor tinas u otros materiales inflamables se encuentren alejados de la placa.
Tome nota de las distancias mínimas indicadas a continuación.
2. Antes de taladrar la pared, marque los puntos exactos siguiendo las indicaciones de la fig. 4.
3. Para paredes de ladrillo, use una broca de cemento de 6 mm, haga los agujeros y coloque los
tacos incluidos en el equipamiento. (Para cartón de yeso o contrarrevestimientos, le aconsejamos
localizar los montantes de madera y usar tornillos para madera de 6 directamente en la madera
o usar fijaciones específicas. Para cualquier otro tipo de pared, pida consejo a un especialista).
4. Fije el soporte con los 2 tornillos incluidos en el equipamiento (fig. 5).
5. Cuelgue la placa en el soporte.
6. Marque los 2 puntos de fijación inferior (consulte la fig. 1). Quite el aparato, haga los agujeros
y coloque los tacos. Entonces, coloque de nuevo el aparato en el soporte superior y fije la parte
inferior del aparato con los dos tornillos que le quedan.
5. Funcionamiento y uso
Modelos con dos potencias
- Gire el mando del termostato en el sentido de las agujas del reloj hasta la posición 6.
- Funcionamiento con potencia mín.: gire el selector de funciones hasta la posición 1 (se enciende la lám-
para piloto).
- Funcionamiento con potencia máx.: gire el selector de funciones hasta la posición 2.
- Apagado: gire el selector de funciones hasta la posición “0”.
E
15
6. Funcionamiento y uso
Modelos monopotencia
- Gire el mando del termostato en el sentido de las agujas del reloj hasta la posición 6.
- Gire el selector de funciones hasta la posición 1 (se enciende la lámpara piloto).
- Apagado: gire el selector de funciones hasta la posición “0”.
7. Regulación del termostato (para ambos modelos)
Cuando el ambiente haya alcanzado la temperatura deseada, gire lentamente el termostato hasta que
se apague el piloto ( o hasta la posición indicada por un “click”), no supere esta posición. La tempera-
tura de esta forma será automáticamente regulada y mantenida constante por el termostato.
8. Mantenimiento
Antes de efectuar cualquier operación de mantenimiento, desenchufe la placa de la corriente y
espere hasta que se haya enfriado. La placa no requiere un mantenimiento particular.
Sólo debe limpiarle el polvo con un paño suave y seco. No use nunca polvos abrasivos o disolventes.
Si es necesario, elimine la suciedad concentrada con un aspirador.
9. Advertencias
- No use nunca la placa cerca de bañeras, pilas, duchas o piscinas.
- No use la placa para secar la lencería.
- No ponga nunca el cable de alimentación encima de la placa si está caliente.
- Use la placa únicamente en la posición vertical.
- Si el cable de alimentación estuviese estropeado, para evitar todo riesgo, el fabricante o su ser-
vicio de asistencia técnica o una persona con una cualificación similar deberá sustituirlo.
- Le aconsejamos no exponer la placa a corrientes de aire ya que fuertes corrientes podrían per-
judicar la eficiencia del aparato.
- Le desaconsejamos usar alargadores ya que podrían recalentarse durante el funcionamiento del
aparato.
- Al igual que sucede con todos los aparatos eléctricos, a pesar de que las instrucciones tienden
a considerar el mayor número posible de casos, de todas formas deberá tener cuidado y recur-
rir al sentido común durante la utilización del aparato, especialmente con niños en las proximi-
dades.
- Sitúe el aparato de forma que pueda acceder fácilmente a la clavija y al enchufe de corriente
después de la instalación.
- No use este aparato en una habitación cuya superficie sea inferior a los 4 m
2
.
El aparato incorpora un dispositivo antivuelco que apaga el aparato en caso de caída. Para encen-
der de nuevo el aparato, sólo debe ponerlo de nuevo en posición vertical.
Un dispositivo de seguridad interrumpe el funcionamiento del aparato en caso de producirse un
recalentamiento accidental. Para restablecer el funcionamiento, desenchufe el aparato de la corriente
durante unos minutos, elimine la causa del recalentamiento, y enchufe de nuevo el aparato.
IMPORTANTE: No cubra nunca el aparato durante el funcionamiento para evitar reca-
lentamientos, ya que ello podría provocar un peligroso aumento de la temperatura.
ADVERTENCIA: para evitar los riesgos relacionados con la reposición accidental del interruptor de relé
térmico, no alimente este aparato con un dispositivo de encendido/apagado exterior , tal como un timer,
ni lo conecte a un circuito que el proveedor de energía enciende y apaga regularmente.
ADVERTENCIAS PARA LA ELIMINACIÓN CORRECTA DEL PRODUCTO SEGÚN ESTABLECE LA
DIRECTIVA EUROPEA 2002/96/CE.
Al final de su vida útil, el producto no debe eliminarse junto a los desechos urbanos.
Puede entregarse a centros específicos de recogida diferenciada dispuestos por las admini-
straciones municipales, o a distribuidores que facilitan este servicio. Eliminar por separado
un electrodoméstico significa evitar posibles consecuencias negativas para el medio ambien-
te y la salud derivadas de una eliminación inadecuada y permite reciclar los materiales que
lo componen, obteniendo así un ahorro importante de energía y recursos. Para subrayar la
obligación de eliminar por separado los electrodomésticos, en el producto aparece un con-
tenedor de basura móvil tachado.
 Loading...