

ELECTRIC HEATING CONVECTOR
Instructions for use
CONVECTEUR ELECTRIQUE
Mode d'emploi
ELEKTRO-KONVEKTOR
Gebrauchsanweisung
TERMOCONVETTORE ELETTRICO
Libretto istruzioni
ELECTRISCHE CONVECTOR
Gebruiksaanwijzing
TERMOCONVECTOR ELÉCTRICO
Libro de instrucciones
CONVECTOR ELÉCTRICO
Manual de instruções
ODHUIVE" HLEKTRIKOUV KOUQEVKTORODHUIVE" HLEKTRIKOUV KOUQEVKTOR
ODHUIVE" HLEKTRIKOUV KOUQEVKTOR
ODHUIVE" HLEKTRIKOUV KOUQEVKTORODHUIVE" HLEKTRIKOUV KOUQEVKTOR
ELEKTRISK VÄRMEKONVEKTOR
Bruksanvisning
ELEKTRISK VARMEOVN
Bruksanvisning
ELEKTRISK VARMEAPPARAT
Brugsanvisning
SÄHKÖINEN VIRTAUSLÄMMITINSÄHKÖINEN VIRTAUSLÄMMITIN
SÄHKÖINEN VIRTAUSLÄMMITIN
SÄHKÖINEN VIRTAUSLÄMMITINSÄHKÖINEN VIRTAUSLÄMMITIN
Käyttöohjeet
ELEKTRICK¯ TEPELN¯ KONVEKTORELEKTRICK¯ TEPELN¯ KONVEKTOR
ELEKTRICK¯ TEPELN¯ KONVEKTOR
ELEKTRICK¯ TEPELN¯ KONVEKTORELEKTRICK¯ TEPELN¯ KONVEKTOR
Návod k pouÏití
ELEKTRYCZNY GRZEJNIK KONWEKTOROWYELEKTRYCZNY GRZEJNIK KONWEKTOROWY
ELEKTRYCZNY GRZEJNIK KONWEKTOROWY
ELEKTRYCZNY GRZEJNIK KONWEKTOROWYELEKTRYCZNY GRZEJNIK KONWEKTOROWY
Instrukcja u˝ytkowania
ELEKTROMOS HőSUGÁRZÓ
Kezelési utasítás
5713000200/01.2000
1
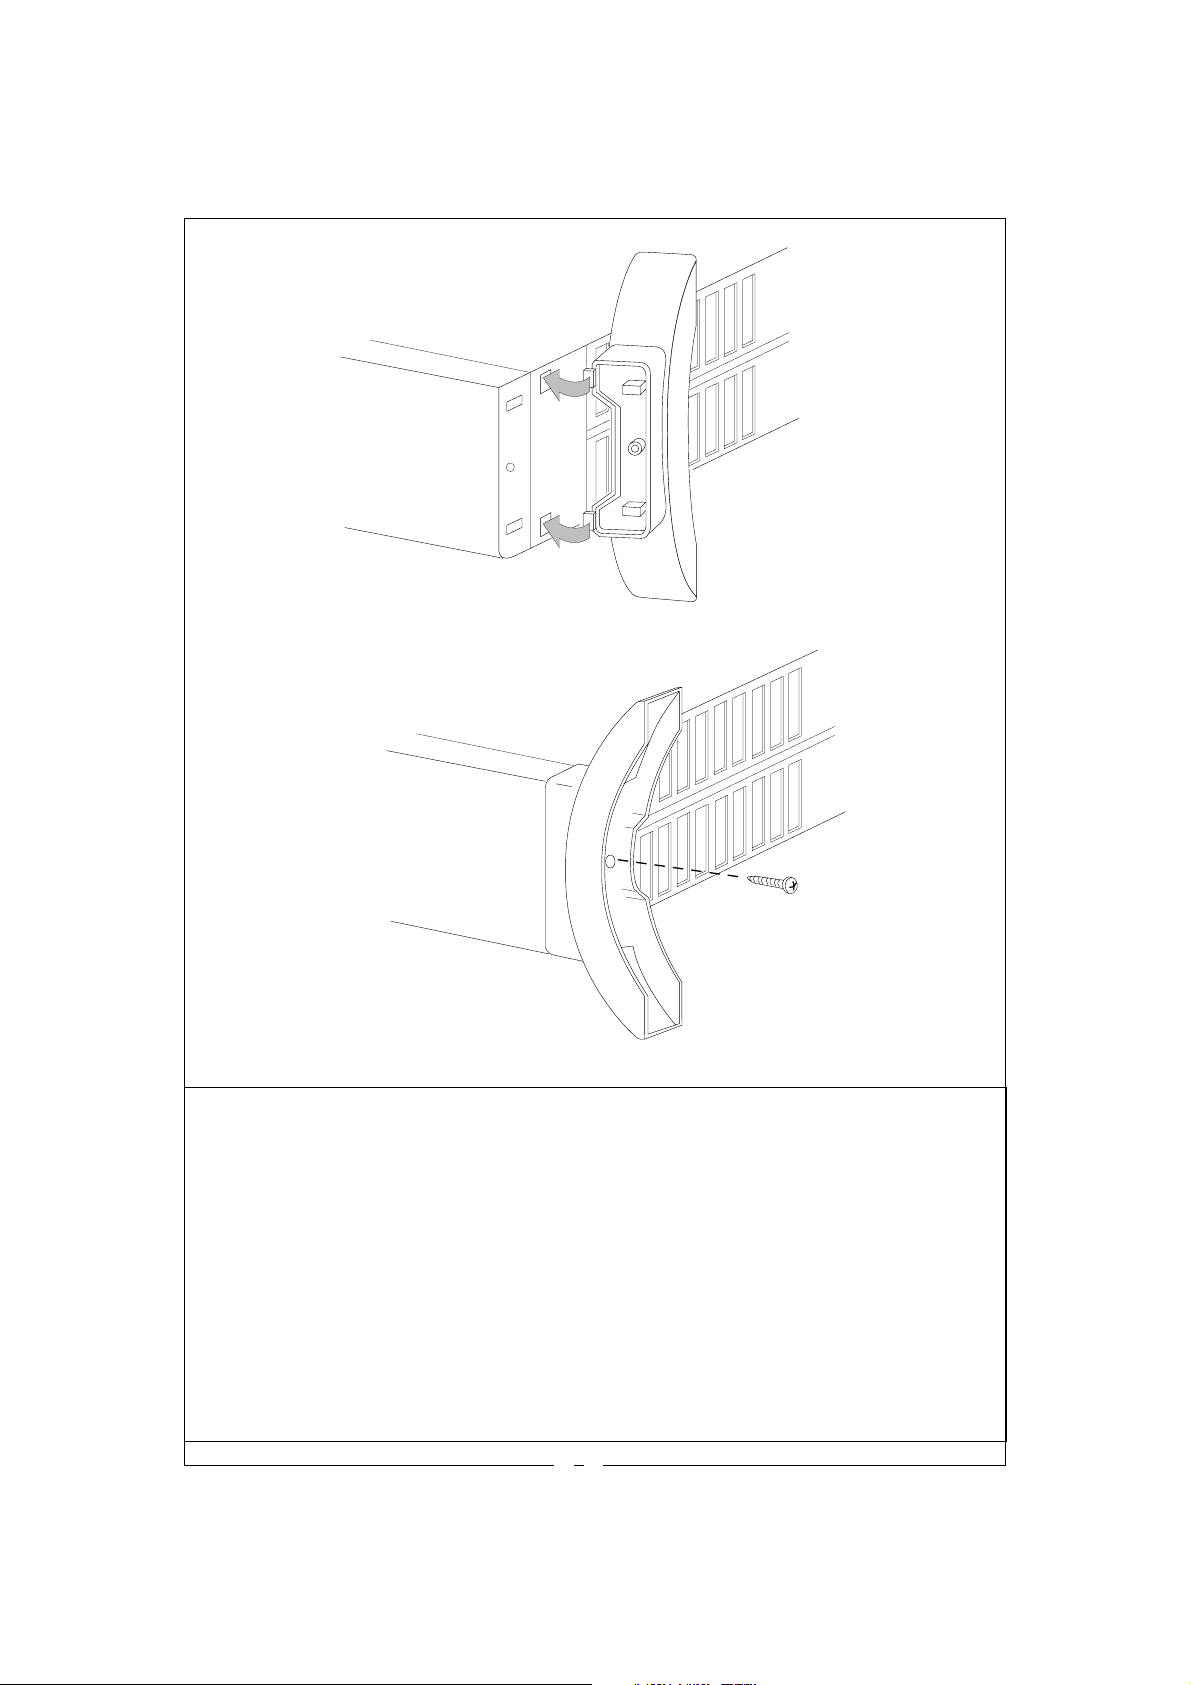
Fig. 1
Fig. 2
ELECTRICAL CONNECTION (U.K. ONLY)
A) If your appliance comes fitted with a plug, it will incorporate a 13 Amp fuse. If it does not fit your socket, the plug should be cut off from the mains lead
and an appropriate plug fitted, as below.
WARNING: Very carefully dispose of the cut off plug after removing the fuse: do not insert in a 13 Amp socket elsewhere in the house as this could
cause a shock hazard.
With alternative plugs not incorporating a fuse, the circuit must be protected by a 15 Amp fuse. If the plug is a moulded-on type, the fuse cover must
be re-fitted when changing the fuse using a 13 Amp Asta approved fuse to BS 1362. In the event of losing the fuse cover, the plug must NOT be used
until a replacement fuse cover can be obtained from your nearest electrical dealer. The colour of the correct replacement fuse cover is that as marked
on the base of the plug.
B) If your appliance is not fitted with a plug, please follow the instructions provided below.
IMPORTANT
The wires in the mains lead are coloured in accordance with the following code:
As the colours of the wires in the mains lead may not correspond with the coloured markings identifying the terminals in your plug, proceed
as follows:
The blue wire must be connected to the terminal marked with the letter N or coloured black.
The brown wire must be connected to the terminal marked with the letter L or coloured red.
If you have a 3-pins plug, do not connect any wire to the "earth" terminal.
Blue: Neutral
Brown: Live
2

GB
ASSEMBLING THE FEET
Fit the feet ti the appliance as follows:
- Insert the anchor pins into the slots and turn the foot until it clicks into position (fig. 1).
- Fasten the feet in position using the screws (fig. 2).
WALL-MOUNTING
If you want to fix the appliance to the wall, please contact your nearest Service Centre asking for the wall-mounting kit.
ELECTRICAL CONNECTION
- Before inserting the plug in an electrical outlet, check carefully to be certain that the voltage in your home’s
electrical system matches the voltage indicated on the appliance and that the socket and main feed are of a
size sufficient to power this appliance.
- THIS APPLIANCE COMPLIES WITH EEC DIRECTIVE 89/336 REGARDING ELECTROMAGNETIC
COMPATIBILITY.
OPERATION AND USE
Turning the appliance on
- Models with only one switch
This appliance is turned on when you can see the red area on the switch (or, in those models so equipped, when
the warning light on the switch comes on).
- Models with only a thermostat
This appliance can be turned on by rotating its knob clockwise until it stops at the last possible setting.
To turn this appliance off, rotate the knob to its lowest position and remove its plug from the electrical outlet.
- Models with a thermostat and two switches
Turn the thermostat knob clockwise until it reaches its last possible setting, then press one switch (minimum
power) or both switches (maximum power) so the red area becomes visible (or the warning light comes on in
those models so provided).
Adjusting the thermostat
When the room has reached the desired temperature, turn the thermostat knob slowly in an anti-clockwise direction until you
get to the setting — and not beyond it — where you hear a click (or, for models with warning lights, until those lights turn off).
The thermostat will then adjust that set temperature automatically and keep it constant.
If your appliance is the type with 2 switches, you could utilize only one of them during mild seasons and on days
not particularly cold. You will thus use but little electrical power and obtain even greater savings in energy
consumption.
Anti-freeze function (only for models with a thermostat)
Turn the switch (or switches) to make the red area show, then turn the thermostat knob to the " " setting. When so regulated,
this appliance will keep a room at a temperature of 5° C. while consuming but a minimum of energy.
Model with a fan
This version makes it possible to heat a room even more quickly, thanks to a built-in fan that speeds up the spread
of heat and keeps the temperature uniform.
To turn this unit on, proceed as follows:
• Turn the thermostat knob clockwise to the last possible setting.
• To operate the appliance at minimum without the fan, push the I button (the red area will become visible or, in
models having a switch with a warning light, the light will come on).
• To operate the appliance at minimum with the fan, press the II button (the red area will become visible or, in
models having a switch with a warning light, the light will come on).
• Push both switches in order to get the highest power
In this model, the thermostat can be adjusted just as it is for models without a fan.
MAINTENANCE
Always pull the plug out of its electrical outlet before beginning any cleaning.
This electric convector requires no special maintenance. All you have to do is dust it off with a soft, dry cloth —
but do so only when the appliance is cold. Never use abrasive powders or solvents.
HELPFUL ADVICE
• Do not make use of this heating convector in the immediate proximity of bathtubs, showers, washbasins, pools,
etc. In addition, this appliance must never be placed directly under a permanent electrical outlet.
• Do not place the power cable atop this appliance when it is hot.
• Always use this heating convector only in an upright position.
• Do not block the hot-air outlet grilles or the intake grille located on the bottom of the appliance.
• This appliance comes with a Y-type connection. Replacement of the power cable must be entrusted only a
technician authorised by the manufacturer, because such work requires special tools.
• Never use this appliance in a room whose base area is less than 4 m
equipment in a draft, because blasts of air may adversely affect the equipment's operational efficiency.
Important:
Never cover this appliance in any manner whatsoever while it is operating, because by doing
so you will cause a dangerous increase in the temperature of the appliance itself.
2
. We likewise recommend that you not place this
3
F
MONTAGE DES PIEDS
Effectuer les opérations suivantes permettant le montage des pieds.
- Introduire les crochets dans les trous et tourner le pied jusqu'à ce qu'il s'accroche. (fig. 1)
- Lorsque les pieds sont accrochés à l'appareil, il faut ensuite les fixer en utilisant les vis fournies avec l'appareil. (fig. 2)
MONTAGE MURAL
Si vous souhaitez fixer l’appareil au mur, adressez-vous au centre de service après-vente le plus proche de chez
vous pour obtenir le kit pour l’installation murale.
BRANCHEMENT ELECTRIQUE
- Avant de brancher la fiche dans la prise de courant, vérifiez attentivement que le voltage de secteur
corresponde bien à la valeur en V indiquée sur l’appareil et que la prise de courant et la ligne d’alimentation
soient dimensionnées pour la charge de l’appareil.
- CET APPAREIL EST CONFORME A LA DIRECTIVE 89/336/CEE CONCERNANT LA COMPATIBILITE
ELECTROMAGNETIQUE.
FONCTIONNEMENT ET UTILISATION
Mise en marche
- Modèles muni d’un seul interrupteur
L’appareil est allumé quand la zone rouge est visible sur l’interrupteur (ou lorsque le voyant s’allume sur les
modèles munis d’un interrupteur avec voyant lumineux).
- Modèles munis seulement de thermostat
Pour mettre l’appareil en marche, tournez la manette dans le sens des aiguilles d’une montre jusqu’à la butée
de la position maximale. Pour éteindre l’appareil, tournez le bouton sur la position minimum et débranchez la
fiche de la prise de courant.
- Modèles munis de thermostat et de deux interrupteurs
Tournez la manette du thermostat dans le sens des aiguilles d’une montre complètement jusqu’à la position
maximale, appuyez ensuite sur un (puissance minimale) ou sur les deux interrupteurs (puissance maximale) de
façon à voir la zone rouge (ou l’allumage du voyant sur les modèles munis d’interrupteur avec voyant lumineux).
Réglage du thermostat
Quand la pièce aura atteint la température souhaitée, tournez lentement la manette du thermostat dans le sens
contraire à celui des aiguilles d’une montre afin d’atteindre la position signalée par un “click” (pour les modèles
munis de voyants, jusqu’à l’extinction de ceux-ci) et pas au-delà. La température ainsi fixée sera automatiquement
réglée et maintenue constante par le thermostat. Si votre appareil est muni de 2 interrupteurs, pendant les demisaisons ou les journées où il ne fait pas particulièrement froid, vous pouvez appuyer sur un seul interrupteur afin
de sélectionner la puissance minimum, réalisant ainsi une économie d’énergie supplémentaire.
Fonction antigel (seulement pour les modèles munis de thermostat)
Actionnez les interrupteurs de façon à voir la zone rouge, tournez ensuite la manette du thermostat sur la position
". De cette manière, l’appareil maintient la température de la pièce à 5°C environ avec une consommation
"
minimale d’énergie.
Modèle avec ventilateur
Cette variante permet de chauffer encore plus rapidement grâce au ventilateur incorporé qui accélère la diffusion
de la chaleur dans la pièce et garantit une température uniforme.
Pour la mise en marche, procédez de la manière suivante:
• Tournez la manette du thermostat dans le sens des aiguilles d’une montre jusqu’à la position maximale.
• Pour le fonctionnement au ralenti sans ventilateur, appuyez sur le bouton I(la zone rouge sera visible ou, sur
les modèles munis d’un interrupteur avec voyant lumineux, le voyant s’allumera).
• Pour le fonctionnement au ralenti avec ventilateur, appuyez sur le bouton II (la zone rouge sera visible ou, sur
les modèles munis d’un interrupteur avec voyant lumineux, le voyant s’allumera).
• La puissance maximale est obtenue en appuyant sur les deux interrupteurs.
Le réglage du thermostat, sur ce modèle, s’effectue de la même manière que sur les modèles sans ventilation.
ENTRETIEN
Avant d’effectuer toute opération de nettoyage, débranchez toujours la fiche de la prise de courant.
Le convecteur électrique ne nécessite pas d’entretien particulier. Il suffit d’enlever la poussière à l’aide d’un chiffon
doux et sec; nettoyez-le uniquement quand il est froid. N’utilisez jamais de poudres abrasives ou de solvants.
AVERTISSEMENTS
• N’utilisez jamais le thermoconvecteur tout près de baignoires, douches, éviers, piscines, etc. En outre,
l’appareil ne doit jamais être placé directement en dessous d’une prise de courant fixe.
• Ne déposez pas le cordon d’alimentation sur l’appareil chaud.
• N’utilisez le thermoconvecteur que dans la position verticale.
• N’obstruez pas les grilles de sortie de l’air chaud, ni celle d’entrée située sur le fond de l’appareil.
• L’appareil est muni de connexion du type Y. Le remplacement du cordon d’alimentation doit être effectué
exclusivement par un personnel agréé par le fabricant étant donné que des outils spéciaux sont nécessaires.
• N’utilisez pas l’appareil dans des pièces ayant une aire de base inférieure à 4m
le placer dans des courants d'air qui pourraient perturber le fonctionnement de l'appareil.
Important:
Ne jamais couvrir l’appareil pendant son fonctionnement, cela entraînerait une dangereuse
augmentation de la température de l’appareil même.
4
2
. Il est en outre déconseillé de
D
MONTAGE DER STELLFÜSSE
Zur Montage der Füße folgendermaßen vorgehen:
- Haken in die Öffnungen stecken und Fuß drehen bis er in ein hakt. (Abb 1)
- Nach Einhaken der Füße am Gerät, diese mit den mitgelieferten Schrauben befestigen (Abb 2)
WANDMONTAGE
Wenn Sie das Gerät an der Wand befestigen möchten, wenden Sie sich bitte an die nächstliegende
Kundendienststelle und verlangen Sie das Wandinstallationsset.
ELEKTRISCHER ANSCHLUSS
- Bevor Sie das Gerät an der Steckdose anschließen, prüfen Sie gewissenhaft, ob die auf dem Typenschild mit
V angegebene Netzspannung mit der Ihrer elektrischen Anlage übereinstimmt und ob die Steckdose und die
Versorgungsleitung der Gerätebelastung standhalten.
- DIESES GERÄT ENTSPRICHT DER VORSCHRIFT 89/336EU BEZGL. DER ELEKTROMAGNETISCHEN
KOMPATIBILITÄT.
BETRIEB UND GEBRAUCH
Einschalten
- Modelle mit einem einzigen Schalter
Das Gerät ist eingeschaltet, wenn auf dem Schalter der rote Bereich sichtbar ist ( oder die Kontrollampe bei
den Modellen einschaltet, die mit Schalter mit Kontrollampe ausgerüstet sind).
- Nur mit Thermostat ausgerüstete Modelle
Das Gerät schaltet durch Drehen des Einstellknopfs im Uhrzeigersinn bis zum Anschlag auf Maximalstellung ein. Um das
Gerät auszuschalten, drehen Sie den Drehknopf auf die Minimalstellung und ziehen den Netzstecker.
- Modelle mit Thermostat und zwei Schaltern
Den Einstellknopf des Thermostats im Uhrzeigersinn bis auf die Maximalstellung drehen, danach einen (niedrigste
Leistungsstufe) oder beide Schalter (höchste Leistungsstufe) drücken, so daß der rote Bereich sichtbar ist (oder die
Kontrollampe bei den Modellen einschaltet, die mit Schalter mit Kontrollampe ausgerüstet sind).
Einstellen des Thermostats
Wurde die gewünschte Raumtemperatur erreicht, den Einstellknopf des Thermostats langsam entgegen dem
Uhrzeigersinn bis zu der durch ein “Klick” signalierten Position drehen (bei den Modellen mit Kontrollampen, bis
zum Erlöschen derselben) und nicht weiter. Die so festgelegte Temperatur wird vom Thermostat automatisch
geregelt und konstant gehalten. Ist Ihr Gerät mi 2 Schaltern ausgerüstet, können Sie im Frühling bzw. Herbst oder
an nicht zu kalten Tagen nur einen Schalter drücken und so die niedrigste Leistungsstufe anwählen, wodurch Sie
Ihren Energieverbrauch weiter vermindern.
Frostschutzstufe (nur bei den Modellen mit Thermostat)
Die Schalter betätigen, so daß der rote Bereich erscheint, dann den Thermostateinstellknopf auf Position "
stellen. In dieser Einstellung hält das Gerät bei geringstem Stromverbrauch die Raumtemperatur bei etwa 5°C.
Modell mit Gebläse
Mit dieser Ausführung kann die Heizgeschwindigkeit dank dem eingebauten Gebläse noch gesteigert werden,
das die Wärmeverteilung im Raum beschleunigt und eine einheitliche Temperatur gewährleistet.
Zum Einschalten gehen Sie wie folgt vor:
• Den Thermostateinstellknopf im Uhrzeigersinn auf maximale Stellung drehen.
• Für den Betrieb auf der niedrigsten Stufe ohne Gebläse, die Taste I drücken (der rote Bereich ist sichtbar oder
bei Modellen, die mit Schalter mit Kontrollampe ausgerüstet sind, schaltet diese ein).
• Für den Betrieb auf der niedrigsten Stufe mit Gebläse, die Taste II drücken (der rote Bereich ist sichtbar oder
bei Modellen, die mit Schalter mit Kontrollampe ausgerüstet sind, schaltet diese ein).
• Die höchste Leistungsstufe wird durch Drücken beider Schalter erzielt.
Die Thermostateinstellung bei diesem Modell erfolgt wie beim Modell ohne Gebläse.
PFLEGE UND WARTUNG
Vor Beginn einer jeden Wartungsarbeit immer zuerst den Netzstecker ziehen.
Der Elektro-Konvektor bedarf keiner besonderen Wartung. Entfernen Sie den Staub einfach mit einem weichen, trockenen
Tuch. Reinigen Sie das Gerät erst, wenn es abgekühlt ist. Verwenden Sie niemals Scheuer- oder Lösungsmittel.
WICHTIGE HINWEISE
• Verwenden Sie den Elektro-Konvektor nicht in unmittelbarer Nähe von Bade- bzw. Duschwannen, Waschbecken,
Schwimmbädern usw. Das Gerät darf nicht direkt unter einer festangebrachten Steckdose aufgestellt werden.
• Das Versorgungskabel nicht mit dem heißen Gerät lin Berührung bringen.
• Den Elektro-Konvektor ausschließlich in senkrechter Position einsetzen.
• Sowohl die Luftaustrittsgitter als auch das Lufteingangsgitter am Boden des Gerätes nicht bedecken.
• Das Gerät ist mit einer Y-Verbindung ausgerüstet. Der Austausch des Versorgungskabels darf nur von Personal
ausgeführt werden, das hierzu vom Hersteller autorisiert wurde, da Spezialwerkzeuge erforderlich sind.
• Das Gerät nicht in Räumen einsetzen, deren Grundfläche weniger als 4 m
abgeraten, da Gerät an zugigen Stellen aufzustellen, wodurch der Betrieb gestört werden könnte.
Wichtig: Das Gerät während dem Betrieb in keinem Fall bedecken, da dies eine gefährliche
Temperaturerhöhung desselben zur Folge hätte.
5
2
beträgt. Außerdem wird davon
"
I
MONTAGGIO DEI PIEDINI
Per il montaggio dei piedini, procedere nel seguente modo:
- Inserire i ganci nei fori e ruotare il piedino fino ad agganciarlo. (fig.1)
- Dopo aver agganciato i piedini all'apparecchio, fossarli con le viti in dotazione. (fig. 2)
MONTAGGIO A PARETE
Se volete fissare l'apparecchio alla parete, rivolgetevi al Centro Assistenza a voi più vicino richiedendo il Kit di
installazione a parete.
ALLACCIAMENTO ELETTRICO
- Prima di inserire la spina nella presa di corrente verificare attentamente che il voltaggio della Vostra rete
domestica corrisponda al valore in V indicato sull’apparecchio e che la presa di corrente e la linea di
alimentazione siano dimensionate al carico dell'apparecchio.
- QUESTO APPARECCHIO É CONFORME ALLA DIRETTIVA 89/336/CEE ED AL D.M. 476/92 SULLA
COMPATIBILITÁ ELETTROMAGNETICA.
FUNZIONAMENTO ED USO
Accensione
- Modelli con un solo interruttore
L'apparecchio è acceso quando sull'interruttore è visibile la zona rossa (o si accende la spia nei modelli dotati
di interruttore con spia luminosa).
- Modelli con solo termostato
L'apparecchio si accende ruotando la manopola in senso orario fino all'arresto in posizione massima. Per
spegnere l'apparecchio, ruotare la manopola in posizione minima e staccare la spina dalla presa di corrente.
- Modelli con termostato e due interruttori
Ruotare la manopola del termostato in senso orario fino alla posizione di massimo, quindi premere uno
(potenza minima) o ambedue gli interruttori (potenza massima) in modo che sia visibile la zona rossa (o si
accende la spia nei modelli dotati di interruttore con spia luminosa).
Regolazione termostato
Quando l’ambiente avrà raggiunto la temperatura desiderata, ruotare lentamente la manopola del termostato in senso
antiorario fino alla posizione segnalata da un "click" (per i modeli con spie, fino allo spegnimento delle stesse) e non
oltre. La temperatura così fissata verrà automaticamente regolata e mantenuta costante dal termostato.
Se il Vostro apparecchio è del tipo a due interruttori, nelle stagioni intermedie o nelle giornate non particolarmente
rigide potrete premere un solo interruttore e selezionare, così, la potenza minima ottenendo una ulteriore
economia di consumo.
Funzione antigelo (solo per i modelli con termostato)
Agire sugli interruttori in modo da far apparire la zona rossa, quindi portare la manopola termostato in posizione "
Così impostato l'apparecchio mantiene l'ambiente ad una temperatura di circa 5°C con un minimo dispendio di
energia.
Modello con ventilatore
Questa versione permette di ottenere un riscaldamento ancora più rapido grazie al ventilatore incorporato che
accellera la diffusione del calore nell'ambiente e rende la temperatura uniforme.
Per l'accensione, procedere come segue:
• Ruotare la manopola termostato in senso orario in posizione massima.
• Per il funzionamento al minimo senza ventola, premere il tasto I (sarà visibile la zona rossa o, nei modelli dotati
di interruttore con spia luminosa, si accenderà la spia).
• Per il funzionamento al minimo con ventola, premere il tasto II (sarà visibile la zona rossa o, nei modelli dotati di
interruttore con spia luminosa, si accenderà la spia).
• La massima potenza si ottiene premendo ambedue gli interruttori.
La regolazione del termostato, in questo modello, si effettua come per i modelli senza ventilazione.
MANUTENZIONE
Prima di qualsiasi pulizia togliere sempre la spina dalla presa di corrente.
Il convettore elettrico non richiede una particolare manutenzione. E’ sufficiente spolverarlo con un panno soffice
ed asciutto; pulirlo solo quando è freddo. Non usare mai polveri abrasive o solventi.
AVVERTENZE
• Non usare il termoconvettore nelle immediate vicinanze di vasche da bagno, docce, lavandini, piscine, ecc.
Inoltre, l’apparecchio non deve essere posto direttamente sotto una presa di corrente fissa.
• Non appoggiare il cavo di alimentazione sull’apparecchio caldo.
• Usare il termoconvettore sempre e solamente in posizione verticale.
• Non ostruire le griglie d’uscita dell’aria calda, né quella di entrata, che si trova sul fondo dell’apparecchio.
• Apparecchio provvisto di collegamente tipo Y. La sostituzione del cavo di alimentazione deve essere fatta solo
da personale autorizzato dal costruttore in quanto sono necessari degli utensili speciali.
• Non utilizzare questo apparecchio in stanze, la cui area di base è inferiore a 4 m
2
. Ed inoltre si sconsiglia di posizionarlo
in correnti d'aria che possono perturbare il funzionamento dell'apparecchio.
Importante: non coprire in nessun caso l'apparecchio durante il funzionamento, poiché ciò provocherebbe
un pericoloso aumento di temperatura dello stesso.
6
".

NL
INSTALLATIE VAN DE VOETJES
Monteer de voetjes als volgt:
- Schuif de haakjes in de openingen en draai het voetje totdat het vast zit. (fig. 1)
- Zodra de voetjes aan het apparaat zitten schroeft u ze vast met de toebehorende schroefjes (fig. 2)
BEVESTIGING AAN DE MUUR
Indien u het aparaat aan de muur wenst te bevestigen, dient u zicht tot het dichtstbijzijnde assistentie centrum
te wenden en aldaar het pakket voor installatie aan de muur vragen.
ELECTRISCHE AANSLUITING
- Alvorens de stekker in het stopcontact te steken nauwkeurig controleren dat het voltage van uw electriciteitsnet
overeenkomt met de waarde in V aangegeven op het apparaat en dat het stopcontact en de electriciteitssnoer
de juiste afmetingen hebben in overeenstemming met de belasting van het apparaat.
- DIT APPARAAT IS CONFORM DE EEG REGEL 89/336 BETREFFENDE DE ELECTROMAGNETISCHE
VERENIGBAARHEID.
FUNCTIONEREN EN GEBRUIK.
Het aanzetten van het apparaat.
- Modellen met één schakelaar
Het apparaat staat aan wanneer op de schakelaar het rode gedeelte zichtbaar is (of het controlelampje gaat
branden bij modellen uitgerust met schakelaar met controlelampje)
- Modellen met alleen een thermostaat
Het apparaat wordt aangezet door de knop kloksgewijs te draaien totdat deze niet verder kan omdat de
maximale stand bereikt is. Om het apparaat af te zetten, de knop op de minimumstand draaien en de stekker
uit het stopcontact nemen.
- Modellen met thermostaat en twee schakelaars
De knop van de thermostaat kloksgewijs draaien tot aan de maximale stand, hierna één schakelaar (minimum
vermogen) of allebei de schakelaars (maximaal vermogen) indrukken zodat het rode gedeelte zichtbaar wordt
(of het lampje gaat branden bij modellen die uitgerust zijn met schakelaars met een controlelampje).
Het reguleren van de thermostaat
Wanneer de temperatuur in de ruimte het gewenste niveau heeft bereikt, de thermostaat knop langzaam tegen
de klok in draaien tot op het punt waar u een “klik” hoort (voor de modellen met controlelampjes, totdat deze
lampjes uitgaan) en niet verder. De temperatuur die op deze manier ingesteld wordt, zal automatisch geregeld
en constant op niveau gehouden worden door de thermostaat. Indien uw apparaat van het type met twee
schakelaars is, kunt u tijdens de tussenseizoenen of op dagen dat het niet bijzonder koud is, alleen één schakelaar
indrukken en op deze manier het minimum vermogen kiezen en hierdoor energie besparen.
Antivries functie (alleen voor de modellen met thermostaat)
De schakelaars indrukken zodat het rode gedeelte zichtbaar wordt, hierna de thermostaat knop draaien tot op
de functie "
minimum verbruik van energie.
Modellen met ventilator
Met dit model is het mogelijk de ruimte nog sneller te verwarmen dankzij de ingebouwde ventilator die de
verspreiding van de warmte versneld en een gelijkmatige verdeling van de temperatuur bevorderd.
Voor het aanzetten als volgt te werk gaan:
• De thermostaat knop kloksgewijs draaien tot aan de maximale stand.
• Voor het minimaal functioneren zonder ventilator, de schakelaar I indrukken (het rode gedeelte zal zichtbaar
worden of, bij modellen uitgerust met schakelaars met controlelampjes, zal het lampje gaan branden).
• Voor het minimaal functioneren met ventilator, de schakelaar I I indrukken (het rode gedeelte zal zichtbaar
worden of, bij modellen uitgerust met schakelaars met controlelampjes, zal het lampje gaan branden).
• Het maximale vermogen kan men bereiken door beide schakelaars in te drukken.
Het reguleren van de thermostaat, bij dit model, gaat op dezelfde manier als bij de modellen zonder ventilator.
ONDERHOUD
Alvorens het apparaat schoon te maken, de stekker uit het stopcontact trekken.
De electrische convector vereist geen speciaal onderhoud. Het is voldoende het apparaat af te stoffen met een
zachte, droge doek.; het apparaat alleen schoonmaken als het afgekoeld is. Nooit schuurmiddelen of
oplosmiddelen gebruiken.
WAARSCHUWINGEN
• De electrische convector niet gebruiken in de onmiddelijke nabijheid van badkuipen, douches, wasbakken,
zwembaden, enz. Bovendien dient het apparaat niet direct onder een vast stopcontact gezet te worden.
• Leg het electriciteitssnoer niet op het warme apparaat.
• Gebruik de electrische convector altijd en uitsluitend in verticale stand.
• Belemmer niet de warme lucht uitgangroosters, noch het luchtingangrooster, dat zich aan de onderkant van
het apparaat bevindt.
• Apparaat voorzien van een Y verbinding. De vervanging van het electriciteitssnoer dient alleen uitgevoerd te
worden door door de fabrikant geautorizeerd personeel omdat hiervoor speciaal gereedschap nodig is.
• Gebruik het apparaat niet in ruimtes met een oppervlakte van minder dan 4 vierkante meter. Bovedien wordt
afgeraden het apparaat op de tocht te zetten omdat dit het correct functioneren zou kunnen verstoren.
Belangrijk
". Op deze manier houdt het apparaat de temperatuur in de ruimte op ongeveer 5°C met een
:
In geen geval het apparaat bedekken tijdens het in werking zijn, omdat dit een gevaarlijke
toename van de temperatuur van het apparaat tot gevolg zou hebben.
7

E
MONTAJE DE LOS PIES
Para el montaje de los pies, actuar como se indica a contuinación:
- Introducir los ganchos en los orificios y girar el pie hasta que se enganche. (fig. 1)
- Después de haber enganchado los pies en el aparato, fijarlos por medio de los tornillos suministrados (fig. 2)
MONTJE DE PARED
Si desean fijar el aparato en la pared, diríjanse al centro de asistencia mas cercano a uds, pidiendo en kit de
instalacióen la pared.
CONEXIÓN ELÉCTRICA
- Antes de introducir el enchufe en la toma de corriente verificar atentamente que el voltaje de su red doméstica
corresponda al valor en V indicado en el aparato y que la toma de corriente y la línea de alimentación
correspondan a la carga del aparato.
- ESTE APARATO ES CONFORME A LAS NORMAS 897336/CEE SOBRE LA COMPATIBILIDAD
ELECTROMAGNÉTICA.
FUNCIONAMIENTO Y USO
Encendido
- Modelos con un sólo interruptor
El aparato está encendido cuando en el interruptor es visible la zona roja (o se enciende el indicador, en los
modelos dotados de interruptor con indicador luminoso).
- Modelos sólo con termostato
El aparato se enciende girando el selector en sentido horario hasta el tope en la posición máxima.
Para apagar el aparato, girar el selector hasta el mínimo y desenchufarlo.
- Modelos con termostato y dos interruptores
Girar el selector del termostato en sentido horario hasta la posición máxima, luego apretar uno (potencia
mínima) o los dos interruptores (potencia máxima) de modo que sea visible la zona roja (o se encienda el
indicador en los modelos dotados de indicador luminoso).
Regulación del termostato
Cuando el ambiente habrá alcanzado la temperatura deseada, girar lentamente el selector del termostato a
izquierdas hasta la posición señalada por un “clic” (en los modelos con indicadores, hasta que éstos se apagan)
y no más allá. El termostato se ocupará de regular y mantener constante la temperatura establecida.
Si su aparato es de los que tienen 2 interruptores, en las estaciones intermedias o en los dias que no son
particolarmente rígidos, aprieten un sólo interruptor y seleccionen de este modo la potencia mínima obteniendo
un ulterior ahorro en el consumo.
Función anticongelante (sólo para los modelos con termostato)
Accionar los interruptores de manera que aparezca la zona roja, luego colocar el selector del termostato en la
posición "
el mínimo derroche de energía.
Modelo con ventilador
Esta versión permite obtener una calefacción aún más rápida gracias al ventilador incorporado que acelera la
difusión del calor en el ambiente y mantiene uniforme la temperatura.
Para el encendido actuar de la siguiente manera:
• Girar el selector del termostato en sentido horario hasta la posición máxima
• Para el funcionamiento al mínimo sin el ventilador, apretar el mando l(aparece la zona roja o, en los modelos
dotados de indicador luminoso, se enciende el indicador).
• Para el funcionamiento al mínimo con ventilador, apretar el mando Il ( aparece la zona roja, en los modelos
dotados de indicador luminoso, se enciende el indicador).
• La máxima potencia se obtiene apretando los dos interruptores
La regulación del termostato, en este modelo, se efectúa igual que en los modelos sin ventilación.
MANUTENCIÓN
Antes de realizar cualquier tipo de limpieza, desenchufar el aparato.
El convector eléctrico no requiere una particular manutención. Es suficiente quitarle el polvo con un paño suave
y seco: limpiarlo sólo cuando está frío. No usar nunca polvos abrasivos o solventes.
ADVERTENCIAS
• No usar el termoconvector cerca de bañeras, duchas, lavabos, piscinas, etc. Además el aparato no debe ser
colocado directamente bajo una toma de corriente fija.
• No apoyar el cable de alimentación en el aparato cuando aún está caliente.
• Usar el termoconvector siempre y solamente en posición vertical.
• No obstruir las rejillas de salida del aire caliente ni la de entrada que se encuentra en el fondo del aparato.
• Aparato dotado de conexión de tipo Y. La sustitución del cable de alimentación debe ser efectuada sólo por
personal autorizado por el fabricante ya que son necesarios utensilios especiales.
• No utilizar este aparato en habitaciones cuya área es inferior a 4 m
hay corrientes de aire que pueden perturbar el funcionamiento del aparato.
Importante:
". El aparato, regulado de esta manera, mantiene el ambiente a una temperatura de unos 5ºC con
2
. Y además aconsejamos no colocArlo donde
no tapar el aparato durante su funcionamiento por ningún motivo pues ello provocaría un
aumento de temperatura del mismo.
8

P
MONTAGEM DOS PÉS
Para a montagem dos pés, proceder da seguinte maneira:
- Colocar os ganchos nos furos e girar o pé até prendé-lo. (fig. 1)
- Depois de enganchados os pés ao aparelho, fixe-os com os parafusos enteregues. (fig. 2)
MONTAGEM NA PAREDE
Se quiser fixar o aparelho na parede, contactar o centro de assistência mais próximo e pedir o kit de
instalação mural.
LIGAÇÃO ELÉCTRICA
- Antes de colocar a ficha na tomada de corrente, verificar cuidadosamente que a voltagem da Vossa rede
doméstica corresponda ao valor em V indicado no aparelho e que a tomada de corrente e a rede de alimentação
sejam dimensionadas para a carga do aparelho.
- ESTE APARELHO ESTÁ EM CONFORMIDADE COM A DIRECTIVA 89/336/CEE NO QUE DIZ RESPEITO
A COMPATIBILIDADE ELECTROMAGNÉTICA.
FUNCIONAMENTO E USO
Ligar
- Modelos com somente um interruptor
O aparelho está ligado quando no interruptor a zona vermelha é visível (ou se acende o indicador luminoso
nos modelos dotados de interruptor com indicador luminoso).
- Modelos com somente termóstato
Liga-se o aparelho girando o botão no sentido horário até a paragem na posição máxima.
Para desligar o aparelho, girar o botão até à posição mínima e retirar a ficha da tomada de corrente.
- Modelos com termóstato e dois interruptores
Girar o botão do termóstato no sentido horário até à posição máxima, em seguida, premer um (potência
mínima) ou ambos os interruptores (potência máxima) de modo que seja visível a zona vermelha (ou se acenda
o indicador luminoso nos modelos dotados de interruptor com indicador luminoso).
Regulação do termóstato
Quando o ambiente terá alcançado a temperatura desejada, girar lentamente o botão do termóstato no sentido
anti-horário até à posição sinalizada por um “clic” (para os modelos com indicadores luminosos, até que os
mesmos se apaguem) e não além. A temperatura assim fixada será automaticamente regulada e mantida
constante pelo termóstato.
Se o seu aparelho é do tipo com 2 interruptores, nas estações intermediárias ou nos dias particularmente rígidos,
pode premer um só interruptor e seleccionar, assim, a potência mínima, obtendo uma ulterior poupança de
consumo.
Função antigelo (somente para os modelos com termóstato)
Utilizando os interruptores, fazer com que apareça a zona vermelha, em seguida, colocar o botão do termóstato
na posição "
5ºC com um gasto mínimo de energia.
Modelo com ventilador
Esta versão permite obter um aquecimento ainda mais rápido graças ao ventilador incorporado que acelera a
difusão do calor no ambiente e faz com que a temperatura seja uniforme.
Para ligar, seguir as instruções abaixo:
• Girar o botão do termóstato no sentido horário na posição máxima.
• Para o funcionamento no mínimo sem ventarola, premer a tecla I (será visível a zona vermelha ou, nos modelos
dotados de interruptor com indicador luminoso, se acenderá o indicador luminoso).
• Para o funcionamento no mínimo com ventarola, premer a tecla II (será visível a zona vermelha ou, nos
modelos dotados de interruptor com indicador luminoso, se acenderá o indicador luminoso).
• Obtém-se a potência máxima premindo ambos os interruptores.
A regulação do termóstato, neste modelo, é feita da mesma forma que para os modelos sem ventilação.
MANUTENÇÃO
Antes de qualquer limpeza, retirar sempre a ficha da tomada de corrente.
O convector eléctrico não necessita de uma manutenção especial. É suficiente tirar o pó com um pano macio
e seco; limpá-lo somente quando estiver frio. Nunca usar pós abrasivos ou solventes.
ADVERTÊNCIAS
• Não usar o termoconvector próximo a banheiras, duches, lavatórios, piscinas, etc. O aparelho também não
deve ser colocado directamente sob uma tomada de corrente fixa.
• Não apoiar o cabo de alimentação no aparelho quente.
• Usar o termoconvector sempre e somente na posição vertical.
• Não obstruir as grelhas de saída de ar quente, nem a de entrada que se encontra no fundo do aparelho.
• Aparelho dotado de ligação Y. A substituição do cabo de alimentação deve ser feita somente por pessoa
autorizada pelo fabricante pois são necessárias ferramentas especiais.
• Não utilizar este aparelho em divisões cuja área de base for inferior a 4 m
aparelho em corrente de ar que possa interferir no funcionamento do mesmo.
Importante:
". Assim programado o aparelho mantém o ambiente em uma temperatura de aproximadamente
2
. E aconselha-se não colocar o
não cobrir em caso algum o aparelho durante o funcionamento, pois isto provocaria um
perigoso aumento de temperatura do mesmo.
9

GR
SUNARMOLOGHSH UPOSTHRIGMATWNSUNARMOLOGHSH UPOSTHRIGMATWN
SUNARMOLOGHSH UPOSTHRIGMATWN
SUNARMOLOGHSH UPOSTHRIGMATWNSUNARMOLOGHSH UPOSTHRIGMATWN
Gia th sunarmolovghsh twn podiwvn kavnete ta evxhvz
- Bavlete tou" gavntzou" sti" truvpe" kai gurivste to povdi mevcri na aggistrwqeiv (scevdio 1)
- Katovpin pou aggistrwvsate ta povdia sth suskeuhv, budwvste ta ma ti" katavllhle" buvde" (scevdio 2)
TOPOQETHSHTOPOQETHSH
TOPOQETHSH
TOPOQETHSHTOPOQETHSH
Eavn epiqumeivte na topoqethvsete th suskeuhv ston toivco, mporeivte na kalevsete to pio kontinov se esav" kevntro tecnikhv"
bohvqeia" zhtwvnta" tou" na sa" promhqeuvsoune me to koutiv twn ulikwvn scetikwvn gia thn egkatasthvsei se toivco
HLEKTRIKH SUNDESH HLEKTRIKH SUNDESH
HLEKTRIKH SUNDESH
HLEKTRIKH SUNDESH HLEKTRIKH SUNDESH
- Prin sundevsete to fi" sthn privza tou reuvmato", bebaiwqeivte ovti h parochv tou oikiakouv sa" diktuvou antistoiceiv
sthn timhv pou upodeiknuvete me th monavda V pavnw sthn suskeuhv kai ovti to fi" allav kai ta hlektrikav kalwvdia
mporouvn na ‘shkwvsoun’ th zhtouvmenh apov th suskeuhv iscuv.
- AUTH H SUSKEUH EINAI SUMFWNH ME THN ODHGIA 89-3367EOK PERI HLEKTROMAGNHTIKHS
SUMBATOTHTAS. CRHSH KAI LEITOURGIA
CRHSH KAI LEITOURGIACRHSH KAI LEITOURGIA
CRHSH KAI LEITOURGIA
CRHSH KAI LEITOURGIACRHSH KAI LEITOURGIA
Evnarxh leitourgiva"Evnarxh leitourgiva"
Evnarxh leitourgiva"
Evnarxh leitourgiva"Evnarxh leitourgiva"
Montevla me evna movno diakovpthMontevla me evna movno diakovpth
-
Montevla me evna movno diakovpth
Montevla me evna movno diakovpthMontevla me evna movno diakovpth
H suskeuhv brivskete se leitourgiva ovtan ston diakovpth eivnai orathv hv kovkkinh zwvnh (hv ovtan anavyei h endeiktikhv lucniva leitourgiva"
sta montevla sta opoiva problevpete h uvparxh endeiktikhv" lucniva" pavnw ston diakovpth leitourgiva").
Montevla me movno qermostavthMontevla me movno qermostavth
-
Montevla me movno qermostavth
Montevla me movno qermostavthMontevla me movno qermostavth
H suskeuhv tivqetai se leitourgiva peristrevfonta" to qermostavth dexiovstrofa mevcri to tevlo" th" diadromhv" tou,
sthn mevgisth dhladhv dunathv timhv. Gia na sbhvsete th suskeuhv, peristrevyte to diakovpth sto elavcisto kai
aposundevste to fi" apov thn privza tou hlektrikouv reuvmato".
Montevla me qermostavth kai duvo diakovpte"Montevla me qermostavth kai duvo diakovpte"
-
Montevla me qermostavth kai duvo diakovpte"
Montevla me qermostavth kai duvo diakovpte"Montevla me qermostavth kai duvo diakovpte"
Peristrevyte dexiovstrofa to qermostavth mevcri th mevgisthv tou timhv. Katovpin pievste ton prwvto diakovpth (camhlhv
iscuv") hv kai tou" duvo maziv (uyhlhv iscuv") evtsi wvste na eivnai orathv h kovkkinh zwvnh (hv wvste n v anavyei h endeiktikhv
lucniva leitourgiva" sta montevla autav sta opoiva problevpete endeiktikhv lucniva).
Ruvqmish" qermostavthRuvqmish" qermostavth
Ruvqmish" qermostavth
Ruvqmish" qermostavthRuvqmish" qermostavth
Ovtan h qermokrasiva tou cwvrou qa evcei ftavsei sto epiqumhtov epivpedo, peristrevyte argav to qermostavth
aristerovstrofa mevcri th qevsh ovpou q v akousteiv evna elafrov ‘klik’ (hv mevcri" ovtou sbhvsei hv endeiktikhv lucniva
sta montevla pou thn proûpoqevtoun) kai ovci parapevra. H qermokrasiva tou cwvrou qa diathreivte autovmata plevon
staqerhv, sto epivpedo autov pou orivsthke apov to qermostavth. Eavn h suskeuhv pou crhsimopoieivte eivnai
efodiasmevnh me duvo diakovpte" iscuvo", katav ti" endiavmese" epocev" (avnoixh, Eavn h suskeuhv sa" eivnai authv me
tou" duvo diakovpte", katav ti" endiavmese" epocev" hv katav ti" hmevre" pou de kavnei idiaivtero kruvo, mporeivte na
pievsete movnon ton evnan apov tou" duvo diakovpte", epilevgonta" kat’ autovn ton trovpo thn elavcisth iscuv kai
petucaivnonta" evtsi mia megaluvterh oikonomiva sthn katanavlwsh.
Antiyuktikhv leitourgiva (movno sta montevla me qermostavth)Antiyuktikhv leitourgiva (movno sta montevla me qermostavth)
Antiyuktikhv leitourgiva (movno sta montevla me qermostavth)
Antiyuktikhv leitourgiva (movno sta montevla me qermostavth)Antiyuktikhv leitourgiva (movno sta montevla me qermostavth)
Qevste tou" diakovpte" katav tevtoion trovpo wvste na eivnai orathv h kovkkinh zwvnh kai katovpin qevste to
qermostavth sthn qevsh . Econta" qevsh kat autovn ton trovpo diakovpte" kai qermostavth, h suskeuhv qa
brivskete se qevsh na diathrhvsei to cwvro se miva qermokrasiva stou" perivpou 5°C me th mikrovterh dunathv
katanavlwsh energeiva".
Montevlo me exaeristhvraMontevlo me exaeristhvra
Montevlo me exaeristhvra
Montevlo me exaeristhvraMontevlo me exaeristhvra
Autov to montevlo exasfalivzei mia pio avmesh qevrmansh tou cwvrou cavrh" tou enswmatwmevnou exaeristhvra o
opoivo" epitacuvnei thn katanomhv th" zevsth" ston peribavllon kai thn staqerovthta th" qermokrasiva".
Gia na to qevsete se leitourgiva, energeivste w" exhv":
•
Peristrevyte dexiovstrofa to qermostavth sthn mevgisth dunathv tou qevsh.
•
Gia leitourgiva sto camhlov epivpedo iscuv" cwriv" ton exaeristhvra, pievste to koumpiv
kovkkinh zwvnh hv anavbonta" thn endeiktikhv lucniva sta montevla pou thn problevpoun).
•
Gia leitourgiva sto camhlov epivpedo iscuv" me ton exaeristhvra, pievste to koumpiv II (qevtonta" evtsi orathv thn
kovkkinh zwvnh hv anavbonta" thn endeiktikhv lucniva sta montevla pou thn problevpoun).
•
Gia leitourgiva sto uyhlov epivpedo iscuv", arkeiv na pievsete amfovterou" tou" diakovpte".
H ruvqmish tou qermostavth se autav ta montevla givnete katav ton ivdio trovpo me ta montevla cwriv" exaeristhvra
SUNTHRHSHSUNTHRHSH
SUNTHRHSH
SUNTHRHSHSUNTHRHSH
Prin ap v opoiondhvpote kaqarismov, aposundevete pavnta th suskeuhv apov to hlektrikov reuvma.Prin ap v opoiondhvpote kaqarismov, aposundevete pavnta th suskeuhv apov to hlektrikov reuvma.
Prin ap v opoiondhvpote kaqarismov, aposundevete pavnta th suskeuhv apov to hlektrikov reuvma.
Prin ap v opoiondhvpote kaqarismov, aposundevete pavnta th suskeuhv apov to hlektrikov reuvma.Prin ap v opoiondhvpote kaqarismov, aposundevete pavnta th suskeuhv apov to hlektrikov reuvma.
H suskeuhv den evcei anavgkh kavpoia" eidikhv" sunthvrhsh". Arkeiv na thn xeskonivzete me evna stegnov kai malakov
paniv: Kaqarivzetev th movno ovtan eivnai kruva. Mh crhsimopoieivte sklhrav aporrupantikav kai dialuvmata.
PROEIDOPOIHSHSPROEIDOPOIHSHS
PROEIDOPOIHSHS
PROEIDOPOIHSHSPROEIDOPOIHSHS
•
Mh crhsimopoieivte th suskeuhv kontav se mpavnia, ntousievre", nipthvre", pisivne" k.t.l H suskeuhv de qa prevpei
na sundeqeiv katav movnimo trovpo se kavpoia phghv hlektrikouv reuvmato".
•
Mhn topoqeteivte to kalwvdio trofodosiva" pavnw sthn suskeuhv ovtan authv eivnai akovma zesthv apov th crhvsh.
•
Crhsimopoieivte th suskeuhv movno se kavqeth diavtaxh kai ovci diaforetikav.
•
Mh fravzete th scavra empodivzonta" evtsi thn exagwghv tou aevra ma ouvte kai authvn th" eisovdou pou brivskete
kavtw apov th suskeuhv.
•
H suskeuhv proûpoqevtei suvndesh tuvpou ‘U’. H antikatavstash tou kalwdivou trofodosiva" prevpei na givnete movno
apov proswpikov exousiodothmevno apov ton kataskeuasthv afouv eivnai aparaivthth h crhvsh eidikwvn ergaleivwn.
•
Mh crhsimopoieivte authvn th suskeuhv se cwvrou" me embadovn mikrovtero twn 4m2. Epivsj" qa sa" apotrevpame na
topoqethvsete th suskeuhv endianmesa se reuvmata aevra ta opoiva qa empovdizan th leitourgiva th" suskeuhv".
PROSOCH:
STONSTON
TOICOTOICO
STON
TOICO
STONSTON
TOICOTOICO
I
(qevtonta" evtsi orathv thn
mhn skepavzete ep v oudenhv lovgo th suskeuhv katav th diavrkeia th leitourgiva" th" giativ autov eivnaimhn skepavzete ep v oudenhv lovgo th suskeuhv katav th diavrkeia th leitourgiva" th" giativ autov eivnai
mhn skepavzete ep v oudenhv lovgo th suskeuhv katav th diavrkeia th leitourgiva" th" giativ autov eivnai
mhn skepavzete ep v oudenhv lovgo th suskeuhv katav th diavrkeia th leitourgiva" th" giativ autov eivnaimhn skepavzete ep v oudenhv lovgo th suskeuhv katav th diavrkeia th leitourgiva" th" giativ autov eivnai
dunatovn na prokalevsei mia epikivndunh avnodo th" qermokrasiva" th" ivdia" th" suskeuhv".dunatovn na prokalevsei mia epikivndunh avnodo th" qermokrasiva" th" ivdia" th" suskeuhv".
dunatovn na prokalevsei mia epikivndunh avnodo th" qermokrasiva" th" ivdia" th" suskeuhv".
dunatovn na prokalevsei mia epikivndunh avnodo th" qermokrasiva" th" ivdia" th" suskeuhv".dunatovn na prokalevsei mia epikivndunh avnodo th" qermokrasiva" th" ivdia" th" suskeuhv".
10
.

DK
MONTERING AF STØTTEFØDDERNE
Monter støttefoden ved at gå frem på følgende måde:
- Før tappene ind i indhakkene og sæt støttefoden på plads. (fig. 1)
- Efter at støttefoden er sat på apparatet, fastgøres den med de medfolgende skuer (fig. 2)
OPHÆNGNING PÅ VÆG
Hvis De vil fastgøre apparatet til væggen, skal De henvende Dem til nærmeste servicenter og bede om de
færdigpakkede monteringsdele til vægophængning.
ELEKTRISK NETTILSLUTNING
- Før at stikkontakten sættes i stikket check omhyggeligt at husnettets spænding svarer til værdien i V (volt) der
er vist på apparatet og at både stikket og el-netteter rigtigt dimensioneret til apparatets belastning.
- DETTE APPARAT ER I OVERENSSTEMMELSE MED EF DIREKTIV 89/336 OM ELEKTROMAGNETISK
KOMPATIBILITET.
BRUG OG DRIFT
Tænding
- Modeller der kun har en afbryder
Apparatet er tændt når man kan se den røde overflade på afbryderen (eller den røde lampe, på de modeller
der er udstyret med den).
- Modeller der kun har termostat
Apparatet tænder når man drejer håndhjulet med uret og det standser ved endestillingen.
For at slukke apparatet, drejes håndhjulet indtil minimum positionen og stikkontakten tages ud af stikket.
- Modeller med termostat og to afbryder
Drej termostatens håndhjul med uret indtil endestillingen, derefter tryk på en (min. styrke)eller bægge
afbryderne (maks. styrke) så den røde overflade kan ses (eller den røde lampe, på de modeller der er udstyret
med den).
TERMOSTATENS JUSTERING
Når værelset har nået den ønskede temperatur, drejes håndhjulet imod uret indtil stillingen hvor der høres en
“click” (for modellerne med lampe, der hvor den slukker sig) og ikke længere.Den sådan bestemte temperatur vil
automatiskt holdes konstant af termostaten.
Hvis jeres apparat er af typen med to afbrydere kan I, i de mellem liggende sæsoner eller i de når vejret ikke er
særligt slemt, anvende en afbryder alene og dermed vælge den laveste styrke og opnå en yderligere forbrugs
besparelse.
Frosthindrende funktion (kun for modellerne med termostat)
Stil afbryderne så man kan se de røde overflader, og stil håndhjulet på ”
værelset ved circa 5°C med det mindste energiforbrug.
Model med blæser
Denne version tillader en endu hurtigere opvarmning, takket være den indbygget blæser der accelererer varmens
udbredelse i værelset og gør temperaturen mere ensformig.
Tændingen sker på følgende måde:
• Termostatens håndhjul drejes med uret til maks. stillingen.
• For min.drift uden blæser, trykkes knap I (den røde overflade bliver synlig eller, for modellerne der er udstyret
med afbryder og lampe tænder denne).
• For min.drift med blæser, trykkes knap II (den røde overflade vil blive synlig eller for modellerne der er udstyret
med afbryder og lampe så tænder denne).
• Den maksimale styrke opnåes ved at trykke på bægge afbryderne.
Termostatens indstilling udføres, for denne model, ligesom for dem uden termostat.
VEDLIGEHOLDELSE
Før enhver rengøring tak altid stikkontakten ud af stikket.
El-konvektoren behøver ikke nogen særlig vedligeholdelse.Der er nok at gøre den ren med en blød og tør klud
:gør den kun ren når den er kold. Brug aldrig slibende pulver eller solventer.
ANMÆRKNINGER
• Brug aldrig varmeapparatet lige ved siden af badekar, kummer, svømmebassiner, m.m. Derudover bør
apparatet aldrig stilles lige under et fast stik.
• Læg aldrig ledningen på det varme apparat.
• Brug altid varmeapparatet i vandret stilling.
• Tildæk aldrig udgangs-rillerne til den varme luft, og heller ikke dem til den kolde, der befinder sig på apparatets
bund.
• Apparatet er udstyret med forbindelse af Y typen. Udskiftningen af fødningsledningen må kun udføres af
personale autoriserede af konstruktøren idet der kræves specialværktøj.
• Brug ikke dette apparat i værelser vis overflade er mindre en 4 m
gennemjrpek, der kan forstyrre apparatets virkning.
VIGTIGT: tildæk aldrig apparatet under driften, fordi det vil oversage en farlig stigning af temperaturen
i det samme.
“.Sådan indstillet holder apparatet
2
. Og derudover frarådes det at stille det i
11

S
MONTAGE AV FÖTTERNA
För montering av fötterna gå följande sätt.
- Haka i hakarna i hålen och vrid foten tills den är fasthakad. (fig. 1)
- Efter det att fötterna fasthakats på apparatenfäst desamma med skruvarna som medföljer som utrustning. (fig. 2)
VÄGGMONTERING
Om du önskar montera apparaten på väggen, vänd dig till den närmaste serviceverkstaden och beställ
satsen för väggmontering.
ELEKTRISK ANSLUTNING
- Kontrollera noga att spänningen i vägguttaget stämmer med den som angivits på apparaten innan denna
ansluts till vägguttaget, och att vägguttaget är dimensionerat för apparatens effektförbrukning.
- DENNA APPARAT FÖLJER DIREKTIVEN 89/336/CEE OM ELEKTROMAGNETISK KOMPATIBILITET.
FUNKTION OCH ANVÄNDNING
Påslagning
- Modeller med endast en strömbrytare
Apparaten är på när den röda zonen syns på strömbrytaren (eller också tänds kontrollampan på modeller
utrustade med sådan).
- Modeller med enbart termostat
Apparaten startas genom att vrida vredet medurs tills det stannar vid ändläget.
För att stänga av apparaten, ställ vredet i läge min och drag ur kontakten ur vägguttaget.
- Modeller med termostat och två knappar
Vrid termostatens vred medurs tills den når ändläget. Slå sedan på den ena (lägsta effekt) eller båda knapparna
(max effekt) så att den röda zonen syns (eller kontrollampan på modeller utrustade med sådan tänds).
Reglering av termostat
När omgivningen nått önskad temperatur, vrid sakta termostaten moturs till läget där det hörs ett “klick” (på
modeller med en kontrollampa tills denna släcks), och sen ej längre. Temperaturen som fixeras på detta sätt
kommer att regleras automatiskt och hållas konstant av termostaten.
Om er apparat har 2 strömbrytare kan man välja att sätta på bara den ena vid inte alltför kalla dagar och på så
vis välja lägre effekt med tillhörande besparing av energi.
Antifrysfunktion (endast på modeller med termostat)
Tryck på knapparna så att de röda zonerna syns och vrid sedan termostaten till läget "
kommer maskinen att hålla rummets temperatur vid ca 5 °C med så liten energiinsats som möjligt.
Modeller med fläkt
Denna version tillåter en ännu snabbare uppvärmning tack vare den inbyggda fläkten som snabbar på
värmediffusionen i omgivningen och gör att temperaturen blir lika i hela rummet.
För att starta, gör enligt följande:
• Vrid termostaten medurs till maxläget.
• För minimiläge utan fläkt, tryck på knappen I (den röda zonen syns, eller också tänds kontrollampan på modeller
utrustade med sådan).
• För minimiläge med fläkt, tryck på knappen II (den röda zonen syns, eller också tänds kontrollampan på
modeller utrustade med sådan).
• Maxläge når man genom att välja bägge knappar.
Regleringen av termostaten på denna modell går till på samma sätt som på modellen utan fläkt.
UNDERHÅLL
Innan allt underhåll ska alltid kontakten dras ur vägguttaget.
Den elektriska värmekonvektorn kräver inget särskilt underhåll. Det räcker att damma av den med en mjuk och
torr trasa. Rengör den endast då den är kall. Använd aldrig repande rengöringsmedel eller lösningsmedel.
VARNINGAR
• Använd ej termokonvektorn i närheten av badkar, duschar, tvättfat, swimmingpooler etc. Dessutom får
apparaten ej placeras under ett fast strömuttag.
• Lägg ej strömkabeln ovanpå det varma höljet.
• Värmekonvektorn får enbart användas i vertikalt läge.
• Se till att varken gallret för den varma utloppsluften eller gallret för inloppsluften (på baksidan av apparaten) är hindrade.
• Apparaten är konstruerad för elektrisk anslutning av Y-typ. Utbyte av strömkabeln får endast utfˆras av
tillverkaren auktoriserad personal då specialverktyg erfordras.
• Använd ej denna apparat i utrymmen vars golvyta är mindre än 4 m
2
. Dessutom avrådes från att placera den i
luftströmmar som kan störa dess funktion.
• Den här fläkten är inte avsedd att användas i hygieniska rum, barnkammare, daghem och bostadsrum.
Viktigt: övertäck aldrig apparaten medan den är i drift, då detta medför en farlig temperaturhöjning.
". Inställd på detta sätt
12

N
MONTERING AV BENENE
- Sett i ankerpluggen og vri foten inntil den "kikker" på plass. (fig. 1)
- Fest føttene i posisjon ved bruk av to skruer. (fig. 2)
VEGGMONTERING
Dersom apparatet skal monteres på en vegg, henvend deg til det nærmeste servicesenteret og bestill veggmonteringssettet.
ELEKTRISK TILKOBLING
- Før støpselet settes i kontakten, kontroller nøye at spenningen i stikkontakten er den samme som verdien V
som er avmerket på ovnen, og at stikkontakten og strømtilførselen er dimensjonert for ovnens strømforbruk/
effekt.
- DENNE OVNEN ER I OVERENSTEMMELSE MED DIREKTIVET 89/336/EU OM ELEKTROMAGNETISK
FORENLIGHET.
FUNKSJON OG BRUK
På-slåing
- Modeller med bare en bryter
Ovnen er slått på når den røde delen på bryteren er synlig (lyset slår seg på på modellene utstyrt med lysende
bryter).
- Modeller med kun termostat
Ovnen slår seg på ved å skru termostaten med klokka helt til den stopper i maksumumsposisjon.
For å slå av ovnen, skru bryteren på minimums styrke og ta støpselet ut av stikkontakten.
- Modeller med termostat og to brytere
Skru termostaten med klokka så langt det er mulig. Trykk så på den ene (minimums styrke) eller begge bryterne
(maksimums styrke) slik at den røde delen blir synlig (lyset slår seg på på modellene utstyrt med lysende bryter).
Regulering av termostat
Når romtemperaturen er kommet opp i ønskelig nivå, skru så sakte på termostaten mot klokka til det høres et
“klikk”, og ikke lenger (for modellene med lys, til dette slår seg av). Den ønskede temperaturen vil på den måten
bli regulert, og vil bli holdt konstant ved hjelp av termostaten.
Hvis ovnen er av typen med to brytere, kan også kun en av bryterne trykkes inn, og på den måten velges den
laveste styrken. Dette vil gi et lavere energiforbruk i mellomsesonger eller på mindre kalde dager.
Antifrost-funksjon (kun for modellene med termostat)
Skru på bryterne slik at den røde delen er synlig; sett så termostaten på "
holde en romtempetatur på ca. 5° C og ha et minimumsforbruk av energi.
Modell med vifte
Denne versjonen tillater en enda hurtigere oppvarming takket være den innebygde viften som øker spredningen
av varmen i rommet og gjør temperaturen lik over alt.
For å slå på, gå frem på følgende måte:
• Skru termostaten med klokka til maksimumsposisjon.
• For bruk på minimum uten vifte, trykk på tasten I(den røde delen vil bli synlig; på modellene med bryter med
lys vil dette slå seg på).
• For bruk på minimum med vifte, trykk på tasten II (den røde delen vil bli synlig; på modellene med bryter med
lys vil dette slå seg på).
• Den høyeste styrken oppnås ved å trykke på begge bryterne.
Reguleringen av termostaten, på denne modellen, gjøres på samme måte som på modellene uten ventilering.
VEDLIKEHOLD
Før enhver rengjøring trekk alltid ut støpselet av stikkontakten.
Den elektriske varmeovnen krever ikke noe spesielt vedlikehold. Det holder å tørke over den med en myk og tørr
klut; rengjør den kun når den er kald. Bruk aldri midler som kan skrape eller løsemidler.
ADVARSEL
• Bruk ikke den elektriske varmeovnen i umiddelbar nærhet av badekar, dusjer, vasker, svømmebasseng etc.
Ovnen må aldri plasseres rett under en stikkontakt.
• Ikke legg ledningen oppå varm ovn.
• Bruk kun den elektriske varmeovnen i vertikal stilling.
• Ikke sperr utgangsristen for varm luft, og heller ikke den for inngående luft som befinner seg nederst i ovnen.
• Ovn forsynt med tilkobling type Y. Utbytting av ledningen skal kun utføres av autorisert personell da det er
nødvendig med spesialverktøy.
• Ikke bruk denne ovnen i rom hvor gulvarealet er mindre enn 4 kvadratmeter. I tillegg frarådes det å plassere den
i trekk da dette kan ha innvirkning på ovnens funksjon.
VIKTIG: tildekk aldri ovnen mens den er i bruk da dette kan forårsake temperaturøkning i selve
varmeovnen.
" . Innstilt på denne måten vil ovnen
13
SF
JALKOJEN ASENNUS
Jalat asennetaan seuraavalla tavalla:
- Hakaset pistetään aukkoihin ja jalkaa kierretää kunnes se menee paikoillen. (Kuva 1)
- Kun jalat ovat paikoillaan, kiinnitetään ne mukana olevilla ruuveilla. (Kuva 2)
SEINÄÄN KIINNITYS
Ota yhteys lähimpään asiakaspalvelukeskukseen, mikäli haluat kiinnittää laitteen seinään ja pyydä tätä
tarkoitusta varten tarvittavia välineitä.
SÄHKÖKYTKENTÄ
- Ennen kuin kytket laitteen pistorasiaan, tarkista että verkkojännite vastaa laitteen arvokilvessä ilmoitettua
jännitettä ja että pistorasia ja syöttökaapeli ovat laitteen kuormituksen kannalta oikein mitoitettuja.
- TÄMÄ LAITE ON SÄHKÖMAGNEETISTA YHTEENSOPIVUUTTA KOSKEVAN EU-DIREKTIIVIN 89/336
SEKÄ ASETUKSEN MUKAINEN.
TOIMINTA JA KÄYTTÖ
Käynnistys
- Yhdellä katkasijalla varustetut mallit
Kun laite käynnistetään, tulee katkaisijan punainen osa näkyviin (tai valomerkki syttyy, mikäli kysymyksessä
on malli, joka on varustettu valomerkillä).
- Mallit , joissa vain lämmmönsäädin
Laite käynnistetään kiertämällä säätönuppia myötäpäivään, kunnes tämä pysähtyy ääriasentoonsa.
Laitteen sulkemiseksi kierrä säätönuppia minimiasentoonsa ja ota pistoke irti pistorasiastaan.
- Mallit , joissa lämmönsäädin ja kaksi katkasijaa
Kierrä lämmönsäätimen säätönuppia myötäpäivään, kunnes se saavuttaa ääriasentonsa ja paina sen jälkeen
yhtä katkasijaa (minimiteho) tai molempia katkaisijoita (maksimiteho), siten että punainen osa katkaisijasta jää
näkyviin (tai vaihtoehtoisesti valomerkki syttyy malleissa, jotka ovat valomerkillä varustettuja).
Lämmönsäätimen käyttö
Kun huoneilma on saavuttanut toivomasi lämpötilan, käännä säätönuppia hyvin hitaasti vastapäivään, kunnes
se saavuttaa asennon, jossa kuuluu naksahtava merkkiääni (tai kunnes valomerkki sammuu valomerkillä
varustetussa mallissa). Älä kierrä säätönuppia tämän rajan yli. Lämpötila, joka täten tulee lukituksi, pysyy
automaattisesti muttumattomana, koska lämmönsäädin ohjaa sitä jatkuvasti. Jos laitteenne on kahdella katkaisijalla
varustettua tyyppiä, voitte talvikauden alussa ja lopussa tai yleensäkin silloin, kun lämpötila ei ole kovin alhainen,
painaa vain yhtä katkaisijaa ja saavuttaa siten lisää energiansäästöä.
Jäätymisen esto (vain lämmönsäätimellä varustetuissa malleissa)
Paina katkaisijoita siten, että punainen osa tulee näkyviin, ja kierrä säätönuppi "
säädettynä laite pitää hyvin pienellä virrankulutuksella huoneen lämpätilan noin 5°C lämpöasteessa.
Tuulettimella varustettu malli
Tämän laiteversion avulla saadaan huonetilan lämmitys vieläkin nopeammaksi, koska tuuletin puhaltaa lämmintä
ilman huoneeseen ja levittää lämpötilan nopeasti tasaiseksi.
Käynnistys tapahtuu seuraavasti:
• Kierrä lämmönsäätimen säätönuppia myötäpäivään, kunnes se on saavuttanut maksimiasentonsa.
• Jos haluat käyttää minimitehoa käyttämättä tuuletinta, paina katkasijaa I (katkaisijan punainen osa tulee
näkyviin tai valomerkillä varustetuissa laitteissa valomerkki sytttyy).
• Jos haluat käyttää minimitehoa tuulettimen kera, paina katkasijaa II ( (katkaisijan punainen osa tulee näkyviin
tai valomerkillä varustetuissa laitteissa valomerkki sytttyy).
• Maksimiteho saadaan päälle, kun painetaan molempia katkaisijoita.
Lämmönsäätimen käyttö laitteen tässä mallissa tapahtuu samalla tavalla kuin ilman tuuletinta olevissa malleissa.
HUOLTO
Ota pistoke aina irti pistorasiasta ennen huoltotoimenpiteiden suorittamista.
Sähköinen virtauslämmitin ei vaadi erikoista huoltoa. Riittää, että se pyyhitään kuivalla ja pehmeällä kankaalla:
Lämmittimen tulee olla tällöin kylmä. Älä koskaan käytä hiovia tai liuottavia pesuaineita.
VAROITUKSIA
• Älä käytä virtauslämmitintä lähellä kylpyammeita, suihkuja, pesualtaita, uima-altaita jne. Virtauslämmitintä ei
myöskään tule sijoittaa suoraan seinäpistorasian alle.
• Älä laske syöttökaapelia kuuman laitteen päälle.
• Käytä virtauslämmitintä aina yksinomaan pystysuorassa asennossa.
• Älä estä millään tavoin lämpimän ilman vapaata ulospääsyä ritilän läpi, huolehdi myös että laitteen pohjassa
sijaitseva ilman sisäänmenoritilä on vapaa ilman kiertoa haittaavista esteistä.
• Laite on varustettu Y-tyyppisellä liitännällä. Laitteen syöttökaapelin vaihdon saa suorittaa vain tehtaan
valtuuttama teknikko , koska tähän tarvitaan erikoistyökaluja.
• Älä käytä tätä laitetta huoneessa, jonka pinta-ala on alle 4m
2
. Älkää myöskään asettako laitetta paikkoihin, joissa
ilmavirrat voivat häiritä laitteen toimintaa.
Tärkeää: älä koskaa peitä laitetta millään tavoin sen toiminnan aikana, koska laitteen peittäminen
nostaa sen lämpötilan vaarallisen korkeaksi.
"- asentoon. Tällä tavoin
14

CZ
UPEVNÛNÍUPEVNÛNÍ
UPEVNÛNÍ
UPEVNÛNÍUPEVNÛNÍ
Pfii upevÀování podnoÏek postupujte následujícím zpÛsobem:
- VloÏte háãky do otvorÛ a za‰roubujte podnoÏku. (obr.1)
- Pfiipojené podnoÏky upevnûte ‰roubem, kter˘ je souãástí balení. (obr.2)
UPEVNÙNÍ NA STÙNU.UPEVNÙNÍ NA STÙNU.
UPEVNÙNÍ NA STÙNU.
UPEVNÙNÍ NA STÙNU.UPEVNÙNÍ NA STÙNU.
Chcete-li upevnit pfiístroj na stûnu, obraÈte se na servisní sluÏbu, která Vám poskytne sadu nástrojÛ k instalaci pfiístroje.
ELEKTRICKÉ NAPOJENÍ.ELEKTRICKÉ NAPOJENÍ.
ELEKTRICKÉ NAPOJENÍ.
ELEKTRICKÉ NAPOJENÍ.ELEKTRICKÉ NAPOJENÍ.
- Dfiíve neÏ zasunete zástrãku do elektrické sítû, ujistûte se, zda elektrické napûtí Va‰í sítû odpovídá hodnotû VoltÛ,
- TENTO P¤ÍSTROJ ODPOVÍDÁ P¤EDPISÛM CEE 89/336 ELEKTROMAGNETICKÉ KOMPATIBILITY
PROVOZ A POUÎITÍPROVOZ A POUÎITÍ
PROVOZ A POUÎITÍ
PROVOZ A POUÎITÍPROVOZ A POUÎITÍ
ZapnutíZapnutí
Zapnutí
ZapnutíZapnutí
--
-
--
--
-
--
--
-
--
Regulace termostatuRegulace termostatu
Regulace termostatu
Regulace termostatuRegulace termostatu
Po dosaÏení poÏadované teploty, otáãejte pomalu knoflíkem termostatu proti smûru hod. ruãiãek aÏ do polohy
oznaãené signálem “klik” (u modelÛ se svûteln˘m signálem, aÏ do zhasnutí kontrolní Ïárovky). Takto nastavená teplota
bude automaticky regulována a udrÏována termostatem.
Je-li Vበpfiístroj vybaven dvûma vypínaãi, stisknutím jen jednoho a nastavením min. v˘konu, mÛÏete v ne pfiíli‰
studen˘ch obdobích, dosáhnout sníÏení spotfieby pfiístroje.
Funkce proti mrazu (pouze u modelÛ s termostatem)Funkce proti mrazu (pouze u modelÛ s termostatem)
Funkce proti mrazu (pouze u modelÛ s termostatem)
Funkce proti mrazu (pouze u modelÛ s termostatem)Funkce proti mrazu (pouze u modelÛ s termostatem)
Nastavte vypínaãe do polohy, kdy je viditelné ãervené pole, poté nastavte termostat do polohy " ". Takto nastaven˘
pfiístroj bude udrÏovat teplotu cca 5°C s minimální ztrátou energie.
Model s ventilátoremModel s ventilátorem
Model s ventilátorem
Model s ventilátoremModel s ventilátorem
Tento model poskytuje rychlej‰í dosaÏení poÏadované teploty díky ventilátoru, kter˘ urychlí rozptyl tepla a souãasnû
udrÏuje stejnomûrnou teplotu.
K zapnutí pfiístroje postupujte podle následujících pokynÛ:
• knoflíkem termostatu otáãejte ve smûru hod. ruãiãek aÏ do max. polohy
• k min. provozu bez ventilátoru, stisknûte tlaãítko I (objeví se ãervené pole, u modelÛ se svûteln˘m signálem se
• k min. provozu s ventilátorem, stisknûte tlaãítko II (objeví se ãervené pole, u modelÛ se svûteln˘m signálem se
• max. provoz získáte stisknutím obou tlaãítek
Regulace termostatu tohoto modelu je stejná, jako regulace termostatu pfiístrojÛ bez ventilátoru.
ÚDRÎBAÚDRÎBA
ÚDRÎBA
ÚDRÎBAÚDRÎBA
NeÏ pfiistoupíte k ãistûní pfiístroje, ujistûte se, Ïe pfiístroj je vypojen z elektrické sítû.NeÏ pfiistoupíte k ãistûní pfiístroje, ujistûte se, Ïe pfiístroj je vypojen z elektrické sítû.
NeÏ pfiistoupíte k ãistûní pfiístroje, ujistûte se, Ïe pfiístroj je vypojen z elektrické sítû.
NeÏ pfiistoupíte k ãistûní pfiístroje, ujistûte se, Ïe pfiístroj je vypojen z elektrické sítû.NeÏ pfiistoupíte k ãistûní pfiístroje, ujistûte se, Ïe pfiístroj je vypojen z elektrické sítû.
Elektrick˘ ohfiívaã nevyÏaduje zvlá‰tní údrÏbu. Je dostaãující jej otfiít mûkk˘m, such˘m hadrem. Pfiístroj ãistûte vÏdy
zastudena. NepouÏívejte rozpou‰tûdla nebo ãistící prá‰ky.
POUÃENÍPOUÃENÍ
POUÃENÍ
POUÃENÍPOUÃENÍ
• NepouÏívejte tepeln˘ ohfiívaã v blízkosti sprch, van, umyvadel, bazénÛ a podobnû. Pfiístroj nesmí b˘t umístûn pod
• Nepokládejte napájecí kabel na tepl˘ pfiístroj.
• PouÏívejte tepeln˘ ohfiívaã pouze ve svislé poloze.
• Nepfiikr˘vejte ochrann˘ ro‰t rozptylovaãe teplého vzduchu, ani otvor pro pfiívod vzduchu, kter˘ je umístûn na spodní
• Pfiístroj je opatfien zapojením typu Y. V˘mûna napájecího kabelu musí b˘t provedena pouze specializovan˘m
• NepouÏívejte pfiístroj v prostorách, jejichÏ podlaha je men‰í neÏ 4 m2. NeumísÈujte pfiístroj, kde je pravdûpodobné
PODNOÎEK PODNOÎEK
PODNOÎEK
PODNOÎEK PODNOÎEK
uveden˘ch na pfiístroji a zda zásuvka sítû má rozmûry odpovídající napûtí pfiístroje.
modely s jedním vypínaãemmodely s jedním vypínaãem
modely s jedním vypínaãem
modely s jedním vypínaãemmodely s jedním vypínaãem
Pfiístroj je zapnut, kdyÏ je na vypínaãi viditelné ãervené pole (nebo se rozsvítí kontrolní Ïárovka u pfiístrojÛ, jejichÏ
vypínaã má svûteln˘ signál)
modely s termostatemmodely s termostatem
modely s termostatem
modely s termostatemmodely s termostatem
K zapnutí pfiístroje otáãejte knoflík ve smûru hod. ruãiãek aÏ do maximální polohy. K vypnutí pfiístroje otáãejte knoflík
aÏ do minimální polohy a vytáhnûte zástrãku ze sítû.
modely s termostatem a dvûma vypínaãimodely s termostatem a dvûma vypínaãi
modely s termostatem a dvûma vypínaãi
modely s termostatem a dvûma vypínaãimodely s termostatem a dvûma vypínaãi
Otáãejte knoflík termostatu ve smûru hod. ruãiãek aÏ do max. polohy, poté stisknûte jeden (min. v˘kon) nebo oba
vypínaãe (max. v˘kon) tak, aby bylo viditelné ãervené pole (u modelÛ, které mají svûteln˘ signál se rozsvítí kontrolní
Ïárovka).
rozsvítí kontrolní Ïárovka)
rozsvítí kontrolní Ïárovka)
zástrãkou do elektrické sítû.
ãásti pfiístroje.
personálem, urãen˘m v˘robcem, jelikoÏ je nutné pouÏít specifick˘ch nástrojÛ.
proudûní vzduchu, ztíÏil by se tím provoz pfiístroje.
dÛleÏité upozornûní:dÛleÏité upozornûní:
dÛleÏité upozornûní:
dÛleÏité upozornûní:dÛleÏité upozornûní:
nepfiikr˘vejte nikdy pfiístroj bûhem provozu, mohlo by dojít k nebezpeãnému pfiehfiátí.nepfiikr˘vejte nikdy pfiístroj bûhem provozu, mohlo by dojít k nebezpeãnému pfiehfiátí.
nepfiikr˘vejte nikdy pfiístroj bûhem provozu, mohlo by dojít k nebezpeãnému pfiehfiátí.
nepfiikr˘vejte nikdy pfiístroj bûhem provozu, mohlo by dojít k nebezpeãnému pfiehfiátí.nepfiikr˘vejte nikdy pfiístroj bûhem provozu, mohlo by dojít k nebezpeãnému pfiehfiátí.
15

PL
MONTA˚ NÓ˚EK URZÑDZENIA
Dopasowaç no˝ki urzàdzenia w nast´pujàcy sposób:
- Wprowadziç sworznie nó˝ek w otwory i przekr´ciç nó˝k´, a˝ znajdzie si´ we w∏aÊciwej pozycji (rys. 1).
- Zamocowaç nó˝ki Êrubami we w∏aÊciwej pozycji (rys. 2).
MONTA˚ ÂCIENNY
Je˝eli urzàdzenie ma zostaç zamontowane na Êcianie, prosimy o kontakt z najbli˝szym Centrum Serwisowym i poprosiç o
zestaw do montowania Êciennego.
POD¸ÑCZENIE DO SIECI
- Przed pod∏àczeniem wtyczki do gniazdka elektrycznego nale˝y dok∏adnie sprawdziç, czy napi´cie elektryczne w
Paƒstwa domu odpowiada napi´ciu wymaganemu przez urzàdzenie oraz czy gniazdko i przewód g∏ówny odpowiadajà
zasilaniu urzàdzenia.
- URZÑDZENIE ODPOWIADA DYREKTYWIE EEC 89/336 ODNOÂNIE KOMPATYBILNOÂCI ELEKTROMAGNETYCZNEJ.
OBS¸UGA I U˚YTKOWANIE
W∏àczanie urzàdzenia
- Modele wyposa˝one tylko w jeden wy∏àcznik
Urzàdzenie jest w∏àczone, gdy wy∏àcznik zostaje podÊwietlony na czerwono (lub w niektórych modelach, kiedy na
wy∏àczniku zapala si´ lampka ostrzegawcza).
- Modele wyposa˝one tylko w termostat
Urzàdzenie mo˝e zostaç w∏àczone poprzez przekr´cenie pokr´t∏a w kierunku zgodnym z ruchem wskazówek zegara a˝
do ostatniej mo˝liwej pozycji ustawienia.
Aby wy∏àczyç urzàdzenie, nale˝y przekr´ciç pokr´t∏o na najni˝szà pozycj´ ustawienia i wyjàç wtyczk´ z gniazdka
elektrycznego.
- Modele z termostatem i dwoma wy∏àcznikami
Przekr´ciç pokr´t∏o termostatu w kierunku zgodnym z ruchem wskazówek zegara, a˝ dojdzie ono do ostatniej mo˝liwej
pozycji ustawienia, nast´pnie wcisnàç jeden wy∏àcznik (moc minimalna) lub oba wy∏àczniki (moc maksymalna), a˝ zapali
si´ czerwona kontrolka (lub lampka ostrzegawcza w niektórych modelach).
Regulacja termostatu
Kiedy w pomieszczeniu zapanuje odpowiednia temperatura, przekr´ciç powoli pokr´t∏o termostatu w kierunku przeciwnym
do ruchu wskazówek zegara, a˝ dojdzie ono do pozycji ustawienia, w której s∏ychaç klikni´cie (lub w modelach wyposa˝onych
w lampki kontrolne, a˝ kontrolki zgasnà) - nie przekraczaç tej pozycji. Termostat automatycznie dostosuje i b´dzie utrzymywa∏
ustawionà temperatur´.
Je˝eli urzàdzenie posiada 2 wy∏àczniki, mo˝na korzystaç tylko z jednego w niezbyt ch∏odne dni. W ten sposób mo˝na
zmniejszyç zu˝ycie energii elektrycznej.
Funkcja zapobiegania zamarzaniu (tylko w modelach z termostatem)
Przekr´ciç wy∏àcznik (lub wy∏àczniki) a˝ zaÊwieci si´ czerwona kontrolka, nast´pnie przekr´ciç pokr´t∏o termostatu do
ustawienia "❄". Przy takim ustawieniu urzàdzenie b´dzie utrzymywa∏o temperatur´ pomieszczenia 5° C, przy minimalnym
zu˝yciu energii elektrycznej.
Model z nadmuchem
Wersja ta umo˝liwia jeszcze szybsze ogrzanie pomieszczenia dzi´ki wbudowanemu wiatraczkowi, która przyspiesza
rozchodzenie si´ ciep∏a i utrzymuje jednakowà temperatur´.
Aby w∏àczyç urzàdzenie, nale˝y wykonaç nast´pujàce czynnoÊci:
• Przekr´ciç pokr´t∏o termostatu w kierunku zgodnym z ruchem wskazówek zegara na ostatnià mo˝liwà pozycj´ ustawienia.
• Aby urzàdzenie pracowa∏o z minimalnà mocà bez nadmuchu, nale˝y wcisnàç przycisk I (zapali si´ czerwone Êwiate∏ko
lub, w modelach z wy∏àcznikiem wyposa˝onym w lampk´ ostrzegawczà, zapali si´ kontrolka).
• Aby urzàdzenie pracowa∏o z minimalnà mocà z nadmuchem, nale˝y wcisnàç przycisk II (zapali si´ czerwone Êwiate∏ko
lub, w modelach z wy∏àcznikiem wyposa˝onym w lampk´ ostrzegawczà, zapali si´ kontrolka).
• Wcisnàç oba wy∏àczniki w celu uzyskania najwy˝szej mocy.
W tym modelu mo˝liwa jest regulacja termostatu tak samo jak w modelach bez nadmuchu.
KONSERWACJA
Przed przystàpieniem do czyszczenia nale˝y zawsze wyjàç wtyczk´ z gniazdka.
Niniejszy elektryczny grzejnik konwektorowy nie wymaga specjalnej konserwacji. Nale˝y go jedynie wycieraç z kurzu
mi´kkà, suchà szmatkà ó lecz tylko po ostygni´ciu. Nigdy nie u˝ywaç proszków Êciernych ani rozpuszczalników.
PRZYDATNE RADY
•∑ Nie u˝ywaç grzejnika w bezpoÊrednim sàsiedztwie wanien, pryszniców, umywalek, brodzików, etc. Ponadto, urzàdzenie
nie powinno byç umieszczane pod trwa∏ym gniazdkiem elektrycznym.
•∑ Nie k∏aÊç kabla zasilania na rozgrzanym urzàdzeniu.
• Urzàdzenie musi zawsze znajdowaç si´ w pozycji pionowej.
• Nie zas∏aniaç kratki wylotowej goràcego powietrza ani kratki wlotowej umieszczonej na spodzie urzàdzenia.
∑ Urzàdzenie posiada po∏àczenie gwiazdowe. Wymiany kabla zasilajàcego mo˝e dokonaç jedynie technik autoryzowany
przez producenta, gdy˝ czynnoÊç ta wymaga specjalistycznych narz´dzi.
∑ Nigdy nie stosowaç urzàdzenia w pomieszczeniu o powierzchni mniejszej ni˝ 4 m2. Zalecamy równie˝, aby nie umieszczaç
urzàdzenia w przeciàgu, gdy˝ podmuchy powietrza mogà wp∏ywaç niekorzystnie na skutecznoÊç dzia∏ania urzàdzenia.
Wa˝ne: Nigdy nie przykrywaç urzàdzenia podczas pracy, gdy˝ mo˝e to spowodowaç niebezpieczny wzrost temperatury
samego urzàdzenia.
16

H
TARTÓLÁBAK FELSZERELÉSE
A tartólábak felszerelését az alábbi módon végezze:
- A lapocskát illessze a megfelelő furatba és a lábat beakadásig hajtsa rá. (1. ábra)
- Miután a tartólábat a készülékbe akasztotta, rögzítse a mellékelt csavarokkal. (2. ábra)
FALRASZERELÉS
Amennyiben a falra kívánja szerelni a készüléket, akkor forduljon a lakóhelyéhez legközelebbi Szervizhez és
szerezze be a munkához szükséges szerelési készletet.
ELEKTROMOS BEKÖTÉS
- Mielőtt a villásdugót az aljzatba helyezné, figyelmesen ellenőrizze, hogy a hálózati és a készüléken
feltüntetett Volt értékek megegyeznek-e egymással, valamint hogy az aljzat és a hálózat teljesítménye a
készülék által felvett áramnak megfelel-e.
- EZ A KÉSZÜLÉK MEGFELEL AZ ELEKTROMÁGNESES KOMPATIBILITÁSRÓL SZÓLÓ 89/336 SZ. EU.
IRÁNYELVNEK ÉS A 476/92 SZ. OLASZ MINISZTERI RENDELETNEK.
MŰKÖDÉS ÉS HASZNÁLAT
Bekapcsolás
- Egy kapcsolóval rendelkező típusok
A készülék akkor van bekapcsolva, amikor láthatóvá válik a piros rész (illetve a fénykapcsolós típusok esetében
kigyullad a fény).
- Csak hőfokszabályzóval rendelkező típusok
A készülék bekapcsolásához a tárcsát forgassa az óramutató járásával megegyező irányba egészen
ütközésig, a maximum fokozatra. A készülék kikapcsolásához a tárcsát forgassa minimum fokozatra és húzza
ki a dugót az aljzatból.
- Hőfokszabályzóval és két kapcsolóval rendelkező típusok
A hőfokszabályzó tárcsáját forgassa az óramutató járásával megegyező irányba a maximum fokozatra, majd
nyomja meg az egyik (minimális teljesítmény) vagy mindkét kapcsolót (maximális teljesítmény), hogy láthatóvá
váljon a piros rész (vagy hogy a fénykapcsolóval ellátott készüléken kigyulladjon a fény).
A hőfokszabályozás
Miután a helyiség elérte a kívánt hőfokot, a hőfokszabályzó tárcsáját lassan fordítsa el az óramutató járásával
ellenkező irányba egész addig, amíg nem hall egy kattanást (a fénykapcsolós típusok esetében a fény
kikapcsolásáig), de nem tovább. Az így beállított hőfokot a készülék automatikusan megtartja.
Amennyiben készülékén két kapcsoló található, akkor a nem különösen hideg napokon elég csak egy kapcsolót
megnyomni és ezáltal a minimális teljesítményt beállítani, mert így energiatakarékosságot ér el.
Fagyálló funkció (kizárólag a hőfokszabályzós készülékek esetében)
A kapcsolók segítségével tegye láthatóvá a piros részt, majd a hőfokszabályzót állítsa "❄" fokozatra. Az így
beállított készülék kb. 5˚C-on tartja a szobahőmérsékletet és minimális energiát fogyaszt.
Ventillátorral rendelkező típus
Ezzel a változattal gyorsabban bemelegítheti a helyiséget, mert a beépített ventillátor a hőterjedést felgyorsítja és
egyenletes hőmérsékletet biztosít.
Az alábbiak szerint kapcsolja be a készüléket:
• A hőfokszabályzó tárcsát az óramutató járásával megegyező irányba forgatva állítsa maximum fokozatra .
• Minimumon és ventillátor nélkül üzemeltetheti a készüléket, ha megnyomja a I kapcsolót (a piros rész láthatóvá
válik, illetve a fénykapcsolóval rendelkező készüléken kigyullad a fény).
• Minimumon és ventillátorral üzemeltetheti a készüléket, ha megnyomja a II kapcsolót (a piros rész láthatóvá
válik, illetve a fénykapcsolóval rendelkező készüléken kigyullad a fény).
• A készülék maximális teljesítménnyel üzemel, ha mindkét kapcsolót megnyomja.
A hőfokszabályzó beállítása ezen a típuson ugyanúgy működik, mint a ventillátor nélküli típus esetén.
KARBANTARTÁS
Mielőtt bármilyen tisztítási munkához kezdene, mindig húzza ki a villásdugót az aljzatból.
Az elektromos hősugárzó nem igényel különleges karbantartást. Elég egy puha és száraz ruhával letörölni; csak a
kihült készüléket tisztítsa. Nem szabad dörzshatású port vagy oldószert használni.
FIGYELMEZTETÉS
• A hősugárzót ne üzemeltesse fürdőkád, zuhanyozó, mosdótál, uszoda, stb. közelében. A készüléket nem
szabad közvetlenül egy állandó foglalat alá állítani.
• A tápvezetéket ne tegye a meleg készülékre.
• A hősugárzót mindig és kizárólag függőleges helyzetben használja.
• A készülék alján található szellőzőnyílásokat és a meleg levegő rácsát ne zárja el.
• A készülék Y típusú csatlakoztatással rendelkezik. A tápvezeték csseréjét kizárólag a gyártó által felhatalmazott
szerelő végezheti, mert különleges szerszámokra van szüksége a munka elvégzéséhez.
• A készüléket ne használja 4 m2-nél kisebb alapterületű helyiségben. Nem tanácsos huzatos helyre állítani, mert
ez a megfelelő működést zavarja.
Fontos: üzemeltetés alatt tilos letakarni a készüléket, mert ez veszélyes felmelegedéshez vezethez.
17
 Loading...