Dell 7130, 7139 User Manual

Dell Venue Pro 11 -7130/7139
User’s Guide
Regulatory Model: T07G
Regulatory Type: T07G001

Notes, Cautions, and Warnings
NOTE: A NOTE indicates important information that helps you make better use of your computer.
CAUTION: A CAUTION indicates either potential damage to hardware or loss of data and tells you how to avoid the problem.
WARNING: A WARNING indicates a potential for property damage, personal injury, or death.
© 2013 Dell Inc. All Rights Reserved.
Trademarks used in this text: Dell™, the DELL logo, Venue™, and Wi-Fi Catcher™ are trademarks of Dell Inc. Intel®, Xeon®, Core™, and Atom™, are registered trademarks or trademarks of Intel Corporation in the U.S. and other countries. Microsoft®, Windows®, MS-DOS®, Windows Vista®, the Windows Vista start button, and Office Outlook® are either trademarks or registered trademarks of Microsoft Corporation in the United States and/or other countries. Wi-Fi® is a registered trademark of Wireless Ethernet Compatibility Alliance, Inc.
2013 -10
Rev. A00
Contents |
|
1 Working on Your Tablet........................................................................................ |
5 |
Before Working Inside Your Tablet................................................................................................... |
5 |
Turning off Your Tablet..................................................................................................................... |
6 |
2 Setting Up Your Tablet.......................................................................................... |
9 |
Charging the Tablet........................................................................................................................... |
9 |
Turning On Your Tablet.................................................................................................................. |
10 |
Turning off the Screen..................................................................................................................... |
11 |
Using power buttonUsing Charms............................................................................................ |
11 |
3 Using Your Tablet................................................................................................. |
13 |
Screen Orientation.......................................................................................................................... |
13 |
How to lock / unlock the screen orientation.................................................................................. |
13 |
Adjusting the screen brightness................................................................................................ |
13 |
Gestures........................................................................................................................................... |
14 |
Right-Click................................................................................................................................. |
15 |
The Windows Start Screen.............................................................................................................. |
16 |
How to access the Start screen................................................................................................. |
16 |
Get to know Windows 8.1......................................................................................................... |
16 |
Swipe Right................................................................................................................................ |
16 |
Swipe Left................................................................................................................................... |
17 |
Swipe Up/Down......................................................................................................................... |
17 |
Split Screen...................................................................................................................................... |
17 |
Using Headphones.......................................................................................................................... |
17 |
Removing the Micro-SD card.......................................................................................................... |
18 |
Removing the Battery...................................................................................................................... |
19 |
Installing the Battery....................................................................................................................... |
19 |
Installing the micro-SIM Card......................................................................................................... |
19 |
4 Managing your tablet settings........................................................................... |
21 |
Wi-Fi setting..................................................................................................................................... |
21 |
Turning On/Off Wi-FiConnecting to a network........................................................................ |
21 |
Mobile broadband setting............................................................................................................... |
22 |
Turning On/Off mobile broadbandConnecting to a mobile broadband |
|
networkDisconnecting from mobile broadband networkMobile broadband |
|
optionsService Provider hardware informationEnabling PIN lock........................................... |
22 |
Refreshing / Recovering / Re-setting your tablet.......................................................................... |
24 |
Refresh your PC without affecting your filesRemove everything and re-install |
|
WindowsAdvanced startup....................................................................................................... |
25 |
5 Synchronizing your tablet.................................................................................. |
27 |
Using Microsoft account................................................................................................................. |
27 |
Copying music, photos, and videos.......................................................................................... |
27 |
6 Optional Stylus Features.................................................................................... |
29 |
Getting Your Stylus Ready for Use.................................................................................................. |
29 |
Using the Optional Stylus with Your Tablet ................................................................................... |
30 |
7 Desktop Dock Features....................................................................................... |
31 |
Connecting the Power Adapter...................................................................................................... |
32 |
8 Thin Travel Keyboard Dock Features............................................................... |
33 |
Docking Your Tablet to the Thin Travel Keyboard Dock ............................................................... |
33 |
9 Mobile Keyboard Dock Features....................................................................... |
35 |
Docking Your Tablet to the Keyboard Dock .................................................................................. |
35 |
Undocking Your Tablet from the Keyboard Dock.......................................................................... |
36 |
Charging the dock.......................................................................................................................... |
36 |
Battery behavior......................................................................................................................... |
37 |
10 Cleaning Your Tablet........................................................................................ |
39 |
11 Troubleshooting................................................................................................. |
41 |
Battery problem............................................................................................................................... |
41 |
System problem.............................................................................................................................. |
42 |
Touchscreen problem..................................................................................................................... |
43 |
Network problem............................................................................................................................ |
43 |
12 System Setup...................................................................................................... |
45 |
System Setup (BIOS) Options.......................................................................................................... |
45 |
Updating the BIOS .......................................................................................................................... |
53 |
13 Specifications...................................................................................................... |
55 |
14 Contacting Dell.................................................................................................. |
59 |

1
Working on Your Tablet
Before Working Inside Your Tablet
Use the following safety guidelines to help protect your tablet from potential damage and to help to ensure your personal safety. Unless otherwise noted, each procedure included in this document assumes that the following condition exists:
•You have read the safety information that shipped with your tablet.
WARNING: Before working inside your tablet, read the safety information that shipped with your tablet. For additional safety best practices information, see the Regulatory Compliance Homepage at www.dell.com/regulatory_compliance
CAUTION: Many repairs may only be done by a certified service technician. You should only perform troubleshooting and simple repairs as authorized in your product documentation, or as directed by the online or telephone service and support team. Damage due to servicing that is not authorized by Dell is not covered by your warranty. Read and follow the safety instructions that came with the product.
CAUTION: To avoid electrostatic discharge, ground yourself by using a wrist grounding strap or by periodically touching an unpainted metal surface, such as a connector on the back of the tablet.
CAUTION: Handle components and cards with care. Do not touch the components or contacts on a card. Hold a card by its edges or by its metal mounting bracket.
CAUTION: When you disconnect a cable, pull on its connector or on its pull-tab, not on the cable itself. Some cables have connectors with locking tabs; if you are disconnecting this type of cable, press in on the locking tabs before you disconnect the cable. As you pull connectors apart, keep them evenly aligned to avoid bending any connector pins. Also, before you connect a cable, ensure that both connectors are correctly oriented and aligned.
NOTE: The color of your tablet and certain components may appear differently than shown in this document.
To avoid damaging your tablet, perform the following steps before you begin working inside the tablet.
1.Ensure that your work surface is flat and clean to prevent the tablet cover from being scratched.
2.Turn off your tablet (see Turning Off Your Tablet).
3.If the tablet is connected to a docking device (docked) such as the optional docking station or keyboard dock, un-dock it.
4.Disconnect the power adapter from the tablet.
5.Turn the tablet upside-down on a flat work surface.
NOTE: To avoid damaging the system board, you must remove the main battery before you service the tablet.
6.Remove the main battery.
5
7.Press and hold the power button for a few seconds to remove the flea power from the system board.
CAUTION: To guard against electrical shock, always unplug your tablet from the electrical outlet.
CAUTION: Before touching anything inside your tablet, ground yourself by touching an unpainted metal surface, such as the metal at the back of the tablet. While you work, periodically touch an unpainted metal surface to dissipate static electricity, which could harm internal components.
8.Remove the storage SD card from the tablet.
Turning off Your Tablet
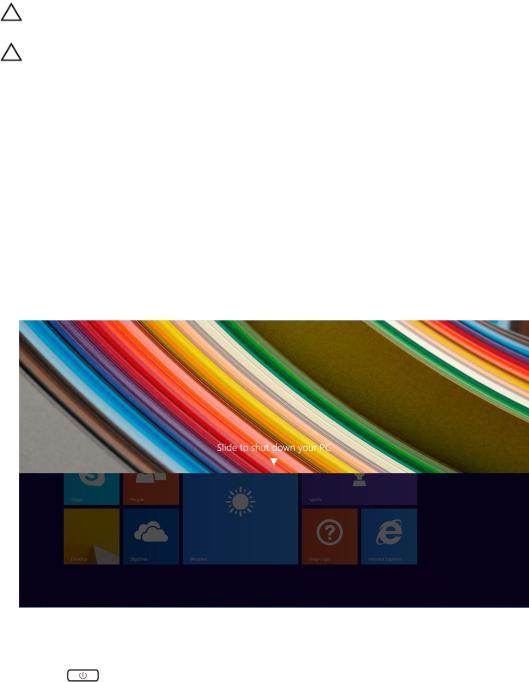
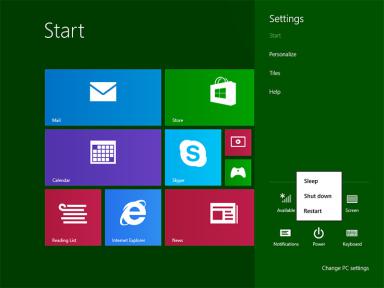
Turning off your tablet completely shuts down your tablet. You can turn off your tablet by two ways:
•Using power button
•Using charms menu
1.To turn off your tablet using power button:
a)Press and hold the Power button  until you see “Slide to shut down your PC” on the screen.
b) Slide to shut down your tablet.
 NOTE: You can also turn off your tablet without sliding down the screen. Press and hold the
Power button for >10 seconds to turn off your tablet. You can perform this force shutdown, if your tablet is not responding / behaving unexpectedly or touch is not working.
2.To turn off your tablet using the charms menu:
a)Swipe from the right edge of the display to access the Charms menu.
b)Touch Settings  —> Power
  —> Shut down to turn off the tablet.
6
7
8
2
Setting Up Your Tablet
Charging the Tablet
CAUTION: Charge the battery in an ambient temperature of 0 °C to 40 °C.
CAUTION: Use only the power adapter and power cable that came with your tablet. Using unauthorized power adapters or power cables may cause severe damage to your tablet.
NOTE: The battery is not fully charged when you unpack your tablet.
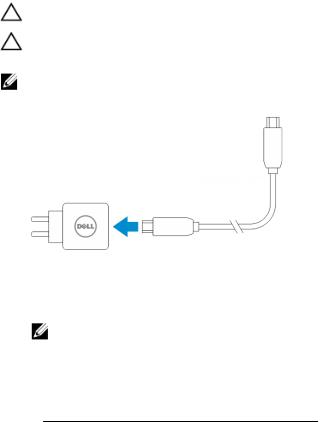
1. Connect the power cable into the power adapter.
2.Connect the power adapter to an electrical outlet and charge the tablet until the battery is fully charged.
 NOTE: The tablet battery requires about 4 hours to fully charge.
NOTE: You can also trickle charge the tablet via micro-USB connection. The battery takes up to 24 hours to fully charge depending on the power output of the USB port. The trickle charging also works with other non-Dell adapters.
You can check the tablet battery charge status from:
•Battery-charge light located on the front of the tablet:
LED Behavior |
Description |
|
|
Solid white color on |
Battery is charging. |
Off |
Battery is not charging. Either no AC adapter |
|
is connected or battery is fully charged. |
Amber color on Momentarily |
– The LED will be solid amber for 2 |
|
|
|
seconds and then change to solid |
|
white. This is an indication that the |
|
system cannot power on with the |
|
current state of charge, but the battery |
|
is being charged. |
|
– Battery is charging |
|
– The tablet will not power on. |
9
 NOTE: You can check the exact battery charge level by booting to the operating system.
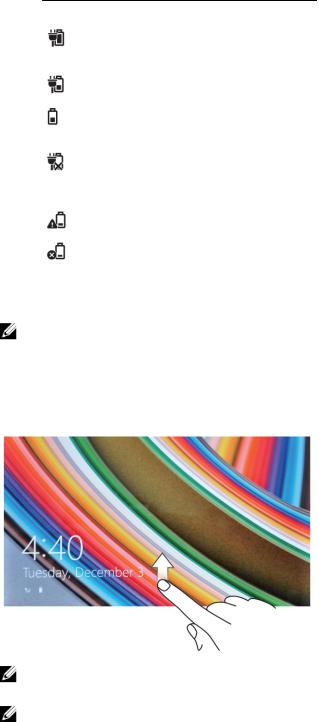
•Battery icons displayed on the screen:
Battery icon |
Description |
|
|
|
Battery is fully charged and AC adapter is |
|
connected. |
|
Battery is charging with AC adapter. |
|
Your tablet is running on battery power and |
|
the battery is discharging. |
|
Your tablet is plugged in, and either no |
|
battery is detected or the battery is not |
|
working correctly. |
|
Battery is at low level. |
|
Battery is at critical level. |
Turning On Your Tablet
NOTE: Use this tablet in an ambient temperature between 0 °C and 40 °C.
1.Press and hold the Power button for 2 seconds to turn on your tablet.
2.If the lock screen image displays, swipe your finger from the bottom of the display to switch to the login screen, and then enter password to log in to Windows.
The tablet is ready for use after the Windows Start screen displays.
NOTE: If the login screen is not enabled in Windows 8.1, you will be taken directly from the lock screen to the start screen.
NOTE: The lock screen is only displayed when returning from a sleep state.
10

Turning off the Screen
Using power button
Press the Power button  to turn off the screen.
Using Charms
1.Swipe from the right edge of the display to access the Charms bar.
2.Touch Settings  —> Power
  —> Sleep to turn off the screen.
NOTE: If your tablet is in a sleep state, press the Power button  or Windows button
  once to turn on the screen.
11
12

3
Using Your Tablet
Screen Orientation
For optimal viewing experience, the screen orientation changes automatically to portrait or landscape format depending on how you hold the tablet.
NOTE: Some applications may not support automatic screen rotation to portrait or landscape format.
How to lock / unlock the screen orientation
1.Swipe from the right edge of the display to access the Charms bar.
2.Touch Settings  → Screen
  .
.
3.Touch  toggle to lock the screen orientation, or touch
  toggle to unlock the screen orientation.
Adjusting the screen brightness
You can also adjust the screen brightness here by using the slider under the toggle  menu.
menu.
You can also adjust your screen automatically. To adjust the screen brightness automatically:
13
1.Swipe from the right edge of the display to access the Charms bar.
2.Touch Settings  → PC settings → PC and devices → Power and sleep.
3.Under Brightness, slide left or right to turn on / turn off the automatic brightness option.
NOTE: You can turn on / turn off the slider to have the screen automatically adjust the brightness, based on the ambient light.
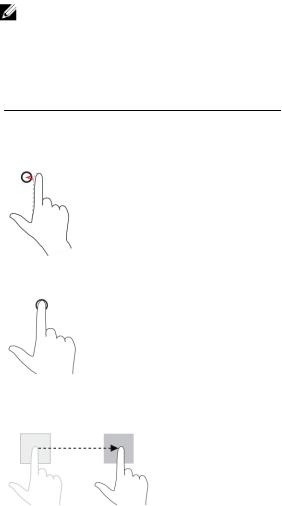
Gestures
Your tablet has a multi-touch display. You can touch the screen to operate the tablet.
Gesture Actions |
Functions |
|
|
Touch |
• Select items on the screen, including options, |
|
|
Tap gently on the display with your fingertip. |
entries, images, and icons |
|
• Start applications |
|
• Touch buttons on the screen |
|
• Input text using the on-screen keyboard |
Touch and Hold |
• Display detailed information about an item |
|
|
|
• Open the context menu of an item to |
|
perform further actions |
Touch and hold your finger on the display
Drag and Drop |
Move item such as images and icons on the screen |
1.Touch and hold your finger on an item on the screen
2.Keeping your finger in contact with the display, move your fingertip to the desired location
3.Take your finger off the display to drop the item in the desired location
Swipe or Slide
•Scroll through the Start screen, web pages, lists, entries, photos, contacts, and so on
•Close an application. (Swipe the application to the bottom of the display)
14
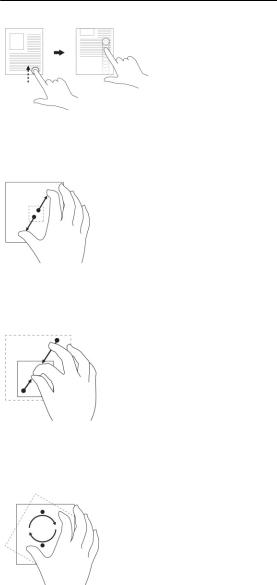
Gesture Actions |
Functions |
|
|
Move your finger in a vertical or horizontal direction on the display
Zoom in |
Enlarge the view of an image or web page |
Touch the display with two fingers and then move the fingers apart
Zoom out |
Reduce the view of an image or web page |
Touch the display with two fingers and then move the fingers closer
Rotate |
Rotate an object by 90 degrees |
Touch the display with two or more fingers and then move the fingers in a clockwise or counter-clockwise arc
Right-Click
To perform a right-click in your tablet, Touch and Hold your finger for 2 seconds on any section of the screen or an icon and then release your finger.
The options menu appears on the screen.
15
The Windows Start Screen
The Windows Start screen displays a list of default and custom Live Tiles, which act as a shortcut to Control Panel, Windows Explorer, Weather application, RSS, Windows Store, Internet Explorer, and other installed applications.
Live Tiles on your Start screen change and update in real time so you can get real-time updates about news or sports, check what your friends are up to, and get the latest weather forecast.
The tile-based user interface gives you direct access to your most recently used applications, Emails, photos, music, videos, contacts, Facebook & Twitter updates, and frequently viewed websites. You can pin your favorite or frequently used applications as Live Tiles to customize the Start screen.
You also can personalize the Start screen by setting your favorite picture as a wallpaper.
NOTE: Live Tiles can be added or removed by using Pin or Unpin
 options.
How to access the Start screen
Follow either method to access the Start screen:
•Press the Windows button .
.
•Swipe from the right edge of the display to access the Charms bar, and then touch the Start icon
 .
.
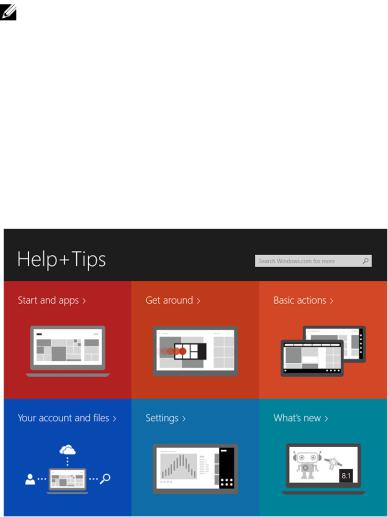
Get to know Windows 8.1
You can touch the Help+Tips tile on the Start screen to get help and tips on using Windows 8.1.
Swipe Right
Swiping-in from the right edge of the display reveals the Charms bar. Charms provide access to the system commands, such as Start, Search, Share, Devices, and Settings options.
16

If your tablet is running on an application or performing actions, pressing the Start icon  takes you
back to the Start screen. If you are at the Start screen, pressing the Start icon  takes you to the most recently used application or most recently viewed screen.
NOTE: The functionality of the Start icon  is same as Windows button
  .
.
Swipe Left
•Swiping slowly from the left edge to the right edge of the display reveals thumbnails of the open applications and cycles the thumbnails of the open applications.
•Swiping-in and out on the left edge of the display brings up a list of the most recently used applications.
Swipe Up/Down
•Swiping-in from the bottom or top edge of the display reveals the All apps icon . Touch All apps to show an alphabetical list of all applications installed on your tablet.
•Swiping-in from the top to the bottom of an application docks or closes the application.
For more information on using Windows Start screen, click here.
You can also enable the camera (front), when the screen is in lock mode. To enable the camera when the screen is in lock mode:
1.Swipe from the right edge of the display to access the Charms bar.
2.Click Settings  → Change PC Settings → PC and Devices
3.Scroll down and navigate to Camera.
4.Swipe to turn on, to use the camera during the lock screen mode.
To make sure you can use the camera during the lock screen mode:
1.Press Power  button to turn off the screen.
2.Press Power  button again to enable the lock screen mode.
3.Swipe down to enable the camera.
Split Screen
The split screen option enables you to open two applications on the same screen, which helps you in multitasking. To split the screen:
1.Open any two applications that you want to perform the split screen.
2.Swipe from the left to open the second application and hold your finger until the screen splits.
3.Release your finger to drop the second application.
NOTE: Windows 8.1 enables you to split the screen in variable width.
Using Headphones
You can use headphones to listen to music and sounds, record audio, or make calls.
17
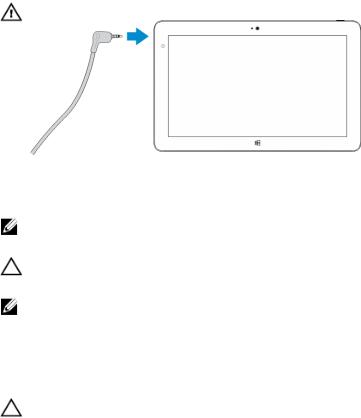
WARNING: Listening to loud music for extended period of time can lead to hearing loss.
1.Connect the headphones to the audio port (3.5 mm) on the tablet.
2.Insert the earphones in your ears and adjust the volume level to a comfortable level.
NOTE: When you connect a headphone or an external audio device to the audio connector, the integrated speakers on your tablet are muted automatically.
CAUTION: To prevent damage to the headphones when disconnecting it from the tablet, pull the connector and not the cable.
NOTE: It is recommended that you turn down the volume level before plugging the headphone, and then adjust to a comfortable level. Sudden exposure to loud sounds can cause hearing damage.
Removing the Micro-SD card
CAUTION: Removing the Micro-SD card when transferring data may cause data loss or result in application errors. Make sure your tablet has finished all save operations to the Micro-SD card.
1.Enter the Desktop mode. Touch Safely Remove Hardware in the notification area at the bottom-right corner of the screen.
 NOTE: If you don’t see Safely Remove Hardware
  , touch Show Hidden Icons to display all icons in the notification area.
2.Touch Eject SD Memory Card. A message appears confirming that the Micro-SD card can be safely removed. If a warning message appears stating the Micro-SD card cannot be removed, ensure all data transfers involving the Micro-SD card are complete.
3.Insert the tip of a small bent paperclip into the small hole on the micro-SD slot cover.
4.Push the tip all the way into the hole until the micro-SD tray ejects. Pull the micro-SD card tray out.
18
 Loading...