


MSL5052

Compaq StorageWorks
MSL5000 Series Library User Guide
Part Number: 231910-002
Second Edition (February 2002)
This guide is to be used as step-by-step instructions for installation
and as a reference for operating, troubleshooting, and upgrading.
b

© 2002 Compaq Information Technologies Group, L.P.
Compaq, the Compaq logo, and StorageWorks are trademarks of Compaq Information Technologies
Group, L.P. in the U.S. and/or other countries. All other product names mentioned herein may be
trademarks of their respective companies.
Compaq shall not be liable for technical or editorial errors or omissions contained herein. The
information is provided as is without warranty of any kind and is subject to change without notice. The
warranties for Compaq products are set forth in the express limited warranty statements accompanying
such products. Nothing herein should be construed as constituting an additional warranty.
MSL5000 Series Library User Guide
Second Edition (February 2002)
Part Number: 231910-002

Contents
About this Guide
Text Conventions . . . . . . . . . . . . . . . . . . . . . . . . . . . . . . . . . . . . . . . . . . . . . . . . . . . . . . . vii
Symbols in Text . . . . . . . . . . . . . . . . . . . . . . . . . . . . . . . . . . . . . . . . . . . . . . . . . . . . . . . . .ix
Symbols on Equipment . . . . . . . . . . . . . . . . . . . . . . . . . . . . . . . . . . . . . . . . . . . . . . . . . . . ix
Rack Stability. . . . . . . . . . . . . . . . . . . . . . . . . . . . . . . . . . . . . . . . . . . . . . . . . . . . . . . . . . . x
Getting Help. . . . . . . . . . . . . . . . . . . . . . . . . . . . . . . . . . . . . . . . . . . . . . . . . . . . . . . . . . . . xi
Compaq Technical Support . . . . . . . . . . . . . . . . . . . . . . . . . . . . . . . . . . . . . . . . . . . . . xi
Compaq Website . . . . . . . . . . . . . . . . . . . . . . . . . . . . . . . . . . . . . . . . . . . . . . . . . . . . . xi
Compaq Authorized Reseller. . . . . . . . . . . . . . . . . . . . . . . . . . . . . . . . . . . . . . . . . . . . . . . xi
1 Introduction
Models . . . . . . . . . . . . . . . . . . . . . . . . . . . . . . . . . . . . . . . . . . . . . . . . . . . . . . . . . . . . . . 1–2
Accessories. . . . . . . . . . . . . . . . . . . . . . . . . . . . . . . . . . . . . . . . . . . . . . . . . . . . . . . . . . . 1–2
Tape Drives . . . . . . . . . . . . . . . . . . . . . . . . . . . . . . . . . . . . . . . . . . . . . . . . . . . . . . . . . . 1–3
Magazines . . . . . . . . . . . . . . . . . . . . . . . . . . . . . . . . . . . . . . . . . . . . . . . . . . . . . . . . . . . 1–4
Power Supplies. . . . . . . . . . . . . . . . . . . . . . . . . . . . . . . . . . . . . . . . . . . . . . . . . . . . . . . . 1–5
Robotics . . . . . . . . . . . . . . . . . . . . . . . . . . . . . . . . . . . . . . . . . . . . . . . . . . . . . . . . . . . . . 1–7
Library Controller Board . . . . . . . . . . . . . . . . . . . . . . . . . . . . . . . . . . . . . . . . . . . . . . . . 1–8
Factory-Defined Accessory PCI Slots . . . . . . . . . . . . . . . . . . . . . . . . . . . . . . . . . . . . . . 1–9
Front Panel Indicators . . . . . . . . . . . . . . . . . . . . . . . . . . . . . . . . . . . . . . . . . . . . . . . . . 1–10
Multi-Unit Library Systems. . . . . . . . . . . . . . . . . . . . . . . . . . . . . . . . . . . . . . . . . . . . . 1–11
2 Installation
Setting up the Tabletop Model. . . . . . . . . . . . . . . . . . . . . . . . . . . . . . . . . . . . . . . . . . . . 2–2
Setting up the Rackmount Model. . . . . . . . . . . . . . . . . . . . . . . . . . . . . . . . . . . . . . . . . . 2–3
Applying Power to the Library . . . . . . . . . . . . . . . . . . . . . . . . . . . . . . . . . . . . . . . . . . . 2–7
SCSI Cable Configurations . . . . . . . . . . . . . . . . . . . . . . . . . . . . . . . . . . . . . . . . . . . . . . 2–8
Supported SCSI Cables . . . . . . . . . . . . . . . . . . . . . . . . . . . . . . . . . . . . . . . . . . . . . . 2–8
Two Tape Drives Dual Host System. . . . . . . . . . . . . . . . . . . . . . . . . . . . . . . . . . . . 2–9
Four Tape Drives Dual Host System. . . . . . . . . . . . . . . . . . . . . . . . . . . . . . . . . . . 2–10
Compaq StorageWorks MSL5000 Series Library User Guide iii

Contents
3 Library Configuration
Factory Default Configuration Settings . . . . . . . . . . . . . . . . . . . . . . . . . . . . . . . . . . . . . 3–2
Setting a SCSI ID . . . . . . . . . . . . . . . . . . . . . . . . . . . . . . . . . . . . . . . . . . . . . . . . . . . . . . 3–2
Setting Up a Reserved Slot . . . . . . . . . . . . . . . . . . . . . . . . . . . . . . . . . . . . . . . . . . . 3–5
How Reserved Slots are Numbered. . . . . . . . . . . . . . . . . . . . . . . . . . . . . . . . . . 3–5
Setting Up Your Network . . . . . . . . . . . . . . . . . . . . . . . . . . . . . . . . . . . . . . . . . . . . 3–9
4 Operation
Front Panel . . . . . . . . . . . . . . . . . . . . . . . . . . . . . . . . . . . . . . . . . . . . . . . . . . . . . . . . . . . 4–2
Magazine Doors . . . . . . . . . . . . . . . . . . . . . . . . . . . . . . . . . . . . . . . . . . . . . . . . . . . . 4–3
Indicators . . . . . . . . . . . . . . . . . . . . . . . . . . . . . . . . . . . . . . . . . . . . . . . . . . . . . . . . . 4–4
Front Panel and Media Security Locks . . . . . . . . . . . . . . . . . . . . . . . . . . . . . . . . . . 4–5
GUI Touch Screen. . . . . . . . . . . . . . . . . . . . . . . . . . . . . . . . . . . . . . . . . . . . . . . 4–5
Host System. . . . . . . . . . . . . . . . . . . . . . . . . . . . . . . . . . . . . . . . . . . . . . . . . . . . 4–6
Inserting and Removing Tape Cartridges . . . . . . . . . . . . . . . . . . . . . . . . . . . . . . . . . . . . 4–6
Removing Magazines. . . . . . . . . . . . . . . . . . . . . . . . . . . . . . . . . . . . . . . . . . . . . . . . 4–7
Inserting Cartridges into a Magazine . . . . . . . . . . . . . . . . . . . . . . . . . . . . . . . . . . . . 4–8
Using Mail Slots (Left Magazines Only) . . . . . . . . . . . . . . . . . . . . . . . . . . . . . . . . 4–10
Barcode Labels. . . . . . . . . . . . . . . . . . . . . . . . . . . . . . . . . . . . . . . . . . . . . . . . . . . . 4–11
Library Display Screens and Options . . . . . . . . . . . . . . . . . . . . . . . . . . . . . . . . . . . . . . 4–12
Initialization Screen . . . . . . . . . . . . . . . . . . . . . . . . . . . . . . . . . . . . . . . . . . . . . . . . 4–12
Library Status Screen. . . . . . . . . . . . . . . . . . . . . . . . . . . . . . . . . . . . . . . . . . . . . . . 4–13
Technical Support Information Option . . . . . . . . . . . . . . . . . . . . . . . . . . . . . . 4–14
Mail Slot Access Option (Left Magazines Only) . . . . . . . . . . . . . . . . . . . . . . 4–14
Magazine Access Option. . . . . . . . . . . . . . . . . . . . . . . . . . . . . . . . . . . . . . . . . 4–15
Move Media. . . . . . . . . . . . . . . . . . . . . . . . . . . . . . . . . . . . . . . . . . . . . . . . . . . 4–15
LCD Contrast Controls . . . . . . . . . . . . . . . . . . . . . . . . . . . . . . . . . . . . . . . . . . 4–16
Power. . . . . . . . . . . . . . . . . . . . . . . . . . . . . . . . . . . . . . . . . . . . . . . . . . . . . . . . 4–16
Status . . . . . . . . . . . . . . . . . . . . . . . . . . . . . . . . . . . . . . . . . . . . . . . . . . . . . . . . 4–17
Online . . . . . . . . . . . . . . . . . . . . . . . . . . . . . . . . . . . . . . . . . . . . . . . . . . . . . . . 4–17
Menu . . . . . . . . . . . . . . . . . . . . . . . . . . . . . . . . . . . . . . . . . . . . . . . . . . . . . . . . 4–18
Menu Selections . . . . . . . . . . . . . . . . . . . . . . . . . . . . . . . . . . . . . . . . . . . . . . . . . . . . . . 4–19
View System Data Area. . . . . . . . . . . . . . . . . . . . . . . . . . . . . . . . . . . . . . . . . . . . . 4–19
Library Options . . . . . . . . . . . . . . . . . . . . . . . . . . . . . . . . . . . . . . . . . . . . . . . . 4–19
SCSI Options . . . . . . . . . . . . . . . . . . . . . . . . . . . . . . . . . . . . . . . . . . . . . . . . . . 4–22
Network Options . . . . . . . . . . . . . . . . . . . . . . . . . . . . . . . . . . . . . . . . . . . . . . . 4–26
Library Info . . . . . . . . . . . . . . . . . . . . . . . . . . . . . . . . . . . . . . . . . . . . . . . . . . . 4–27
Cartridge Map . . . . . . . . . . . . . . . . . . . . . . . . . . . . . . . . . . . . . . . . . . . . . . . . . 4–27
iv Compaq StorageWorks MSL5000 Series Library User Guide

Edit Options Area . . . . . . . . . . . . . . . . . . . . . . . . . . . . . . . . . . . . . . . . . . . . . . . . . 4–28
Library. . . . . . . . . . . . . . . . . . . . . . . . . . . . . . . . . . . . . . . . . . . . . . . . . . . . . . . 4–28
SCSI . . . . . . . . . . . . . . . . . . . . . . . . . . . . . . . . . . . . . . . . . . . . . . . . . . . . . . . . 4–29
Network. . . . . . . . . . . . . . . . . . . . . . . . . . . . . . . . . . . . . . . . . . . . . . . . . . . . . . 4–29
Passwords . . . . . . . . . . . . . . . . . . . . . . . . . . . . . . . . . . . . . . . . . . . . . . . . . . . . 4–30
Utilities Area . . . . . . . . . . . . . . . . . . . . . . . . . . . . . . . . . . . . . . . . . . . . . . . . . . . . . 4–30
Maintenance . . . . . . . . . . . . . . . . . . . . . . . . . . . . . . . . . . . . . . . . . . . . . . . . . . 4–31
Diagnostics . . . . . . . . . . . . . . . . . . . . . . . . . . . . . . . . . . . . . . . . . . . . . . . . . . . 4–32
Factory . . . . . . . . . . . . . . . . . . . . . . . . . . . . . . . . . . . . . . . . . . . . . . . . . . . . . . 4–33
Security Level . . . . . . . . . . . . . . . . . . . . . . . . . . . . . . . . . . . . . . . . . . . . . . . . . 4–34
5 Maintenance
Running a Cleaning Cartridge . . . . . . . . . . . . . . . . . . . . . . . . . . . . . . . . . . . . . . . . . . . . 5–2
Automatically Running a Cleaning Cartridge . . . . . . . . . . . . . . . . . . . . . . . . . . . . . 5–2
Manually Running a Cleaning Cartridge. . . . . . . . . . . . . . . . . . . . . . . . . . . . . . . . . 5–2
Running a Cleaning Cartridge From a Mail Slot . . . . . . . . . . . . . . . . . . . . . . . 5–3
Running a Cleaning Cartridge From a Tape Cartridge Slot . . . . . . . . . . . . . . . 5–3
Running a Cleaning Cartridge From a Cleaning Slot . . . . . . . . . . . . . . . . . . . . 5–4
Replacing a Cleaning
Cartridge in a Reserved Slot . . . . . . . . . . . . . . . . . . . . . . . . . . . . . . . . . . . . . . . . . . . . . 5–4
Replacing a Cleaning Cartridge in a Right Magazine . . . . . . . . . . . . . . . . . . . . . . . 5–5
Replacing a Cleaning Cartridge in a Mail Slot . . . . . . . . . . . . . . . . . . . . . . . . . . . . 5–5
Contents
6 Troubleshooting
Introduction . . . . . . . . . . . . . . . . . . . . . . . . . . . . . . . . . . . . . . . . . . . . . . . . . . . . . . . . . . 6–1
Platform Problems . . . . . . . . . . . . . . . . . . . . . . . . . . . . . . . . . . . . . . . . . . . . . . . . . . . . . 6–2
Error Recovery. . . . . . . . . . . . . . . . . . . . . . . . . . . . . . . . . . . . . . . . . . . . . . . . . . . . . . . . 6–2
Error Recovery Procedures . . . . . . . . . . . . . . . . . . . . . . . . . . . . . . . . . . . . . . . . . . . . . . 6–4
Fault Symptom Codes (FSCs) . . . . . . . . . . . . . . . . . . . . . . . . . . . . . . . . . . . . . . . . . . . . 6–5
A Regulatory Compliance Notices
Federal Communications Commission Notice. . . . . . . . . . . . . . . . . . . . . . . . . . . . . . . . A–1
Class A Equipment . . . . . . . . . . . . . . . . . . . . . . . . . . . . . . . . . . . . . . . . . . . . . . . . . A–1
Class B Equipment . . . . . . . . . . . . . . . . . . . . . . . . . . . . . . . . . . . . . . . . . . . . . . . . . A–2
Modifications. . . . . . . . . . . . . . . . . . . . . . . . . . . . . . . . . . . . . . . . . . . . . . . . . . . . . . A–2
Cables . . . . . . . . . . . . . . . . . . . . . . . . . . . . . . . . . . . . . . . . . . . . . . . . . . . . . . . . . . . A–2
Declaration of Conformity for products marked with the FCC logo - United States
only . . . . . . . . . . . . . . . . . . . . . . . . . . . . . . . . . . . . . . . . . . . . . . . . . . . . . . . . . . A–2
Compaq StorageWorks MSL5000 Series Library User Guide v

Contents
Canadian Notice (Avis Canadien) . . . . . . . . . . . . . . . . . . . . . . . . . . . . . . . . . . . . . . . . A–3
Class A Equipment. . . . . . . . . . . . . . . . . . . . . . . . . . . . . . . . . . . . . . . . . . . . . . . . . A–3
Class B Equipment. . . . . . . . . . . . . . . . . . . . . . . . . . . . . . . . . . . . . . . . . . . . . . . . . A–3
European Union Notice . . . . . . . . . . . . . . . . . . . . . . . . . . . . . . . . . . . . . . . . . . . . . . . . A–4
Taiwan Notice. . . . . . . . . . . . . . . . . . . . . . . . . . . . . . . . . . . . . . . . . . . . . . . . . . . . . . . . A–4
Japanese Notice . . . . . . . . . . . . . . . . . . . . . . . . . . . . . . . . . . . . . . . . . . . . . . . . . . . . . . A–5
B Specifications
Operational Performance . . . . . . . . . . . . . . . . . . . . . . . . . . . . . . . . . . . . . . . . . . . . . . . B–2
Reliability (MSL5026 and MSL5052) . . . . . . . . . . . . . . . . . . . . . . . . . . . . . . . . . . . . . B–2
Power . . . . . . . . . . . . . . . . . . . . . . . . . . . . . . . . . . . . . . . . . . . . . . . . . . . . . . . . . . . . . . B–3
Mechanical . . . . . . . . . . . . . . . . . . . . . . . . . . . . . . . . . . . . . . . . . . . . . . . . . . . . . . . . . . B–3
Environmental (MSL5026 and MSL5052). . . . . . . . . . . . . . . . . . . . . . . . . . . . . . . . . . B–4
Acoustics. . . . . . . . . . . . . . . . . . . . . . . . . . . . . . . . . . . . . . . . . . . . . . . . . . . . . . . . . . . . B–5
Safety . . . . . . . . . . . . . . . . . . . . . . . . . . . . . . . . . . . . . . . . . . . . . . . . . . . . . . . . . . . . . . B–6
C Electrostatic Discharge
Grounding Methods . . . . . . . . . . . . . . . . . . . . . . . . . . . . . . . . . . . . . . . . . . . . . . . . . . . C–2
D Removing and Replacing a Tape Drive
Instructions . . . . . . . . . . . . . . . . . . . . . . . . . . . . . . . . . . . . . . . . . . . . . . . . . . . . . . . . . . D–2
E Configuration Examples
SCSI Cable Configurations. . . . . . . . . . . . . . . . . . . . . . . . . . . . . . . . . . . . . . . . . . . . . . E–1
Configuration Examples. . . . . . . . . . . . . . . . . . . . . . . . . . . . . . . . . . . . . . . . . . . . . E–2
Pass-Through Mechanism Cabling. . . . . . . . . . . . . . . . . . . . . . . . . . . . . . . . . . . . . . . E–13
Configuration Examples. . . . . . . . . . . . . . . . . . . . . . . . . . . . . . . . . . . . . . . . . . . . E–13
Index
vi Compaq StorageWorks MSL5000 Series Library User Guide
About this Guide
The following sections are covered:
• Text Conventions
• Symbols in Text
• Symbols on Equipment
• Rack Stability
• Getting Help
• Compaq Authorized Reseller
Text Conventions
This document uses the conventions in Table 1 to distinguish elements of text.
Table 1: Text Conventions
Element Convention Examples
• Named Keys
•Key
Sequences
• Menu Items
•Directory
Names
• Button
Names
• Dialog Box
Names
Bold Home, Print Screen, Num Lock, Esc, PgUp
A plus sign (+) between two keys means that
you should press them simultaneously:
Ctrl+A, Ctrl+Home, Alt+Ctrl+Del
Initial Caps
(for UNIX, AIX, and
Solaris directory names,
the exact case of every
character is displayed).
On the File menu, choose Save.
Save the file in the C:\StorageSets\Default
directory.
(UNIX, AIX, Solaris): Save the file in the
/home/newuser/practice directory.
To back up files, click the Backup Now button.
In the Save As dialog box, choose the drive
then the folder.
Compaq StorageWorks MSL5000 Series Library User Guide vii
About this Guide
Table 1: Text Conventions (Continued)
Element Convention Examples
• User Input
and System
Responses
(Output and
Error
Messages)
• COMMAND
NAMES
• Drive Names
filenames Unless case sensitive,
Menu Command
Sequences
URLs Sans serif font. For update notices, visit:
Initial Caps and
monospace font.
COMMAND NAMES appear
in upper case, unless
they are case sensitive
(UNIX, AIX, and Solaris
command names are
case sensitive and will
not appear in uppercase).
Entered
are displayed in angle
brackets (
lower case.
use lowercase italics.
If filenames are
case-sensitive (UNIX,
AIX, Solaris) or are
easier to understand with
some upper case letters,
the exact case of each
character is displayed.
Initial Caps, with a right
angle bracket (>)
between items. Menu
items are displayed as
shown on screen.
<variables>
< >) and all
User Input and System Responses:
• To exit from the program, type Exit.
• At the prompt, type this command:
SHOW THIS_CONTROLLER
(no variable)
• To see your settings, give the command:
SHOW <storagesets> FULL
(with variable)
• You will see the Continue? message.
Command Names
• Use SET THIS_CONTROLLER to change
parameters.
• To manage storage, enter RUN
sysmgr.exe
• (UNIX, AIX, Solaris): To list files, give the ls
command.
• Drive Names:
Navigate to your CD-ROM drive
(usually D: or
To configure storage, edit storageset.ini.
Changes are stored in
NewSystemConfigurationFile.ini.
(UNIX, AIX, Solaris): Errors are logged to
MixedCaseFile.txt.
To compare documents, choose:
Tools > Documents > Compare.
http://www.compaq.com/products/updates
E:).
viii Compaq StorageWorks MSL5000 Series Library User Guide
Symbols in Text
These symbols may be found in the text of this guide. They have the following
meanings.
WARNING: Text set off in this manner indicates that failure to follow directions
in the warning could result in bodily harm or loss of life or damage to
equipment.
CAUTION: Text set off in this manner indicates that failure to follow directions could
result in damage to equipment or loss of information.
IMPORTANT: Text set off in this manner presents clarifying information or specific instructions.
NOTE: Text set off in this manner presents commentary, sidelights, or interesting points of
information.
Symbols on Equipment
Any enclosed surface or area of the equipment marked with these
symbols indicates the presence of electrical shock hazards. Enclosed
area contains no operator serviceable parts.
About this Guide
WARNING: To reduce the risk of injury from electrical shock hazards, do
not open this enclosure.
Any RJ-45 receptacle marked with these symbols indicates a network
interface connection.
WARNING: To reduce the risk of electrical shock, fire, or damage to the
equipment, do not plug telephone or telecommunications connectors into
this receptacle.
Compaq StorageWorks MSL5000 Series Library User Guide ix

About this Guide
Any surface or area of the equipment marked with these symbols
indicates the presence of a hot surface or hot component. Contact with
this surface could result in injury.
WARNING: To reduce the risk of injury from a hot component, allow the
surface to cool before touching.
Power supplies or systems marked with these symbols indicate the
presence of multiple sources of power.
WARNING: To reduce the risk of injury from electrical shock,
remove all power cords to completely disconnect power from the
supplies and systems.
Any product or assembly marked with these symbols indicates that the
component exceeds the recommended weight for one individual to
handle safely.
WARNING: To reduce the risk of personal injury or damage to the
equipment, observe local occupational health and safety requirements
and guidelines for manually handling material.
Rack Stability
WARNING: To reduce the risk of personal injury or damage to the equipment, be
sure that:
• The leveling jacks are extended to the floor.
• The full weight of the rack rests on the leveling jacks.
• In single rack installations, the stabilizing feet are attached to the rack.
• Racks are coupled in multiple rack installations.
• Only one rack component is extended at any time. A rack may become
unstable if more than one rack component is extended for any reason.
x Compaq StorageWorks MSL5000 Series Library User Guide

Getting Help
If you still have a question after reading this guide, contact service representatives or
visit our website.
Compaq Technical Support
In North America, call the Compaq technical support at 1-800-OK-COMPAQ. This
service is available 24 hours a day, 7 days a week.
NOTE: For continuous quality improvement, calls may be recorded or monitored.
Outside North America, call Compaq technical support at the nearest location.
Telephone numbers for worldwide technical support are listed on the Compaq
website: http://www.compaq.com
Be sure to have the following information available before you call Compaq:
• Technical support registration number (if applicable)
• Product serial numbers
• Product model names and numbers
• Applicable error messages
About this Guide
.
• Operating system type and revision level
• Detailed, specific questions
Compaq Website
The Compaq website has the latest information on this product as well as the latest
drivers. Access the Compaq website at:
http://www.compaq.com/products/storageworks/msl5026/index.html.
Compaq Authorized Reseller
For the name of your nearest Compaq Authorized Reseller:
• In the United States, call 1-800-345-1518.
• In Canada, call 1-800-263-5868.
• Elsewhere, see the Compaq website for locations and telephone numbers.
Compaq StorageWorks MSL5000 Series Library User Guide xi

1
Introduction
The Compaq StorageWorks™ MSL5000 Series Library is a tape library system that
combines Digital Linear Tape (DLT) and Super DLT (SDLT) drive technology with
advanced robotics. Designed for backup operations with high-end networks and
high-performance servers, the library is the next generation performer in high-volume
backup and archival service. The library also features high availability, maximum
storage density, and easy serviceability.
The library’s SCSI interface-to-host system supports Low Voltage Differential (LVD).
The tape drives and robotics control functions each use separate SCSI connections and
SCSI ID addresses. Library SCSI I/O is provided through two VHDCI-series, 68-pin,
Micro-D SCSI connectors located at the rear of the unit directly under each tape drive.
Robotics SCSI I/O is provided through two VHDCI-series, 68-pin, Micro-D SCSI
connectors located on the library controller board.
The remainder of this chapter describes the major components of the library,
including:
• Models and accessories
• Tape drives
• Magazines
• Power supply
• Robotics
• Library controller board
• Accessory PCI slots
• Front panel indicators
• Multi-unit library configurations
Compaq StorageWorks MSL5000 Series Library User Guide 1–1

Introduction
Models
The MSL5000 Series Library family includes the following models:
• MSL5026SL
• MSL5026DLX
• MSL5052
Any MSL5000 Series Library can operate as a stand-alone unit or can be installed in a
storage cabinet to form a larger integrated multi-unit library configuration. MSL5026
libraries contain up to two tape drives, two removable tape cartridge magazines, and
robotics capable of random or sequential tape cartridge operation. MSL5052 libraries
contain up to four tape drives, four removable tape cartridge magazines, and robotics
capable of random tape cartridge operation.
Accessories
Contact your Compaq authorized service provider or visit the Compaq website at
www.compaq.com for the most current list of accessories that are available for an
MSL5000 Series Library.
IMPORTANT: Mixing DLT 40/80 tape drives with SDLT 110/220 tape drives should only be
done in association with your application software media partitioning guidelines.
1–2 Compaq StorageWorks MSL5000 Series Library User Guide
Tape Drives
MSL5000 Series Libraries support up to 4 tape drives (see Figure 1–1). All tape drives
are hot-plug capable
Micro-D SCSI connectors located at the rear of the library directly beneath each tape
drive.
2
Introduction
. SCSI I/O is accomplished through two VHDCI-series, 68-pin,
2
1
1
4
3
Figure 1–1: Library tape drive locations
1
Tap e D r i v e 0
2
Tap e D r i v e 1
3
Tap e D r i v e 2
4
Tap e D r i v e 3
Compaq StorageWorks MSL5000 Series Library User Guide 1–3

Introduction
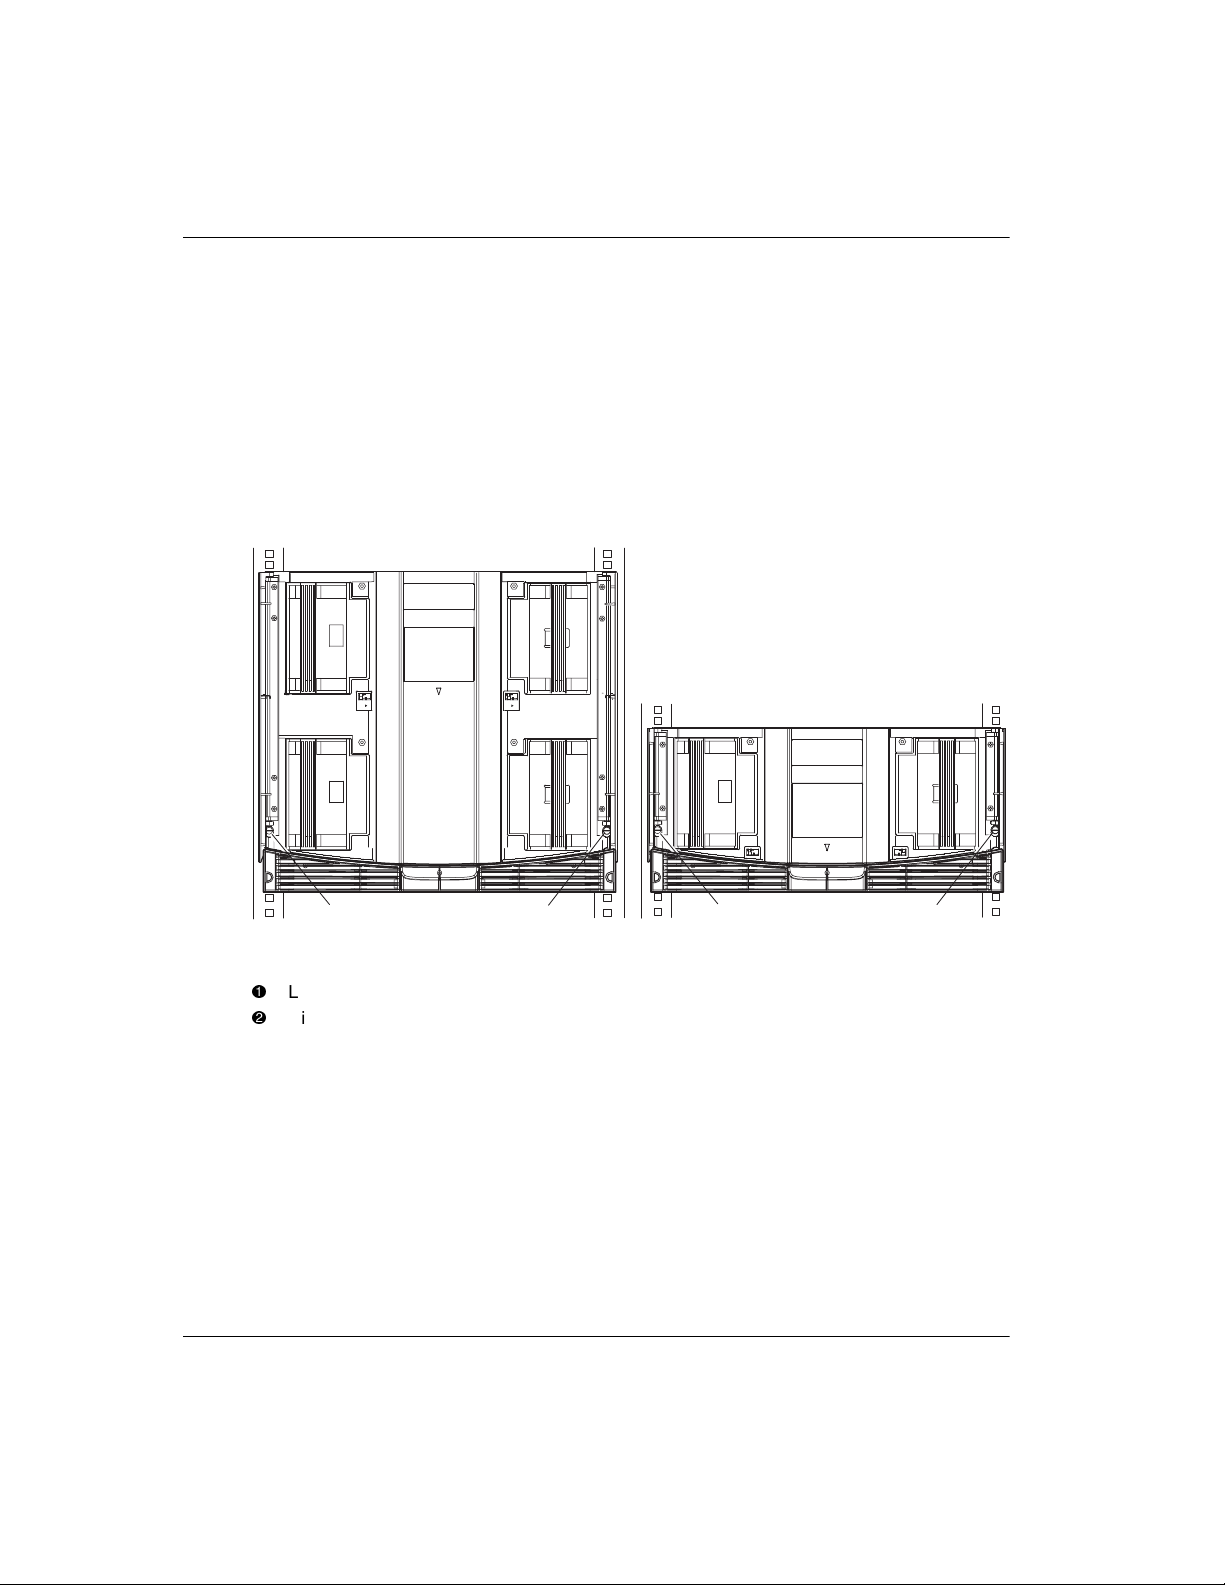
Magazines
MSL5000 Series Libraries contain two or four removable tape cartridge magazines
that are accessible through the front doors (see Figure 1–2).
1
2
1
1
2
2
Figure 1–2: Library magazines
1
Left Magazine(s), with integrated mail slot
2
Right Magazine(s)
Looking from the front of the library, each left tape magazine includes a mail slot,
which is accessible when that magazine’s door is open. Pivoting forward, this mail slot
feature lets you insert or remove a single tape without having to unlock, remove, and
reinventory the magazine. If 13 data slots are required, the library can be reconfigured
to recognize each mail slot as a standard data slot. The right tape magazine(s) contain
fixed cartridge slots (no mail slot feature), so they retain their full 13-slot data capacity
at all times.
1–4 Compaq StorageWorks MSL5000 Series Library User Guide

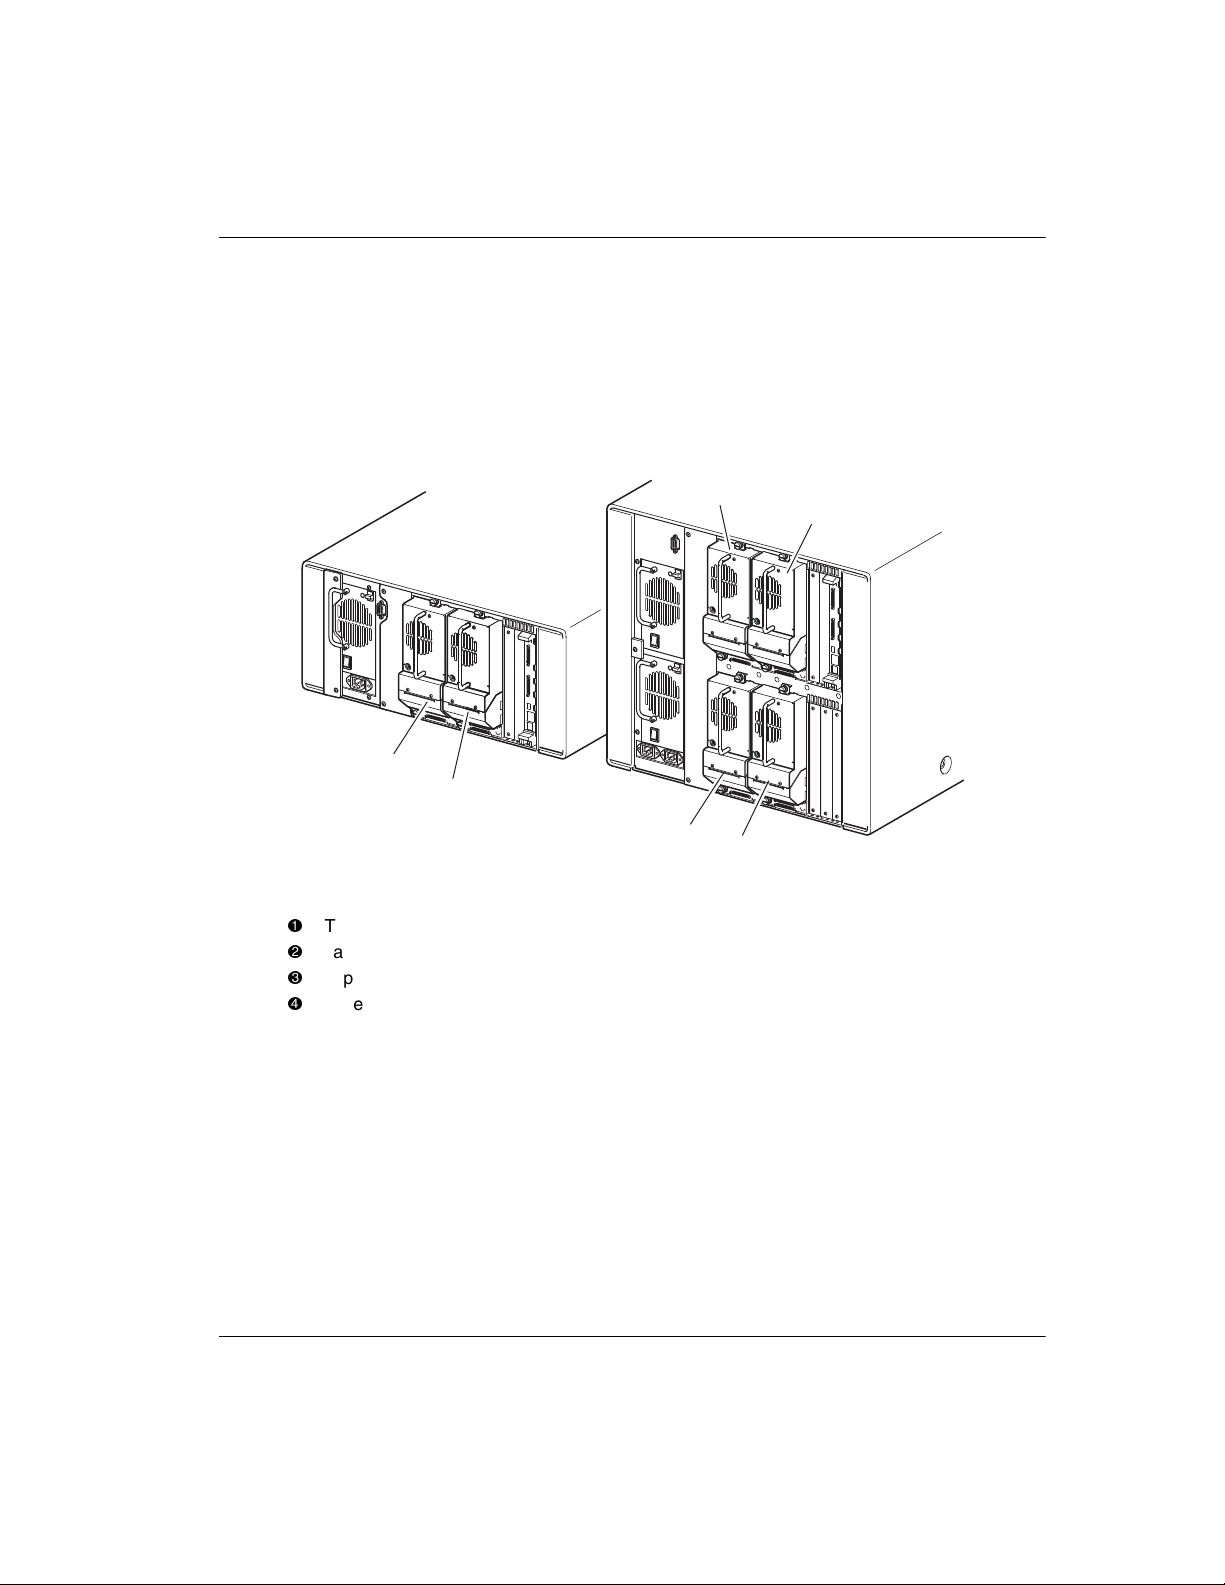
Power Supplies
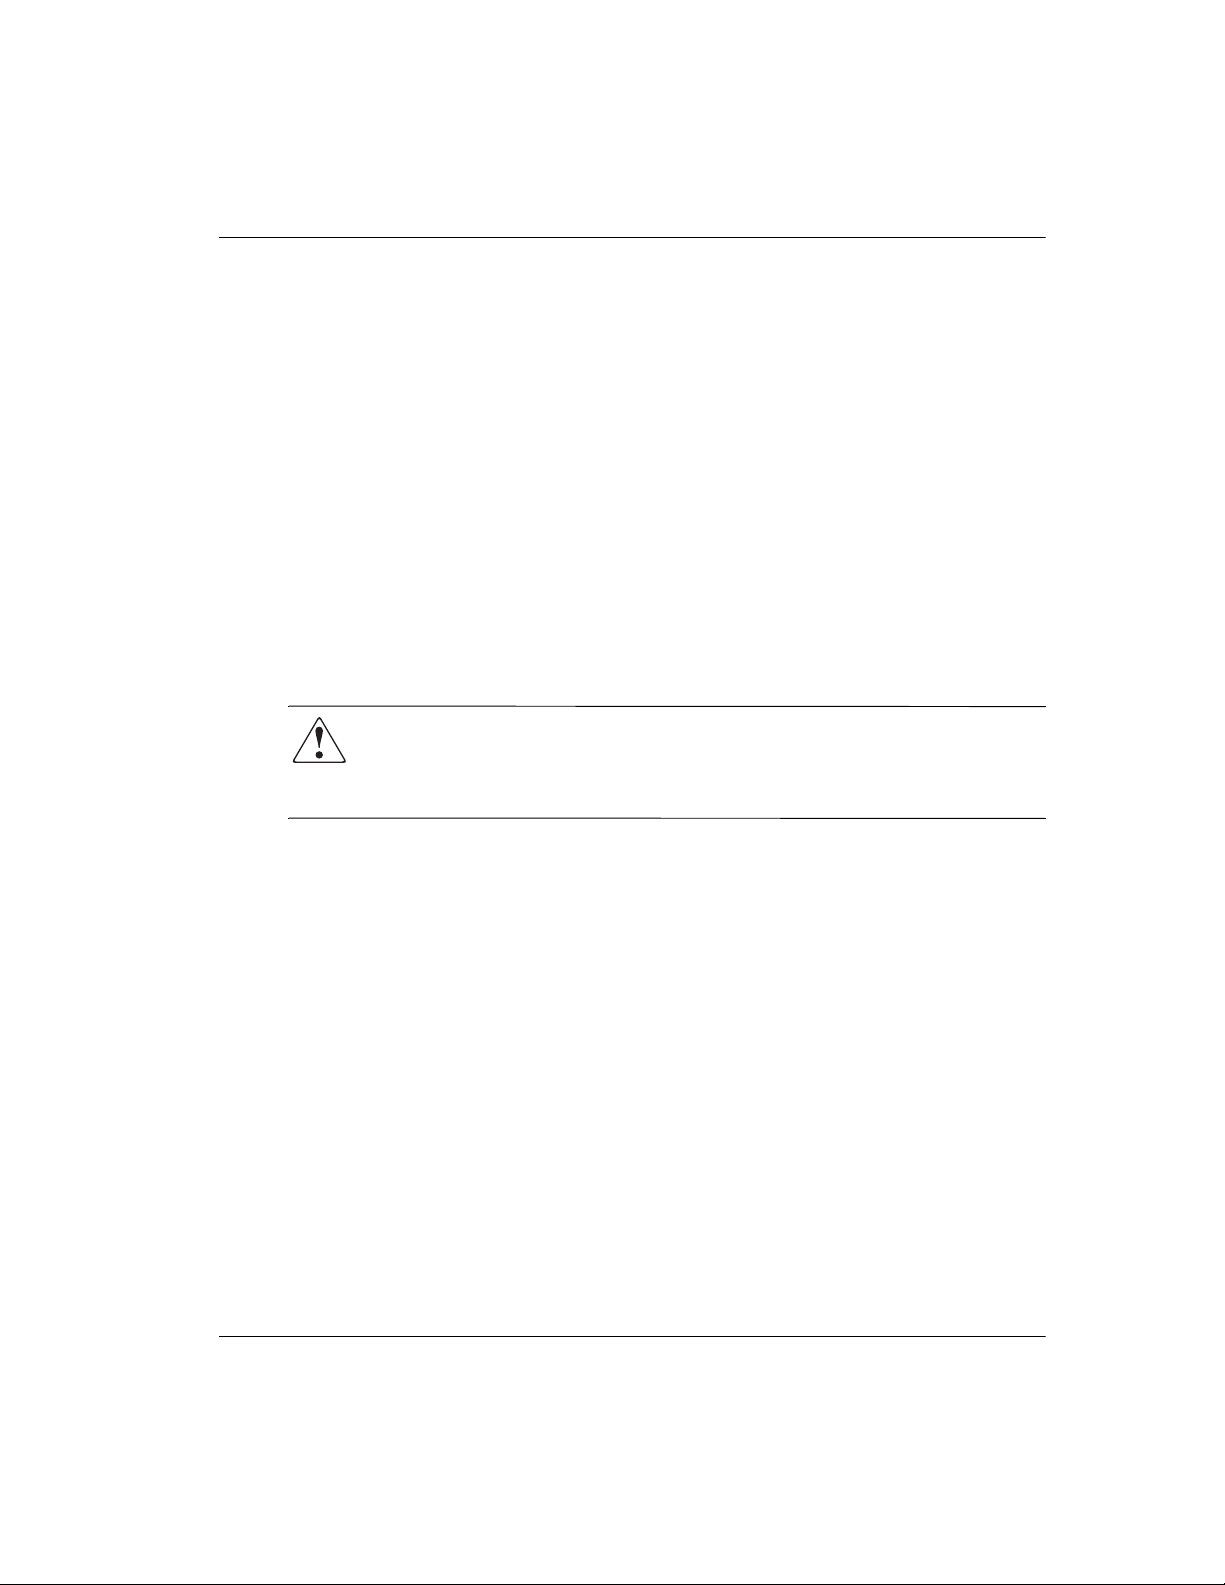
MSL5000 Series Libraries support one or two power supplies that are accessible from
the rear of the unit (see Figure 1–3). These auto-ranging power supplies are capable of
using any nominal AC voltage between 100 VAC and 240 VAC power, at 50 Hz or 60
Hz, and are easily removed without requiring special tools.
Power to the library is supplied through AC connectors at the rear panel of each power
supply receiver. Library power is normally controlled from the Graphical User
Interface (GUI) touch screen; however, a manual power disconnect switch, located at
the rear of each power supply is provided.
Power supplies can be easily replaced in maintenance/service mode using a #1 Phillips
screwdriver to remove the power supply bracket.
For the MSL5052 library, two power supplies are supported to provide redundancy for
mission critical operations. Both power supplies share the load under normal
operating conditions, however, if one of the power supplies fail the remaining power
supply assumes the full load (see Figure 1-3 on the following page).
Introduction
Compaq StorageWorks MSL5000 Series Library User Guide 1–5
Introduction
Figure 1–3: Library power supplies
NOTE: For the MSL5052, the left AC power receptacle is for the bottom power supply. The right
AC power receptacle is for the top power supply.
1
Power On LED (lights after touching the front panel display)
2
Power Supply Release Latch
3
Power Switch
4
Power Supply
5
AC Power Cord(s)
6
Power supply bracket
1–6 Compaq StorageWorks MSL5000 Series Library User Guide
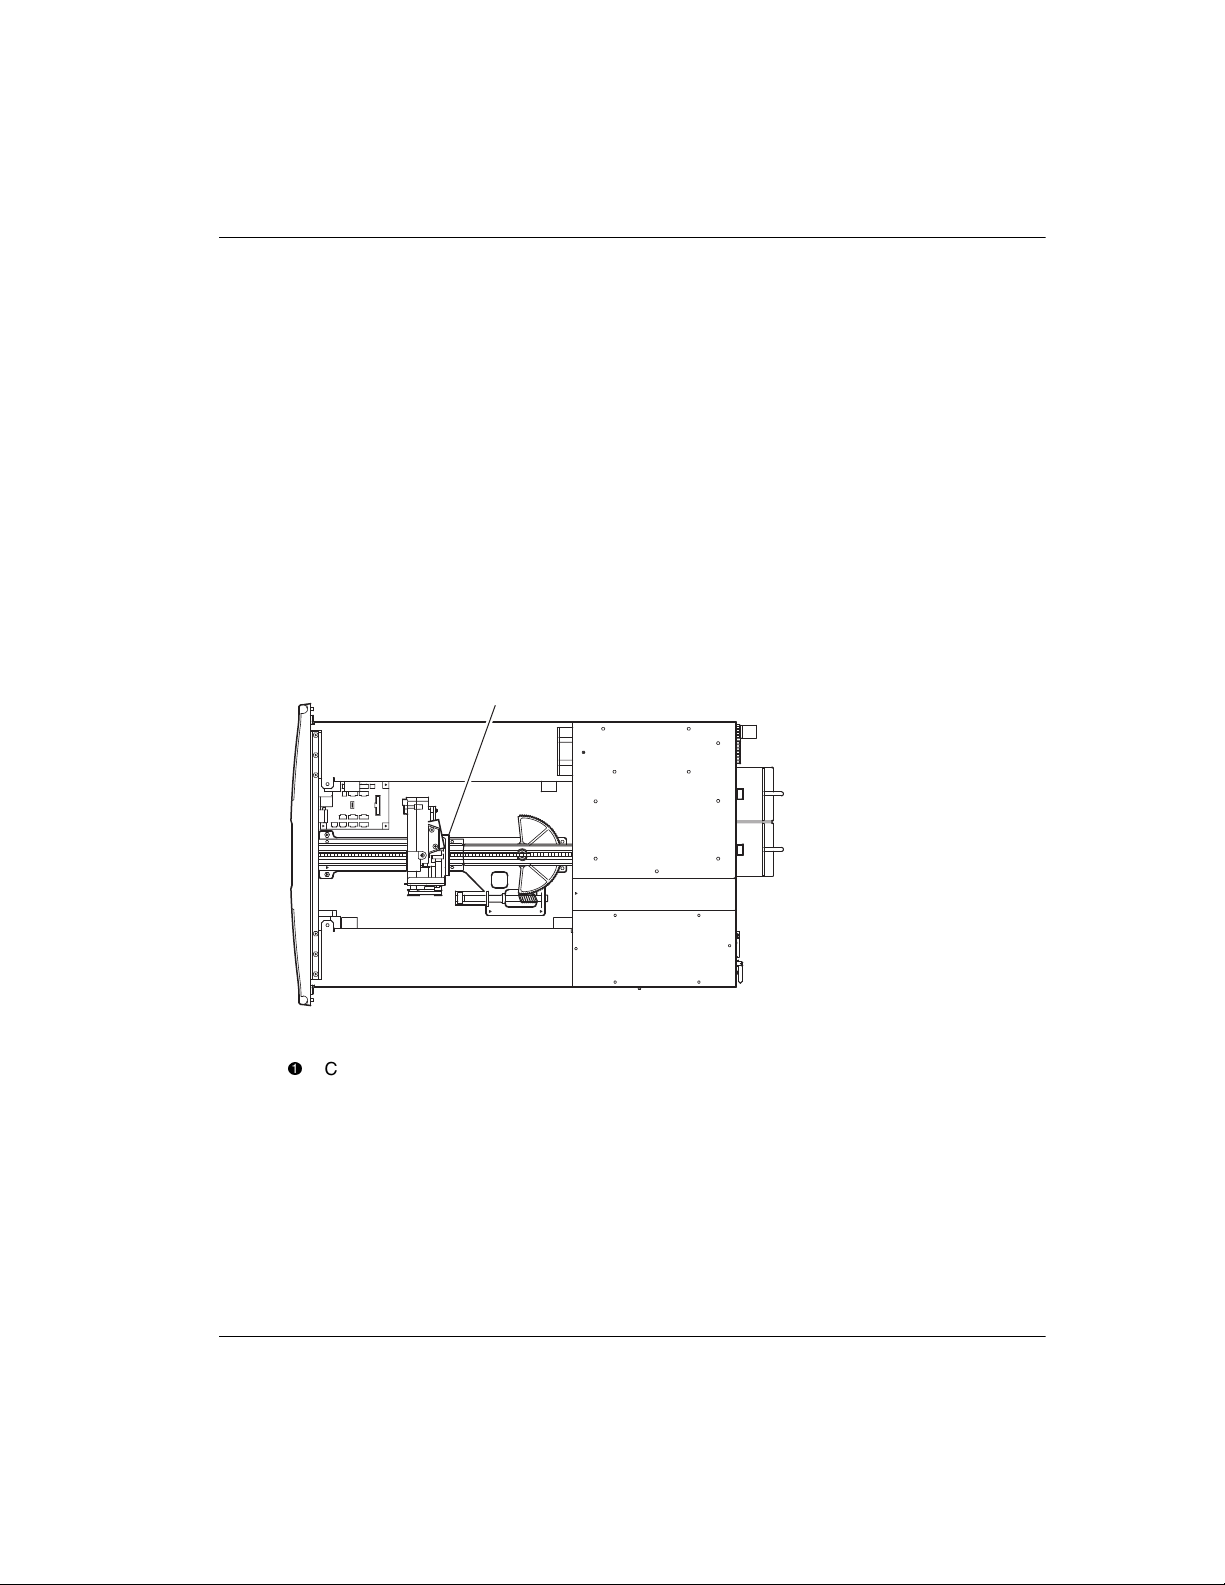
Robotics
MSL5000 Series Library robotics consists of a cartridge shuttle, motor hardware,
motor drives, and other support electronics (see Figure 1–4). The MSL5052 library
also contains a vertical axis mechanism that enables the robotics to travel between the
upper and lower tape cartridge magazines. These robotics are capable of picking and
placing tapes throughout a 180-degree arc that consists of the tape drives, tape
cartridge magazines, and an optional Pass-Through Mechanism (PTM).
The cartridge shuttle assembly includes a mounted barcode reader for scanning tape
cartridges installed in the magazines and tape drives.
IMPORTANT: Both full barcode reader scan and physical scan are conducted each time the
library is initially powered up or each time a tape magazine is accessed using normal
operational modes.
In MSL5052 libraries, the robotic-PTM interface is at the lower vertical axis PTM
elevator position only.
Introduction
1
Figure 1–4: Library robotics (top cover removed, MSL5026 shown)
1
Cartridge Shuttle Assembly with Integral Barcode Reader
Compaq StorageWorks MSL5000 Series Library User Guide 1–7

Introduction
Library Controller Board
The library controller board contains a single microprocessor and associated logic
devices to control all robotics operations and manage overall library functions. The
microprocessor enables the SCSI interface between the library and the host system.
NOTE: The SCSI terminator must always be connected to the library controller board for proper
operation when configured as standalone or master.
The library controller board is installed in a card cage at the rear of the library and can
be serviced with using only a #1 Phillips screwdriver (see Figure 1–5).
IMPORTANT: For MSL5000 Series Libraries, the library controller board must be installed in
the right slot of the card cage area (upper card cage area for the MSL5052). The remaining
slots on the MSL5000 Series Libraries do not support the required connections for the library
controller board to operate correctly.
Figure 1–5: Library controller board
1
Library Controller Board
2
Factory-Defined Accessory PCI Slots (up to 5)
1–8 Compaq StorageWorks MSL5000 Series Library User Guide
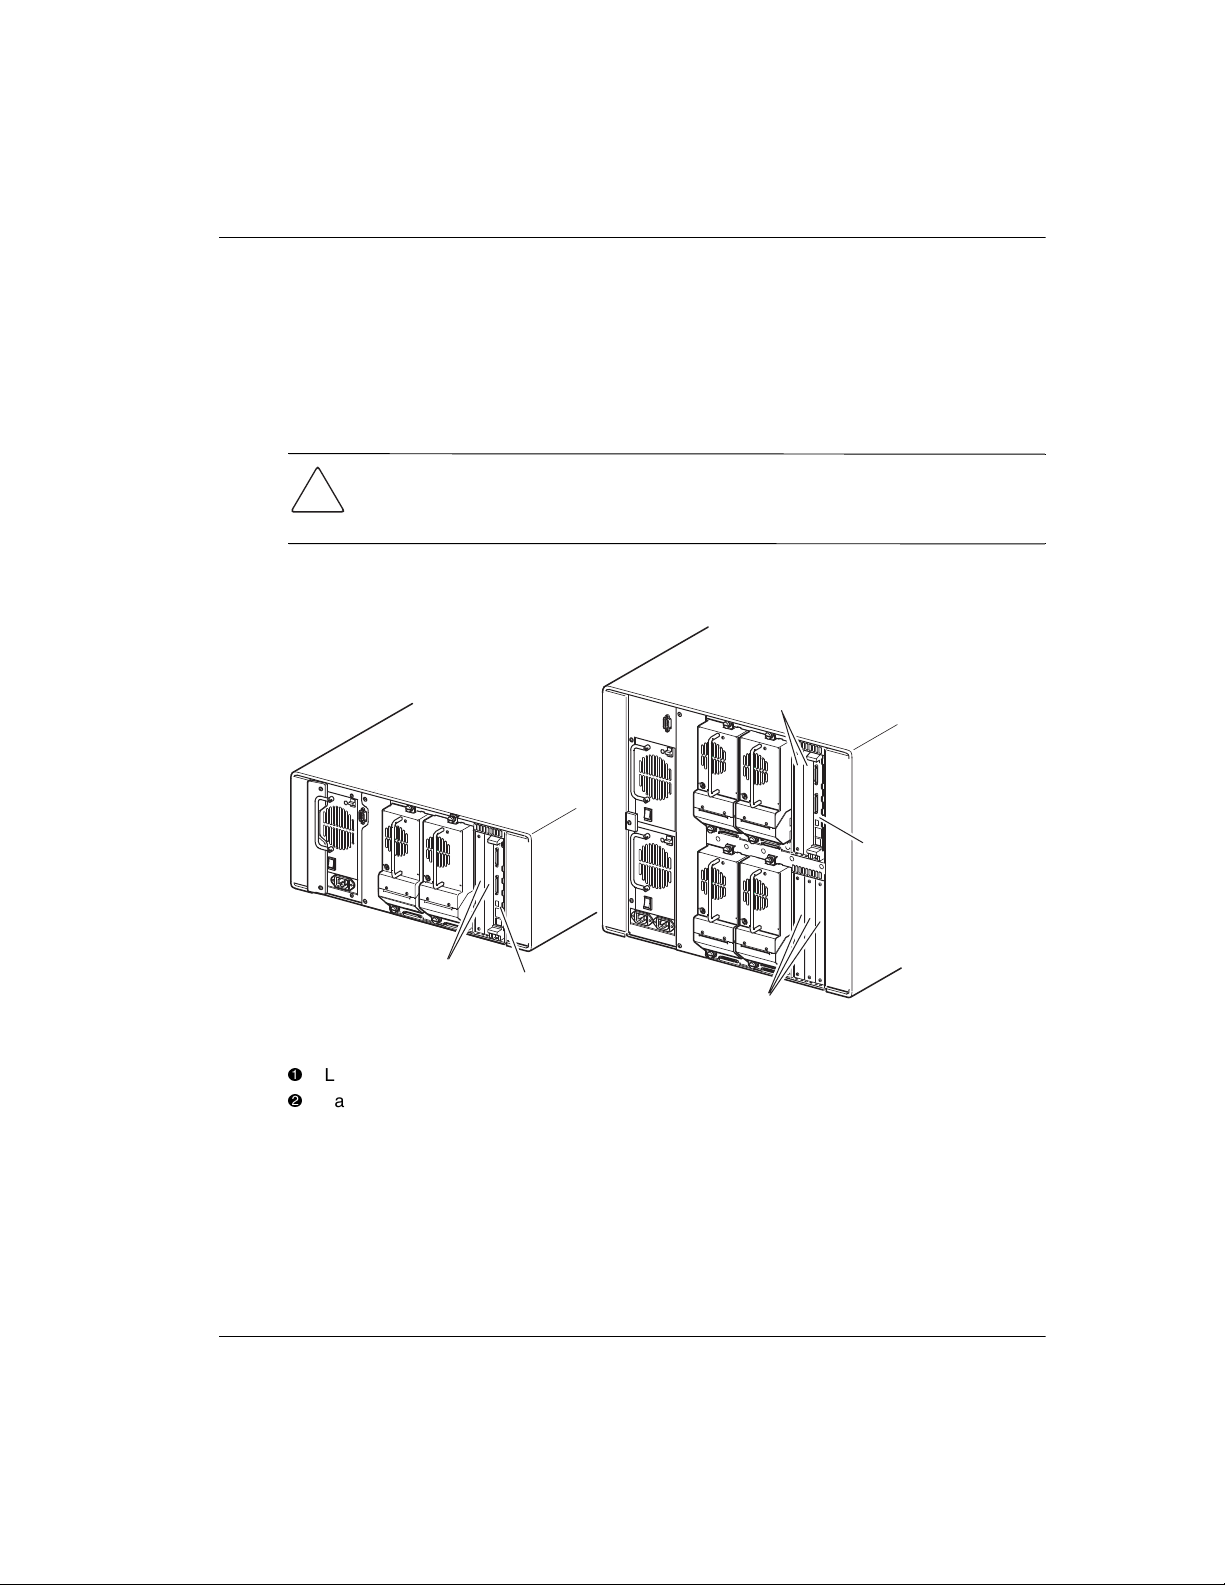
Factory-Defined Accessory PCI Slots
MSL5000 Series Libraries contain one or two rear-access card cages and one or two
32-bit, 33-MHz Compact PCI backplanes (see Figure 1–6). These backplanes contain
the plug-in connectors for a library controller board and up to five optional
Compaq-defined PCI add-in cards.
CAUTION: Use of non-Compaq qualified PCI option cards can damage your
MSL5000 Series Library and will void product warranty. Follow all installation,
configuration, and operating instructions shipped with the option card upgrade kit.
IMPORTANT: For MSL5000 Series Libraries only, the library controller board must be installed
in the right slot of the card cage area (upper card cage area for the MSL5052).
Introduction
2
1
2
1
2
Figure 1–6: Library card cages
1
Library Controller Board
2
Factory-Defined Accessory PCI Slots (up to 5)
Compaq StorageWorks MSL5000 Series Library User Guide 1–9
Introduction
Front Panel Indicators
The library front panel indicators consist of the following:
• View i n g win dow—lets you visually check the library’s internal operations.
• GUI touch screen—manually operated to set up and configure the library.
• Library status LED—displays the library’s operational status.
1
2
3
Figure 1–7: Library front panel
1
Viewing Window
2
GUI Touch Screen
3
Library Status LED
1–10 Compaq StorageWorks MSL5000 Series Library User Guide
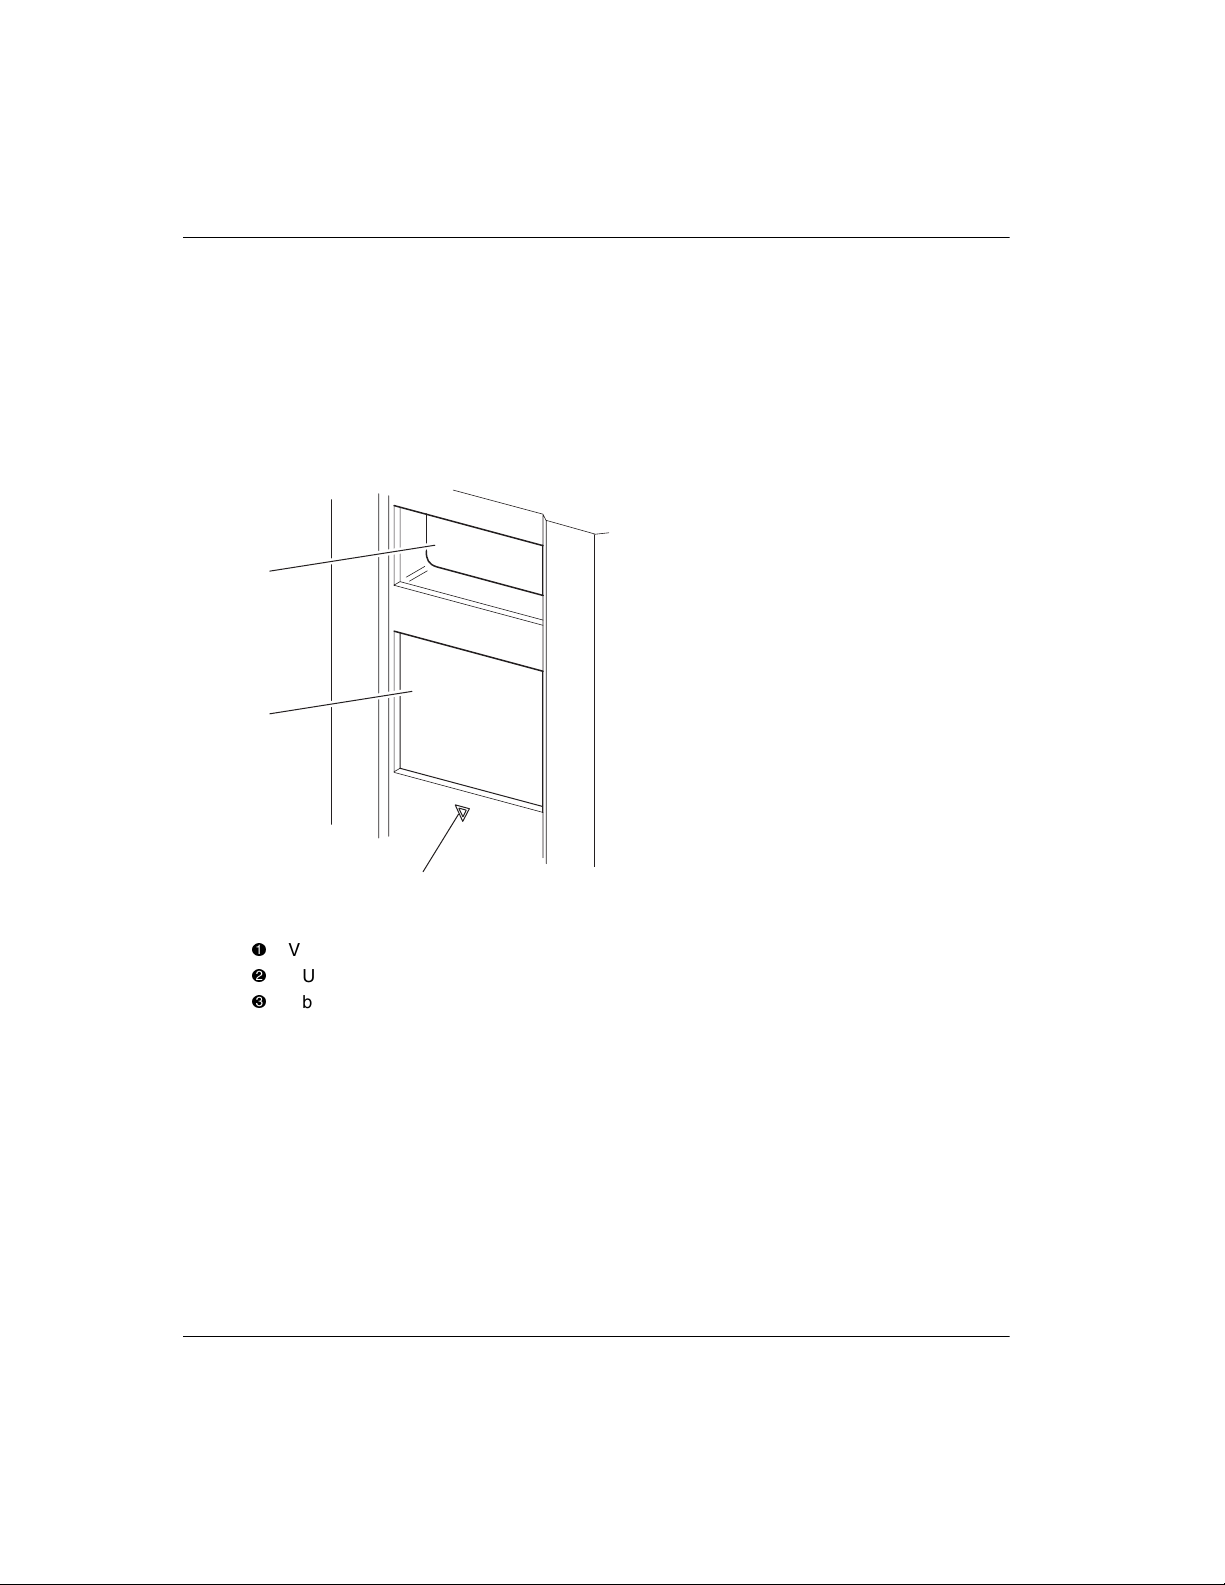
Multi-Unit Library Systems
MSL5000 Series libraries can be stacked in a scalable combination with additional
MSL5026 and MSL5052 libraries to form a multi-unit library configuration. Through
use of a rear-mounted Pass-Through Mechanism (PTM), all libraries in a multi-unit
library configuration can operate together as a single virtual library system. Stacked
libraries are interconnected through their rear panel Ethernet connections to a supplied
router that mounts to the storage cabinet. The router also provides a Wide Area
Network (WAN) connector when libraries are combined in their maximum stacked
height.
A maximum of four MSL5052 or seven MSL5026 libraries can be connected together
in this manner. Any combination of seven libraries, not exceeding 40 Units (40U) in
total stacked height, can also be used. A multi-unit library configuration appears to the
host computer system and application software as a single library. For multi-unit
applications, the top library becomes the master unit and all other libraries are slave
units.
WARNING: The PTM continues to function each time a slave library is physically
removed from the storage cabinet configuration during normal library operation.
Refer to the Compaq StorageWorks Pass-Through Mechanism Reference Guide
for detailed installation, configuration, and operation information
Introduction
.
The library’s robotics can pick and place tape cartridges into a movable elevator that
encompasses the full length of the PTM. In this manner, individual tapes can be passed
up or down between the libraries contained in the multi-unit library configuration
under the master library control. Robotics access to the PTM is located at the rear of
the library beneath the PTM cover (see Figure 1–8 on the following page).
Compaq StorageWorks MSL5000 Series Library User Guide 1–11
Introduction
Figure 1–8: Library PTM mounting location
1
2
1
1
2
2
PTM Interface Connector
PTM Mounting Cover (removal required for PTM installation)
1–12 Compaq StorageWorks MSL5000 Series Library User Guide

Installation
This chapter explains how to install a Compaq StorageWorks MSL5000 Series
Library. Sections in this chapter include:
• Setting up the tabletop model
• Setting up the rackmount model
• Applying power to the library
• SCSI cable configurations
IMPORTANT: Be sure to keep and store all shipping materials from your MSL5000
Series Library.
2
Compaq StorageWorks MSL5000 Series Library User Guide 2–1
Installation
Setting up the Tabletop Model
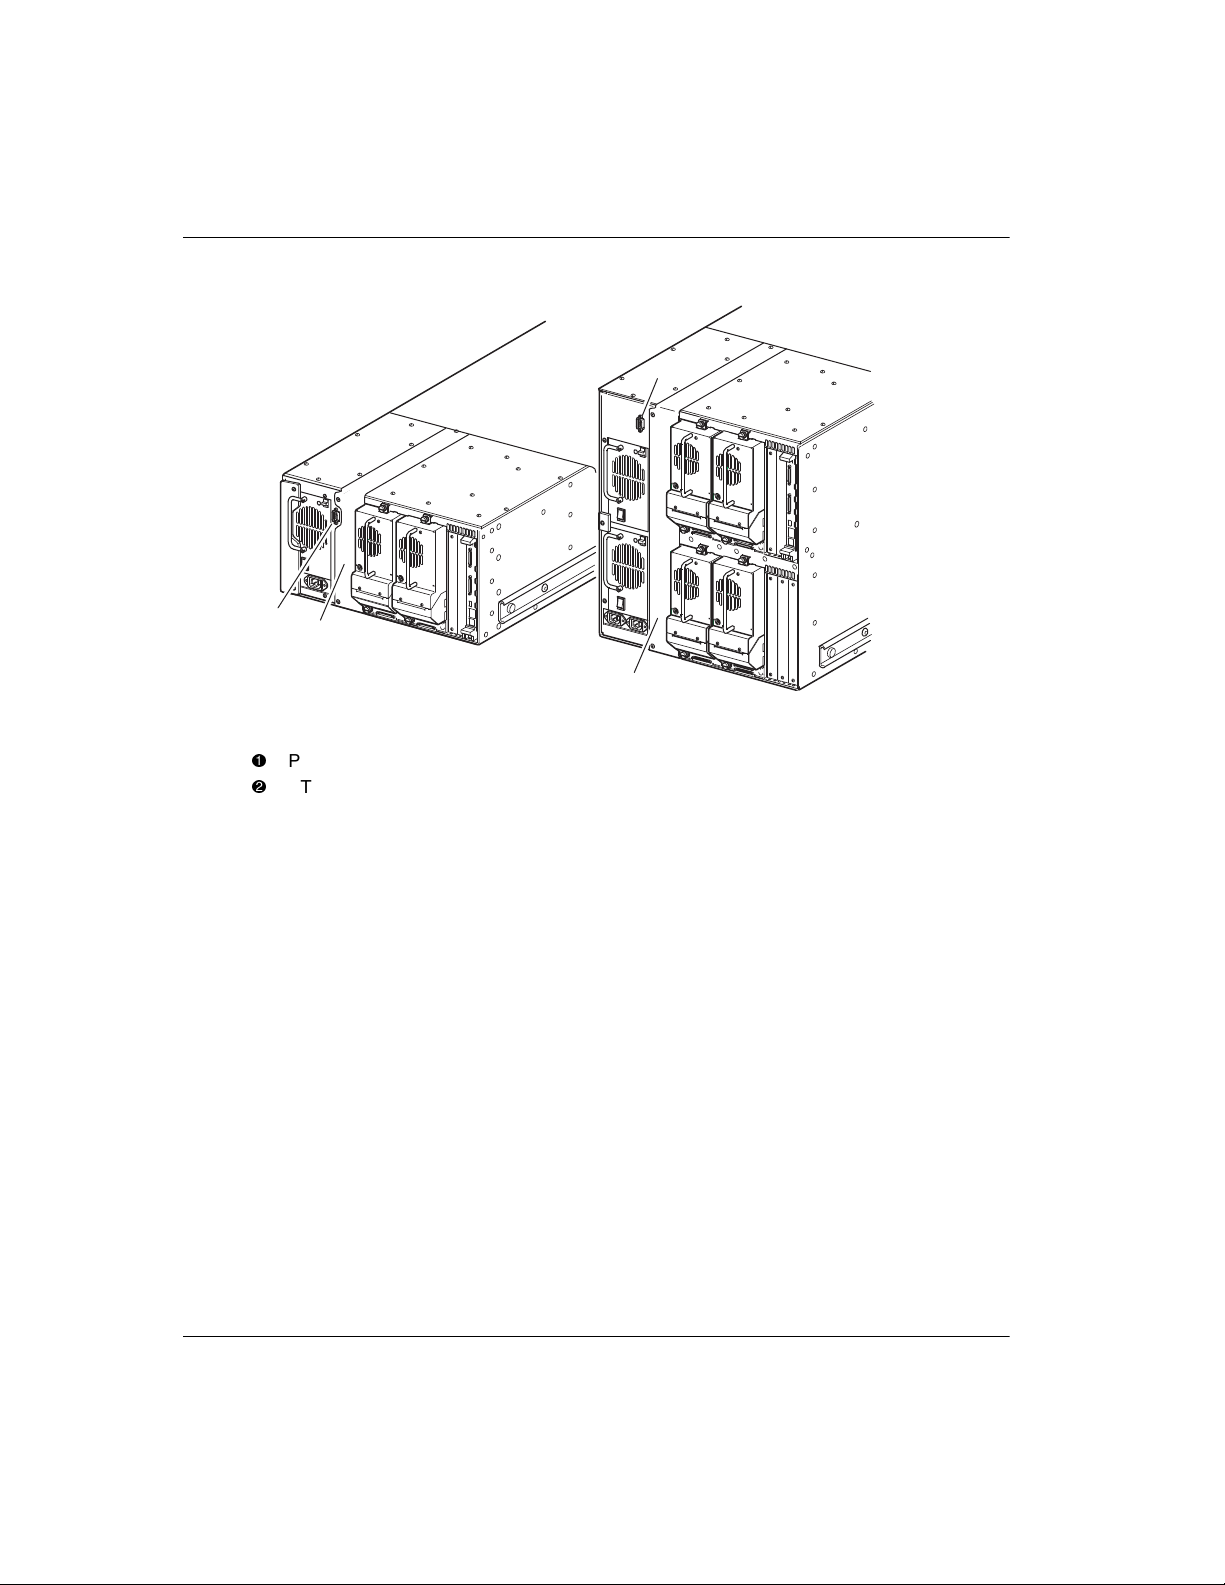
Library tabletop models require no mechanical assembly for mounting (see
Figure 2–1). Place the library on a desk, table, or other stable, horizontal surface.
Make sure the cooling grills at the front and the fans at the rear of the library are not
obstructed. Allow 18 inches (50 cm) of clearance at the front and rear for magazine
and hot-plug tape drive access, without the need to reposition the library.
NOTE: To reduce tabletop clearance requirements, temporarily move the library forward or
rearward to access the hot-plug drive shoes and magazines, respectively.
18"
(50 cm)
18"
(50 cm)
Figure 2–1: Tabletop model clearances (MSL5026 shown)
2–2 Compaq StorageWorks MSL5000 Series Library User Guide
Setting up the Rackmount Model
Setting up the rackmount model requires a template, storage cabinet slide rails, and a
mechanical lift to physically install the library in a storage cabinet.
To setup the rackmount model:
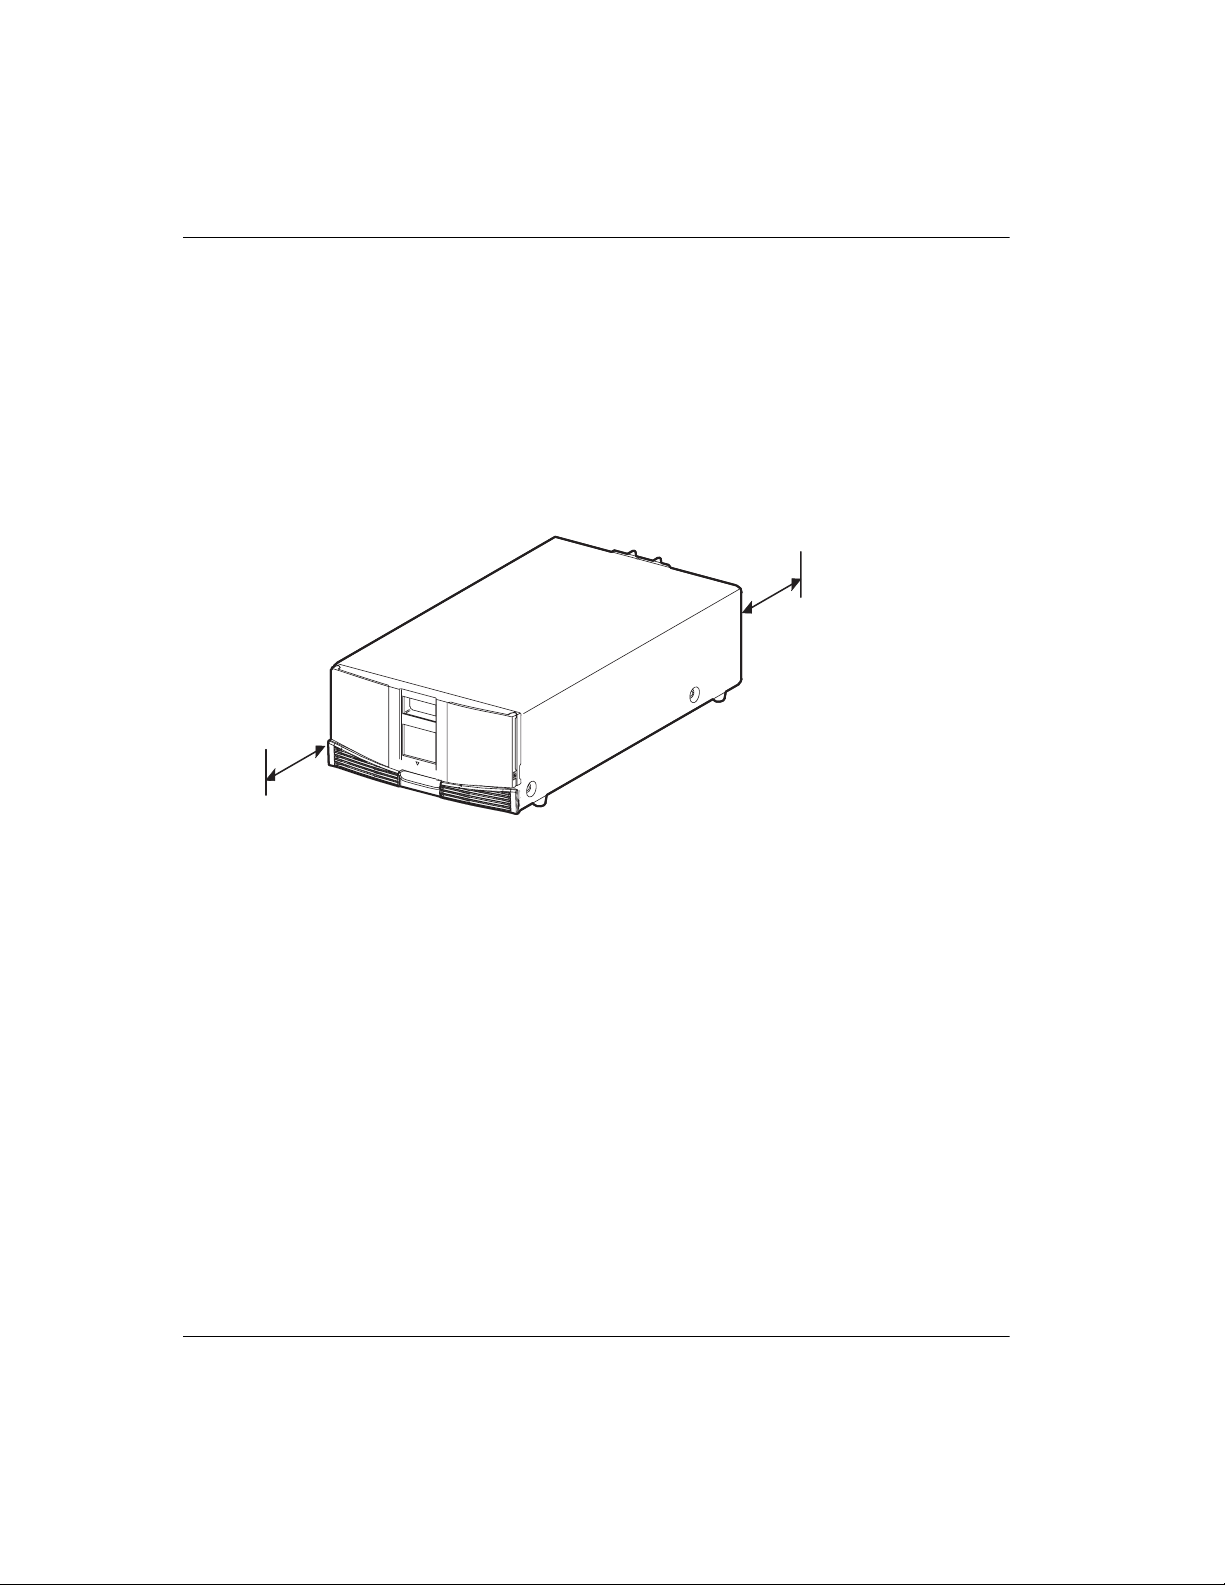
1. Use the template that shipped with the library to mark the location of the
mounting hardware on the mounting rails of the storage cabinet (see Figure 2–2).
MSL5052
MSL5026
Installation
Figure 2–2: Library template
NOTE: For Compaq Alpha Server H9A Series racks, refer to the instructions included in the
Alpha Rack Rail Adapter Kit.
Compaq StorageWorks MSL5000 Series Library User Guide 2–3
Installation
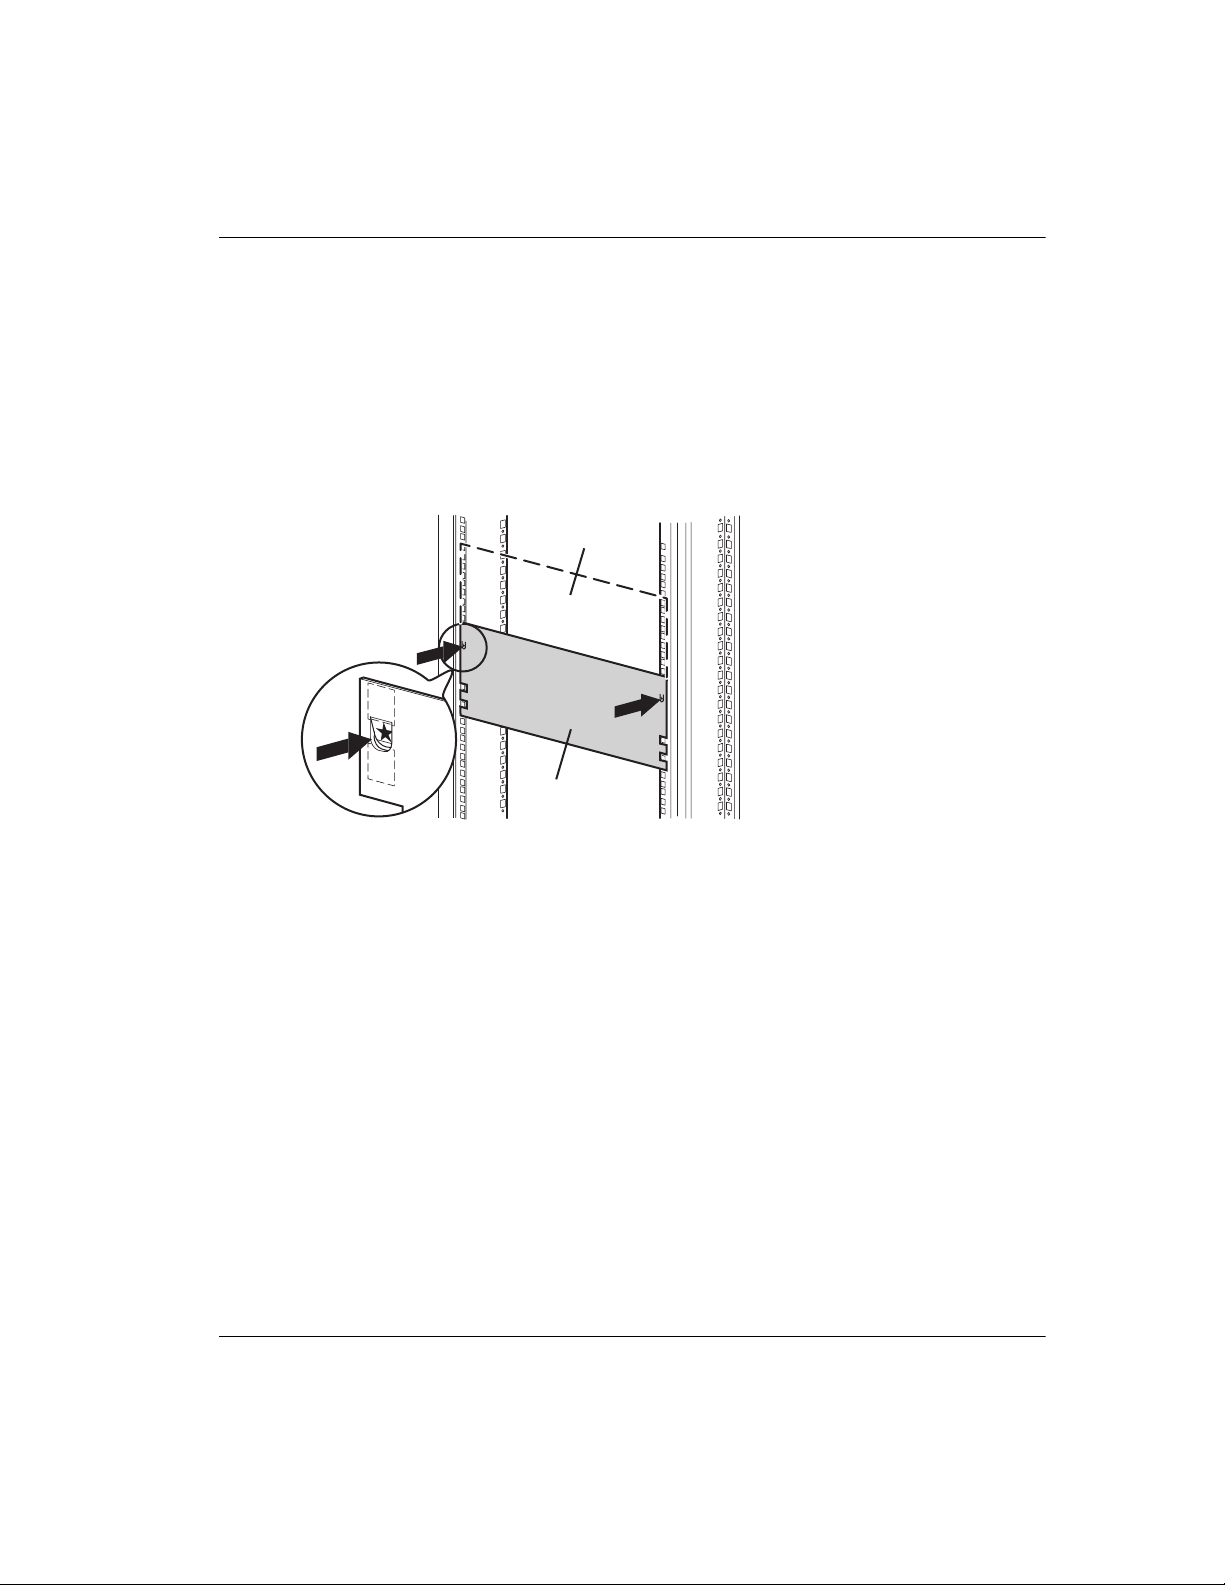
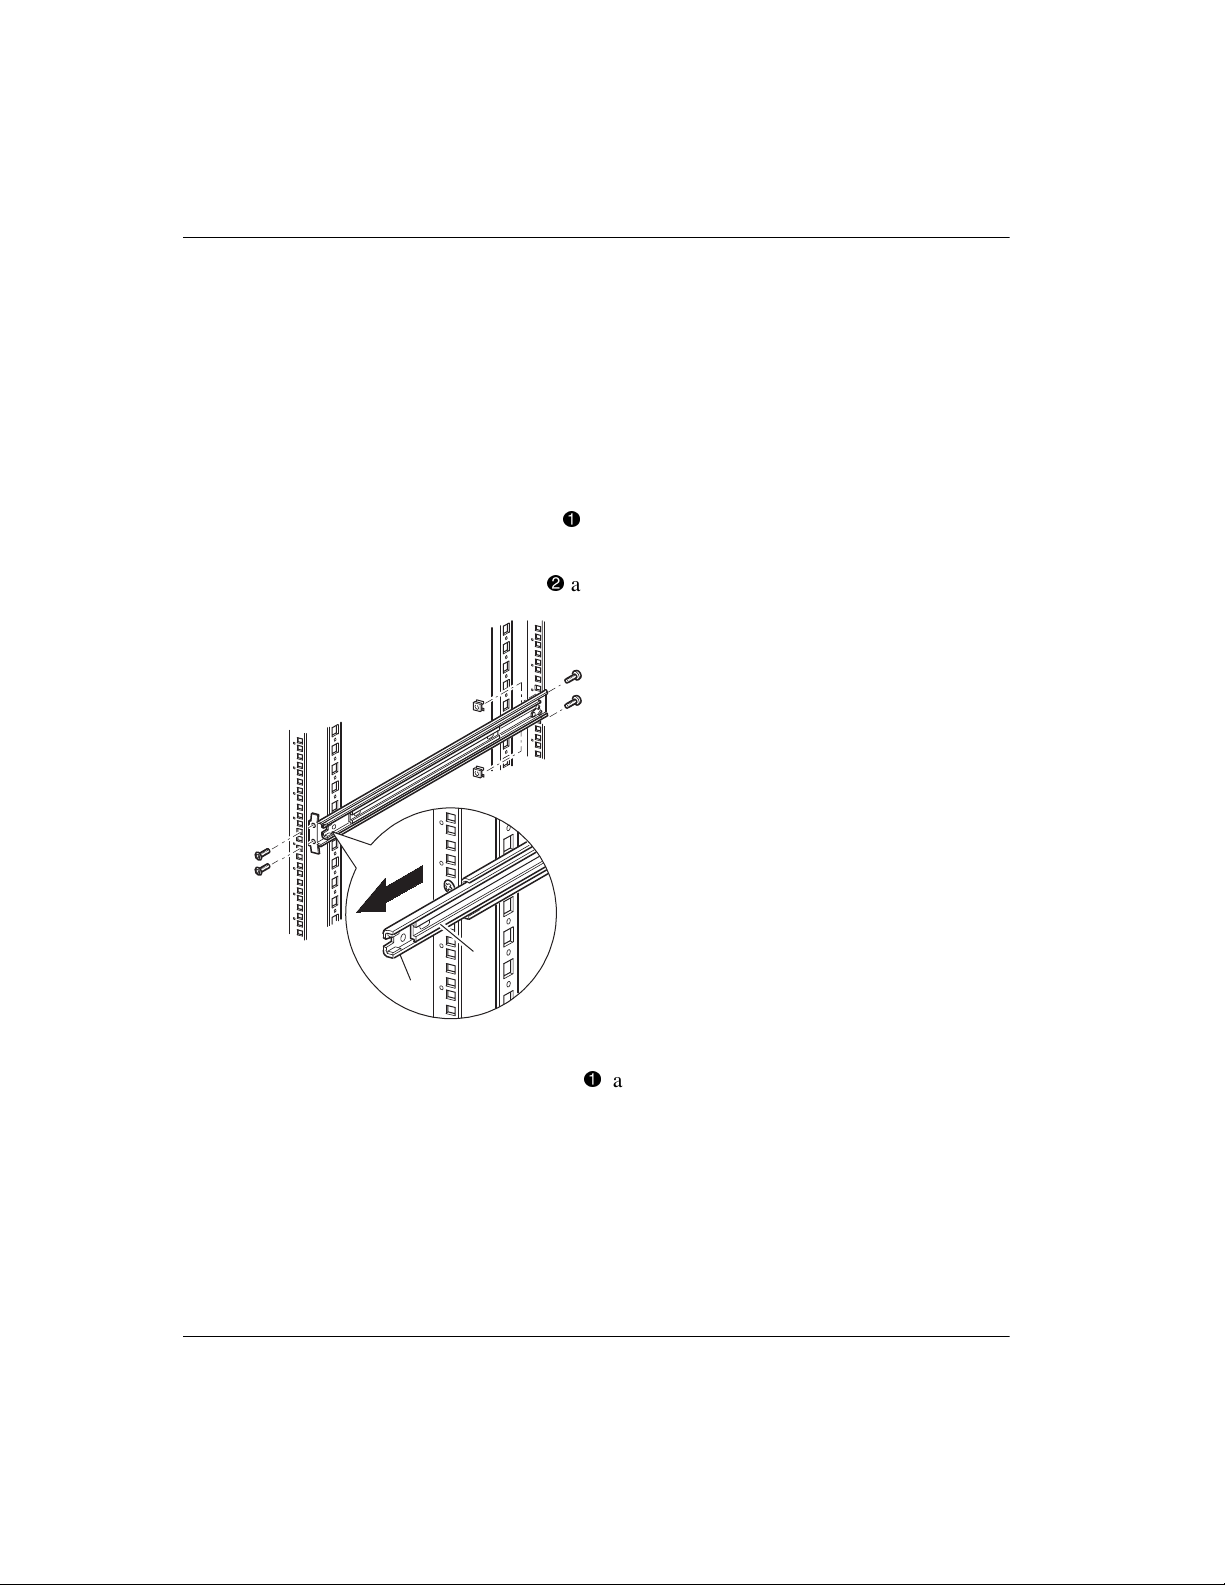
2. Remove the template and then attach the rails using the supplied fasteners (see
Figure 2–3). The front rail brackets are threaded to directly accept screws. The
rear brackets are not threaded and require cage nuts in the storage cabinet’s rear
vertical rails.
NOTE: Refer to the Compaq Rack Products Reference Guide for detailed cage nut
installation instructions.
IMPORTANT: Fully tighten the front rail screws. Leave the rear rail screws “finger tight” to
prevent binding when mounting the library.
a. Fully extend the slide rails 1 on both sides of the storage cabinet until
they lock.
b. Slide the inner guide rail
2
as far as possible to the front of the rail assembly.
2
1
Figure 2–3: Installing the rails
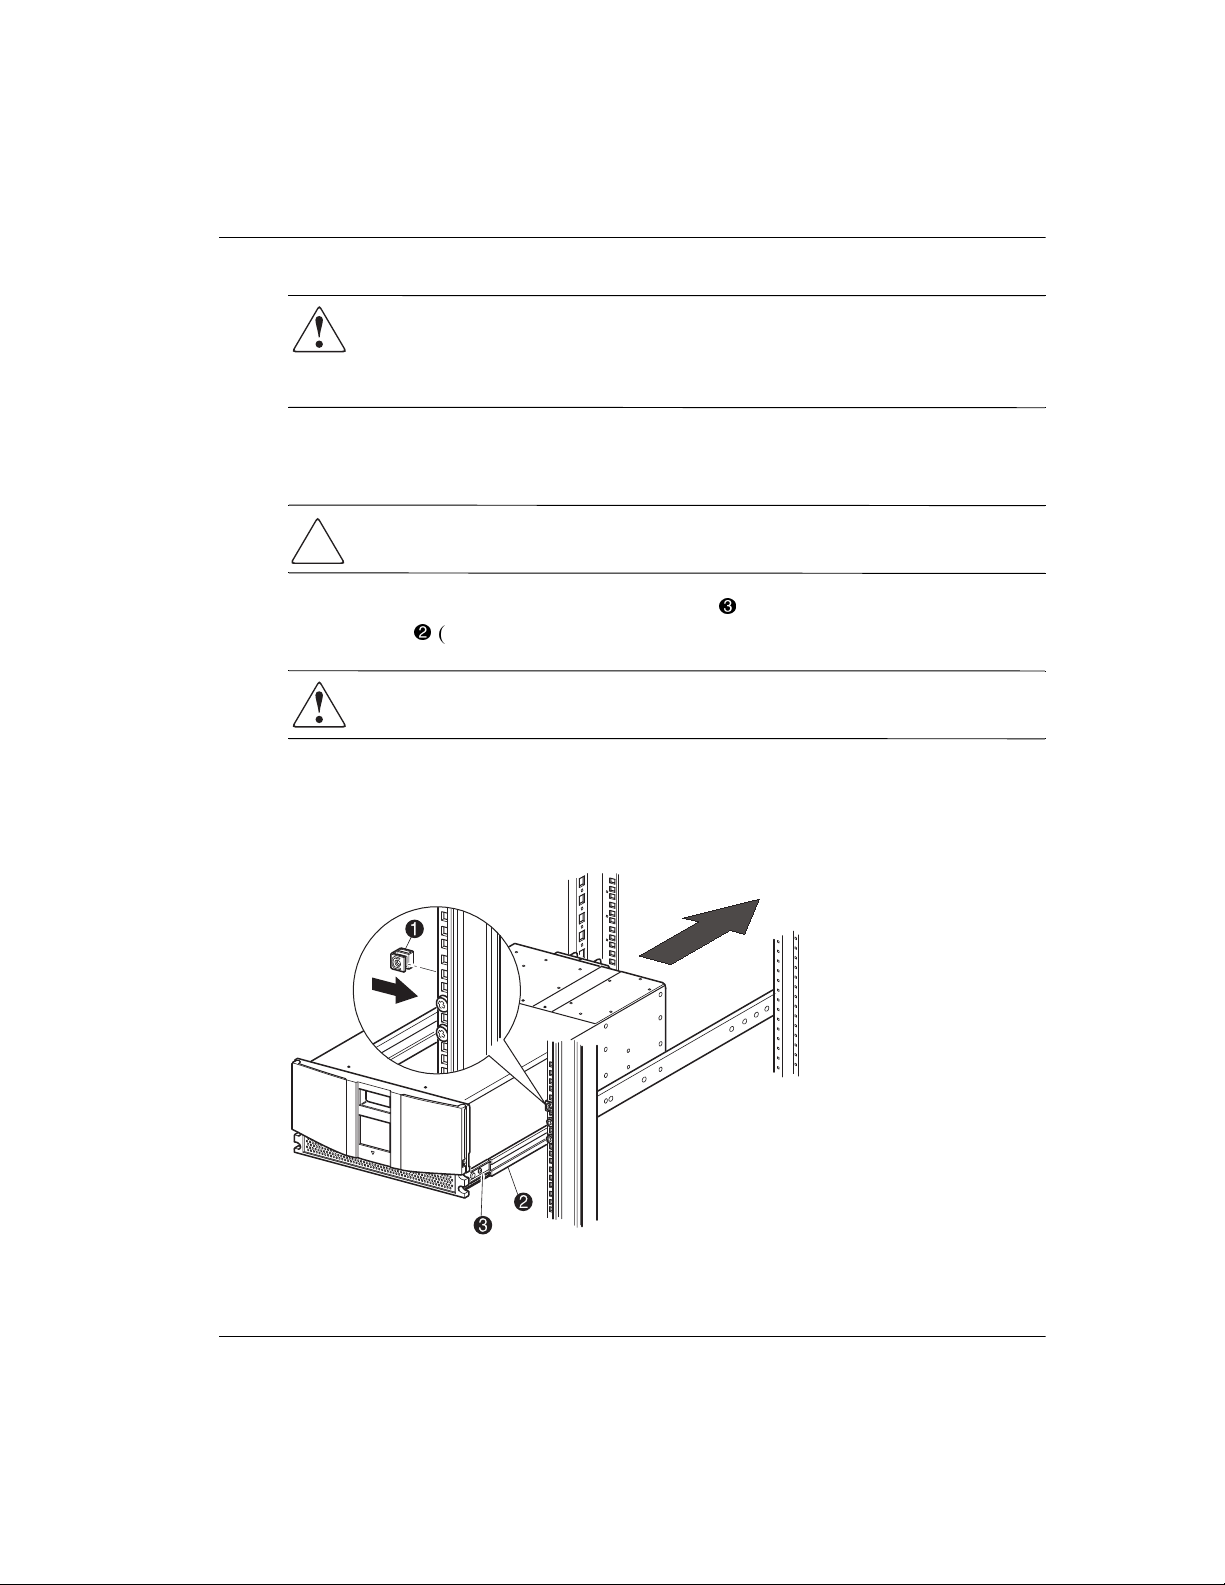
3. Install the two slide-on cage nuts 1, aligned two rack units above the rail bracket
screws, on each of the front storage cabinet vertical rails (Figure 2-4).
2–4 Compaq StorageWorks MSL5000 Series Library User Guide
Installation
WARNING: Use a mechanical lift to perform the next step. Make certain, when
the library is fully extended, that a force of 20% of the storage cabinet’s weight,
but not more than 57 pounds (26 kg), applied in any direction other than
upwards, does not cause the storage cabinet to overbalance.
4. Using a mechanical lift, lift the library and visually align the inner and
intermediate slide rails.
CAUTION: The library is heavier toward the tape drive end (rear).
5. Carefully insert the library’s inner slide rails 3 into the extended intermediate
2
slide rails
WARNING: A storage cabinet might become unstable if more than one
component is extended for any reason. Extend only one component at a time.
(see Figure 2–4).
6. Slide the library completely into the storage cabinet until the front panel
touches it.
7. Fully tighten the rear rail screws.
Figure 2–4: Installing the library (Model MSL5026 shown)
Compaq StorageWorks MSL5000 Series Library User Guide 2–5
Installation
8. Remove the tape to open the doors for installation.
9. Remove and discard the pull-tabs used to block the latch mechanism. Do not close
the doors.
NOTE: If necessary, see chapter 4, “Operation,” for information on how to manually open
the library doors.
10. With the doors open, secure the front panel to the storage cabinet using the two
retaining screws (see Figure 2–5). Close the doors.
You can now cable the library.
1
2
1
2
Figure 2–5: Securing the library
1
Left Retaining Screw
2
Right Retaining Screw
2–6 Compaq StorageWorks MSL5000 Series Library User Guide
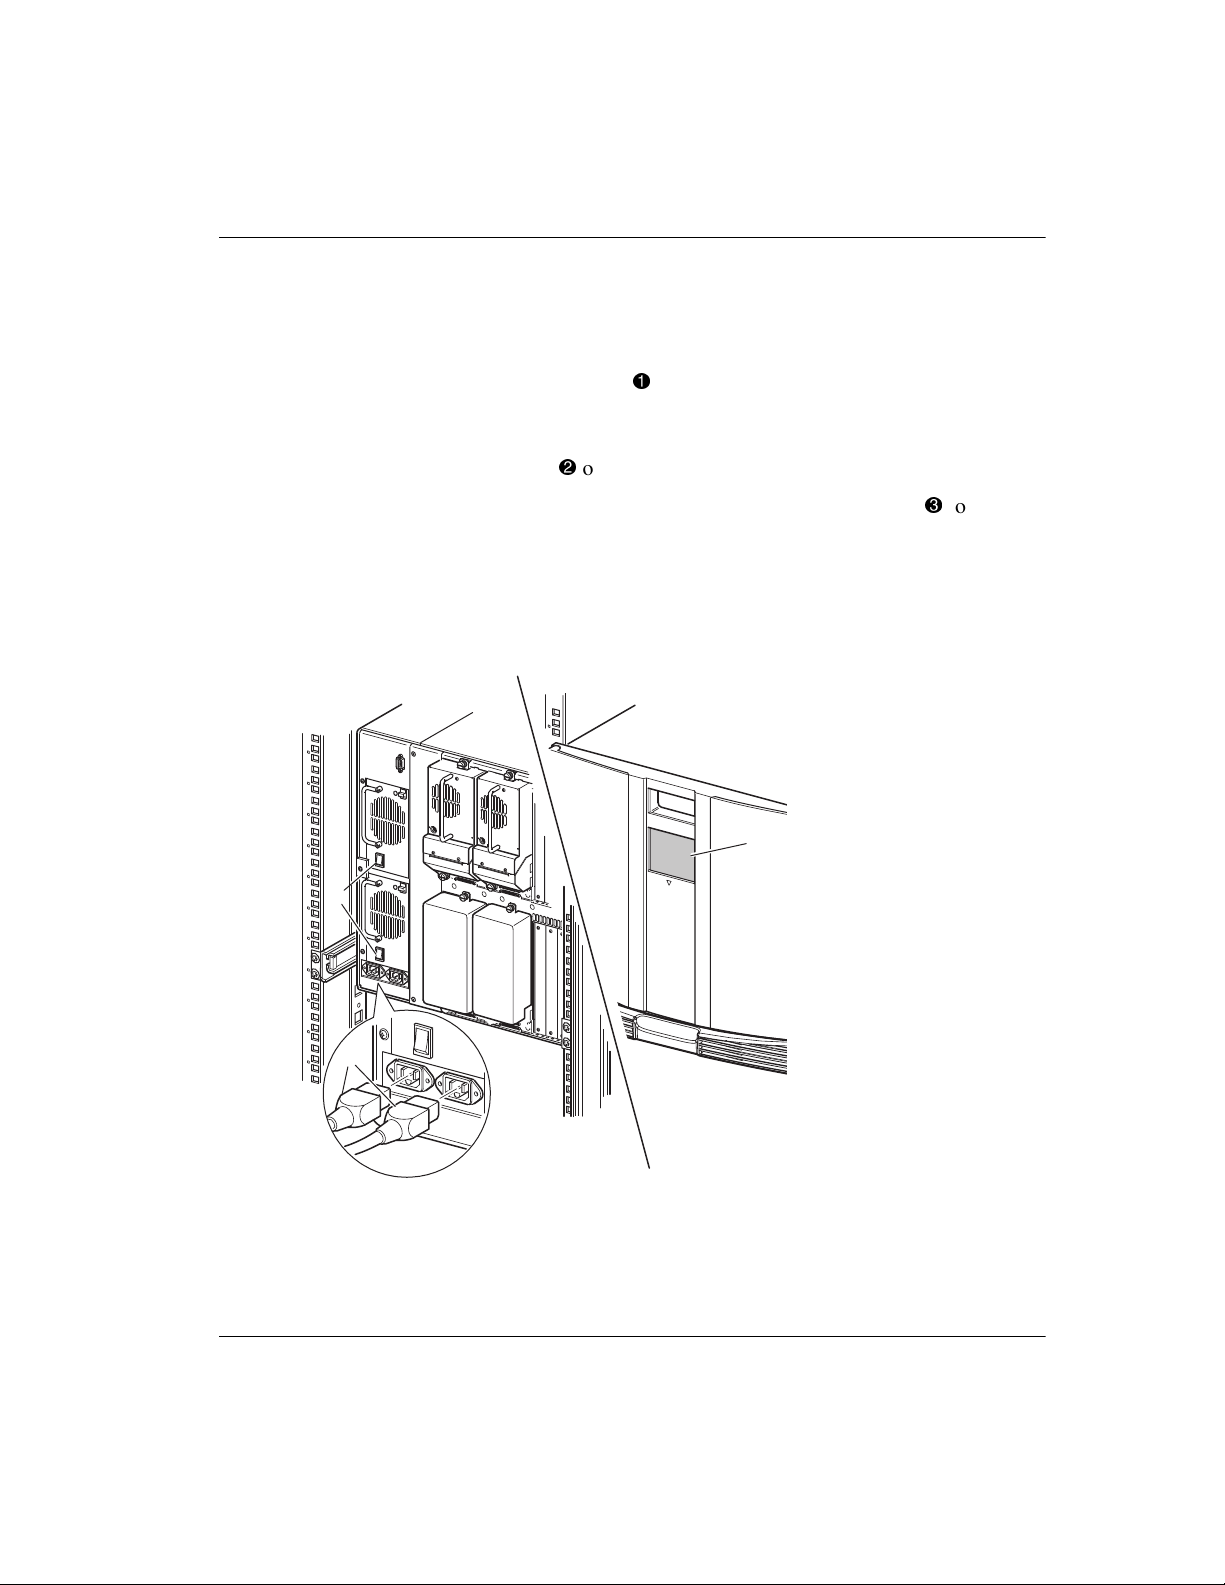
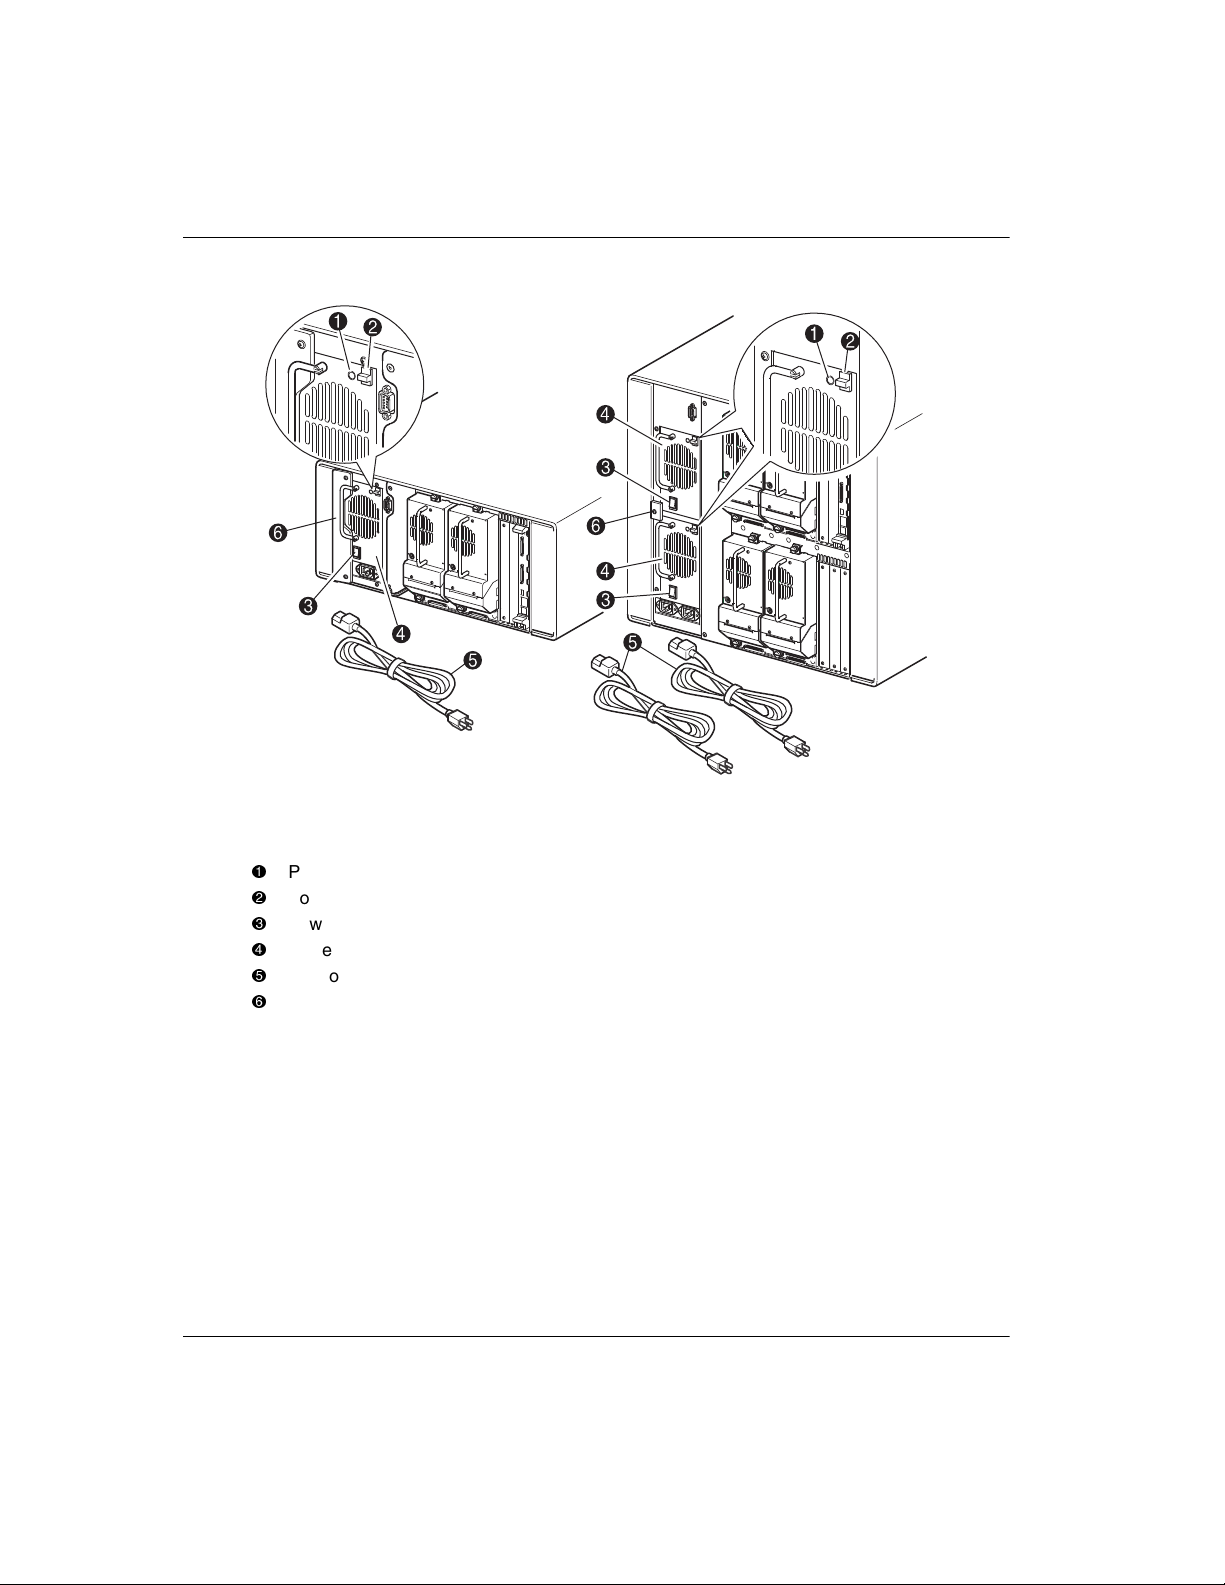
Applying Power to the Library
To apply power to the library (see Figure 2–6):
Installation
1. Connect each supplied power cord
NOTE: The left AC power receptacle is for the bottom power supply. The right AC
receptacle is for the top power supply. (MSL5052 only).
1
to each power supply receptacle.
2. Toggle each power switch 2 on.
3. Press anywhere on the Graphical User Interface (GUI) touch screen
3
to activate
the display and turn the library on.
IMPORTANT: The SCSI terminator must always be connected to the library controller
board for proper operation if configured as a master or standalone.
NOTE: Using a piece of tape to lift one corner, carefully remove the appliqué from the GUI
touch screen and save for future reference.
3
2
1
Figure 2–6: Applying power to the library (MSL5052 rackmount shown)
Compaq StorageWorks MSL5000 Series Library User Guide 2–7
 Loading...