


b
Getting Started
Compaq Evo Notebook N620c Series
Document Part Number: 316625-001
January 2003
This guide explains how to set up your hardware and software, identify the exterior components of the notebook, find and install the latest versions of Compaq software, and find additional information and support.
© 2003 Compaq Information Technologies Group, L.P.
Compaq, the Compaq logo, Evo, ROMPaq, and SoftPaq are trademarks of Compaq Information Technologies Group, L.P. in the U.S. and/or other countries. Microsoft and Windows are trademarks of Microsoft Corporation in the U.S. and/or other countries. All other product names mentioned herein may be trademarks of their respective companies.
Compaq shall not be liable for technical or editorial errors or omissions contained herein or for the incidental or consequential damages in connection with the furnishing, performance, or use of this material. The information in this document is provided “as is” without warranty of any kind, and is subject to change without notice. The warranties for Compaq products are set forth in the express limited warranty statements accompanying such products. Nothing herein should be construed as constituting an additional warranty.
Getting Started
First Edition January 2003
Reference Number: N620c
Document Part Number: 316625-001

Contents
1 Hardware and Software Setup
Setting Up the Hardware . . . . . . . . . . . . . . . . . . . . . . . . . 1–1
Setting Up the Software . . . . . . . . . . . . . . . . . . . . . . . . . . 1–4
Setting Up the Wireless MultiPort. . . . . . . . . . . . . . . 1–5
Installing Optional Applications . . . . . . . . . . . . . . . . 1–6
Notebook Support and Safety Tips . . . . . . . . . . . . . . 1–7
Confirming Hibernation Settings. . . . . . . . . . . . . . . . 1–8
2 A Look at the Notebook
Display Components . . . . . . . . . . . . . . . . . . . . . . . . . . . . 2–1
Pointing Device Components. . . . . . . . . . . . . . . . . . . . . . 2–2
Pointing Stick Model. . . . . . . . . . . . . . . . . . . . . . . . . 2–2
TouchPad Model . . . . . . . . . . . . . . . . . . . . . . . . . . . . 2–3
Dual Pointing Device Model . . . . . . . . . . . . . . . . . . . 2–4
Top Components . . . . . . . . . . . . . . . . . . . . . . . . . . . . . . . 2–5
Speakers and Memory Compartment . . . . . . . . . . . . 2–5
Lights. . . . . . . . . . . . . . . . . . . . . . . . . . . . . . . . . . . . . 2–6
Buttons, Keys and Switches . . . . . . . . . . . . . . . . . . . 2–8
Left Side Components . . . . . . . . . . . . . . . . . . . . . . . . . . 2–10
Right Side Components . . . . . . . . . . . . . . . . . . . . . . . . . 2–11
Front Panel Components . . . . . . . . . . . . . . . . . . . . . . . . 2–12
Rear Panel Components . . . . . . . . . . . . . . . . . . . . . . . . . 2–13
Bottom Components. . . . . . . . . . . . . . . . . . . . . . . . . . . . 2–15
Additional Standard Components . . . . . . . . . . . . . . . . . 2–17
Getting Started |
iii |

Contents
3 How to Get Information, Help and Updates
Using the Documentation Library CD . . . . . . . . . . . . . . . 3–1 Viewing Guides on the CD . . . . . . . . . . . . . . . . . . . . 3–2 Contacting Technical Support . . . . . . . . . . . . . . . . . . . . . 3–3 Updating Compaq Software. . . . . . . . . . . . . . . . . . . . . . . 3–4 Obtaining the Compaq Support Software CD . . . . . . 3–5 Preparing to Update Software . . . . . . . . . . . . . . . . . . 3–5 Downloading Software from the Internet . . . . . . . . . . . . 3–6 Downloading System ROM. . . . . . . . . . . . . . . . . . . . 3–7 Downloading Other SoftPaqs . . . . . . . . . . . . . . . . . . 3–8 Restoring Software. . . . . . . . . . . . . . . . . . . . . . . . . . . . . . 3–9 Installing a Retail Version of an Operating System. . . . 3–10
Index
iv |
Getting Started |

1
Hardware and Software Setup
Setting Up the Hardware
ÄCAUTION: Setup must begin by connecting the notebook to AC power. To ensure that the correct drivers load and to prevent file corruption or damage to the components during initial setup:
■Do not set up the notebook while it is docked in an optional Port Replicator.
■Do not remove the battery pack until the notebook has been connected to external AC power.
■Do not run the notebook on battery power. Use external AC power throughout initial setup.
Getting Started |
1–1 |

Hardware and Software Setup
1.Place the notebook on a flat surface near an electrical outlet, then connect the notebook to external AC power.
Plug the AC adapter cable into the DC power connector 1. Plug the power cord into the AC adapter 2 and into an electrical outlet 3. (Power cords and outlets vary by country.)
Connecting the notebook to external power
2.Open the notebook by sliding the display release latch to the right 1 and raising the display 2.
Opening the notebook
1–2 |
Getting Started |

Hardware and Software Setup
3.Turn on the notebook by sliding and releasing the power switch 1.
Turning on the notebook
When the notebook is turned on:
■The power/standby light 2 turns on.
■The battery pack in the battery bay begins to charge and the battery light 3 turns on. The battery light remains on while the battery pack is charging and turns off when the battery pack is fully charged.
Getting Started |
1–3 |

Hardware and Software Setup
Setting Up the Software
The initial setup prompt is displayed on the screen as soon as the notebook is connected to external power.
Before responding to the initial setup prompt and proceeding through the online instructions, read the following setup information.
ÄCAUTION: To ensure that the correct drivers load and to prevent file corruption or damage to the components during initial setup:
■Do not unplug the notebook from the electrical outlet.
■Do not shut down the notebook.
■Do not remove or insert a drive.
■After you begin the initial software setup, you must complete
the entire process. Setup time varies depending on notebook configuration.
■If you are prompted to select a language, choose carefully and keep in mind that the languages you do not choose will be deleted from the system and cannot be restored during initial setup.
■During the setup process, you must accept the End User License Agreement to continue.
1–4 |
Getting Started |

Hardware and Software Setup
Setting Up the Wireless MultiPort
If you ordered your notebook with a wireless MultiPort, your notebook was shipped with the wireless MultiPort module preinstalled.
Preinstalled wireless MultiPort Module
The wireless MultiPort is disabled by default. To set up the wireless MultiPort:
1.Press Fn+F2 to enable the wireless MultiPort and install preloaded wireless MultiPort drivers.
Do not attempt to install wireless MultiPort drivers before the initial software setup is complete.
2.Install preloaded wireless MultiPort software according to the instructions in “Installing Optional Applications” later in this chapter.
To configure the wireless MultiPort, contact your network administrator.
Getting Started |
1–5 |

Hardware and Software Setup
For instructions on using the wireless MultiPort, refer to the wireless user documentation included on the Documentation Library CD shipped with your notebook:
■For a Bluetooth wireless device, refer to:
Software Reference Guide (Bluetooth for Windows) or
Software Reference Guide (Bluetooth for XP).
■For an 802.11b wireless device, refer to User’s Guide (Compaq Wireless LAN MultiPort W200).
Installing Optional Applications
You can install third-party applications or preloaded utilities at any time after initial setup is complete.
■To install a third-party application, refer to the documentation included with the application.
■To install a preloaded application, select Start > Software Setup. A setup wizard loads, and a list of applications is displayed. Select the application you want to install, and follow the instructions on the screen.
To view the descriptions and space requirements of preloaded Compaq utilities without installing them, select Start > Software Setup, and, after viewing the utility information, select Cancel.
■To install preloaded wireless MultiPort software, select Start > Software Setup. A setup wizard loads, and a list of applications is displayed. Select the application for the wireless option you ordered with your notebook:
For Bluetooth wireless, select Bluetooth MultiPort Module by Compaq.
For 802.11b wireless, select Compaq Wireless LAN W200 Client Manager.
1–6 |
Getting Started |
Hardware and Software Setup
Do not attempt to install the preloaded wireless MultiPort software before the wireless MultiPort has been enabled and the drivers have been installed.
Notebook Support and Safety Tips
After setting up the software, locate the support and safety information included with your notebook.
Refer to the Worldwide Telephone Numbers booklet included with your notebook to contact an authorized dealer, reseller, or service provider or visit www.compaq.com to:
Download the latest software and drivers for your notebook.
Open an online service event with a Compaq support specialist.
Get information about your notebook, including reference guides, specifications, white papers, part numbers, and customer advisories.
Getting Started |
1–7 |

Hardware and Software Setup
■Read suggestions for creating a safe and comfortable work environment. Ergonomic and safety information about the notebook is provided on this CD in the Safety & Comfort Guide.
ÅWARNING: This is a Class B digital device, pursuant to Part 15 of the FCC Rules. For more Class B information, refer on this CD to Regulatory and Safety Notices. To reduce the risk of personal injury, electric shock, fire, or damage to the equipment:
■Do not disable the power cord grounding plug. It is an important
safety feature.
■Plug the power cord into a grounded (earthed) electrical outlet that is easily accessible at all times.
■Do not place anything on power cords or cables. Arrange them so that no one can accidentally step on or trip over them.
■Disconnect power from the equipment by unplugging the power cord from the electrical outlet.
■Do not pull on a cord or cable. When unplugging from the electrical outlet, grasp the cord by the plug.
Confirming Hibernation Settings
Hibernation is enabled at the factory, and Compaq recommends that you do not disable Hibernation. To verify that Hibernation is enabled:
■In Windows 2000 Professional, select Start > Settings > Control Panel > Power Options icon > Hibernate tab. Make sure that the Enable Hibernate Support check box is selected.
■In Windows XP, select Start > Control Panel > Performance and Maintenance icon> Power Options icon > Hibernate tab. Make sure that the Enable Hibernation check box is selected.
1–8 |
Getting Started |
2
A Look at the Notebook
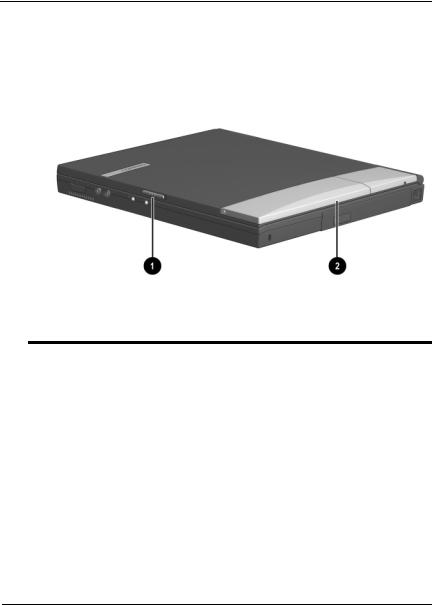
Display Components
Identifying display components
Display Component Descriptions
1 |
Display release latch |
Opens the notebook. |
|
|
|
2 |
MultiPort |
Supports an optional USB-enabled |
|
|
wireless device such as a Bluetooth |
|
|
or 802.11b wireless LAN. |
|
|
|
Getting Started |
2–1 |
A Look at the Notebook
Pointing Device Components
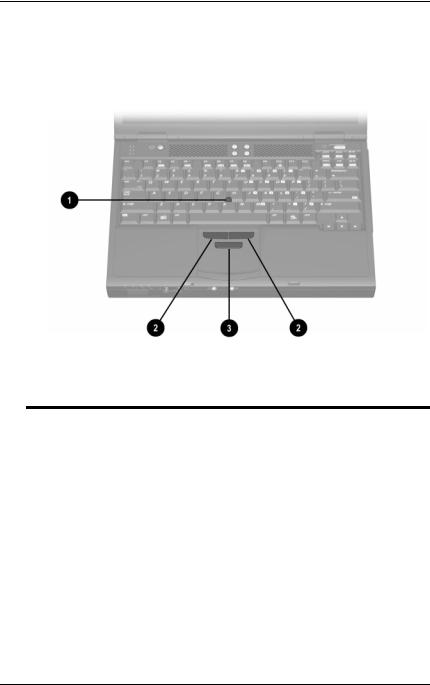
Pointing Stick Model
Identifying pointing stick components
Pointing Stick Component Descriptions
1 |
EasyPoint IV 3D Pointing |
Moves the pointer and selects or |
|
Stick |
activates items on the screen. |
|
|
|
2 |
Left and right pointing stick |
Function like the left and right buttons |
|
buttons |
on an external mouse. |
|
|
|
3 |
Scroll pointing stick button |
Functions like the scroll button on an |
|
|
external mouse. |
|
|
|
2–2 |
Getting Started |

A Look at the Notebook
TouchPad Model
Identifying TouchPad components
TouchPad Component Descriptions
1 TouchPad |
Moves the pointer and selects or |
|
activates items on the screen. Can be |
|
set to perform other mouse functions, |
|
such as scrolling, selecting, and |
|
double-clicking. |
2Left and right TouchPad buttons
Function like the left and right buttons on an external mouse.
Getting Started |
2–3 |
 Loading...