


. . . . . . . . . . . . . . . . . . . . . . . . .
Notice
The information in this guide is subject to change without notice.
COMPAQ COMPUTER CORPORATION SHALL NOT BE LIABLE FOR TECHNICAL OR EDITORIAL ERRORS OR OMISSIONS CONTAINED HEREIN; NOR FOR INCIDENTAL OR CONSEQUENTIAL DAMAGES RESULTING FROM THE FURNISHING, PERFORMANCE, OR USE OF THIS MATERIAL.
This guide contains information protected by copyright. No part of this guide may be photocopied or reproduced in any form without prior written consent from Compaq Computer Corporation.
© 1995 Compaq Computer Corporation. All rights reserved. Printed in Singapore.
Compaq, Deskpro, LTE, Contura, Presario, ProLinea Registered U. S. Patent and Trademark Office.
LTE 5000 is a trademark of Compaq Computer Corporation. Contura Registered in the Philippines Patent Office.
Microsoft, MS-DOS, and Windows are registered trademarks of Microsoft Corporation.
Windows 95 is a trademark of Microsoft Corporation.
The software described in this guide is furnished under a license agreement or nondisclosure agreement. The software may be used or copied only in accordance with the terms of the agreement.
Product names mentioned herein may be trademarks and/or registered trademarks of their respective companies.
Beyond Setup
Compaq LTE 5000 Family of Personal Computers
Second Edition (September 1996)
First Edition (September 1995)
Part Number 213660-002
Compaq Computer Corporation

. . . . . . . . . . . . . . . . . . . . . . . . .
Regulatory Notices
Federal Communications
Commission Notice
This equipment has been tested and found to comply with the limits for a Class B digital device, pursuant to Part 15 of the FCC Rules. These limits are designed to provide reasonable protection against harmful interference in a residential installation. This equipment generates, uses, and can radiate radio frequency energy and, if not installed and used in accordance with the instructions, may cause harmful interference to radio communications. However, there is no guarantee that interference will not occur in a particular installation. If this equipment does cause harmful interference to radio or television reception, which can be determined by turning the equipment off and on, the user is encouraged to try to correct the interference by one or more of the following measures:
■Reorient or relocate the receiving antenna.
■Increase the separation between the equipment and the receiver.
■Connect the equipment into an outlet on a circuit different from that to which the receiver is connected.
■Consult the dealer or an experienced radio or television technician for help.
Modifications
The FCC requires the user to be notified that any changes or modifications made to this device that are not expressly approved by Compaq Computer Corporation may void the user’s authority to operate the equipment.
Cables
Connections to this device must be made with shielded cables with metallic RFI/EMI connector hoods to maintain compliance with FCC Rules and Regulations.
v

. . . . . . . . . . . . . . . . . . . . . . . . .
European Notice
Products with the CE Marking comply with both the EMC Directive (89/336/EEC) and the Low Voltage Directive (73/23/EEC) issued by the Commission of the European Community.
Compliance with these directives implies conformity to the following European Norms:
■EN55022 (CISPR 22)—Radio Frequency Interference
■EN50082-1 (IEC801-2, IEC801-3, IEC801-4)—Electromagnetic Immunity
■EN60950 (IEC950)—Product Safety
Canadian Notice
This Class B digital apparatus meets all requirements of the Canadian Interference-Causing Equipment Regulations.
Avis Canadien
Cet appareil numérique de la classe B respecte toutes les exigences du Règlement sur le matériel brouilleur du Canada.
German Ergonomics Notice
The Compaq series 2880 family of personal computers, when combined with one of the Compaq family of enhanced keyboards and a QVision or FS family of desktop monitors, meets the requirements of ZH 1/.618 (German Safety Regulations for Display Work Places in the Office Sector). The installation guide included with the monitors provides configuration information.
vi
. . . . . . . . . . . . . . . . . . . . . . . . .
Japanese Notice
Airline Travel Notice
Use of electronic equipment aboard commercial aircraft is at the discretion of the airline.
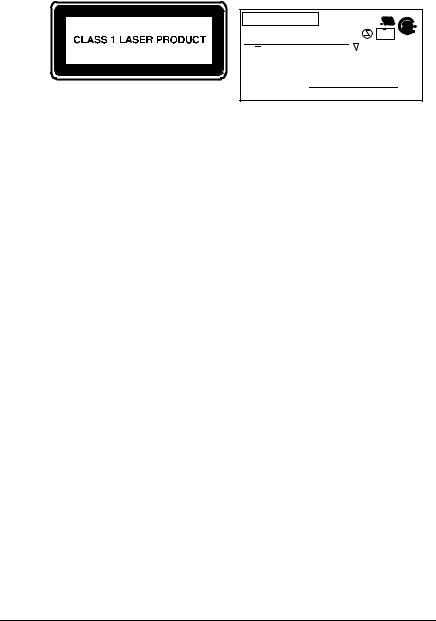
Laser Safety
All Compaq systems equipped with CD-ROM drives comply with the appropriate safety standards, including IEC 825. With specific regard to the laser, the equipment complies with laser product performance standards set by government agencies as a Class 1 laser product. It does not emit hazardous light; the beam is totally enclosed during all modes of customer operation and maintenance.
CDRH Regulations
The Center for Devices and Radiological Health (CDRH) of the U.S. Food and Drug Administration implemented regulations for laser products on August 2, 1976. These regulations apply to laser products manufactured from August 1, 1976. Compliance is mandatory for products marketed in the United States.
WARNING: Use of controls or adjustments or performance of
!procedures other than those specified herein may result in hazardous radiation exposure.
vii
. . . . . . . . . . . . . . . . . . . . . . . . .
The removable CD-ROM drive is classified as a CLASS 1 LASER PRODUCT. These labels are located on the outside of the CD-ROM drive:
TEAC CD-40 E-900-U |
R |
|||
|
|
|
R |
|
|
|
|
TUV |
|
S/NO. |
|
PRODUCT SERVICE |
||
S |
TEAC CORP. |
|||
DC |
5V1.5A. |
|||
|
MADE IN JAPAN |
|||
CERTIFICATION THIS PRODUCT CMPLIES |
||||
WITH DHHS RULES 21 CFR CHAPTER 1 . SUBCHAPTER J |
||||
APPLICABLE AT DATE OF MANUFACTURE. |
|
|||
MANUFACTURED |
|
TIF |
||
TEAC CORPORATION |
|
TT |
||
3-7-3 NAKA-CHO, MUSASHINO-SHI, TOKYO, JAPAN |
||||
Laser Information
Laser Type: |
Ellipse |
Wave Length: |
780 nm +15/- 10 nm |
Divergence Angle: |
10 (vertical) /36 (horizontal) degrees |
Output Power: |
0.7 mW to 2.5 mW |
Polarization: |
Circular |
Numerical Aperture: |
0.45 ± 0.04 |
Only authorized technicians trained by Compaq should attempt to repair this equipment. All troubleshooting and repair procedures are detailed to allow only subassembly/module level repair. Because of the complexity of the individual boards and subassemblies, no one should attempt to make repairs at the component level or to make modifications to any printed wiring board. Improper repairs can create a safety hazard.
viii

. . . . . . . . . . . . . . . . . . . . . . . . .
Contents
Preface |
|
|
||
|
Where to Find Information |
xv |
|
|
|
Symbols and Conventions Used in This Guide |
xv |
|
|
|
Compaq Support |
xvi |
|
|
|
|
Preparing for a Technical Support Call |
xvii |
|
|
|
Ordering Backup Diskettes |
xvii |
|
|
|
Worldwide Telephone Numbers |
xviii |
|
Chapter 1 |
|
|
||
Taking a Look at the Computer |
|
|
||
|
Preinstalled Software |
1-2 |
|
|
|
|
Backing Up the Preinstalled Software |
1-2 |
|
|
|
Reinstalling Drivers if You Delete the Preinstalled Software1-2 |
||
|
|
|
|
|
|
Interior Components |
1-3 |
|
|
|
|
Memory |
1-3 |
|
|
|
Increasing RAM Memory |
1-3 |
|
|
Exterior Components |
1-4 |
|
|
|
|
Components on the Front and Right Side |
1-5 |
|
|
|
Components on the Rear and Left Side |
1-8 |
|
Chapter 2 |
|
|
||
Keyboard and EasyPoint II Pointing Device |
|
|
||
|
EasyPoint II Pointing Device and Mouse Buttons |
2-1 |
|
|
|
|
Customizing the Pointing Device |
2-2 |
|
|
|
Replacing the Pointing Device Cap |
2-2 |
|
|
Identifying Keyboard Features |
2-3 |
|
|
|
Using the Embedded Numeric Keypad |
2-4 |
|
|
|
Using Text Stretch |
2-4 |
|
|
|
Hotkeys |
2-4 |
|
|
Contents ix

. . . . . . . . . . . . . . . . . . . . . . . . .
Chapter 3
Basic Operating, Maintenance, and Travel Guidelines
|
Power Sources |
3-1 |
|
|
|
Connecting to an External Power Source |
3-1 |
|
|
Disconnecting from an External Power Source |
3-3 |
|
Power Controls |
3-4 |
|
|
|
Turning On the Computer |
3-4 |
|
|
Turning Off the Computer |
3-5 |
|
Caring for the Computer |
3-5 |
|
|
Traveling and Shipping Guidelines |
3-6 |
|
|
|
Air Travel |
3-6 |
|
|
International Travel |
3-7 |
|
|
Shipping |
3-7 |
Chapter 4 |
|
||
Using Battery Packs |
|
||
|
Extending Battery Pack Operating Time |
4-1 |
|
|
Battery Gauge Icons and Battery Light |
4-2 |
|
|
Enhancing Battery Gauge Accuracy |
4-3 |
|
|
Identifying and Resolving a Low-Battery Condition |
4-4 |
|
|
Replacing Battery Pack(s) |
4-5 |
|
|
|
Removing a Battery Pack from the Computer |
4-5 |
|
|
Inserting a Battery Pack into the Computer |
4-7 |
|
Charging Battery Packs |
4-8 |
|
|
|
Charging Battery Packs in the Computer |
4-8 |
|
|
Charging Battery Packs in Expansion Bases |
4-8 |
|
|
Charging Battery Packs Outside Normal Operating |
|
|
|
Conditions |
4-9 |
|
Storing Battery Packs |
4-10 |
|
|
Recycling Used Battery Packs |
4-10 |
|
x Contents

. . . . . . . . . . . . . . . . . . . . . . . . .
Chapter 5
Connecting External Desktop Equipment
Serial Devices |
5-2 |
|
Parallel Devices |
5-3 |
|
External Monitor |
5-4 |
|
External Keyboard, Numeric Keypad, or PS/2 Mouse |
5-6 |
|
MultiBay-ISA Expansion Base |
5-7 |
|
Docking the Computer in the Expansion Bases |
5-7 |
|
|
Undocking the Computer from the Expansion Bases |
5-11 |
|
Using the Ethernet Connectors on the Expansion Base |
5-12 |
Attaching an Optional Security Cable Lock |
5-12 |
|
|
Preparing for an Infrared Connection |
5-15 |
Chapter 6
Working with Removable Drives
Number and Supported Locations for Drives and Battery Packs6-2
Caring for Removable Drives |
6-3 |
|
|
Placing a Hard Drive into the Hard Drive Carrying Case 6-4 |
|
|
Placing a CD-ROM Drive or Diskette Drive into the |
|
|
MultiBay Device Carrying Case |
6-5 |
Dedicated Hard Drive Bay |
6-6 |
|
|
Securing a Drive in the Dedicated Hard Drive Bay |
6-6 |
Removing a Hard Drive from the Dedicated Hard Drive Bay6-7 Inserting a Hard Drive into the Dedicated Hard Drive Bay6-9
Computer MultiBay |
6-11 |
|
|
Securing a Drive in the Computer MultiBay |
6-11 |
|
Inserting the MultiBay Weight Saver into the Computer |
|
|
MultiBay |
6-12 |
|
Inserting a Hard Drive into the Computer MultiBay |
6-12 |
|
Removing a Hard Drive from the Computer MultiBay |
6-15 |
|
Inserting a CD-ROM Drive into the Computer MultiBay6-16 |
|
Removing a CD-ROM Drive from the Computer MultiBay6-17
Operating a CD-ROM Drive |
6-18 |
Accessing a Diskette Drive in the Expansion Base |
6-22 |
Inserting a Diskette Drive into the Computer MultiBay 6-22 Removing a Diskette Drive from the Computer MultiBay6-24
Using a Diskette Drive |
6-25 |
Contents xi

. . . . . . . . . . . . . . . . . . . . . . . . .
|
Using Additional Hard Drives |
6-26 |
|
|
|
Using LTE 5000 Hard Drives |
6-26 |
|
|
Using LTE Elite Hard Drives |
6-26 |
|
Changing the Boot Drive |
6-29 |
|
Chapter 7 |
|
||
Using PC Cards |
|
||
|
Using PC Cards in Windows 95 |
7-1 |
|
|
|
Installing Card-Specific Device Drivers |
7-2 |
|
|
Formatting Storage PC Cards |
7-2 |
|
Using PC Cards in MS-DOS Mode |
7-3 |
|
|
Inserting a PC Card |
7-4 |
|
|
Removing a PC Card |
7-6 |
|
Chapter 8 |
|
||
Using Audio Equipment |
|
||
|
Using the Built-In Audio Equipment |
8-2 |
|
|
|
Internal Stereo Speakers |
8-3 |
|
|
Volume Control |
8-3 |
|
|
Internal Microphone |
8-4 |
|
Connecting Optional External Audio Equipment |
8-4 |
|
|
|
Stereo Speaker/Headphone Jack |
8-4 |
|
|
Stereo Line-In Jack |
8-5 |
|
|
Mono Microphone Jack |
8-5 |
Chapter 9 |
|
||
Installing an Optional Memory Expansion Board |
9-1 |
||
Chapter 10 |
|
||
Running Computer Setup |
|
||
|
Initialization Menu |
10-2 |
|
|
Ports Menu |
10-3 |
|
|
Power Menu |
10-3 |
|
xii Contents

. . . . . . . . . . . . . . . . . . . . . . . . .
|
Security Menu |
10-5 |
|
|
|
Setup Password |
10-5 |
|
|
Power-On Password |
10-6 |
|
|
QuickLock/QuickBlank |
10-7 |
|
|
Device Disabling |
10-7 |
|
Exit Menu |
10-7 |
|
|
Customizing Computer Settings |
10-8 |
|
|
Power Management |
10-8 |
|
|
|
Computer Setup Power Management |
10-8 |
|
|
Windows 95 Power Properties |
10-9 |
|
|
Suspend |
10-9 |
|
|
Hibernation |
10-10 |
|
Security Features |
10-10 |
|
Chapter 11 |
|
||
Running Compaq Diagnostics |
|
||
|
Computer Checkup (TEST) |
11-1 |
|
|
View System Information (INSPECT) |
11-3 |
|
Chapter 12 |
|
||
Intelligent Manageability |
|
||
|
Asset Management |
12-1 |
|
|
Fault Management |
12-1 |
|
|
Security Management |
12-2 |
|
Chapter 13 |
|
||
Troubleshooting |
|
||
|
Checklist for Minor Problems |
13-2 |
|
|
Solving Audio Problems |
13-3 |
|
|
Solving Battery and Battery Gauge Problems |
13-4 |
|
|
Solving CD-ROM Drive Problems |
13-7 |
|
|
Solving Diskette and Diskette Drive Problems |
13-8 |
|
|
Solving Hard Drive Problems |
13-10 |
|
|
Solving Hardware Problems |
13-11 |
|
|
Solving Infrared Problems |
13-12 |
|
|
Solving Keyboard Problems |
13-13 |
|
|
Solving Memory Problems |
13-13 |
|
Contents xiii
. . . . . . . . . . . . . . . . . . . . . . . . .
|
Solving PC Card Problems |
13-14 |
|
Solving Pointing Device Problems |
13-15 |
|
Solving Power Problems |
13-16 |
|
Solving Printer Problems |
13-17 |
|
Solving Screen Problems |
13-18 |
Appendix A |
A-1 |
|
Appendix B |
B-1 |
|
Appendix C |
C-1 |
|
Appendix D |
D-1 |
|
Appendix E |
E-1 |
|
Appendix F |
F-1 |
|
Index |
I-1 |
|
xiv Contents

. . . . . . . . . . . . . . . . . . . . . . . . .
Preface
Before You Begin
Where to Find Information
This Beyond Setup guide and the online User’s Guide should answer most questions that you may have about your new Compaq personal computer and the preinstalled Windows 95 operating system.
You can access the online User’s Guide in two ways: (1) click the Start button, point to Compaq Information Center, then click User’s Guide, or (2) click the Start button, then click Help.
In addition to this Beyond Setup guide and the online User’s Guide, the following Compaq printed and online references are supplied with the computer to provide information about specific topics:
■Quick Setup (printed card to get you started in seven easy steps)
■Caring for Removable Drives (printed reference card)
■Compaq Dictionary (online dictionary of computer terms)
■Safety & Comfort Guide (printed and online guide to help you create a comfortable work environment)
Symbols and Conventions Used in This
Guide
The following format conventions distinguish elements of the text throughout this guide:
■Key names appear in a boldfaced type looking very much the way they appear on the keyboard. For example, Home, End, Backspace, and Tab.
■When keys must be pressed at the same time, the action is represented by the key names and the plus (+) symbol. For example, Ctrl+Alt+Delete.
■Drive letters that are not in command lines are presented in uppercase type as shown here: drive A.
■Folder (directory) names that are not in command lines are presented in uppercase type as shown here: DIRECTORY.
Before You Begin |
xv |
. . . . . . . . . . . . . . . . . . . . . . . . .
■File names that are not in command lines are presented in uppercase italic type as shown here: FILENAME.
■Commands are presented in lowercase, bold type as shown here: install or a:\install. Commands that are to be entered at the command prompt may be shown on a separate line.
■When you need to type information and press the Enter key, you are directed to "enter" the information.
■When you need to type information without pressing the Enter key, you are directed to "type" the information.
The following words and symbols mark special messages throughout this guide:
WARNING: Text set off in this manner indicates that failure to ! follow directions could result in bodily harm or loss of life.
CAUTION: Text set off in this manner indicates that failure to follow directions in the caution could result in damage to equipment or loss of information.
IMPORTANT: Text set off in this manner presents clarifying information or specific instructions.
NOTE: Text set off in this manner presents commentary, sidelights, or interesting points of information.
Compaq Support
For customer support or to order backup diskettes of the preinstalled software, call one of the telephone numbers on the following pages to locate your nearest Compaq authorized dealer, reseller, or service provider.
NOTE: If you take the computer in for service, remember to furnish your power-on and setup passwords to the service provider or to disable your passwords.
xvi Before You Begin

. . . . . . . . . . . . . . . . . . . . . . . . .
Preparing for a Technical Support Call
If you cannot solve a problem using the troubleshooting tips in Chapter 13 and the online Troubleshooting help, you may need to call technical support. To receive the fastest possible solution when you call, follow the instructions in Chapter 12 to run Compaq Diagnostics and have the following available when you call:
■The computer
■Serial number, on the back of the computer behind the connector door above the serial connector
■Purchase date on invoice
■Conditions under which the problem occurred
■Error messages that occurred
■Hardware configuration
■Type of printer connected
■Hardware and software you are using
■Your Windows 95 product identification number (PIN). To locate the PIN number, click the Start button, point to Settings, click Control Panel, double-click the System icon, then click the General tab. Your PIN number is below your name.
■The printed error message log from Computer Checkup (TEST), or a list of the devices and error messages received
■Contents of View System Information (INSPECT), as well as the CONFIG.SYS and AUTOEXEC.BAT files
Ordering Backup Diskettes
It is recommended that you create a backup of the preinstalled software as described in Chapter 1. However, for an additional cost, you can order backup diskettes from Compaq. Before calling to order, be sure to have the computer serial number available. The serial number is on the back of the computer behind the connector door above the serial connector.
NOTE: If an order form was included with the computer, complete the form and return it or call one of the numbers listed on the order form.
Before You Begin xvii
. . . . . . . . . . . . . . . . . . . . . . . . .
Worldwide Telephone Numbers
Locate your geographical area from the following table and use one of the telephone numbers for Compaq assistance.
General Information Numbers:—Product information, technical assistance, and the location of your nearest Compaq authorized dealer, reseller, or service provider.
Technical Support Numbers:—Hardware technical support in analyzing system configuration and diagnostic problems or troubleshooting.
Customer Support Numbers:—Information on service and support programs including warranty, product catalogs, and white papers.
PaqFax Numbers:—Automatic facsimile response system for technical and product specific information that is transmitted to any fax machine. PaqFax is available 24 hours a day.
NOTE: Telephone numbers are subject to change without notice.
Worldwide Telephone Numbers
|
Country |
|
|
|
Location |
Code |
Telephone Number |
||
|
|
|
|
|
Argentina |
|
|
|
|
General Information |
+54 |
-1-796-1616 |
||
Technical Support |
+54 |
-1-796-1717 |
||
|
|
|
|
|
Australia |
|
|
|
|
General Information |
|
|
61-2-9911-1999 |
|
Technical Support |
|
|
61-2-9911-1955 |
|
PaqFax |
|
|
61-2-9911-1982 |
|
|
|
|
|
|
Austria |
|
|
|
|
General Information |
|
|
0222/8 78-16 16 |
|
Technical Support |
|
|
0222/8 78-16-16 |
|
Ordering Backup Software |
+31 |
-55-38-43-39 |
||
|
|
|
|
|
xviii Before You Begin

. . . . . . . . . . . . . . . . . . . . . . . . .
Worldwide Telephone Numbers Continued |
|
|
||
|
Country |
|
|
|
Location |
Code |
Telephone Number |
||
|
|
|
|
|
Belgium |
|
|
|
|
General Information |
+32 |
-2-716-95-11 |
||
Compaq Care Center |
+32 |
-2-716-96-96 |
||
Compaq Care Center Fax |
+32 |
-2-716-95-85 |
||
General Fax |
+32 |
-2-725-22-13 |
||
FaxPaq |
+32 |
-2-716-96-99 |
||
QuickLine |
+32 |
-2-716-95-92 |
||
Ordering Backup Software |
+32 |
-2-716-96-78 |
||
Ordering Backup Software Fax |
+32 |
-2-716-96-79 |
||
|
|
|
|
|
Brazil |
|
|
|
|
General Information |
|
|
55-11-246-7866 |
|
|
|
|
|
|
Canada |
|
|
|
|
General Information |
|
|
1-905-707-1715 |
|
Technical Support |
|
|
1-800-OKCOMPAQ |
|
|
|
|
(1-800-652-6672) |
|
Customer Support |
|
|
1-800-263-5868 |
|
Ordering Backup Software |
|
|
1-800-952-7689 |
|
Battery Pack Recycling |
|
|
1-800-263-5868 |
|
|
|
|
|
|
Caribbean |
|
|
|
|
General Information |
|
|
011-713-514-4220 |
|
Technical Support |
|
|
011-713-518-2200 |
|
|
|
|
|
|
Chile |
|
|
|
|
General Information |
|
|
56-2-274-1911 |
|
Technical Support |
|
|
56-2-274-3007 |
|
|
|
|
|
|
China |
|
|
|
|
General Information |
|
|
861-849-2928 |
|
Technical Support |
|
|
861-849-2913 |
|
|
|
|
|
|
Colombia |
|
|
|
|
General Information |
|
|
57-1-312-0201 |
|
Technical Support |
|
|
57-1-345-0266 |
|
|
|
|
|
|
Before You Begin |
xix |

. . . . . . . . . . . . . . . . . . . . . . . . .
Worldwide Telephone Numbers Continued |
|
|
||
|
|
|
|
|
|
Country |
|
|
|
Location |
Code |
Telephone Number |
||
|
|
|
|
|
Czech Republic |
|
|
|
|
General Information |
+42 |
-2-232-8772 |
||
Technical Support |
+42 |
-2-232-8772 |
||
|
|
|
|
|
Denmark |
|
|
|
|
General Information |
+45 |
-45-90-45-90 |
||
Technical Support |
+45 |
-45-90-45-45 |
||
|
|
|
|
|
Finland |
|
|
|
|
General Information |
+358 |
-0-615-599 |
||
Technical Support |
|
|
9800-206-720 |
|
QuickLine (BBS) |
+358 |
-0-6155 9870 |
||
|
|
|
|
|
France |
|
|
|
|
General Information |
+33 |
-1-41-33-41-33 |
||
Technical Support |
+33 |
-1-41-33-44-55 |
||
|
|
|
|
|
Germany |
|
|
|
|
|
|
(0,12 DM/2 sec. or 3,60 DM/min.) |
||
Menu Selection |
|
|
0190/88 80 80 |
|
Notebook Hotline |
|
|
0190/88 80 82 |
|
|
|
(0,48 DM/min.) |
||
QuickLine |
|
|
0180/5 21 21 18 |
|
FaxPaq |
|
|
0180/5 21 21 19 |
|
|
|
|
|
|
Hong Kong |
|
|
|
|
General Information |
|
|
852-28681382 |
|
Technical Support |
|
|
852-90116633 |
|
PaqFax |
|
|
852-28671648 |
|
|
|
|
|
|
Hungary |
|
|
|
|
General Information |
+36 |
-1-201-8776 |
||
Technical Support |
+36 |
-1-201-8776 |
||
|
|
|
|
|
India |
|
|
|
|
General Information |
|
|
91-80-559-6023 |
|
PaqFax |
|
|
91-80-559-8989 |
|
BBS |
|
|
91-80-559-8900 |
|
|
|
|
|
|
xx Before You Begin

. . . . . . . . . . . . . . . . . . . . . . . . .
Worldwide Telephone Numbers Continued |
|
|
||
|
Country |
|
|
|
Location |
Code |
Telephone Number |
||
|
|
|
|
|
Italy |
|
|
|
|
General Information |
+39 |
-2-57-59-03-61 |
||
Technical Support |
+39 |
-2-57-59-03-00 |
||
Customer Support |
+39 |
-1-67-82-50-12 |
||
|
|
|
|
|
Japan |
|
|
|
|
General Information |
|
|
0120-101-589 |
|
Technical Support |
|
|
0120-101-589 |
|
Windows 95 Support |
|
|
0120-505-589 |
|
Ordering Backup Software |
|
|
0120-250-589 |
|
FaxStation |
|
|
81-3-5402-0991 |
|
|
|
|
|
|
Korea |
|
|
|
|
General Information |
|
|
82-2-3470-07001 |
|
Technical Support |
|
|
82-2-523-3575 |
|
|
|
|
82-082-902-77774 |
|
|
|
|
|
|
Malaysia |
|
|
|
|
General Information |
|
|
603-717-1188 |
|
Technical Support |
|
|
603-718-1636 |
|
|
|
|
|
|
Mexico |
|
|
|
|
General Information |
|
|
1-525-229-7900 |
|
Technical Support |
|
|
1-525-229-7910 |
|
PaqFax |
|
|
1-525-229-7920 |
|
|
|
|
|
|
Netherlands |
|
|
|
|
General Information |
|
|
0182-565805 |
|
Customer Support |
|
|
06-91681616 (Dfl. 0.75/min) |
|
Fax |
|
|
06-8991116 (Dfl. 0.40/min) |
|
QuickLine Bulletin Board |
|
|
0182-572366 |
|
|
|
|
|
|
New Zealand |
|
|
|
|
General Information |
|
|
64-9-307-3969 |
|
|
|
|
|
|
Norway |
|
|
|
|
General Information |
+47 |
-22-07-20-00 |
||
Technical Support |
+47 |
-22-07-20-20 |
||
|
|
|
|
|
Before You Begin |
xxi |

. . . . . . . . . . . . . . . . . . . . . . . . .
Worldwide Telephone Numbers Continued |
|
|
||
|
|
|
|
|
|
Country |
|
|
|
Location |
Code |
Telephone Number |
||
|
|
|
|
|
Poland |
|
|
|
|
General Information |
+48 |
-2-630-3535 |
||
Technical Support |
+48 |
-2-630-3535 |
||
|
|
|
|
|
Portugal |
|
|
|
|
General Information |
+351 |
-1-4120132 |
||
Technical Support |
+351 |
-1-4120132 |
||
|
|
|
|
|
Singapore |
|
|
|
|
General Information |
|
|
65-753-6688 |
|
Customer Support Center |
|
|
65-750-3030 |
|
PaqFax |
|
|
65-750-4514 |
|
|
|
|
|
|
South Africa |
|
|
|
|
General Information |
|
|
27-11-728-6999 |
|
Technical Support |
|
|
27-11-728-6999 |
|
|
|
|
|
|
Spain |
|
|
|
|
General Information |
+34 |
-1-640-1500 |
||
Technical Support |
+34 |
-1-640-1302 |
||
|
|
|
|
|
Sweden |
|
|
|
|
General Information |
+46 |
-8-703-5240 |
||
Technical Support |
+46 |
-8-703-5240 |
||
PaqFax (hämtfax) |
+46 |
-8-703-5225 |
||
QuickLine (BBS) |
+46 |
-8-703-5220 |
||
|
|
|
|
|
Switzerland |
|
|
|
|
Technical Support |
|
|
157/64-00 |
|
QuickLine Bulletin Board |
|
|
01/8 38-24 21 |
|
Ordering Backup Software |
|
|
155/62-06 |
|
PaqFax |
|
|
01/8 38-22 38 |
|
|
|
|
|
|
xxii Before You Begin

. . . . . . . . . . . . . . . . . . . . . . . . .
Worldwide Telephone Numbers Continued |
|
|
||
|
Country |
|
|
|
Location |
Code |
Telephone Number |
||
|
|
|
|
|
Taiwan |
|
|
|
|
General Information |
|
|
886-2-7351000 |
|
Technical Support |
|
|
886-2-3761170 |
|
BBS |
|
|
886-2-3761175 |
|
|
|
|
|
|
Thailand |
|
|
|
|
General Information |
|
|
62-2-679-6222 |
|
|
|
|
|
|
United Arab Emirates (Dubai) |
|
|
|
|
General Information |
+97 |
14 -818100 |
||
|
|
|
|
|
United Kingdom |
|
|
|
|
General Information |
|
|
0990-134456 |
|
FaxPaq |
|
|
0181-332-3550 |
|
QuickLine Bulletin Board |
|
|
0181-332-9499 |
|
|
|
|
|
|
United States |
|
|
|
|
General Information |
|
|
1-713-514-6864 |
|
Technical Support |
|
|
1-800-OKCOMPAQ |
|
|
|
|
(1-800-652-6672) |
|
Customer Support |
|
|
1-800-345-1518 |
|
PaqFax |
|
|
1-800-345-1518, Option 1 |
|
Download Facility |
|
|
1-713-518-1418 |
|
(modem access only) |
|
|
|
|
Ordering Backup Software |
|
|
1-800-952-7689 |
|
Battery Pack Recycling |
|
|
1-800-524-9859 |
|
|
|
|
|
|
Venezuela |
|
|
|
|
General Information |
|
|
58-2-953-6944 |
|
|
|
|
|
|
Before You Begin xxiii
. . . . . . . . . . . . . . . . . . . . . . . . .
Chapter 1
Taking a Look at the Computer
This chapter provides an overview of the computer features and components. Illustrations and tables identify external components and give a brief description of their functions.
All models of the computer include the following features:
■Intel Mobile Pentium processor
■8 or 16 megabytes DRAM memory (expandable up to 72 or 80 megabytes, respectively)
■256 Kbytes of Level 2 cache memory
■True 64-bit system architecture
■Upgradable flash ROM BIOS
■High-performance PCI bus graphics with hardware-assisted motion video acceleration (MVA)
■Keyboard with built-in pointing device and mouse buttons
■Removable hard drive in a dedicated hard drive bay
■MultiBay that supports a CD-ROM drive, second hard drive, diskette drive, second battery pack, or weight saver
■One Type III PC Card (PCMCIA) slot that supports one Type III card or any combination of two Type II and Type I cards
■Infrared port and software that supports wireless IrDA or cable links for file transfer, file synchronization, and printing
■Built-in speakers, microphone, and jacks for Sound Blaster Pro compatible stereo sound
■Energy Star compliant power saving features
■Ports and connectors for external equipment, including serial, parallel, external monitor, and an external PS/2 pointing device, keyboard, or numeric keypad
■Desktop functionality with the optional MultiBay Expansion Base that has two MultiBays, two Type III PC Card slots, Ethernet RJ-45 and BNC connectors, a MIDI/game port.
■Support for MultiBay Expansion Base
■MultiBay-ISA Expansion Base
■Support for MultiBay-ISA Expansion Base that has all the features of the MultiBay Expansion Base plus full-length ISA slot and Premier Sound audio
■Support for the optional MPEG and TV Video Adapter, which can be connected to the undocked computer, or to either expansion base when the computer is docked.
Taking a Look at the Computer |
1-1 |

. . . . . . . . . . . . . . . . . . . . . . . . .
Preinstalled Software
The Windows 95 operating system is preinstalled on the computer hard drive.
MS-DOS real mode drivers are also preinstalled, which load if you have older MS-DOS based programs or games that require an MS-DOS real mode session. Refer to the online Readme file for more information. Click the Start button, point to Programs, point to MS-DOS Real Mode, then click Readme.
NOTE: Computer Setup and Compaq Diagnostics are not on the computer hard drive. Computer Setup is in the system BIOS, and the Compaq Diagnostics utilities are on diskette. Refer to Chapter 10, "Running Computer Setup," for information about setting up your computer and Chapter 11, "Running Compaq Diagnostics," for information about running diagnostic utilities.
Backing Up the Preinstalled Software
Compaq recommends that you create a backup of the preinstalled software. For online backup instructions, click the Start button; point to Programs, Accessories, System Tools; and click Backup. In Backup, click the Help menu, Help Topics, and the Index tab. Find and display the instructions for the topic "system, backing up."
If you prefer, you can order backup diskettes for an additional cost. To order, refer to the Worldwide Telephone Numbers listed in the Preface of this guide. Or, if an order form was included with your computer, complete the form and return it or call one of the numbers listed on the form.
Reinstalling Drivers if You Delete the Preinstalled Software
If you reconfigure the hard drive and install your own MS-DOS and/or Windows operating environment, you will need to reinstall some device drivers to regain full functionality of the computer. Call one of the worldwide telephone numbers listed in the Preface of this guide for information about ordering the drivers kit. When ordering, ask for the Compaq LTE 5000 Drivers Kit for
Windows 95.
1-2 Taking a Look at the Computer

. . . . . . . . . . . . . . . . . . . . . . . . .
Interior Components
Interior components vary by model, and some components are upgradable. To view information about your system components, double-click the System icon in Control Panel or run the View System Information (INSPECT) utility from the Compaq Diagnostics diskette. Refer to Chapter 11, "Running Compaq Diagnostics," for more information about running the View System Information utility.
Memory
The computer has an upgradable flash ROM BIOS. ROM (read only memory) is permanent memory in a chip on the computer system board. BIOS (Basic Input/Output System) is software in ROM that provides basic functionality for the computer.
The computer has 256 or 512 Kbytes of cache memory, depending on the model. Cache memory is high-speed memory that stores the most recently used information in anticipation that it will be needed again by the microprocessor. This high-speed transfer of information improves overall system performance.
The base amount of random access memory (RAM) in the computer is either 8 megabytes or 16 megabytes, depending on the model. You can view the amount of RAM memory either by running Computer Setup or by double-clicking the System icon in Control Panel, then clicking the General tab.
RAM is where the computer temporarily stores open files and program information and carries out commands. Information in RAM that has not been saved to a storage medium, such as the hard drive, is lost when power to the computer is turned off.
Increasing RAM Memory
You can increase the amount of RAM memory by adding a memory expansion board, available in 8, 16, 32, and 64 megabyte sizes. Refer to Chapter 9, "Installing an Optional Memory Expansion Board," for procedures to add a memory expansion board.
Taking a Look at the Computer |
1-3 |

. . . . . . . . . . . . . . . . . . . . . . . . .
Exterior Components
The green power/suspend light and the yellow battery light are visible whether the computer is opened or closed.
Power/Suspend Light and Battery Light on the Computer
Slide the release latches forward and open the display to see all the components on the front of the computer.
Opening the Computer
1-4 Taking a Look at the Computer

. . . . . . . . . . . . . . . . . . . . . . . . .
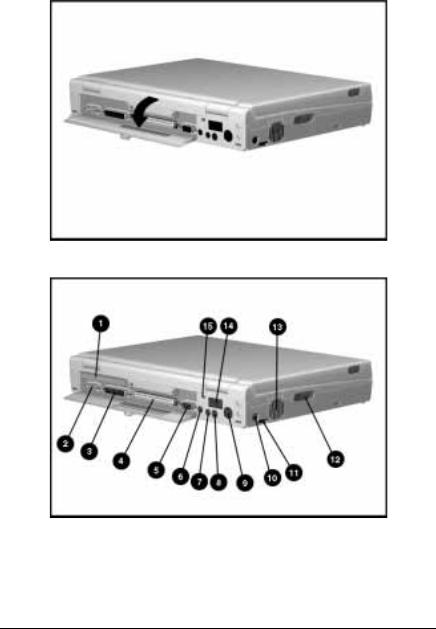
Components on the Front and Right Side
Front and Right Side View
Components on the Front and Right Side
|
Component |
Function |
||
|
|
|
|
|
1 |
Power switch |
Turns the power on and off. |
||
2 |
Display switch |
Turns display off if display is closed when the |
||
|
|
|
computer is on. |
|
3 |
Suspend button |
Initiates and exits Suspend. When pressed |
||
|
|
|
simultaneously with the Fn key, initiates Hibernation. |
|
Refer to Chapter 3, "Basic Operating, Maintenance, and Travel Guidelines".
Continued
Taking a Look at the Computer |
1-5 |

. . . . . . . . . . . . . . . . . . . . . . . . .
Components on the Front and Right Side Continued
|
Component |
|
|
|
|
|
Function |
||
|
|
|
|
|
|
|
|
|
|
4 Status panel icons |
The computer is connected to an external |
||||||||
|
|
|
|
|
|
|
|
power source. |
|
|
|
|
|
|
|
|
|
QuickLock/QuickBlank has been initiated. |
|
|
|
|
|
|
|
|
|
Type your power-on password on the |
|
|
|
|
|
|
|
|
|
blank screen to exit |
|
|
|
|
|
|
|
|
|
QuickLock/QuickBlank. |
|
|
|
|
|
|
|
|
|
Power management is turned on. Refer to |
|
|
|
|
|
|
|
|
|
Chapter 10, "Running Computer Setup," |
|
|
|
|
|
|
|
|
|
for information about power management. |
|
|
|
|
|
|
|
|
|
A diskette drive in the MultiBay is being |
|
|
|
|
|
|
|
|
|
accessed. |
|
|
|
|
|
|
|
|
|
A hard drive in the dedicated hard drive |
|
|
|
|
|
|
|
|
|
bay or a hard drive or CD-ROM drive in |
|
|
|
|
|
|
|
|
|
the MultiBay is being accessed. |
|
|
|
|
|
|
|
|
|
An external monitor is actively displaying |
|
|
|
|
|
|
|
|
|
||
|
|
|
|
|
|
|
|
information. |
|
|
|
|
|
|
|
|
|
The built-in speakers on the front of the |
|
|
|
|
|
|
|
|
|
display or speakers or headphones |
|
|
|
|
|
|
|
|
|
connected to the computer or either |
|
|
|
|
|
|
|
|
|
expansion base are turned on. |
|
|
|
|
|
|
|
|
|
Num Lock is on, which enables the |
|
|
|
|
|
|
|
1 embedded numeric keypad. |
|||
|
|
|
|
|
|
|
|
Caps Lock is on, which causes new text |
|
|
|
|
|
|
|
A to be typed in uppercase letters. |
|||
|
|
|
|
|
|
↓ |
Scroll Lock is on, which causes the cursor |
||
|
|
|
|
|
|
|
|
to scroll by fields instead of by lines. |
|
|
|
|
|
|
|
|
|
||
2 |
1 |
|
|
|
|
Battery gauges 1 and 2. Gauge 1 turns on |
|||
|
|
|
|
|
|
|
|
when a battery pack is in the battery |
|
|
|
|
|
|
|
|
|
compartment and shows the approximate |
|
|
|
|
|
|
|
|
|
amount of charge in the battery pack. |
|
|
|
|
|
|
|
|
|
Gauge 2 turns on when a battery pack is |
|
|
|
|
|
|
|
|
|
in the computer MultiBay and shows the |
|
|
|
|
|
|
|
|
|
approximate amount of charge in the |
|
|
|
|
|
|
|
|
|
battery pack. |
|
|
|
|
|
|
|
|
|
|
|
|
|
|
|
|
|
|
|
|
Continued |
1-6 Taking a Look at the Computer

. . . . . . . . . . . . . . . . . . . . . . . . .
Components on the Front and Right Side Continued
5
6
7
8
9
10
11
12
13
14
15
16
Component
Ventilation intake
Stereo speakers
Brightness control
Contrast control (not shown)
Power/suspend light
Battery light
Microphone
PC Card slots
Battery release
Keyboard
Battery compartment
Hard drive bay
MultiBay
Function
The ventilation intake, along with the exhaust, provides airflow that helps prevent the computer from overheating.
Built-in stereo speakers for PC sounds and the multimedia sound system.
Adjusts the brightness of the display.
Adjusts the contrast of the display (not on all models).
Green light turns on when power to the computer is turned on; turns off when power to the computer is turned off; blinks when the computer is in Suspend.
Yellow light turns on when a battery pack in the computer is charging; turns off when battery pack completes fast charging; blinks to indicate a lowbattery condition.
Built-in microphone for the multimedia sound system.
Accepts one Type III or any combination of two Type II and Type I PC Cards (PCMCIA).
Releases a battery pack in the battery compartment so that it can be removed.
Keyboard with EasyPoint II pointing device and mouse buttons. Refer to Chapter 2, "Keyboard and EasyPoint II Pointing Device," for information on the keyboard and integrated pointing device.
Dedicated battery compartment for the main battery pack.
Dedicated hard drive bay.
Bay that supports multiple devices: a CD-ROM drive, hard drive, diskette drive, or battery pack.
Taking a Look at the Computer |
1-7 |
. . . . . . . . . . . . . . . . . . . . . . . . .
Components on the Rear and Left Side
Pull open the connector door on the rear panel to see all the external connectors on the rear of the computer.
Opening the Connector Door on the Rear Panel
Rear and Left Side View
1-8 Taking a Look at the Computer

. . . . . . . . . . . . . . . . . . . . . . . . .
1
2
3
4
5
6
7
8
9
10
11
12
13
14
15
Component |
Function |
|
|
|
|
Serial number |
You will need this serial number whenever you call |
|
|
for customer support. |
|
|
|
|
Serial connector
Parallel connector
External options connector
External monitor connector
Connects optional serial devices.
Connects optional parallel devices.
Connects either expansion base or the optional MPEG and TV Video Adapter.
Connects an external monitor.
Power connector
Stereo speaker/ headphone jack
Stereo line-in jack
Keyboard/mouse connector
Mono microphone jack
Connects the AC Adapter or the optional Automobile Adapter.
Connects external speakers or headphones.
Stereo line-in for devices such as CD player, tape deck, or tuner.
Connects an external keyboard, numeric keypad, PS/2 mouse, or other pointing device.
Connects a powered electret condenser microphone.
Volume control |
Controls volume to the built-in speakers or to |
|
|
external speakers or headphones connected to |
|
|
the computer or either expansion base. |
|
|
|
|
MultiBay device release |
Releases a drive or battery pack in the MultiBay. |
|
|
|
|
Ventilation exhaust |
The ventilation exhaust, along with the intake, |
|
|
provides airflow that helps prevent the computer |
|
|
from overheating. |
|
|
|
|
Infrared port |
Transfers data to another computer or external |
|
|
device that accepts the IrDA format. |
|
|
|
|
Security slot |
Provision for an optional security cable lock to be |
|
|
attached to the computer. |
|
|
|
|
Taking a Look at the Computer |
1-9 |

. . . . . . . . . . . . . . . . . . . . . . . . .
Chapter 2
Keyboard and EasyPoint II
Pointing Device
The computer keyboard has separate pointer and screen-control keys, an embedded numeric keypad, special hotkeys for quick access to certain functions, a palm rest, and an integrated pointing device and mouse buttons.
! |
WARNING: To reduce risk of serious injury to hands, wrists, or other |
|
joints, read the Safety & Comfort Guide. |
||
|
|
|
EasyPoint II Pointing Device
and Mouse Buttons
The integrated EasyPoint II pointing device provides mouse functions in all software that supports a Microsoft-compatible mouse. The pointing device is located on the keyboard between the letters G, H, and B. The pointing device is easy to use with your left or right index finger and eliminates the need to take your hand from the keyboard to move the pointer. Apply light pressure in any direction to move the onscreen pointer.
Keyboard and EasyPoint II Pointing Device |
2-1 |
 Loading...