


 Loading...

Contents
Chapter 1 Welcome
Thank you for buying a Compaq Internet PC . . . . . . . . . . . . . . . . . . . . . . . . . . . . . . . . . . . 1-1 Words and Symbols to Watch For. . . . . . . . . . . . . . . . . . . . . . . . . . . . . . . . . . . . . . . . . . . . 1-2 Safety Tips . . . . . . . . . . . . . . . . . . . . . . . . . . . . . . . . . . . . . . . . . . . . . . . . . . . . . . . . . . . . . . 1-2 Special Text . . . . . . . . . . . . . . . . . . . . . . . . . . . . . . . . . . . . . . . . . . . . . . . . . . . . . . . . . . . . . 1-3 Help!. . . . . . . . . . . . . . . . . . . . . . . . . . . . . . . . . . . . . . . . . . . . . . . . . . . . . . . . . . . . . . . . . . . 1-4
Glossary. . . . . . . . . . . . . . . . . . . . . . . . . . . . . . . . . . . . . . . . . . . . . . . . . . . . . . . . . . . . . 1-4 Index . . . . . . . . . . . . . . . . . . . . . . . . . . . . . . . . . . . . . . . . . . . . . . . . . . . . . . . . . . . . . . . 1-4 Windows Help . . . . . . . . . . . . . . . . . . . . . . . . . . . . . . . . . . . . . . . . . . . . . . . . . . . . . . . . 1-4 Troubleshooting . . . . . . . . . . . . . . . . . . . . . . . . . . . . . . . . . . . . . . . . . . . . . . . . . . . . . . . 1-4 Compaq Service and Support . . . . . . . . . . . . . . . . . . . . . . . . . . . . . . . . . . . . . . . . . . . . . 1-4
Chapter 2 Features of Your Internet PC
The Digital Dashboard. . . . . . . . . . . . . . . . . . . . . . . . . . . . . . . . . . . . . . . . . . . . . . . . . . . . . 2-1
E-mail Waiting . . . . . . . . . . . . . . . . . . . . . . . . . . . . . . . . . . . . . . . . . . . . . . . . . . . . . . . . 2-2
Internet Alive!. . . . . . . . . . . . . . . . . . . . . . . . . . . . . . . . . . . . . . . . . . . . . . . . . . . . . . . . . 2-2
Reset . . . . . . . . . . . . . . . . . . . . . . . . . . . . . . . . . . . . . . . . . . . . . . . . . . . . . . . . . . . . . . . 2-3
Power Management. . . . . . . . . . . . . . . . . . . . . . . . . . . . . . . . . . . . . . . . . . . . . . . . . . . . . . . 2-4
Putting Your PC to Sleep. . . . . . . . . . . . . . . . . . . . . . . . . . . . . . . . . . . . . . . . . . . . . . . . . 2-4
Waking Your PC . . . . . . . . . . . . . . . . . . . . . . . . . . . . . . . . . . . . . . . . . . . . . . . . . . . . . . . 2-4
Shutting Down Your PC . . . . . . . . . . . . . . . . . . . . . . . . . . . . . . . . . . . . . . . . . . . . . . . . . 2-5
In Case of System Lockup . . . . . . . . . . . . . . . . . . . . . . . . . . . . . . . . . . . . . . . . . . . . . . . 2-5
Microsoft Windows Power Management. . . . . . . . . . . . . . . . . . . . . . . . . . . . . . . . . . . . . 2-5
Accessing the Microsoft Windows Power Management Settings. . . . . . . . . . . . . . . . . . . 2-5
Sleep Mode . . . . . . . . . . . . . . . . . . . . . . . . . . . . . . . . . . . . . . . . . . . . . . . . . . . . . . . . . . 2-7
Contents |
i |

The Compaq USB Internet Keyboard. . . . . . . . . . . . . . . . . . . . . . . . . . . . . . . . . . . . . . . . . . 2-7
The Basics of Keyboarding . . . . . . . . . . . . . . . . . . . . . . . . . . . . . . . . . . . . . . . . . . . . . . . 2-8 Internet Button Suite (US) . . . . . . . . . . . . . . . . . . . . . . . . . . . . . . . . . . . . . . . . . . . . . . . 2-10 Internet Button Suite (Canada) . . . . . . . . . . . . . . . . . . . . . . . . . . . . . . . . . . . . . . . . . . . 2-11 The Special Buttons . . . . . . . . . . . . . . . . . . . . . . . . . . . . . . . . . . . . . . . . . . . . . . . . . . . 2-12 Multimedia Buttons . . . . . . . . . . . . . . . . . . . . . . . . . . . . . . . . . . . . . . . . . . . . . . . . . . . 2-13 Reprogramming the Easy Access Buttons. . . . . . . . . . . . . . . . . . . . . . . . . . . . . . . . . . . 2-14 Disabling and Enabling the Easy Access Buttons . . . . . . . . . . . . . . . . . . . . . . . . . . . . . 2-14
The Compaq USB Scroll Mouse. . . . . . . . . . . . . . . . . . . . . . . . . . . . . . . . . . . . . . . . . . . . . 2-15
Scroll Mouse Functions . . . . . . . . . . . . . . . . . . . . . . . . . . . . . . . . . . . . . . . . . . . . . . . . 2-16 Scrolling and Zooming with the Mouse . . . . . . . . . . . . . . . . . . . . . . . . . . . . . . . . . . . . . 2-17 Choosing Scroll Mouse Options . . . . . . . . . . . . . . . . . . . . . . . . . . . . . . . . . . . . . . . . . . 2-17 Quick Launch with CyberJump and HyperJump . . . . . . . . . . . . . . . . . . . . . . . . . . . . . . 2-18
About Your CD-ReWritable (CD-RW) Drive . . . . . . . . . . . . . . . . . . . . . . . . . . . . . . . . . . . . 2-21
Types of CD Media . . . . . . . . . . . . . . . . . . . . . . . . . . . . . . . . . . . . . . . . . . . . . . . . . . . . 2-21 just!burn CD Assistant . . . . . . . . . . . . . . . . . . . . . . . . . . . . . . . . . . . . . . . . . . . . . . . . . 2-22 PacketCD . . . . . . . . . . . . . . . . . . . . . . . . . . . . . . . . . . . . . . . . . . . . . . . . . . . . . . . . . . . 2-22 just!audio . . . . . . . . . . . . . . . . . . . . . . . . . . . . . . . . . . . . . . . . . . . . . . . . . . . . . . . . . . . 2-22 CD!backup . . . . . . . . . . . . . . . . . . . . . . . . . . . . . . . . . . . . . . . . . . . . . . . . . . . . . . . . . . 2-22 just!data. . . . . . . . . . . . . . . . . . . . . . . . . . . . . . . . . . . . . . . . . . . . . . . . . . . . . . . . . . . . 2-23 Accessing the just!burn User’s Manual . . . . . . . . . . . . . . . . . . . . . . . . . . . . . . . . . . . . . 2-23 Recording Audio CDs . . . . . . . . . . . . . . . . . . . . . . . . . . . . . . . . . . . . . . . . . . . . . . . . . . 2-24 What is Buffer Underrun? . . . . . . . . . . . . . . . . . . . . . . . . . . . . . . . . . . . . . . . . . . . . . . . 2-25
Using the DVD Player (available on select models) . . . . . . . . . . . . . . . . . . . . . . . . . . . . . 2-26
Using a Regionalized DVD . . . . . . . . . . . . . . . . . . . . . . . . . . . . . . . . . . . . . . . . . . . . . . 2-26 Identifying Your Region Setting. . . . . . . . . . . . . . . . . . . . . . . . . . . . . . . . . . . . . . . . . . . 2-27 Changing a Region Setting . . . . . . . . . . . . . . . . . . . . . . . . . . . . . . . . . . . . . . . . . . . . . . 2-27 Play Settings . . . . . . . . . . . . . . . . . . . . . . . . . . . . . . . . . . . . . . . . . . . . . . . . . . . . . . . . 2-27 Display Options . . . . . . . . . . . . . . . . . . . . . . . . . . . . . . . . . . . . . . . . . . . . . . . . . . . . . . 2-28 On-screen Control Buttons . . . . . . . . . . . . . . . . . . . . . . . . . . . . . . . . . . . . . . . . . . . . . . 2-29 Parental Control of DVD Viewing. . . . . . . . . . . . . . . . . . . . . . . . . . . . . . . . . . . . . . . . . . 2-31
ii |
Contents |

Chapter 3 A Quick Overview of Microsoft Windows
Get Organized: How To Manage Your Files . . . . . . . . . . . . . . . . . . . . . . . . . . . . . . . . . . . . . 3-1
Storage Drives . . . . . . . . . . . . . . . . . . . . . . . . . . . . . . . . . . . . . . . . . . . . . . . . . . . . . . . . 3-2 Searching For Files. . . . . . . . . . . . . . . . . . . . . . . . . . . . . . . . . . . . . . . . . . . . . . . . . . . . . 3-2 Copying Files . . . . . . . . . . . . . . . . . . . . . . . . . . . . . . . . . . . . . . . . . . . . . . . . . . . . . . . . . 3-3 Moving Files. . . . . . . . . . . . . . . . . . . . . . . . . . . . . . . . . . . . . . . . . . . . . . . . . . . . . . . . . . 3-3 Renaming Files . . . . . . . . . . . . . . . . . . . . . . . . . . . . . . . . . . . . . . . . . . . . . . . . . . . . . . . 3-3 Deleting Files . . . . . . . . . . . . . . . . . . . . . . . . . . . . . . . . . . . . . . . . . . . . . . . . . . . . . . . . . 3-3 Restoring Files . . . . . . . . . . . . . . . . . . . . . . . . . . . . . . . . . . . . . . . . . . . . . . . . . . . . . . . . 3-4 Emptying the Recycle Bin. . . . . . . . . . . . . . . . . . . . . . . . . . . . . . . . . . . . . . . . . . . . . . . . 3-4 Creating Folders. . . . . . . . . . . . . . . . . . . . . . . . . . . . . . . . . . . . . . . . . . . . . . . . . . . . . . . 3-4 Deleting Files and Folders . . . . . . . . . . . . . . . . . . . . . . . . . . . . . . . . . . . . . . . . . . . . . . . 3-5
Learning about the Control Panel . . . . . . . . . . . . . . . . . . . . . . . . . . . . . . . . . . . . . . . . . . . . 3-6
Setting Up Display Properties . . . . . . . . . . . . . . . . . . . . . . . . . . . . . . . . . . . . . . . . . . . . . 3-7 Changing the Wallpaper . . . . . . . . . . . . . . . . . . . . . . . . . . . . . . . . . . . . . . . . . . . . . . . . . 3-8 Changing the Screen Saver . . . . . . . . . . . . . . . . . . . . . . . . . . . . . . . . . . . . . . . . . . . . . . 3-9
Shortcuts for the Desktop . . . . . . . . . . . . . . . . . . . . . . . . . . . . . . . . . . . . . . . . . . . . . . . . . 3-10
How Do I Create a Shortcut? . . . . . . . . . . . . . . . . . . . . . . . . . . . . . . . . . . . . . . . . . . . . 3-10 Arranging and Positioning Shortcuts. . . . . . . . . . . . . . . . . . . . . . . . . . . . . . . . . . . . . . . 3-10
Chapter 4 Connecting To The World
Working With Your Modem . . . . . . . . . . . . . . . . . . . . . . . . . . . . . . . . . . . . . . . . . . . . . . . . . 4-1 Identifying Your Modem . . . . . . . . . . . . . . . . . . . . . . . . . . . . . . . . . . . . . . . . . . . . . . . . . . . 4-1
Compaq Digital DSL/56K Modem (available on select models) . . . . . . . . . . . . . . . . . . . . 4-1 Using Your Modem with the 56K ITU V.90 Standard . . . . . . . . . . . . . . . . . . . . . . . . . . . . 4-2 Establishing an Account with an Internet Service Provider . . . . . . . . . . . . . . . . . . . . . . . 4-2 DSL Benefits . . . . . . . . . . . . . . . . . . . . . . . . . . . . . . . . . . . . . . . . . . . . . . . . . . . . . . . . . 4-2 Using Your Modem with DSL Service . . . . . . . . . . . . . . . . . . . . . . . . . . . . . . . . . . . . . . . 4-3 Connecting Your Digital DSL/56K Modem . . . . . . . . . . . . . . . . . . . . . . . . . . . . . . . . . . . . 4-4 Installing the Digital DSL/56K Modem Upgrade. . . . . . . . . . . . . . . . . . . . . . . . . . . . . . . . 4-4
Contents |
iii |

Networking Your PCs. . . . . . . . . . . . . . . . . . . . . . . . . . . . . . . . . . . . . . . . . . . . . . . . . . . . . . 4-5
Connecting Your Internet PC to an Ethernet Network (available on select models). . . . . . 4-5 Setting Up a Network . . . . . . . . . . . . . . . . . . . . . . . . . . . . . . . . . . . . . . . . . . . . . . . . . . . 4-5 Mapping a Network Drive . . . . . . . . . . . . . . . . . . . . . . . . . . . . . . . . . . . . . . . . . . . . . . . . 4-7 Sharing Folders . . . . . . . . . . . . . . . . . . . . . . . . . . . . . . . . . . . . . . . . . . . . . . . . . . . . . . . 4-8 Sharing Printers . . . . . . . . . . . . . . . . . . . . . . . . . . . . . . . . . . . . . . . . . . . . . . . . . . . . . . 4-10
Let’s Get Digital . . . . . . . . . . . . . . . . . . . . . . . . . . . . . . . . . . . . . . . . . . . . . . . . . . . . . . . . . 4-11
Introducing the Digital Creativity Imaging Center (available on select models). . . . . . . . 4-11 What Is A Digital Interface? . . . . . . . . . . . . . . . . . . . . . . . . . . . . . . . . . . . . . . . . . . . . . 4-11
Chapter 5 Quick and Easy Upgrades
Making A Good Thing Better . . . . . . . . . . . . . . . . . . . . . . . . . . . . . . . . . . . . . . . . . . . . . . . . 5-1 Access to the Components . . . . . . . . . . . . . . . . . . . . . . . . . . . . . . . . . . . . . . . . . . . . . . . . . 5-2
Removing the Back EZ Access Panel . . . . . . . . . . . . . . . . . . . . . . . . . . . . . . . . . . . . . . . 5-2
Installing New Hardware. . . . . . . . . . . . . . . . . . . . . . . . . . . . . . . . . . . . . . . . . . . . . . . . . . . 5-3
Removing the Left EZ Access Panel . . . . . . . . . . . . . . . . . . . . . . . . . . . . . . . . . . . . . . . . 5-4
Replacing the Modem or Adding a PCI Expansion Card . . . . . . . . . . . . . . . . . . . . . . . . . . 5-4
Replacing the Hard Drive . . . . . . . . . . . . . . . . . . . . . . . . . . . . . . . . . . . . . . . . . . . . . . . . 5-5 Removing the Right EZ Access Panel . . . . . . . . . . . . . . . . . . . . . . . . . . . . . . . . . . . . . . . 5-6
Adding or Replacing Memory Modules . . . . . . . . . . . . . . . . . . . . . . . . . . . . . . . . . . . . . . . 5-6 Reinstalling Deleted Drivers . . . . . . . . . . . . . . . . . . . . . . . . . . . . . . . . . . . . . . . . . . . . . . . . 5-8 Installing Additional Software . . . . . . . . . . . . . . . . . . . . . . . . . . . . . . . . . . . . . . . . . . . . . . 5-8
Installing Software from a CD or Diskette . . . . . . . . . . . . . . . . . . . . . . . . . . . . . . . . . . . . 5-9 Installing a Downloaded Program File. . . . . . . . . . . . . . . . . . . . . . . . . . . . . . . . . . . . . . . 5-9
Chapter 6 Troubleshooting
Helpful Hints . . . . . . . . . . . . . . . . . . . . . . . . . . . . . . . . . . . . . . . . . . . . . . . . . . . . . . . . . . . . 6-1 Entering BIOS (CMOS) Setup . . . . . . . . . . . . . . . . . . . . . . . . . . . . . . . . . . . . . . . . . . . . . . . . 6-1 Troubleshooting Guidelines. . . . . . . . . . . . . . . . . . . . . . . . . . . . . . . . . . . . . . . . . . . . . . . . . 6-1 Troubleshooting Audio Problems . . . . . . . . . . . . . . . . . . . . . . . . . . . . . . . . . . . . . . . . . . . . 6-2 Troubleshooting CD, CD-RW or DVD Problems . . . . . . . . . . . . . . . . . . . . . . . . . . . . . . . . . . 6-4 Troubleshooting Diskette Drive and Zip Drive Problems . . . . . . . . . . . . . . . . . . . . . . . . . . 6-5 Troubleshooting Display (Monitor) Problems . . . . . . . . . . . . . . . . . . . . . . . . . . . . . . . . . . . 6-7 Troubleshooting Fax Modem Problems . . . . . . . . . . . . . . . . . . . . . . . . . . . . . . . . . . . . . . . 6-8 Troubleshooting Game Problems . . . . . . . . . . . . . . . . . . . . . . . . . . . . . . . . . . . . . . . . . . . . 6-9 Troubleshooting Hard Drive Problems . . . . . . . . . . . . . . . . . . . . . . . . . . . . . . . . . . . . . . . . 6-9
iv |
Contents |

Troubleshooting Internet Access Problems . . . . . . . . . . . . . . . . . . . . . . . . . . . . . . . . . . . 6-10 Troubleshooting Keyboard and Scroll Mouse Problems . . . . . . . . . . . . . . . . . . . . . . . . . 6-11 Troubleshooting Memory Problems . . . . . . . . . . . . . . . . . . . . . . . . . . . . . . . . . . . . . . . . . 6-12 Troubleshooting Power Problems . . . . . . . . . . . . . . . . . . . . . . . . . . . . . . . . . . . . . . . . . . . 6-12 Troubleshooting Printer Problems (see your printer manual for additional Information) 6-14 Contacting Technical Support . . . . . . . . . . . . . . . . . . . . . . . . . . . . . . . . . . . . . . . . . . . . . . 6-17
Chapter 7 Government Approvals
European Union Notice . . . . . . . . . . . . . . . . . . . . . . . . . . . . . . . . . . . . . . . . . . . . . . . . . . . . 7-1 Federal Communications Commission Notice . . . . . . . . . . . . . . . . . . . . . . . . . . . . . . . . . . 7-2
Modifications . . . . . . . . . . . . . . . . . . . . . . . . . . . . . . . . . . . . . . . . . . . . . . . . . . . . . . . . . 7-2 Cables . . . . . . . . . . . . . . . . . . . . . . . . . . . . . . . . . . . . . . . . . . . . . . . . . . . . . . . . . . . . . . 7-2
Declaration of Conformity for Products Marked with the FCC Logo (United States Only) 7-3
Canadian Notice . . . . . . . . . . . . . . . . . . . . . . . . . . . . . . . . . . . . . . . . . . . . . . . . . . . . . . . 7-3 Avis Canadien . . . . . . . . . . . . . . . . . . . . . . . . . . . . . . . . . . . . . . . . . . . . . . . . . . . . . . . . 7-3
Telecom Network Approvals . . . . . . . . . . . . . . . . . . . . . . . . . . . . . . . . . . . . . . . . . . . . . . . . 7-4 U.S. Regulations Governing the Use of Modems . . . . . . . . . . . . . . . . . . . . . . . . . . . . . . . . 7-4
Ringer Equivalence Number (REN) . . . . . . . . . . . . . . . . . . . . . . . . . . . . . . . . . . . . . . . . . 7-4
Telephone Consumer Protection Act of 1991 . . . . . . . . . . . . . . . . . . . . . . . . . . . . . . . . . . . |
7-5 |
Canadian Regulations Governing the Use of Modems . . . . . . . . . . . . . . . . . . . . . . . . . . . . |
7-6 |
U.K. BABT Users Notice . . . . . . . . . . . . . . . . . . . . . . . . . . . . . . . . . . . . . . . . . . . . . . . . . . . |
7-7 |
Telephone Network Connection . . . . . . . . . . . . . . . . . . . . . . . . . . . . . . . . . . . . . . . . . . . |
7-7 |
Auto Dialing with the Modem . . . . . . . . . . . . . . . . . . . . . . . . . . . . . . . . . . . . . . . . . . . . . |
7-8 |
Benutzerhinweise für besondere Bestimmungen in Österreich . . . . . . . . . . . . . . . . . . . . |
7-9 |
Hinweis für die Benutzung in osterreich . . . . . . . . . . . . . . . . . . . . . . . . . . . . . . . . . . . . . |
7-9 |
Wahlsperre. . . . . . . . . . . . . . . . . . . . . . . . . . . . . . . . . . . . . . . . . . . . . . . . . . . . . . . . . . . |
7-9 |
Benutzerhinweise für besondere Bestimmungen in Deutschland . . . . . . . . . . . . . . . . . . |
7-9 |
Hinweis für die Benutzung in der Bundesrepublik Deutschland. . . . . . . . . . . . . . . . . . . . |
7-9 |
Brugerinstruktioner i overensstemmelse med danske krav . . . . . . . . . . . . . . . . . . . . . . . |
7-9 |
Opkaldskoder P og T . . . . . . . . . . . . . . . . . . . . . . . . . . . . . . . . . . . . . . . . . . . . . . . . . . . |
7-9 |
Contents |
v |

Speciale gebruiksinstructies voor Nederland . . . . . . . . . . . . . . . . . . . . . . . . . . . . . . . . . 7-10
Aansluitfactor. . . . . . . . . . . . . . . . . . . . . . . . . . . . . . . . . . . . . . . . . . . . . . . . . . . . . . . . 7-10 Wachten op kiestoon . . . . . . . . . . . . . . . . . . . . . . . . . . . . . . . . . . . . . . . . . . . . . . . . . . 7-10 Handenvrij bellen . . . . . . . . . . . . . . . . . . . . . . . . . . . . . . . . . . . . . . . . . . . . . . . . . . . . . 7-10
Användarinstruktioner i överensstämmelse med svenska krav
Uppringningskod P och T. . . . . . . . . . . . . . . . . . . . . . . . . . . . . . . . . . . . . . . . . . . . . . . . . . 7-10 New Zealand Modem Statements . . . . . . . . . . . . . . . . . . . . . . . . . . . . . . . . . . . . . . . . . . . 7-11
Safety . . . . . . . . . . . . . . . . . . . . . . . . . . . . . . . . . . . . . . . . . . . . . . . . . . . . . . . . . . . . . 7-12 Batteries . . . . . . . . . . . . . . . . . . . . . . . . . . . . . . . . . . . . . . . . . . . . . . . . . . . . . . . . . . . 7-12 Using the Computer . . . . . . . . . . . . . . . . . . . . . . . . . . . . . . . . . . . . . . . . . . . . . . . . . . . 7-13 Energy Compliance . . . . . . . . . . . . . . . . . . . . . . . . . . . . . . . . . . . . . . . . . . . . . . . . . . . 7-14
Glossary
Index
vi |
Contents |

Chapter 1 |
Welcome |
|
Thank you for buying a Compaq Internet PC
With this purchase, you are a part of the next generation of PC users, people who demand the latest in PC technology. Whether you use your computer for business or pleasure, or both, you are sure to hit the ground running with this feature-packed PC.
There are four unique guides provided with your new PC:
1.Getting Started Guide
2.Reference Guide
3.Service and Support Guide
4.Safety and Comfort Guide
Together, they provide the following:
information about the features of your new PC
hints and tips to make computing easier
information needed to replace or add components to your PC
Please take a few moments to familiarize yourself with the contents of the guides. Doing so will make it easier to find the necessary information at the turn of a page.
Welcome |
1-1 |

Words and Symbols to Watch For
The following words and symbols have special meaning in this guide:
*
+
`
a
HINT: Helpful hints that will make using your computer easier and faster.
NOTE: Important information concerning the operation of your Internet PC.
CAUTION: Failure to follow directions may result in equipment damage or loss of data.
WARNING: Failure to follow directions may result in bodily harm or loss of life.
Safety Tips
Your safety is important. Before performing any procedures involving the internal components of your Internet PC, please take a few moments to read the following Warning and Caution statements. Following the guidelines in these statements will help to reduce the risk of personal injury or equipment damage.
aWARNING: To reduce the risk of electric shock and damage to the equipment, do the following:
Do not disable any 3-prong grounding plug. The grounding pin on a 3-prong plug is an important safety feature. Removal of the grounding pin increases the risk of computer damage. If you cannot fit the plug into your electrical outlet, contact an electrician for information on having grounded outlets installed.
Use only grounded electrical outlets when plugging in your computer. These outlets should be easily accessible at all times.
When connecting a power cord to a grounded electrical outlet, ensure that nothing rests on the power cord.
Turn the computer off.
Unplug the computer power cord.
Disconnect the modem line from the telephone jack.
Disconnect all network cables.
Disconnect all cables and power cords from the computer.
1-2 |
Welcome |

`CAUTION: To prevent damage to the computer from electrostatic discharge, you must become static-free before removing the cover. To become static-free, touch an unpainted metal surface or one of the screws on the computer cover. As you work, avoid touching exposed metal on any of the computer circuit boards.
+NOTE: If you are expecting an electrical storm to pass through your area, it is a good idea to ensure that your Internet PC is properly turned off. You should disconnect the modem line from the telephone wall jack and remove all power cords from their electrical outlets.
+NOTE: The graphics shown in this guide may differ slightly from your Internet PC.
Special Text
The following examples explain the specially formatted text used in this guide:
Keyboard key names appear in bold type: Home, End, Backspace, Tab
Keyboard keys that must be pressed at the same time to perform a task appear in bold type with a plus sign (+) between the key names: Ctrl+Home
Drives appear as capital letters: drive C
Folder names appear with initial capital letters: Favorites
File names appear in italics with an initial capital letter: Setup.exe
Command line statements appear in lowercase bold type: a:\install
Names of icons appear in bold type followed by a picture of the icon:
My Computer Gicon
Menu items appear in bold type: Programs, Accessories
Web addresses (URLs) appear in lowercase bold type: www.compaq.com
Welcome |
1-3 |
Help!
|
Compaq provides you with several resources to help you learn about your |
|
Internet PC. |
Glossary |
Computer terms that may be unfamiliar to you are identified in the glossary. |
Index |
The index in each guide is a comprehensive list of the topics covered in that guide. |
Windows Help |
Refer to Getting Started and Reference Guide for detailed information about |
|
Windows Help. |
Troubleshooting |
The Troubleshooting section shows how to fix many common computer-related |
|
issues. Refer to the Troubleshooting section located in the Reference Guide. |
Compaq Service |
Your Internet PC is equipped with several helpful programs that will aid you in |
and Support |
identifying and solving common computer problems. You can learn about these |
|
programs in the Service and Support Guide. |
|
If you need further technical support or assistance, visit the Compaq Web site at: |
|
www.compaq.com/mypresario |
|
Compaq technical support telephone numbers are listed in the Certificate of Warranty |
|
included with your Internet PC. |
|
For logging future service calls, please see the Service Diary in the Service and |
|
Support Guide. |
1-4 |
Welcome |

Chapter 2 |
Features of Your Internet PC |
|
|
|
|
|
|
This chapter gives you information about many of the exciting, easy-to-use features |
|
|
of your Presario Internet PC. |
The Digital Dashboard
Your Internet PC has a new, informative tool called Digital Dashboard that will:
Provide the necessary feedback to assist you in the initial setup of your PC.
Alert you to changes in status such as connected or disconnected external peripherals.
Inform you of new e-mail messages.
Display the exact time according to the Atomic Clock.
Digital Dashboard
Features of Your Internet PC |
2-1 |

|
No. Icon |
|
Component |
|
|
|
|
||
|
|
|
|
|
|
|
|
|
|
1-- PC Speaker
2 |
¤ E-Mail Waiting Indicator |
3-- LCD Screen
4 |
¦ |
Internet Alive Indicator |
|
|
|
5 |
p |
Sleep Mode Indicator |
|
|
|
6 |
˜ |
Awake Indicator |
|
|
|
7 |
-- |
Start/Reset Button |
Disclaimer: Some free Internet Service Providers, such as NetZero and AltaVista, use a unique dialer. You must manually connect to these ISPs in order to use some features of the Digital Dashboard, such as Synchronize Time (Atomic Clock) and E-mail Waiting.
Disclaimer: When connecting to the Internet using a Digital Subscriber Line (DSL), cable modem, or network (LAN, HomePNA), the following Digital Dashboard functions are unavailable: Internet Alive, E- mail Waiting Indicator, and Clock Synchronization (Atomic Clock). Users of systems with DSL or cable modems should check the Compaq Presario Web site periodically for updates and details to enable Clock/Mail applications to work with these communications devices.
E-mail Waiting Your system will periodically dial out to the Internet using Microsoft Task Scheduler and see if you have received any new e-mail messages. Digital Dashboard will display the user ID of the person(s) with new mail awaiting them. For example, the dashboard may say: JBlack has Mail Waiting, MBlack has Mail Waiting.
However, when your PC is in Sleep mode, Digital Dashboard will not display the mail-waiting message. Instead, the E-mail Waiting indicator will blink to note a new mail message.
Disclaimer: The Digital Dashboard E-mail Waiting indicator and the e-mail message on the LCD screen work with Post Office Protocol (POP) and Post Office Protocol-3 (POP3) e-mail servers. Please check with your Internet Service Provider or e-mail service provider to verify that your e-mail service uses one of these protocols. POP3 servers configured in Microsoft Outlook Express or Microsoft Outlook are ready to be enabled in the Digital Dashboard control panel.
Internet Alive! Digital Dashboard will also notify you that you are online. When you are connected, the ¦icon will glow.
2-2 |
Features of Your Internet PC |

Reset |
In the event of a system lockup, pressing the Start/Reset button for 4 seconds will |
|
|
place your PC in safe mode. Pressing the button again will reactivate the computer. |
|
|
` CAUTION: Be sure to save regularly. If you don’t you will lose unsaved information. |
|
|
Digital Dashboard Settings |
|
|
To access the settings of the Digital Dashboard, complete the following steps: |
|
|
1. |
Click Start, then Settings, then Control Panel. |
|
2. |
From the Control Panel, double-click Digital Dashboard. |
|
3. |
The Digital Dashboard Control Panel screen is displayed. |
Digital Dashboard General Settings Tab
The Digital Dashboard Control Panel contains following tabs:
General Settings - allows you to enable or disable the Digital Dashboard.
Internet Time - allows you to enable Internet time updates for your PC clock.
Features of Your Internet PC |
2-3 |

Device Detective - allows you to enable onscreen and sound notification of added or deleted devices.
E-Mail Waiting - allows you to configure how you are notified when new e-mail arrives.
Internet Alive - allows you to configure how your PC indicates that you are online.
Dial-Up Settings - allows you to select which Dial-up account to use.
Power Management
Putting Your PC to Sleep
Your new Internet PC has three states of power: Standby (Sleep), Awake, and
Off (Shut down). Typically, when you finish a computing session, you can place your PC in Sleep mode. In the event of a system lockup or if you are unplugging your PC to upgrade components, you will need to shut down completely. The following sections will walk you through each of these procedures.
To put your computer into the Sleep mode, press the Sleep button 1 on your Compaq USB Internet Keyboard. The sleep pýindicator on the Digital Dashboard will glow.
Sleep Button
Waking Your PC To wake your computer from the Sleep mode, press the Sleep 1 button on your Compaq USB Internet Keyboard. The Awake ˜indicator on the Digital Dashboard will glow, indicating that the system is active.
2-4 |
Features of Your Internet PC |

Shutting Down
Your PC
In Case of
System Lockup
To shut down your computer in order to upgrade or replace components, such as memory or PCI expansion cards, press and release the Start/Reset button on the Digital Dashboard. You can also shut down your computer by completing the following steps:
1.Click Start on the Windows taskbar.
2.Click Shut Down.
3.Select Shut down.
In the event of a system lockup, pressing the Start/Reset button for 4 seconds will shut down your computer without shutting down Windows.
`CAUTION: We recommend that you use this method of shutdown only in the event of a system lockup since it will cause Windows to run ScanDisk and you will lose any unsaved data.
Microsoft
Windows Power
Management
Accessing the
Microsoft
Windows Power
Management
Settings
Microsoft Windows is equipped with a power management utility program that enables you to reduce the power consumed by your Internet PC. You can set the power management properties so that certain devices turn off after a predetermined period of inactivity.
To access the Microsoft Windows Power Management program, complete the following steps:
1.From the Windows Taskbar, click Start, point to Settings, then click
Control Panel.
2.Double-click the Power Management æ icon. The Power Management Properties window displays.
Preset Power Schemes
The following preset power schemes are available:
Microsoft Windows Power Schemes
|
Preset Option |
System goes to |
Monitor turns off |
Hard disk turns off |
|
Standby after… |
after… |
after… |
|
|
|
|||
|
|
|
|
|
|
Home/Office Desk |
20 minutes of no activity |
15 minutes of no activity |
30 minutes of no activity |
|
|
|
|
|
|
Always On |
Never |
15 minutes of no activity |
1 hour of no activity |
|
|
|
|
|
Features of Your Internet PC |
2-5 |

+NOTE: If you have your Internet PC connected to a network or have an “ALWAYS ON” DSL modem, you should set the power scheme to Always On. This will prevent the Internet PC from going into Sleep mode and breaking the network or DSL connection.
Your Internet PC power scheme is set to Home/Office Desk. Once the specified amount of time has elapsed, the device enters Sleep mode. Components in Sleep mode rapidly return to a fully active state once activity is detected.
Creating a Personal Power Scheme
If you find that the preset power management schemes do not fit your work habits, you can create a personal power scheme.
To create your own personal power scheme, complete the following steps:
1.From the Windows Taskbar, click Start, point to Settings, and then click
Control Panel.
2.Double-click the Power Management æicon.
3.Complete the following steps in the Power Management Properties window:
a.Ensure that the Home/OfficeDesk power scheme is selected.
b.Click the down arrow next to System standby and select the amount of time that passes before the computer goes into Sleep mode.
c.Click the down arrow next to Turn off monitor and select the amount of time that passes before the monitor goes into Sleep mode.
d.Click the down arrow next to Turn off hard disks and select the amount of time that passes before the hard drive goes into Sleep mode.
4.Click Save As, type in a name for your personal power scheme, and click OK..
5.Click Apply, then click OK.
Your personal power scheme is now activated.
2-6 |
Features of Your Internet PC |

Sleep Mode The Sleep mode is a low-power standby state that reduces the amount of electrical power consumed by your Internet PC while you are not actively using it. Microsoft Windows Power Management will automatically put your Internet PC into the Sleep mode once the power scheme timers expire. Or, you may choose to activate Sleep mode immediately by pressing the Sleep button on the keyboard or by completing the following:
1.Save all your work and exit all programs.
2.From the Windows Taskbar, click Start.
3.Select Shut Down, and then choose Stand by.
4.Click OK.
The Awake ˜light will go off, and the Sleep pýlight will glow, indicating that the computer is in Sleep mode.
The Compaq USB Internet Keyboard
Your Compaq USB Internet Keyboard offers an assortment of Easy Access buttons that make accessing the Internet and using your favorite software programs easier and faster. Along with the standard computer keyboard buttons, the Internet Keyboard provides the following:
Multimedia buttons
Internet Button Suite
Special purpose buttons
USB Internet Keyboard
Features of Your Internet PC |
2-7 |

The Basics of
Keyboarding
No. Description
1Multimedia Buttons
2Internet Button Suite
3Special Purpose Buttons
The Internet keyboard offers two USB connectors. Typically, your Compaq USB scroll mouse will be connected to one, leaving the other open for low-powered devices, such as a joystick or gamepad. High-powered devices or devices requiring external power, such as cameras and scanners, should be plugged into one of the USB connectors on the computer instead of the keyboard.
The standard keyboard has four major types of keys:
main keys (typewriter-style)
function keys (F1 through F12)
arrow keys (← → ↑ ↓)
numeric keys (calculator-style)
Some keys have special functions when used either alone or combined with other keys. The functions may vary depending on the programs you are using. Refer to Help to learn how these keys can be used in combination with other keys to develop shortcuts in your programs.
Key/Button Description
Esc
Esc exits a program, moves back one window, or cancels a command, depending on the program you are using.
Tab |
Tab forwards the cursor a designated distance. |
Caps Lock
Caps Lock capitalizes all letters when typed. The Caps Lock light on the keyboard glows when the key is active.
Shift
Shift is frequently used in combination with other keys. The effect depends on the program you are using.
Ctrl
Control is normally used in combination with other keys. The effect depends on the program you are using.
±Windows opens the Start menu.
2-8 |
Features of Your Internet PC |

|
Key/Button |
Description |
|
|
|
|
Alt |
Alt is frequently used in combination with other keys. By pressing Alt, the focus |
|
moves from the cursor to the menu bar. The effect depends on the program you are |
|
|
|
using. |
|
|
|
|
F1-F12 |
Function keys are assigned specific tasks, depending on the program you are using. |
|
Some tasks include shortcuts, spelling and grammar checks, and activating the |
|
|
|
menu bar. Refer to Help for details on specific key combinations. |
|
|
|
|
Backspace |
Backspace moves the cursor left one space and deletes the character in that space. |
)Windows Application usually has the same effect as a right mouse click.
Scroll Lock |
Scroll Lock prevents automatic scrolling in some programs and allows scrolling to |
|
be controlled by the arrow keys. The Scroll Lock light on the keyboard glows when |
||
|
this key is activated. The effect depends on the program you are using. |
|
|
|
|
Pause/ |
Pause temporarily stops screen scrolling. The effect depends on the program you |
|
Break |
are using. |
|
|
|
|
Insert |
Insert switches typing between insert and overtype modes. For example, after |
|
pressing this key, new text is either inserted into the current text or replaces it. |
||
|
||
|
|
|
Home |
Home moves the cursor to the beginning of the text line, table cell, or document. |
|
Home can also be used in combination with other keys. |
||
|
||
|
|
|
Page Up/ |
Page Up/Page Down moves the page up or down. |
|
Page Down |
||
|
||
|
|
|
Delete |
Delete deletes the character to the right of the cursor and moves the following text |
|
left one space. |
||
|
||
|
|
|
End |
End moves the cursor to the end of the text line, table cell, or document. It can also |
|
be used in combination with other keys. |
||
|
||
|
|
|
ý← → |
Arrow moves the cursor left, right, up, and down. |
|
↑ ↓ |
|
|
|
|
|
|
Num Lock indicates that use of the 10-key number pad will produce only numbers. |
|
NumLock |
Pressing the Num Lock key on the keyboard will activate and deactivate this |
|
|
function. |
Features of Your Internet PC |
2-9 |
Internet Button The Internet buttons provide quick access to selected sites on the Internet.
Suite (US)
|
|
Internet Button Suite |
|
|
|
No. |
Icon |
US (see next table for Canada) |
|
|
|
1 |
¤ |
Instant E-Mail provides one-touch access for sending and reading your e-mail. |
|
|
|
2 |
- |
Community takes you to a predefined Web site that provides a vibrant community |
|
|
experience featuring live events, discussion boards, chat and unique content. |
3 |
$ |
My Presario is your instant connection to Compaq for product information, helpful |
|
|
hints, performance updates, service, and more. |
|
¦ |
Instant Internet provides your daily start point to the Internet. It connects you to a |
4 |
personalized Web page filled with local weather, news, sports, and financial |
|
|
|
information. |
|
|
|
5 |
© |
Instant Search accesses a default Web site that helps you locate information on |
|
|
the Internet. |
|
Ÿ |
Entertainment Ideas is your online inside scoop on the world of entertainment |
6 |
featuring music downloads, streaming video, webcasts, entertainment news and |
|
|
|
reviews. |
|
|
|
7 |
° |
Retail Central provides an instant connection to your computer store and a variety |
|
|
of leading consumer companies. |
+NOTE: For the Internet Button Suite to operate, you must be connected to the Internet. Until you set up your Internet Service Provider (ISP), each Internet button will launch the Compaq Internet Setup process.
2-10 |
Features of Your Internet PC |

Internet Button
Suite (Canada)
No. |
Icon |
Canada |
|
|
|
1 |
¤ |
Instant E-Mail provides one-touch access for sending and reading your e-mail. |
|
|
|
2 |
- |
Community takes you to a predefined Web site that provides a vibrant community |
|
|
experience featuring live events, discussion boards, chat and unique content. |
3 |
$ |
My Presario is your instant connection to Compaq for product information, helpful |
|
|
hints, performance updates, service, and more. |
|
¦ |
Instant Internet provides your daily start point to the Internet. It connects you to a |
4 |
personalized Web page filled with local weather, news, sports, and financial |
|
|
|
information. |
|
|
|
5 |
© |
Instant Search accesses a default Web site that helps you locate information on |
|
|
the Internet. |
6 |
Ÿ |
Instant Answer provides you with a central location to obtain specific information |
|
|
about your Internet PC. |
|
° |
Shopping Online takes you to an electronic shopping experience. Compaq has |
7 |
partnered with several companies to provide you with the convenience of catalog |
|
|
|
shopping at the touch of a button. |
|
|
|
Features of Your Internet PC |
2-11 |

The Special |
Your Compaq USB Internet Keyboard is equipped with several special purpose |
Buttons |
buttons that allow quick and easy access to your favorite locations. |
Special Purpose Buttons
No. Icon Component
1Quick Print allows you to quickly print from a web page or a program
²application, such as Microsoft Word. This button is programmable.
2 |
k |
Launch starts Built-In Technician (US only). This button launches |
|
|
|
Microsoft Works in Canada. This button is programmable. |
|
|
|
|
|
3 |
„ |
Minus allows you to decrease the volume of your PC audio. |
|
|
|
|
|
4 |
A |
Mute button allows you to temporarily mute your PC audio. |
|
|
|
|
|
5 |
… |
Plus allows you to increase the volume of your PC audio. |
|
|
|
|
|
6 |
p |
Sleep places your computer into a low power state, as well as wakes |
|
your computer. |
|||
|
|||
|
|
|
|
|
|
Scroll Lock prevents automatic scrolling in some programs and allows |
|
7 |
5 |
scrolling to be controlled by the arrow keys. The Scroll Lock light on the |
|
keyboard glows when this key is activated. The effect depends on the |
|||
|
|||
|
|
program you are using. |
|
|
|
|
|
8 |
á |
Caps Lock capitalizes all letters when typed. The Caps Lock light on the |
|
keyboard glows when the key is active. |
|||
|
|||
|
|
|
|
|
|
Num Lock indicates that use of the 10-key number pad will produce only |
|
9 |
â |
numbers. Pressing the Num Lock key on the keyboard will activate and |
|
|
|
deactivate this function. |
2-12 |
Features of Your Internet PC |

Multimedia |
The Multimedia buttons allow you to easily control your multimedia devices. |
Buttons |
|
|
|
Multimedia Buttons |
|
|
|
No. |
Icon |
Component |
|
|
|
1 |
ˆ |
Play/Pause starts or stops CD or DVD temporarily. |
|
|
|
2 |
‹ |
Rewind/Previous Track skips to the previous track. |
|
|
|
3 |
Π|
Fast Forward/Next Track skips to the next track. |
|
|
|
4 |
‘ |
Stop ends the CD or DVD playback. |
|
|
|
5 |
’ |
Eject/Load ejects or loads the CD or DVD. |
|
|
|
Features of Your Internet PC |
2-13 |

Reprogramming
the Easy Access
Buttons
You can reprogram the Easy Access buttons to reflect your personal preferences.
The Easy Access Button Support ¸icon is located on the Windows desktop Status bar. It can be accessed by clicking Start, pointing to Programs, and choosing
Reprogram Easy Access Buttons.
+NOTE: The Internet Easy Access buttons can only be reprogrammed to other URLs (Web sites).
Disabling and
Enabling the
Easy Access
Buttons
To reprogram your Easy Access buttons, complete the following steps:
1.From the Status bar, right-click the Easy Access Button Support ¸ icon and choose Reprogram Easy Access Buttons. The Compaq Easy Access Button Settings window is displayed.
2.Click the button you wish to change.
3.Follow the instructions provided.
After you have reprogrammed the button, move the cursor over each button and your choices will be displayed by a pop-up menu called Hover Help. Select the choice you prefer.
You can turn off all Easy Access buttons from the Easy Access Button program. When the buttons are disabled, only the Sleep and Volume Control buttons will operate. The Easy Access Button Support ¸icon located on the status bar will appear with a red X on top when it is disabled. You can still access the button functions if you click the Easy Access Button Support ¸ icon.
To disable the Easy Access Buttons, complete the following steps:
1.From the Status bar, right-click the Easy Access Button Support ¸icon.
2.Click Disable Easy Access Buttons.
To enable the Easy Access buttons, complete the following steps:
1.From the Status bar, right-click the Easy Access Button Support ¸icon.
2.Click Enable Easy Access Buttons.
2-14 |
Features of Your Internet PC |

The Compaq USB Scroll Mouse
The Compaq USB scroll mouse is similar to other computer pointing devices except that it has a small wheel button between the two mouse buttons. This wheel allows you to save time and steps by rolling the wheel on the scroll mouse forward or backward instead of using the scroll bar.
-
USB Scroll Mouse
No. Component
1Left Mouse Button
2Right Mouse Button
3Wheel Button
Features of Your Internet PC |
2-15 |

Scroll Mouse
Functions
The scroll mouse offers standard mouse functions in addition to unique scrolling functions. Basic mouse techniques that are used with any mouse include the following:
Key/Button Description
Click |
Press and release the left mouse button once to select or highlight. |
Double-click
Press and release the left mouse button twice, quickly. If you double-click too slowly, the computer will respond as if you single-clicked.
For graphics:
1.Position the cursor over the graphic.
2.Press and hold down the left mouse button while dragging the graphic to the new location.
3.Release the button.
Drag and drop For text:
1.Point to the text.
2.Place the cursor inside the selected text.
3.Press and hold down the left mouse button while dragging the text to its new location.
4.Release the button.
In menus: Point to the menu item and click.
Select In most programs: Point to the beginning of your selection, hold down the left mouse button, and move the cursor to the end of your selection. Release the
mouse button.
Right-click Click the right mouse button once to produce a context-specific Shortcut menu.
2-16 |
Features of Your Internet PC |

Scrolling and Zooming with the Mouse
In addition to the typical mouse functions, the scroll mouse has the ability to move right, left, and diagonal.
|
Key/Button |
Description |
|
|
|
|
|
|
|
1. |
Open a program and press the center mouse button (wheel) that is assigned to |
|
|
|
AutoScroll. |
|
AutoScroll |
2. |
Move the mouse once in the direction you want to scroll (vertically, horizontally, |
|
|
or diagonally). The farther you move the cursor from the starting point, the faster |
|
|
|
|
|
|
|
|
the scrolling. |
|
|
3. |
To stop AutoScroll, press any mouse button. |
|
|
|
|
|
Wheel Scroll |
1. |
To scroll up, move the wheel forward. |
|
2. |
To scroll down, move the wheel backward. |
|
|
|
||
|
|
|
|
|
|
1. |
Place the mouse cursor in a program. |
|
Zoom |
2. |
Press and hold the Ctrl key on the keyboard. |
|
|
3. |
To zoom in, move the wheel forward. To zoom out, move the wheel backward. |
|
|
|
|
Choosing Scroll
Mouse Options
You can choose features for setting up the mouse, choosing button assignments, and controlling cursor movements.
To access the Scroll Mouse properties, complete the following steps:
1.Click Start.
2.Select Settings, then click Control Panel.
3.Double-click the Mouse icon. The Mouse Properties window displays.
4.From the Mouse Properties window, select the settings you prefer. The settings are listed in the following table.
.
Setting |
Description |
|
|
|
|
Quick Setup |
Allows you to reset your mouse properties to the factory defaults. |
|
|
|
|
Pointers |
Allows you to select different schemes to use with the pointer. |
|
|
|
|
Buttons |
Changes the button and wheel functions. Click the Options button to |
|
change your mouse button assignment options. For more information, |
||
|
click Help. |
|
|
|
|
Motion |
Sets the cursor speed and acceleration. You can also enable Smart Moves |
|
and create a pointer trail. |
||
|
||
|
|
|
Orientation |
Allows you to change the angle of the mouse movement. |
|
|
|
|
Devices |
Allows you to add another pointing device. |
|
|
|
Features of Your Internet PC |
2-17 |

Quick Launch |
The CyberJump and HyperJump features combine commonly used tasks into one |
|
with CyberJump |
convenient grid. CyberJump is used in an Internet window, whereas HyperJump is |
|
and HyperJump |
used in your documents. |
|
|
Before you can use this feature, you must first assign either function, CyberJump or |
|
|
HyperJump, to a mouse button. You can make your left button, right button, or the |
|
|
wheel work with CyberJump or HyperJump. |
|
|
To assign a mouse button or the wheel to CyberJump or HyperJump, complete the |
|
|
following steps: |
|
|
1. |
Click Start. |
|
2. |
Select Settings, then click Control Panel. |
|
3. |
Double-click the Mouse Zicon. The Mouse Properties windows displays. |
|
4. |
Select the Buttons tab. |
|
5. |
From the Button Assignments drop-down lists, choose CyberJump or |
|
|
HyperJump for the respective mouse button. |
|
6. |
Open a document. |
|
7. |
Press the assigned mouse button or wheel to display the CyberJump or |
|
|
HyperJump grid. |
|
8. |
Click an icon on the grid to execute a command. |
|
To perform a double-click with the button assigned to CyberJump or HyperJump, |
|
|
complete the following steps: |
|
|
1. |
Click Start. |
|
2. |
Select Settings, then click Control Panel. |
|
3. |
Double-click the Mouse Zicon. The Mouse Properties window displays. |
|
4. |
Select the Buttons tab. |
|
5. |
Click the Options button, select the CyberJump or HyperJump tab and select |
|
|
double-click. |
|
6. |
Press and release the button quickly when using the double-click function. |
2-18 |
Features of Your Internet PC |
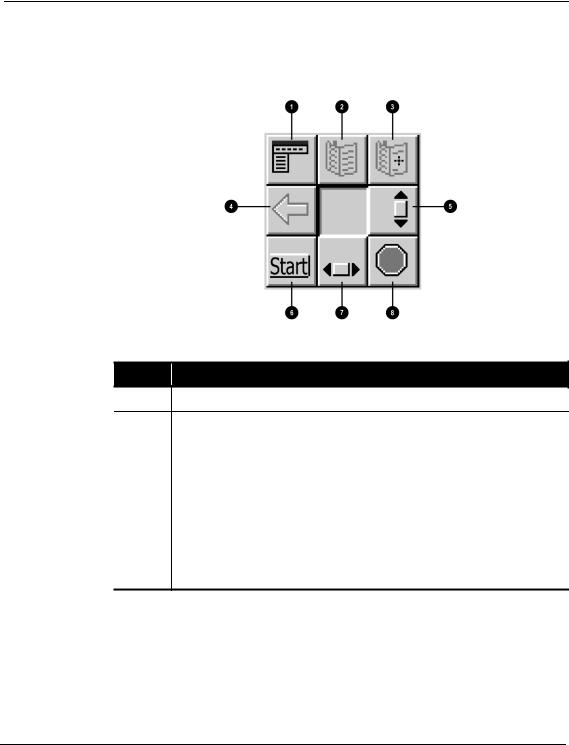
CyberJump Functions
CyberJump functions are defined in the following illustration and table.
CyberJump Functions
No. Component
1Menu activates the CyberMenu.
2 |
Go to Bookmark displays the Bookmark window. |
|
|
3 |
Add Bookmark adds current page to Bookmark window. |
|
|
4 |
Go Back returns to previous page. |
|
|
5 |
Vertical Scroll jumps to the vertical scroll bar. |
|
|
6 |
Start activates the Windows Start menu. |
|
|
7 |
Horizontal Scroll jumps to the horizontal scroll bar. |
|
|
8 |
Stop returns to the previous page. |
Features of Your Internet PC |
2-19 |
Loading...