


 Loading...
Canon PowerShot Pro 90 IS, PowerShot S100 Digital ELPH, PowerShot S110 Digital ELPH, PowerShot S300 User Manual

1 ImageBrowser Software User Guide

Table of Contents (1/2)
Chapter 1 Try It! ImageBrowser |
|
Starting ImageBrowser ............................................................. |
4 |
Downloading Images to Your Computer .................................. |
9 |
Printing Images ....................................................................... |
12 |
Supplementary Information .................................................... |
14 |
Chapter 2 What is ImageBrowser ? |
|
What Can ImageBrowser Do? ................................................. |
15 |
Storing Images ........................................................................ |
17 |
Understanding the Browser Window ...................................... |
18 |
Changing the Browser Window Display .................................. |
19 |
Using Contextual Menus ......................................................... |
22 |
Chapter 3 Managing Images |
|
Moving and Copying Images ................................................... |
23 |
Deleting Images ...................................................................... |
26 |
Rotating Images ...................................................................... |
27 |
Duplicating Images.................................................................. |
28 |
Renaming Images .................................................................... |
29 |
Viewing Image Information .................................................... |
30 |
Creating Folders ...................................................................... |
31 |
Renaming Folders .................................................................... |
32 |
Deleting Folders ...................................................................... |
33 |
Chapter 4 Viewing Images |
|
Selecting Folders ..................................................................... |
34 |
Opening Images ...................................................................... |
35 |
Changing the Magnification ................................................... |
36 |
Editing Images ......................................................................... |
37 |
Editing Images with Other Programs ...................................... |
41 |
Chapter 5 Using the Camera Window |
|
Opening the Camera Window ................................................ |
42 |
Downloading Images .............................................................. |
43 |
Deleting Images in the Camera ............................................... |
45 |
Rotating Images in the Camera ............................................... |
46 |
Adding Computer Images to the Camera ................................ |
47 |
Checking and Modifying the Camera Settings ........................ |
49 |
Other Functions of the Camera Window ................................. |
50 |
2 ImageBrowser Software User Guide

Table of Contents (2/2)
Chapter 6 Using Supplementary Features |
|
Creating Images for E-mail ...................................................... |
51 |
Exporting Images .................................................................... |
53 |
Running Slide Shows ............................................................... |
55 |
Adding Sounds to Images ........................................................ |
58 |
Saving the “My Camera Settings” to the Camera .................... |
60 |
Printing Images ....................................................................... |
70 |
Printing Images over Multiple Pages ....................................... |
78 |
Sorting Images by Date and Time - TimeTunnel ...................... |
79 |
Playing Movies ........................................................................ |
81 |
Editing Movies (Mac OS X Only ) ............................................. |
82 |
Converting RAW Images ......................................................... |
85 |
Operating the Camera Shutter from a Computer ................... |
89 |
Stitching Panoramic Images with PhotoStitch ......................... |
93 |
3 ImageBrowser Software User Guide
Appendices |
|
Supported File Formats ........................................................... |
94 |
Starting ImageBrowser Automatically (Mac OS X Only) .......... |
95 |
Preventing ImageBrowser from Starting Automatically (Mac OS 9 Only) .. |
96 |
Automation Wizard Feature at Startup (Mac OS 9 Only) ........ |
97 |
Customizing Preferences ....................................................... |
101 |
Setting up Slide Shows on the Camera .................................. |
104 |
Print Settings ......................................................................... |
105 |
Troubleshooting .................................................................... |
107 |
Index |
|
Index ..................................................................................... |
108 |
NOTE
•This guide uses Mac OS X (v10.2) screen shots and procedures in the explanations. The screen shots and procedures may vary slightly if you are using another version of the Mac OS.
•The following terms are used in this guide.
Mac OS X is used for Mac OS X (v10.1/v10.2/v10.3) Mac OS 9 is used for Mac OS 9.0–9.2
Memory card is used for CF cards, SD cards and PC cards.

Chapter 1
Try It! ImageBrowser
Starting ImageBrowser (1/5)
This chapter covers the ImageBrowser basics, such as starting the program, downloading images from the camera and printing images. It begins with the procedures for starting ImageBrowser.
IMPORTANT
•This guide assumes that all the relevant software programs and drivers have been correctly installed on your computer. If you have not yet installed the software, please read the guide supplied with your product and install it.
Starting ImageBrowser with Mac OS X
IMPORTANT
•You can also use this procedure to start ImageBrowser in Mac OS X when using a memory card reader.
1.Use the interface cable to connect the camera to the computer.
Please see the manual supplied with your camera for connection instructions.
Some models cannot connect with the computer unless you set them to a particular mode, such as the Playback mode. As described in the guides for these models, set the camera to the correct mode to transfer data.
2.Close iPhoto or Image Capture if either program starts up.
3.Double-click the [Canon ImageBrowser] icon on the desktop.
ImageBrowser starts.
4 ImageBrowser Software User Guide
Chapter 1
Try It! ImageBrowser
Starting ImageBrowser (2/5)
REFERENCE
•You can also start ImageBrowser automatically without starting iPhoto or Image Capture when you connect the camera to the computer. See the Starting ImageBrowser Automatically (Mac OS X Only) topic in the Appendices for information on this topic.
•Depending on the selections you make during installation, the Canon ImageBrowser icon may not appear on the desktop. In this case, start ImageBrowser by double-clicking on the application using the following sequence.
Locate and open the [Canon Utilities] folder, then open the [ImageBrowser] folder and double-click on the [ImageBrowser] icon.
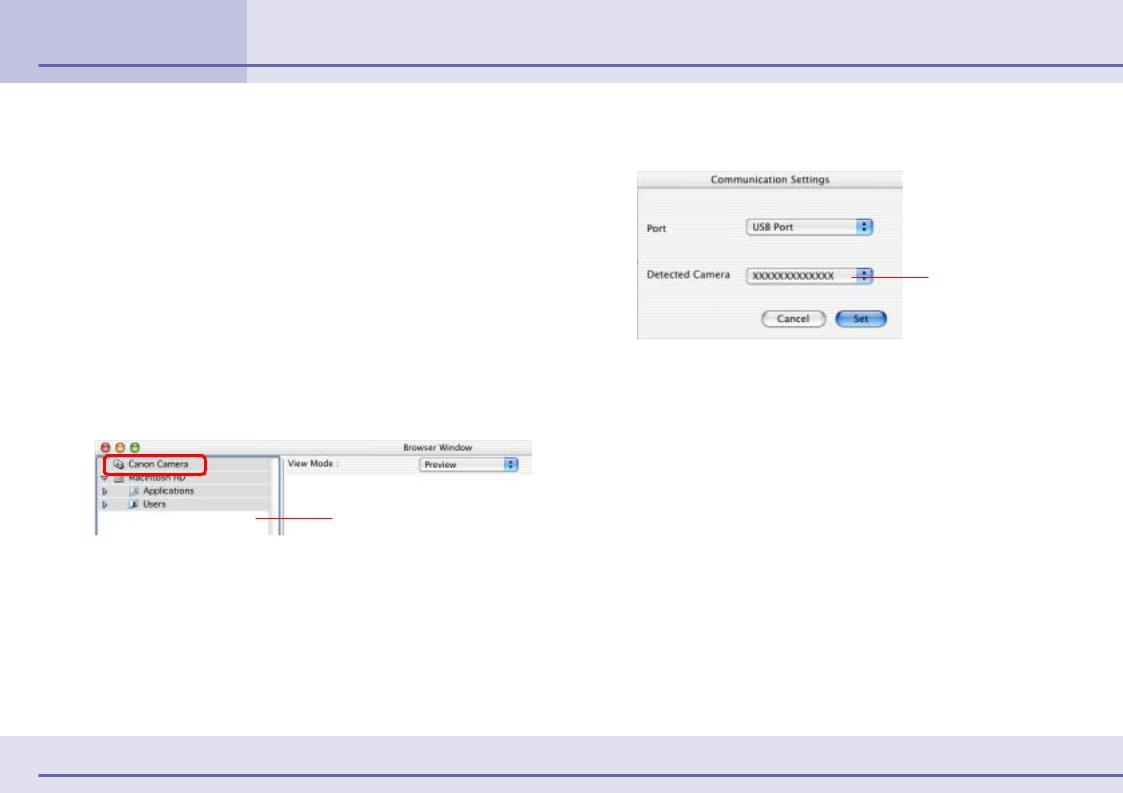
4.Click [Canon Camera] in the Explorer View section.
Explorer View Section
A dialog similar to the one below will open. (This dialog will only appear the first time the program is started.)
Your camera model name or [Canon Camera] and the USB port number (i.e. @1) appears here.
5. Confirm that [USB Port] is selected in the [Port] category and that your camera model name or [Canon Camera] is selected in the [Detected Camera] category and click [Set].
6. Closeup. iPhoto or Image Capture if either program starts
The Camera Window will open and display the images in the camera.
5 ImageBrowser Software User Guide
Chapter 1
Try It! ImageBrowser
Starting ImageBrowser (3/5)
Starting ImageBrowser with Mac OS 9
■Starting ImageBrowser by connecting a camera to your computer
This is the method in which ImageBrowser is started by connecting the camera to the computer and preparing it for communication.
IMPORTANT
•This method can only be used when the camera is connected to the computer with an interface cable. The program may not start automatically with some camera models.
•If you are using a memory card reader, refer to the Starting from the ImageBrowser Icon section of the Starting ImageBrowser (5/5) topic.
REFERENCE
•To stop ImageBrowser from starting automatically, refer to the
Preventing ImageBrowser from Starting Automatically (Mac OS 9 Only) topic of the Appendices.
1. Use the interface cable to connect the camera to the computer.
Please see the manual supplied with your camera for connection instructions.
Some models cannot connect with the computer unless you set them to a particular mode, such as the Playback mode. As described in the guides for these models, set the camera to the correct mode to transfer data.
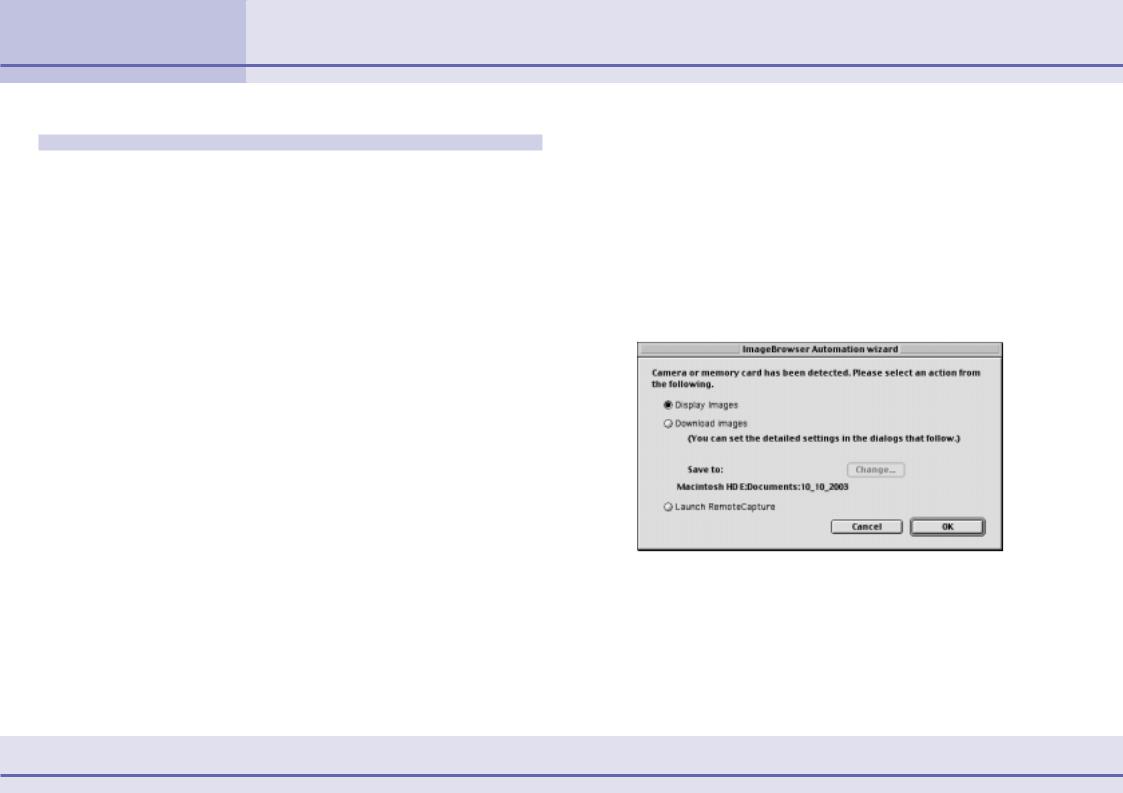
The ImageBrowser Automation Wizard dialog will appear the first time you start ImageBrowser.
This dialog allows you to select the next action for ImageBrowser to automatically perform after it is started.
See the Troubleshooting topic in the Appendices if a dialog like the ImageBrowser Automation Wizard fails to appear.
6 ImageBrowser Software User Guide
Chapter 1
Try It! ImageBrowser
Starting ImageBrowser (4/5)
2. For this example, leave the [Display Images] option selected and click the [OK] button.
REFERENCE
•See the Automation Wizard Feature at Startup (Mac OS 9 Only) topic in the Appendices for information about [Download Images] or [Launch RemoteCapture].
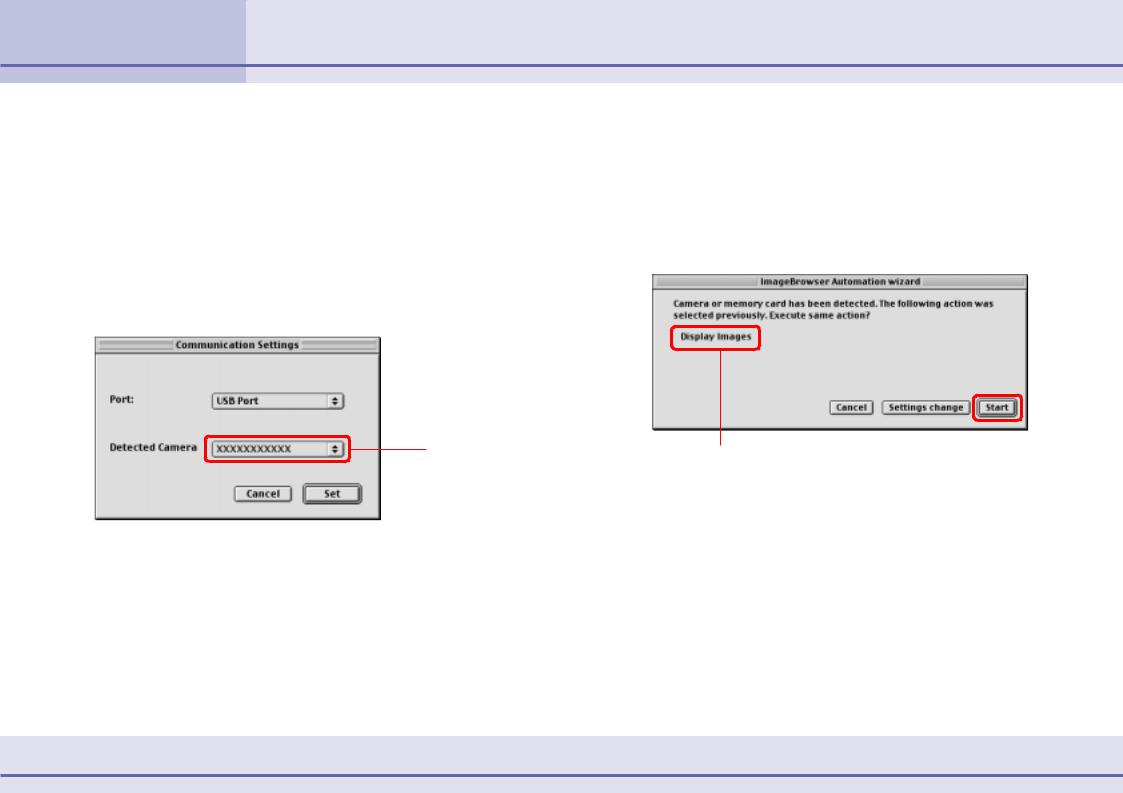
A dialog similar to the following one will appear. (This dialog will only appear the first time the program is started.)
The model name of the camera that you are using appears here.
3. Click [Set].
The Camera window will open and display the camera’s images.
REFERENCE
•Procedures for Subsequent ImageBrowser Startups
When you start ImageBrowser again the next time, the previously selected auto processing option will display in the dialog box. To execute the command, click the [Start] button. To do nothing, click the [Cancel] button and to change the settings, click the [Settings change] button.
The previously selected option will display.
•See the Automation Wizard Feature at Startup (Mac OS 9 Only) topic in the Appendices for information about changing the settings.
IMPORTANT
•The ImageBrowser Automation Wizard only appears when ImageBrowser starts automatically after you connect the camera to the computer with the interface cable. It will not appear when you start ImageBrowser by using the icon as described on the next page.
7 ImageBrowser Software User Guide

Chapter 1
Try It! ImageBrowser
Starting ImageBrowser (5/5)
Starting from the ImageBrowser icon
Use this method to start ImageBrowser if you are using a memory card reader. It may also be used to start ImageBrowser without connecting a camera or to restart it after exiting.
1. Double-click the [Canon ImageBrowser] icon on the desktop.
ImageBrowser starts.
REFERENCE
•Depending on the selections you make during installation, the Canon ImageBrowser icon may not appear on the desktop. In this case, start ImageBrowser by double-clicking on the application using the following sequence.
Locate and open the [Canon Utilities] folder, then open the [ImageBrowser] folder and double-click on the [ImageBrowser] icon.
8 ImageBrowser Software User Guide
Chapter 1
Try It! ImageBrowser
Downloading Images to Your Computer (1/3)
This section explains how to download images from the camera to a computer.
Camera Window
■Mac OS X
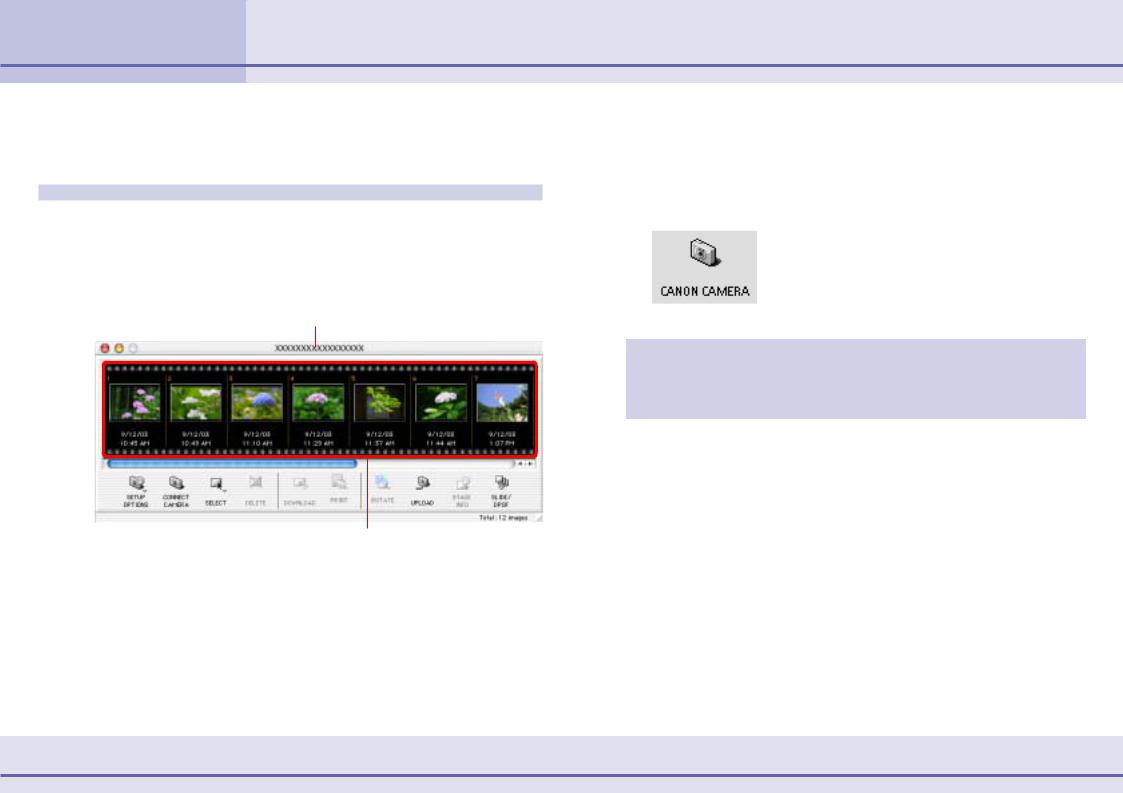
Click [Canon Camera] in the Explorer View section to open the Camera Window.
Your camera model name appears here
Images from the camera display in order
■Mac OS 9
Open the Camera Window by connecting the camera to the computer to start ImageBrowser and selecting [Display Images] or [Download Images] in the ImageBrowser Automation Wizard.
REFERENCE
•The Camera Window does not appear when you start ImageBrowser from the desktop. However, when you connect the camera and make it ready for communication with your computer, the Camera Window appears.
If the Camera Window does not appear even when you prepare the camera for communication, click [Canon Camera] at the bottom left of the Browser Window and select the appropriate port and camera model.
If you are using a memory card reader, open the memory card that appears in the Explorer View section and double-click the [DCIM] folder.
9 ImageBrowser Software User Guide
Chapter 1
Try It! ImageBrowser
Downloading Images to Your Computer (2/3)
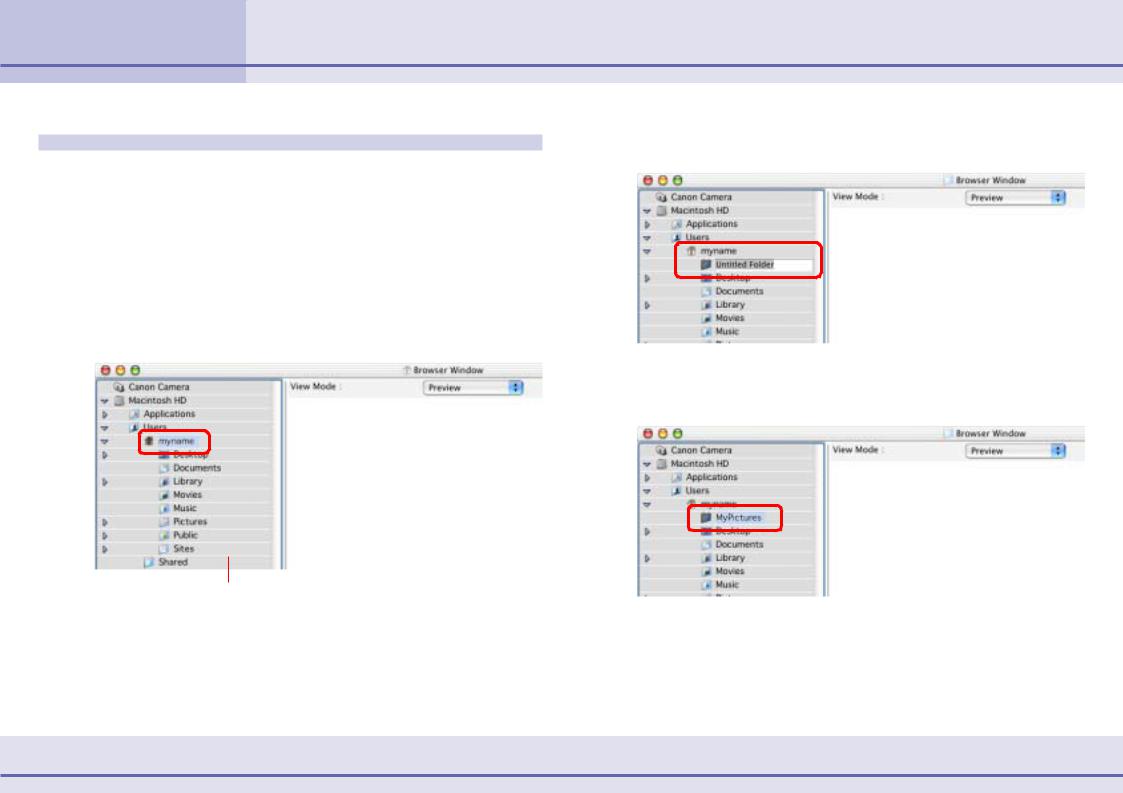
Creating a destination folder |
3. |
|
|
Let’s begin with how to create a new folder to use as the |
|
|
destination folder for images imported from the camera. |
|
1. |
Click the Browser Window to bring it to the front. |
|
2. |
Select [Users] on the startup disk and [your user log-in |
|
name].
New folders are created on the disk that you select here.
Browser Window
4.
Browser Area
Explorer View Section
The disks available to your computer display in the Explorer View area.
REFERENCE
•With Mac OS 9, select [Macintosh HD] in the Explorer View section.
On the [File] menu, click [New Folder].
A new folder is created.
Input a new folder name and press the [return] key.
This provides the new folder with the specified name.
10 ImageBrowser Software User Guide
Chapter 1
Try It! ImageBrowser
Downloading Images to Your Computer (3/3)
Importing Images to Your Computer
Use the following procedure to import (copy) images to the newly created folder on your computer.
1. Click the Camera Window to bring it to the front.
2. Click the image that you want to import.
A blue frame appears around the image.
REFERENCE
•You can select several images by holding down the [shift] key and clicking the images that you want to copy. If you hold down the [option] and [shift] keys together and click on two images, you can select all the images between them.
3.Click [Download].
The selected images are copied into the folder you just created and small versions (thumbnails) are displayed in the Browser Area of the Browser Window.
Image imported from the camera
Try to import all the images that you want.
Next, let’s try printing.
REFERENCE
•For detailed information on how to use the Camera Window, see Chapter 5.
11 ImageBrowser Software User Guide
Chapter 1
Try It! ImageBrowser
Printing Images (1/2)
This section explains how to print the images downloaded to the folder on a printer.
REFERENCE
•Images recorded in the Adobe RGB color space will appear unsaturated when printed using PhotoRecord. Color space settings are only available on select camera models.
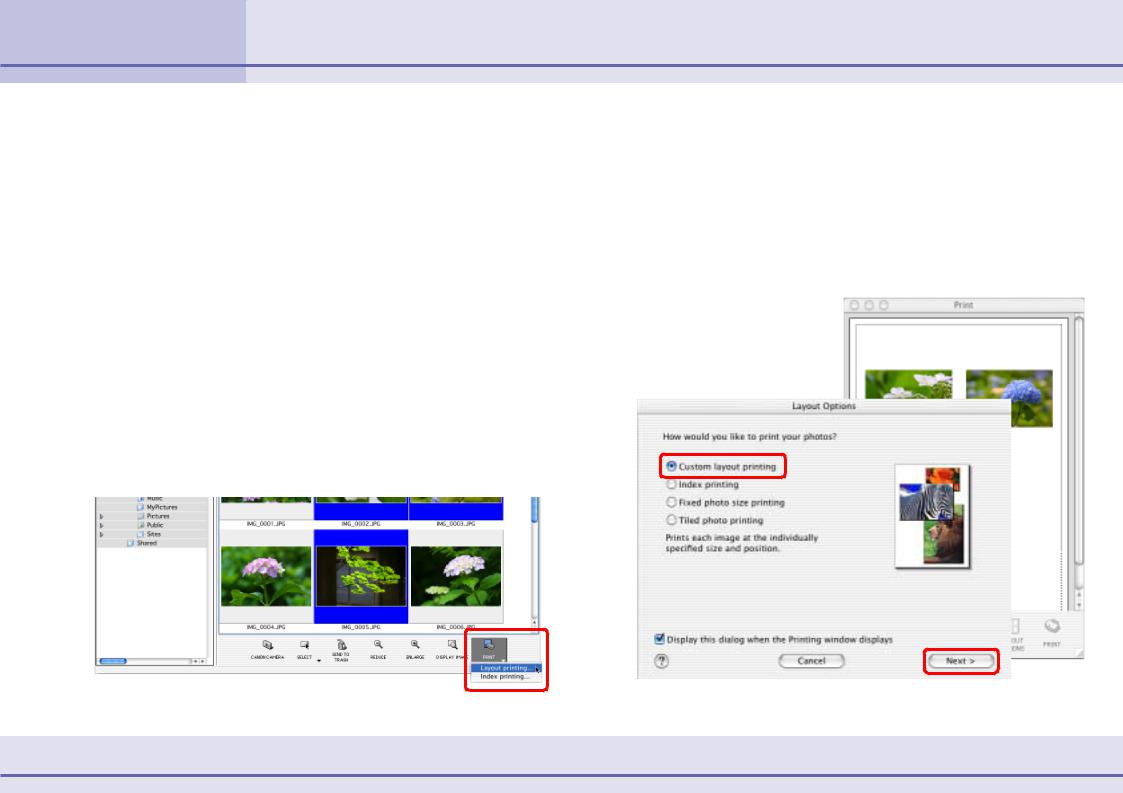
1.Click the image you want to print.
A blue frame appears around the image.
REFERENCE
•You can select several images by holding down the [shift] key and clicking the images that you want to print. If you hold down the [option] and [shift] keys together and click on two images, you can select all the images between them.
2.Click [Print] and select [Layout Printing] from the displayed menu.
The Layout Options dialog and Print window open.
The selected images are automatically laid out in the Print window. You can select a layout option in the Layout Options dialog. For the moment, just print the images without making any changes.
3. In the Layout Options dialog, leave the [Custom layout printing] option selected and click [Next].
Print Window
Layout Options Dialog
12 ImageBrowser Software User Guide

Chapter 1
Try It! ImageBrowser
Printing Images (2/2)
4.
5.
When the Page Setup dialog box appears, click [OK].
The Layout Options dialog closes.
In the Print window, click [Print].
The Print Settings dialog box appears. Select the print options that you want and start printing.
REFERENCE
•You cannot click [Print] in the Print window while the Layout Options dialog is open.
•For details on print operations, see the Printing Images section in Chapter 6.
13 ImageBrowser Software User Guide
Chapter 1
Try It! ImageBrowser
Supplementary Information
We recommend that you memorize the following information before you begin using ImageBrowser.
If You Have a Problem
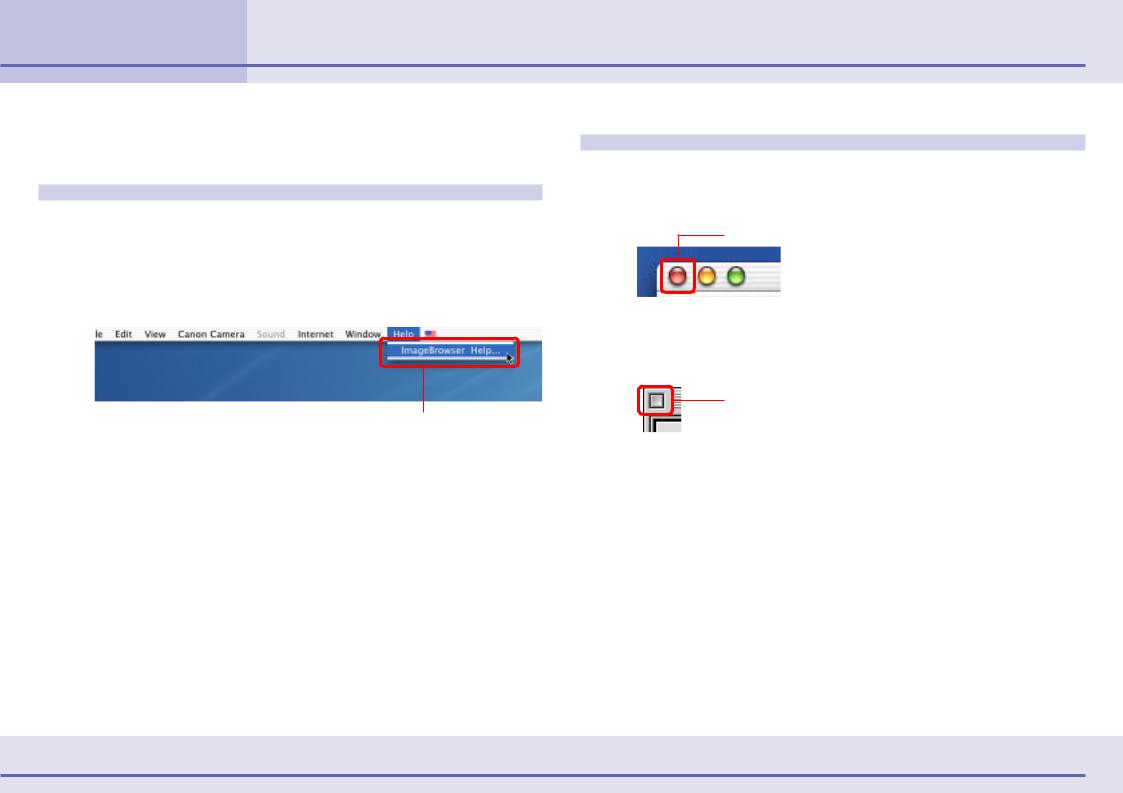
ImageBrowser comes with a Help file. Use it when you want to learn how to do an operation, or when you want to know about the features of the application.
You can access Help by clicking [ImageBrowser Help] on the [Help] menu.
Displays Help
Exiting ImageBrowser
With Mac OS X, you can exit ImageBrowser by clicking [Quit ImageBrowser] from the [ImageBrowser] menu. Alternatively, click the red button in the Browser Window.
Close Button
With Mac OS 9, you can exit ImageBrowser by clicking [Quit] on the [File] menu. Alternatively, click the Close Box in the Browser Window.
Close Box
14 ImageBrowser Software User Guide

Chapter 2
What is ImageBrowser?
What Can ImageBrowser Do? (1/2)
This chapter explains the various basic skills required to master ImageBrowser. Let’s begin with an overview of the main features of ImageBrowser.
Connect the camera to a computer to:
•View an index of the images from the camera on the computer monitor.
•Download images from the camera to the computer.
•View information about images stored in the camera, such as the shooting date and camera settings.
•Use your computer to set up slide shows or DPOF print settings (not available on some models).
•Save computer images onto your camera.
•Operate the shutter of a camera connected to a computer via an interface cable to take pictures remotely. Or to perform interval timer shooting after specifying an interval and the number of images to be taken (only on models supporting remote shooting).
•Convert RAW format images (change them to the TIFF or JPEG format and resave them). Adjust the brightness, contrast, color and other settings as you convert them. Some camera models do not support RAW images.
Use the file management features to:
•Categorize, sort and manage image files on your computer with easy procedures.
•Move or copy images.
•Perform simple editing such as cropping images or adjusting their colors.
•Run a slide show displaying the images in sequence in fullscreen mode.
•Use the TimeTunnel feature to display images in a tunnel-like arrangement in the order of their shooting dates.
•Create and edit movies, adding various effects: link movies and still images, superimpose titles and other text, and add background music (supported by Mac OS X only).
Use the My Camera Settings function to:
•Save the My Camera Settings in the computer to the camera or vice versa.
•Manage newly created image and sound files as My Camera Settings.
REFERENCE
•The start-up image, start-up sound, shutter sound, operation sound and self-timer sound are collectively called the “My Camera Settings.”
•The Canon CD-ROM supplied with your product contains several prepared My Camera Settings files. These files are automatically copied to your computer when you install ImageBrowser.
15 ImageBrowser Software User Guide

Chapter 2
What is ImageBrowser?
What Can ImageBrowser Do? (2/2)
By using other applications:
ImageBrowser gives you additional power when you use it together with the following applications. (You can start these applications from within ImageBrowser.)
■PhotoStitch
•You can stitch multiple images (which were split and shot individually using functions like the camera's Stitch Assist mode) together to form a single, large size, panoramic picture.
•You can stitch images horizontally or vertically or in a matrix format.
•When you shoot the surroundings in 360 degrees, you can later stitch the images to form a 360-degree cylindrical shape. By saving this stitched image in QuickTime VR format, you can then get a virtual view of the various parts of the image.
16 ImageBrowser Software User Guide
Chapter 2
What is ImageBrowser?
Storing Images
What happens to the files you import, move or copy with ImageBrowser?
Where are images stored?
You can use the following procedure to locate images.
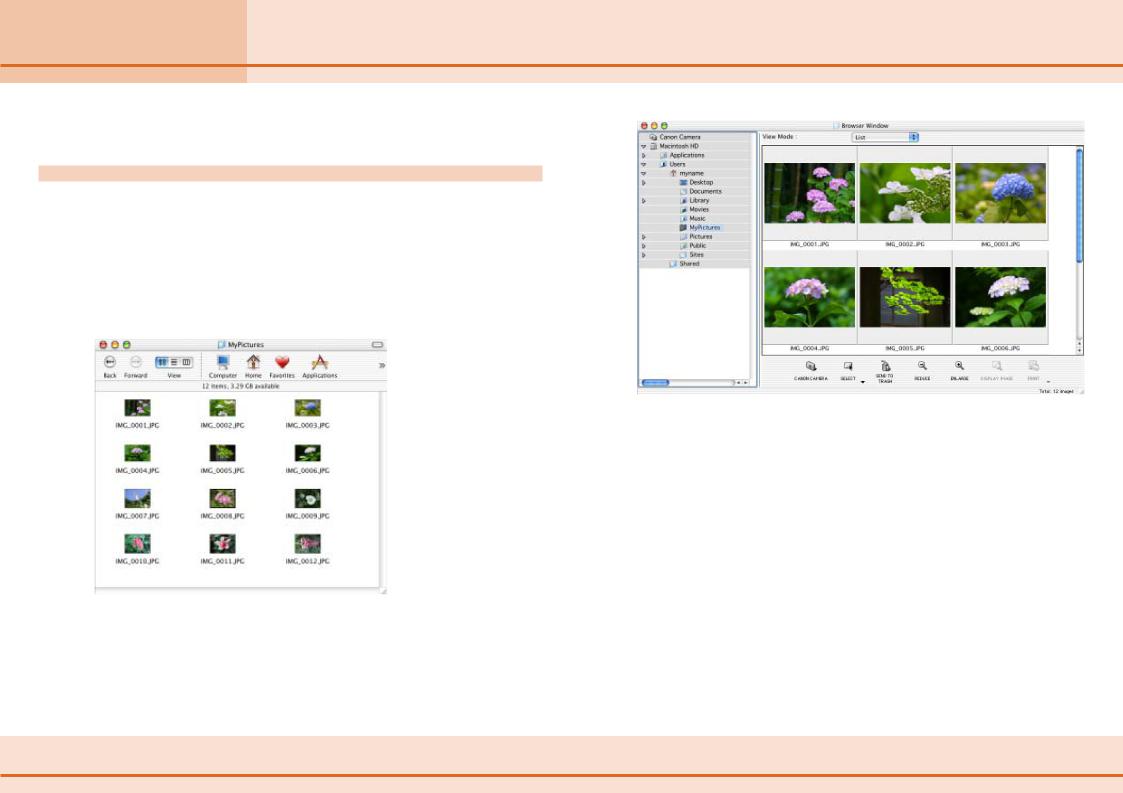
1. In the Finder, double-click the disk containing the folder you created earlier.
2. Double-click the folder that you created.
Image files appear in the folder as shown below.
However, when you select [My Pictures] from the Browser Window, images are displayed as follows:
As you can see, they have exactly the same names. Thus, the images displayed in the Browser Area of ImageBrowser are actually the files in the folder that you selected above. When you move or copy images using
ImageBrowser, files are moved or copied accordingly in the Finder.
17 ImageBrowser Software User Guide

Chapter 2
What is ImageBrowser?
Understanding the Browser Window
This section describes the various parts of the Browser Window display.
Explorer View Section
Displays the disks and folders that you can use on your computer.
If you click the disclosure triangle on the left edge of the display, you can switch between collapsing and expanding the contents of that folder.
You can drag this line to change the position of the boundary between the Explorer View Section and the Browser Area.
REFERENCE
•Images recorded in the Adobe RGB color space will appear unsaturated when displayed in ImageBrowser. Color space settings are only available on select camera models.
Control Panel
This area contains buttons that allow you to perform a variety of functions.
Browser Area
This is the area where thumbnails of images in the selected folder are displayed.
Image Name
This is where the file name of each individual image is displayed.
You can drag this part of the frame to change the size of the Browser Window.
18 ImageBrowser Software User Guide

Chapter 2
What is ImageBrowser?
Changing the Browser Window Display (1/3)
You can change the way the Browser Window displays information to make it easier to use. This section describes how to do this.
Changing the size of thumbnails
By clicking  or
or  you can change the size of the thumbnails displayed in the Browser Area.
19 ImageBrowser Software User Guide
Chapter 2
What is ImageBrowser?
Changing the Browser Window Display (2/3)
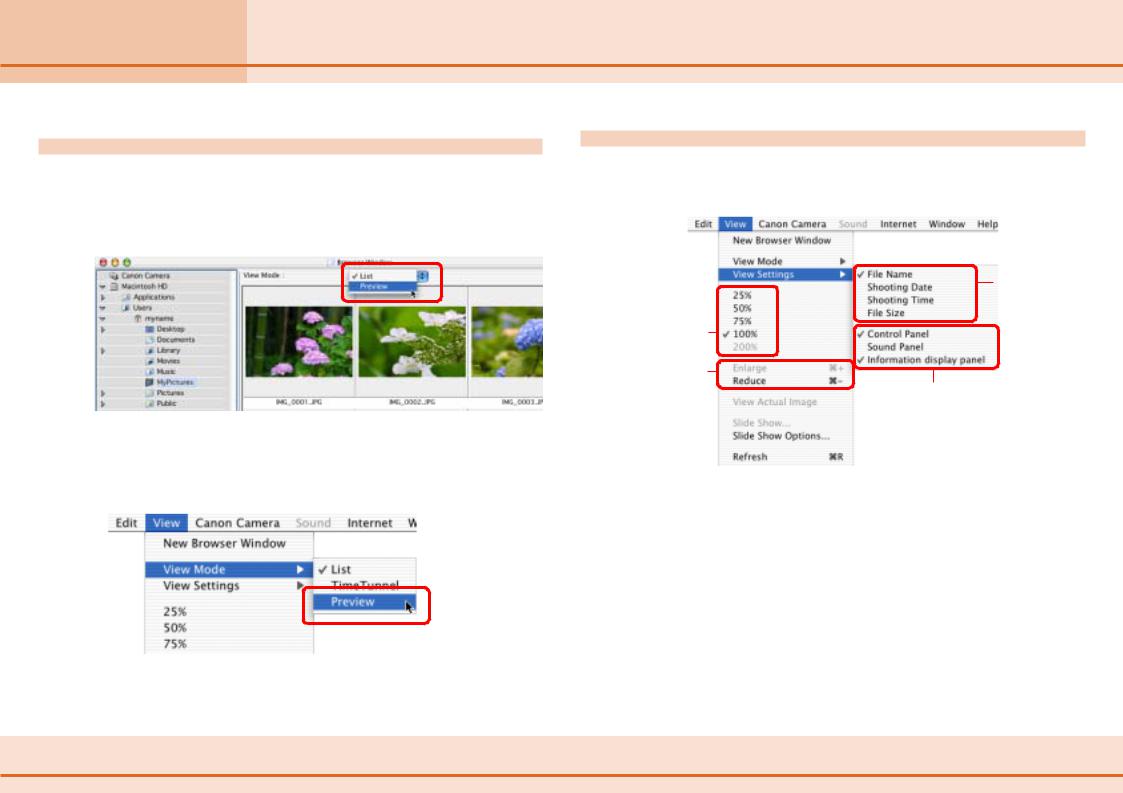
Changing the Display Mode
If you select [Preview] in the [View Mode] list box at the top of the Browser Window, you can display a larger preview version of an image above the thumbnails. To stop displaying the preview image, change the [View Mode] list box back to [List].
REFERENCE
•You can also select the preview mode by clicking the [View] menu and selecting [View Mode], followed by [Preview].
Changing the Display Method
You can use the View menu to fine-tune the Browser Window display settings.
Allows you to enlarge and reduce the size of thumbnails.
Allows you to select the size of thumbnails.
REFERENCE
Allows you to specify the information displayed under the thumbnail.
Control Panel
Allows you to hide or display the control panel in the lower part of the Browser Area.
Sound Panel
Allows you to hide or display the sound panel. This panel allows you to record and play back voice messages.
Information Display Panel
Shows/hides comments added to images, the histogram (graph showing the distribution of brightness data) and shooting information.
•The Information display panel can be selected when the display mode is set to Preview.
20 ImageBrowser Software User Guide
Chapter 2
What is ImageBrowser?
Changing the Browser Window Display (3/3)
For example, you can display the Browser Window as follows:
Preview Image Display Area
Comments
Histogram
(graph showing the distribution of brightness data)
Shooting Information
You can change the preview image size by dragging here.
The shooting date is displayed as well as the file name.
Control Panel |
Sound Panel |
21 ImageBrowser Software User Guide
Chapter 2
What is ImageBrowser?
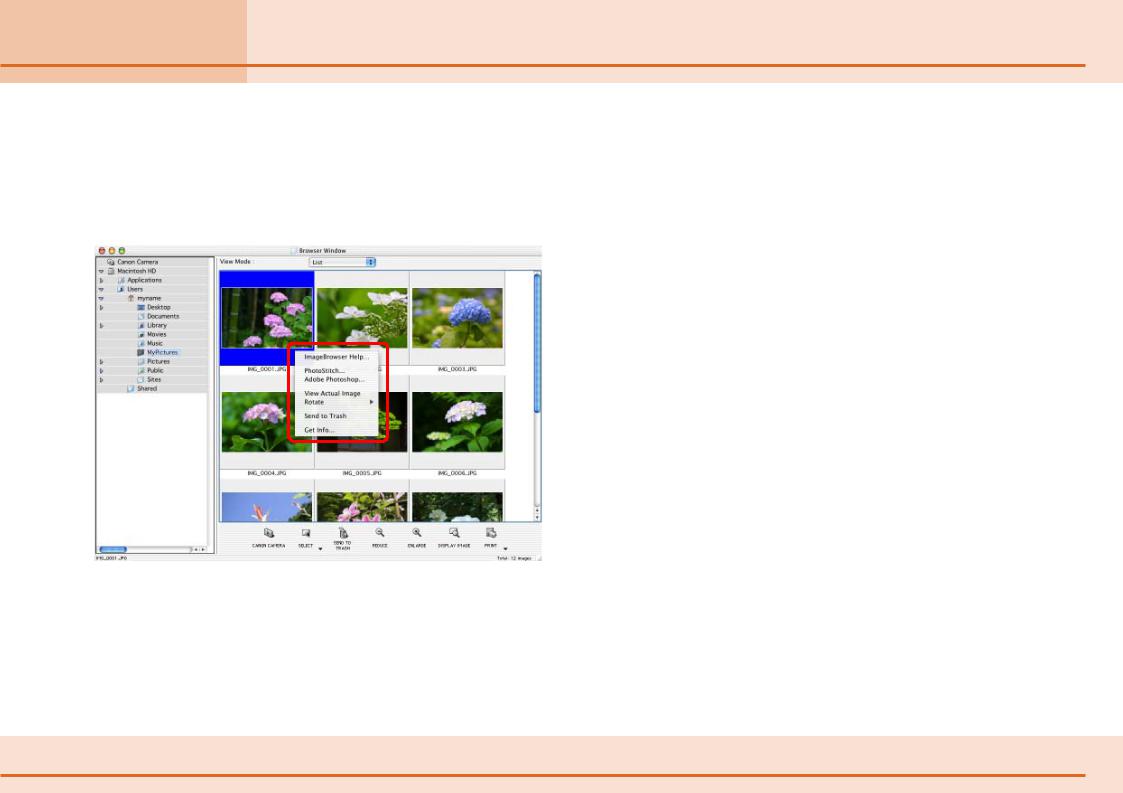
Using Contextual Menus
When you hold down the [control] key and click the mouse button, a menu is displayed. This is a contextual menu.
In ImageBrowser, you can access many useful functions through contextual menus.
For example, when you hold down the [control] key and click an image, the following contextual menu appears.
A contextual menu is, as its name implies, a menu whose options vary according to the context. It is a collection of the most commonly used buttons and commands that apply to a given situation.
Contextual menus allow you to use ImageBrowser more efficiently. When you feel comfortable with ImageBrowser, try using the contextual menus in different situations and you will be impressed with their convenience.
Note that, in general, this manual does not cover operations using contextual menus. (This is because explaining the many menu variations would take too many pages.)
Nevertheless, a full explanation is provided on the corresponding page when a contextual menu is used in a procedure.
22 ImageBrowser Software User Guide
Chapter 3
Managing Images
Moving and Copying Images (1/3)
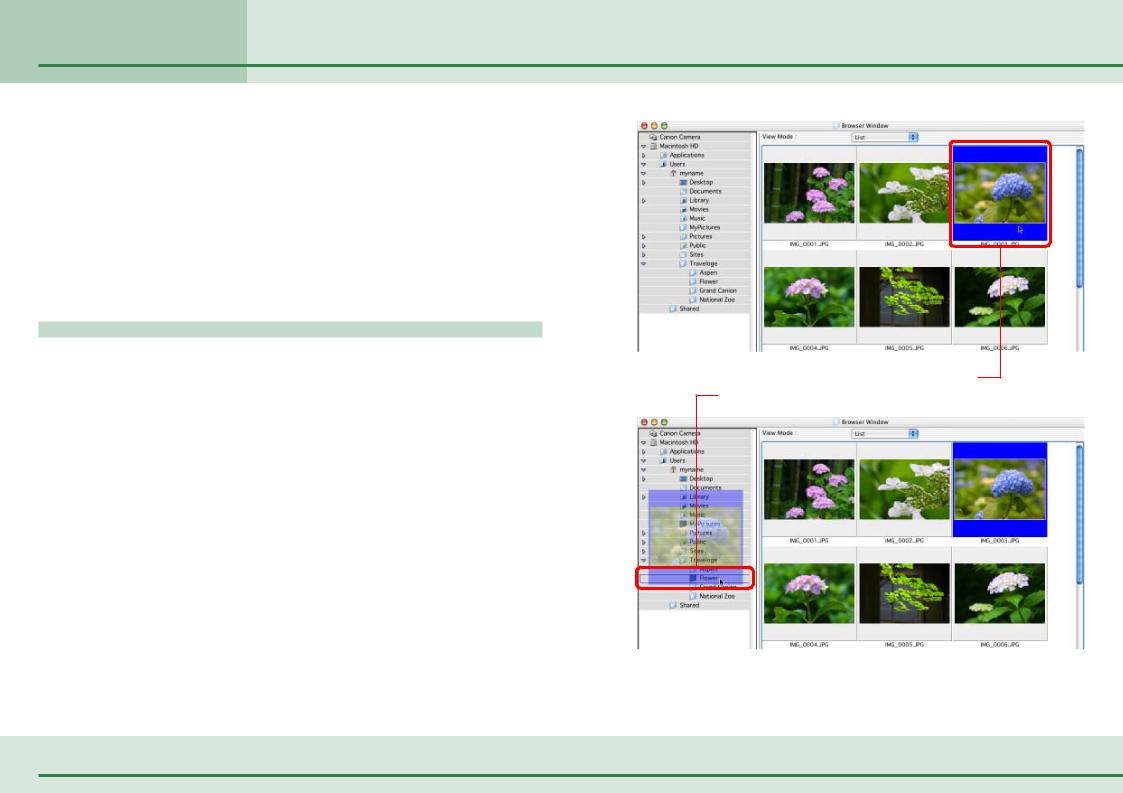
This section describes how to move and copy images between folders.
REFERENCE
•Moving or copying images in ImageBrowser affects the actual location in which those images are stored on your computer.
•When you use the Finder to modify files or folders while ImageBrowser is open, those changes might not be reflected in the ImageBrowser window. To remedy this, click [Refresh] on the [View] menu.
Moving or copying in the Explorer View Section
When you want to move an image, you first need to display it in the Browser Area. Then, drag that image to the destination folder in the Explorer View Section.
When you want to copy an image, proceed as above, but press and hold the [option] key before releasing the mouse button to drop the image.
A Drag the image that you want to move. B Drop it at the desired location.
23 ImageBrowser Software User Guide

Chapter 3
Managing Images
Moving and Copying Images (2/3)
Moving or copying images using two Browser Windows
You can display a second Browser Window by clicking [New Browser Window] on the [View] menu.
You can move or copy images between folders by displaying different folders in two Browser Windows, then dragging images from one Browser Window to another.
The First Browser Window
REFERENCE
•To copy an image, proceed as below, but press and hold the [option] key before releasing the mouse button to drop the image.
•Up to two Browser Windows can be open simultaneously.
A Drag the image that you want to move.
B Drop it at the desired location.
The Second Browser Window
24 ImageBrowser Software User Guide

Chapter 3
Managing Images
Moving and Copying Images (3/3)
More ways of moving and copying images
■Moving or copying multiple images
You can select several images that you want to move or copy all at once. While holding down the [shift] key, or the [option] + [shift] keys, click the images you want to move or copy. After selecting the images, you can move or copy all of them at the same time using the same basic procedure as explained in the previous page.
■Moving or copying a complete folder
Instead of selecting individual images, you can select an entire folder for moving or copying. Drag the folder that you have chosen in the Explorer View Section, and drop it into another folder.
■Copying to a camera
You can copy images to a camera. When you open the Camera Window and drag an image from the Browser Area into the Camera Window, the image is copied to the camera. For details on this feature, see the Adding Computer Images to the Camera section in Chapter 5.
REFERENCE
•You can select all the images at once by clicking  (Select) at the bottom of the Browser Window and choosing [Select All] from the next menu. If you choose [Deselect All], you can deselect all selected images.
•You can also select/deselect all images by clicking the [Edit] menu and selecting [Select All] or [Deselect All].
25 ImageBrowser Software User Guide
Chapter 3
Managing Images
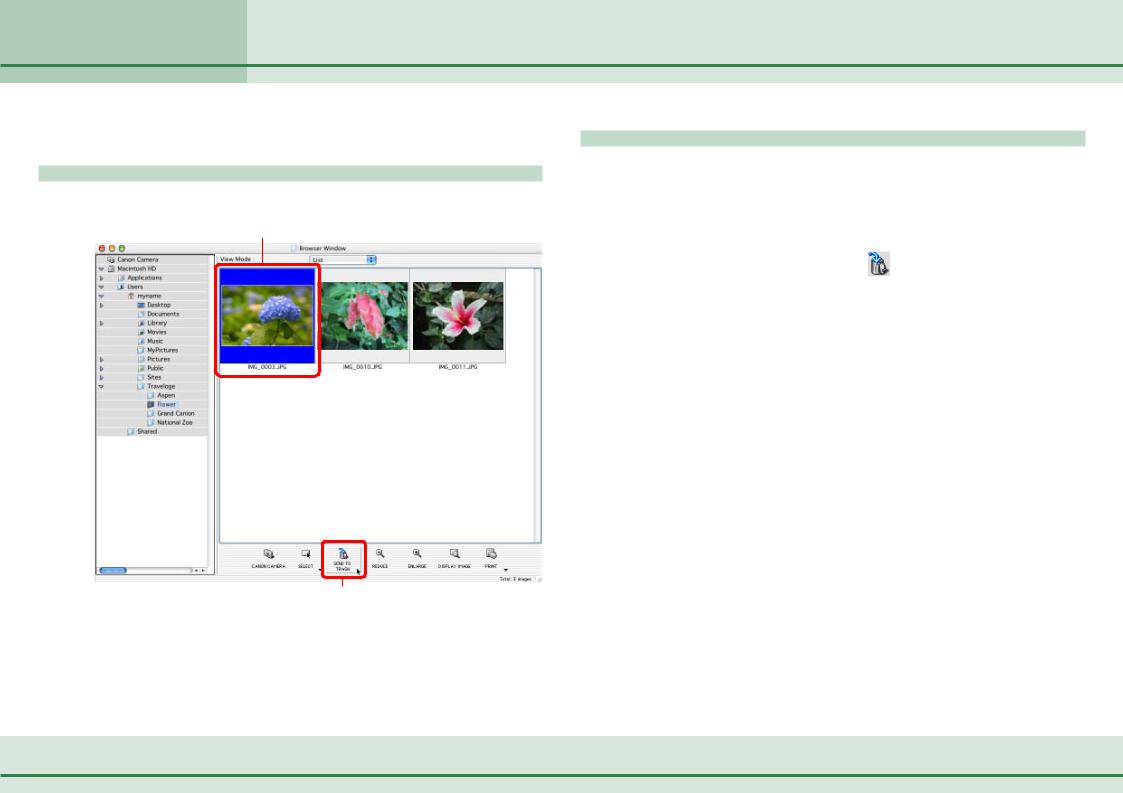
Deleting Images
This section describes how to delete images that you no longer need.
How to delete an image
Click the image that you want to delete and click  (Send to Trash).
REFERENCE |
B Click here. |
|
•You can recover images that you accidentally delete. Doubleclick the Trash icon to open it, and drag the image files from the Trash to the original folder on the desktop (not the Explorer View section).
More ways of deleting images
■Deleting multiple images
You can select several images at once by holding down the [shift] key, or the [option] + [shift] keys, and clicking the images
you want to delete. When you have selected all the images that you want to delete, clicking (Send to Trash) deletes all the selected images at once.
■Deleting images from the File menu
Click an image. Then, click [Send to Trash] on the [File] menu to delete the image.
REFERENCE
•After taking these steps, you can completely delete the images from the computer by clicking the [Finder] menu in Mac OS X or the [Special] menu in Mac OS 9 and selecting [Empty Trash].
26 ImageBrowser Software User Guide
Chapter 3
Managing Images
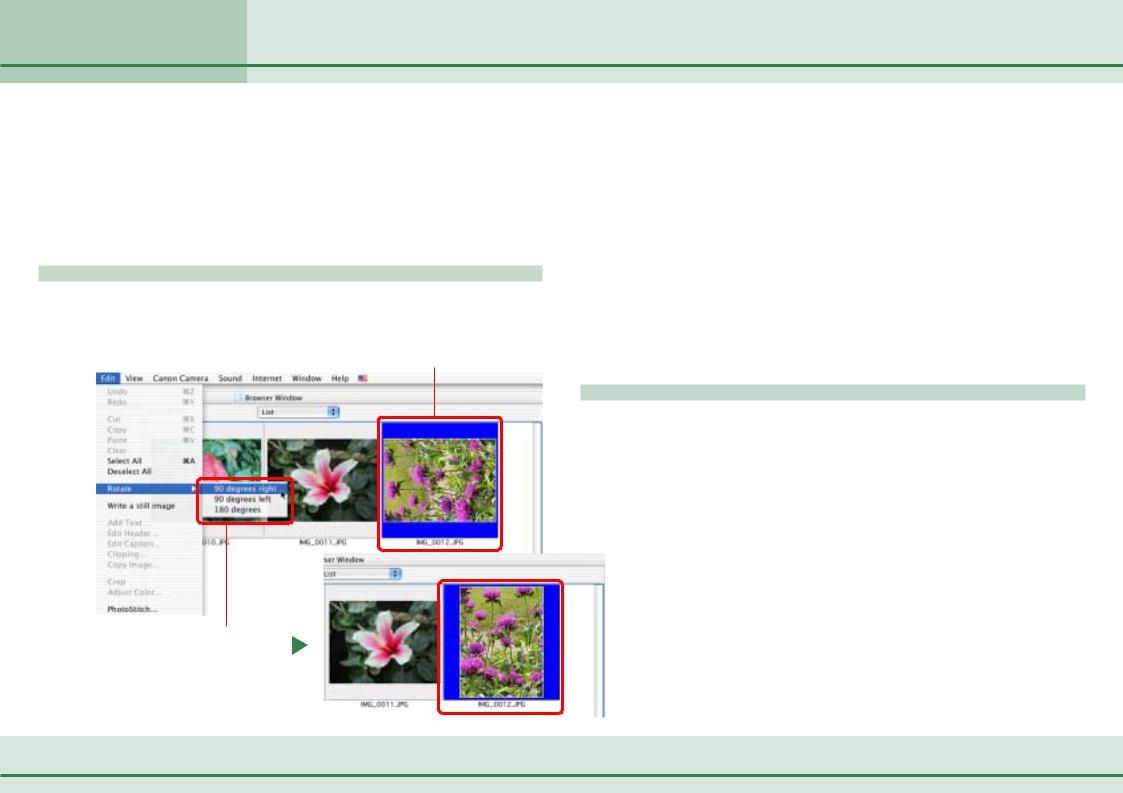
Rotating Images
This section describes how to rotate images to the desired orientation. This is useful for images taken by holding the camera vertically.
IMPORTANT
•When you rotate an image in ImageBrowser, the actual image file on the disk is over-written with the rotated image.
How to rotate an image
Click the image that you want to rotate. On the [Edit] menu, point to [Rotate] and click the desired rotation angle.
A Click the image that you want to rotate.
B Click a rotation angle.
REFERENCE
•[90 degrees right] is a clockwise rotation and [90 degrees left] is a counterclockwise rotation.
•There are two settings for rotating images. The default setting rotates the original image.
•You can also set it to display the image in both the original and rotated positions. Click the [ImageBrowser] menu (in Mac OS 9, click the [Edit] menu), select [Preferences] and [Browser Window], and click to place a check mark beside [Retain original when rotating JPEG images].
•When you rotate an image in a format other than JPEG, only the rotated image displays. The original image file is overwritten.
More ways of rotating images
■Rotating multiple images
You can select several images at once by holding down the [shift] key, or the [option] + [shift] keys, and clicking the images you want to rotate. When you have selected all the images that you want to rotate, perform the rotation operation and all the selected images are rotated at the same time.
27 ImageBrowser Software User Guide

Chapter 3
Managing Images
Duplicating Images
This section describes how to duplicate images (create an exact copy of an image file).
How to duplicate an image
Click an image. On the [File] menu, click [Duplicate].
A Click the image that you want to duplicate.
B Click here.
More ways of duplicating images
■Duplicating multiple images
You can select several images at once by holding down the [shift] key, or the [option] + [shift] keys, and clicking the images that you want to duplicate. When you have selected all the images that you want to duplicate, perform the duplication operation and all the selected images are duplicated at once.
■Duplicating a complete folder
Instead of duplicating single images, you can select an entire folder for duplication. Select the folder in the Explorer View Section (make sure no images are selected in the Browser Area), and on the [File] menu click [Duplicate]. The complete folder is duplicated.
The duplicated image
28 ImageBrowser Software User Guide
Chapter 3
Managing Images
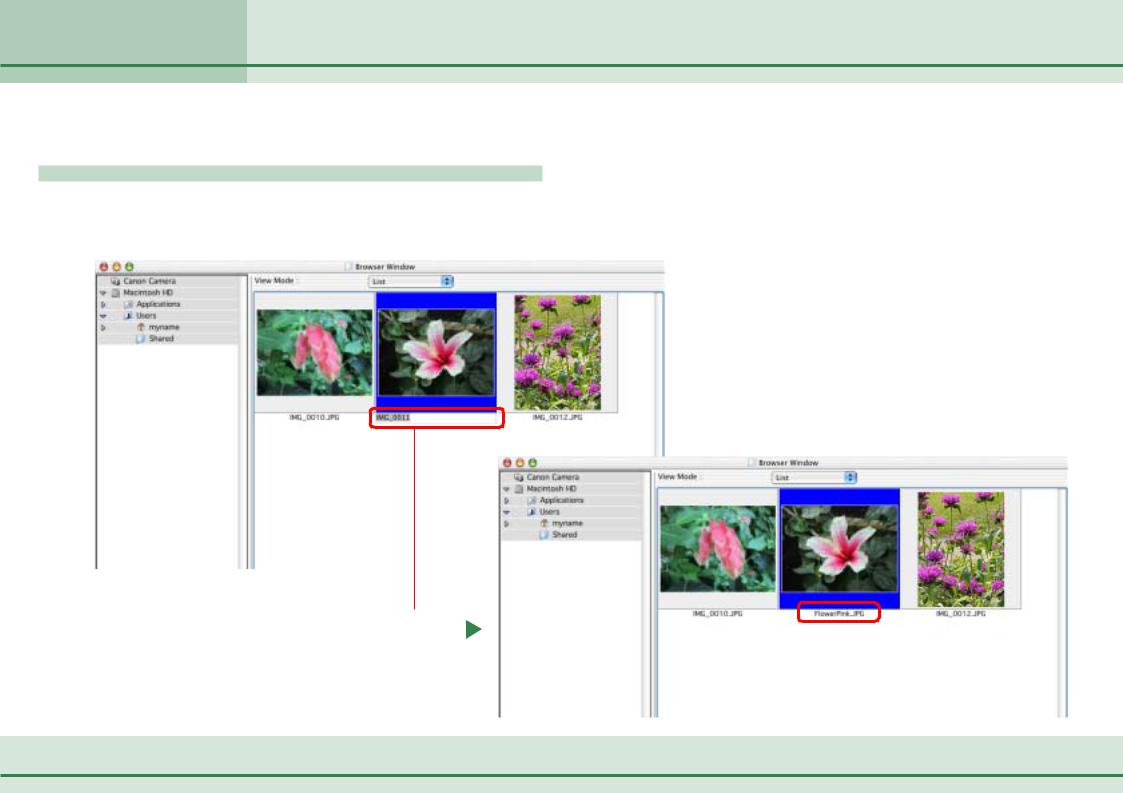
Renaming Images
This section describes how to rename images.
How to rename an image
Click the name of the image that you want to rename. After a moment you can type the new name of the image. Type the new name and press [return].
IMPORTANT
•Please do not change the file name extension, which identifies the file type. If you change this part of the name, the image may cease to display in ImageBrowser. The file name extension, such as [.JPG], is the last part of the file name and is preceded by a period.
Click here, and wait a moment, then type the new name and press [return].
29 ImageBrowser Software User Guide
Chapter 3
Managing Images
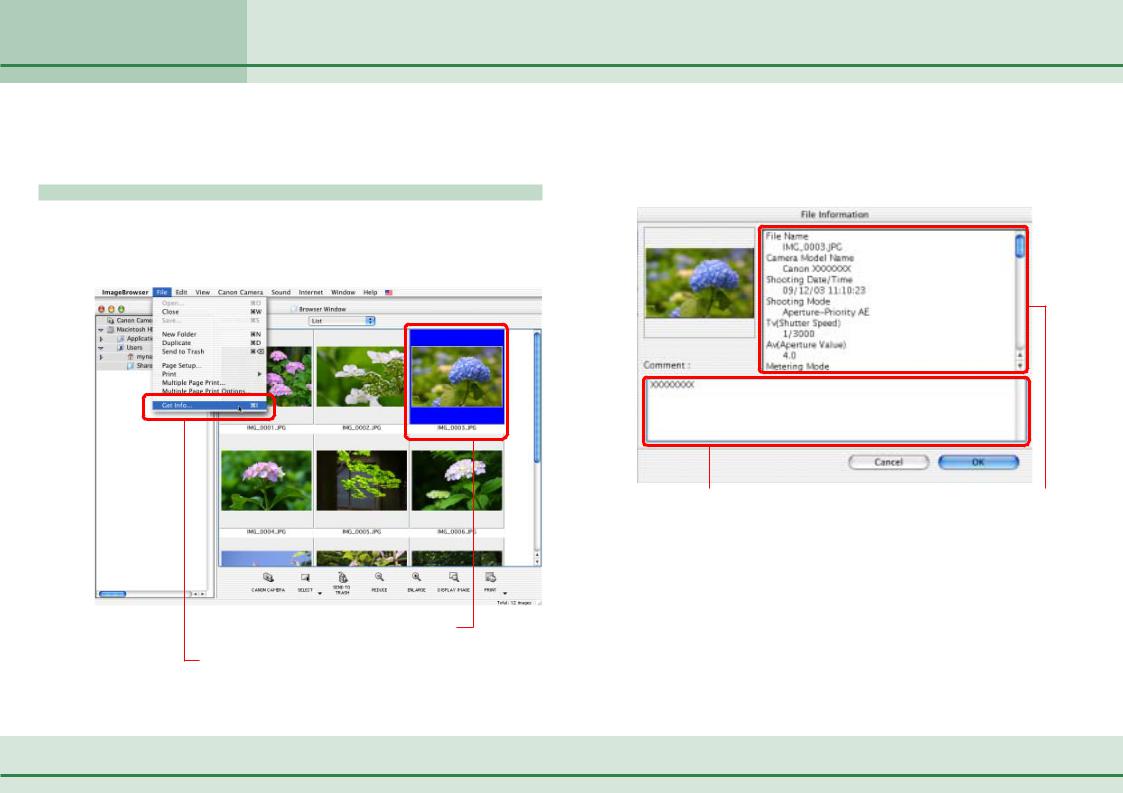
Viewing Image Information
You can click images and look at the various shooting information about them.
How to view image information
In the Browser Area, click an image. Then, on the [File] menu, click [Get Info] to open the File Information dialog box for that image.
The File Information dialog box contains such information as the camera model, the date the image was shot, and the camera settings at the time of shooting. To close the File Information dialog box, click [OK].
AClick the image for which you want to view information.
B Click here.
You can input a |
Information displayed here |
comment here. |
depends on the camera used. |
REFERENCE
•The file information also displays below the histogram when the Browser Area display mode is set to [Preview].
•When an image taken by the camera is modified and saved by another program, information about the camera settings might be lost.
30 ImageBrowser Software User Guide
Loading...