


ENGLISH
ESPAÑOL
Canon Inkjet Business Printer
Impresora de inyección de tinta para empresas Canon


 series
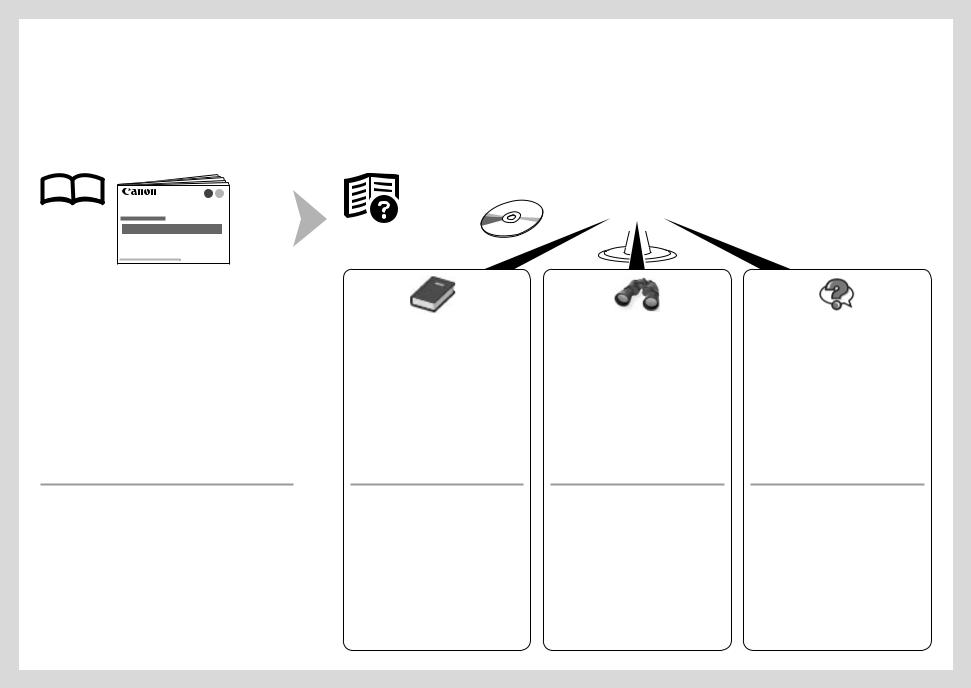
Getting Started
Read Me First
Guía de inicio
Léame en primer lugar
Make sure to read this manual before using the printer. Please keep it in hand for future reference.
Asegúrese de leer este manual antes de utilizar la impresora. Consérvelo a mano para utilizarlo como referencia en el futuro.
On-screen manuals can be viewed on a computer. They are included on the Setup CD-ROM and are installed during the software installation. Some parts of the manual may be displayed in English. For details on opening the on-screen manuals, refer to page 20.
Los manuales en pantalla se pueden ver en un ordenador. Se incluyen en el CD-ROM de instalación (Setup CD-ROM) y se instalan durante el proceso de instalación del software. Algunas partes del manual pueden aparecer en inglés. Para obtener más información sobre cómo abrir los manuales en pantalla, consulte la página 20.
Getting Started
(this manual)
Describes how to set up and use your printer.
|
|
|
|
|
|
|
|
|
|
|
|
|
|
|
|
|
|
|
|
|
|
|
|
|
|
|
|
|
|
|
|
|
|
|
|
|
|
|
|
|
|
|
|
|
|
|
|
|
|
|
|
|
|
|
|
|
|
|
|
|
|
|
|
|
|
Basic Guide |
Advanced Guide |
Troubleshooting |
||||||||
Describes basic operations and media, |
Describes various operating procedures |
Describes troubleshooting tips for |
||||||||
and gives an introduction to other |
to make full use of printer. |
problems you may encounter when using |
||||||||
functions available. |
|
|
|
|
|
|
|
|
|
the printer. |
Guía de inicio
(este manual)
Describe cómo configurar y usar la impresora.
Guía básica
Describe las operaciones básicas y los soportes y ofrece una introducción a otras funciones disponibles.
Guía avanzada
Describe los distintos procedimientos operativos para sacar el máximo provecho de la impresora.
Solución de problemas
Proporciona consejos para solucionar los problemas que puedan surgir al utilizar la impresora.
Model Number: K10362 (iX6520) Número de modelo: K10362 (iX6520)

■ Contents
1Preparation P.2
2Install the Print Head P.5
3Install the Ink Tanks P.8
4Load Paper P.11
5Install the Software P.12
6Application Software P.20
7Try Using the Printer P.22
Print Photos from a Computer P.22
8 Specifications P.24
■Symbols Used in This Document
 Prohibited actions.
Instructions including important information.
•In this guide, Windows 7 operating system is referred to as Windows 7 and Windows Vista operating system as Windows Vista.
•In this guide, the screens are based on Windows 7 Home Premium and Mac OS X v.10.6.x. (Unless noted otherwise, the screens are those of Windows 7.)
•Microsoft is a registered trademark of Microsoft Corporation.
•Windows is a trademark or registered trademark of Microsoft Corporation in the U.S. and/or other countries.
•Windows Vista is a trademark or registered trademark of Microsoft Corporation in the U.S. and/or other countries.
•Internet Explorer is a trademark or registered trademark of Microsoft Corporation in the U.S. and/or other countries.
•Macintosh and Mac are trademarks of Apple Inc., registered in the U.S. and other countries.
•Safari is a trademark of Apple Inc., registered in the U.S. and other countries.
■ Contenido
1Preparativos P.2
2Instalación del cabezal de impresión P.5
3Instalación de los depósitos de tinta P.8
4Carga del papel P.11
5Instalación del software P.12
6Software de aplicación P.20
7Pruebe la impresora P.22
Impresión de fotografías desde un ordenador P.22
8 Especificaciones P.25
■Símbolos utilizados en este documento
 Acciones prohibidas.
Instrucciones que incluyen información importante.
•En esta guía, para referirse al sistema operativo Windows 7 se utiliza el término Windows 7 y para referirse al sistema operativo Windows Vista se utiliza el término Windows Vista.
•Las pantallas de esta guía se basan en Windows 7 Home Premium y Mac OS X v.10.6.x. (A menos que se indique lo contrario, las pantallas serán de Windows 7.)
•Microsoft es una marca comercial registrada de Microsoft Corporation.
•Windows es una marca comercial o una marca comercial registrada de Microsoft Corporation en EE UU y/u otros países.
•Windows Vista es una marca comercial o una marca comercial registrada de Microsoft Corporation en EE UU y/u otros países.
•Internet Explorer es una marca comercial o una marca comercial registrada de Microsoft Corporation en EE UU y/u otros países.
•Macintosh y Mac son marcas comerciales de Apple Inc., registradas en EE UU y en otros países.
•Safari es una marca comercial de Apple Inc., registrada en EE UU y en otros países.
1
Preparativos
Preparation
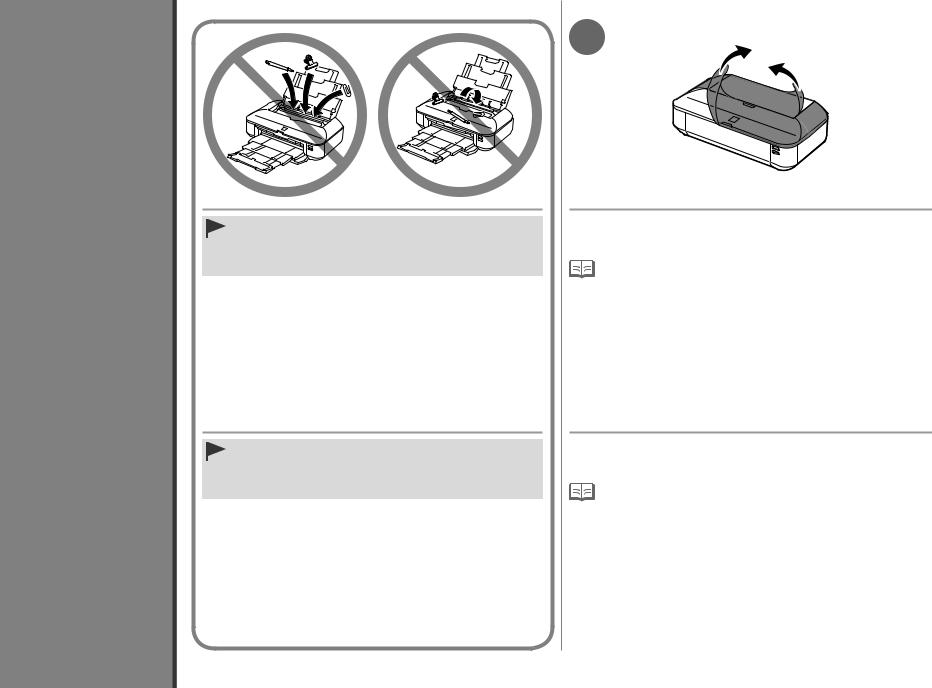
•Do not install the printer where an object may fall on it. In addition, do not place any object on the top of the printer. It may fall into the printer when opening covers, resulting in malfunction.
•No instale la impresora donde le pueda caer algún objeto. Además, no coloque ningún objeto encima de la impresora. Podría caer dentro de la impresora al abrir la cubierta y provocar fallos en el funcionamiento.
1
Remove all orange tape and protective materials from the inside and outside of the printer.
 • The tape and protective materials may differ in shape and position from those shown here.
Retire todas las cintas naranjas y todos los materiales protectores del interior y el exterior de la impresora.
 • La forma y la posición de la cinta y los materiales protectores pueden variar respecto a las que se muestran aquí.
2 |
1 |
2 |
3 |
3 |
4 |
5 |
6 |
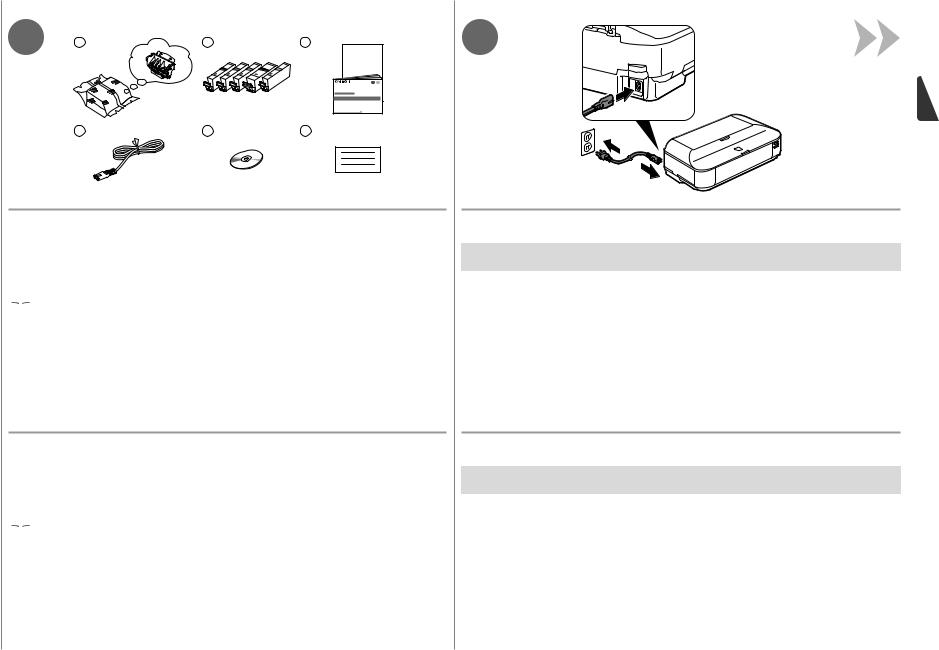
Make sure all the following items are supplied.
1. |
Print Head |
5. |
Setup CD-ROM (containing the drivers, |
2. |
Ink tanks (5: BK, M, C, PGBK, Y) |
|
applications and on-screen manuals) |
3. |
Manuals |
6. |
Other documents |
4. |
Power cord |
|
|
 • A USB cable is necessary to connect the printer with your computer.
Compruebe que no falta ninguno de los elementos siguientes.
1. |
Cabezal de impresión |
5. |
CD-ROM de instalación (Setup CD-ROM) |
|
2. |
Depósitos de tinta (5: BK, M, C, PGBK, Y) |
|
(que contiene los controladores, las |
|
3. |
Manuales |
|
aplicaciones y los manuales en pantalla) |
|
6. |
Otros documentos |
|||
4. |
Cable de alimentación |
|||
|
|
 • Se necesita un cable USB para conectar la impresora al ordenador.
Insert the power cord into the connector on the left side at the back of the printer and into the wall outlet firmly.
 • Do NOT connect the USB cable at this stage.
Introduzca firmemente el cable de alimentación en el conector situado a la izquierda de la parte posterior de la impresora y a la toma de corriente.
 • NO conecte el cable USB en este momento.
4 |
A |
5 |
B |
|
|
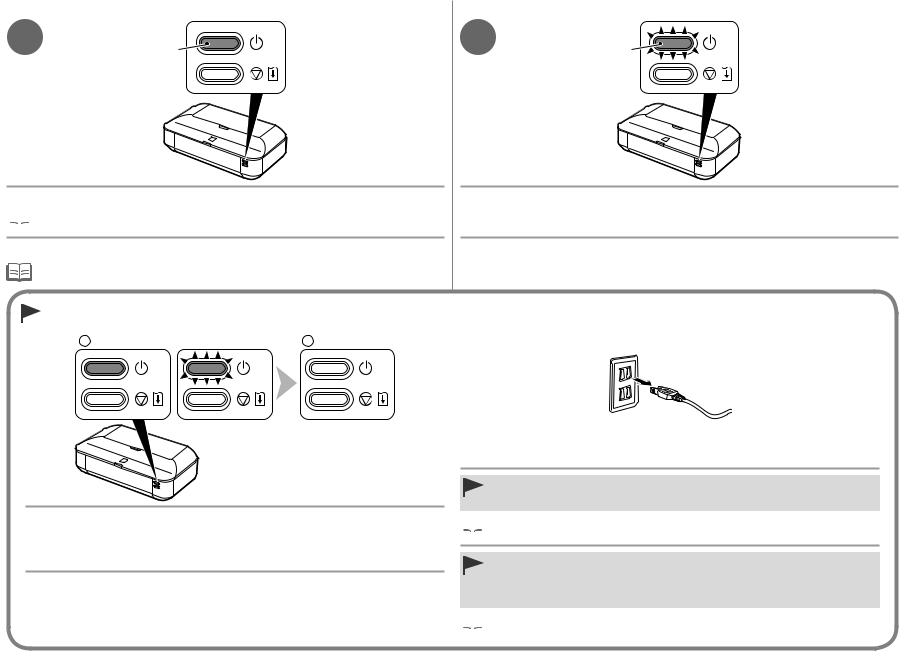
Press the ON button (A) to turn on the printer.
 • It takes about 5 seconds for the ON button to work after the power cord is plugged in.
Pulse el botón ACTIVADO (ON) (A) para encender la impresora.
 • Una vez conectado el cable de corriente, el botón ACTIVADO (ON) tarda unos 5 segundos en ponerse en funcionamiento.
Make sure that the lamp (B) of the ON button lights blue.
Asegúrese de que la luz (B) del botón ACTIVADO (ON) se ilumina en azul.
When it is necessary to turn off the printer Cuando sea necesario desconectar la impresora
1 |
2 |
Be sure to follow the procedure below.
1.Press the ON button to turn off the printer.
2.Make sure that the lamp of the ON button is not lit.
Operating noise may continue for up to 30 seconds until the printer turns off.
Asegúrese de seguir el procedimiento que se explica a continuación.
1.Pulse el botón ACTIVADO (ON) para desconectar la impresora.
2.Asegúrese de que la luz del botón ACTIVADO (ON) no está iluminada.
Hasta que la impresora se apague, 30 segundos como máximo, se puede seguir escuchando el ruido de funcionamiento.
•Before removing the power plug, make sure that the lamp of the ON button is not lit. Removing the power plug while the lamp of the ON button is lit or flashing may cause drying and clogging of the Print Head, resulting in poor printing.
 • The specification of the power cord differs for each country or region.
•Antes de retirar el cable de alimentación, asegúrese de que no esté encendida la luz del botón ACTIVADO (ON). Si se retira el cable de alimentación mientras la luz del botón ACTIVADO (ON) esté encendida o parpadea, los cabezales de impresión se pueden secar y obstruir teniendo como resultado una impresión de mala calidad.
 • Las especificaciones del cable de alimentación varían según el país o la región de uso.

2
Instalación del cabezal de impresión
Install the Print Head
1 |
2 |
3 |
|
C |
A |
B |
|
Open the Front Cover (A). |
Open the Top Cover (B). |
The Print Head Holder (C) moves to the installation |
|
|
|
position. |
|
|
|
If the Print Head Holder does not move, make sure that the |
|
|
|
printer is turned on. For details, refer to to on page 3 in “1 |
|
|
|
Preparation”. |
|
|
|
|
Go to the next page. |
|
|
|
|
Abra la cubierta delantera (A). |
Abra la tapa superior (B). |
El soporte del cabezal de impresión (C) se desplazará |
|
|
|
a la posición de instalación. |
|
|
|
Si el soporte del cabezal de impresión no se mueve, compruebe |
|
|
|
que la impresora está encendida. Para conocer todos los |
|
|
|
detalles, consulte de a en la página 3 de “1 Preparativos”. |
|
|
|
|
Vaya a la siguiente página. |
|
|
|
|

4 |
5 |
6 |
|
F |
G |
D |
E |
|
|
|
Firmly lift the part (D) of the Print Head Lock Lever in the Print Head Holder until it stops.
•Do not touch the inside of the Print Head Holder (E). The printer may not print properly if you touch it.
Remove the Print Head from the silver |
Remove the orange protective cap. |
package. |
|
•Handle the Print Head carefully. Do not drop or apply excessive pressure to it.
•Do not touch the inside (F) or metal parts (G) of the Print Head. The printer may not print properly if you touch them.
•There may be some transparent or light blue ink on the inside of the bag the Print Head comes in, or the inside of the protective cap - this has no effect on print quality. Be careful not to get ink on yourself when handling these items.
Levante firmemente la parte (D) de la palanca de bloqueo del cabezal de impresión del soporte del cabezal de impresión hasta que se detenga.
•No toque el interior del soporte del cabezal de impresión (E). Si se toca, es posible que la impresora no imprima correctamente.
Retire el cabezal de impresión del |
Retire la tapa protectora naranja. |
embalaje plateado. |
|
•Maneje el cabezal de impresión con cuidado. No lo deje caer ni le aplique una presión excesiva.
•No toque el interior (F) ni las piezas metálicas (G) del cabezal de impresión. Si los toca, puede que la impresora no imprima correctamente.
•Puede haber un poco de tinta transparente o de color azul claro dentro de la bolsa en la que viene el cabezal de impresión o dentro de la tapa protectora: esto no afecta a la calidad de impresión. Tenga cuidado para no mancharse de tinta al manipular estos componentes.
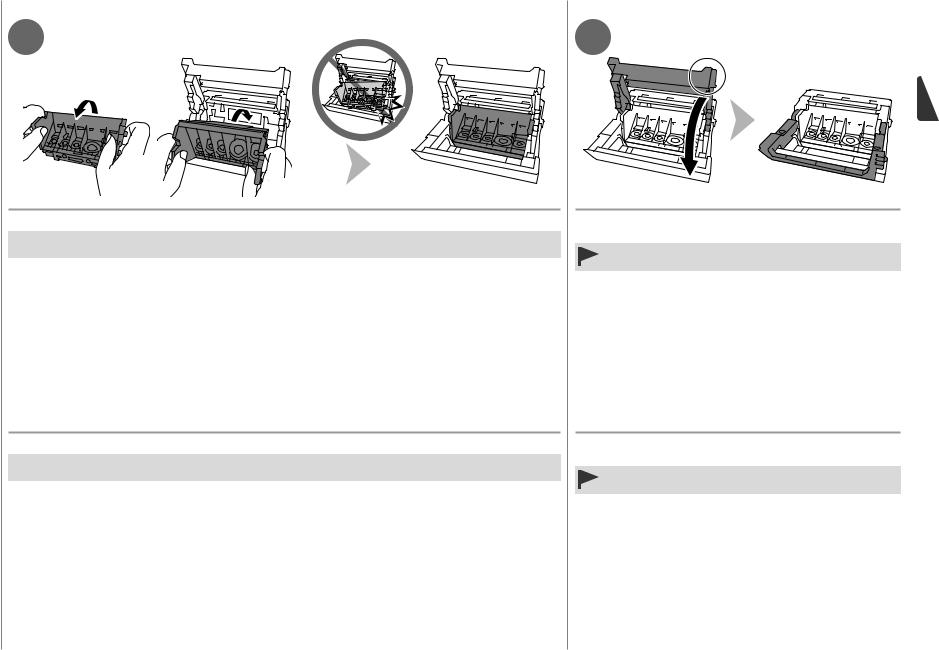
7
Tilt the Print Head forward and set it in place as shown.
 • Do not knock the Print Head against the sides of the holder.
Incline el cabezal de impresión hacia adelante y sitúelo como se muestra.
 • No golpee el cabezal de impresión contra los laterales del soporte.
8
Hold the Print Head Lock Lever firmly and lower it completely.
•Once you have installed the Print Head, do not remove it unnecessarily.
Sujete firmemente la palanca de bloqueo del cabezal de impresión y bájela por completo.
•Una vez instalado el cabezal de impresión, no lo retire si no es necesario.
 Loading...