


 Loading...


 /
/ 


/


 /
/


Printer Guide
IMPORTANT:
Read this manual carefully.
Use this manual when you need quick reference help for the printer feature of your machine.

 Using Your Documentation
Your machine includes the following documentation. This documentation has been designed so that you can easily use your machine to suit your particular needs.
Setting up the machine ..................................
Setting up paper ............................................
Quick guide for making copies .....................
Quick guide for sending faxes.......................
Installing the CAPT .......................................
Document and paper handling .....................
Making copies.................................................
Maintenance ...................................................
Troubleshooting feed and copy issues ..........
Sending and receiving faxes ..........................
Speed dialing...................................................
Troubleshooting fax issues.............................
Printing with the CAPT.................................
Checking the Status of a Print Job...............
Troubleshooting CAPT issues .......................
Quick Start Guide
Reference Guide
Fax Guide
Printer Guide
• The machine shown in this guide is the PC1230D model
NOTE
ii
Copyright
Copyright ©2002 Canon Inc.
All rights reserved. No part of this publication may be reproduced, transmitted, transcribed, stored in a retrieval system, or translated into any language or computer language, in any form or by any means, electronic, mechanical, magnetic, optical, chemical, manual, or otherwise, without prior written permission from Canon.
Notice
Canon makes no guarantees of any kind with regard to this manual. Canon is not liable for errors contained herein or for consequential or incidental damages incurred as a result of acting on information contained in the manual. The information contained herein shall not be reproduced in whole or in part without prior written consent from Canon.
Trademarks
LBP, Canon, and the Canon Logo are trademarks of Canon Inc.
Microsoft®, Windows®, and Windows NT® are either registered trademarks or trademarks of Microsoft Corporation in the United States and/or in other countries.
Other brand and product names are trademarks or registered trademarks of their respective companies.
In this manual, Microsoft®, Microsoft® Windows®, and Microsoft® Windows NT® are referred to as Microsoft, Windows, and Windows NT respectively.
iii


 Contents
Chapter 1: Installing the Canon Advanced Printing Technology
Installing the CAPT . . . . . . . . . . . . . . . . . . . . . . . . . . . . . . . . . . |
.1-2 |
Windows 95/98/Me . . . . . . . . . . . . . . . . . . . . . . . . . . . . . . . . . . |
.1-3 |
USB Users . . . . . . . . . . . . . . . . . . . . . . . . . . . . . . . . . . . . |
.1-3 |
Parallel Port Users . . . . . . . . . . . . . . . . . . . . . . . . . . . . . |
.1-5 |
Windows NT 4.0/2000/XP . . . . . . . . . . . . . . . . . . . . . . . . . . . . . |
.1-9 |
USB Users . . . . . . . . . . . . . . . . . . . . . . . . . . . . . . . . . . . . |
.1-9 |
Parallel Port Users . . . . . . . . . . . . . . . . . . . . . . . . . . . . . |
1-11 |
Network Users . . . . . . . . . . . . . . . . . . . . . . . . . . . . . . . . . |
1-23 |
“Canon PC1200 iC D600 iR1200G” Group . . . . . . . . . . . . . . . . |
1-30 |
Printing with the CAPT . . . . . . . . . . . . . . . . . . . . . . . . . . . . . . . |
1-31 |
Chapter 2: Printer Properties
Windows 95/98/Me Printer Properties . . . . . . . . . . . . . . . . . . . . .2-2
Windows NT4.0/2000/XP Printer Properties and Default Document
Properties . . . . . . . . . . . . . . . . . . . . . . . . . . . . . . . .2-14
Chapter 3: Checking the Status of a Print Job
Opening the Status Window . . . . . . . . . . . . . . . . . . . . . . . . . . . .3-2 Using Canon PC1200/iC D600/iR1200G Status Window . . . . . .3-3 Network Printer Status . . . . . . . . . . . . . . . . . . . . . . . . . . . . . . . .3-12 The Status Window Icon . . . . . . . . . . . . . . . . . . . . . . . . . . . . . .3-13 Closing the Status Window . . . . . . . . . . . . . . . . . . . . . . . . . . . .3-13 Messages . . . . . . . . . . . . . . . . . . . . . . . . . . . . . . . . . . . . . . . . .3-13
Chapter 4: Troubleshooting
Finding Information . . . . . . . . . . . . . . . . . . . . . . . . . . . . . . . . . . .4-1
Printer Problems . . . . . . . . . . . . . . . . . . . . . . . . . . . . . . . . . . . . .4-2
CAPT Problems . . . . . . . . . . . . . . . . . . . . . . . . . . . . . . . . . . . . . .4-4
CAPT Messages . . . . . . . . . . . . . . . . . . . . . . . . . . . . . . . . . . . . .4-6
Using the Trouble Shooter . . . . . . . . . . . . . . . . . . . . . . . . . . . . . .4-8
Uninstalling the CAPT . . . . . . . . . . . . . . . . . . . . . . . . . . . . . . . .4-10
Appendix: Printer Specifications
Index . . . . . . . . . . . . . . . . . . . . . . . . . . . . . . . . . . . . . . . . . . I-1
Glossary . . . . . . . . . . . . . . . . . . . . . . . . . . . . . . . . . . . . . . G-1
iv

 Type Conventions Used in This Guide
Please read the list below of symbols, terms, and abbreviations used in this guide.
WARNING
CAUTION
IMPORTANT
NOTE
• Indicates a warning concerning operations that may lead to death or injury to persons if not performed correctly. In order to use the machine safely, always pay attention to these warnings.
• Indicates a caution concerning operations that may lead to injury to persons or damage to property if not performed correctly. In order to use the machine safely, always pay attention to these cautions.
• Indicates an operational warning or restriction. Be certain to read these items to operate the machine correctly, and to avoid damage to the machine.
• Indicates a note for operation or an additional explanation. Reading these is highly recommended.
(! p. n-nn) |
A number preceded by an arrow and enclosed in parenthesis refers to a |
|
page number in this guide which contains more information on the |
|
topic of the previous sentence. |
!Quick Start Guide
!Reference Guide
Refer to the Quick Start Guide for details on the topic of the previous sentence.
Refer to the Reference Guide for details on the topic of the previous sentence.
machine |
The word “machine” refers to the iR1210G/iR1230G/PC1210D/ |
|
PC1230D/1270D. |
default |
A setting that remains in effect unless you change it. |
Your new machine has many advanced features, including the CAPT (Canon Advanced Printing Technology). The CAPT gives you instant access to printer information. In this documentation the CAPT is also referred to as the Canon PC1200/iC D600/iR1200G, as it appears on your screen after it has been installed.
vi

Chapter 1
InstallingtheCanonAdvanced
Printing Technology
This chapter describes the CAPT (Canon Advanced Printing Technology). It includes the following information:
•Installing the CAPT
•Printing with the CAPT
1
Installing the Canon Advanced Printing Technology
1-1


 Installing the CAPT
If you are using the iR1210G/iR1230G/PC1210D/PC1230D/1270D as a local printer (connected directly to your computer) follow the steps below. If the iR1210G/iR1230G/ PC1210D/PC1230D/1270D is already on your network, and you want to start using it, follow the steps in “Network Users” on page 1-23. If you want to install the iR1210G/iR1230G/ PC1210D/PC1230D/1270D as a network printer, follow the steps in “Connecting the iR1210G/iR1230G/PC1210D/PC1230D/1270D as a Network Printer” on page 1-26.
•If there are any printer drivers of previous versions installed on your computer, be sure to delete those drivers from your computer before installing PC1200/iC D600/
IMPORTANT iR1200G.
1-2

 Windows 95/98/Me
For installation instructions using the CD-ROM menu, please refer to the Quick Start Guide.

 USB Users
■ Windows 98/Me Plug and Play
Following is the installation procedure of plug and play for “Using USB Port” under Windows 98. Before you install the software, make sure you do the following:
•Connect the machine to your computer (! Quick Start Guide).
•Turn on the machine (! Quick Start Guide).
•Start up Windows 98.
Using USB Port (USB Cable)
NOTE
In order to use the printer via USB, the following requirements need to be satisfied.
•Your computer must be equipped with a USB port and it is necessary that its operation is approved by the manufacturer.
.
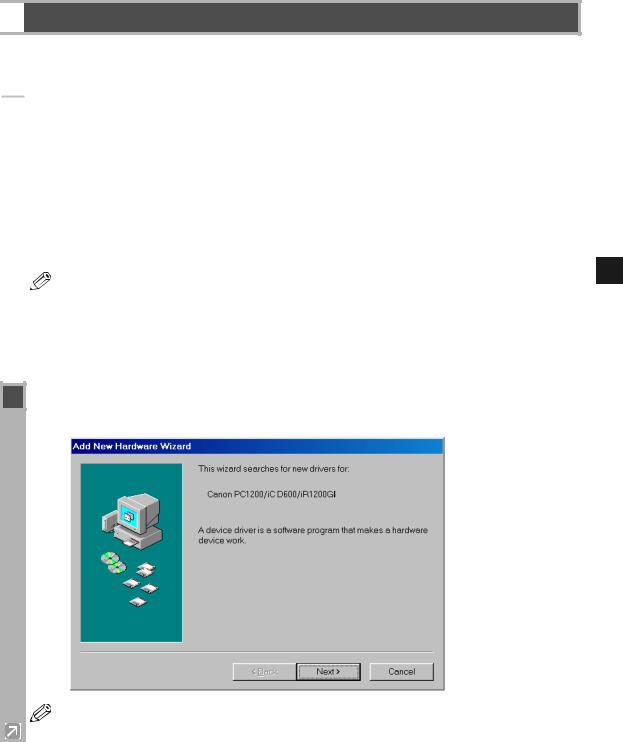
1Plug and Play is being carried out and the The Add New Hardware Wizard dialog box appears. Click Next >.
• “Unknown” may be displayed as the name of the device.
NOTE
1
Installing the Canon Advanced Printing Technology
1-3

2Select Search for the best driver for your device (Recommended) in the Add New Hardware Wizard and click Next >.
3Select Specify a location and click Browse… to select the driver in the language that you want to install. For example, if your CD-ROM drive is drive D:, browse to D:\English\Win9x, then click Next >.
Click Next > on Windows driver files search for the device.
4 Enter the name you wish to use, then click Finish.
1-4
5When the installation is complete, the following dialog box appears. Click OK to close the dialog box. Click Finish on the Add New Hardware Wizard.

 Parallel Port Users
•If there already are LBP-460/465/660/800/810 or other printer drivers installed on your computer, before installing PC1200/iC D600/iR1200G uninstall those drivers or
IMPORTANT set them for file output, selecting FILE: in the port selection dialog.
■ Add Printer Wizard
To install the CAPT on a local computer using Windows 95/98/Me, you can use the Windows 95/98/Me Add Printer Wizard.
Following is the installation procedures for “Using Parallel Port” under Windows 98.
1 From the Start menu, select Settings, then Printers. The Printers folder appears.
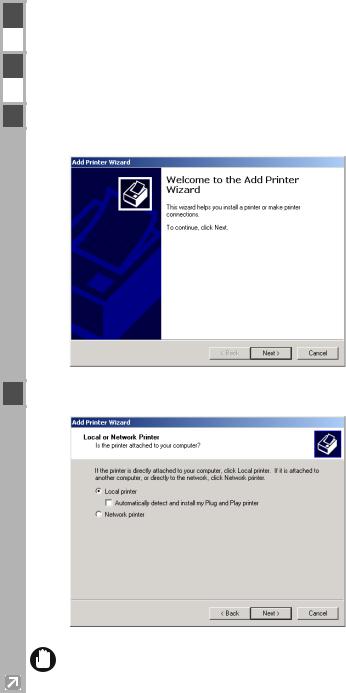
2Double-click the Add Printer icon. The Add Printer Wizard dialog box appears. Click
Next >.
1
Installing the Canon Advanced Printing Technology
1-5

3 |
Select Local Printer and click Next >. |
4 |
The Wizard displays a list of available printers. Click Have Disk…. |
1-6
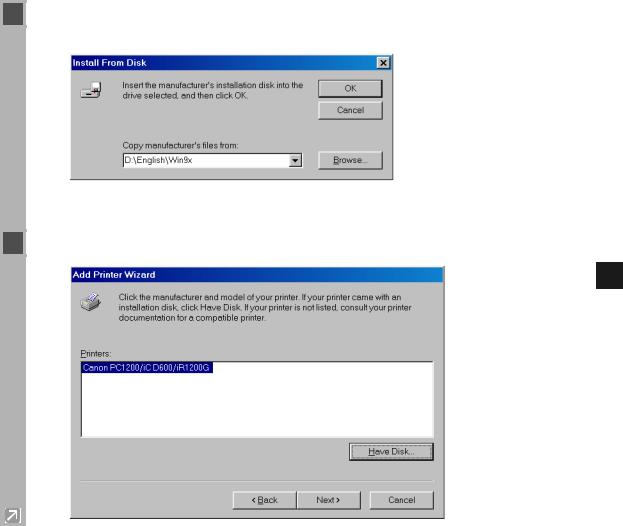
5The Install From Disk dialog box appears. Use Browse… to select the directory or enter the path name that contains the printer software, then click OK.
For example, if you are using the CD-ROM to install the software, and your CD-ROM drive is drive D:, the path name would be D:\English\Win9x.
6 Select the printer, and click Next >.
1
Installing the Canon Advanced Printing Technology
1-7

7 Select the printer’s port, and then click Next >.
8 Enter the name you wish to use, then click Finish.
9When the installation is complete, the following dialog box appears. To close the dialog box, click OK. Click Finish on the Add New Hardware Wizard.
1-8


 Windows NT 4.0/2000/XP

 USB Users
■ Windows 2000/XP Plug and Play
Following is the installation procedure of plug and play for “Using USB Port” under Windows 2000.
Before you install the software, make sure you do the following:
•Connect the machine to your computer (! Quick Start Guide).
•Turn on the machine (! Quick Start Guide).
•Start up Windows 2000.
Using USB Port (USB Cable)
NOTE
In order to use the printer via USB, the following requirements need to be satisfied.
•Your computer must be equipped with a USB port and it is necessary that its operation is approved by the manufacturer.
•Windows NT 4.0 is not available for USB.
.
1Plug and Play is being carried out and the USB class driver, “USB Printing Support” is automatically detected and installed.
2 Log on as member of Administrators. The full control access right for the printer is necessary  for the installation of the CAPT.
1
Installing the Canon Advanced Printing Technology
1-9
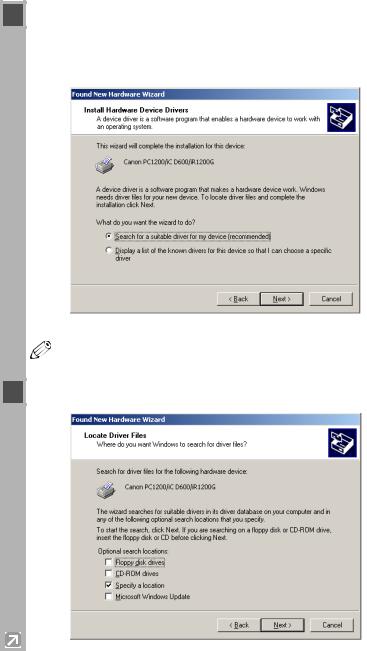
3The Found New Hardware Wizard dialog box appears. Click Next >.
Select Search for a suitable driver for my device (recommended) in the Found New Hardware Wizard and click Next >.
• “Unknown” may be displayed as the name of the device.
NOTE
4 Select Specify a location and click Next >.
1-10
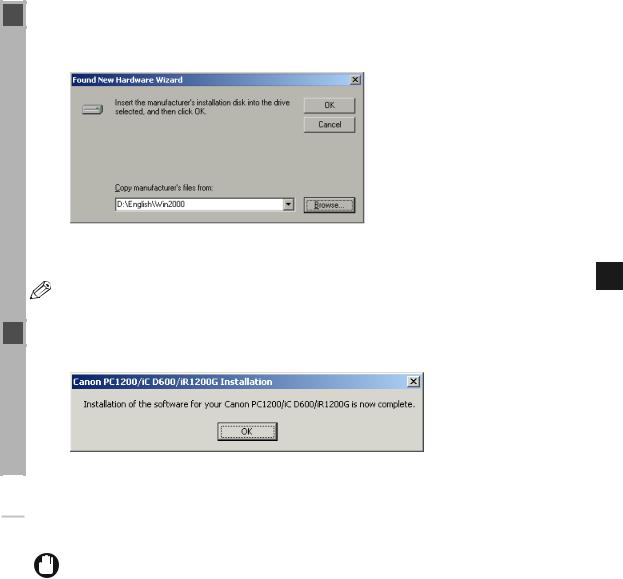
5The Found New Hardware Wizard dialog box appears. Click Browse… to select the driver in the language that you want to install. For example, if your CD-ROM drive is drive D:, browse to D:\English\Win2000, then click OK.
Click Next > on Driver Files Search Results.
• Click Yes if the Digital Signature Not Found dialog box appears.
NOTE
6When the installation is complete, the following dialog box appears. Click OK to close the dialog box. Click Finish on the Found New Hardware Wizard.

 Parallel Port Users
• If there already are LBP-460/465/660/800/810 or other printer drivers installed on
your computer, before installing PC1200/iC D600/iR1200G uninstall those drivers or IMPORTANT set them for file output, selecting FILE: in the port selection dialog.
■ Windows 2000/XP Plug and Play
Following is the installation procedure of plug and play for “Using Parallel Port” under Windows 2000.
Before you install the software, make sure you do the following:
•Connect the machine to your computer (! Quick Start Guide).
•Turn on the machine (! Quick Start Guide).
•Start up Windows 2000.
1
Installing the Canon Advanced Printing Technology
1-11

.
1Plug and Play is being carried out and the Found New Hardware Wizard dialog box appears. Click Next >
2Select Search for a suitable driver for my device (recommended) in the Found New Hardware Wizard and click Next >.
• “Unknown” may be displayed as the name of the device.
NOTE
1-12

3 Select Specify a location and click Next >.
4The Found New Hardware Wizard dialog box appears. Click Browse… to select the driver in the language that you want to install. For example, if your CD-ROM drive is drive D:, browse to D:\English\Win2000, then click OK.
Click Next > on Driver Files Search Results.
• Click Yes if the Digital Signature Not Found dialog box appears.
NOTE
5When the installation is complete, the following dialog box appears. Click OK to close the dialog box. Click Finish on the Found New Hardware Wizard.
1
Installing the Canon Advanced Printing Technology
1-13

■ Windows NT 4.0 Add Printer Wizard
To install the CAPT on a local computer using Windows NT 4.0, you can use the Windows NT
Add Printer Wizard.
1 Log on as member of Administrators. The full control access right for the printer is necessary  for the installation of the CAPT.
2 From the Start menu, select Settings, then Printers. The Printers folder appears.
3 Double-click the Add Printer icon. The Add Printer Wizard dialog box appears.
4 |
Select My Computer, then click Next >. |
5 |
Select the printer port or ports you want to use, then click Next >. |
1-14
6 |
Click Have Disk… in the Manufacturers/Printers dialog box. |
7 |
The Install From Disk dialog box appears. Use Browse… to select the directory or enter the |
|
path name that contains the CAPT, then click OK. |
|
For example, if you are using the CD-ROM to install the CAPT, and your CD-ROM drive is |
|
drive D:, the path name would be D:\english\WinNT40. |
8 |
Select your printer model from the list of printers displayed, then click Next >. |
1
Installing the Canon Advanced Printing Technology
1-15
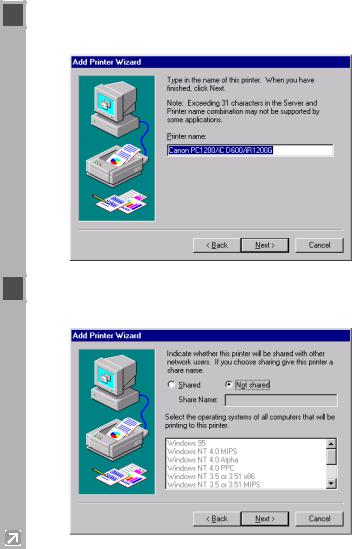
9Click Next > to accept the default printer name, or enter the name you wish to use, then click
Next >.
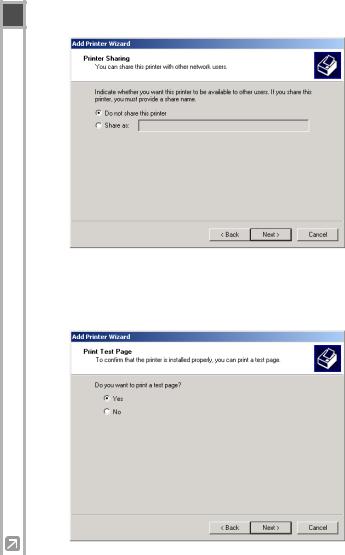
10Select whether this printer is shared or not shared with other computers. If it is shared, select all the operating systems that will use this printer. Click Next >.
1-16
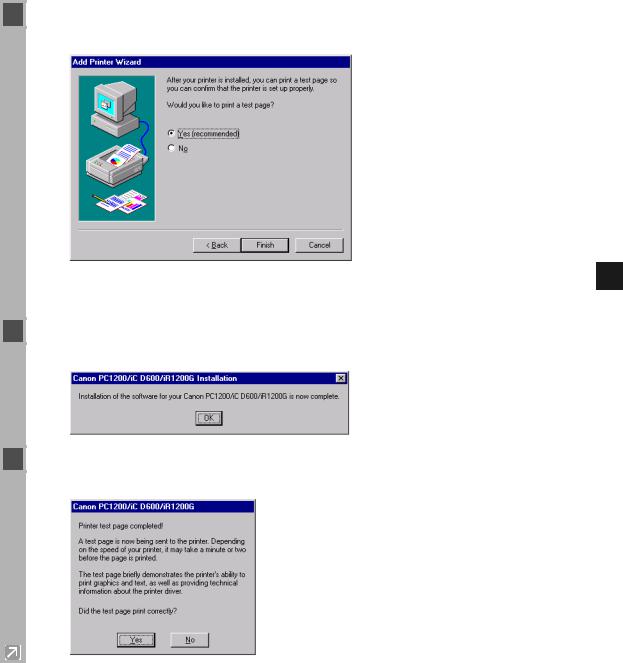
11Click Yes if you want to print a test page, or No if you do not want to print a test page, then click Finish.
Windows creates the Canon PC1200 iC D600 iR1200G icon on the Desktop, and the
Canon PC1200/iC D600/iR1200G icon is added to the Printers folder.
12When the installation is complete, the following dialog box appears. Click OK to close the dialog.
13If you opted to print a test page, the test page prints after the installation completes, and the following dialog appears. If the test page printed correctly, click Yes.
1
Installing the Canon Advanced Printing Technology
1-17
■ Windows 2000/XP Add Printer Wizard
To install the CAPT on a local computer using Windows 2000/XP, you can use the Add Printer Wizard.
Following is the installation procedure for “Using Parallel Port” under Windows 2000.
1 Log on as member of Administrators. The full control access right for the printer is necessary  for the installation of the CAPT.
2 From the Start menu, select Settings, then Printers (in Windows XP, select Printers and  Faxes from Start menu). The Printers (in Windows XP, Printers and Faxes) folder appears.
3Double-click the Add Printer icon (in Windows XP, click Add a printer in Printer Tasks). The Add Printer Wizard dialog box appears. Click Next >.
4 Select Local printer, then click Next >.
•To check on “Automatically detect and install my Plug and Play printer” is not recommended.
IMPORTANT
1-18

5 Select the printer port or ports you want to use, then click Next >.
6Click Have Disk… in the Manufacturers/Printers dialog box.
7The Install From Disk dialog box appears. Use Browse… to select the directory or enter the path name that contains the CAPT, then click OK.
For example, if you are using the CD-ROM to install the CAPT, and your CD-ROM drive is drive D:, the path name would be D:\English\Win2000.
1
Installing the Canon Advanced Printing Technology
1-19

8 Select your printer model from the list of printers displayed, then click Next >.
9Click Next > to accept the default printer name, or enter the name you wish to use, then click
Next >.
1-20
10 Select whether this printer is shared or not shared with other computers. Click Next >.
|
|
|
|
|
|
|
|
|
|
|
|
|
1 |
11 |
|
Click Yes if you want to print a test page, or No if you do not want to print a test page, then |
|
|||
|
TechnologyPrintingAdvancedCanontheInstalling |
|||||
|
|
|
|
click Next >. |
||
|
|
|
|
|
|
|
|
|
|
|
|
|
|
|
|
|
|
|
|
|
1-21

12 Click Finish.
• Click Yes if the Digital Signature Not Found dialog box appears.
NOTE
Windows creates the Canon PC1200 iC D600 iR1200G icon on the Desktop, and the Canon PC1200/iC D600/iR1200G icon is added to the Printers folder.
13When the installation is complete, the following dialog box appears. Click OK to close the dialog.
14If you opted to print a test page, the test page prints after the installation completes, and the following dialog appears. If the test page printed correctly, click OK.
1-22


 Network Users
■Connecting to the iR1210G/iR1230G/PC1210D/PC1230D/ 1270D Already on Your Network
If the iR1210G/iR1230G/PC1210D/PC1230D/1270D is already on your network you can install it two different ways. The easiest way is using automatic network download. If network download is not available, you can use the Add Printer Wizard.
Network Download
Windows 95/98/Me and Windows NT 4.0/2000/XP clients can download the drivers for the iR1210G/iR1230G/PC1210D/PC1230D/1270D automatically.
1 |
Open Explorer and browse the network until you can see the |
|
Canon PC1200/iC D600/iR1200G printer icon. |
2 |
Double-click the printer icon, or drag the printer icon to your Printers (in Windows XP, |
|
Printers and Faxes) folder. |
3 |
Follow the instructions on screen. |
• Service Pack 4 or later must be installed on Windows NT servers in order for
NOTE |
Windows 95/98/Me clients to use network download. |
|
•Windows NT 4.0/2000/XP clients cannot download the driver from Windows 95/98/ Me servers.
Windows 95/98/Me Add Printer Wizard
To install the CAPT for a network printer you can use the Windows 95/98/Me Add Printer Wizard.
1 From the Start menu, select Settings, then Printers. The Printers folder appears.
2 Double-click the Add Printer icon. The Add Printer Wizard dialog box appears.
3 Select Network printer, then click Next >.
4 Enter the network path or print queue that you want to connect to, or use Browse… to open  the Browse for Printer dialog to select the printer.
1
Installing the Canon Advanced Printing Technology
1-23

5 The Wizard displays a list of available printers. Click Have Disk….
• Depending on your network environment, the installation of the driver may be
NOTE |
carried out automatically. |
|
6The Install From Disk dialog box appears. Use Browse… to select the directory or enter the path name that contains the printer software, then click OK.
7If the server is a Windows 95/98/Me computer, you can enter a name for the printer, or accept the default name and click Next >.
• If the connection fails you’ll be able to install the printer but you will not be able to
NOTE |
use the printer until it comes back online. |
8 Follow the instructions on screen to complete installation.
1-24
Loading...