


IXUS
Table of contents
 Loading...
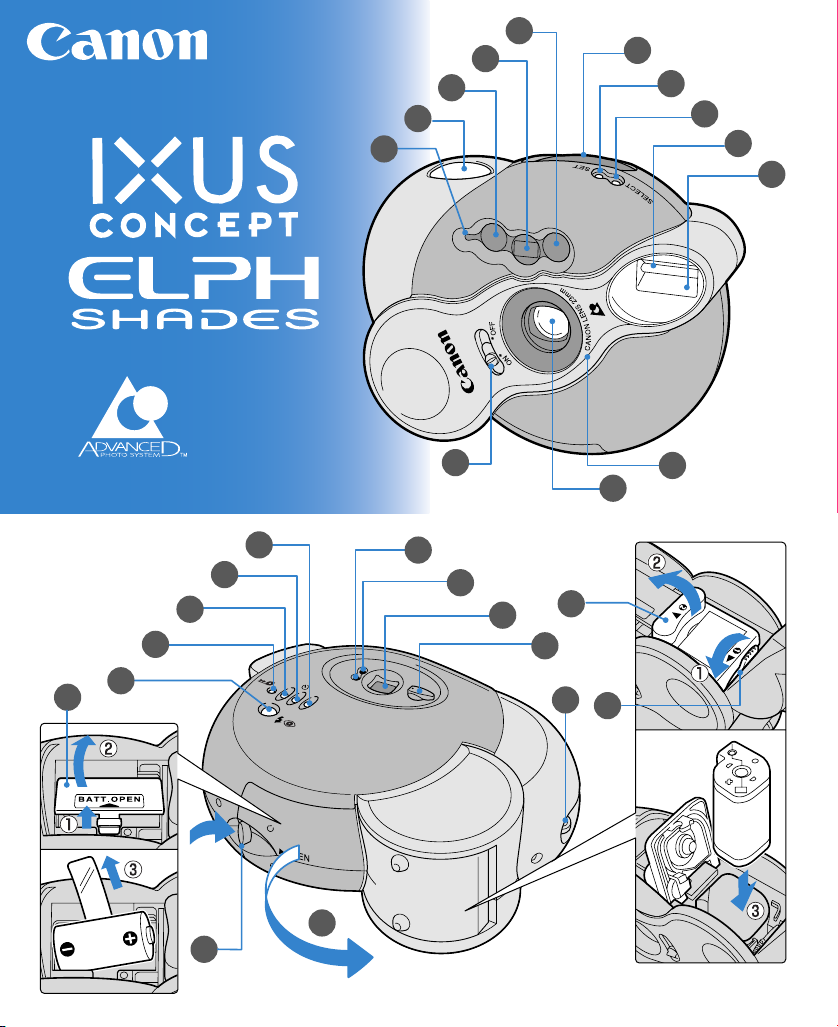
D
ATE
T
IT
L
E
C
H
P
1
2
3
4
5
6
7
8
9
10
11
12
14
15
16
17
18
19
20
21
25
24
22
23
26
13
27
28
CT1-7469-001
PRINTED IN MALAYSIA
1 Push the bottom cover lock tab @8 in the
direction indicated by the arrow to open the
bottom cover @7.
2
Open the battery cover
@4
and load the battery.
The camera uses one CR2 type lithium battery.
When blinks on the LCD panel y, replace
the battery.
3
Turn the film cartridge compartment cover lever
@6 in the direction indicated by the arrow and
open the film cartridge compartment cover @5.
4 Insert the film cartridge and close the film
cartridge compartment cover and close the
bottom cover.
Check that the visual exposure indicator of film is
(unexposed).
5 Slide the main switch !1 downwards to turn
the camera on.
The lens cover opens.
6 Select the print type with the print type
selection lever @2.
You can choose from three print types: C print, H
print or P print.
7 Place the AF mark over the subject and
press the shutter button r.
8 When the film cartridge has finished and
the film has rewound, remove the film
cartridge from the camera.
The visual exposure indicator of film will be
(exposed).
ENGLISH
Nomenclature
AF Sensor
Viewfinder Window
AF Emitter
Shutter Button
. . . . . . . . . . . . . . . . . . . . . . . .
¡
Light Metering Window
LCD Panel
SET Button
. . . . . . . . . . . . . . . . . . . . . . . . .
¢∞
SELECT Button
. . . . . . . . . . . . . . . . . . . . . .
¢§
Flash
Red-eye Reduction Lamp
. . . . . . . . . . . . . .
™£
Main Switch
. . . . . . . . . . . . . . . . . . . . . . . . . .
¡
Lens
Focal Length
DATE Button
. . . . . . . . . . . . . . . . . . . . . . . .
¢∞
Self-timer Button
. . . . . . . . . . . . . . . . . . . .
£
TITLE (Title selection) Button
. . . . . . . . . . . .
§
Mid-roll Rewind Button
Flash Mode Button
. . . . . . . . . . . . . . . . .
™
Orange Indicator
Green Indicator
Viewfinder
Print Type Selection Lever
. . . . . . . . . . . . . . .
¡
Strap Mount
Battery Cover
. . . . . . . . . . . . . . . . . . . . . . . . .
¡
Film Cartridge Compartment Cover
. . . . . . .
¡
Film Cartridge Compartment Cover Lever
. .
¡
Bottom Cover
. . . . . . . . . . . . . . . . . . . . . . . . .
¡
Bottom Cover Lock Tab
. . . . . . . . . . . . . . . . .
¡
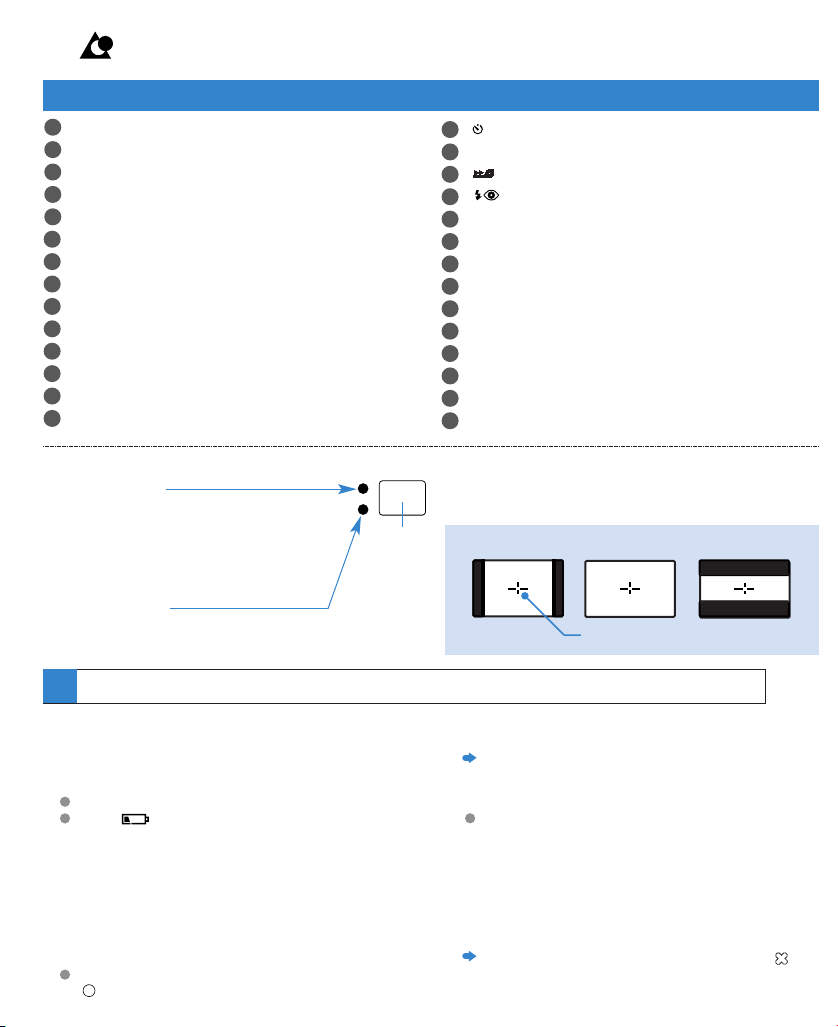
Green and Orange indicators
Green indicator
Lit: Camera is focused (ready to shoot)
Blinking: Proximity warning
* If the proximity warning appears, move away
from the subject until the indicator stops
blinking and press the shutter button again.
Orange indicator
Lit: Flash has charged
Blinking (4 times/sec): Camera shake warning
Viewfinder
The viewfinder field changes when you switch @2. The
black areas will not be printed.
Cprint Hprint Pprint
AFmark
See the nomenclature for the number in the circle.
1
2
3
4
5
6
7
8
9
10
11
12
13
14
15
16
17
18
19
20
21
25
24
22
23
26
27
28
1
Basic Operations
Viewfinder

1 Premere la linguetta di blocco del coperchio
inferiore @8 nella direzione indicata dalla
freccia per aprire il coperchio inferiore @7.
2
Aprire il coperchio pila
@4
e inserire la pila.
La fotocamera impiega una pila litio tipo CR2.
Quando lampeggia sul pannello LCD y,
sostituire la pila.
3 Girare la leva del coperchio del vano
caricatore @6 in direzione della freccia e
aprire il coperchio del vano caricatore @5.
4 Inserire il caricatore e chiudere il coperchio
del vano caricatore e chiudere il coperchio
inferiore.
Controllare che l’indicatore visivo di esposizione
sia (vergine).
5 Spostare l’interruttore principale !1 verso il
basso per accendere la fotocamera.
Il copriobiettivo si apre.
6 Selezionare il formato di stampa con la leva
di selezione del formato di stampa @2.
Si può scegliere tra tre formati di stampa: formato
C, formato H e formato P.
7 Posizionare il segno AF sopra il soggetto e
premere il pulsante di scatto r.
8 Quando la pellicola è finita ed è stata
riavvolta, estrarre il caricatore dalla
fotocamera.
L’indicatore visivo di esposizione sarà
(esposta).
ITALIANO
Nomenclatura
Sensore AF
Finestrella del mirino
Emettitore AF
Pulsante di scatto
. . . . . . . . . . . . . . . . . . . . .
¡
Finestrella dell’esposimetro
Pannello LCD
Tasto SET
. . . . . . . . . . . . . . . . . . . . . . . . .
¢∞
Tasto SELECT
. . . . . . . . . . . . . . . . . . . . . .
¢§
Flash
Spia di riduzione fenomeno occhi rossi
. .
™£
Interruttore principale
. . . . . . . . . . . . . . . . .
¡
Obiettivo
Lunghezza focale
Tasto DATE
. . . . . . . . . . . . . . . . . . . . . . . . .
¢∞
Tasto di autoscatto
. . . . . . . . . . . . . . . . . .
£
Tasto TITLE (selezione titolo)
. . . . . . . . . . . .
§
Tasto di riavvolgimento a metà rullino
Tasto di modalità del flash
. . . . . . . . . .
™
Indicatore arancione
Indicatore verde
Mirino
Leva di selezione del formato di stampa
. . .
¡
Attacco per la cinghia
Coperchio pila
. . . . . . . . . . . . . . . . . . . . . . . .
¡
Coperchio del vano caricatore
. . . . . . . . . . .
¡
Leva del coperchio del vano caricatore
. . . .
¡
Coperchio inferiore
. . . . . . . . . . . . . . . . . . . .
¡
Linguetta di blocco del coperchio inferiore
. .
¡
Indicatori verde e arancione
Indicatore verde
Illuminato: La fotocamera è a fuoco
(pronta a scattare)
Lampeggiante: Avvertimento di vicinanza
*
Se appare l’avvertimento di vicinanza, allontanarsi dal
soggetto fino a che l’indicatore cessa di lampeggiare
e premere di nuovo il pulsante di scatto.
Indicatore arancione
Illuminato: Il flash è carico
Lampeggiante (4 volte/sec.): Avvertimento di tremito fotocamera
Mirino
Il campo del mirino cambia quando si sposta @2. Le
aree nere non sono stampate.
FormatoC FormatoH FormatoP
SegnoAF
Vedere la nomenclatura per i numeri nei cerchietti.
1
2
3
4
5
6
7
8
9
10
11
12
13
14
15
16
17
18
19
20
21
25
24
22
23
26
27
28
1
Operazioni basilari
Mirino
Loading...