


 Loading...
Series
PS/PCL Printer Guidede
Please read this guide before operating this equipment. |
ENG |
After you finish reading this guide, store it in a safe place for future reference. |


 About the Manuals for the Machine
The manuals for this machine are divided as follows. Please read them to suit your needs.
For Basic Use ................................................
Troubleshooting .............................................
For Basic Copying ...........................................
For Convenient Copying ....................................
For Basic Mail Box Function Use .........................
For Convenient Mail Box Function Use ..................
For Remote UI Use .......................................... 
For Setting Up the Network Connection & Installing
the CD-ROM Software ......................................
For Printer Use............................................... 
For Installing Printer Driver, etc. ......................... 
For Connecting and Setting the Network................. 
Reference Guide
Copying Guide
Mail Box Function Guide
Remote UI Guide
Setup Guide
PS/PCL Printer Guide
(This Document)
PCL Driver Guide
PS Driver Guide
Network Guide
CD-ROM
CD-ROM
CD-ROM
CD-ROM
The manuals supplied with optional equipment are included in the list above.
Depending on the system configuration and product purchased, some manuals may be unavailable (irrelevant).


 How This Manual Is Organized
Chap 1 |
Before You Start Using the Machine |
Please read this chapter first |
|
|
1 |
||||
|
|
|
||
|
|
|
||
|
|
|
||
Chap 2 |
Menu Functions and Operation |
|
|
|
|
2 |
|||
|
|
|
||
|
|
|||
|
|
|||
Chap 3 |
Printer Settings Menu Functions and Operation |
|
||
3 |
||||
|
|
|
||
|
|
|
|
|
|
|
|
|
|
Chap 4 |
Report Settings Menu |
|
|
|
|
4 |
|||
|
|
|
||
|
|
|
|
|
|
|
|
|
|
Chap 5 |
Troubleshooting |
|
|
|
|
5 |
|||
|
|
|
||
|
|
|
|
|
|
|
|
|
|
Chap 6 |
Appendix |
|
|
|
|
6 |
|||
|
|
|
||
|
|
|
|
|
Contains the Index and Appendix.
•Considerable effort has been made to make sure that this manual is free of inaccuracies and omissions.
•However, as we are constantly improving our products if you need an exact specification, please contact Canon.
PREFACE
Thank you for purchasing the Canon Network Multi-PDL Printer Kit-C1/C2. This manual describes the additional functionality this kit provides for an iR3300/2800/2200 Series machine, and how to specify these functions from the touch panel display.
Please read this manual thoroughly before using the Network Multi-PDL Printer Kit-C1/C2 with an iR3300/2800/2200 Series machine in order to familiarise yourself with the added capabilities, and to make the most of the functions. After reading this manual store it in a safe place for future reference.
CAUTION:
In this manual, CAUTION MESSAGES with this  symbol indicate that neglecting the suggested procedure or practice could result in personal injury.
Copyright 2001 by Canon, Inc. All rights reserved.
No part of this publication may be reproduced or transmitted in any form or by any means, electronic or mechanical, including photocopying and recording, or by any information storage or retrieval system without the prior written permission of Canon, Inc.
ii PREFACE

About Trademarks
License Notice
Universal Font Scaling Technology, UFST, is licensed from Agfa Monotype Corporation. Copyright © 1993-2000 Agfa Monotype Corporation.
Trademark Credits
Adobe, PostScript, and PostScript 3 are trademarks of Adobe Systems Incorporated. Agfa is a trademark of Agfa-Gevaert AG and may be registered in some jurisdictions. Apple, Macintosh and TrueType are trademarks of Apple Computer, Inc.
Albertus, Arial and Times New Roman are trademarks of The Monotype Corporation Plc., and may be registered in some jurisdictions.
CG and UFST are trademarks of Agfa Monotype Corporation or its affiliated companies and may be registered in some jurisdictions.
CG Omega is a product of Agfa Monotype Corporation and CG Times, based on Times New Roman under license from the Monotype Corporation, is a product of Agfa Monotype Corporation.
Times and Universe are trademarks of Linotype-Hell AG and/or its subsidiaries and may be registered in some jurisdictions.
Canon, the Canon logo and NetSpot are trademarks of Canon Inc. Marigold, licensed by Agfa, is a trademark of AlphaOmega Typography, Inc.
Microsoft, Windows and Windows NT are registered trademarks of Microsoft Corporation (US) in the U.S and other countries. Wingdings is a trademark of Microsoft Corporation. PCL, PCL 5e and PCL 6 are trademarks of Hewlett-Packard Company.
UNIX is a registered trademark exclusively licensed from X/Open Company, Ltd. in the United States and other countries.
As concerns typeface credit, the actual names on a FONT LIST for this printer may differ from those listed above.
The following fonts are licensed from Bitstream Technologies, Inc.
Dutch™ 801 Roman, Dutch™ 801 Bold, Fixed Pitch 810 Courier 10 Pitch/Text, Fixed Pitch 810 Courier Bold 10 Pitch/Text.
Other company or product names used in this manual and not included in the list above are trademarks of those companies and may be registered in certain jurisdictions.
About Abbreviations
In this manual, Microsoft ® Windows® and PostScript 3 emulation are referred to as Windows and PS, respectively.
About Trademarks |
iii |

Safety Information
1.Laser Safety
This Product is certified as a Class 1 laser product under EN60825-1:1994. This means that the product does not produce hazardous laser radiation.
Since radiation emitted inside the product is completely confined within protective housings and external covers, the laser beam can not escape from the machine during any phase of user operation.
2.Additional Information
When servicing or adjusting the optical system of the product, be careful not to place screwdrivers or other shiny objects in the path of the laser beam. Also, accessories such as watches and rings should be removed before working on the product. The reflected beam, even though visible or invisible, can permanently damage your eyes.
The following label is attached to the main unit where there is danger of exposure to laser radiation:
CAUTIONATTENTIONVORSICHTPRECAUCIONATTENZIONEVARO! - VARNING!- ADVARSEL!- ADVARSEL-
CAUTIONATTENTIONVORSICHTPRECAUCIONATTENZIONEVARO! - VARNING!- ADVARSEL!- ADVARSEL-
LASER RADIATION WHEN OPEN AND INTERLOCKS DEFEATED. AVOID EXPOSURE TO BEAM
RAYONNEMENT LASER DANGEREUX EN CAS D'OUVERTURE ET LORSQUE LA SÉCURITÉ EST NEUTRALISÉE. EXPOSITION DANGEREUSE AU FAISCEAU. LASERSTRAHLUNG. WENN ABDECKUNG GEÖFFNET UND SICHERHEITSVERRIEGELUNG ÜBERBRÜCKT. NICHT DEM STRAHL AUSSETZEN. RADIACION LASER EN EL INTERIOR. CIERRE SELLADO. EVITE LA EXPOSICION AL HAZ EN CASO DE ROTURA DE ESTE PARA SU APERTURA. RADIAZIONE LASER PERICOLOSA IN CASO DI APERTURA E QUANDO IL BLOCCO DI SICUREZZA È GUASTO. EVITARE L'ESPOSIZIONE AL FASCIO. AVATTAESSA JA SUOJALUKITUS OHITETTAESSA OLET ALTTIINA LASERSÄTEILYLLE ÄLÄ KATSO SÄTEESEEN.
LASERSTRÅLNING NÄR DENNA DEL ÄR ÖPPNAD OCH SPÄRREN ÄR URKOPPLAD. BETRAKTA EJ STRÅLEN. LASER BESTRÅLING, NÅR ÅBEN OG LUKKE AFBRYDER ER SAT UD AF FUNKTION. UNDGÅ BESTRÅLING.
LASERSTRÅLING NÅR DEKSEL ÅPNES OG SIKKERHETSLÅS BRYTES. UNNGÅ EKSPONERING FOR STRÅLEN.
LASER RADIATION WHEN OPEN. AVOID EXPOSURE TO BEAM.
RAYONNEMENT LASER EN CAS D'OUVERTURE. EXPOSITION DANGEREUSE AU FAISCEAU.
LASERSTRAHLUNG, WENN ABDECKUNG GEÖFFNET. NICHT DEM STRAHL AUSSETZEN.
RADIACION LASER CUANDO SE ABRE. EVITAR EXPONERSE AL RAYO.
RADIAZIONE LASER IN CASO DI APERTURA. EVITARE L'ESPOSIZIONE AL FASCIO.
AVATTAESSA OLET ALTTIINA LASERSÄTEILYLLE. ÄLÄ KATSO SÄTEESEEN.
LASERSTRÅLNING NÄR DENNA DEL ÄR ÖPPNAD. BETRAKTA EJ STRÅLEN.
LASER STRÅLING, NÅR DENNE ER ÅBEN. UNDGÅ BESTRÅLING.
LASERSTRÅLING NÅR DEKSEL ÅPNES. UNNGÅ EKSPONERING FOR STRÅLEN.
This Copier has been classified under EN60825-1:1994 and conforms to the following classes;
CLASS 1 LASER PRODUCT LASER KLASSE 1
APPAREIL A RAYONNEMENT LASER DE CLASSE 1 APPARECCHIO LASER DI CLASSE 1
PRODUCTO LASER DE CLASE 1
APARELHO A LASER DE CLASSE
 CAUTION
•Use of controls, adjustments or performance of procedures other than those specified in the manual may result in hazardous radiation exposure.
ivSafety Information

Table of Contents
How This Manual Is Organized . . . . . . . . . . . . . . . . . . . . . . . . . . . . . . . . . . . . . . |
. i |
PREFACE . . . . . . . . . . . . . . . . . . . . . . . . . . . . . . . . . . . . . . . . . . . . . . . . . . . . . . . . |
ii |
About Trademarks . . . . . . . . . . . . . . . . . . . . . . . . . . . . . . . . . . . . . . . . . . . . . . . . |
iii |
License Notice . . . . . . . . . . . . . . . . . . . . . . . . . . . . . . . . . . . . . . . . . . . . . . . . . iii Trademark Credits . . . . . . . . . . . . . . . . . . . . . . . . . . . . . . . . . . . . . . . . . . . . . . iii About Abbreviations . . . . . . . . . . . . . . . . . . . . . . . . . . . . . . . . . . . . . . . . . . . . . iii
Safety Information . . . . . . . . . . . . . . . . . . . . . . . . . . . . . . . . . . . . . . . . . . . . . . . . iv Table of Contents . . . . . . . . . . . . . . . . . . . . . . . . . . . . . . . . . . . . . . . . . . . . . . . . . v How to Use This Manual . . . . . . . . . . . . . . . . . . . . . . . . . . . . . . . . . . . . . . . . . . . viii
Symbols Used in This Manual . . . . . . . . . . . . . . . . . . . . . . . . . . . . . . . . . . . . |
viii |
Keys Used in This Manual . . . . . . . . . . . . . . . . . . . . . . . . . . . . . . . . . . . . . . . |
viii |
Displays Used in This Manual . . . . . . . . . . . . . . . . . . . . . . . . . . . . . . . . . . . . . |
. ix |
Illustrations Used in This Manual . . . . . . . . . . . . . . . . . . . . . . . . . . . . . . . . . . |
. ix |
Operation of the Machine and Terms Used in This Manual . . . . . . . . . . . . . . . |
x |
What the Machine Can Do . . . . . . . . . . . . . . . . . . . . . . . . . . . . . . . . . . . . . . . . . . |
xi |
Additional Functions Screen . . . . . . . . . . . . . . . . . . . . . . . . . . . . . . . . . . . . . . . |
xi |
Chapter 1 Before You Start Using the Machine
Menu Functions . . . . . . . . . . . . . . . . . . . . . . . . . . . . . . . . . . . . . . . . . . . . . . . . .1-2
What Are Menu Functions? . . . . . . . . . . . . . . . . . . . . . . . . . . . . . . . . . . . . . .1-2
Accessing the Menus . . . . . . . . . . . . . . . . . . . . . . . . . . . . . . . . . . . . . . . . . . .1-3
Using the Printer Settings Menu . . . . . . . . . . . . . . . . . . . . . . . . . . . . . . . . . . . .1-5
Using the Report Settings Menu . . . . . . . . . . . . . . . . . . . . . . . . . . . . . . . . . . . .1-8
Chapter 2 Menu Functions and Operation
Printer Settings Menu Functions . . . . . . . . . . . . . . . . . . . . . . . . . . . . . . . . . . .2-2
Report Settings Menu Functions . . . . . . . . . . . . . . . . . . . . . . . . . . . . . . . . . . .2-5
Table of Contents |
v |

Chapter 3 Printer Settings Menu Functions and Operation
Settings Menu . . . . . . . . . . . . . . . . . . . . . . . . . . . . . . . . . . . . . . . . . . . . . . . . . . |
3-3 |
Copies . . . . . . . . . . . . . . . . . . . . . . . . . . . . . . . . . . . . . . . . . . . . . . . . . . . . . 3-3
2-Sided Printing . . . . . . . . . . . . . . . . . . . . . . . . . . . . . . . . . . . . . . . . . . . . . 3-3
Paper Feed . . . . . . . . . . . . . . . . . . . . . . . . . . . . . . . . . . . . . . . . . . . . . . . . . 3-4
Default Paper Size . . . . . . . . . . . . . . . . . . . . . . . . . . . . . . . . . . . . . . . . . 3-4
Default Paper Type . . . . . . . . . . . . . . . . . . . . . . . . . . . . . . . . . . . . . . . . 3-5
Paper Size Override . . . . . . . . . . . . . . . . . . . . . . . . . . . . . . . . . . . . . . . 3-5
Print Quality . . . . . . . . . . . . . . . . . . . . . . . . . . . . . . . . . . . . . . . . . . . . . . . . 3-6
Image Refinement . . . . . . . . . . . . . . . . . . . . . . . . . . . . . . . . . . . . . . . . . 3-6
Density . . . . . . . . . . . . . . . . . . . . . . . . . . . . . . . . . . . . . . . . . . . . . . . . . 3-6
Toner Save . . . . . . . . . . . . . . . . . . . . . . . . . . . . . . . . . . . . . . . . . . . . . . 3-6
Layout . . . . . . . . . . . . . . . . . . . . . . . . . . . . . . . . . . . . . . . . . . . . . . . . . . . . . 3-7
Binding . . . . . . . . . . . . . . . . . . . . . . . . . . . . . . . . . . . . . . . . . . . . . . . . . 3-7
Margin . . . . . . . . . . . . . . . . . . . . . . . . . . . . . . . . . . . . . . . . . . . . . . . . . . 3-8
Offset X . . . . . . . . . . . . . . . . . . . . . . . . . . . . . . . . . . . . . . . . . . . . . . . 3-10
Offset Y . . . . . . . . . . . . . . . . . . . . . . . . . . . . . . . . . . . . . . . . . . . . . . . . 3-10
Auto Continue . . . . . . . . . . . . . . . . . . . . . . . . . . . . . . . . . . . . . . . . . . . . . . 3-11
Job Securing Time . . . . . . . . . . . . . . . . . . . . . . . . . . . . . . . . . . . . . . . . . . 3-11
Timeout . . . . . . . . . . . . . . . . . . . . . . . . . . . . . . . . . . . . . . . . . . . . . . . . . . . 3-12
Print After Completing RIP . . . . . . . . . . . . . . . . . . . . . . . . . . . . . . . . . . . . 3-12
Finisher . . . . . . . . . . . . . . . . . . . . . . . . . . . . . . . . . . . . . . . . . . . . . . . . . . . 3-13
Punch . . . . . . . . . . . . . . . . . . . . . . . . . . . . . . . . . . . . . . . . . . . . . . . . . . . . 3-16
Booklet . . . . . . . . . . . . . . . . . . . . . . . . . . . . . . . . . . . . . . . . . . . . . . . . . . . 3-17
Saddle Stitch . . . . . . . . . . . . . . . . . . . . . . . . . . . . . . . . . . . . . . . . . . . . . . . 3-18
Transparency Interleaving . . . . . . . . . . . . . . . . . . . . . . . . . . . . . . . . . . . . 3-19
Personality . . . . . . . . . . . . . . . . . . . . . . . . . . . . . . . . . . . . . . . . . . . . . . . . 3-19
Initialize . . . . . . . . . . . . . . . . . . . . . . . . . . . . . . . . . . . . . . . . . . . . . . . . . . . 3-19
PCL/PS Settings . . . . . . . . . . . . . . . . . . . . . . . . . . . . . . . . . . . . . . . . . . . . . . . |
3-20 |
PCL . . . . . . . . . . . . . . . . . . . . . . . . . . . . . . . . . . . . . . . . . . . . . . . . . . . . . . |
3-20 |
Orientation . . . . . . . . . . . . . . . . . . . . . . . . . . . . . . . . . . . . . . . . . . . . . . |
3-20 |
Font Number . . . . . . . . . . . . . . . . . . . . . . . . . . . . . . . . . . . . . . . . . . . . |
3-20 |
Point Size . . . . . . . . . . . . . . . . . . . . . . . . . . . . . . . . . . . . . . . . . . . . . . |
3-20 |
Pitch . . . . . . . . . . . . . . . . . . . . . . . . . . . . . . . . . . . . . . . . . . . . . . . . . . |
3-20 |
Form Lines . . . . . . . . . . . . . . . . . . . . . . . . . . . . . . . . . . . . . . . . . . . . . |
3-21 |
Symbol Set . . . . . . . . . . . . . . . . . . . . . . . . . . . . . . . . . . . . . . . . . . . . . |
3-21 |
Custom Paper . . . . . . . . . . . . . . . . . . . . . . . . . . . . . . . . . . . . . . . . . . . |
3-21 |
Unit of Measure . . . . . . . . . . . . . . . . . . . . . . . . . . . . . . . . . . . . . . . . . . |
3-21 |
X Dimension . . . . . . . . . . . . . . . . . . . . . . . . . . . . . . . . . . . . . . . . . . . . |
3-21 |
Y Dimension . . . . . . . . . . . . . . . . . . . . . . . . . . . . . . . . . . . . . . . . . . . . |
3-22 |
Append CR to LF . . . . . . . . . . . . . . . . . . . . . . . . . . . . . . . . . . . . . . . . . |
3-22 |
PS (Printer Kit-C1 Only) . . . . . . . . . . . . . . . . . . . . . . . . . . . . . . . . . . . . . . |
3-22 |
Job Timeout . . . . . . . . . . . . . . . . . . . . . . . . . . . . . . . . . . . . . . . . . . . . . |
3-22 |
Wait Timeout . . . . . . . . . . . . . . . . . . . . . . . . . . . . . . . . . . . . . . . . . . . . |
3-22 |
Print PS Errors . . . . . . . . . . . . . . . . . . . . . . . . . . . . . . . . . . . . . . . . . . |
3-22 |
Utility Menu . . . . . . . . . . . . . . . . . . . . . . . . . . . . . . . . . . . . . . . . . . . . . . . . . . . |
3-23 |
Reset Printer . . . . . . . . . . . . . . . . . . . . . . . . . . . . . . . . . . . . . . . . . . . . . . . |
3-23 |
vi Table of Contents

Chapter 4 Report Settings Menu
PCL Menu . . . . . . . . . . . . . . . . . . . . . . . . . . . . . . . . . . . . . . . . . . . . . . . . . . . . . .4-2
Configuration Page . . . . . . . . . . . . . . . . . . . . . . . . . . . . . . . . . . . . . . . . . . . . .4-2
Font List . . . . . . . . . . . . . . . . . . . . . . . . . . . . . . . . . . . . . . . . . . . . . . . . . . . . .4-2
PS Menu (Printer Kit-C1 Only) . . . . . . . . . . . . . . . . . . . . . . . . . . . . . . . . . . . . . .4-3
Configuration Page . . . . . . . . . . . . . . . . . . . . . . . . . . . . . . . . . . . . . . . . . . . . .4-3
Font List . . . . . . . . . . . . . . . . . . . . . . . . . . . . . . . . . . . . . . . . . . . . . . . . . . . . .4-3
Chapter 5 Troubleshooting
Responding to Error Messages . . . . . . . . . . . . . . . . . . . . . . . . . . . . . . . . . . . . |
5-2 |
Resetting the Machine After a Service Call Message . . . . . . . . . . . . . . . . . . .5-2
When a Message Is Displayed . . . . . . . . . . . . . . . . . . . . . . . . . . . . . . . . . . . . . .5-3
Printing Problems . . . . . . . . . . . . . . . . . . . . . . . . . . . . . . . . . . . . . . . . . . . . . . . .5-5
Printer Trouble . . . . . . . . . . . . . . . . . . . . . . . . . . . . . . . . . . . . . . . . . . . . . . . .5-5
Printing Problems . . . . . . . . . . . . . . . . . . . . . . . . . . . . . . . . . . . . . . . . . . . . . .5-6
Print Quality Problems . . . . . . . . . . . . . . . . . . . . . . . . . . . . . . . . . . . . . . . . . .5-8
Chapter 6 Appendix
Some Basic Facts About Fonts . . . . . . . . . . . . . . . . . . . . . . . . . . . . . . . . . . . . .6-2
What Is a Font? . . . . . . . . . . . . . . . . . . . . . . . . . . . . . . . . . . . . . . . . . . . . . . . .6-2
Attributes of Fonts . . . . . . . . . . . . . . . . . . . . . . . . . . . . . . . . . . . . . . . . . . . . . .6-2
Bit-mapped Fonts and Scalable Fonts . . . . . . . . . . . . . . . . . . . . . . . . . . . . . .6-8
Checking the Font Lists for Available Fonts . . . . . . . . . . . . . . . . . . . . . . . . .6-14
Typeface Samples . . . . . . . . . . . . . . . . . . . . . . . . . . . . . . . . . . . . . . . . . . . .6-16 Symbol Sets . . . . . . . . . . . . . . . . . . . . . . . . . . . . . . . . . . . . . . . . . . . . . . . . .6-30
Configuration Page Sample . . . . . . . . . . . . . . . . . . . . . . . . . . . . . . . . . . . . . . .6-54
Specifications . . . . . . . . . . . . . . . . . . . . . . . . . . . . . . . . . . . . . . . . . . . . . . . . . .6-56
Index . . . . . . . . . . . . . . . . . . . . . . . . . . . . . . . . . . . . . . . . . . . . . . . . . . . . . . . . .6-57
Table of Contents |
vii |

How to Use This Manual
Symbols Used in This Manual
The following symbols are used in this manual, for explanations of procedures and restrictions, handling cautions, and instructions that should be observed for safety.
 WARNING
 CAUTION
 IMPORTANT
 NOTE
NOTE
Indicates a warning concerning operations that may lead to death or injury to persons if not performed correctly. In order to use the machine safely, always pay attention to these warnings.
Indicates a caution concerning operations that may lead to injury to persons or damage to property if not performed correctly. In order to use the machine safely, always pay attention to these cautions.
Indicates operational warnings and restrictions. Be certain to read these items to operate the machine correctly, and to avoid damage to the machine.
Indicates notes for operation or additional explanations. Reading these is highly recommended.
Keys Used in This Manual
The following symbols and key names are used in this manual:
•Control panel keys………………  (Start)
•Touch panel display keys………[OK]
viii How to Use This Manual
Displays Used in This Manual
Screenshots of the touch panel display used in this manual are those taken when the Finisher-J1, Cassette Feeding Unit-W1, Feeder (DADF-H1), Printer Kit, and Network Interface Adapter are attached to the iR3300. Note that functions that cannot be used depending on the model or options, are not displayed on the touch panel display.
The keys which you should press are marked with  , as shown below.
When multiple keys can be pressed on the touch panel display, all keys are marked. Select the keys which suit your needs.
 Place the original, then press [Special Features].
 Press this key for operation.
Illustrations Used in This Manual
Unless otherwise noted, illustrations used in this manual are those taken when the FinisherJ1 and Cassette Feeding Unit-W1 are attached to the iR3300.
How to Use This Manual |
ix |

Operation of the Machine and Terms Used in This
Manual
This machine makes effective use of memory in order to perform print operations efficiently. For example, as soon as the machine has scanned the original that you want to copy, it can immediately scan the next person’s original. You can also print from this machine, using a function other than the Copy function. In this machine, these operations take place in a complex way, so that not only copies, but also various kinds of prints may sometimes have to wait their turn before they can be output.
To avoid confusion when reading this manual, the term “printing” used throughout this manual is defined as set out below. The scanning of an original when making a copy, and the process of making a print, are described separately.
Printing
Outputting a copy, outputting data stored in a mail box, or outputting data sent from a personal computer to the machine.
x |
Operation of the Machine and Terms Used in This Manual |

What the Machine Can Do
Additional Functions Screen
Press  to open the Additional Functions screen. The Printer Settings or the Report Settings can be accessed from this screen.
Report Settings |
|
|
|
|
|
Printer Settings |
|
|
|
|
|
||
|
|
|
|
|
|
|
In the Additional Functions screen, press [Printer Settings] to open the Custom Priting Settings menu.
Utility
Press this key to open the Utility menu, for initializing the printer.
Settings
Press this key to open the Settings menu.
What the Machine Can Do |
xi |

xii What the Machine Can Do

Before You Start Using the Machine 1
CHAPTER
This chapter describes how to set up the printing environment from the touch panel display.
Menu Functions . . . . . . . . . . . . . . . . . . . . . . . . . . . . . . . . . . . . . . . . . . . . . . . . . . . . . . . . 1-2
What Are Menu Functions? . . . . . . . . . . . . . . . . . . . . . . . . . . . . . . . . . . . . . . . . . . . . . . . . . . . . .1-2
Accessing the Menus . . . . . . . . . . . . . . . . . . . . . . . . . . . . . . . . . . . . . . . . . . . . . . . . . . . . . . . . .1-3
Using the Printer Settings Menu . . . . . . . . . . . . . . . . . . . . . . . . . . . . . . . . . . . . . . . . . . . 1-5 Using the Report Settings Menu . . . . . . . . . . . . . . . . . . . . . . . . . . . . . . . . . . . . . . . . . . . 1-8
1-1
1
Before You Start Using the Machine
Menu Functions
This chapter describes the menu functions and how to access them with the touch panel display.
What Are Menu Functions?
The machine lets you specify the number of copies, the paper size, etc., to use when it receives a print job. Normally, however, these types of settings are specified by the application sending the print job, or by the printer driver.
However, you can specify many other settings other than the number of copies, the paper size, etc., which affect the printer function of the machine. These include some settings that cannot be specified from an application or the printer driver. These settings are referred to as “Menu Functions.”
The menu functions are set using the keys on the touch panel display and are grouped together depending on the type of settings performed. This makes them easy to set.
 NOTE
NOTE
•The contents of the Printer Settings are stored in the nonvolatile memory of the machine. This means that the settings are stored even if the power to the machine is switched off - the settings will still be available when the power is switched on again.
Understanding the Printer Settings Priorities
When the same menu function setting can be specified by using the keys on the machine, or by specifying the setting in an application or the printer driver, the setting from the application or printer driver has priority. These settings will override the settings made on the machine.
|
Setting priority |
||
High |
|
|
Low |
|
|
|
|
Application |
|
|
Touch panel display |
Printer driver |
|
|
|
|
|
|
|
|
|
|
|
•The Windows printer driver is included on the CD-ROM provided with the machine. For instructions on installing the printer driver, see the Setup Guide.
1-2 Menu Functions

Accessing the Menus
To access the printer related menu functions, display the Printer Settings screen on the touch panel display and use the keys on the display to specify the settings.
 IMPORTANT
•You can access menus and modify settings while print jobs are waiting in the queue. However, any new settings will only affect print jobs sent to the queue after making the modifications.
1 Press Additional Functions .
Reset |
|
Clear |
1 |
2 |
3 C |
Guide |
|
Star |
? 4 5 6
Additional Functions
7 8 9
0 # ID
2 Press [Printer Settings].
1
Before You Start Using the Machine
Menu Functions |
1-3 |

3 Press [Settings] or [Utility] to access the corresponding menu.
The Settings menu provides access to common settings, such as number of copies, error handling, and toner density.
The Utility menu provides access to the reset printer function.
1
Before You Start Using the Machine
1-4 Menu Functions

Using the Printer Settings Menu
The Printer Settings Menu enables you to access common features. Below is an abbreviated outline of the Printer Settings Menu structure. For a detailed description of all Printer Settings Menu options, see “Printer Settings Menu Functions and Operation,” on p. 3-1 through p. 3-23.
Settings |
Setting Value |
Settings |
|
Common Menu |
|
|
|
|
|
|
|
|
|
|
|||
|
|
|
|
|
|
|
|
|
|
|
|||||
|
|
|
|
|
|
|
|
|
|
|
|
|
|
|
|
|
|
|
Copies |
|
|
|
|
|
|
|
1 |
|
|
||
|
|
|
|
|
|
|
|
||||||||
|
|
|
|
|
|
|
|
|
|
|
|
|
|
|
|
|
|
2-Sided Printing |
|
|
|
|
|
|
|
2000 |
|
|
|||
|
|
|
|
|
|
|
|
|
|
|
|
|
|
|
|
|
|
|
|
|
|
|
|
|
|
|
|
|
|
|
|
|
|
|
|
|
|
|
|
|
|
|
|
|
|
|
|
|
|
|
Paper Feed |
|
|
|
Default Paper Size |
|
|
|
A4 |
|
|||
|
|
|
|
|
|
|
|||||||||
|
|
|
|
|
|
|
|
|
|
|
|
|
|
|
|
|
|
|
|
|
|
|
|
Default Paper Type |
|
|
|
|
|
|
|
|
|
|
|
|
|
|
|
|
|
|
|
|
Statement |
|
|
|
|
|
|
|
|
|
|
Paper Size Override |
|
|
|
|
|
|
|
|
|
|
PCL/PS |
|
|
|
|
|
|
|
|
|
|
||
|
|
|
|
" |
" indicates that settings or levels are omitted. |
||||||||||
|
|
|
|
|
|
||||||||||
|
|
|
|
|
|
||||||||||
|
|
|
|
|
|
||||||||||
|
|
|
|||||||||||||
Utility |
|
Reset Printer |
|||||||||||||
|
|||||||||||||||
|
|
|
|
|
|
|
|
|
|
|
|
|
|
|
|
|
|
|
|
|
|
|
|
|
|
|
|
|
|
|
|
1
Before You Start Using the Machine
Using the Printer Settings Menu |
1-5 |

1
Before You Start Using the Machine
As an example, the following is the sequence of steps for setting the number of copies.
1 Press Additional Functions .
Reset |
|
Clear |
1 |
2 |
3 C |
Guide |
|
Star |
? 4 5 6
Additional Functions
7 8 9
0 # ID
2 Press [Printer Settings].
3 Press [Settings].
1-6 Using the Printer Settings Menu
4
5
Press [Copies].
Enter the number of copies using the numeric keys or [-] and [+].
1
Before You Start Using the Machine
6 Confirm the setting, then press [OK].
Using the Printer Settings Menu |
1-7 |

1
Before You Start Using the Machine
Using the Report Settings Menu
The Report Settings Menu enables you to access report print features such as checking the configuration. Below is an abbreviated outline of the Report Settings Menu structure. For a detailed description of Report Settings Menu options, see “Report Settings Menu,” on p. 4-1.
Settings
Printer |
|
|
|
|
|
|
|
|
|
Configuration |
|
||
|
PCL/PS |
|
|
PCL |
|
|
|
|
|||||
|
|
|
|
|
|
||||||||
|
|
|
|
|
|
|
|
|
|
Page |
|
||
|
|
|
|
|
|
|
|
|
|
|
|||
|
|
|
|
|
|
|
|
|
|
|
|
|
|
|
|
|
|
|
|
|
|
|
|
|
|
|
|
|
|
|
|
|
|
|
|
|
|
Font List |
|
||
|
|
|
|
|
|
|
|
|
|
|
|
|
|
PS |
|
Configuration |
|
Page
(Printer Kit-C1 only)
Font List
1-8 Using the Report Settings Menu

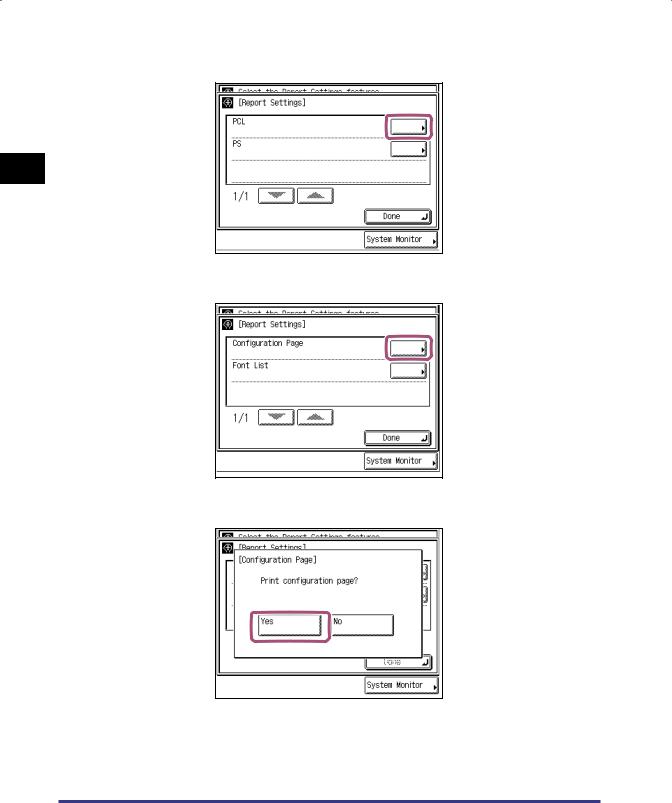
As an example, the following is the sequence of steps for printing a Configuration Page.
1
2
Press Additional Functions .
Reset |
|
Clear |
1 |
2 |
3 C |
Guide |
|
Star |
? 4 5 6
Additional Functions
7 8 9
0 # ID
Press [Report Settings].
1
Before You Start Using the Machine
3 Press [Printer].
Using the Report Settings Menu |
1-9 |
1
Before You Start Using the Machine
4
5
6
Press [PCL].
Press [Configuration Page].
Press [Yes] to print the page.
1-10 Using the Report Settings Menu

Configuration Page Sample
If the printer function is working correctly, the Configuration Page will be similar to the sample below.
PCL Configuration Page
PS Configuration Page
(Printer Kit-C1 Only)
1
Before You Start Using the Machine
Using the Report Settings Menu |
1-11 |

1
Before You Start Using the Machine
1-12 Using the Report Settings Menu

|
|
|
|
|
|
Menu Functions and Operation |
2 |
|
|
CHAPTER |
|
|
|
|
This chapter describes outline of all functions and settings.
Printer Settings Menu Functions . . . . . . . . . . . . . . . . . . . . . . . . . . . . . . . . . . . . . . . . . . . 2-2
Report Settings Menu Functions . . . . . . . . . . . . . . . . . . . . . . . . . . . . . . . . . . . . . . . . . . . 2-5
2-1

2
Menu Functions and Operation
Printer Settings Menu Functions
The following table lists all settings of the Printer Settings Menu.
 NOTE
NOTE
• The bold values indicate the default settings.
Setting |
Available Options |
|
Description |
||
|
|
|
|
|
|
Settings Menu (See p.3-3) |
|
|
|
||
|
|
|
|
|
|
Copies |
1 - 2000 |
|
Sets the number of copies to be printed. |
||
|
|
|
|
|
|
2-Sided Printing |
On, Off |
|
Turns double-sided printing on or off. |
||
|
|
|
|
|
|
Paper Feed |
|
|
|
||
Default Paper Size
Default Paper Type
Letter, Legal, A4, A3, A5,
11x17, Executive, Statement,
Monarch, Com10, DL,
ISO-B5, ISO-C5
Plain Paper, Transparency,
Heavy Paper, Recycled,
Color, Letterhead, Tracing
Paper, Labels, Bond Paper,
Envelope
Sets the default paper size to be used when printing from the machine.
Sets the default paper type to be used for printing.
Paper Size
Override
Print Quality
Image Refinement
Density
Toner Save
Layout
Binding
Margin
Offset X
Offset Y
On, Off
On, Off
1-5-9
On, Off
Long Edge, Short Edge
-30.0 - 0.0 - +30.0 mm
-50.0 - 0.0 - +50.0 mm
-50.0 - 0.0 - +50.0 mm
Turns Paper Size Override on or off.
Turns Image Refinement on or off.
Enables you to set the print density.
Turns Toner Save on or off.
Sets long edge or short edge binding for print jobs.
Sets the margin in millimeters.
Sets the X Offset.
Sets the Y Offset.
2-2 Printer Settings Menu Functions

Setting |
|
Available Options |
|
Description |
|
|
|
|
|
|
|
|
|
Turns the Auto Continue function on or off. When |
Auto Continue |
|
On, Off |
|
Auto Continue is enabled, the machine |
|
|
|
|
automatically continues if an error skip error ocurrs. |
|
|
|
|
|
Job Securing Time |
|
1 hour, 2 hours, 3 hours, |
|
Determines how long a secured job remains in the |
|
6 hours, 12 hours, 24 hours |
|
queue before being cancelled. |
|
|
|
|
||
|
|
|
|
|
Timeout |
|
Timeout (5 - 15 - 300 s), Off |
|
Determines the timeout interval in seconds. |
|
|
|
|
|
Print After |
|
On, Off |
|
Selects whether to print the first page after all the |
Completing RIP |
|
|
pages in job have been rastorized. |
|
|
|
|
||
|
|
|
|
|
|
|
None, Rotate Collating, |
|
|
|
|
Rotate Grouping, Offset |
|
|
|
|
Collating, Offset Grouping, |
|
|
|
|
Staple Sort |
|
|
Finisher |
|
Staple position: Corner |
|
Selects the finisher or shift tray, if installed, and |
|
(Upper-L), Double (Top), |
|
selects the setting for collating and staple sort. |
|
|
|
|
||
|
|
Corner (Upper-R), Double |
|
|
|
|
(Right), Corner (Lower-R), |
|
|
|
|
Double (Bottom), Corner |
|
|
|
|
(Lower-L), Double (Left) |
|
|
Punch |
|
None, Top, Bottom, Left, |
|
Right |
|
|
|
|
|
|
|
Booklet |
|
On, Off |
|
|
|
Saddle Stitch |
|
On, Off |
|
|
|
Transparency |
|
None, Blank, Printed |
Interleaving |
|
|
|
|
|
|
|
|
Personality |
|
Auto, PS, PCL |
|
|
|
Initialize |
|
|
Sets the punch settings for the puncher unit, if installed.
Turns booklet binding on or off.
Turns saddle stitching on or off.
Enables you to determine the settings for Transparency Interleaving.
Enables you to determine the Personality setting.
Enables you to initialize the settings.
PCL/PS Settings (See p.3-20)
PCL |
|
|
|
|
|
|
|
|
|
|
|
Orientation |
|
Portrait, Landscape |
|
Sets the paper orientation. |
|
|
|
|
|
|
|
Font Number |
0 - 120 |
|
|
Sets the font number. |
|
|
|
|
|
|
|
Point Size |
4.00 - 12.00 |
- 999.75 point |
|
Sets the default point size. |
|
|
|
|
|
|
|
Pitch |
0.44 - 10.00 |
- 99.99 cpi |
|
Sets the default pitch. |
|
|
|
|
|
|
|
Form Lines |
|
5 - 64 - 128 lines |
|
Sets the number of lines on a page. |
|
|
|
|
|
|
|
2
Menu Functions and Operation
Printer Settings Menu Functions |
2-3 |

2
Menu Functions and Operation
Setting |
|
Available Options |
|
Description |
|
|
|
|
|
|
|
DESKTOP, ISO4, ISO6, |
|
|
|
|
ISO11, ISO15, ISO17, |
|
|
|
|
ISO21, ISO60, ISO69, |
|
|
|
|
ISOL1, ISOL2, ISOL5, |
|
|
|
|
ISOL6, LEGAL, MATH8, |
|
|
|
|
MCTEXT, MSPUBL, PC775, |
|
|
Symbol Set |
|
PC8, PC850, PC852, |
|
Sets the symbol set. |
|
|
PC8DN, PC8TK, PC1004, |
|
|
|
|
PIFONT, PSMATH, PSTEXT, |
|
|
|
|
ROMAN8, VNINTL, |
|
|
|
|
VNMATH, VNUS, WIN30, |
|
|
|
|
WINBALT, WINL1, WINL2, |
|
|
|
|
WINL5 |
|
|
|
|
|
|
|
Custom Paper |
|
On, Off |
|
Toggles custom paper on or off. |
|
|
|
|
|
|
|
|
|
Sets the unit of measurement for specifying the |
Unit of Measure |
|
Millimeters, Inches |
|
custom paper size. |
|
|
*This setting is only displayed if Custom Paper is set |
||
|
|
|
|
|
|
|
|
|
to on. |
|
|
|
|
|
|
|
|
|
Sets the X dimension of the custom paper. |
X Dimension |
|
138 - 432 mm |
|
*This setting is only displayed if Custom Paper is set |
|
|
|
|
to on. |
|
|
|
|
|
|
|
|
|
Sets the Y dimension of the custom paper. |
Y Dimension |
|
100 - 297 mm |
|
*This setting is only displayed if Custom Paper is set |
|
|
|
|
to on. |
|
|
|
|
|
Append CR to LF |
|
Yes, No |
|
Append a carriage return to each line feed |
|
|
encountered. |
||
|
|
|
|
|
|
|
|
|
|
PS (Print Kit-C1 Only) |
|
|
|
|
|
|
|
|
|
Job Timeout |
|
0 - 3600 s |
|
Sets the timeout setting in seconds. |
|
|
|
|
|
Wait Timeout |
|
0 - 300 - 3600 s |
|
Determines how long a job waits, in seconds, before |
|
|
it times out. |
||
|
|
|
|
|
|
|
|
|
|
Print PS Errors |
|
On, Off |
|
Turns printing of PS errors on or off. |
|
|
|
|
|
Utility Menu (See p.3-23)
Reset Printer
Enables you to reset the printer function and cancel jobs in the print queue or in the machine’s memory.
2-4 Printer Settings Menu Functions
Loading...