


imageCLASS MF4700
Table of contents
 Loading...
Basic Operation Guide
For information about machine setup and software
installation, see the Starter Guide.
This guide describes the basic use of
the machine. Read this guide after
finishing the machine setup.
Read ”Important Safety Instructions”
first ĺp..
Keep this manual for future reference.
For information about advanced operations and
specifications, see the e-Manual included on the User
Software CD-ROM.
2
Manuals for the Machine
Starter Guide
The Starter Guide describes setting up the machine and installing the software.
Be sure to read this manual before using the machine.
Wireless LAN Setting Guide (MF4890dw/MF4880dw Only)
This manual describes Wireless LAN setup procedures and causes and countermeasures
for trouble you might face during the setup. Be sure to read this manual before using the
machine.
e-Manual
The e-Manual includes information about all functions and con gurations of the machine.
This manual is included on the User Software CD-ROM. Use the e-Manual’s search function
to easily nd the information you want.
Basic Operation Guide
The Basic Operation Guide describes common use and basic functions of the copy,
fax, and print functions.
This Manual
For Macintosh Users
The examples shown in this manual are based on the operation in the Windows
environment. To view how to use printer driver, fax driver, and scanner driver, refer
to the driver guides included in the User Software CD-ROM and the driver’s help.
Displaying Driver Guides
To view the Driver Guides, double-click the HTML les from the following folders
on the User Software CD-ROM.
• Canon MF Printer Driver Installation Guide [Documents] [Print]
[Guide] [index.html]
• Canon Fax Driver Installation Guide [Documents] [Fax] [Guide]
[index.html]
• Canon Scanner Driver Guide [Documents] [Scan] [Guide]
[index.html]
Displaying from Driver’s Help System
From each driver panel, click [ ]
3
How to Use This Manual
Symbols Used in This Manual
WARNING
Indicates a situation that may lead to death or injury to persons.
To u
se the machine safely, always pay attention to these warnings.
CAUTION
Indicates a situation that may lead to injury to persons or damage to
eq
uipment. To use the machine safely, always pay attention to these
cautions.
Indicates an operation that must not be performed. Read these items
carefully, and make sure not to perform the described operations.
IMPORTANTIMPORTANT
Indicates operational requirements and restrictions. Be sure to read
these items carefully to operate the machine correctly and avoid
damage to the machine or property.
Indicates a clari cation of an operation or additional explanations for a
procedure. Reading these notes is highly recommended.
Keys and Buttons Used in This Manual
In this manual, the following styles are used to represent keys, messages on the display, and
buttons or other items on a computer screen.
• Operation panel keys: [Key icon] (Key name)
Example: [ ] (Stop)
• Display: <Message>
Example: <Specify Destination>
• Buttons and items on a computer screen: [Item]
Example: [Preference]
Illustrations Used in This Manual
Illustrations Used in This Manual
Illustrations of the MF4890dw are used in this manual. If a procedure or topic applies to only
one mac
hine, this will be clearly indicated in the manual (for example, “MF4880dw”).
Displays Used in This Manual
The display shown in this manual is the factory preset display for the MF4890dw.
De
pending on the system con guration and product purchased, the appearance of the
display may di er.
4
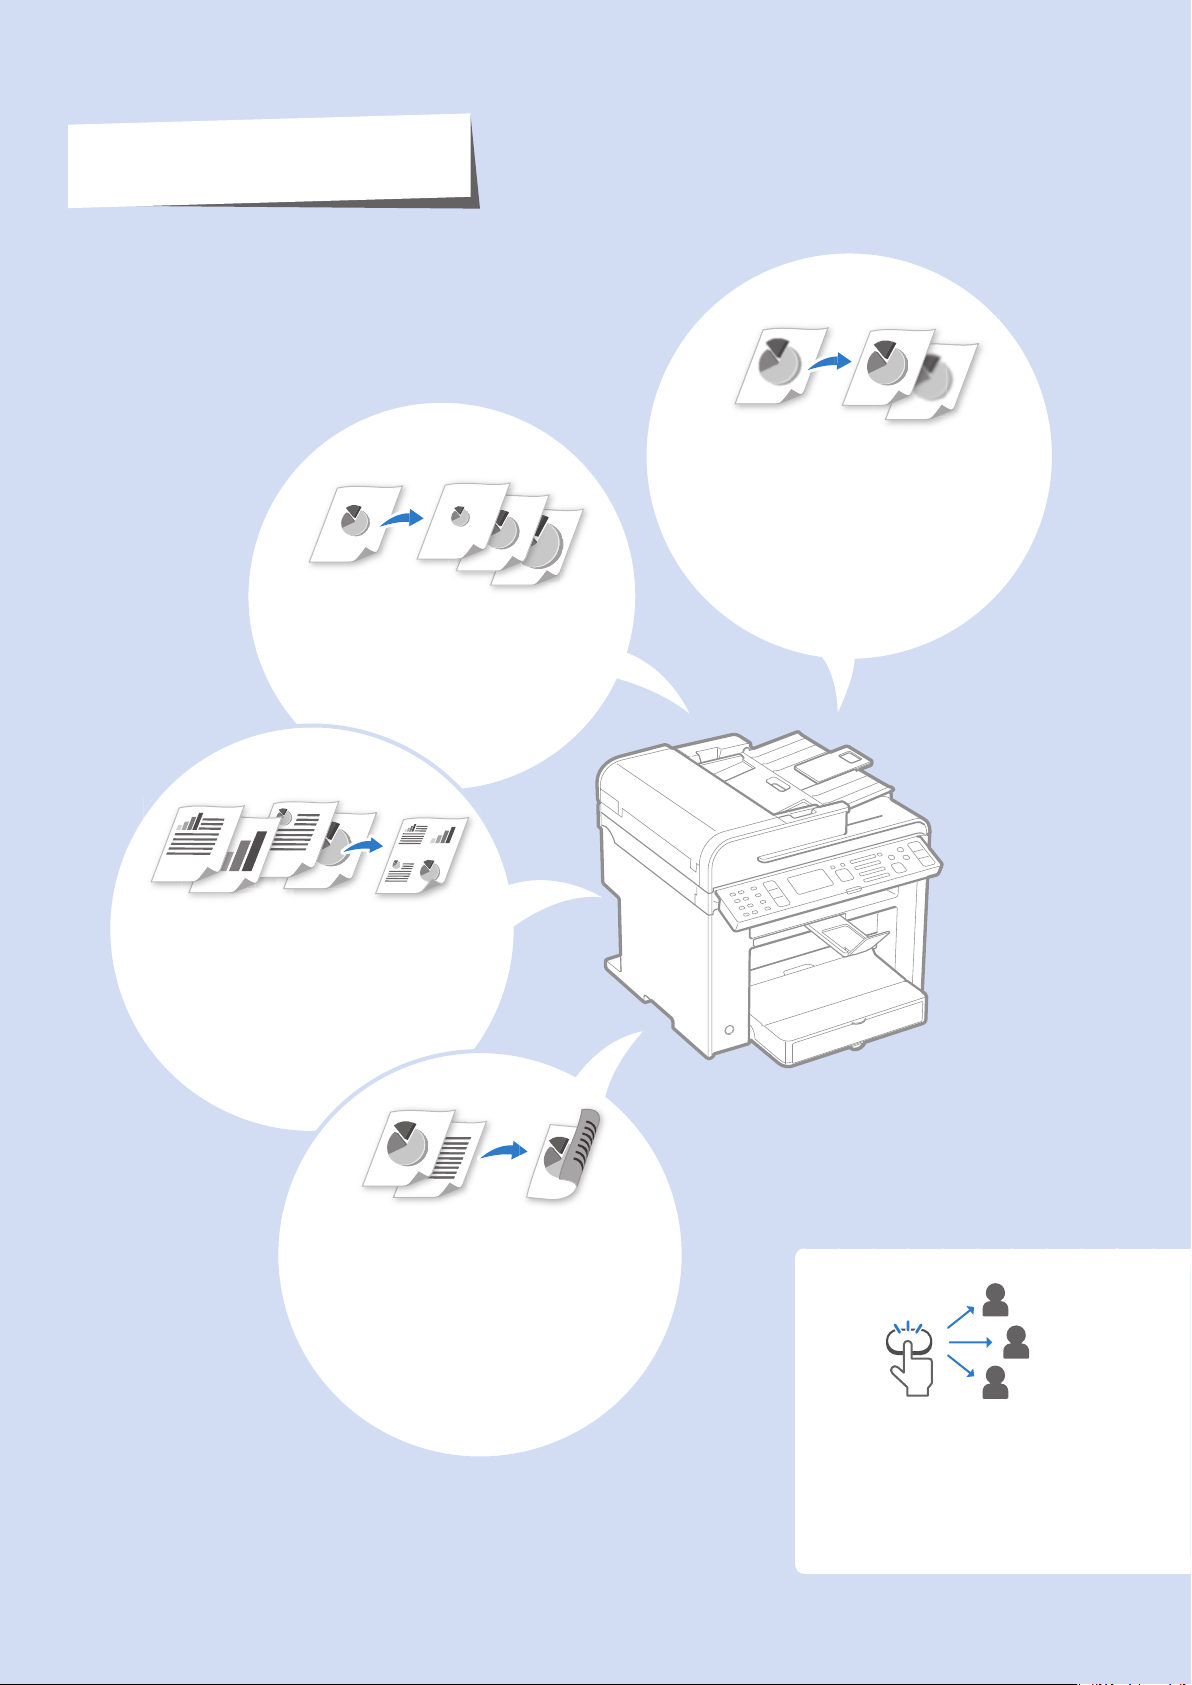
Fax
One-touch/Coded/Group
Dialing
→ P. 4 8
Specify fax destinations using one-
touch keys, coded dial, and group
dial.
Adjusting Quality
Adjust image quality by setting the
density, resolution, and sharpness.
• Copy → P. 3 2
• Fax → P. 5 2
2-Sided Printing*
Print copies, received faxes, or
documents on both sides of paper.
• Copy → P. 3 4
• Print → P. 4 1
• Fax → P. 6 9
Multiple Documents onto
Single Page
Print multiple pages onto a single page.
• Copy → P. 3 5
• Print → P. 4 2
Enlarging and Reducing
• Copy → P. 3 1
• Print → P. 4 0
* MF4890dw/MF4880dwonly
Main Functions
5
Copy
1
2
3
1
2
3
1
2
3
1
1
1
2
2
2
3
3
3
<ON>
<OFF>
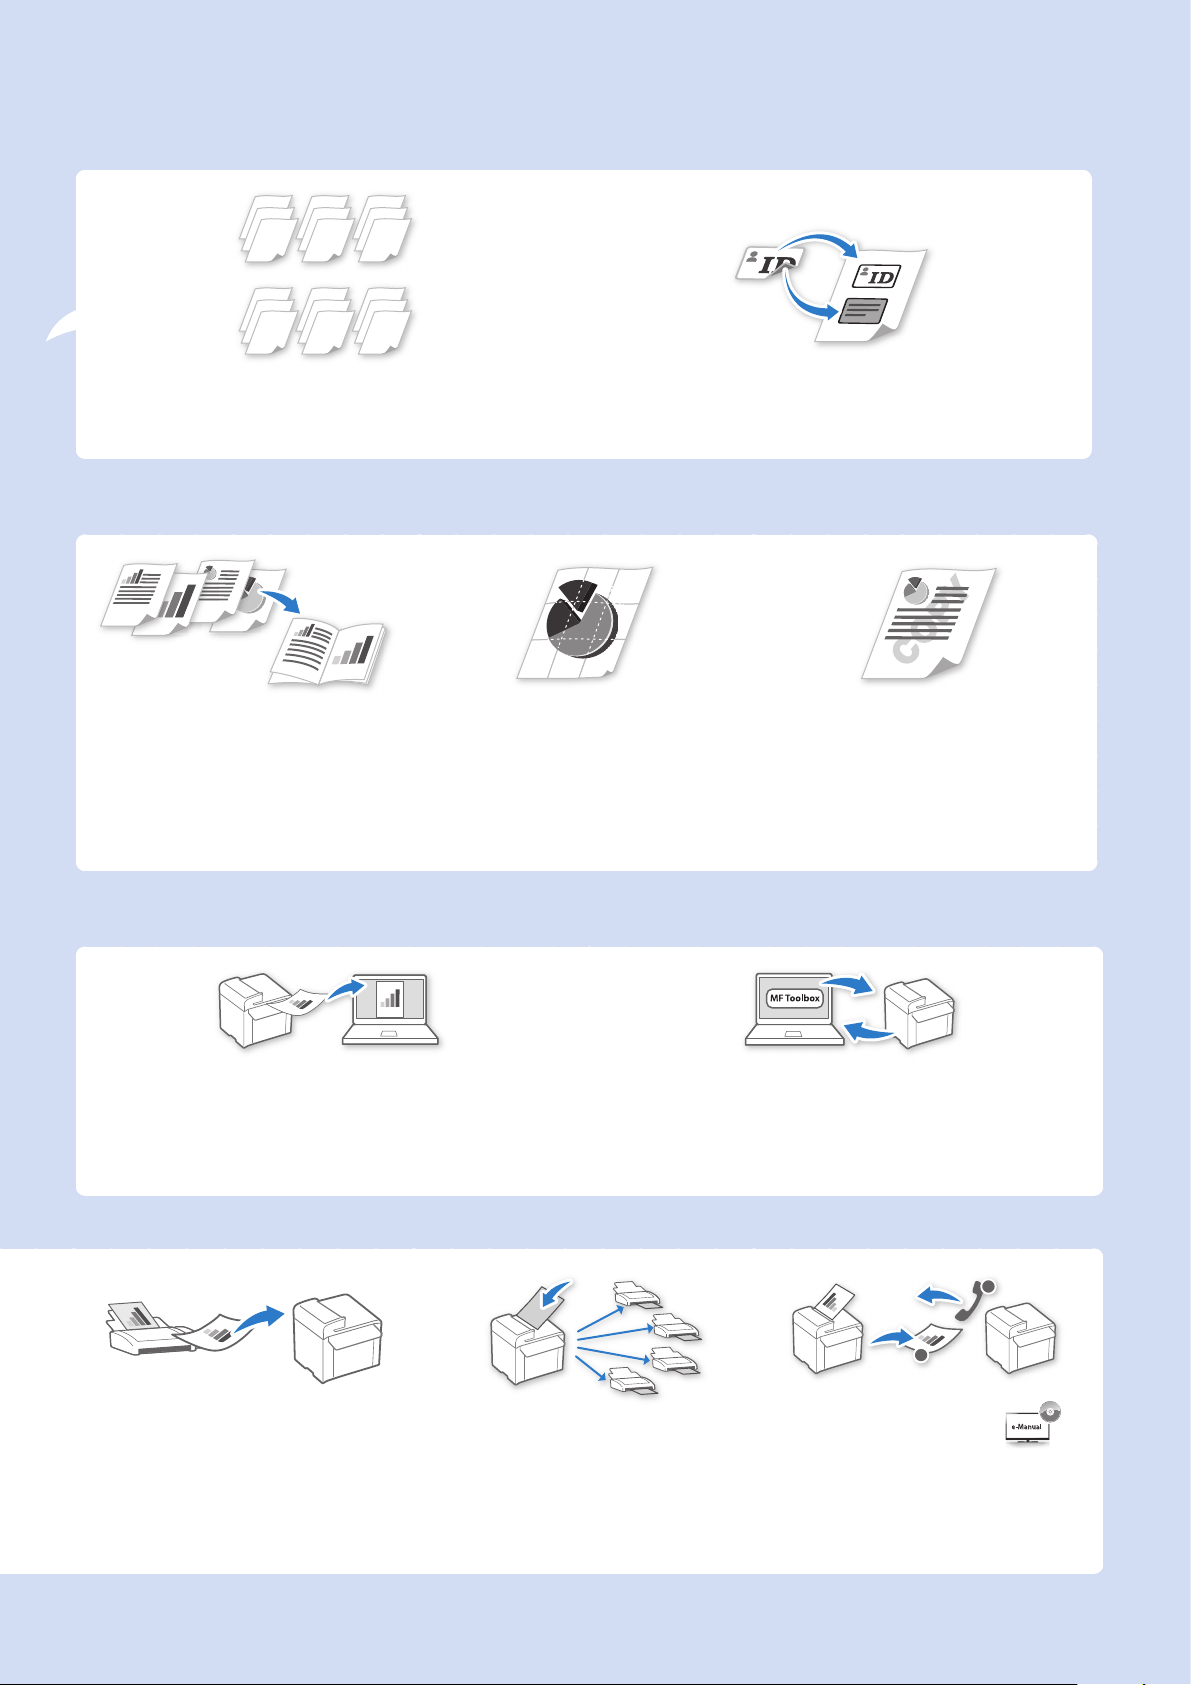
Collating Copies → P. 3 5
Collate copies when copying multiple documents.
Copying ID Card → P. 3 6
Copy both sides of an ID card onto a single page.
Print
Booklet Printing* → P. 4 3
• Combine two pages onto a single
page, and then print on both sides.
• Make a booklet by folding printouts
in half and binding.
Poster Printing → P. 4 4
• Magnify and divide a single-paged
image to print on multiple sheets of
paper.
• Make a poster by combining the
prints together.
Watermark Printing → P. 4 5
Add watermarks, such as “COPY” or
“DRAFT”, to the document.
Scan
Scanning using the Operation Panel → P. 7 5
Select a computer to save scanned images in and scan
images directly from the operation panel.
Remote Scanning from Computers → P.7 8
Set to use the remote scan from the machine, and then
scan images from a computer using the MF Toolbox.
Receiving in the Memory
→ P. 6 4
• Store received faxes in the memory.
• Print or forward the received fax after
con rming the sender.
Sequential Broadcasting
→ P. 5 8
Send the same document to multiple
destinations at a time.
1
2
Polling Receiving →
Retrieve pre-loaded documents from
a sender’s fax machine.
* MF4890dw/MF4880dwonly
6
Basic Operation
Learn the Names and Functions of Each Part of the Machine ……… 10
Front Side …………………………………………………………… 10
In
terior ……………………………………………………………… 12
Back Side …………………………………………………………… 13
Learn the Functions of the Operation Panel ………………………… 14
S
w
itch to Copy/Fax/Scan Mode ……………………………………… 16
Enter Text …………………………………………………………… 17
Set Date and Time …………………………………………………… 18
Place Documents …………………………………………………… 19
Placing Documents on the Platen Glass …………………………… 20
Placing Documents in the Feeder …………………………………… 20
Load Paper …………………………………………………………… 22
Loading Paper in the Paper Cassette ………………………………… 23
Load
ing Paper in the Multi-Purpose Tray …………………………… 24
Loading Envelopes or Paper with a Letterhead ……………………… 25
Setting a Paper Size and Type ……………………………………… 26
Switch to the Quiet Mode …………………………………………… 27
S
w
itch to the Sleep Mode …………………………………………… 27
Use the Toner Saver Mode …………………………………………… 28
Copy
Make a Basic Copy …………………………………………………… 30
Copy by Saving Paper ………………………………………………… 31
Enlarge or Reduce Copies …………………………………………… 31
Adjust the Image Quality for Copy …………………………………… 32
Adjusting the density ……………………………………………… 32
Selecting the Document Type ……………………………………… 32
Adjusting the sharpness …………………………………………… 33
Make Double-Sided Copies (MF4890dw/MF4880dw Only) ………… 34
C
o
py Multiple Pages onto One Sheet ……………………………… 35
Collate Copies ………………………………………………………… 35
Copy a Double-Sided ID Card ………………………………………… 36
View and Cancel Copy Jobs ………………………………………… 37
Change the Default Copy Settings …………………………………… 37
Contents
7
Print
Print a Document …………………………………………………… 40
Enlarge or Reduce a Document ……………………………………… 40
Print a Double-Sided Document (MF4890dw/MF4880dw Only) …… 41
Print Multiple Pages onto One Sheet ………………………………… 42
Print a Booklet (MF4890dw/MF4880dw Only) ……………………… 43
Print a Poster ………………………………………………………… 44
Add Watermarks to a Printout ……………………………………… 45
View and Cancel Print Jobs …………………………………………… 46
Fax
Register Numbers in the Address Book ……………………………… 48
Registering Numbers to One-Touch Keys …………………………… 48
Regi
stering Numbers to Coded Dialing Codes ……………………… 49
Registering Recipients for Group Dialing …………………………… 50
Editing and Deleting Registered Destinations ……………………… 52
Adjust the Image Quality for Fax …………………………………… 52
Adjusting the Density ……………………………………………… 52
Se
lec
ting the Resolution …………………………………………… 53
Adjusting the Sharpness …………………………………………… 53
Specifying the Double-Sided Document Format (MF4890dw Only) … 54
Changing the Default Settings ……………………………………… 54
Send a Fax …………………………………………………………… 55
Entering a Fax Number with the Alphanumeric Keys ………………… 55
U
s
ing the One-Touch Keys ………………………………………… 56
Using the Coded Dialing Codes……………………………………… 56
Searching the Address Book ………………………………………… 57
Redialing …………………………………………………………… 57
Sending a Fax to Multiple Destinations (Sequential Broadcast) ……… 58
Sending a Fax to an International Destination (Adding Pauses) ……… 58
Calling a Recipient before Sending a Fax …………………………… 59
Receive a Fax (Receive Mode) ………………………………………… 60
Using the Machine for Fax Only ……………………………………… 61
U
s
ing the Machine for Faxing and Phoning ………………………… 61
Using the Answering Machine ……………………………………… 62
Using the Machine Primarily for Phoning …………………………… 62
Receiving Faxes in Manual Mode …………………………………… 63
Receive a Fax from Memory ………………………………………… 64
Switching to Memory Lock Mode …………………………………… 64
V
i
ewing/Canceling/Forwarding Received Fax Documents ………… 65
Printing Received Fax Documents …………………………………… 65
View/Cancel/Forward a Fax Job ……………………………………… 66
C
h
ange the Fax Settings ……………………………………………… 66
Changing Fax Sending Settings ……………………………………… 66
Rest
ricting Fax Sending Functions …………………………………… 68
Changing Fax RX Settings …………………………………………… 69
Changing Communication Management Settings ………………… 70
(→ p.105)
You can see frequentely asked
questions about the receive mode.

8
Scan
Understand the Scanning Method …………………………………… 74
Scan a Document with the Operation Panel ………………………… 75
Scanning a Document Using a Shortcut Key ………………………… 77
Scan a Document with the MF Toolbox ……………………………… 78
Con guring Scan Settings Using the MF Toolbox …………………… 80
Scan a Document with the Scanner Driver ………………………… 82
Maintenance and Management
Clean the Machine …………………………………………………… 84
Cleaning the Exterior and Interior …………………………………… 84
Cl
eaning the Fixing Unit …………………………………………… 85
Cleaning the Platen Glass and Feeder ……………………………… 86
Check and Replace Toner Cartridges ………………………………… 87
Checking the Toner Level …………………………………………… 87
C
o
nserving the Toner to Extend the Life of Toner Cartridges ………… 88
Replacing the Toner Cartridge ……………………………………… 88
Manage Using the Report and List Functions ……………………… 91
Co
n
gure Settings Using the Remote UI …………………………… 92
Trou bl es hoo ti ng
Clear Jams …………………………………………………………… 94
Clearing Document Jams in the Feeder……………………………… 95
Cl
earing Paper Jams Inside the Machine …………………………… 96
Resolve a Displayed Message ………………………………………… 100
Resolve a
n Error Code ………………………………………………… 101
Improve Output Quality ……………………………………………… 102
Resolve a Problem …………………………………………………… 104
FAQ …………………………………………………………………… 105
If a Power Failure Occurs ……………………………………………… 108
Recycling Used Cartridges …………………………………………… 108
The Clean Earth Campaign …………………………………………… 108
Important Safety Instructions ……………………………………… 109
Legal Notices ………………………………………………………… 111
Laser Safety …………………………………………………………… 114
(→ p.106)
You can see frequentely asked
questions about the scan function.
9
Learn the Names and Functions of Each Part of the Machine ……… 10
Front Side …………………………………………………………… 10
In
terior ……………………………………………………………… 12
Back Side …………………………………………………………… 13
Learn the Functions of the Operation Panel ………………………… 14
S
w
itch to Copy/Fax/Scan Mode ……………………………………… 16
Enter Text …………………………………………………………… 17
Set Date and Time …………………………………………………… 18
Place Documents …………………………………………………… 19
Placing Documents on the Platen Glass …………………………… 20
Placing Documents in the Feeder …………………………………… 20
Load Paper …………………………………………………………… 22
Loading Paper in the Paper Cassette ………………………………… 23
Load
ing Paper in the Multi-Purpose Tray …………………………… 24
Loading Envelopes or Paper with a Letterhead ……………………… 25
Setting a Paper Size and Type ……………………………………… 26
Switch to the Quiet Mode …………………………………………… 27
S
w
itch to the Sleep Mode …………………………………………… 27
Use the Toner Saver Mode …………………………………………… 28
Basic Operation
This chapter describes overall information about the machine, and how to
place the documents and load the paper. Read this chapter rst.
10
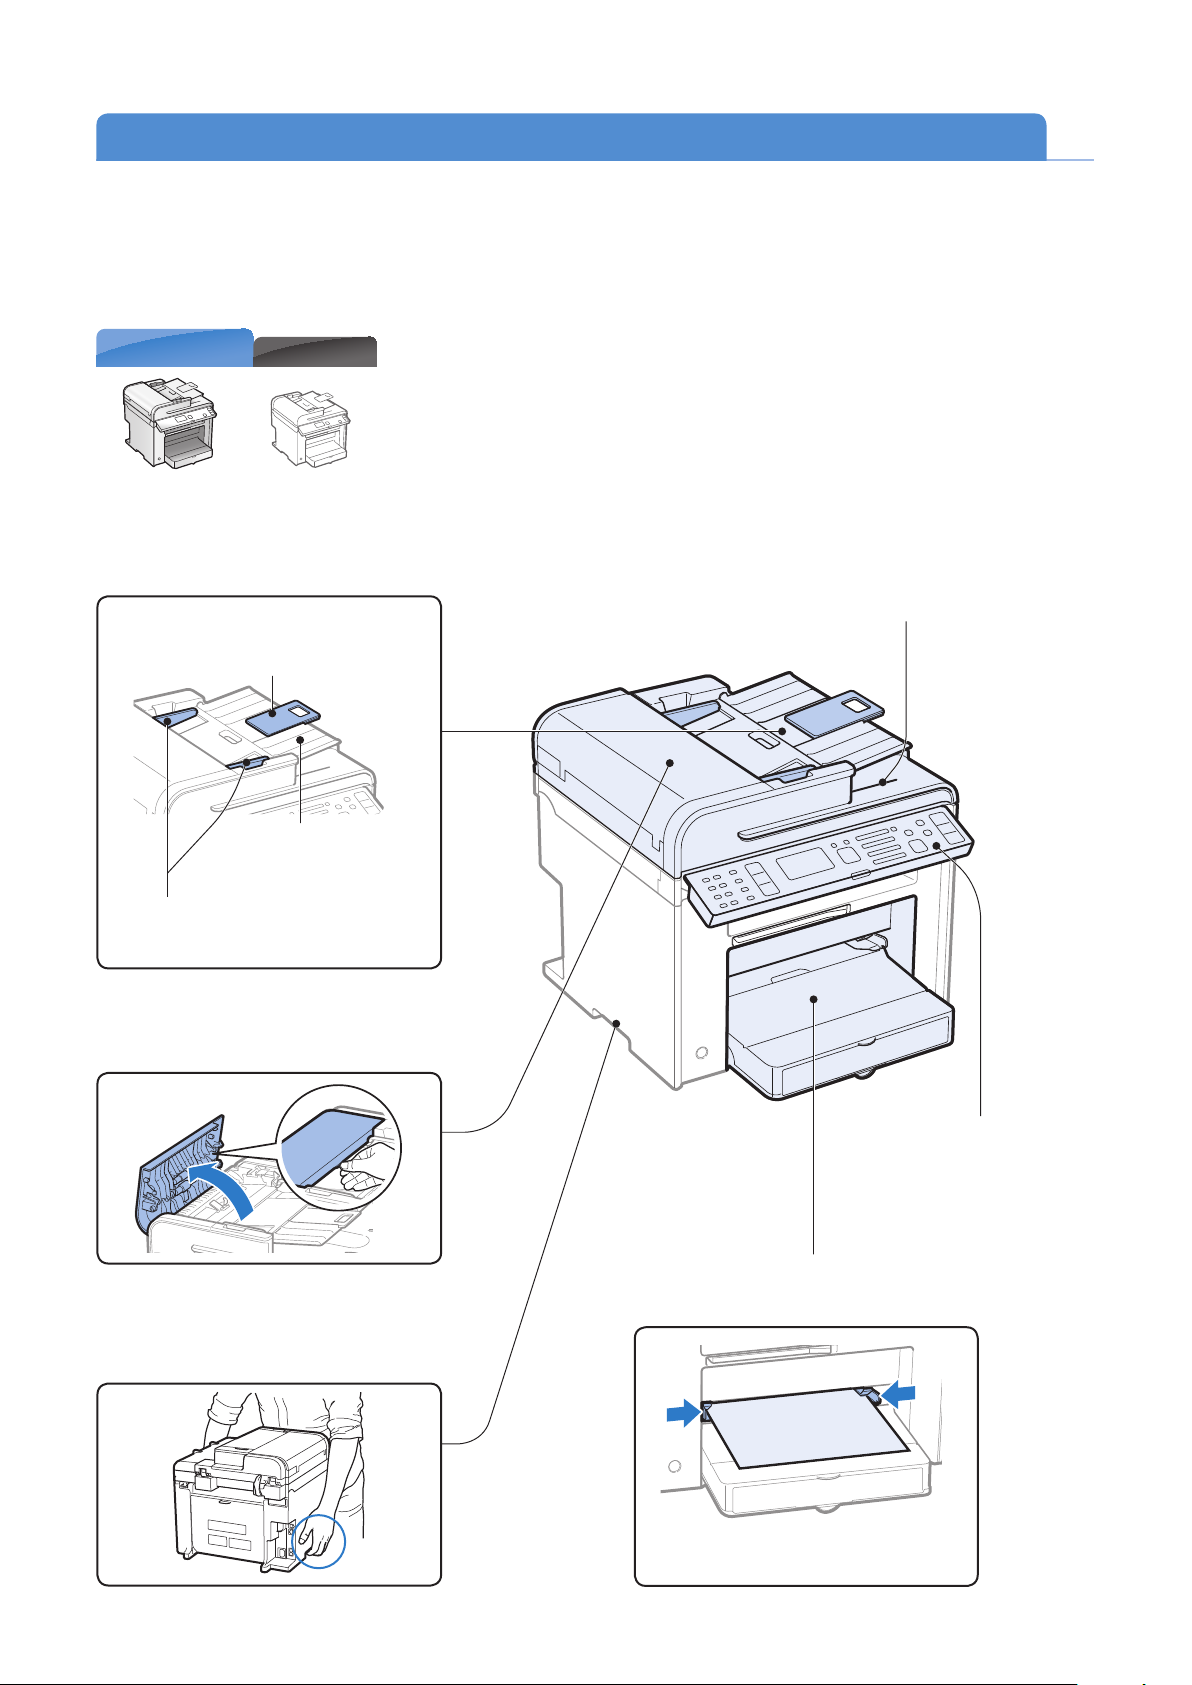
Document return tray
Returns documents after
scanning.
Operation panel
Use the panel to control
the machine (
→P.1 4) .
Multi-purpose tray
Load paper one by one manually (→P. 2 4) .
Paper guides
Adjust these guides to t the paper.
MF4890dw
MF4880dw/MF4770n
Learn the Names and Functions of Each Part of the Machine
Front Side
Feeder cover
Open this cover to clear paper jams (→P.9 5 ) .
Lift handles (left, right)
Hold these handles to lift or transport
the machine.
Feeder
Automatically feeds documents into the
machine (
→P. 2 0 ) .
Tray extension
Pull out to load large size
doc
uments.
Document feeder tray
Place your documents in
this
tray.
Document guides
Adjust these guides to t the document.
11
Basic Operation
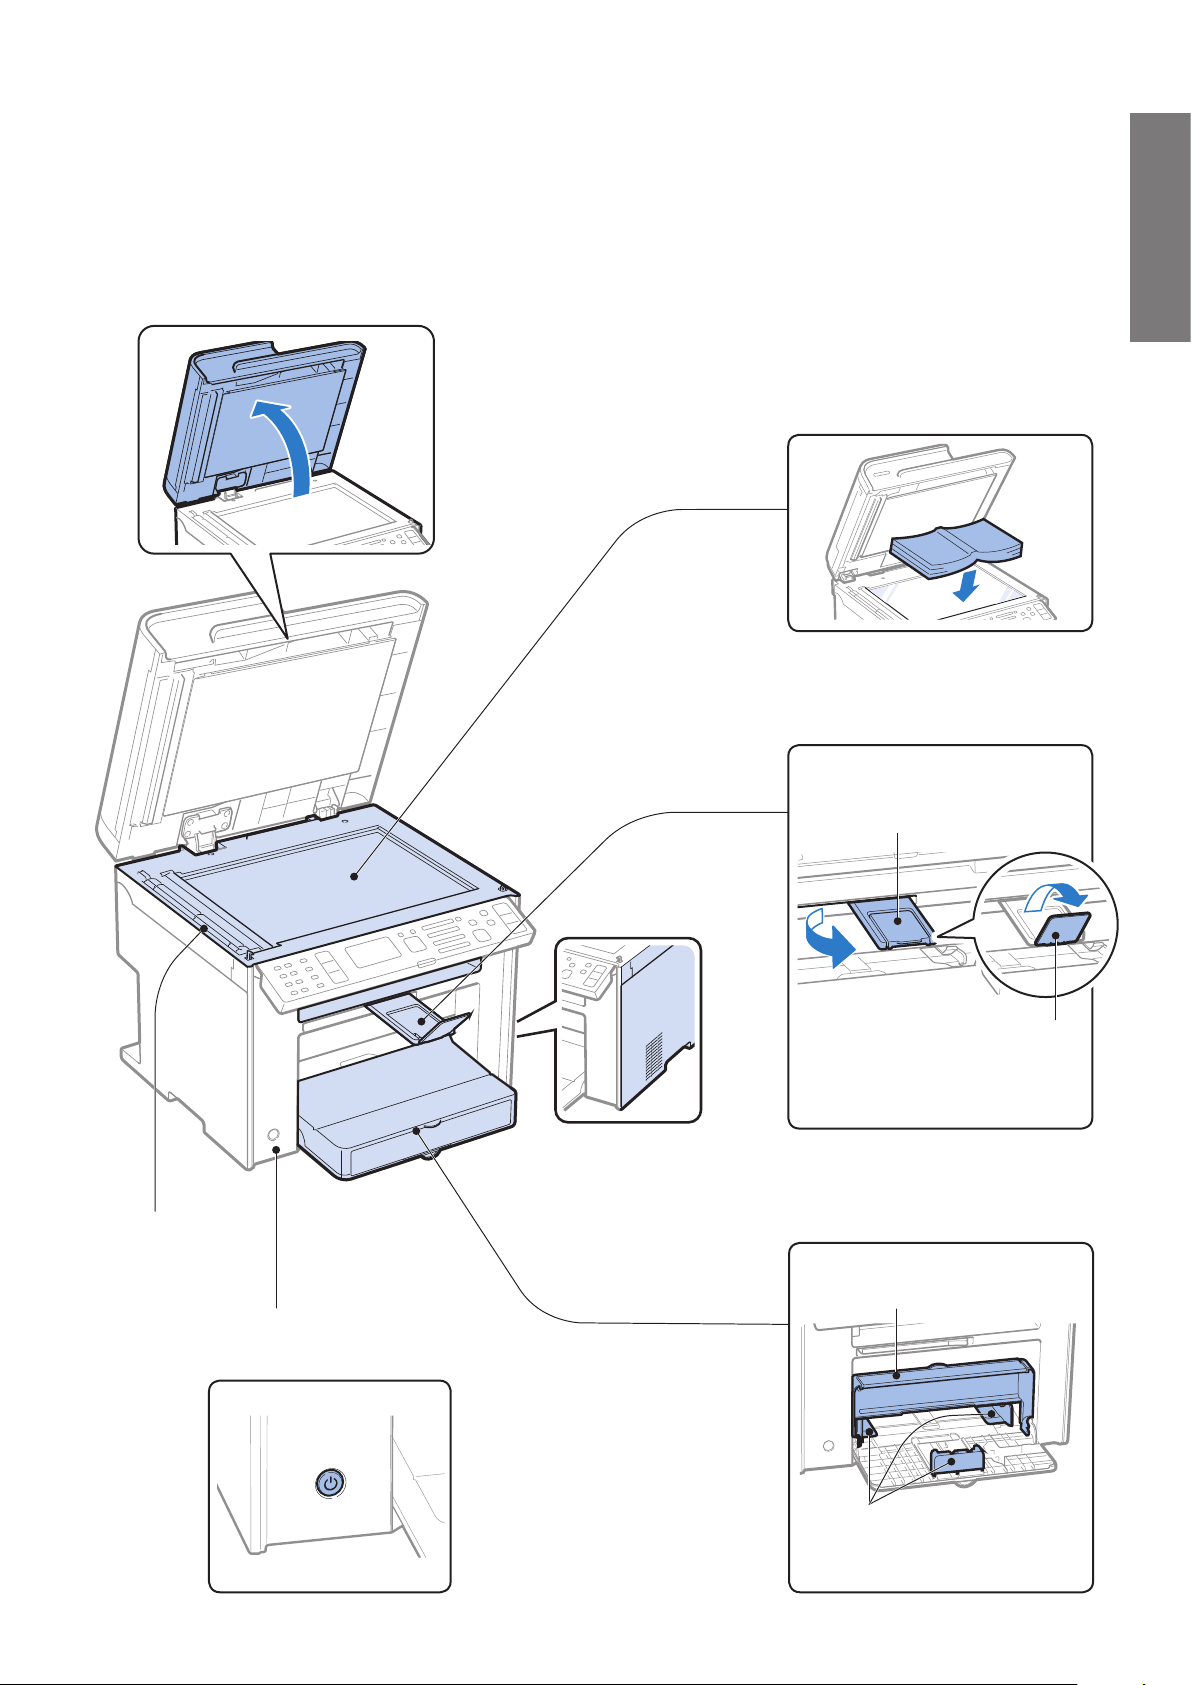
Scanning area
Scans documents
from the feeder.
Platen glass
Used to scan non-standard size paper
or books, as well as standard size
paper (
→P. 2 0 ) .
Ventilation slots
(MF4890dw/
MF4880dw only)
Allows heat to escape
from inside of the
machine. Leave more
than 4” (10 cm) of space
around the machine.
Output tray
Printed documents are output here
Output tray extension
Pull out the tray extension when
us
ing paper larger than LTR.
Paper stopper
Use the paper stopper to
prev
ent paper from falling out
of the output tray.
Paper cassette (Auto)
Load paper here (→P. 2 3) .
Dust cover
Close after loading the paper.
Paper guides
Adjust these guides to t the paper.
Power button
Turn the power ON or OFF.
12
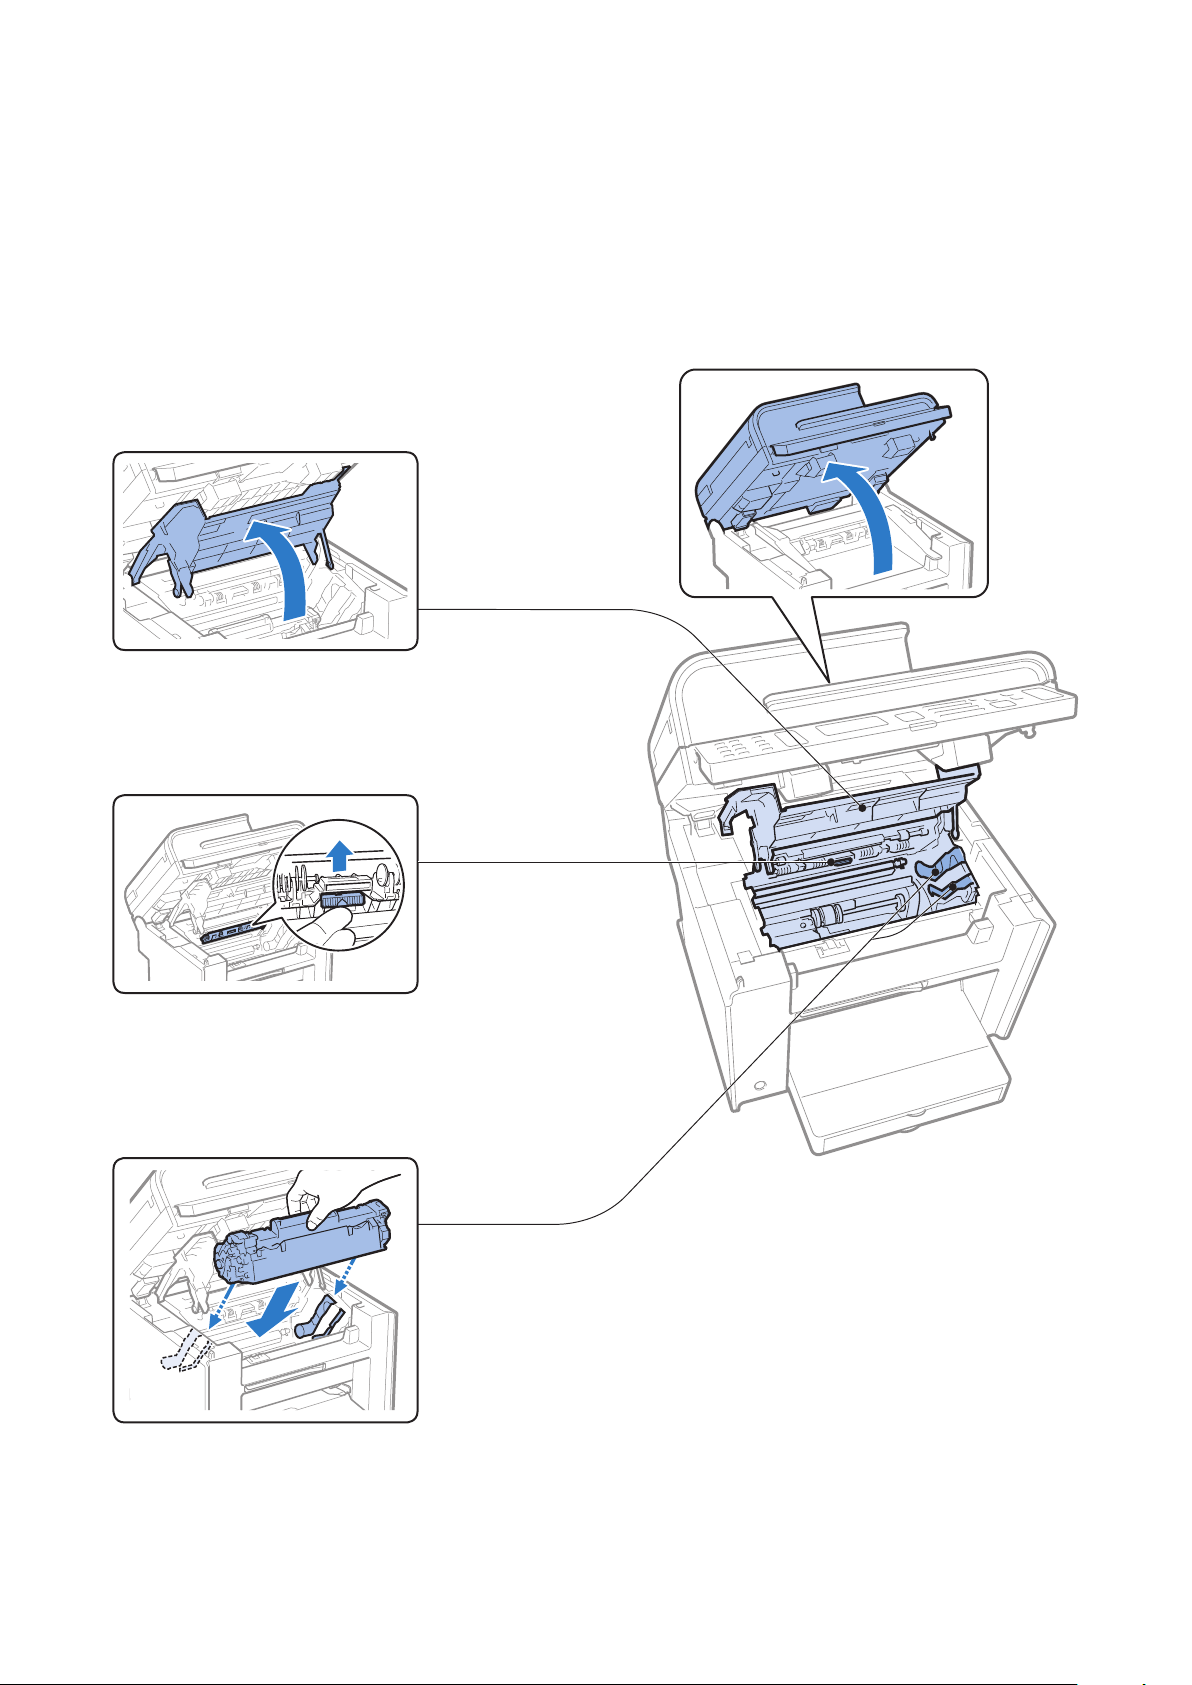
Interior
Paper exit guide
Open this guide to clear paper jams
(
→P. 9 6) .
Toner guides
When inserting the toner cartridge,
t the protrusions on the toner
cartridge into these guides (
→P. 8 8 ) .
Toner cover
Open this cover to access the toner
cartridge or clear paper jams (
→P. 8 8, P. 9 6 ) .
13
Basic Operation
HAND
SET
EXT.
LINE
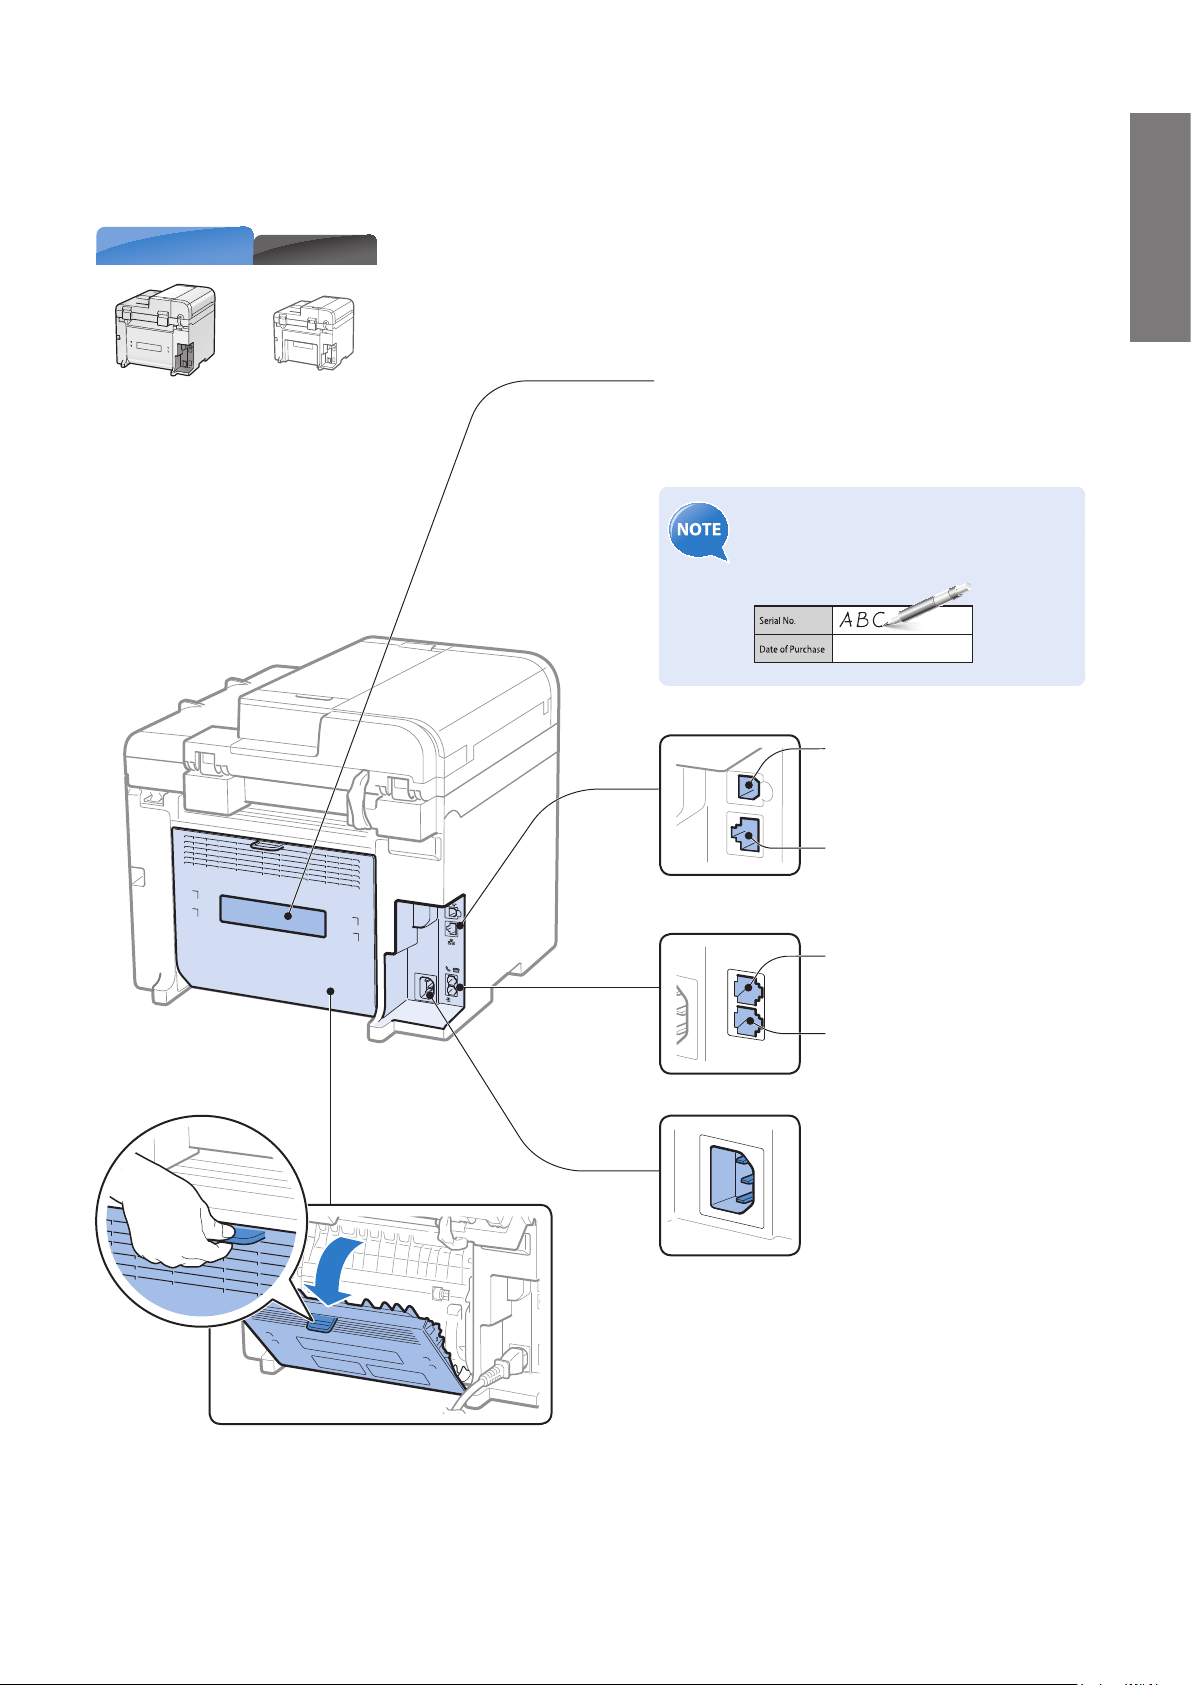
Back Side
Rear cover
(MF4890dw/MF4880dw only)
Open this cover to clear paper jams when using
the 2-sided copy function (
→P. 9 9) .
MF4770n
MF4890dw/MF4880dw
Rating label
The machine’s serial number (consists of three
letters and a 5-digit number) and the required
voltage and current are speci ed.
Write the serial number on the back
cover of this guide for reference when
contacting the Canon Customer Center.
Power socket
Connect the power cord.
USB port
Connect to a computer via a
USB cable.
LAN port
Connect to a network via a
LAN cable.
External device jack
Connect an external telephone.
Telephone line jack
Connect a telephone line.
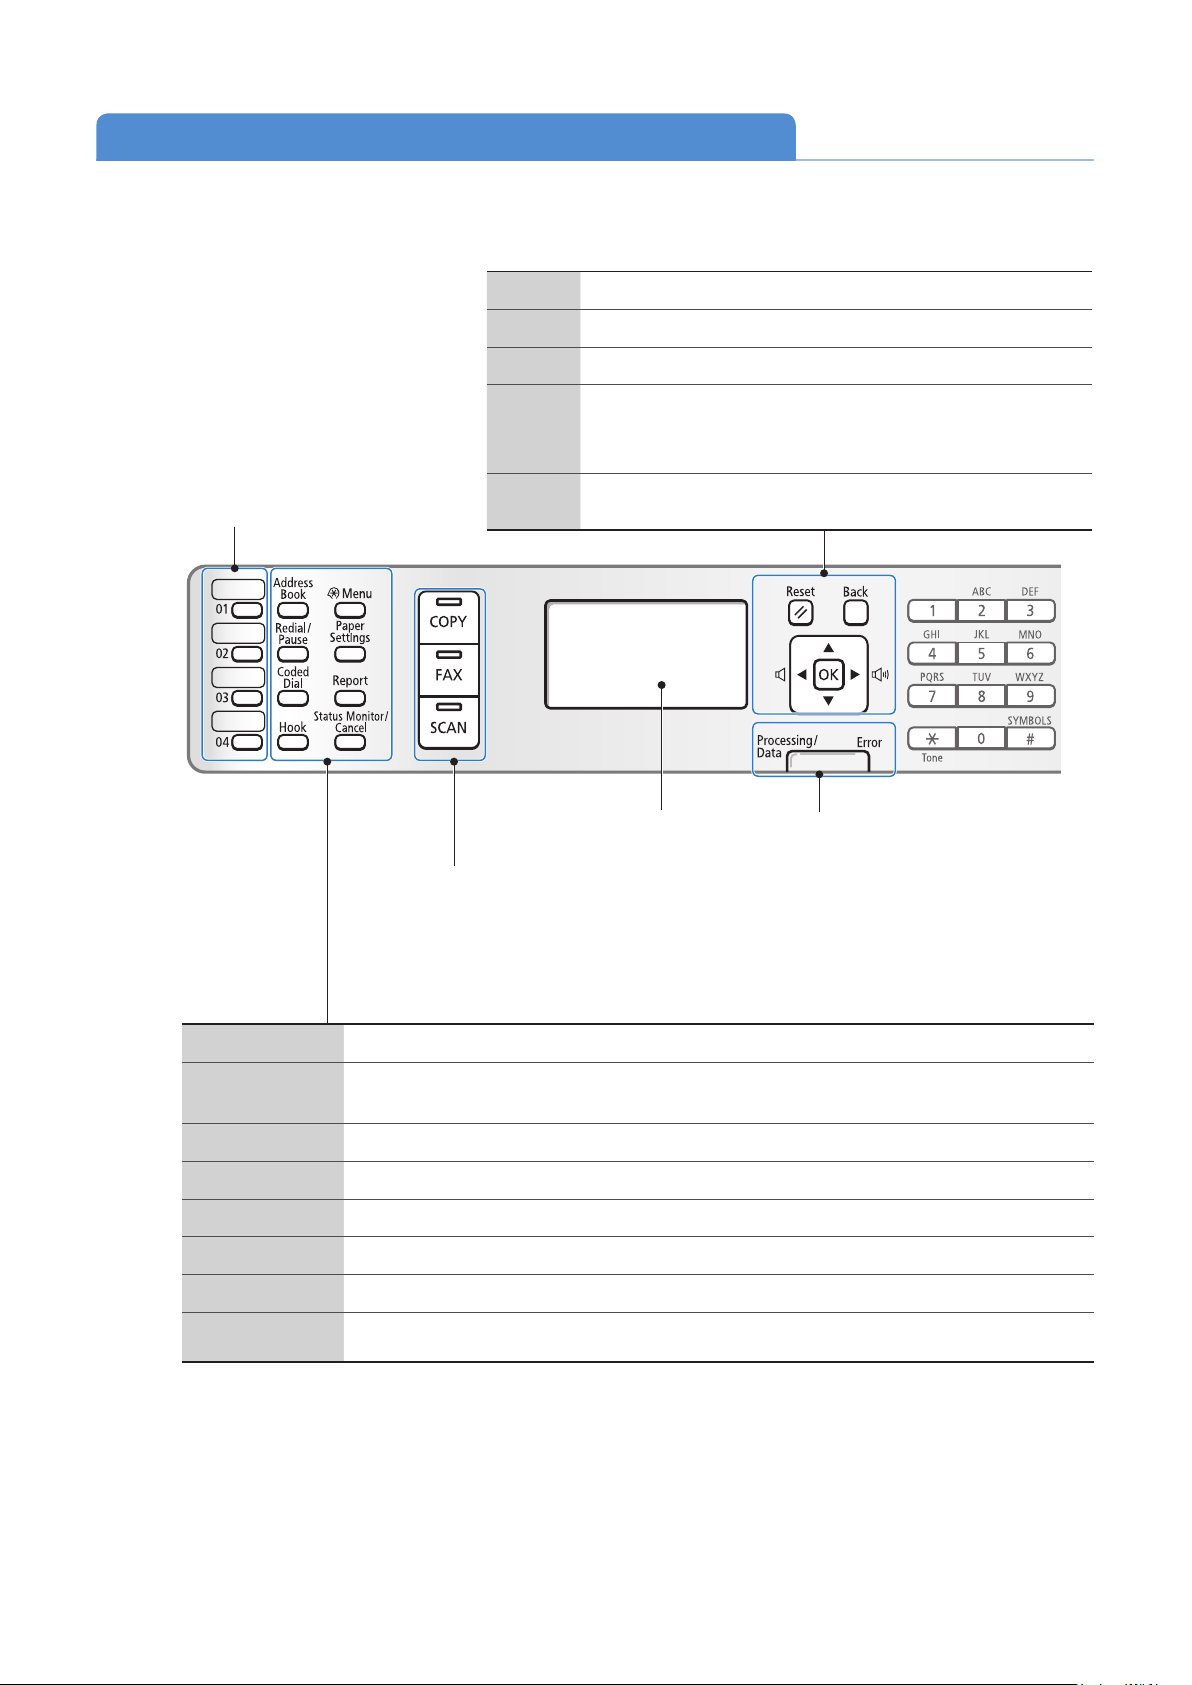
14
Learn the Functions of the Operation Panel
Display
Address Book Press to search for recipients registered in the address book (→p.57).
Redial/Pause
When faxing, press to redial the last three numbers called or insert a pause in a fax number
(
→p.57, p.58).
Coded Dial Press to enter a recipient’s code for coded speed dialing (
→p.56).
Hook Press to dial a number without using a telephone or handset.
Menu Press to access menu functions (see “Navigating the Menu” at the bottom of the next page).
Paper Settings Press to specify paper size and type for the paper cassette or multi-purpose tray (
→p.26).
Report Press to manually print reports and lists (
→p.91).
Status Monitor/
Cancel
P
ress to view or cancel jobs. You can also check the status of the machine (→p.37, p.46, p.66).
One-touch Speed Dial Keys
Press to specify recipients
re
gistered to one-touch keys
(→p.56).
Mode switching keys
Press to switch the mode to copy,
fa
x, or scan (→p.27).
Processing/Data Indicator
The indicator blinks while sending or
re
ceiving data and remains lit when jobs
are waiting in memory.
Error Indicator
The indicator blinks when an error occurs.
Navigate the menu or options.
(See “Navigating the Menu” on the next page.)
Reset Press to return to standby mode.
Back Press to return to the previous screen.
▲/▼ Press to scroll up and down, or to increase or decrease a value.
◄/►
•
Press to return to the previous screen, proceed to the next
screen, or move the cursor to the left or right.
• Press to decrease or increase the fax ring volume.
OK Press to con rm an action or setting.

15
Basic Operation
Navigating the Menu
Example: Adjust the density
Press [
▲] or [▼] to highlight
an item, and then press [OK].
Press [▲] or [▼] to highlight
an item, and then press [OK].
Press [◄] or [►] to adjust the
level, and then press [OK].
(If necessary, press [
▲] or [▼].)
Press [ ] (Menu) to save
the setting.
Menu
Network Settings
Preferences
Timer Settings
Copy Settings
Copy Settings
Change Defaults
Correct Density
Correct Density
- +
Press [ ] (Back) or [◄] to
return to the previous screen.
Press [
]
(Menu).
If you close the menu before you press [OK], the changes made to the
settings are not saved.
Scan►PC1/ Scan►PC2
Press to send the scanned documents to the
re
gistered computer for each keys.
Paper Save Copy
Press to copy with a preset setting to save paper.
Clear Press to delete letters and numbers.
Stop Press to cancel jobs.
Start Press to start copying or sending a fax.
Energy Saver
Press to manually set or cancel the Sleep mode. The Energy
Sav
er indicator lights green while in the Sleep mode (→p.27).
Quiet Mode Press to reduce the noise when performing a job (
→p.27).
Wi-Fi Indicator
(MF4890dw/
MF4880dw only)
Turns on when the machine is connected to Wireless LAN.
Enter letters and numbers (→p.17).
0 to 9
(Numeric Keys)
Press to enter letters and numbers.
*
• Press to switch the character entry mode.
• When sending a fax, press to switch
between pulse and tone dialing.
#
Press to enter symbols.
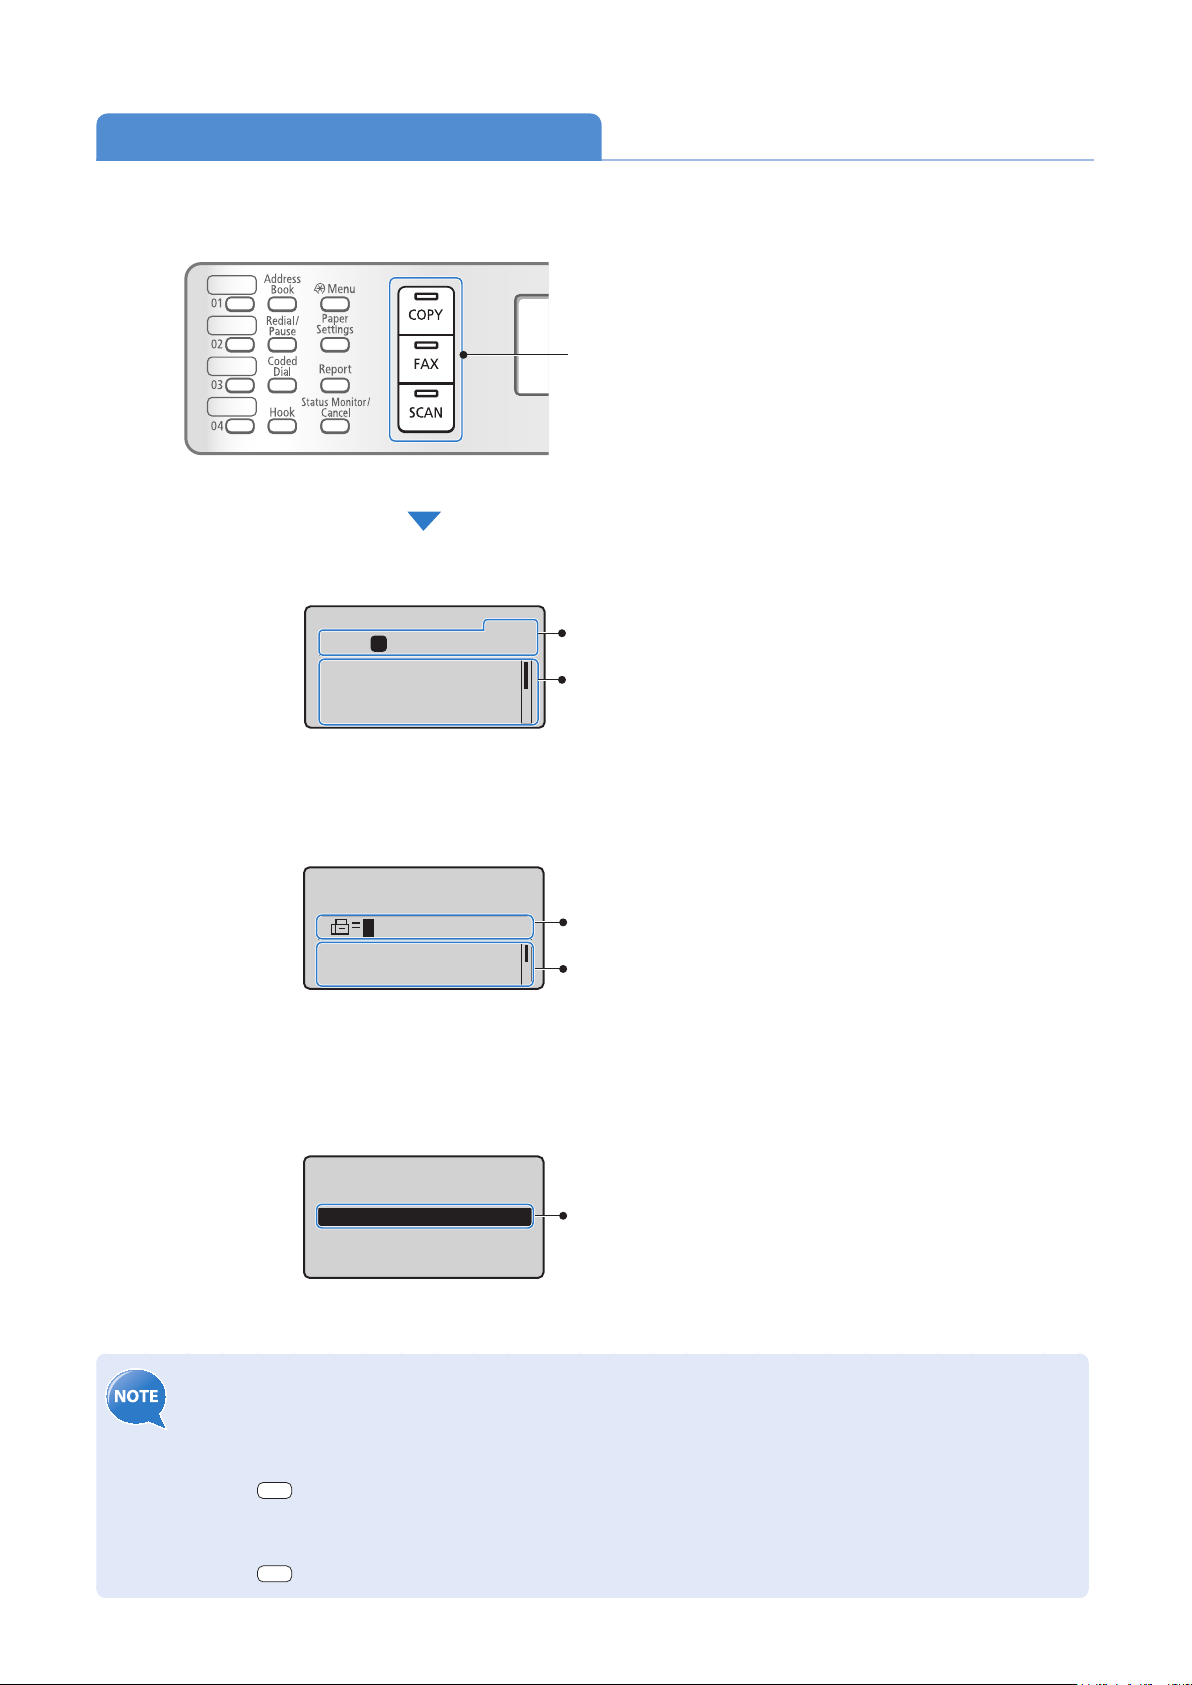
16
Switch to Copy/Fax/Scan Mode
Switch to Copy, Fax, or Scan mode rst to use each mode.
• If you use the Fax mode for the rst time:
Fax setup guide will appear on the display. Refer to the on-screen instructions and Starter Guide to con gure
the s
ettings.
• To set a frequently used mode to the standby mode:
Press [
] (Menu) <Preferences> <Display Settings> <Select Default Screen> Select the
screen [OK].
• To specify how long the machine waits before returning to standby mode:
Press [
] (Menu) <Timer Settings> <Auto Reset Time> Specify the time [OK].
Specify destination.
01/01/2012 12:52AM
RX Mode: Auto
Resolution: 200 x 1
...
Select the scan type.
Computer
Remote Scanner
Fax Mode
Scan Mode
Displays the recipient’s number.
To change the settings:
1. Press [
▲] or [
▼
] to highlight an item, and
then press [OK].
2. Press [
▲], [
▼
], [
◄
] or [
►
] to specify the
values, and then press [OK].
To select the scan method:
Press [
▲] or [
▼
] to highlight an item, and
then press [OK].
Copy: Press Start
100% LTR
Density: 0
Original Type: Text
...
2-Sided: Off
1
+
-
01
Copy Mode
Displays the copy ratio, paper source,
paper size, and number of copies.
To change the settings:
1. Press [
▲] or [
▼
] to highlight an item, and
then press [OK].
2. Press [
▲], [
▼
], [
◄
] or [
►
] to specify the
values, and then press [OK].
If you do not operate the machine for a while, the machine
returns to the Copy mode (standby mode) automatically.
Press the desired mode key.
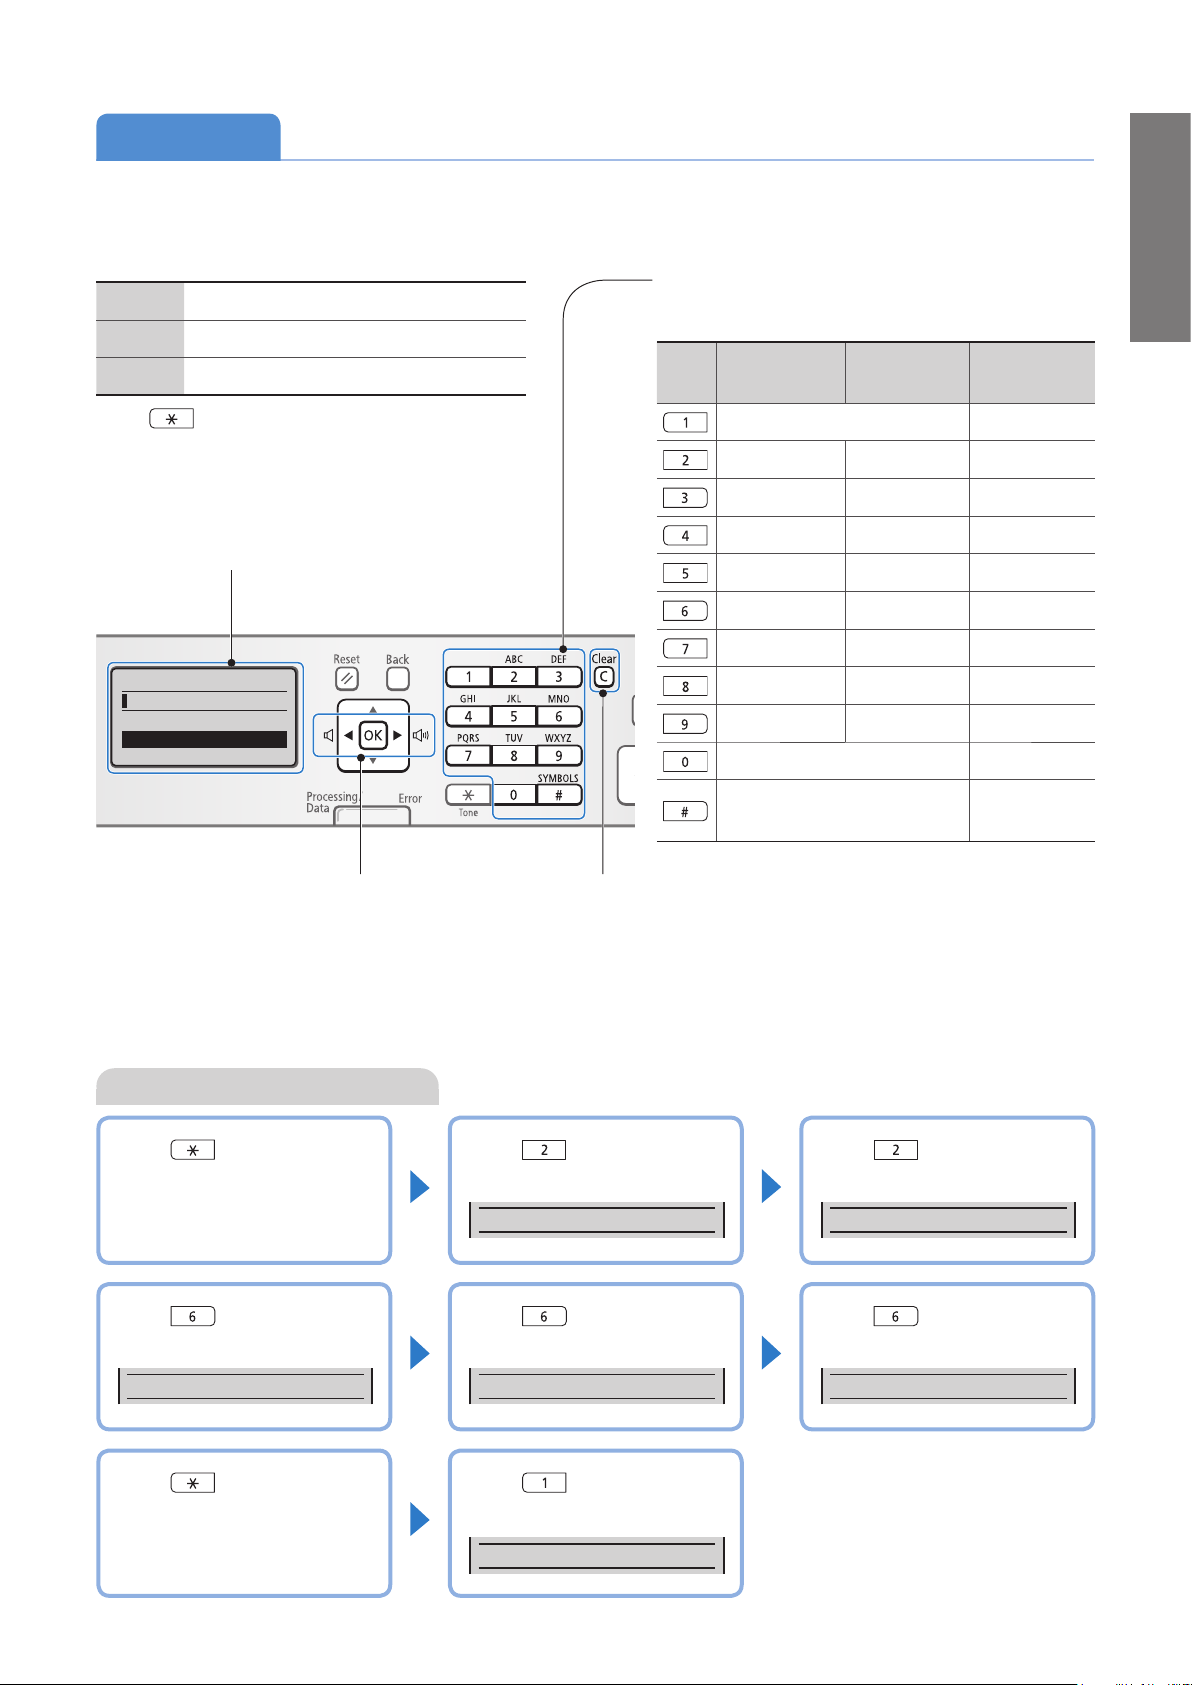
17
Basic Operation
To switch entry modes:
<A> Uppercase alphabetic letters and symbols
<a> Lowercase alphabetic letters and symbols
<12> Numbers
Pr
ess [
] (Tone) repeatedly.
or
1. Press [
▲] or [
▼
] to highlight <Entry Mode>,
and then press [OK].
2. Press [
▲] or [
▼
] to highlight the desired
mode, and then press [OK].
Key
Entry mode:
<A>
Entry mode:
<a>
Entry mode:
<12>
@.-_/ 1
ABC abc 2
DEF def 3
GHI ghi 4
JKL jkl 5
MNO mno 6
PQRS pqrs 7
TUV tuv 8
WXYZ wxyz 9
(Not available) 0
- .
*
# ! " , ; : ^ ` _ = / | ´ ? $ @
% & + \ ( ) [ ] { } < >
(Not available)
To enter text, symbols, and numbers:
Press a key several times until the desired character is
di
sp
layed.
• Press to delete the last character.
• Press and hold to delete all text.
• Press to move the cursor.
• To enter a space, move the cursor to the
end of the text, and then press [
►
].
Enter Text
Enter characters with the alphanumeric keys.
Example: Enter “CANON1”
Press [ ] to switch the
entry mode to <A>.
Press [ ] until the letter “C”
appears on the screen.
C
▌
Press [ ] until the letter “A”
appears on the screen.
CA
▌
Press [ ] until the letter “N”
appears on the screen.
CAN
▌
Press [ ] until the letter “O”
appears on the screen.
CANO
▌
Press [ ] until the letter “N”
appears on the screen.
CANON
▌
Press [ ] to switch the
entry mode to <12>.
Press [ ] to enter “1.”
CANON1
▌
Register Unit Name
<Apply>
Entry Mode: A
18
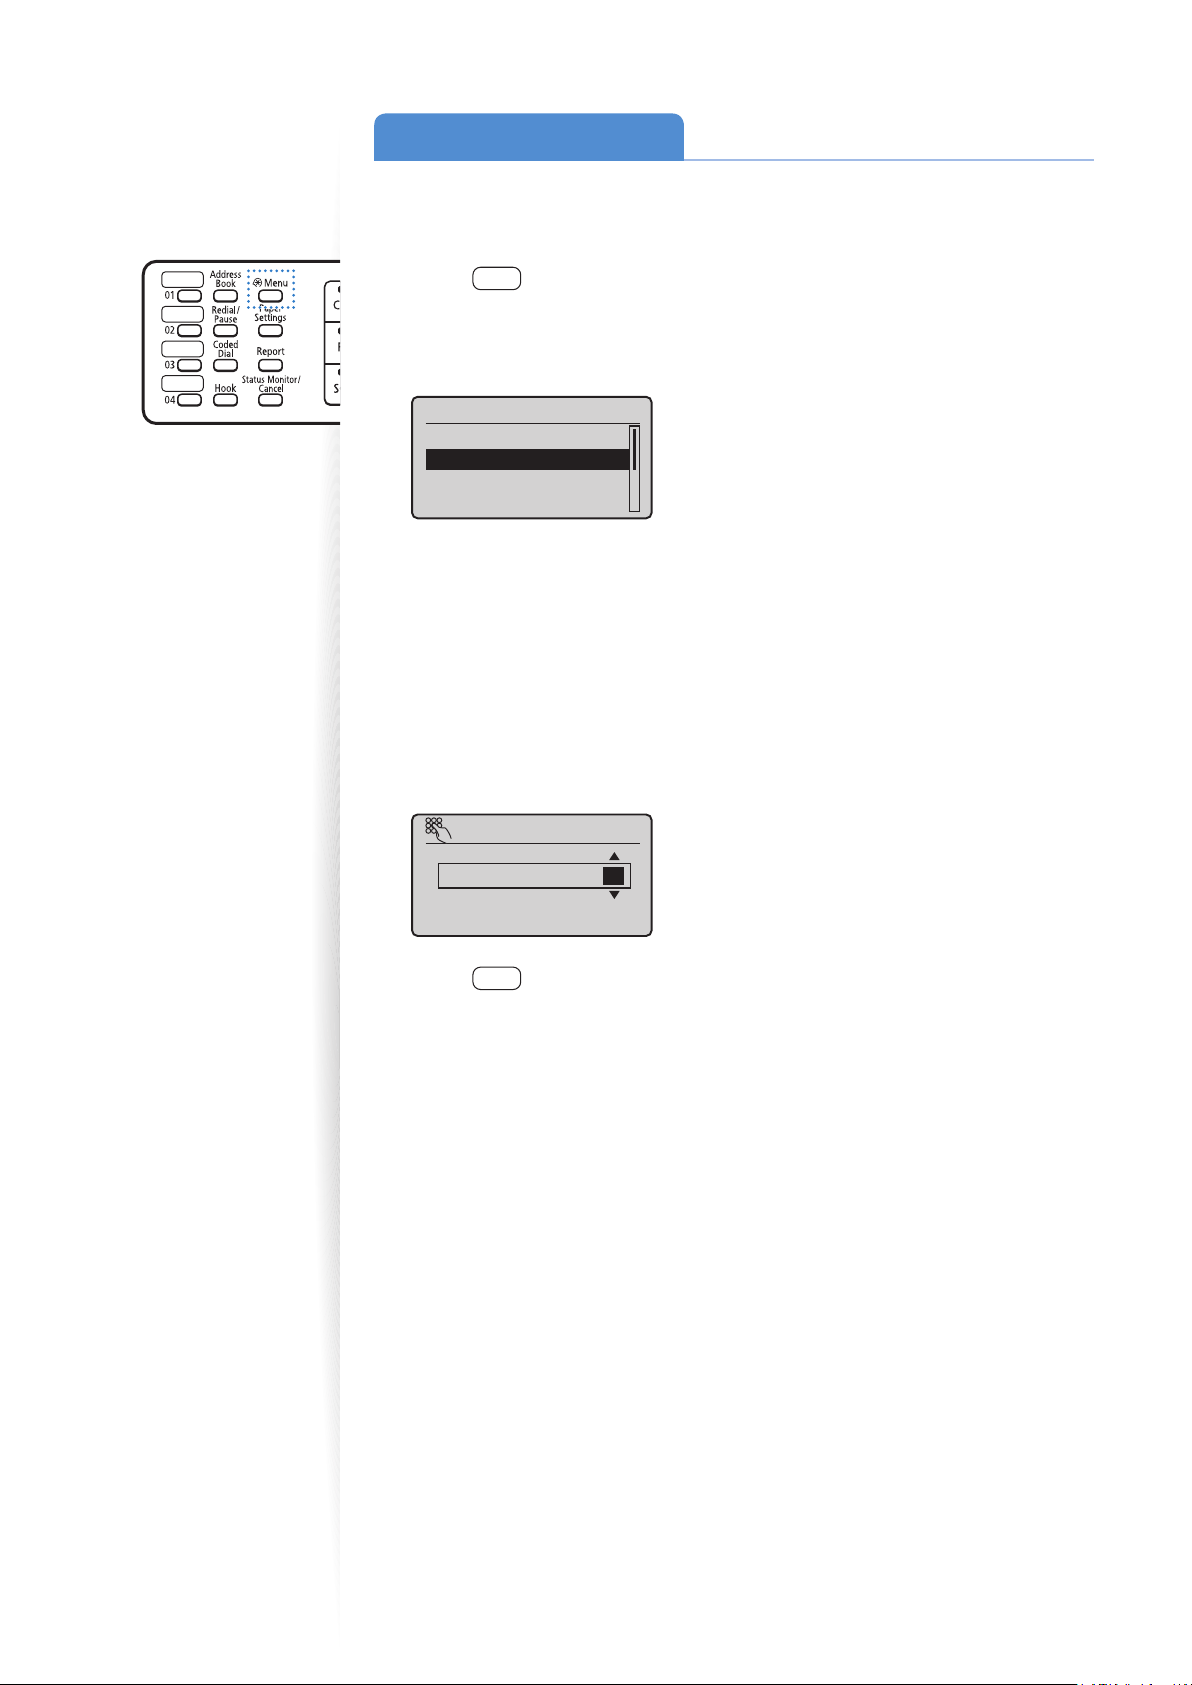
Set Date and Time
If the incorrect date or time is printed on faxes or reports, change the date and time
settings.
1
Press [ ] (Menu).
2
Press [▲] or [
▼
] to highlight <Timer Settings>, and then press [OK].
3
Press [▲] or [
▼
] to highlight <Time & Date Settings>, and then press [OK].
Timer Settings
Quiet Mode Time Set
...
Time & Date Settings
Auto Sleep Time
Auto Reset Time
4
Press [▲] or [
▼
] to highlight <Current Time Settings>, and then press
[OK].
•
To change the display format for the date or time, specify <Date Display Type> or
<12/24 Hour Clock>.
• To use daylight savings time, set <Daylight Savings> to <On>, and then specify
the starting date and the ending date.
5
Use the numeric keys to enter the date and time, and then press [OK].
•
To move the cursor, press [◄] or [►].
• To switch between <AM> or <PM>, press [▲] or [
▼
].
Current Time Set.
01/01/2012 12:52 AM
(0:00-12:59)
6
Press [ ] (Menu) to close the screen.
19
Basic Operation
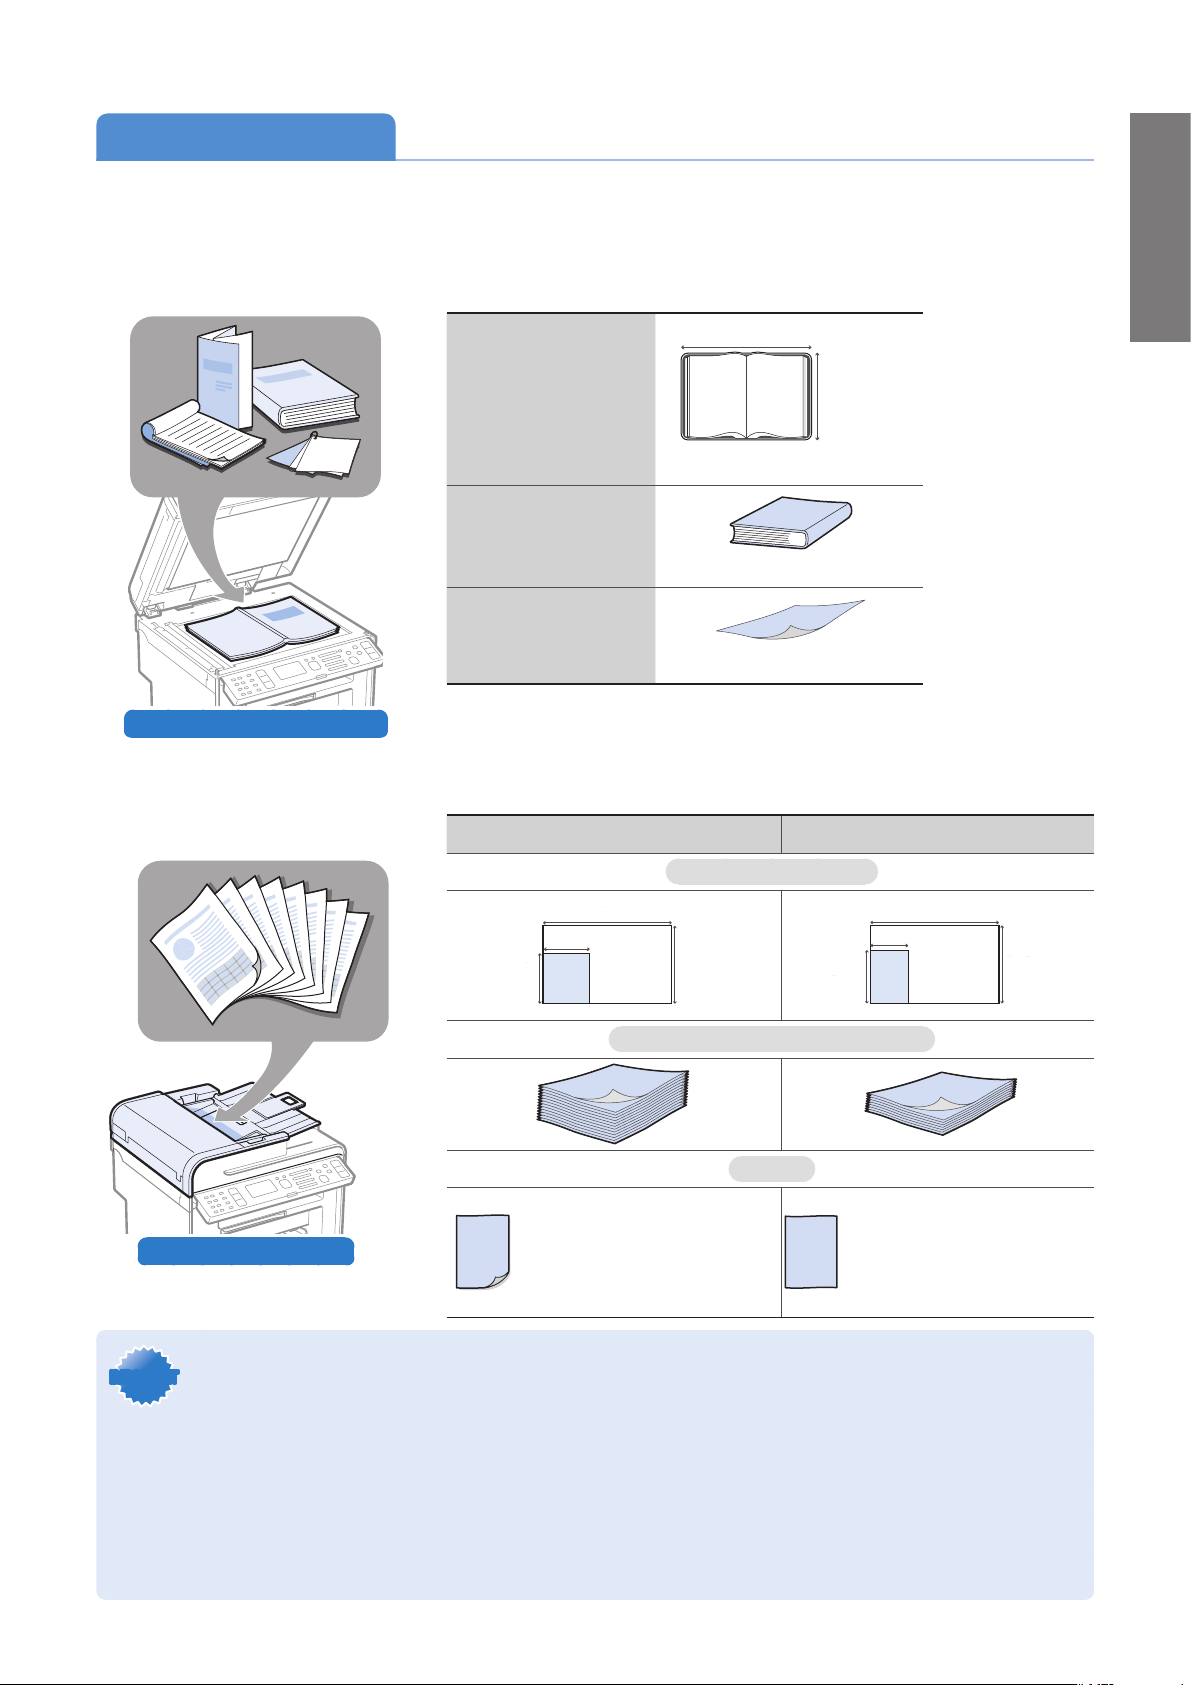
Place Documents
Choose the appropriate way to place documents according to the document’s type.
Check available documents
MF4890dw MF4880dw/MF4770n
Size (Width X Length)
81/2"
(216mm)
81/2"
(216mm)
51/2"
(140mm)
51/2"
(140mm)
5"(127mm)
5"(127mm)
14"(356mm)
14"(356mm)
81/2"
(216mm)
81/2"
(216mm)
57/8"
(148mm)
57/8"
(148mm)
41/8"(105mm)
41/8"(105mm)
14"(356mm)
14"(356mm)
Capacity (For 21 lb Bond (80 g/m²))
Weight
1-sided document
1-sided document
13.3 to 27.9 lb Bond (50 to 105 g/m²)
13.3 to 27.9 lb Bond (50 to 105 g/m²)
2-sided document
2-sided document
16.0 to 27.9 lb Bond (60 to 105 g/m²)
16.0 to 27.9 lb Bond (60 to 105 g/m²)
1-sided document
1-sided document
13.3 to 27.9 lb Bond (50 to 105 g/m²)
13.3 to 27.9 lb Bond (50 to 105 g/m²)
Check available documents
Size (Width X Length)
81/2"
(215.9mm)
113/4"(297mm)
Maximum
Weight
Maximum 4.4 lb (2 kg)
Capacity
1 sheet
When placing non-standard documents
such as heavy paper, small paper, or
booklets:
Use the platen glass. (→p.20)
When placing multiple documents
of plain paper in the same size,
thickness, and weight:
Use the feeder. (→p.20)
50 sheets
50 sheets
35 sheets
35 sheets
Min.
Min.
Min.
Min.
Max.
Max.
Max.
Max.
IMPORTANTIMPORTANT
• Place a document after glue, ink, or correction uid on the document is completely dry.
• To prevent paper jams in the feeder, place a document on the platen glass when using the following types of
paper:
- Wrinkled or creased paper
- Carbon paper or carbon-backed paper
- Curled or rolled paper
- Torn paper
- Thin paper
- Documents with staples or paper clips attached
- Transparency
20
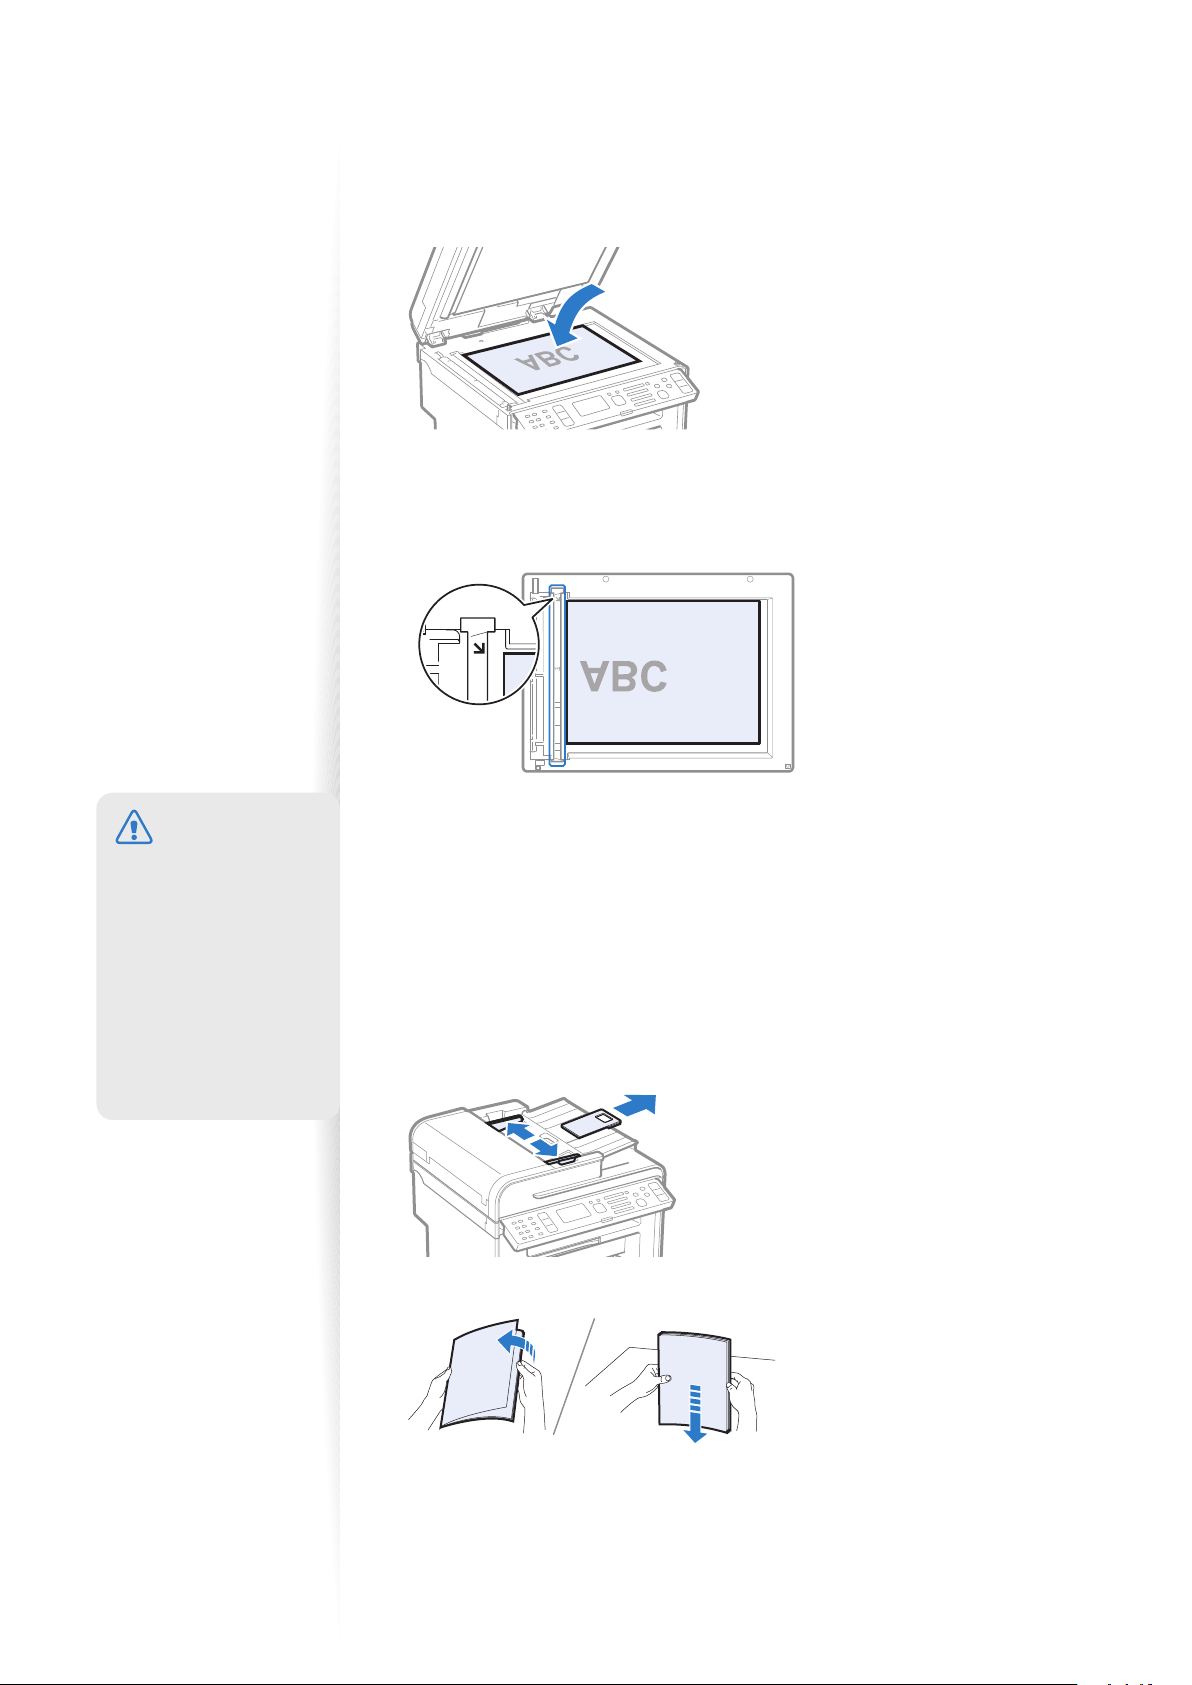
Placing Documents on the Platen Glass
1
Open the feeder.
2
Place your document face down.
3
Align the document with the appropriate paper size marks.
•
If the document does not match any of the paper size marks, align the upper left
edge of your document with the arrow mark.
• If the document is a transparency, place white paper above the document.
A5
STMT
B5
A4
LTR
4
Close the feeder.
Placing Documents in the Feeder
1
Open the document feeder tray.
2
Spread the document guides a little wider than the document’s width.
When placing large documents, pull out the extension tray.
3
Fan the document stack and align the edges of the pages.
Thoroughly fan the
paper in small batches.
Align the edges a few
times on a at surface.
CAUTION
• When closing the
feeder, be careful not
to get your ngers
caught.
• Do not press down
on the feeder
forcefully. This may
damage the platen
glass and cause
personal injury.
21
Basic Operation
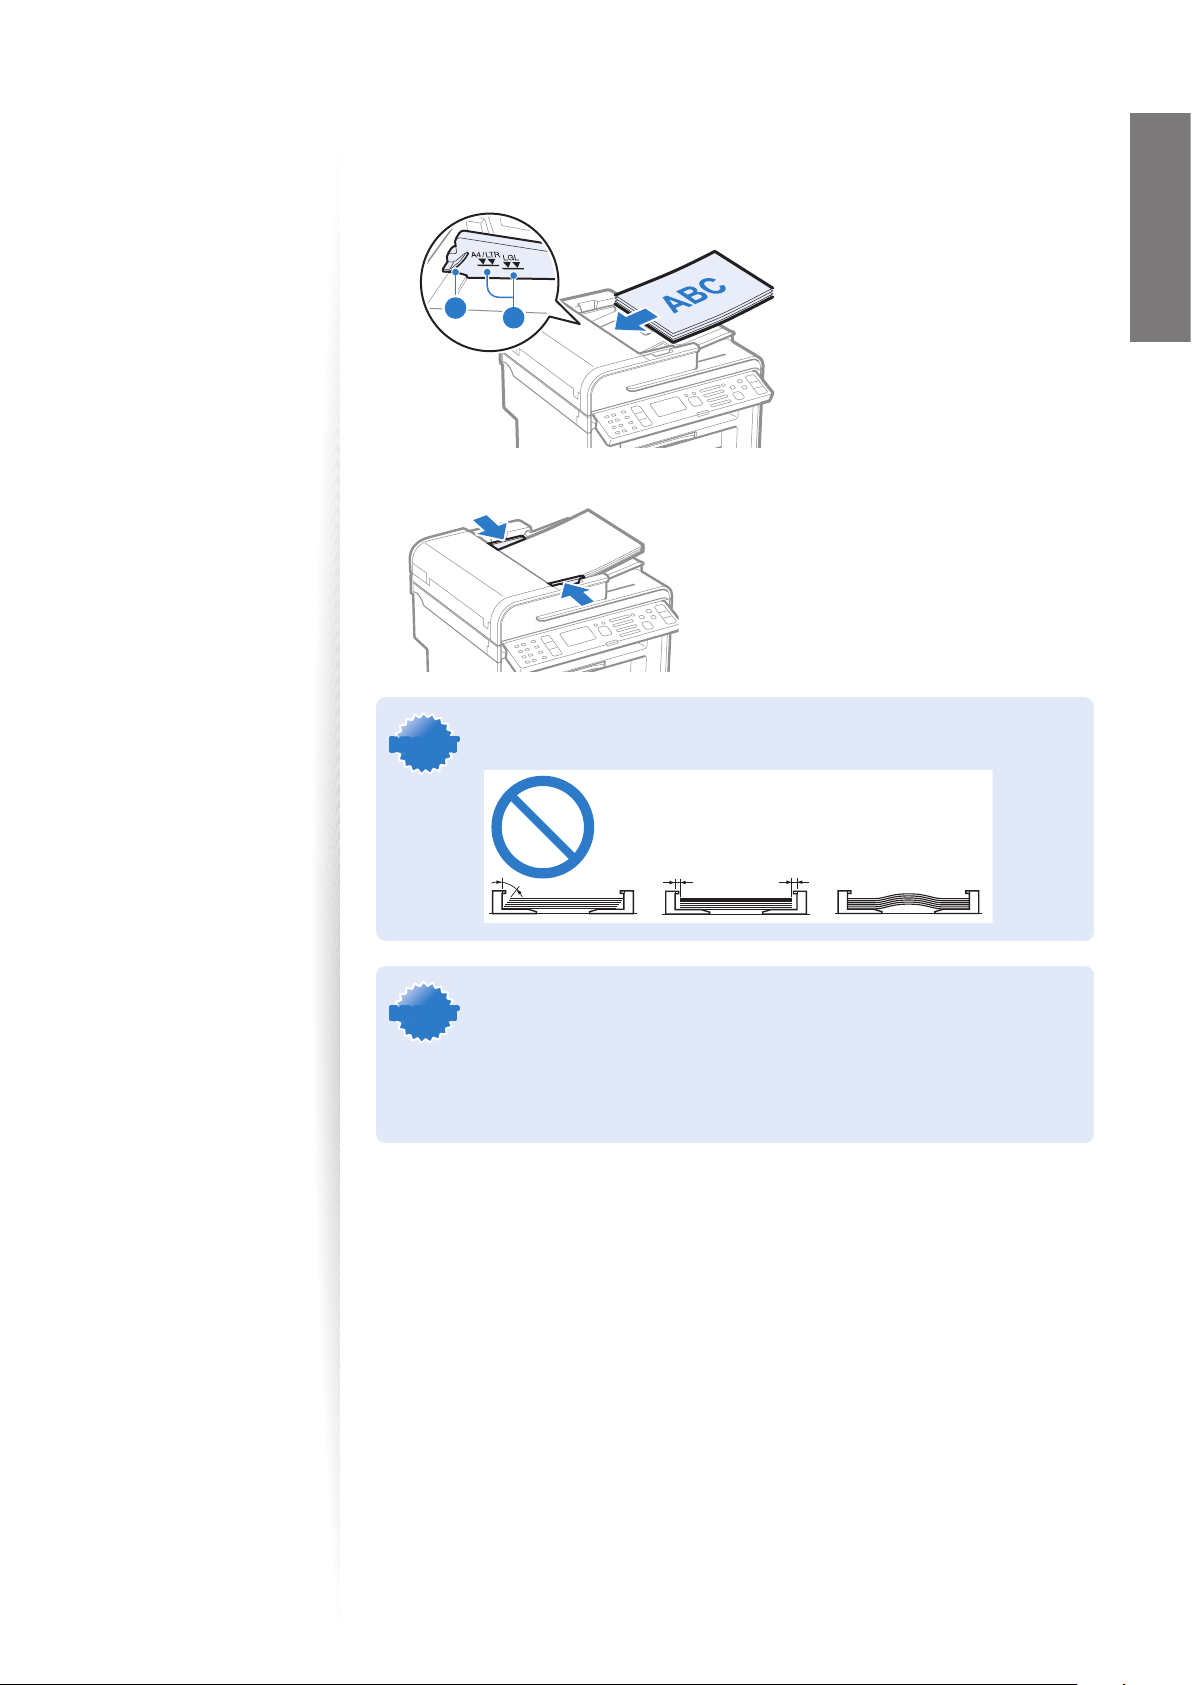
4
Neatly place the documents face up.
•
Place the document under the load limit guides (A).
• Make sure that the paper stack does not exceed the load limit marks (B).
A
B
5
Align the document guides tightly to the width of the document.
IMPORTANTIMPORTANT
If the document guides are too loose or too tight, this may result in
misfeeds or paper jams.
IMPORTANTIMPORTANT
• While scanning documents, do not add or remove documents.
• When scanning is complete, remove the document from the document
return tray to avoid paper jams.
• Do not scan the same document more than 30 times. When a document
is scanned repeatedly, the paper can become wrinkled, earmarked, or
torn, which may result in paper jams.

22
Load Paper
Before loading paper, check the paper is the right type. If you load inappropriate paper
repeatedly, this may cause paper jams.
1
te
p
Check if the type of paper is appropriate.
Paper such as Legal, Letter, Statement, Executive, and envelopes can be used. For details
about the available paper or precautions, see [Basic Operation] [Loading paper] in
the e-Manual.
To prevent paper jams, do not use any of the following:
• Wrinkled or creased paper
• Curled or rolled paper
• Tor n paper
• Damp paper
• Paper printed with a thermal transfer printer
(Do not copy on the reverse side.)
2
tep
Select where to load paper, and then load the paper.
Use the multi-purpose tray when
loading a sheet of
small-sized paper or
heavy paper (→p.24).
Use the paper cassette when
loading a stack of
plain paper in the
same size, thickness,
and weight (
→p.23).
Check if the type of paper is appropriate.
If the setting is di erent from the size of the loaded paper, an error message
appears, or printing is not performed correctly.
23
Basic Operation
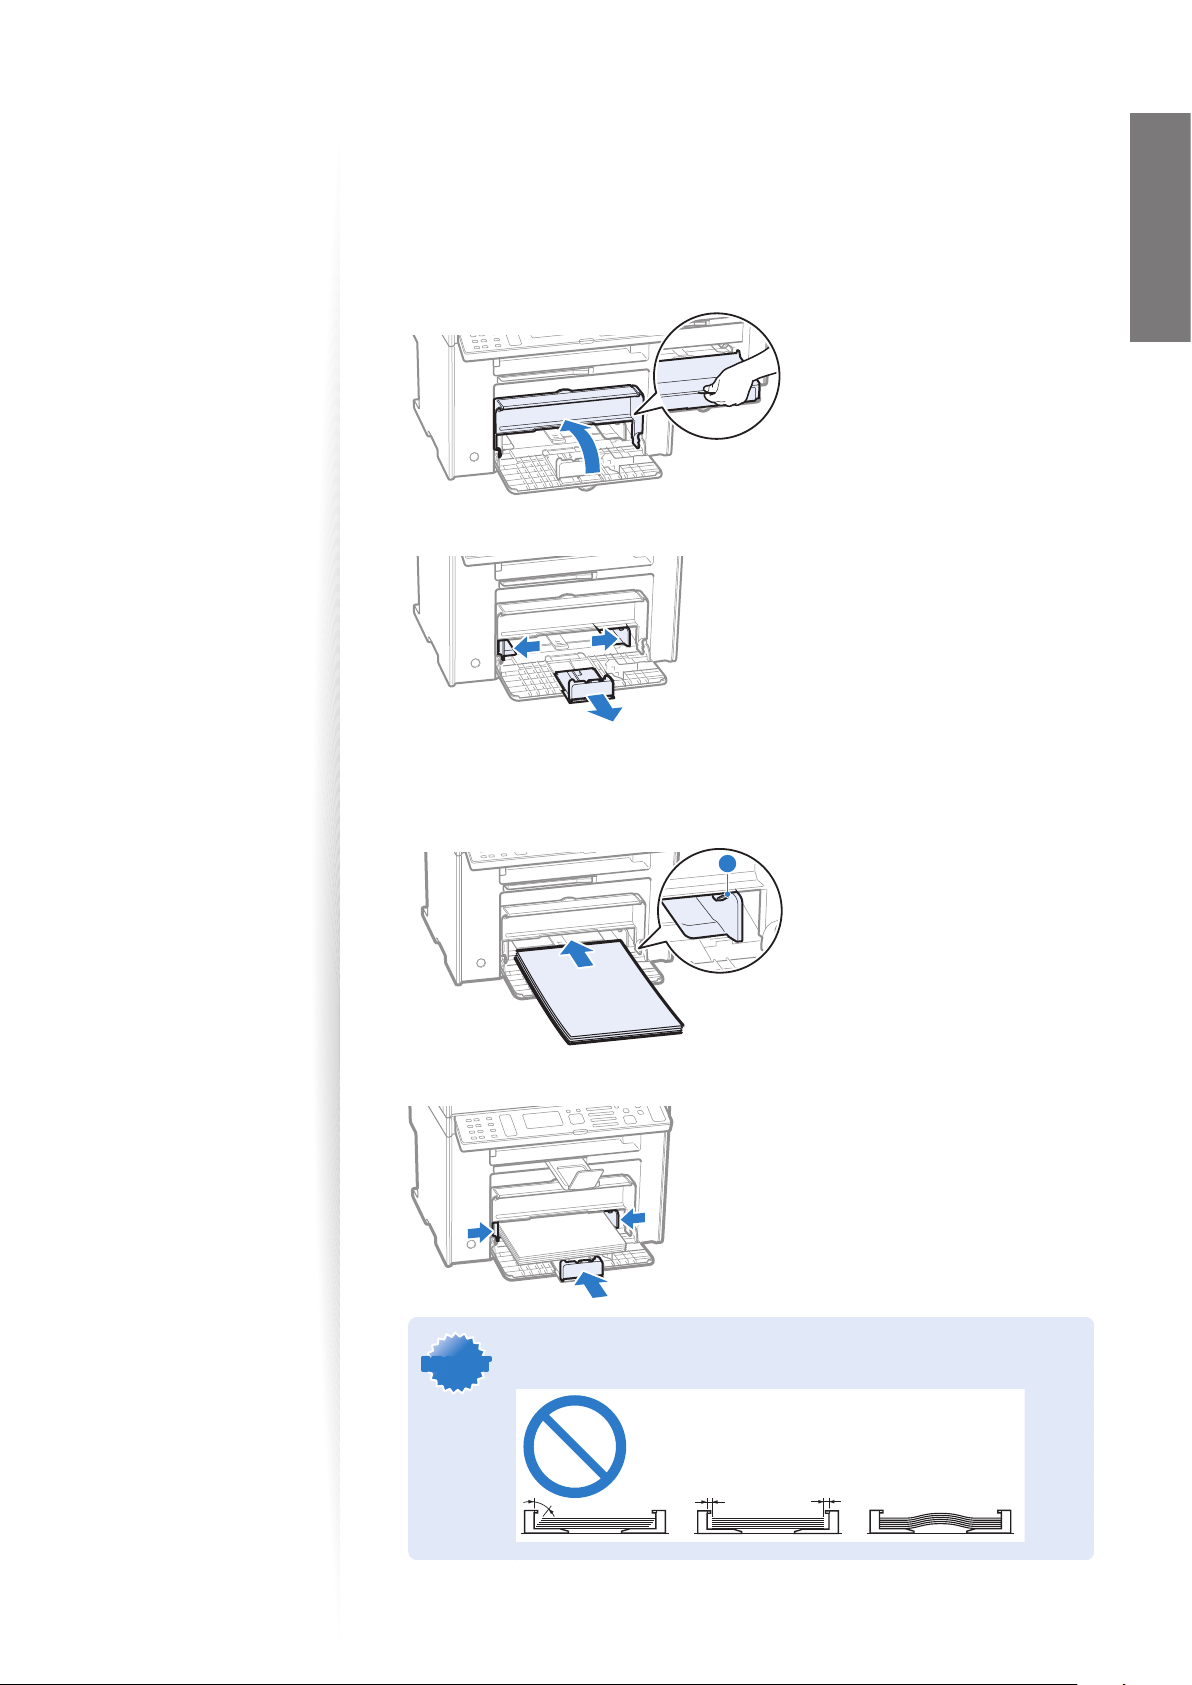
Loading Paper in the Paper Cassette
This section describes how to load letter paper in the Paper Cassette. When loading
envelopes or paper with a letterhead, see ”Loading Envelopes or Paper with a Letterhead”
(
→p.25).
1
Lift the dust cover.
2
Spread the paper guides a little wider than the paper size.
3
Gently load the paper into the paper cassette with the print side face up,
until the edge of the paper stack meets the back of the paper cassette.
•
Make sure that the paper stack does not exceed the load limit guides (A).
A
4
Adjust the paper guides tightly to the width and length of the paper.
IMPORTANTIMPORTANT
If the paper guides are too loose or too tight, this may result in misfeeds
or paper jams.
24
5
Close the dust cover.
6
Specify the loaded paper size and type (→p.25).
Loading Paper in the Multi-Purpose Tray
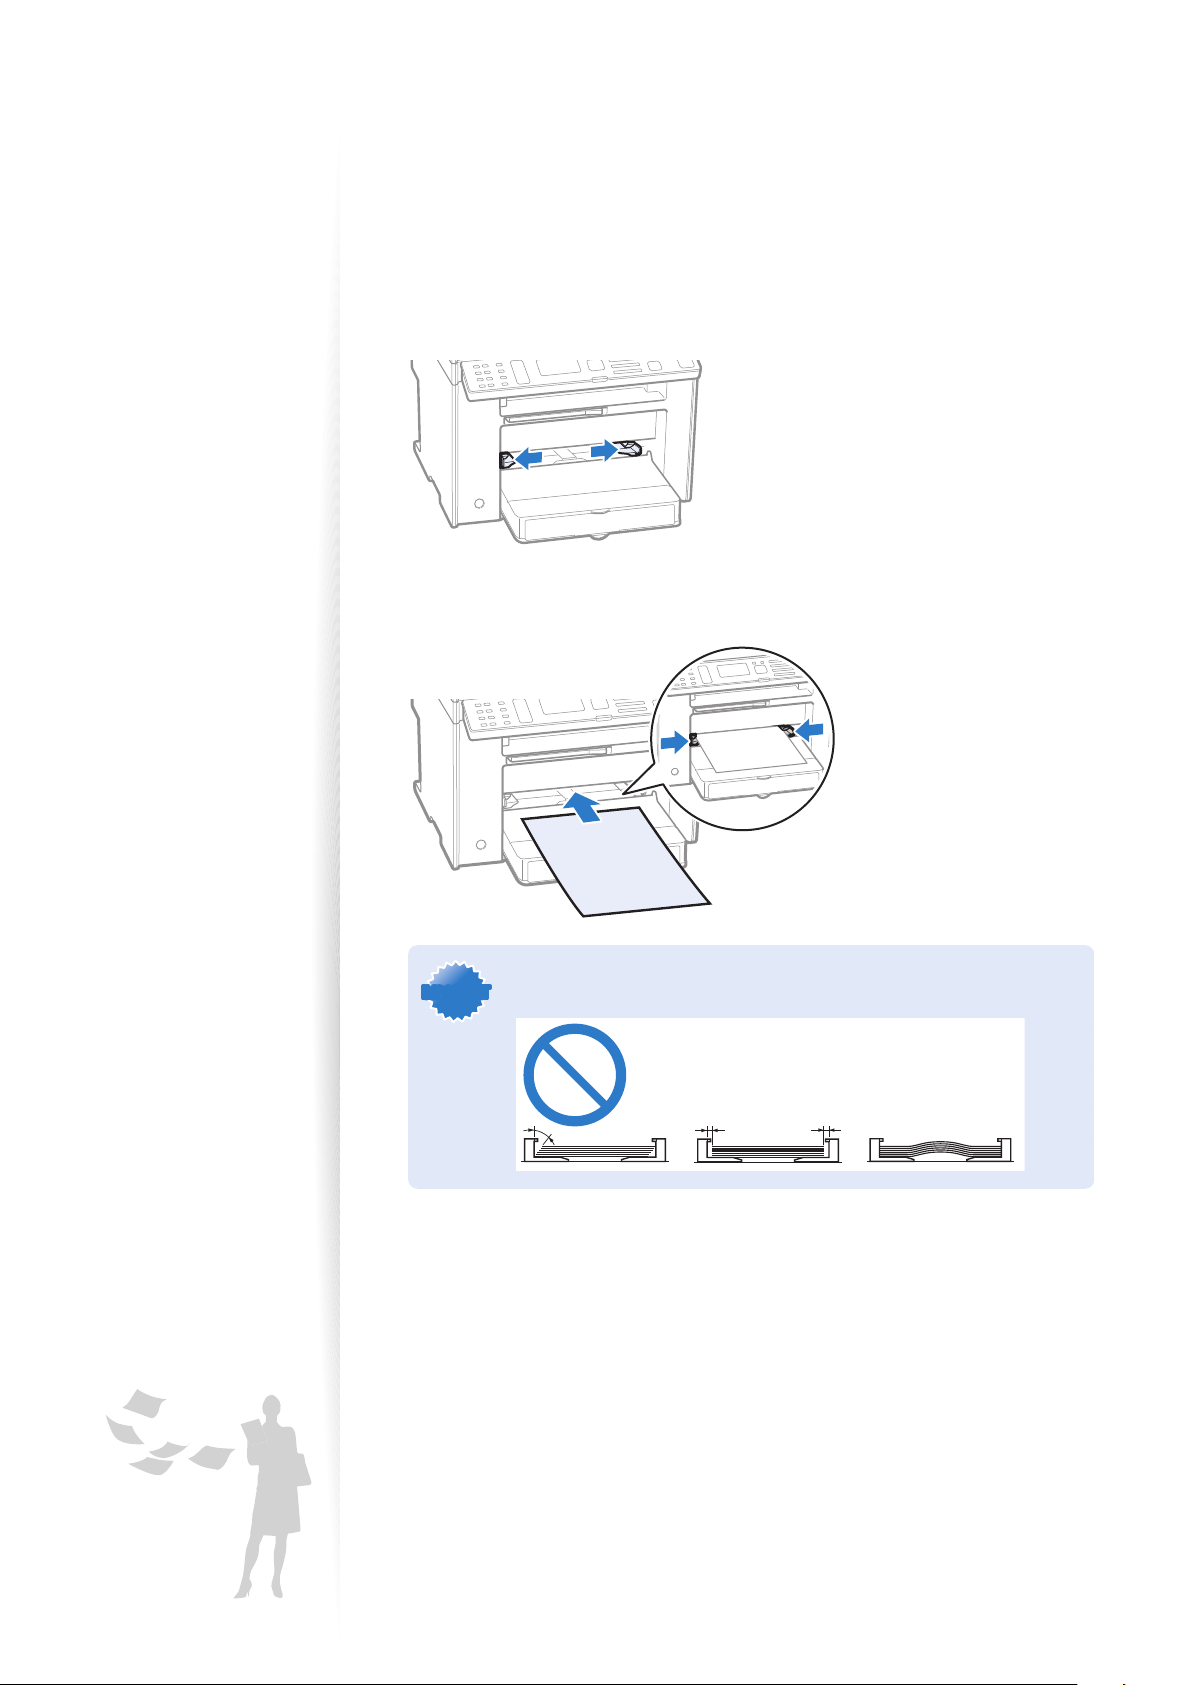
1
Spread the paper guides a little wider than the paper.
2
Gently load the paper into the paper cassette with the print side face up,
and adjust the paper guides tightly to the width of the paper.
IMPORTANTIMPORTANT
If the paper guides are too loose or too tight, this may result in misfeeds
or paper jams.
3
Specify the loaded paper size and type (→p.26).
25
Basic Operation
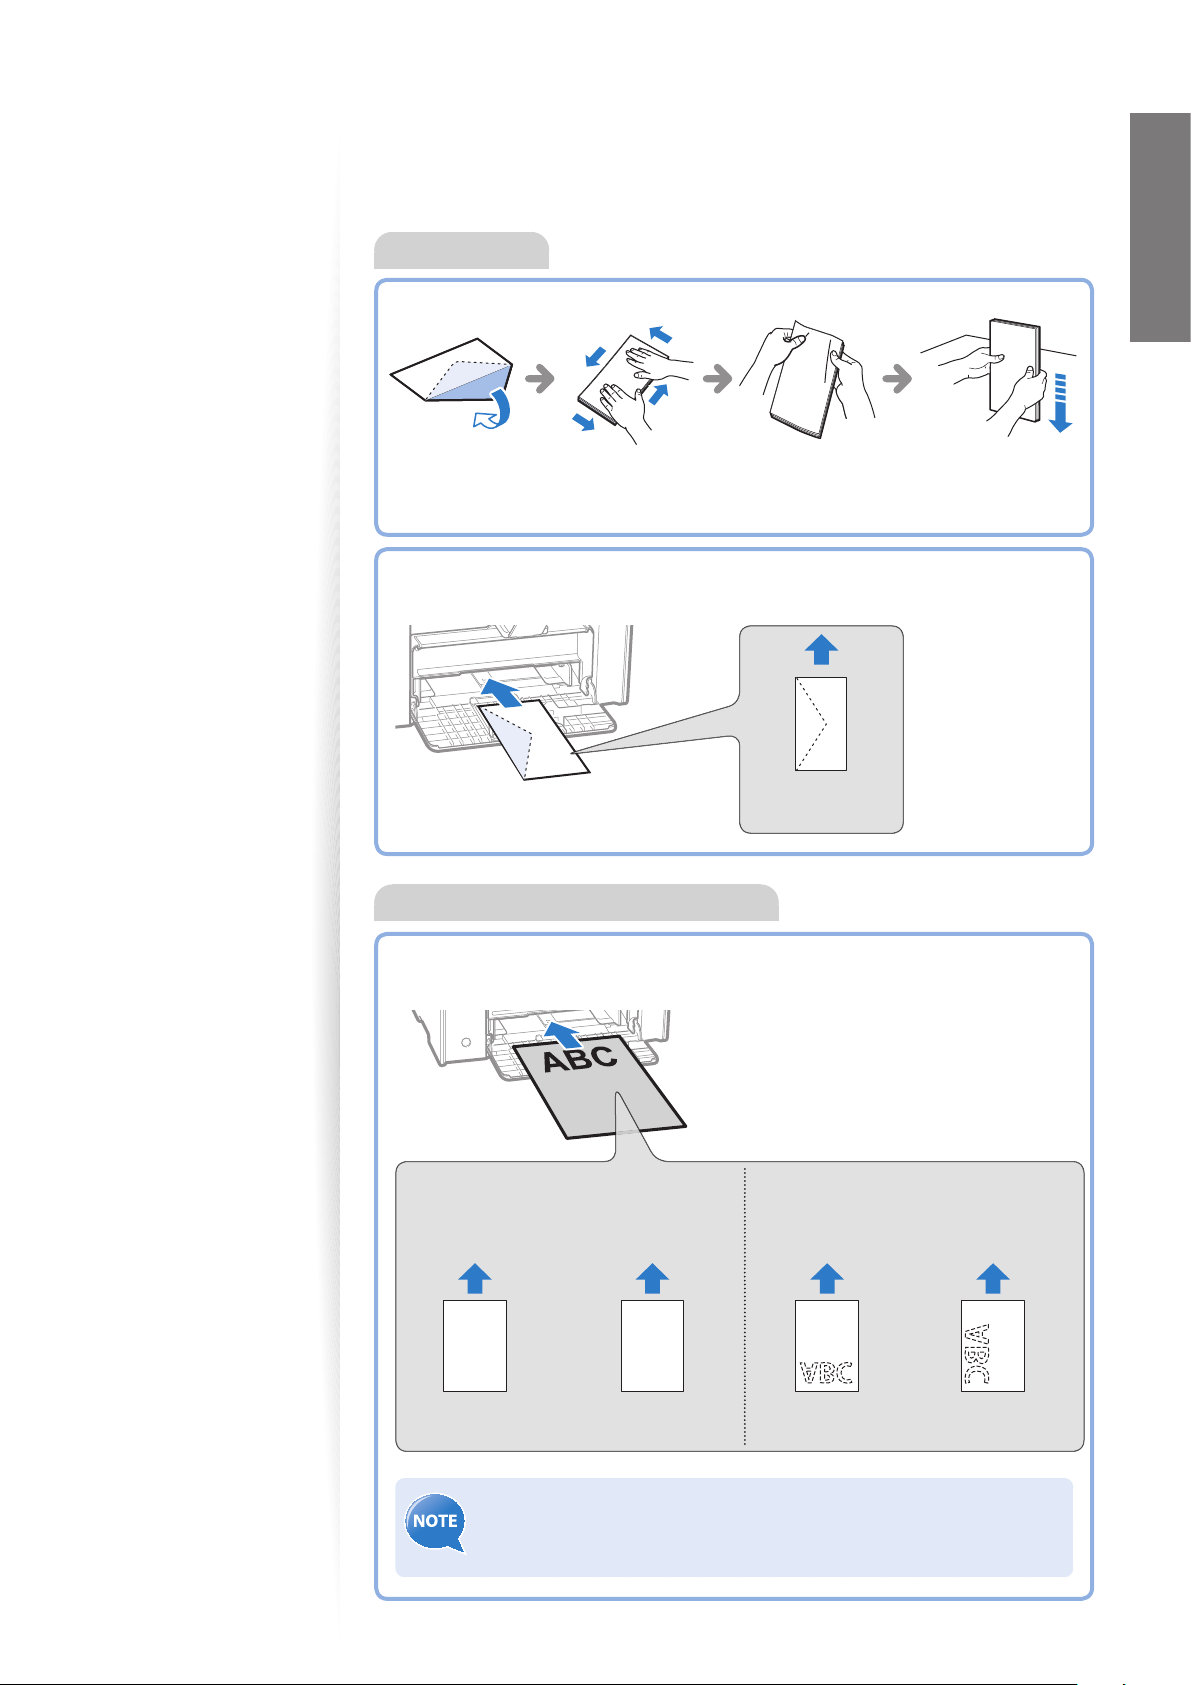
Loading Envelopes or Paper with a Letterhead
This section describes how to load envelopes and paper with a letterhead.
Envelopes
Loading Orientation
Load the paper properly by following the instructions below.
ABC
ABC
1-sided printing
Load the paper with the printed
side face up.
2-sided printing
(MF4890dw/MF4880dw only)
Load the paper with the printed
side face down.
When printing with
portrait layout
When printing with
landscape layout
When printing with
portrait layout
When printing with
landscape layout
If <Print Side Priority> is selected, load the paper with the printed
side face down regardless of 1-sided or 2-sided printing. For details, see
[Basic Operation]
[Select the Print Side] in the e-Manual.
Paper with a Letterhead or Logo
Before Loading
Loading Orientation
Load the envelopes with the aps face up.
Envelope
No.10, DL, ISO-C5
Flatten envelopes
to release any
remaining air.
Loosen any sti corners of the
envelopes, and atten any
curls, as shown in the gure.
26
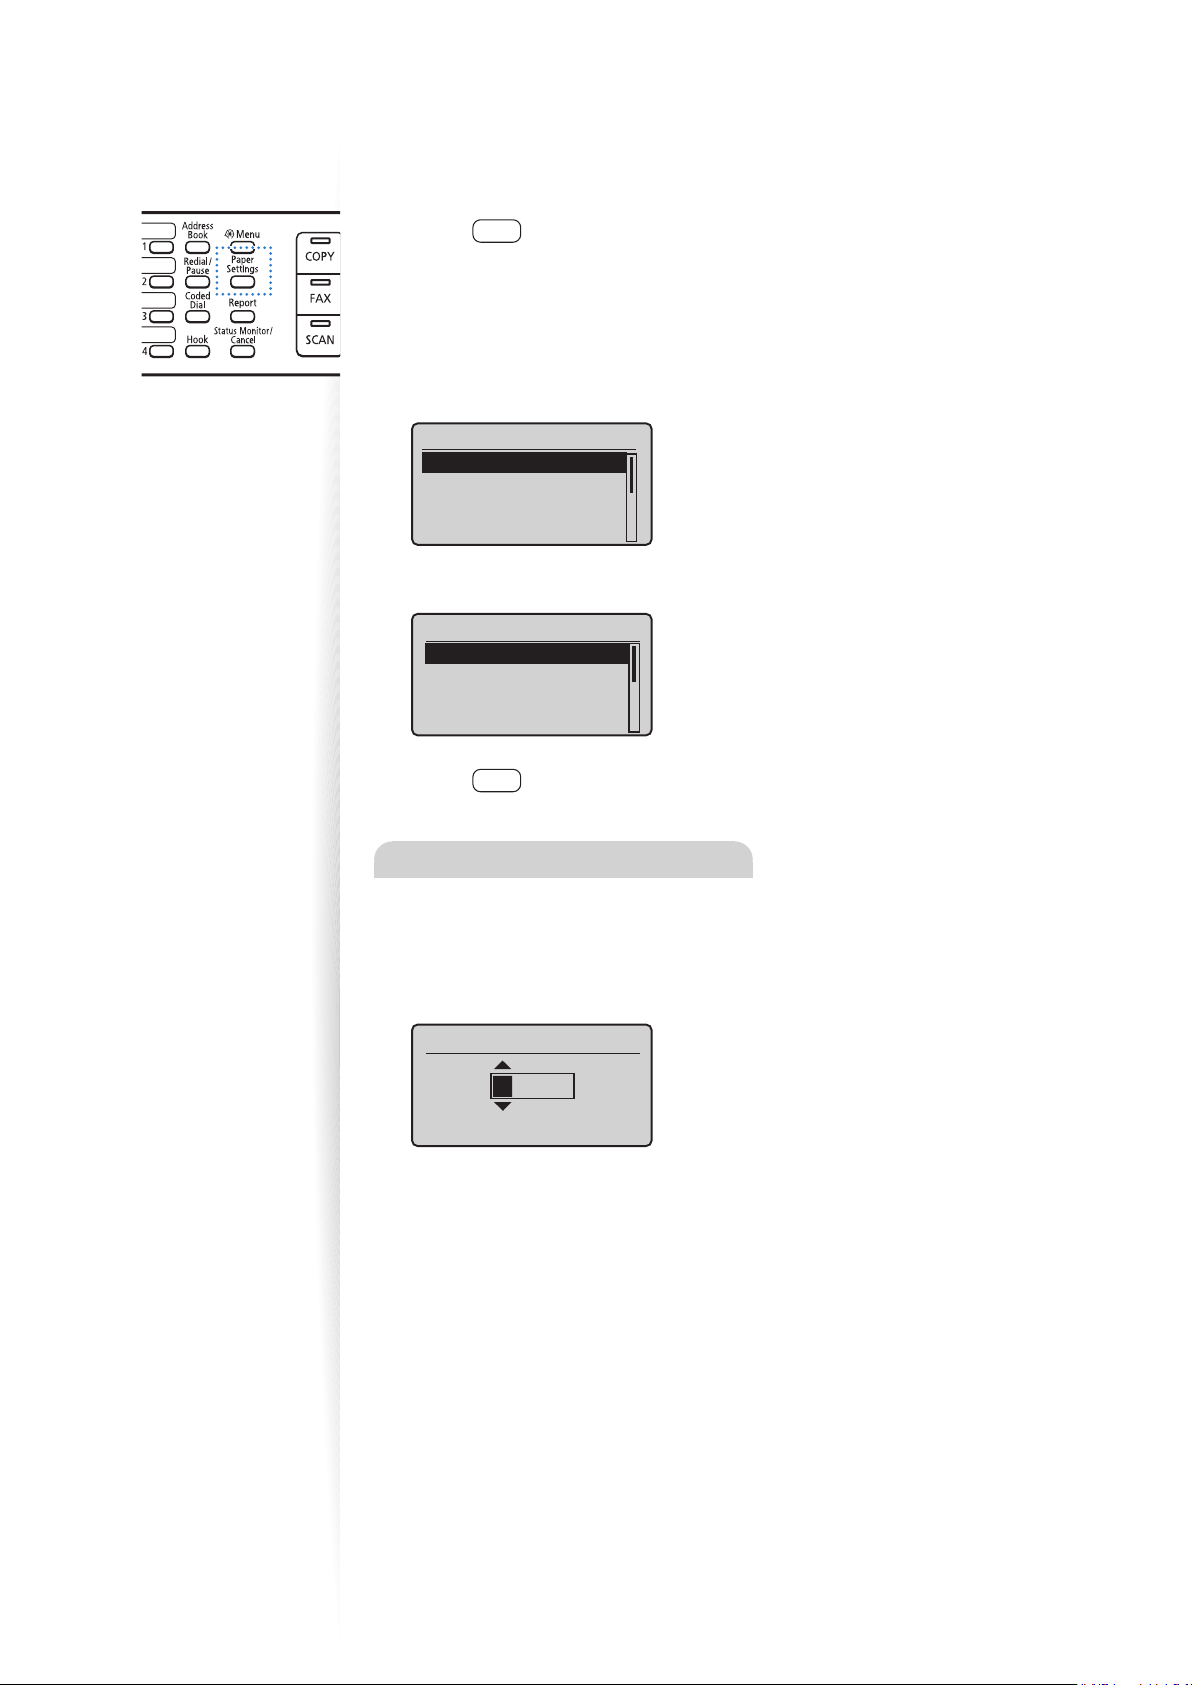
Setting a Paper Size and Type
Make sure that the Paper Settings match the size and the type of the loaded paper.
1
Press [ ] (Paper Settings).
2
Press [▲] or [
▼
] to highlight <MP Tray> or <Drawer 1>, and then press
[OK].
3
Press [▲] or [
▼
] to highlight the desired paper size, and then press [OK].
•
To specify the paper size manually, select <Custom Size>, and then refer to
“Specify a Paper Size Manually” at the bottom of this page to specify the size.
Paper Size
LTR
LGL
STMT
EXEC
4
Press [▲] or [
▼
] to highlight the desired paper type, and then press [OK].
Paper Type
Plain (16 lb Bond-24
Plain L (16 lb Bond
...
Recycled
Color
5
Press [ ] (Paper Settings) to close the screen.
Specify a Paper Size Manually
For paper size, specify within the possible range of length and width (<Y> ≥ <X>).
1
Press [▲] or [
▼
] to highlight <X>, and then press [OK].
2
Use the numeric keys to specify the width, and then press [OK].
Set Length for X
(3-8_1/2)
3_ 0/0 "
3
Press [▲] or [
▼
] to highlight <Y>, and then press [OK].
4
Use the numeric keys to specify the length, and then press [OK].
5
Press [▲] or [
▼
] to highlight <Apply>, and then press [OK].

27
Basic Operation
Switch to the Quiet Mode
You can switch to and cancel the Quiet mode, by pressing [ ] (Quiet Mode).
• By default, the Quiet mode is set to <O >. To change this setting to <On>,
and specify the time to switch to the Quiet mode automatically, press
[ ] (Menu) <Timer Settings> <Quiet Mode Time Settings>,
and then specify a time.
• When the Quiet mode is On, the processing speed of functions becomes
slower.
• The Quiet mode cannot be used with some paper sizes or types.
• The Special mode has higher priority than the Quiet mode.
• The Quiet mode only reduces noise that occurs while the machine is
performing jobs. This does not a ect the speaker or the key volume. To
lower or set <O >, <Entry Tone> or <Job Done Tone>, refer to the
[Basic Operation] [Adjust the Volume] in the e-Manual
Switch to the Sleep Mode
You can switch to and cancel the Sleep mode, by pressing [ ] (Energy Saver).
When the Processing/Data indicator is lit or blinking, the machine will not enter the
Sleep mode, because an operation is in progress or an error has occurred.
By default, the machine automatically enters the Sleep mode if you do not
perform any functions for 5 minutes. To change this setting, press [ ]
(Menu) <Timer Settings> <Auto Sleep Time>, and then specify a
time.
28
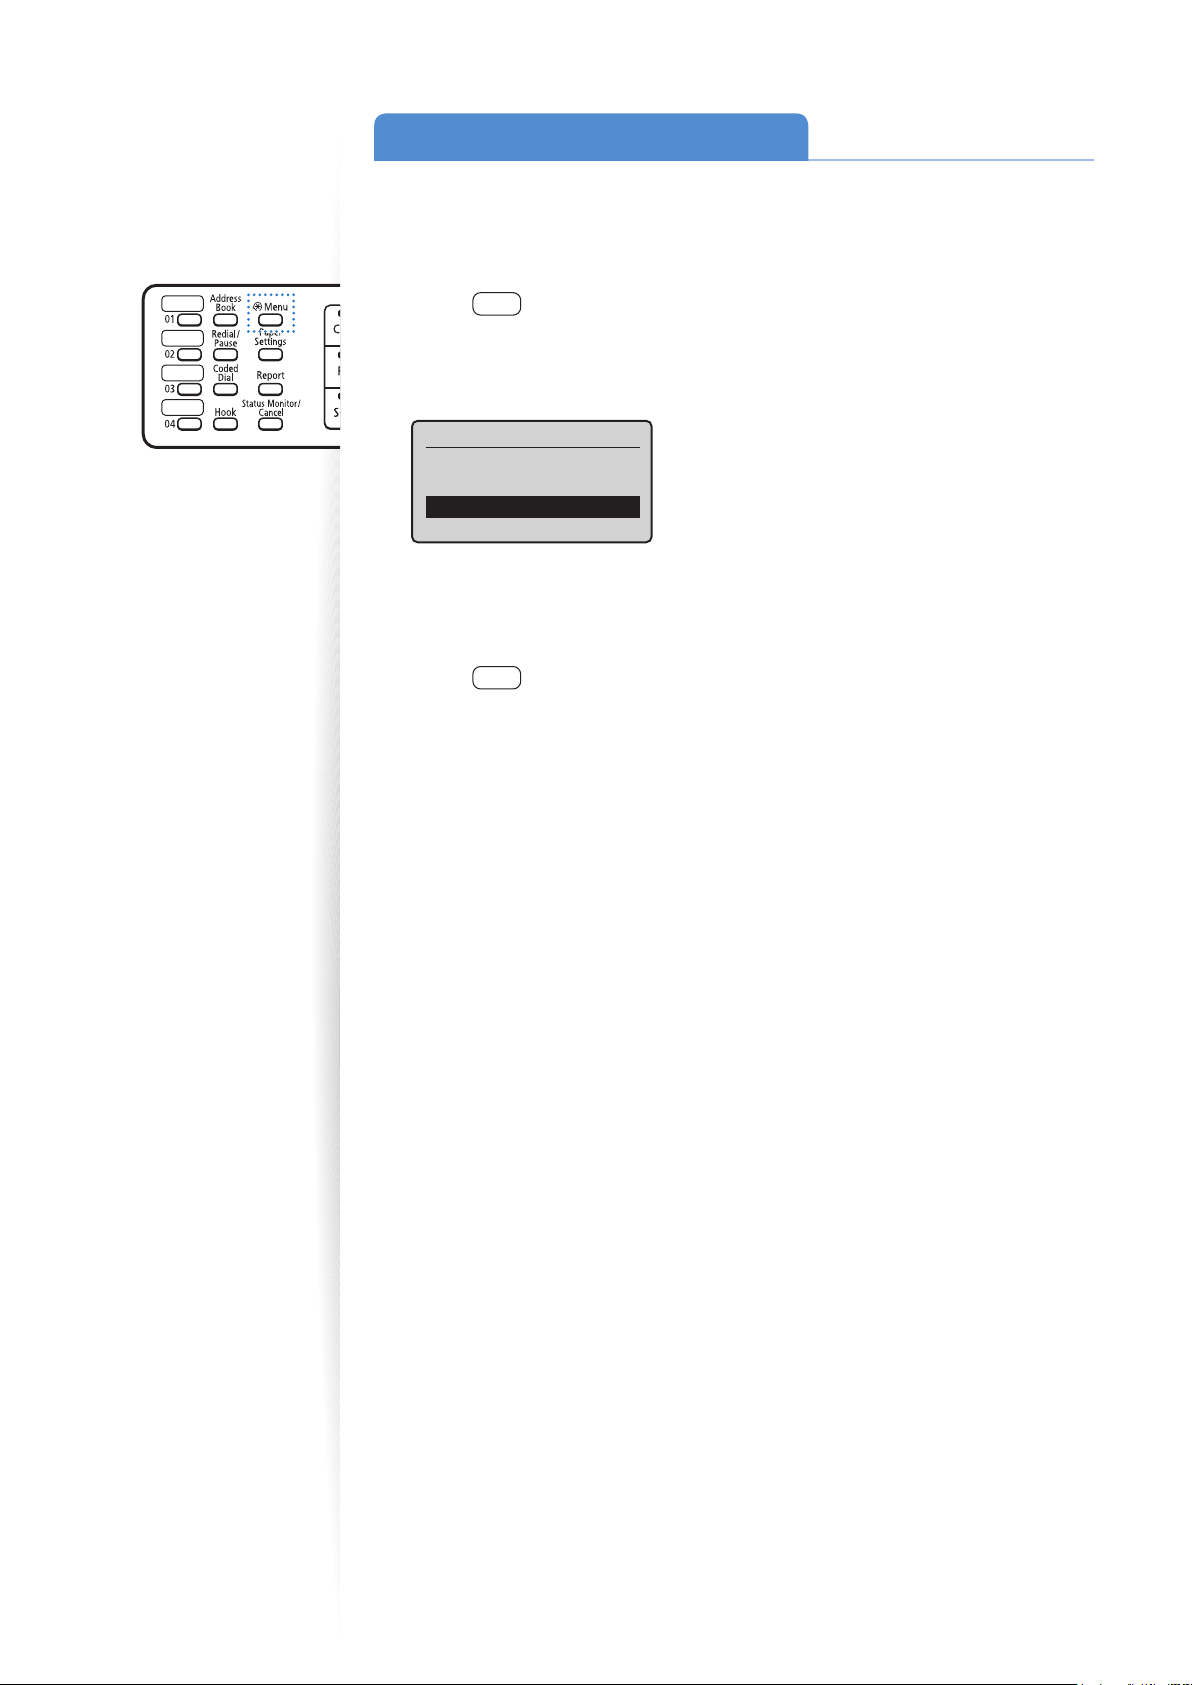
Use the Toner Saver Mode
You can set whether or not to conserve toner when copying or faxing. When using the
Toner Saver mode, the output may not be clear, as subtle details, such as thin lines and light
colors, may not be clearly reproduced.
1
Press [ ] (Menu).
2
Press [▲] or [
▼
] to highlight <Preferences>, and then press [OK].
3
Press [▲] or [
▼
] to highlight <Toner Saver Mode>, and then press [OK].
Preferences
Sound Volume Control
Display Settings
Toner Saver Mode
Paper Feed Method Sw
...
4
Press [▲] or [
▼
] to highlight <Copy> or <Fax>, and then press [OK].
5
Press [▲] or [
▼
] to highlight <On> or <O >, and then press [OK].
6
Press [ ] (Menu) to close the screen.
29
Make a Basic Copy …………………………………………………… 30
Copy by Saving Paper ………………………………………………… 31
Enlarge or Reduce Copies …………………………………………… 31
Adjust the Image Quality for Copy …………………………………… 32
Adjusting the density ……………………………………………… 32
Selec
ting the Document Type ……………………………………… 32
Adjusting the sharpness …………………………………………… 33
Make Double-Sided Copies (MF4890dw/MF4880dw Only) ………… 34
C
o
py Multiple Pages onto One Sheet ……………………………… 35
Collate Copies ………………………………………………………… 35
Copy a Double-Sided ID Card ………………………………………… 36
View and Cancel Copy Jobs ………………………………………… 37
Change the Default Copy Settings …………………………………… 37
Copy
This chapter describes basic copy functions.
30
Make a Basic Copy
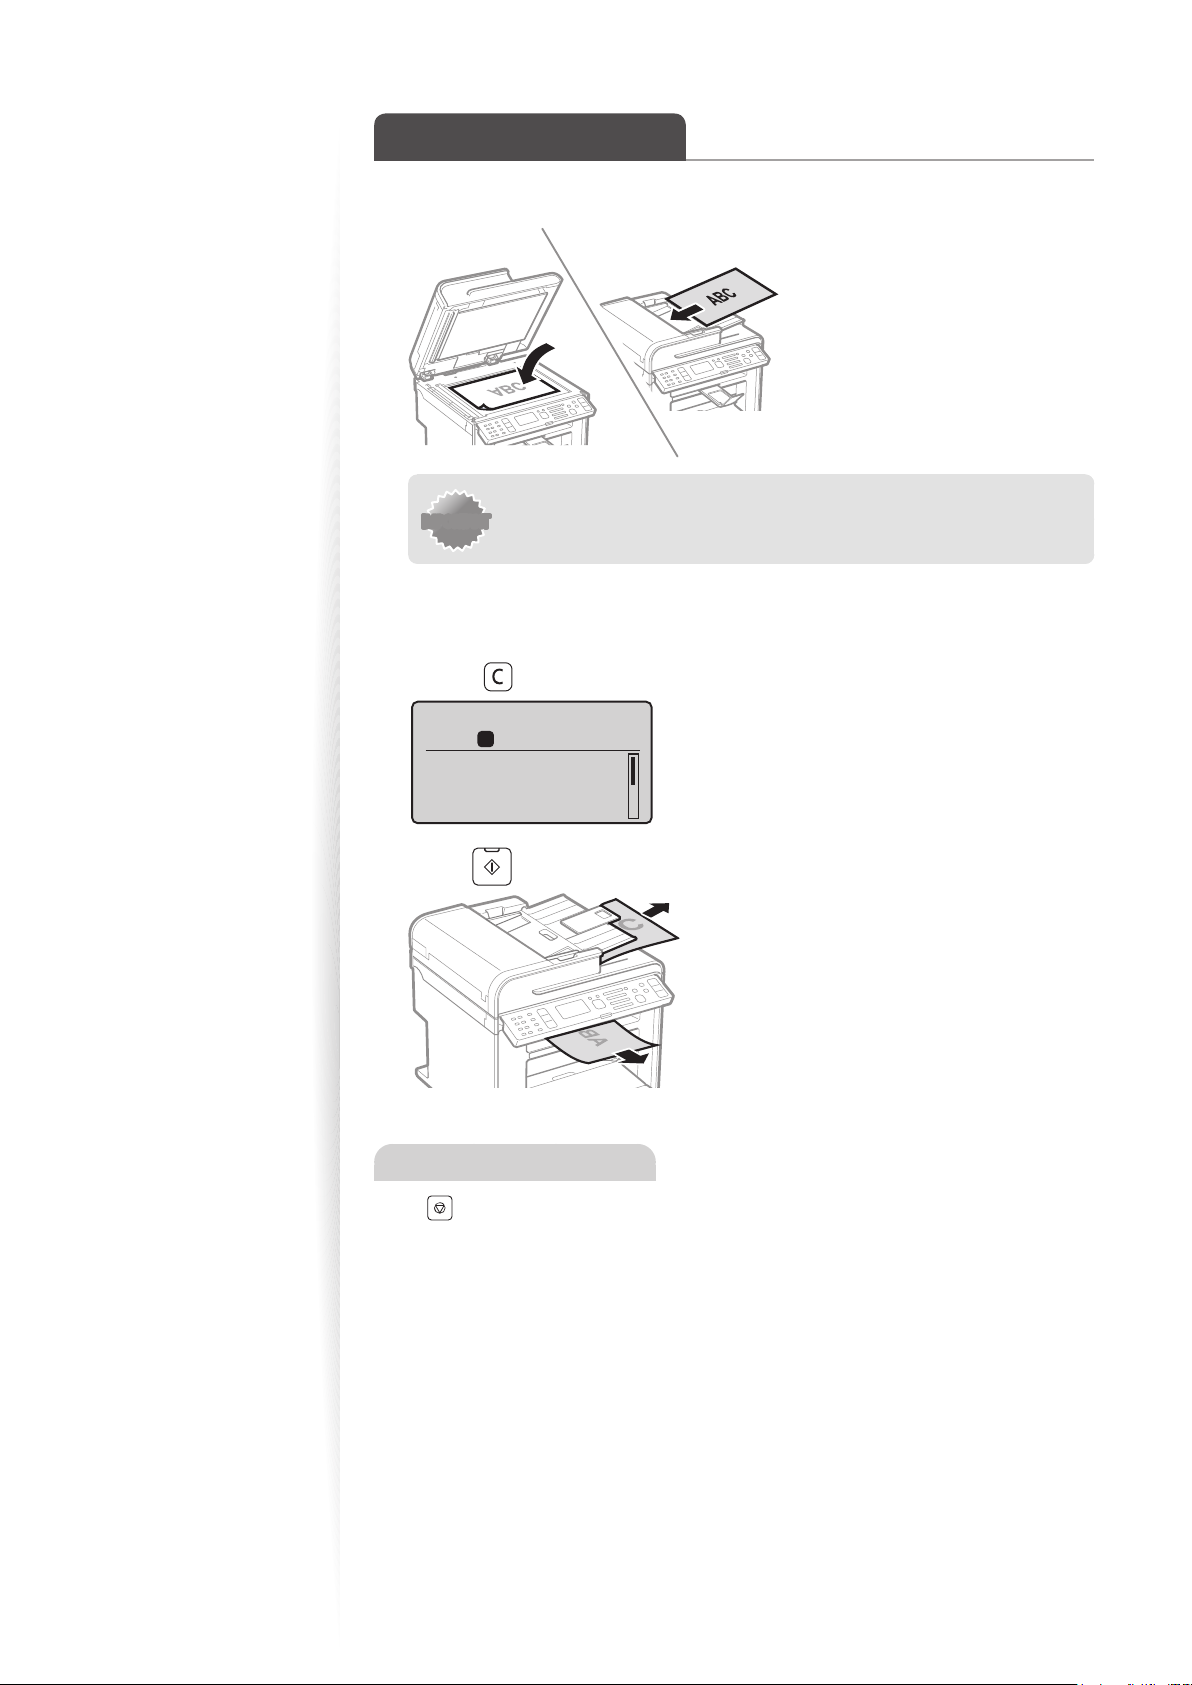
1
Place your documents (→p.19).
IMPORTANTIMPORTANT
If the document guides are too loose or too tight, this may result in
misfeeds or paper jams.
2
Switch to the Copy mode (→p.16).
3
Enter the desired copy quantity (1 to 99) with the alphanumeric keys.
•
Press [ ] (Clear) to delete the entered copy quantity.
Copy: Press Start
100% LTR
Density: 0
Original Type: Text
...
2-Sided: Off
1
+
-
01
4
Press [ ] (Start).
Canceling Copy Jobs
Press [ ] (Stop) twice.
* It is valid when only one job is processing or waiting.
Loading...