


Getting Started
Mise en route
Introducción
Introdução
IMPORTANT
IMPORTANT
IMPORTANTE
IMPORTANTE
For Mac OS users, please refer to P.13
Pour les utilisateurs de Mac, reportez-vous à la p.19
Para usuarios de Mac, consulte la pág.25
Para usuários Mac,
por favor consulte a pág.31
En
Fr
Es
Pt
FT6-1445 (010)
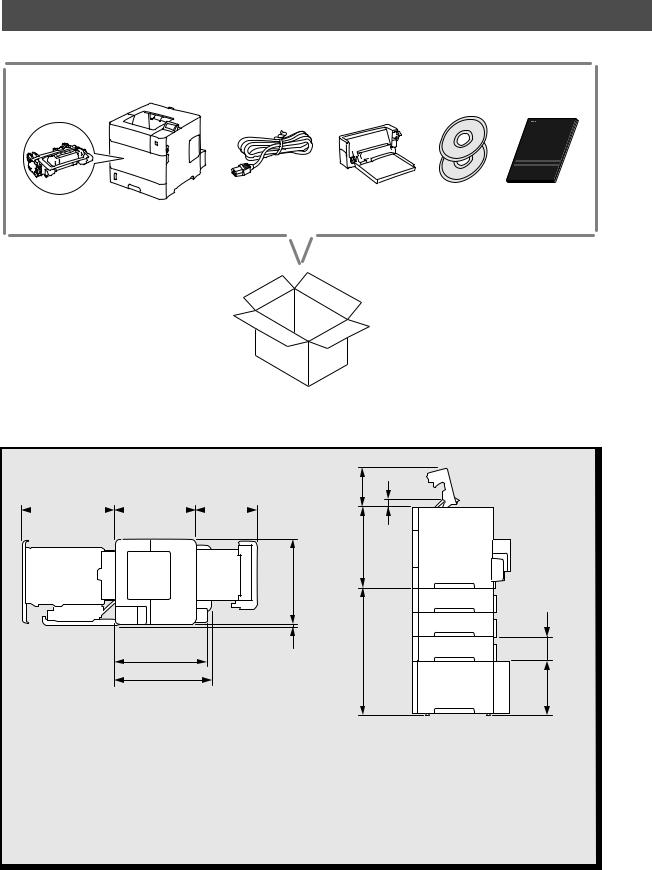
Installing the Printer
Installation Requirements
19 5/8” |
|
17 1/8” |
|
13” |
(497 mm) |
|
(433 mm) |
(331 mm) |
|
|
|
|
|
|
7 5/8” (192 mm)
16 3/8” (415 mm) |
15 7/8” (402 mm) |
1 3/8” (35 mm) |
|
3/8” (8 mm) |
241/2” |
(623mm) |
1/4”10 4 3/4” |
mm)(260(121 mm) |
19 1/2” |
|
|
*2 |
|
|
(496 mm) |
|
|
|
|
|
20 1/2” |
|
|
|
|
|
(519 mm)*1 |
|
|
|
|
|
*1 When the Paper Deck Unit PD-G1 is attached:
*2 When the following optional equipments are attached:
-Paper Feeder PF-B1 (triple decker feeder)
-Paper Deck Unit PD-G1
19 1/8” (484 mm) when four paper feeders are installed.
Provide a space of 4” (100 mm) or more around the machine.
2
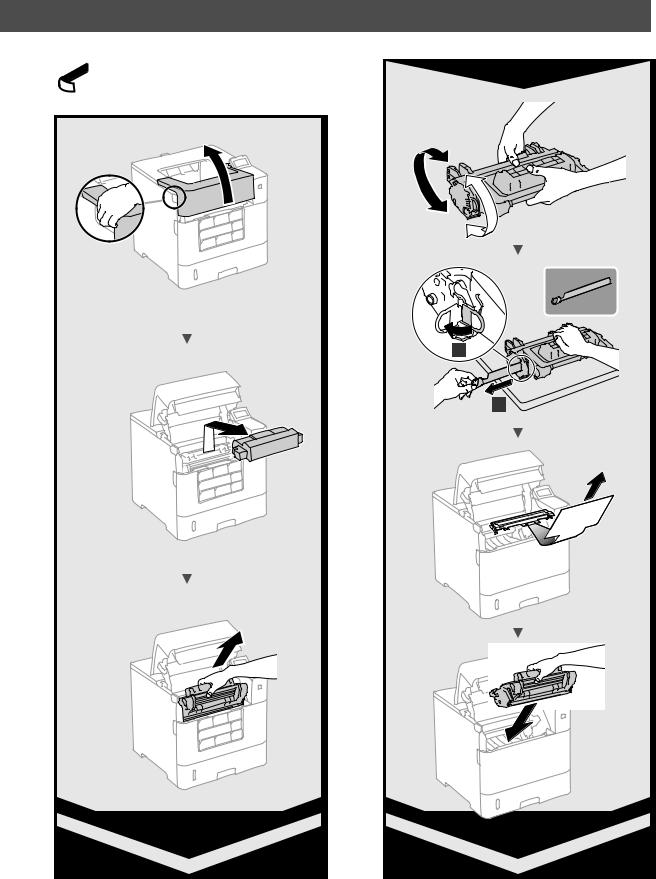
Remove all the tape.
1
2
3

Installing the Printer
4
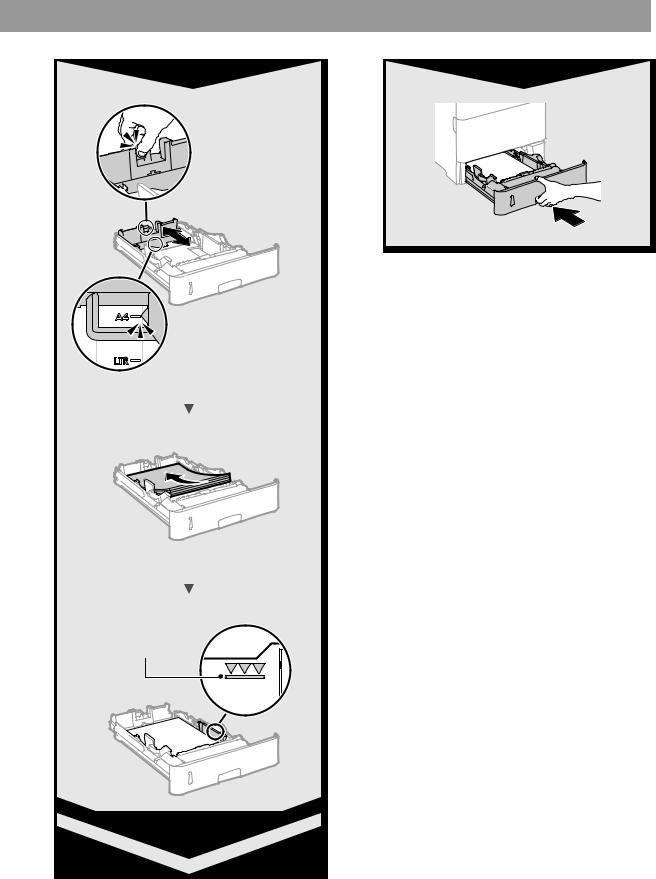
Fill paper up to here
5

Installing the Printer
Paper Feeder PF-B1 (Option)
6

Paper Deck Unit PD-G1 (Option)
7
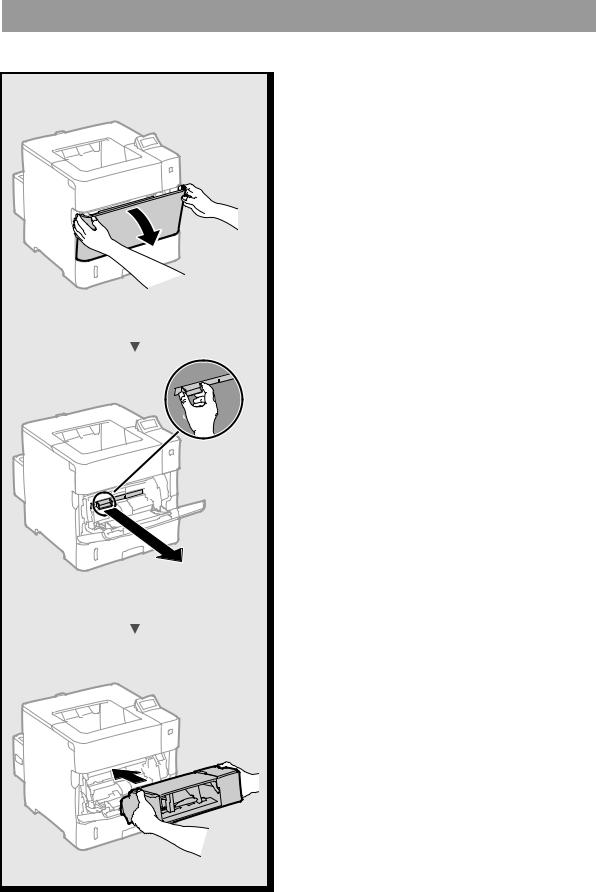
Installing the Printer
Envelope Feeder EF-A1 (Option)
8

Contents |
|
About the Supplied Manuals.................................................. |
10 |
Navigating the Menu and Text Input Method.................. |
10 |
Connecting the Power Cord and Turning ON |
|
the Power....................................................................................... |
11 |
Specifying the Initial Settings................................................. |
11 |
Selecting the Method to Connect the Machine.............. |
11 |
Connecting via a Wired LAN................................................... |
11 |
Connecting via a USB Cable.................................................... |
12 |
Setting the Paper Size and Type............................................ |
12 |
Useful Tasks................................................................................... |
13 |
Clearing Paper Jams................................................................... |
14 |
Replacing Toner Cartridges..................................................... |
15 |
Before Using the Printer........................................................... |
35 |
Table des matières |
|
Au sujet des manuels fournis.................................................. |
16 |
Navigation dans le menu et méthode de saisie |
|
du texte.......................................................................................... |
16 |
Branchement du cordon d'alimentation et mise |
|
sous tension.................................................................................. |
17 |
Configuration des réglages initiaux..................................... |
17 |
Choix de la méthode de connexion de l'appareil........... |
17 |
Connexion via un réseau filaire.............................................. |
17 |
Connexion via un câble USB................................................... |
18 |
Réglage du format et du type de papier............................ |
18 |
Procédures utiles......................................................................... |
19 |
Résolution des bourrages papier.......................................... |
20 |
Remplacement des cartouches de toner........................... |
21 |
Avant d'utiliser l'imprimante.................................................. |
35 |
Contenido |
|
Acerca de los manuales suministrados............................... |
22 |
Navegación por el menú y método de introducción |
|
de texto.......................................................................................... |
22 |
Conexión del cable de alimentación y encendido del |
|
interruptor de alimentación.................................................... |
23 |
Especificación de la configuración inicial.......................... |
23 |
Selección del método de conexión del equipo............... |
23 |
Conexión mediante una red LAN con cable..................... |
23 |
Conexión con un cable USB.................................................... |
24 |
Ajuste del tamaño y el tipo del papel.................................. |
24 |
Tareas útiles................................................................................... |
25 |
Eliminación de atascos de papel........................................... |
26 |
Sustitución de los cartuchos de tóner................................. |
27 |
Antes de utilizar la impresora................................................. |
35 |
Índice |
|
Sobre os manuais fornecidos................................................. |
28 |
Navegação pelo menu e pelo método de entrada |
|
de texto.......................................................................................... |
28 |
Como conectar o cabo de alimentação e ligar a |
|
máquina......................................................................................... |
29 |
Especificação das configurações iniciais............................ |
29 |
Escolhendo o método de conexão da máquina.............. |
29 |
Conexão via LAN com fio......................................................... |
29 |
Conexão via cabo USB............................................................... |
30 |
Configuração do tamanho e do tipo de papel................. |
30 |
Tarefas úteis.................................................................................. |
31 |
Eliminação de obstruções de papel..................................... |
32 |
Substituindo os cartuchos de toner..................................... |
33 |
Antes de Usar a Impressora..................................................... |
35 |
9
About the Supplied Manuals |
|
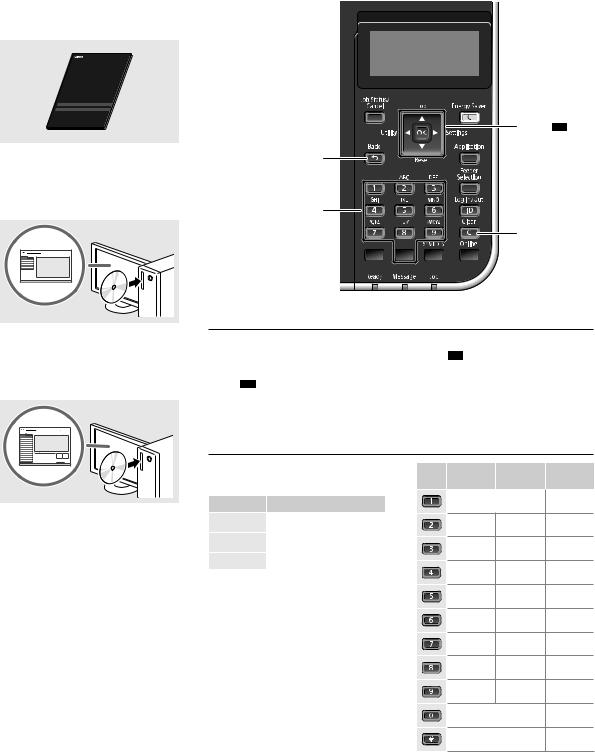
Navigating the Menu and Text Input Method |
|
|
|
Getting Started (This manual):
Read this manual first. This manual describes the installation of the machine, the settings, and a caution.
▲▼▲
Back
Printer Driver Installation Guide
(Provided User Software DVD-ROM):
This manual describes software |
|
installation. |
Numeric keys |
Clear
* 


 #
#
Navigating the Menu
▲
OK
e-Manual (Provided Instruction
Manual DVD-ROM):
The e-Manual is categorized by subject to find desired information easily.
Item selection or moving the cursor among the menu items
Select an item with [▲] or [▼].
Press OK or [►] to proceed to the next hierarchy. Press  or [◄] to return to the previous hierarchy.
Setting confirmation
Press OK .

 Text Input Method
|
Viewing the e-Manual from the |
||
En |
Instruction Manual DVD-ROM |
||
1 |
Insert the provided Instruction |
||
|
|||
|
|
Manual DVD-ROM in your computer*. |
|
|
|
||
|
2 |
Select the language. |
|
|
3 |
Click [Display] in "Display Manual". |
|
*If [AutoPlay] is displayed, click [Run MInst. exe].
 Depending on the operating system you are using, a security protection message appears.
 If the provided Instruction Manual DVDROM has been already inserted in your computer and [Manuals] is not displayed, remove Instruction Manual DVD-ROM and insert it again.
Changing entry mode
To change the entry mode, press  .
.
Entry mode |
Available text |
|
<A> |
Uppercase alphabetic letters and |
|
symbols |
||
|
||
<a> |
Lowercase alphabetic letters and |
|
symbols |
||
|
||
<12> |
Numbers |
|
|
|
Entering text, symbols, and numbers
Enter with the numeric keys or  .
.
Moving the cursor (Entering a space)
Press [◄] or [►], to move the cursor. To enter a space, move the cursor to the end of the text, and press [►].
Deleting characters
Press  . Pressing and holding
  deletes all characters.
Entry mode: Entry mode: Entry mode: |
||
<A> |
<a> |
<12> |
|
@ . - _ / |
1 |
ABC |
abc |
2 |
DEF |
def |
3 |
GHI |
ghi |
4 |
JKL |
jkl |
5 |
MNO |
mno |
6 |
PQRS |
pqrs |
7 |
TUV |
tuv |
8 |
WXYZ |
wxyz |
9 |
(Not available) |
0 |
|
(space) - . * # ! ” , ; : ^ ` _ = / | ’ |
(Not available) |
|
? $ @ % & + \ ˜ ( ) [ ] { } < > |
|
|
10
Connecting the Power Cord and Turning ON
the Power
2
1 
 Do not connect the USB cable at this time. Connect it when installing software.
Selecting the Method to Connect the Machine
●● Connecting via a Wired LAN
You can connect the machine to a wired router. Use the LAN cables to connect the machine to the wired router (access point).
 Connect the computer to the router by cable or wirelessly.
 Make sure that there is an available port in the router to connect the machine and the computer.
 Have a LAN Cable of Category 5 or higher twisted-pair cable ready.
●● Connecting via a USB cable
You can connect the machine to the computer using a USB cable.
 Make sure that the USB cable you use has the following

 mark.
mark. 


Specifying the Initial Settings
The first time you turn ON the power, follow the instructions on the screen. For details on navigating the menu and how to input the numbers, see "Navigating the Menu and Text Input Method" on p. 10.
●● Complete settings starting with language and through to USB-Connected PC OS
Follow the instructions on the screen, set the language, USB-Connected PC OS, and date and time.
Language |
USB-Connected PC OS |
English |
Mac OS |
Čeština |
Windows |
Dansk |
Other |
Deutsch |
|
Connecting via a Wired LAN
Checking before the Setup
Router Internet or
hub
LAN cable
Are the computer and the router (or hub) properly |
|
|
|
connected using a LAN cable? |
|
For more information, see the instruction manual for the |
En |
network device you are using, or contact the networking |
|
device manufacturer. |
|
|
|
Have the network settings on the computer been |
|
completed? |
|
If the computer is not properly configured, you may not use |
|
the wired LAN connection even after completing the following |
|
settings. |
|
NOTE
•When you connect to a network environment that is not security protected, your personal information could be disclosed to third parties. Please use caution.
•If you connect through a LAN in the office, contact your network administrator.
11
 Loading...