


imageCLASS LBP253dw

FT6-1284 (010)
Getting Started En
Es
For Mac OS users,
please refer to P.13
IMPORTANT
Mise en route
Pour les utilisateurs de Mac,
reportez-vous à la p.21
IMPORTANT
Introducción
Para usuarios de Mac,
consulte la pág.29
Fr
IMPORTANTE
PtIntrodução
Para usuários Mac,
por favor consulte a pág.37
IMPORTANTE
2
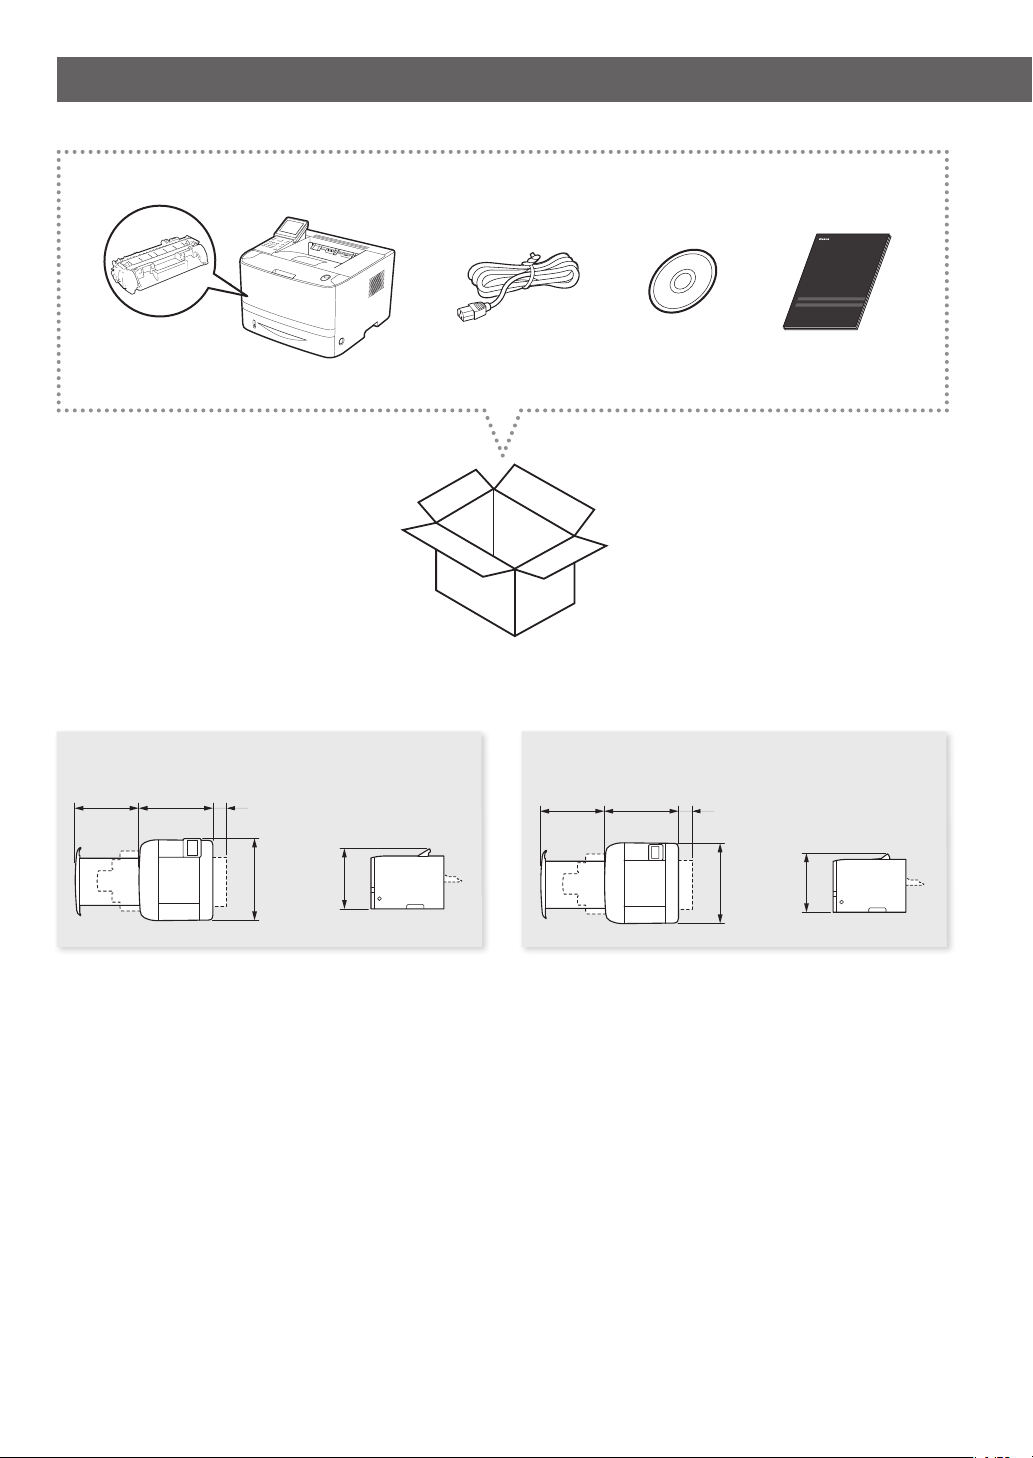
Installing the Printer
LBP253dw LBP251dw
Installation Requirements
141/2”
(369mm)
157/8”(403mm)
147/8”
(377mm)
31/2”
(90mm)
141/2”
(369mm)
157/8”(403mm)
153/4”(400mm)
147/8”
(377mm)
31/2”
(90mm)
141/2”
(369mm)
147/8”
(377mm)
31/2”
(90mm)
111/2”
(317mm)
XX”(XXmm)XX”(XXmm)
111/2”
(317mm)
113/4”
(298mm)
XX”(XXmm)XX”(XXmm)
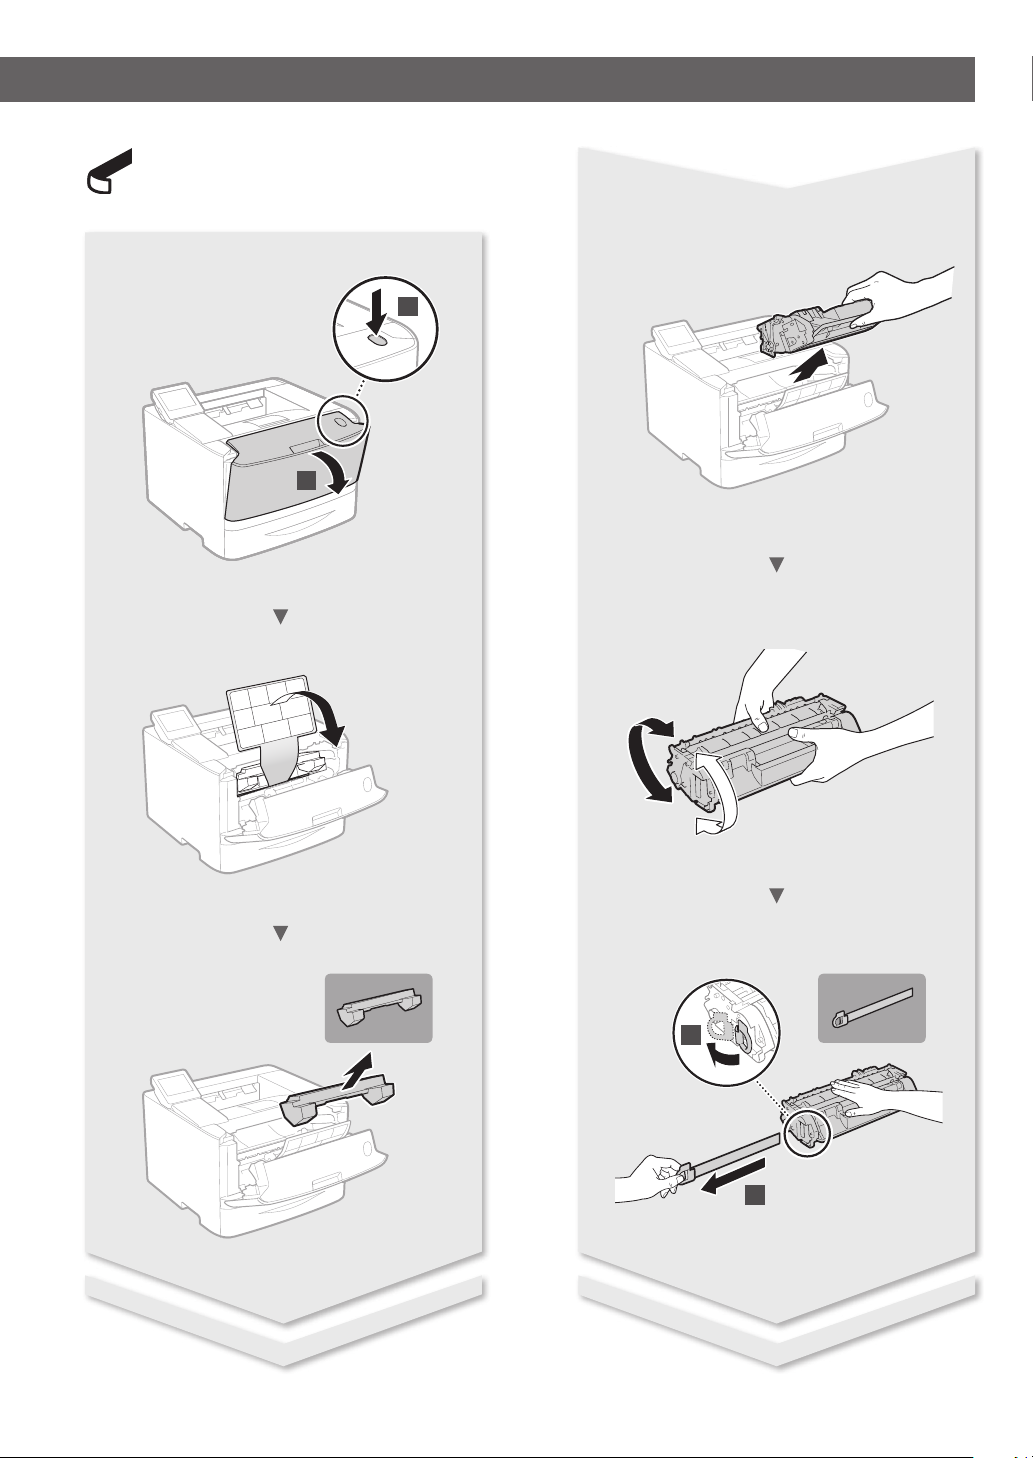
3
Remove all the tape.
1
2
1
2
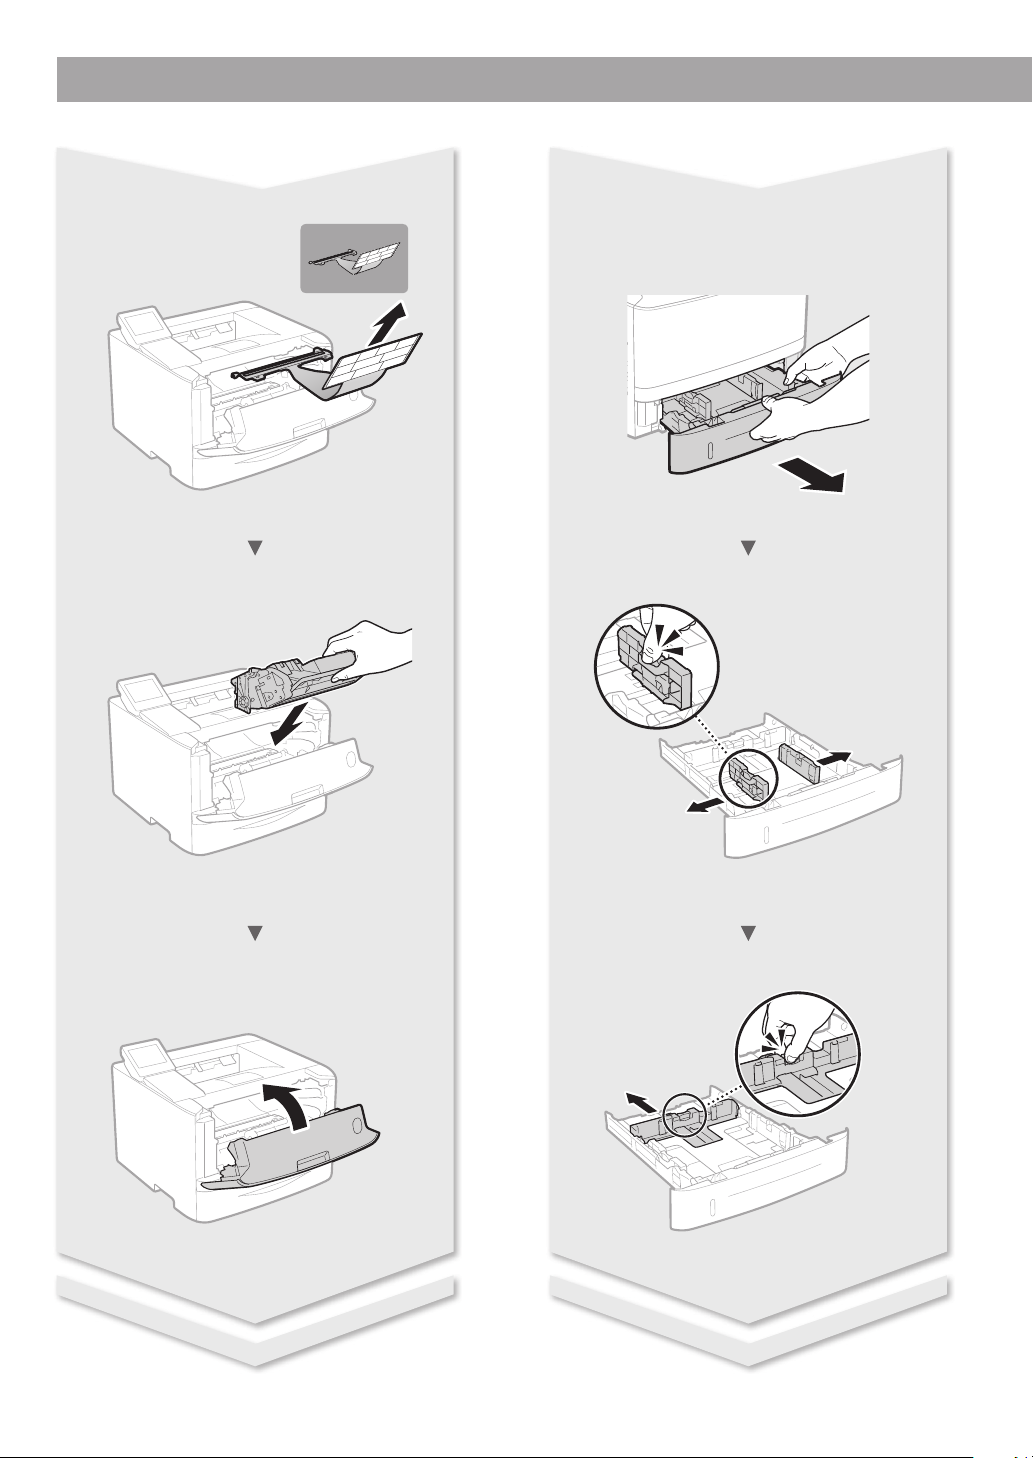
4
Installing the Printer
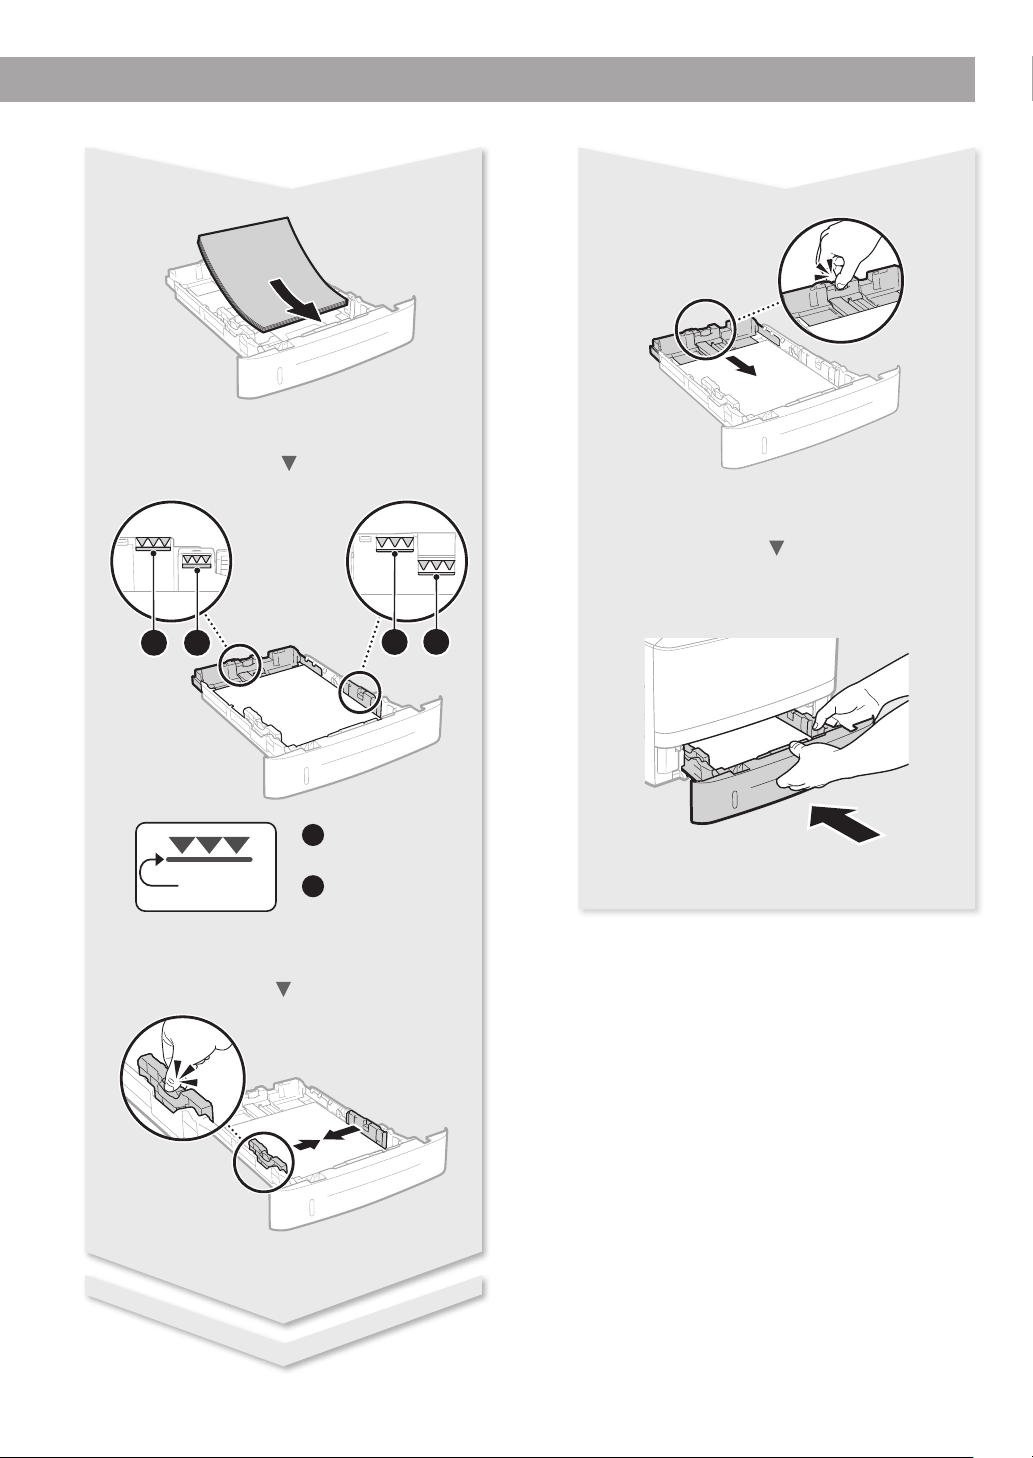
5
For A5 or larger
paper size
For paper size
smaller than A5
a
b
b
a
b
a
Fill paper
up to here
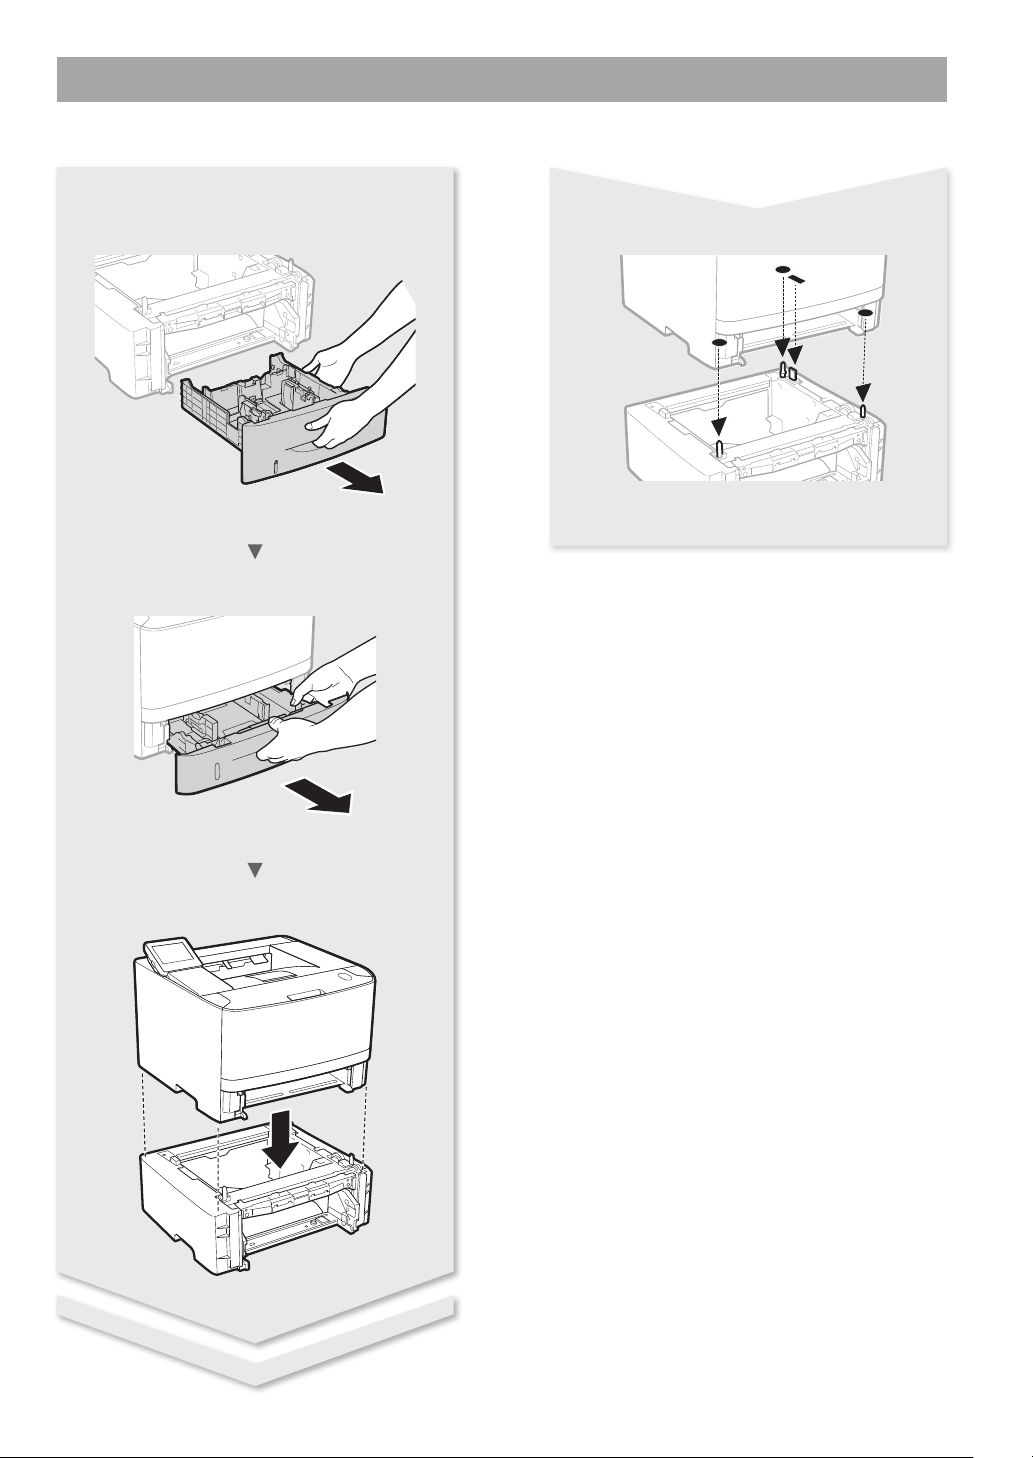
6
Installing the Printer
Paper Feeder Unit PF-44 (Option)

7
Índice
Contenido
Table des matières
Contents
About the Supplied Manuals ....................................................8
Navigating the Menu and Text Input Method ....................8
Connecting the Power Cord and Turning ON
the Power .........................................................................................9
Specifying the Initial Settings ...................................................9
Selecting the Method to Connect the Machine .................9
Selecting the Method to Connect:
Via Wireless LAN or Other Method .......................................10
Connecting via a Wired LAN ................................................... 10
Connecting via a USB Cable ...................................................10
Connecting via a Wireless LAN .............................................. 11
Setting Up a Wireless LAN ....................................................... 11
Setting the Paper Size and Type............................................13
Useful Tasks ................................................................................... 13
Clearing Paper Jams ..................................................................14
Replacing Toner Cartridges .................................................... 15
Before Using the Printer ........................................................... 43
Au sujet des manuels fournis ................................................. 16
Navigation dans le menu et méthode de saisie
du texte ..........................................................................................16
Branchement du cordon d'alimentation et mise
sous tension .................................................................................17
Conguration des réglages initiaux ....................................17
Choix de la méthode de connexion de l'appareil ........... 17
Choix de la méthode de connexion :
Méthode via réseau sans l ou autre ................................... 18
Connexion via un réseau laire .............................................18
Connexion via un câbleUSB................................................... 18
Connexion via un réseau sans l .......................................... 19
Conguration du réseau sans l ..........................................19
Réglage du format et du type de papier............................ 21
Procédures utiles ........................................................................21
Résolution des bourrages papier .........................................22
Remplacement des cartouches de toner........................... 23
Avant d'utiliser l'imprimante .................................................. 43
Acerca de los manuales suministrados ..............................24
Navegación por el menú y método de introducción
de texto ..........................................................................................24
Conexión del cable de alimentación y encendido
del interruptor de alimentación ............................................ 25
Especicación de la conguración inicial .......................... 25
Selección del método de conexión del equipo ............... 25
Selección del método de conexión:
A través de LAN inalámbrica u otro método ....................26
Conexión mediante una red LAN con cable ..................... 26
Conexión con un cable USB....................................................26
Conexión mediante una red LAN inalámbrica ................ 27
Conguración de una LAN inalámbrica ............................27
Ajuste del tamaño y el tipo del papel ................................. 29
Tareas útiles .................................................................................. 29
Eliminación de atascos de papel ..........................................30
Sustitución de los cartuchos de tóner ................................ 31
Antes de utilizar la impresora ................................................43
Sobre os manuais fornecidos ................................................. 32
Navegação pelo menu e pelo método de entrada
de texto ..........................................................................................32
Como conectar o cabo de alimentação e ligar a
máquina ......................................................................................... 33
Especicação das congurações iniciais ............................ 33
Escolhendo o método de conexão da máquina .............33
Escolhendo o método de conexão
Via LAN sem o ou outro método ........................................ 34
Conexão via LAN com o ......................................................... 34
Conexão via cabo USB ..............................................................34
Conexão via LAN sem o ........................................................35
Conguração da LAN sem o ...............................................35
Conguração do tamanho e do tipo de papel ................ 37
Tarefas úteis .................................................................................. 37
Eliminação de obstruções de papel..................................... 38
Substituindo os cartuchos de toner .................................... 39
Antes de Usar a Impressora .................................................... 43

8
En
Navigating the Menu and Text Input Method
About the Supplied Manuals
Getting Started (This manual):
Read this manual rst. This manual
describes the installation of the
machine, the settings, and a caution.
Printer Driver Installation Guide
(Provided DVD-ROM):
This manual describes software
installation.
e-Manual (Provided DVD-ROM):
The e-Manual is categorized by subject to
nd desired information easily.
Viewing the e-Manual from the
DVD-ROM
1 Insert the provided DVD-ROM in your
computer*.
2 Click [Manuals].
3 Click [e-Manual].
* If [AutoPlay] is displayed, click [Run MInst.
exe].
Depending on the operating system you
are using, a security protection message
appears.
If the provided DVD-ROM has been already
inserted in your computer and [Manuals] is
not displayed, remove the DVD-ROM and
insert it again.
Navigating the Menu
Item selection or moving the cursor
among the menu items
LBP253dw
Tap an item to select it. Press
to
return to the previous screen.
LBP251dw
Select an item with [▲] or [▼].
Press
OK
or [
►
] to proceed to the next
hierarchy. Press or [
◄
] to return to
the previous hierarchy.
Setting conrmation
LBP253dw
Tap the item. However, when <Apply>
appears, tap <Apply>.
LBP251dw
Press
OK
. However, when <Apply>
appears on the display, select
<Apply>, and then press
OK
.
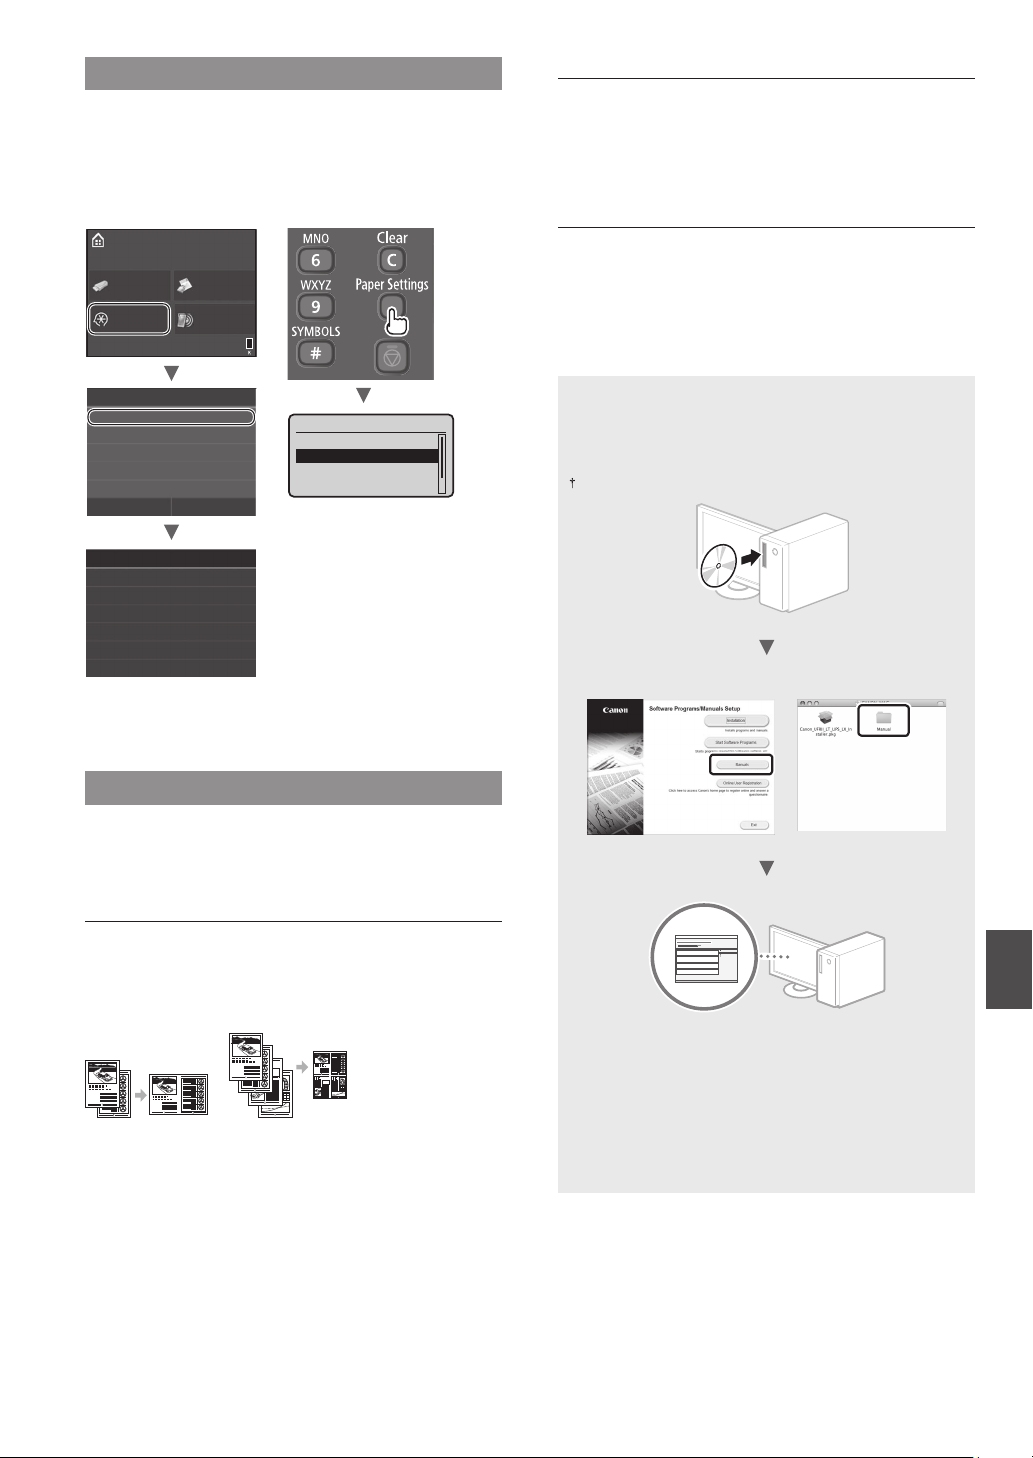
Text Input Method
Changing entry mode
To change the entry mode, tap
<A/a/12> or press
.
Entry mode Available text
<A>
Uppercase alphabetic letters and
symbols
<a>
Lowercase alphabetic letters and
symbols
<12> Numbers
Entering text, symbols, and numbers
Enter with the numeric keys or
.
Moving the cursor (Entering a space)
Tap
or , or press [
◄
] or [
►
], to
move the cursor. To enter a space,
move the cursor to the end of the
text, and tap or press [
►
].
Deleting characters
Press
. Pressing and holding
deletes all characters.
Entry mode:
<A>
Entry mode:
<a>
Entry mode:
<12>
@ . - _ / 1
ABC abc 2
DEF def 3
GHI ghi 4
JKL jkl 5
MNO mno 6
PQRS pqrs 7
TUV tuv 8
WXYZ wxyz 9
(Not available) 0
(space) - . * # ! ” , ; : ^ ` _ = / | ’
? $ @ % & + \ ˜ ( ) [ ] { } < >
(Not available)
Apply#
A/a/12
Administrator
A
System Manager Name
Back
<A/a/12>
*
#
Clear
<Apply>
(
)
LBP251dw
LBP251dw
▲▼
▲
▲
OK
Numeric keys
Menu
9
En
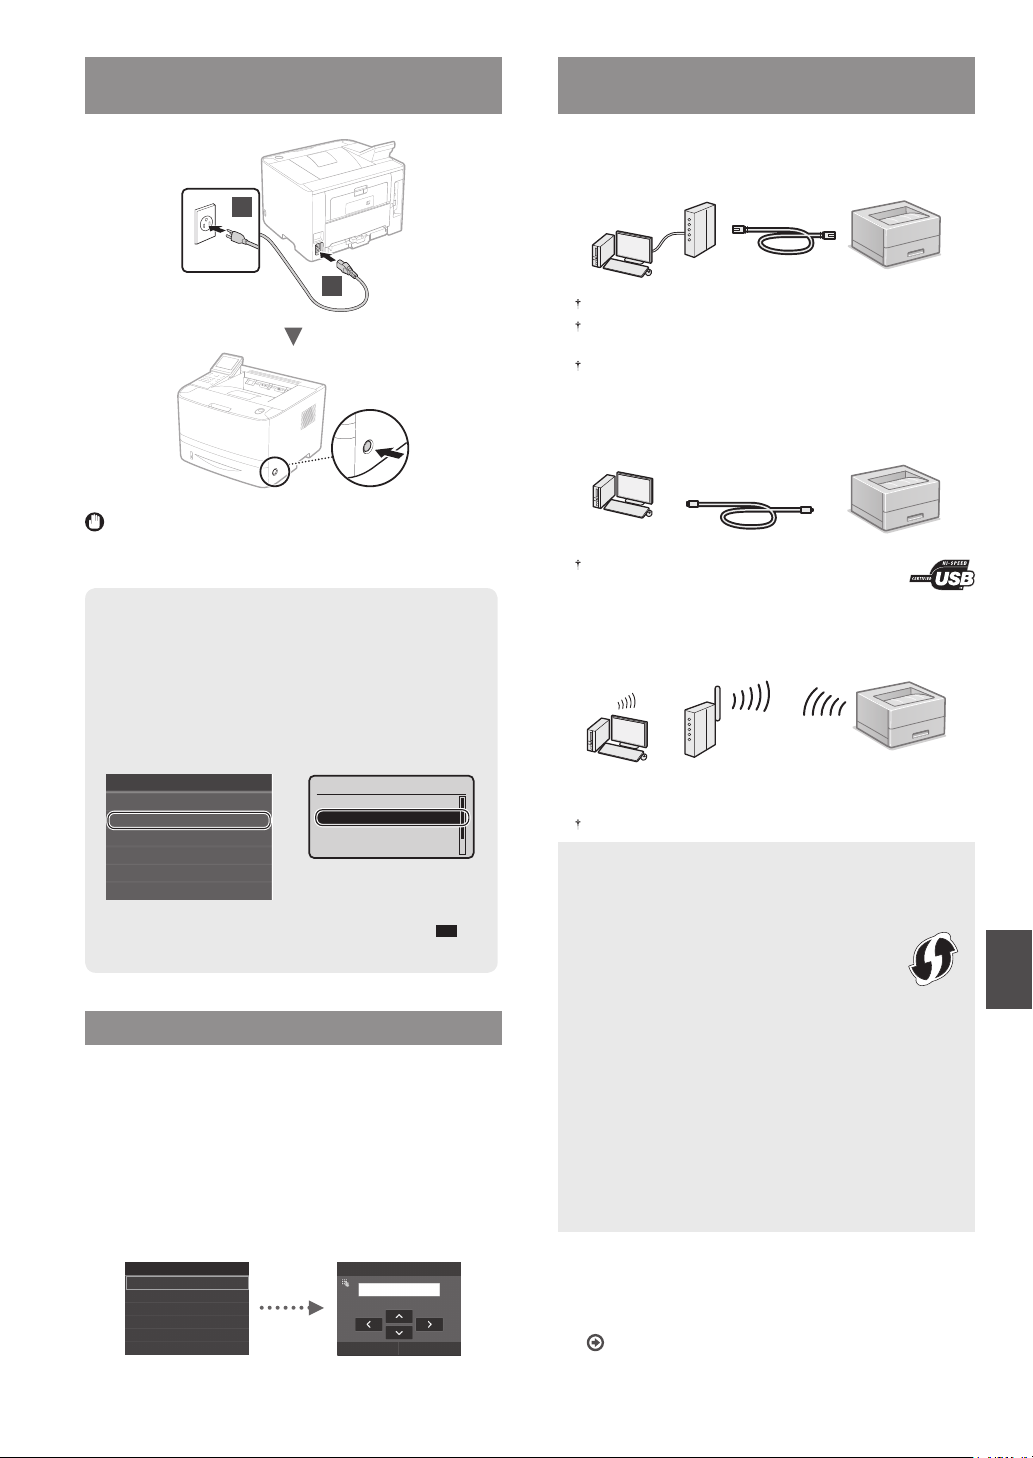
Connecting the Power Cord and Turning ON
the Power
1
2
Do not connect the USB cable at this time. Connect it when
installing software.
Principle of Describing the Operating Instructions
This Getting Started Guide describes the operating
instructions using illustrations of the LBP253dw's screen.
In following some operating instructions, such
as "select …," the operation you perform diers,
depending on the model of the machine.
Tap the item the
operating instruction
refers to.
●
LBP253dw
●
LBP251dw
Use [▲], [▼], [
◄
], or [
►
]
to select the item the
operating instruction
refers to, and press
OK
.
Paper Settings
Select Frequently Used Paper Sizes
Register Custom Paper
Drawer 2
Drawer 1
Multi-Purpose Tray
Register Custom Paper
Drawer 2
Drawer 1
Multi-Purpose Tray
Paper Settings
Specifying the Initial Settings
The rst time you turn ON the power, follow the instructions
on the screen. For details on navigating the menu and how to
input the numbers, see "Navigating the Menu and Text Input
Method" on p. 8.
●
Complete settings starting with language
and through to date and time
Follow the instructions on the screen, set the language,
region, time zone, and date and time.
Language
Spanish
French
Japanese
English
German
Italian
Current Date/Tim e Settings
Apply
10/10/2015 10:26 AM
(0:00-12:59)
Selecting the Method to Connect the
Machine
●
Connecting via a Wired LAN
You can connect the machine to a wired router. Use the LAN
cables to connect the machine to the wired router (access point).
Connect the computer to the router by cable or wirelessly.
Make sure that there is an available port in the router to connect
the machine and the computer.
Have a LAN Cable of Category 5 or higher twisted-pair cable ready.
●
Connecting via a USB cable
You can connect the machine to the computer using a USB
cable.
Make sure that the USB cable you use has the following
mark.
●
Connecting via a Wireless LAN
You can connect the machine to a wireless router*. Since it
is connected to wireless, no LAN cables are needed.
* A wireless router (access point), which supports IEEE802.11b/g/n,
is required.
Connect the computer to the router by cable or wirelessly.
Check if your router has a button
Select from the following two methods, depending on the
router (access point) that you are using.
●
There is a button.
You can easily setup if your router (access point)
has a button, and if the mark is on the router.
●
There is no button.
If there is no button on your router (access point), you
may manually select SSID and complete the settings.
NOTE
If you are looking to install your new device via a wireless
network connection, you can nd a video and written
guides with step-by-step instructions to assist you through
the process from the following URL:
www.usa.canon.com/WirelessHelp
Viewing these guides will ensure a smooth setup of the
device into your existing wireless environment.
●
Direct Connection
Connect a mobile device to the machine wirelessly and
directly without routing through a wireless LAN router (or
access point)
e-Manual "Can Be Used Conveniently with a Mobile
Device"
►
"Connecting to a Mobile Device"
►
"Make
Direct Connection (Access Point Mode)"
10
En
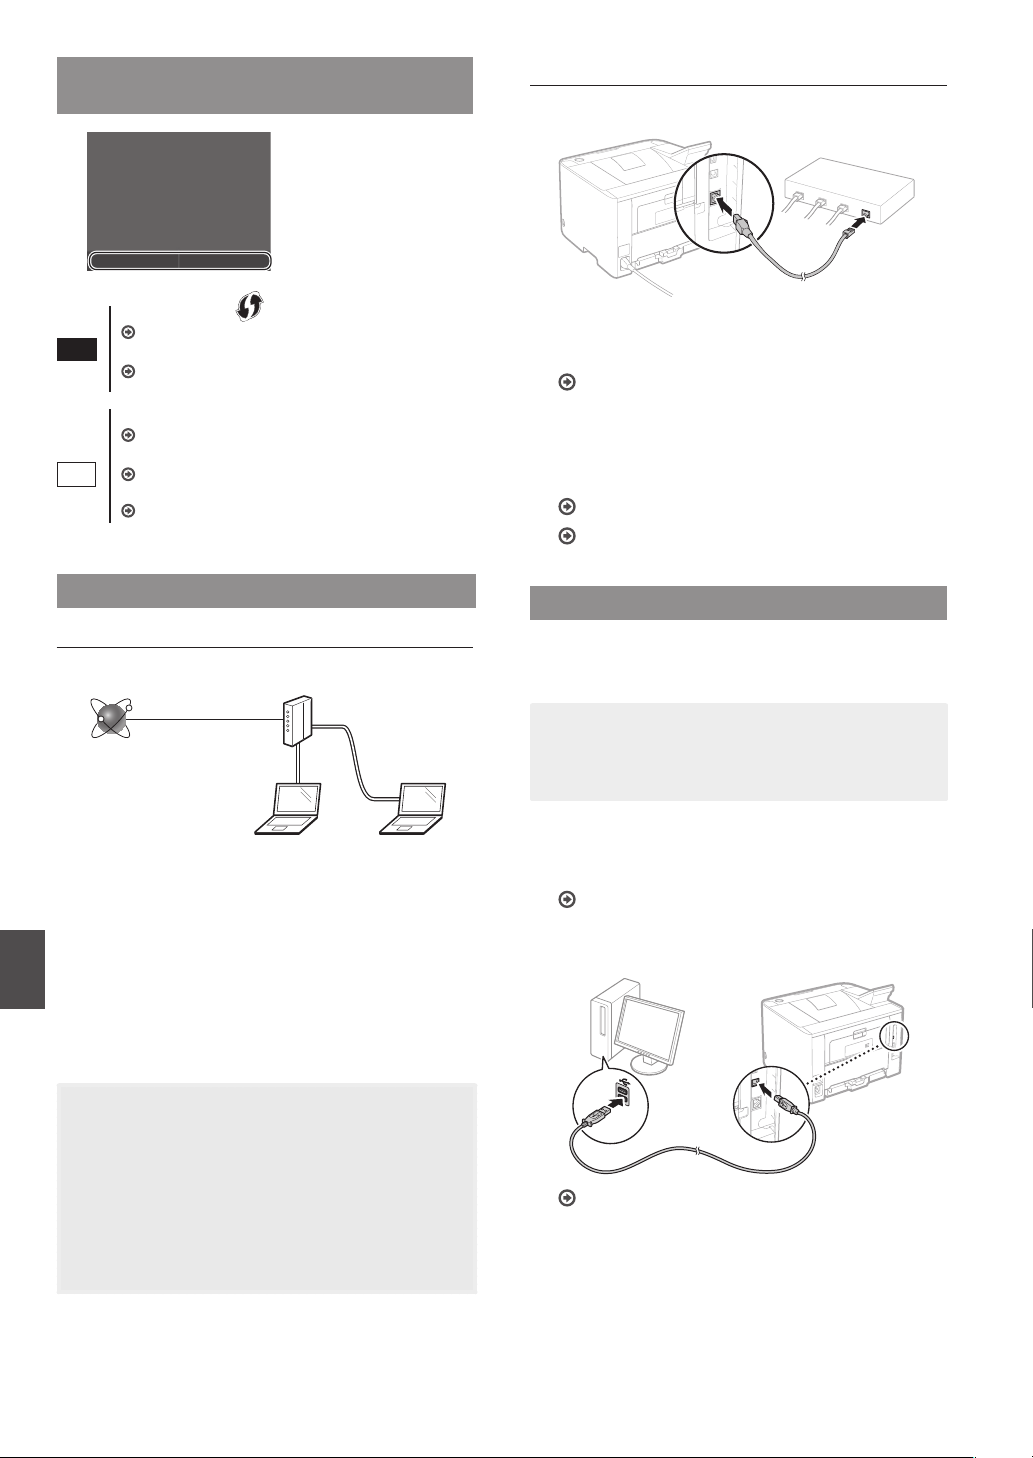
Selecting the Method to Connect:
Via Wireless LAN or Other Method
NoYes
Do you want to use the
wireless LAN to connect
the computer?
The settings can be
configured later.
Yes
No
There is a button.
Start from step 4 of "Push Button Mode" (P. 11).
There is no button.
Start from step 4 of "Setting the Access Point
Manually" (P. 12).
Connect to the computer via a wired LAN
Proceed to "Connecting via a Wired LAN" (P. 10).
Connect to the computer via a USB cable
Proceed to "Connecting via a USB Cable" (P. 10).
Connect to the computer via a wireless LAN later
Proceed to "Connecting via a Wireless LAN" (P. 11).
Connecting via a Wired LAN
Checking before the Setup
Internet
Router
or
hub
LAN cable
Are the computer and the router (or hub) properly
connected using a LAN cable?
For more information, see the instruction manual for the
network device you are using, or contact the networking
device manufacturer.
Have the network settings on the computer been
completed?
If the computer is not properly congured, you may not use
the wired LAN connection even after completing the following
settings.
NOTE
• You cannot connect both the wired LAN and wireless
LAN at the same time. In addition, the machine is set to
the "Wired LAN" by default.
• When you connect to a network environment that is not
security protected, your personal information could be
disclosed to third parties. Please use caution.
• If you connect through a LAN in the oce, contact your
network administrator.
Connecting via a Wired LAN
1
Connect the LAN cable.
The IP address will be automatically congured in 2
minutes. If you want to set the IP address manually, see
the following items.
e-Manual "Network"
►
"Connecting to a Network"
►
"Setting IP Addresses"
2
Install the driver and software using the provided
DVD-ROM.
See "For details on the installation procedures:" (P. 13).
Proceed to "Setting the Paper Size and Type" (P. 13).
Connecting via a USB Cable
Install the driver and software on the DVD-ROM included with
the machine.
NOTE
If you connected the USB cable before installing, rst
remove the USB cable, and then re-install.
1
Install the driver and software using the User
Software and Manuals DVD-ROM.
See "For details on the installation procedures:" (P. 13).
2
Connect the USB cable.
Proceed to "Setting the Paper Size and Type" (P. 13).
11
En
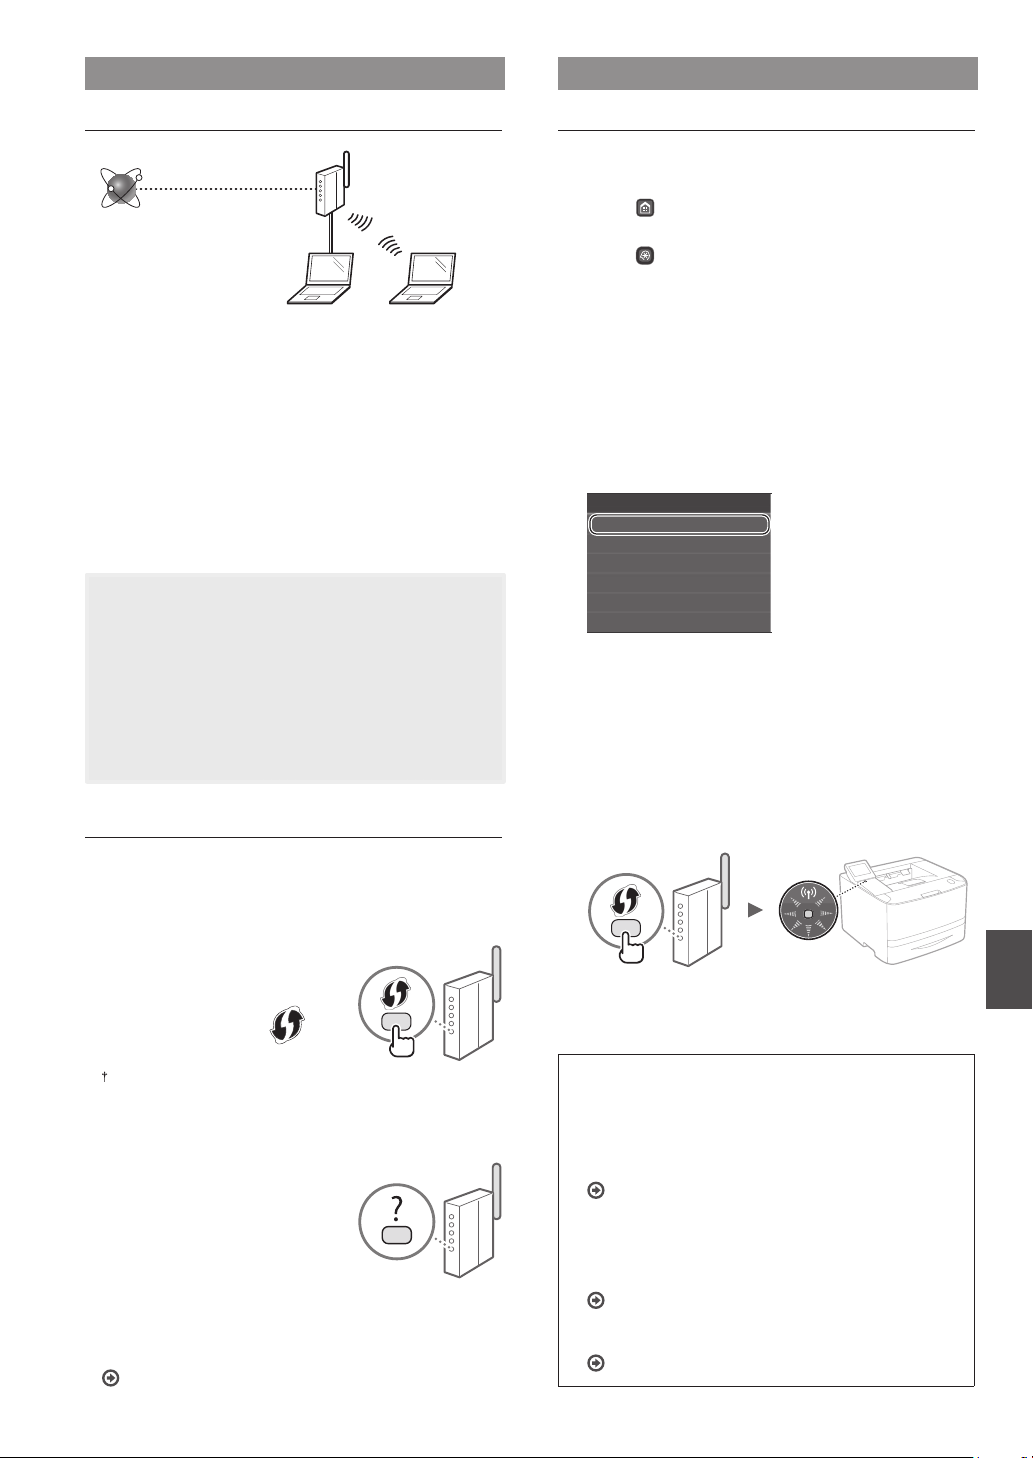
Connecting via a Wireless LAN
Checking before the Setup
Wireless LAN Router
Internet
Is the computer connected to the router (access point)
correctly by a LAN cable or wireless LAN?
For more information, see the instruction manual for the
network device you are using, or contact the networking
device manufacturer.
Have the network settings on the computer been
completed?
If the computer is not properly congured, you may not
use the wireless LAN connection even after completing the
following settings.
NOTE
• You cannot connect both the wired LAN and wireless
LAN at the same time. In addition, the machine is set to
the "Wired LAN" by default.
• When you connect to a network environment that is not
security protected, your personal information could be
disclosed to third parties. Please use caution.
• If you connect through a LAN in the oce, contact your
network administrator.
Checking the Router
Select the connection method to the wireless LAN. Select from
the following two methods depending on the router (access
point) that you are using.
●
There is a button.
This machine supports WPS (Wi-Fi
Protected set up). You can easily set
up if your router (access point) has
a button, and if the mark is on
the router.
If you are not sure whether or not your
router supports WPS, please see the manual included in the
product, or contact the product manufacturer.
●
There is no button.
If there is no button on your router
(access point), you may manually
select SSID and complete the
settings. In this case, you need to
remember the SSID and network key
of your router (access point).
See "Check SSID or Network Key for a
Wireless LAN Router/Access Point" (P. 12) to learn how to nd
out your SSID and network key.
To set up with WPS PIN code method, or setup manually:
e-Manual "Connecting to a Wireless LAN"
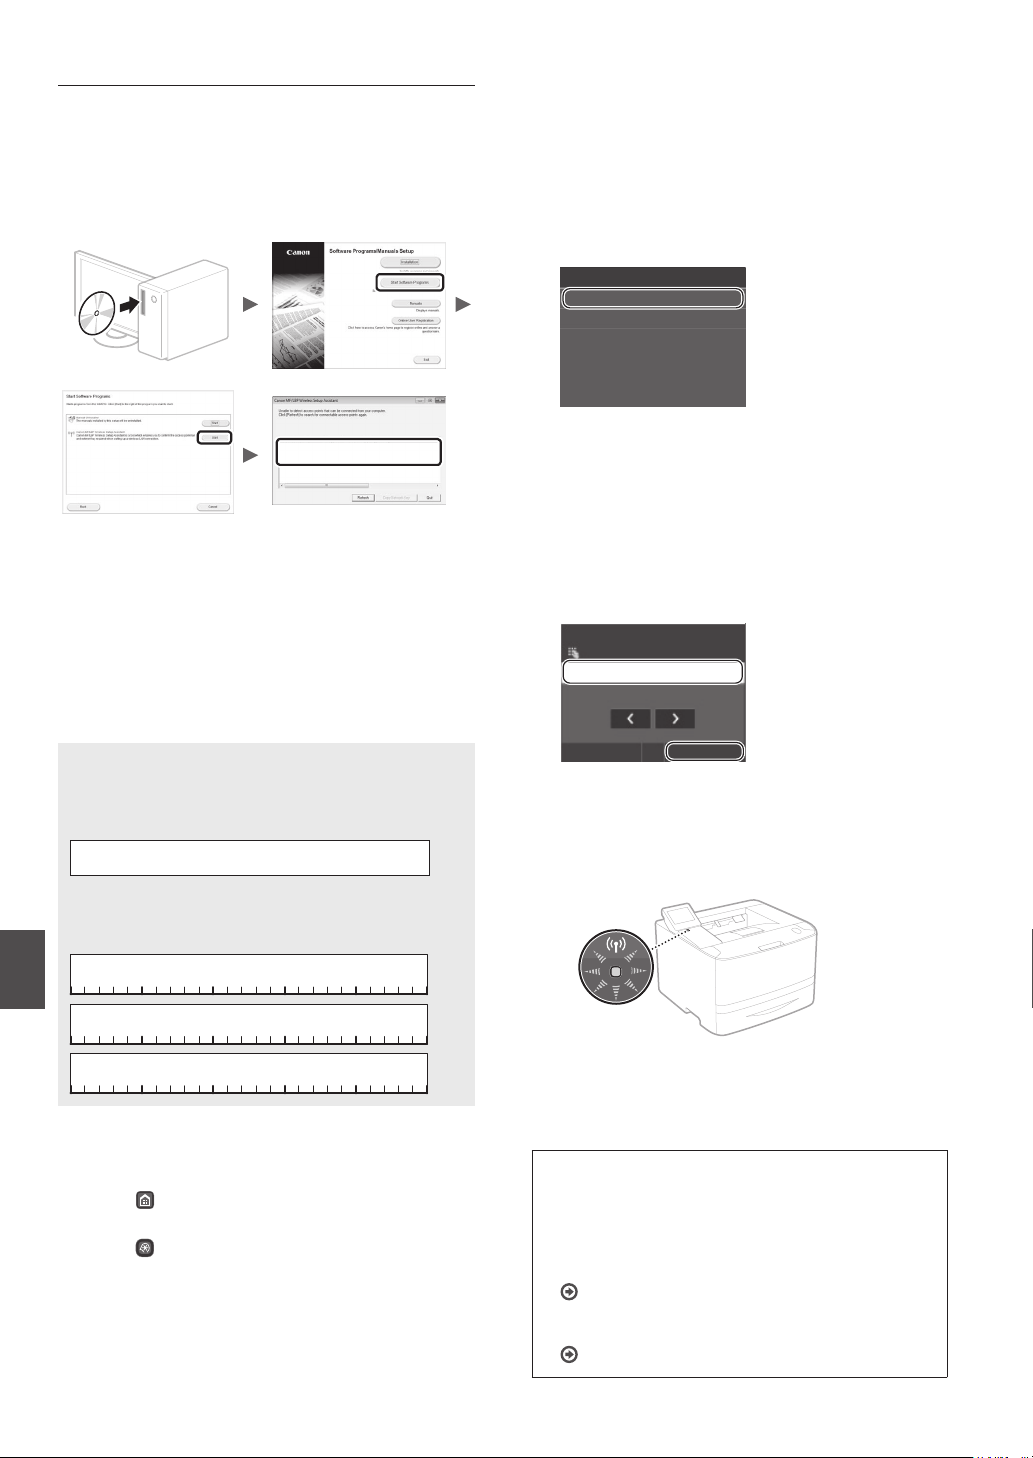
Setting Up a Wireless LAN
Push Button Mode
1
Select <Menu> in the Home Screen.
• LBP253dw
Press and tap <Menu>.
• LBP251dw
Press
on the operation panel.
2
Select <Network Settings>.
3
Select <Wireless LAN Settings>.
4
Read the message that is displayed, and select
<OK>.
5
Select <WPS Push Button Mode>.
Connection Information
Power Save Mode
SSID Settings
WPS PIN Code Mode
WPS Push Button Mode
Wireless LAN Settings
6
Select <Yes>.
7
Press and hold* the button until the lamp lights or
blinks.
You should press the WPS button within 2 minutes after
you select <Yes> in step 6.
* The time that you should hold the button may vary, depending
on the router you are using.
8
Wait approximately 2 minutes after the connection.
The IP address is set during this period of time.
When an error message appears:
Select <OK> to close the screen, check whether the
network key is correct, and then retry the settings. If the
access point cannot be detected even after retrying,
see the following.
e-Manual "When an Error Message Appears"
When checking the network connection:
You can check if the machine is properly connected to the
network using a computer that connected to a network.
e-Manual "Viewing Network Settings"
To set IP address manually:
e-Manual "Connecting to a Wireless LAN"
12
En
Setting the Access Point Manually
1
Check the SSID or network key for a Wireless LAN
Router/Access Point.
• Check the label on the Wireless LAN router.
• You can check the SSID or the network key using "Canon
MF / LBP Wireless Setup Assistant," which is included in
the provided DVD-ROM supplied with the machine.
SampleABCD WEP 01234567890123456789ABCDEF
SampleEFGHIJ WPA-PSK 543210EDCBA
SampleK WPA2-PSK 1234ABCD
If the information of the wireless LAN router is not
displayed, click [Refresh]. If the information is not
displayed when you click [Refresh], check if the computer
settings for a wireless LAN router (access point) are
complete.
2
Write down the name of the SSID and network key
displayed in step 1. When multiple access points are
displayed, write all SSIDs that are displayed.
SSID
It is sometimes written as name of network, or name of an
access point. If there are multiple SSIDs, please write down
them all.
Network Key
It is sometimes written as PIN, WEP key, WPA/WPA2
passphrase, PSK or preshared key.
3
Select <Menu> in the Home Screen.
• LBP253dw
Press
and tap <Menu>.
• LBP251dw
Press
on the operation panel.
4
Select <Network Settings>.
If a screen appears prompting you to enter a System
Manager PIN, enter the correct PIN using the numeric
keys, and select <Apply>.
5
Select <Wireless LAN Settings>.
6
Read the message that is displayed, and select
<OK>.
7
Select <SSID Settings>.
8
Select <Select Access Point>.
SSID Settings
Enter Manually
Select Access Point
9
Select a wireless LAN router.
If multiple matched SSIDs are displayed, select the ID that
is listed rst (the one with the strongest signal).
10
Enter the network key that you have written
down.
Enter the network key using the numeric keys, and
select <Apply>.
Apply
A/a/12 #
XXXXXXXXXXXXX
A
WEP Key (5-26 Characters)
11
Select <Yes>.
12
After the <Connected.> screen is displayed, wait
until the Wi-Fi indicator stops blinking and turns on.
13
Wait approximately 2 minutes after the
connection.
IP address is set during this period of time.
When an error message appears:
Select <OK> to close the screen, check whether the
network key is correct, and then retry the settings.
If the access point cannot be detected even after
retrying, see the following.
e-Manual "When an Error Message Appears"
To set IP address manually:
e-Manual "Connecting to a Wireless LAN"
13
En
Setting the Paper Size and Type
Following the instructions on the screen, set the paper size
and type. Depending on the model you are using, make
settings as shown below.
Output Report
Common Settings
Timer Settings
Preferences
Network Settings
Paper Settings
Menu
Paper Settings
Select Frequently Used Paper Sizes
Register Custom Paper
Drawer 2
Drawer 1
Multi-Purpose Tray
Direct
Connection
Menu
Secure
Print
Memory
Media Print
Home
●
LBP253dw
●
LBP251dw
Register Custom Paper
Drawer 2
Drawer 1
Multi-Purpose Tray
Paper Settings
Useful Tasks
This section describes an overview of the functions that you
can use routinely.
Print
Enlarged/Reduced Printing
Reduced Layout
You can reduce multiple documents to print them on to one
sheet.
2 on 1 4 on 1
Poster Printing
Watermark Printing
Selecting a "Prole"
Network Settings
This machine comes equipped with a network interface that
enables you to construct a network environment easily. The
machine can be used to increase work eciency as a shared
machine in the oce.
Remote UI
You can view the machine's status from the computers on
the network. You can access the machine and manage jobs or
specify various settings via the network.
For details on the installation procedures:
Install the driver and software using the provided
DVD-ROM. For details on the installation procedures, see
the Printer Driver Installation Guide.
You can also download the driver from the Canon Web site.
Windows Mac OS
For Mac users:
The DVD-ROM supplied with this machine may not include
the driver for Mac OS. This is dierent, depending on when
you purchase the machine. Please nd and download the
appropriate driver on our Canon home page. For further
information on installation or using the driver, see the
Printer Driver Installation Guide.
14
En
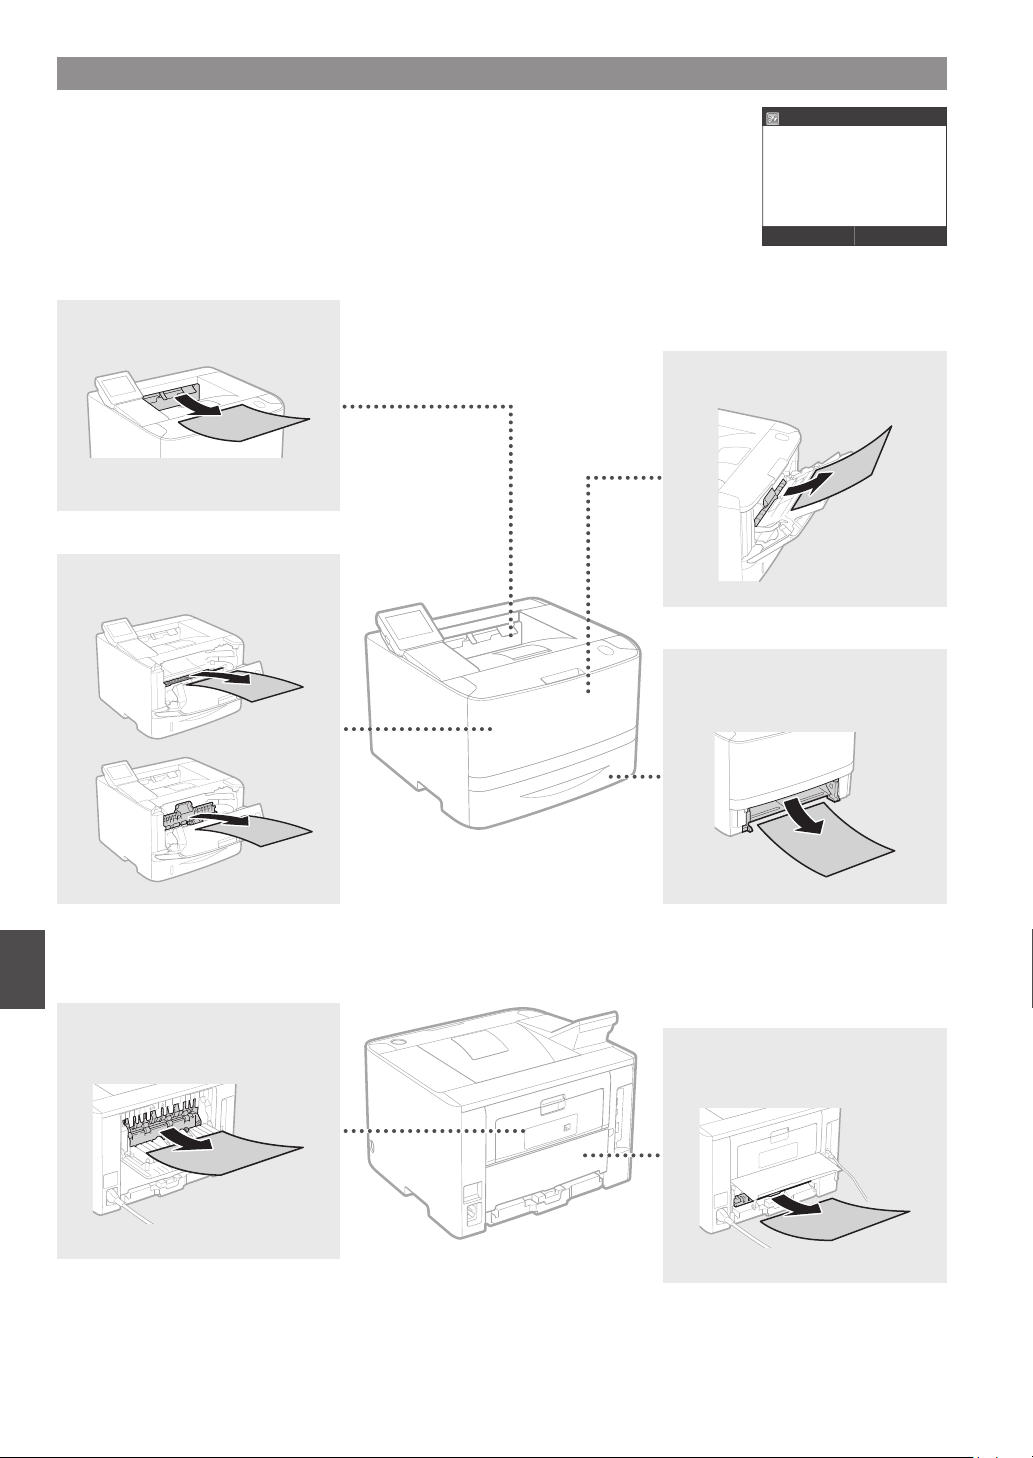
Clearing Paper Jams
If the following screen appears, a paper jam has occurred in the feeder or inside the machine. Follow
the procedure displayed on the screen to remove the jammed document or paper. This manual
indicates only the areas where paper jams occur. For details on each function, see the e-Manual.
Paper jammed.
Next
Press [Next] to display the
steps.
Back side
Back side
Inside the Front cover
Paper drawer
(of the main unit)
Multi-purpose tray
Output tray
 Loading...