


Getting Started
Mise en route
Introducción
Introdução
IMPORTANT
IMPORTANT
IMPORTANTE
IMPORTANTE
For Mac OS users, please refer to P.13
Si vous utilisez Mac OS, reportez-vous à la P.27
Para usuarios de Mac OS, consulte la pág.41
Para usuários de Mac OS, por favor consulte a pág.55
You can access http://canon.com/oip-manual to read the User’s Guide that describes all functions of this machine.
En
Fr
Es
Pt
FT6-1696 (000)
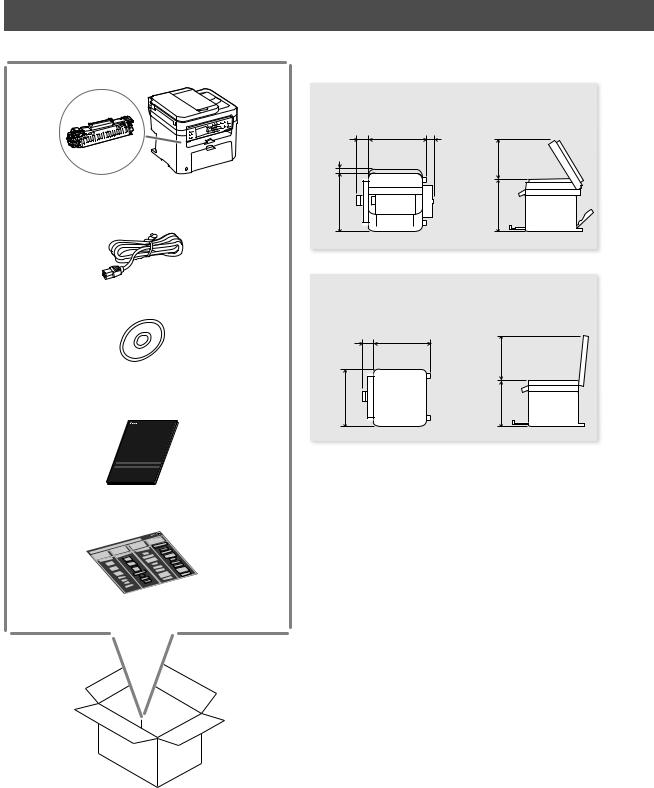
Installing the Machine
Installation Requirements
● MF244dw
|
5” |
14 1/4" |
4 1/4" |
|
|
(128 mm)(362 mm)(106 mm) |
|
||
1 1/2" |
(39 mm) |
|
10 5/8" |
(270 mm) |
15 3/8" |
(390 mm) |
|
14 1/4" |
(360 mm) |
● MF232w
5" |
14 1/4" |
|
(128 mm) |
(362 mm) |
|
15 3/8" (390 mm) |
12 1/4" |
(310 mm) |
12 1/4" |
(312 mm) |
2

Remove all the tape.
1 |
2 |
3
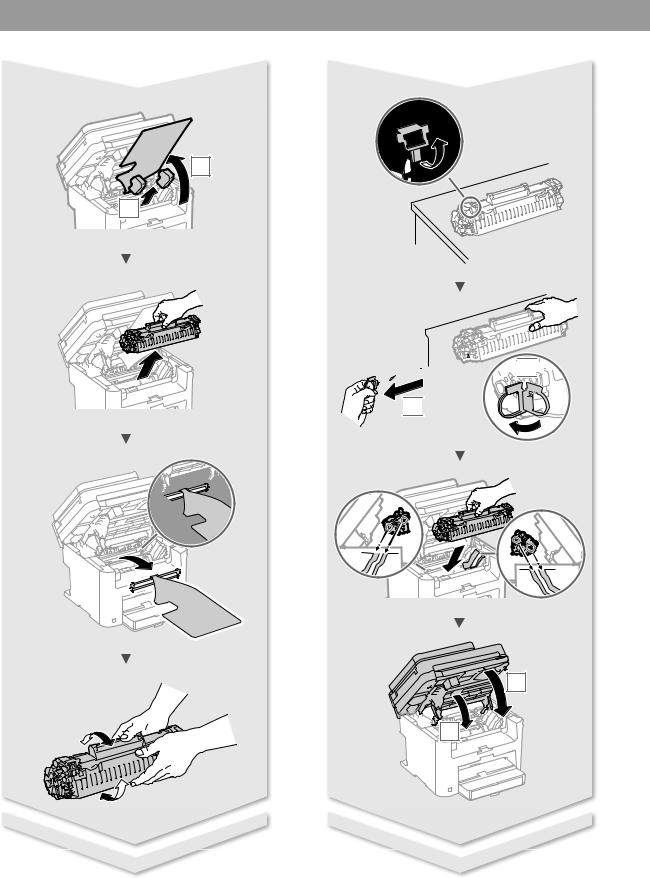
Installing the Machine
1 |
2 |


 1
1


 2
2 


2 |
1 |
4
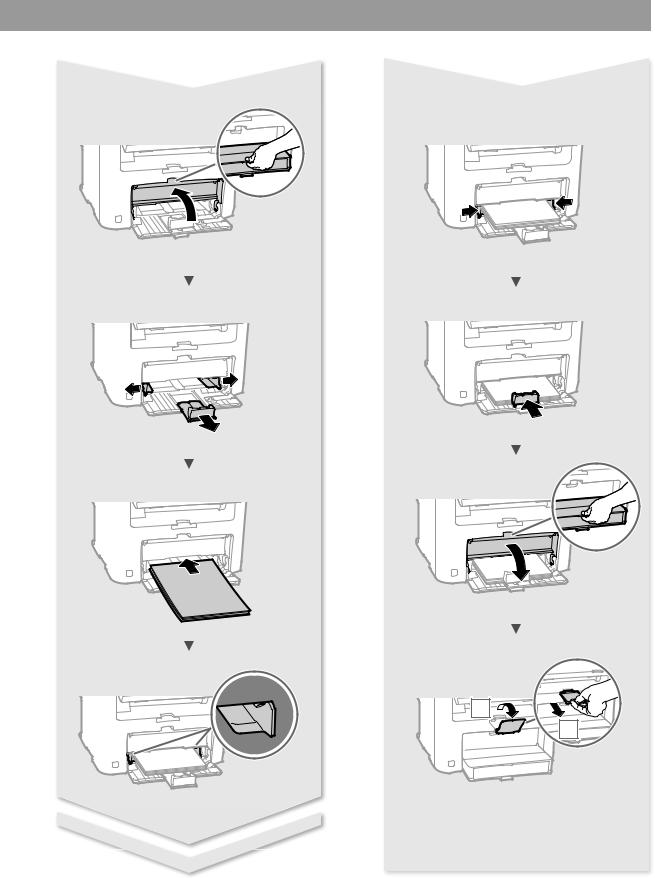
2 |
1 |
5

Contents |
|
About the Manuals ....................................................................... |
8 |
Navigating the Menu and Text Input Method .................... |
8 |
Connecting the Power Cord and Turning ON |
|
the Power ......................................................................................... |
8 |
Specifying the Initial Settings................................................... |
9 |
Choosing the Method to Connect the Machine ................ |
9 |
Choosing the Method to Connect: |
|
Via Wireless LAN or Other Method.......................................... |
9 |
Connecting via a Wired LAN................................................... |
10 |
Table des matières |
|
A propos des manuels.............................................................. |
22 |
Navigation dans le menu et méthode de saisie du |
|
texte ................................................................................................ |
22 |
Branchement du cordon d’alimentation et mise sous |
|
tension............................................................................................ |
22 |
Configuration des réglages initiaux .................................... |
23 |
Choix de la méthode de connexion de la machine ....... |
23 |
Choix de la méthode de connexion de la machine : |
|
Méthode via réseau sans fil ou autre................................... |
23 |
Connecting via a USB Cable ................................................... |
10 |
Connecting via a Wireless LAN .............................................. |
10 |
Setting Wireless LAN ................................................................. |
11 |
Setting a Paper Size and Type................................................ |
13 |
Perform Useful Tasks ................................................................. |
14 |
Replacing Toner Cartridge ...................................................... |
15 |
Clearing Paper Jams .................................................................. |
16 |
* For Mac OS users, please refer to P.13
Connexion via un réseau filaire ............................................. |
24 |
Connexion via un câble USB................................................... |
24 |
Connexion via un réseau sans fil........................................... |
24 |
Configuration du réseau sans fil ........................................... |
25 |
Réglage du format et du type de papier............................ |
27 |
Procédures utiles ........................................................................ |
28 |
Remplacement de la cartouche d’encre ............................ |
29 |
Résolution des bourrages papier ......................................... |
30 |
* Si vous utilisez Mac OS, reportez-vous à la P.27
Contenido |
|
Acerca de los manuales............................................................ |
36 |
Navegación por el menú y método de introducción |
|
de texto.......................................................................................... |
36 |
Conexión del cable de alimentación y encendido del |
|
interruptor de alimentación................................................... |
36 |
Especificación de la configuración inicial.......................... |
37 |
Selección del método de conexión del equipo............... |
37 |
Selección del método de conexión: a través de red |
|
LAN inalámbrica u otro método ........................................... |
37 |
Conexión mediante una red LAN cableada...................... |
38 |
Conexión con un cable USB.................................................... |
38 |
Conexión mediante una red LAN inalámbrica................. |
38 |
Configuración de LAN inalámbrica...................................... |
39 |
Ajuste del tamaño y el tipo del papel ................................. |
41 |
Tareas útiles.................................................................................. |
42 |
Sustitución del cartucho de tóner........................................ |
43 |
Eliminación de atascos de papel .......................................... |
44 |
* Para usuarios de Mac OS, consulte la pág.41 |
|
Índice |
|
Sobre os manuais ....................................................................... |
50 |
Navegação pelo menu e pelo método de entrada de |
|
texto................................................................................................ |
50 |
Como conectar o cabo de alimentação e ligar a |
|
máquina......................................................................................... |
50 |
Especificação das configurações iniciais............................ |
51 |
Escolha do método de conexão da máquina................... |
51 |
Escolher o Método para Conectar: |
|
Através de LAN sem fio ou outro método......................... |
51 |
Conexão via LAN com fio......................................................... |
52 |
Conexão via cabo USB.............................................................. |
52 |
Conexão via LAN sem fio......................................................... |
52 |
Configurações da LAN Sem Fio ............................................. |
53 |
Configuração do tamanho e do tipo de papel ................ |
55 |
Tarefas úteis.................................................................................. |
56 |
Substituição do cartucho de toner ...................................... |
57 |
Eliminação de obstruções de papel..................................... |
58 |
* Para usuários de Mac OS, por favor consulte a pág.55
6

7
About the Manuals
Getting Started (This manual):
Read this manual first. This manual describes the installation of the machine, the settings, and a caution. Be sure to read this manual before using the machine.
MF Driver Installation Guide (Visit the website):
This manual describes software installation.
You can access
http://canon.com/oip-manual to read the User’s Guide that describes all functions of this machine.
User’s Guide (Visit the website):
You can access
http://canon.com/oip-manual to read the User’s Guide that describes all functions of this machine.
En
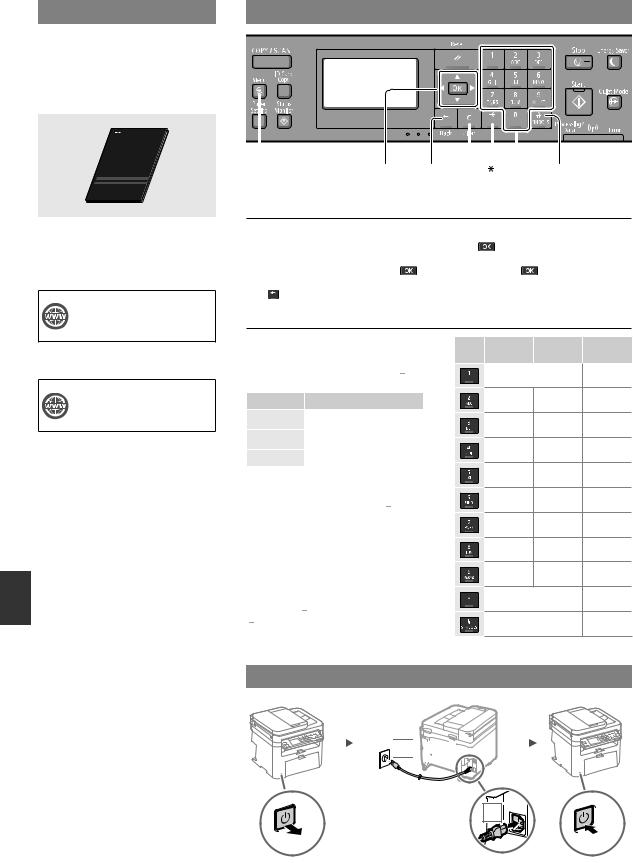
Navigating the Menu and Text Input Method
|
|
|
|
|
|
|
|
|
|
|
|
|
|
|
|
|
|
Menu |
▲▼OK Back Clear |
Numeric keys # |
|||
Navigating the Menu
Item selection or moving the cursor |
Setting confirmation |
|||
among the menu items |
Press |
. However, when <Apply> |
||
Select an item with [▲] or [▼]. |
||||
appears on the display, select <Apply>, |
||||
Proceed to the next hierarchy with |
and then press |
. |
||
or [ ]. Return to the previous hierarchy |
|
|
|
|
with or [ ]. |
|
|
|
|
Text Input Method
Changing entry mode
Press [▼] to select <Entry Mode>, and then press  . You can also press
  to change the entry mode.
Entry mode |
Available text |
|
<A> |
Uppercase alphabetic letters and |
|
symbols |
||
|
||
<a> |
Lowercase alphabetic letters and |
|
symbols |
||
|
||
<12> |
Numbers |
|
|
|
Entering text, symbols, and numbers
Enter with the numeric keys or  .
.
Moving the cursor (Entering a space)
Move with [ ] or [ ]. Move the cursor to the end of the text and press [ ] to enter a space.
Deleting characters
Delete with  . Pressing and holding
  deletes all characters.
Entry mode: Entry mode: Entry mode: |
||
<A> |
<a> |
<12> |
|
@ . - _ / |
1 |
ABC |
abc |
2 |
DEF |
def |
3 |
GHI |
ghi |
4 |
JKL |
jkl |
5 |
MNO |
mno |
6 |
PQRS |
pqrs |
7 |
TUV |
tuv |
8 |
WXYZ |
wxyz |
9 |
(Not available) |
0 |
|
(space) - . * # ! “ , ; : ^ ` _ = / | ‘ |
(Not available) |
|
? $ @ % & + \ ˜ ( ) [ ] { } < > |
|
|
Connecting the Power Cord and Turning ON the Power
 2
2 


1 |
OFF |
ON |
 Do not connect the USB cable at this time. Connect it when installing software.
8
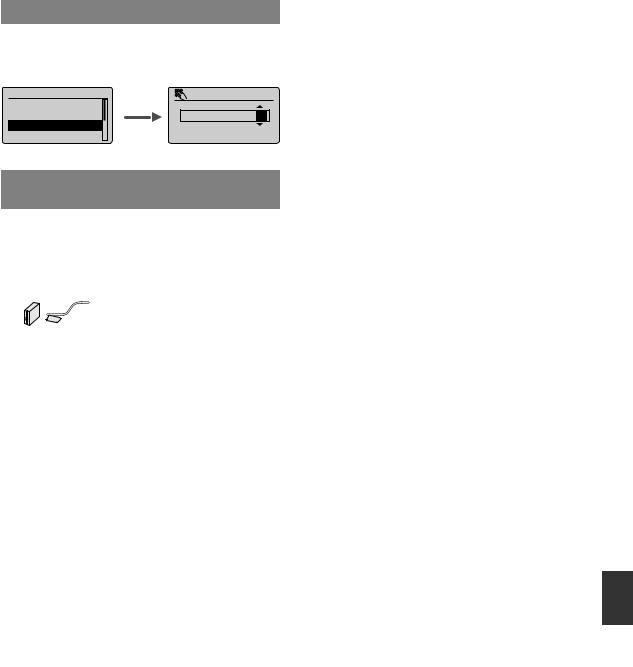
Specifying the Initial Settings
Follow the instructions on the screen, set the language, region, time zone, and date and time. For details on navigating the menu and how to input the numbers, see “Navigating the Menu and Text Input Method” ( P.8).
P.8).
Language |
Current Time Set. |
|
Chinese (Simplified) |
||
|
||
Chinese (Traditional |
08/08/2014 12:52 AM |
|
English |
|
|
French |
(0:00-12:59) |
Choosing the Method to Connect the Machine
● Connecting via a Wired LAN
You can connect the machine to a wired router. Use the LAN cables to connect the machine to the wired router (access point).
 Connect the computer to the router by cable or wirelessly.
 Make sure that there is an available port in the router to connect the machine and the computer.
 Have a LAN Cable of Category 5 twisted-pair cable or higher ready.
● Connecting via a USB cable
You can connect the machine to the computer using a USB cable.
 Make sure that the USB cable you use has the following mark.
● Connecting via a Wireless LAN
You can connect the machine to a wireless router*. Since it is wirelessly connected, no LAN cables are needed.
*A wireless router (access point) that supports IEEE802.11b/g/n is required.
 Connect the computer to the router by cable or wirelessly.
Check if your router has a button
Select from the following two methods depending on the router (access point) that you are using.
●There is a button.
You can easily setup if your router (access point) has a button, and if the mark is on the router.
●There is no button.
If there is no button on your router (access point), manually select your SSID and complete the settings.
NOTE
•If you are looking to install your new device via a Wireless Network connection, you can find a video and written guides with step-by-step instruction to assist you through the process from the following URL: http://www.usa.canon.com/WirelessHelp
Viewing these guides will ensure a smooth setup of the device into your existing wireless environment.
●Direct Connection
Connect a mobile device to the machine wirelessly and directly without routing through a wireless LAN router (or access point).
 User’s Guide “Can Be Used Conveniently with a Mobile Device” “Make Direct Connection (Access Point Mode)”
Choosing the Method to Connect:
Via Wireless LAN or Other Method
Use wireless LAN to |
Current Time Set. |
||
Must rechg. battery |
|
||
connect to network? |
|
||
for 24 hours to save |
|
||
(Can config. later.) |
|
||
|
|||
time settings. After |
|
||
Yes |
No |
|
|
turning main power |
|
||
|
|
|
|
There is a button.
 Start from step 4 of ”Push Button Mode” (P.11).
Yes There is no button.
 Start from step 4 of ”Setting the Access Point
Manually” (P.12).
Connect to the computer via a wired LAN |
En |
 Proceed to “Connecting via a Wired LAN” (P.10).
No
Connect to the computer via a USB cable
 Proceed to “Connecting via a USB Cable” (P.10).
Connect to the computer via a wireless LAN later
 Proceed to “Connecting via a Wireless LAN” (P.10).
9

Connecting via a Wired LAN
Checking Before the Setup
Router Internet or
hub
LAN cable
Are the computer and the router (or hub) properly connected using a LAN cable?
For more information, see the instruction manual for the network device you are using, or contact the networking device manufacturer.
Have the network settings on the computer been completed?
If the computer is not properly configured, you may not be able to use the wired LAN connection even after completing the following settings.
NOTE
•You cannot connect both the wired LAN and wireless LAN at the same time. In addition, the machine is set to the “Wired LAN” by default.
•When you connect to a network environment that is not security protected, your personal information could be disclosed to third parties. Please use caution.
•If you connect through a LAN in the office, contact your network administrator.
Connecting via a Wired LAN
1 Connect the LAN cable.
En
The IP address will be automatically configured in 2 minutes. If you want to set the IP address manually, see the following items.
 User’s Guide “Network” “Connecting to a Network” “Setting IP Addresses”
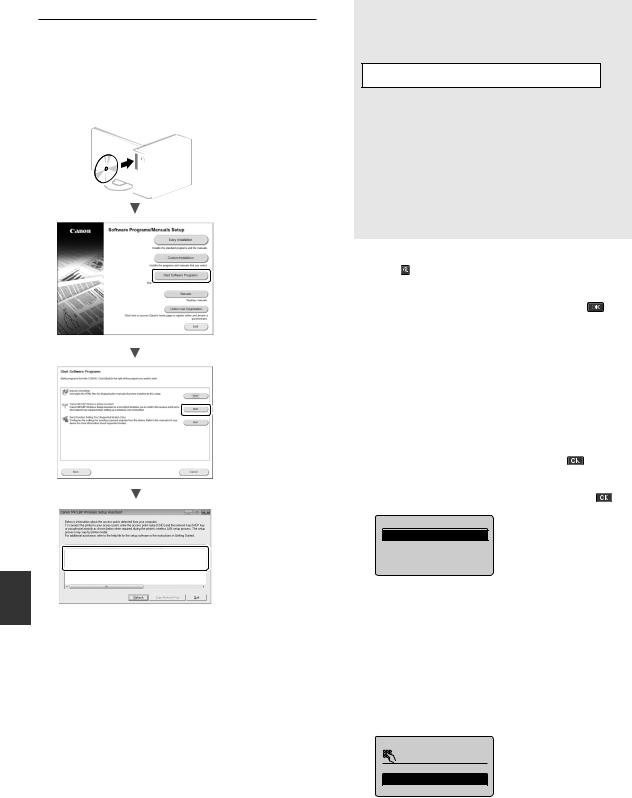
2Install the driver and software using the provided DVD-ROM.
 See “For details on the installation procedures:” (P.13).
  Proceed to “Setting a Paper Size and Type” (P.13).
Connecting via a USB Cable
Install the Driver and Software
Install the driver and software on the provided DVD-ROM.
 See “For details on the installation procedures:” (P.13).
  Proceed to “Setting a Paper Size and Type” (P.13).
NOTE
•If you connected the USB cable before installing, first remove the USB cable and then re-install.
Connecting via a USB Cable
Follow the MF Driver Installation Guide to connect the USB cable.
 Proceed to “Setting a Paper Size and Type” (P.13).
Connecting via a Wireless LAN
Checking Before the Setup

 Wireless LAN Router
Internet
Is the computer connected to the router (access point) correctly by a LAN cable or wireless LAN?
For more information, see the instruction manual for the network device you are using, or contact the networking device manufacturer.
Have the network settings on the computer been completed?
If the computer is not properly configured, you may not be able to use the wireless LAN connection even after completing the following settings.
10
NOTE
•You cannot connect both the wired LAN and wireless LAN at the same time. In addition, the machine is set to the “Wired LAN” by default.
•When you connect to an unsecured network environment, your personal information could be disclosed to third parties. Please use caution.
•If you connect through a LAN in the office, contact your network administrator.
Checking the Router
Select the connection method to the wireless LAN. Select from the following two methods depending on the router (access point) that you are using.
● There is a button.
This machine supports WPS (Wi-Fi Protected Setup). You can easily set up if your router (access point) has a button, and if the mark is on the router.
 If you are not sure whether or not your router supports WPS, please see the manual included in the product, or contact the product manufacturer.
● There is no button.
If there is no button on your router (access point), you
may manually select SSID and complete the settings. In this case, you need to remember SSID and network key of your
router (access point).
See “1 Check SSID or Network Key for a Wireless LAN Router/
Access Point.” (P.12) to learn how to find out your SSID and network key.
To set up with the WPS PIN code method/To set up manually:
 User’s Guide “Connecting to a Wireless LAN”
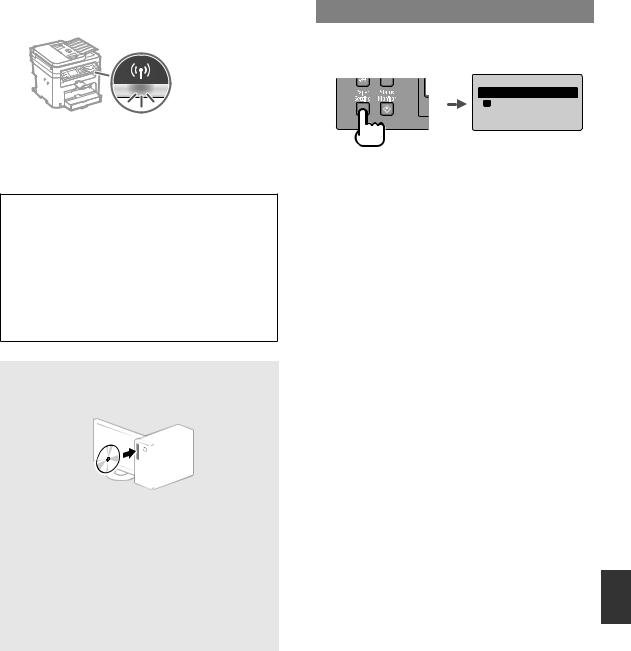
Setting Wireless LAN
Push Button Mode
1 |
Press . |
2 |
Select <Network Settings>, and then press . |
3Select <Wireless LAN Settings>, and then press  .
.
If a screen appears asking whether to enable the wireless
LAN, select <Yes>, and then press  .
.
4Read the message that is displayed, and then press  .
.
5Select <WPS Push Button Mode>, and then press  .
.
Wireless LAN Settings
SSID Settings
WPS Push Button Mode
WPS PIN Code Mode
Power Save Mode
6 Select <Yes>, and then press  .
.
7Press and hold* the button until the lamp lights or blinks.
You should press the WPS button within 2 minutes after you select <Yes> in step 6.
* The time that you should hold the button may vary depending on the router you are using.
8Wait approximately 2 minutes after the connection.
IP address is set during this period of time.
When an error message appears:
Press  to close the screen, check whether or not the network key is correct, and then retry the settings. If the access point cannot be detected even after retrying, see the following.
 User’s Guide “When an Error Message Appears”
When checking the network connection: |
|
You can check if the machine is properly connected to |
|
the network by using a computer that is connected to the |
|
network. |
|
User’s Guide “Viewing Network Settings” |
|
To set IP address manually: |
En |
|
|
User’s Guide “Connecting to a Wireless LAN” |
|
11
Setting the Access Point Manually
1Check SSID or Network Key for a Wireless LAN Router/Access Point.
•Check the label on the Wireless LAN router.
•You can check the SSID or the network key using “Canon MF / LBP Wireless Setup Assistant,” which is included in the DVD-ROM supplied with the machine.
SampleABCD |
WEP |
01234567890123456789ABCDEF |
SampleEFGHIJ |
WPA-PSK |
543210EDCBA |
SampleK |
WPA2-PSK |
1234ABCD |
En
If the information of the wireless LAN router is not displayed, click the [Refresh] button. If the information is not displayed when you click the [Refresh] button, check if the computer settings for a wireless LAN router (access point) are complete.
2Write down the name of SSID and network key displayed in step 1. When multiple access points are displayed, write all SSIDs that are displayed.
SSID
It is sometimes written as name of network, or name of access point. If there are multiple SSIDs, please write down all.
Network Key
It is sometimes written as PIN, WEP key, WPA/WPA2 passphrase, PSK or preshared key.
|
|
|
|
|
|
|
|
|
|
|
|
|
|
|
|
|
|
|
|
|
|
|
|
|
|
|
|
|
|
|
|
|
|
|
|
|
|
|
|
|
|
|
|
|
|
|
|
|
|
|
|
|
|
|
|
|
|
|
|
|
|
|
|
|
|
|
|
|
|
|
|
|
|
|
|
|
|
|
|
|
|
|
|
|
|
|
|
|
|
|
|
|
|
|
|
|
|
|
|
|
|
|
|
|
|
|
|
|
|
|
|
|
|
|
|
|
|
|
|
|
|
|
|
|
|
|
|
|
|
|
|
|
|
|
|
|
|
|
|
|
|
|
|
|
|
|
|
|
|
|
|
|
|
|
|
|
|
|
|
|
|
|
|
|
|
|
|
|
|
|
|
|
|
|
|
|
|
|
|
|
|
|
|
|
|
|
|
|
|
|
|
|
|
|
|
|
|
|
|
|
|
|
|
|
|
|
|
|
|
|
|
|
|
|
|
3 |
Press . |
|||||||||||||||||||||||||
4 |
Select <Network Settings>, and then press . |
|||||||||||||||||||||||||
5Select <Wireless LAN Settings>, and then press  .
.
If a screen appears asking whether to enable the wireless LAN, select <Yes>, and then press  .
.
6Read the message that is displayed, and then press  .
.
7 |
Select <SSID Settings>, and then press . |
8 |
Select <Select Access Point>, and then press . |
SSID Settings
Select Access Point
Enter Manually
9Select a wireless LAN router.
If multiple matched SSIDs are displayed, select the ID that is listed first (the one with the strongest signal).
10 Enter the network key that you have written down.
Enter the network key using the numeric keys.Select <Apply>, and then press  .
.

 Char.)
XXXXXXXX
<Apply>
Entry Mode: A
11 Select <Yes>, and then press  .
.
12
12 After the <Connected.> screen is displayed, wait until the Wi-Fi indicator stops blinking and turns on.
13 Wait approximately 2 minutes after the connection.
IP address is set during this period of time.
When an error message appears:
Press  to close the screen, check whether or not the network key is correct, and then retry the settings.
If the access point cannot be detected even after retrying, see the following.
 User’s Guide “When an Error Message Appears”
To set IP address manually:
 User’s Guide “Connecting to a Wireless LAN”
Setting a Paper Size and Type
Following the instructions on the screen, set the paper size and type.
Paper Settings

 MP Tray
1 Drawer 1
Select Frequently Us...
For details on the installation procedures:
Install the driver and software using the provided DVD-
ROM.
 You can also download the driver from the Canon website.
For details on the installation procedures, see the MF Driver
Installation Guide.
For Mac OS users:
The DVD-ROM supplied with this machine may not include
the printer driver for Mac OS. This is different depending En on when you purchase the machine. Please find and
download the appropriate driver on our Canon homepage. For further information on installation or using the driver, see the manual for the driver.
13
Perform Useful Tasks
You can use various functions in this machine. Following functions are the overview of the main functions that you can use routinely.
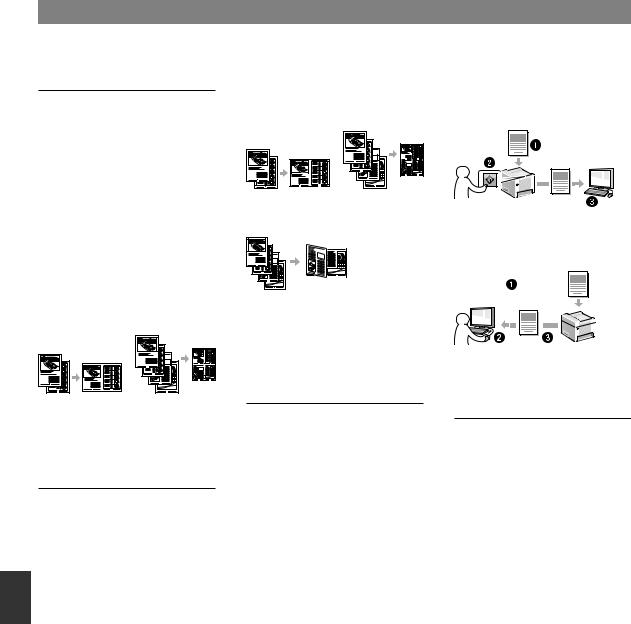
Copy
Enlarged/Reduced Copies
You can enlarge or reduce standard size documents to copy on standard size paper or specify the copy ratio in percentage.
2-Sided Copying*
You can copy 1-sided documents on both sides of paper.
Collating
You can sort copies into sets arranged in page order.
Reduced Layout
You can reduce the amount of paper by printing multiple documents onto one sheet.
2 on 1 |
4 on 1 |
Copying ID Card
You can make a copy of a 2-sided card onto one side of paper.
Enlarged/Reduced Printing
2-Sided Printing*
Reduced Layout |
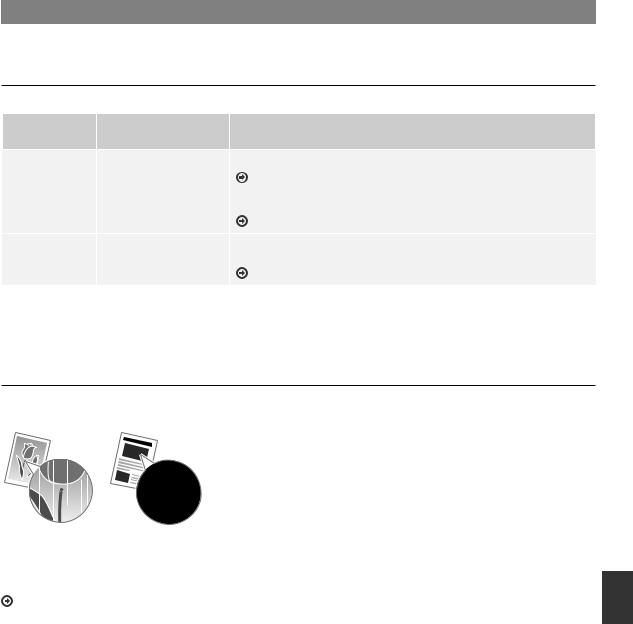
Scan |
|
You can reduce the amount of paper |
Saving the Documents Using the |
|
by printing multiple documents onto |
||
Operation Panel of the Machine |
||
one sheet. |
||
|
|
Documents |
|
Data |
2 on 1 |
4 on 1 |
Booklet Printing*
Saving the Documents Using |
Operations from a Computer |
● Scanning with the MF Scan Utility |
Documents |
Poster Printing |
Data |
|
|
Watermark Printing |
|
Displaying a Preview before Printing |
|
Selecting a “Profile” |
● Scanning from an Application |
|
● Scanning with the WIA Driver |
Network Settings
This machine comes equipped with a network interface that you can construct a network environment easily. You can print a document, use the network scan from all computers which are connected with the machine. The machine supports to increase work efficiency as a shared machine in the office.
Remote UI
You can understand the condition of the machine from the computers on the network. You can access the machine and manage jobs or specify various settings via network.
* MF244dw Only
En
14
Replacing Toner Cartridge
Toner cartridges are consumables. When the toner becomes nearly empty or has run out completely in the middle of a job run, a message appears on the screen, or the following problems may occur. Take the appropriate action accordingly.
When a Message Appears
When the toner becomes nearly empty in the middle of a job run, a message appears on the screen.
Message |
When the message is |
Description and Solutions |
|
displayed on the screen |
|||
|
|
||
<Preparing |
When the toner cartridge |
Shake the toner cartridge to evenly distribute the toner inside the cartridge. |
|
a cartridge is |
needs a replacement |
User’s Guide “Before Replacing the Toner Cartridge” |
|
recommended.> |
soon. |
||
We recommend that the toner cartridge be replaced before printing high- |
|||
|
|
||
|
|
volume documents. |
|
|
|
User’s Guide “How to Replace Toner Cartridges” |
|
<Cart. end of |
When the toner cartridge |
If this message does not disappear, replace the toner cartridge. You can |
|
lifetime. Rplcmt. |
has reached the end of |
continue printing, but the print quality cannot be guaranteed. |
|
recommended.> |
its life. |
User’s Guide “Replacing Toner Cartridges” |
|
|
|
When white streaks appear on the output, or the output is partially faded:
When white streaks appear on the output or the output is partially faded, the toner cartridge has almost reached the end of its life, even if no message appears on the screen. When the print quality becomes unacceptable, see the following to fix the problem.
When White Streaks Appear on the Output or the Output Is Partially Faded
When the toner nearly runs out, white streaks appear on the output, or the output is partially faded.
No message appears on the screen, if the toner nearly runs out. Replace the toner cartridge when white streaks appear on the output, or the output is partially faded.
When this problem occurs:
Follow the steps in the procedure below before replacing the toner cartridge. The machine continues printing until the toner runs out completely.
User’s Guide “Before Replacing the Toner Cartridge” |
En |
When the print quality is still unacceptable:
If the problem persists after you have followed the steps in the procedure below, replace the toner cartridge.
 User’s Guide “How to Replace Toner Cartridges”
15
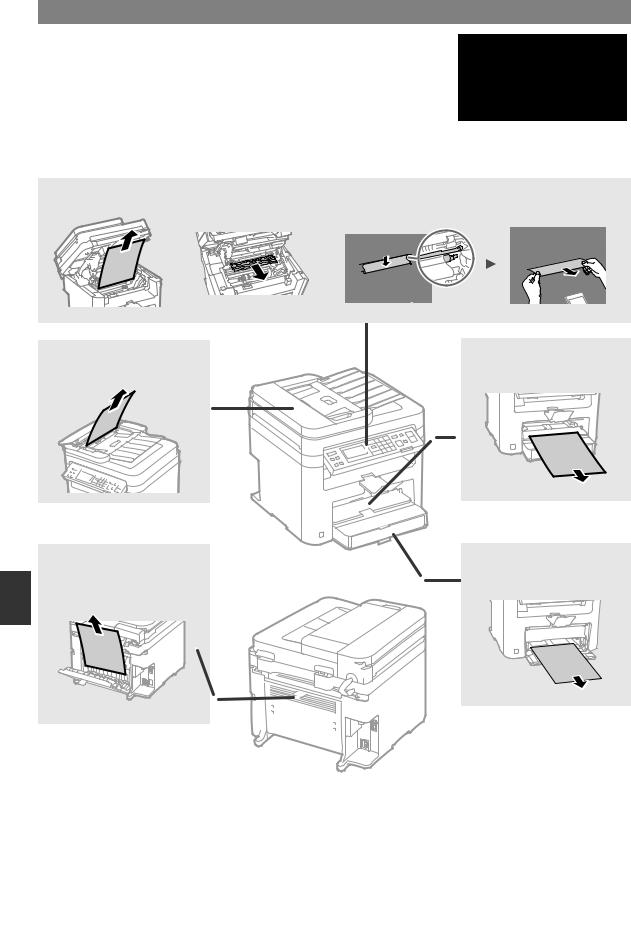
Clearing Paper Jams
If the following screen appears, a paper jam has occurred inside the machine. Follow the procedure displayed on the screen to remove the jammed document or paper. This manual indicates only areas where paper jams occur. For details on each function, see the User’s Guide.
Inside the machine
Feeder
(MF244dw only)
Rear cover
(MF244dw only)
En
 Paper jammed. Press [
  ] to display steps.
Manual Feed Slot
Paper drawer
16

En
17

Appendix
Important Safety
Instructions
This chapter describes important safety instructions for the prevention of injury to users of this machine and others, and damage to property. Read this chapter before using the machine, and follow the instructions to use the machine properly. Do not perform any operations not described in this manual. Canon will not be responsible for any damages resulting from operations not described in this manual, improper use, or repair or changes not performed by Canon or a third party authorized by Canon. Improper operation or use of this machine could result in personal injury and/or damage requiring extensive repair that may not be covered under your Limited Warranty.
 WARNING
Indicates a warning concerning operations that may lead to death or injury to persons if not performed correctly. To use the machine safely, always pay attention to these warnings.
 CAUTION
Indicates a caution concerning operations that may lead to injury to persons if not performed correctly. To use the machine safely, always pay attention to these cautions.
 IMPORTANT
Indicates operational requirements and restrictions. Be sure to read these items carefully to operate the machine correctly and avoid damage to the machine or property.
Installation
To use this machine safely and in a trouble-free way, carefully read the following precautions and install the machine in an appropriate location.
 WARNING
Do not install in a location that may result in a fire or electrical shock
|
• |
A location where the ventilation slots are |
|
|
blocked (too close to walls, beds, sofas, rugs, or |
|
|
similar objects) |
|
• |
A damp or dusty location |
|
• |
A location exposed to direct sunlight or outdoors |
En |
• |
A location subject to high temperatures |
• |
A location exposed to open fl ames |
|
|
• |
Near alcohol, paint thinners or other |
|
|
fl ammable substances |
|
|
Other warnings
•Do not connect unapproved cables to this machine. Doing so may result in a fi re or electrical shock.
•Do not place necklaces and other metal objects or containers fi lled with liquid on the machine. If foreign substances come in contact with electrical parts inside the machine, it may result in a fi re or electrical shock.
•If any foreign substance falls into this machine, unplug the power plug from the AC power outlet and contact your local authorized Canon dealer.
Do not install in the following locations
The machine may drop or fall, resulting in injury.
•An unstable location
•A location exposed to vibrations
 CAUTION
Do not install in the following locations
Doing so may result in damage to the machine.
•A location subject to temperature and humidity extremes, whether low or high
•A location subject to dramatic changes in temperature or humidity
•A location near equipment that generates magnetic or electromagnetic waves
•A laboratory or location where chemical reactions occur
•A location exposed to corrosive or toxic gases
•A location that may warp from the weight of the machine or where the machine is liable to sink (a carpet, etc.)
Avoid poorly ventilated locations
This machine generates a slight amount of ozone and other emissions during normal use. These emissions are not harmful to health. However, they may be noticeable during extended use or long production runs in poorly ventilated rooms. To maintain a comfortable working environment, it is recommended that the room where the machine operates be appropriately ventilated. Also avoid locations where people would be exposed to emissions from the machine.
Do not install in a location where condensation occurs
Water droplets (condensation) may form inside the machine when the room where the machine is installed is heated rapidly, and when the machine is moved from a cool or dry location to a hot or humid location. Using the machine under these conditions may result in paper jams, poor print quality, or damage to the machine. Let the machine adjust to the ambient temperature and humidity for at least 2 hours before use.
In altitudes of above sea level 3,000 m or higher
Machines with a hard disk may not operate properly when used at high altitudes of about 3,000 meters above sea level, or higher.
Leveling feet (only for products with leveling feet)
Do not remove the machine’s leveling feet after the machine has been installed, as this may cause the machine to fall or tip over, resulting in personal injury.
Connecting the Telephone Line (Only for Products with a Fax Function)
This machine conforms to a analog telephone line standard. The machine can be connected to the public switched telephone network (PSTN) only. If you connect the machine to a digital telephone line or a dedicated telephone line, it might impede proper operation of the machine and could be the cause of damage. Make sure to confi rm a type of telephone line before connecting the machine. Contact your optical
fi ber line or IP telephone line service providers if you want to connect the machine to those telephone lines.
When using wireless LAN (only for products with a wireless LAN function)
•Install the machine at a distance of 50 meters or less from the wireless LAN router.
•As far as possible, install in a location where communication is not blocked by intervening objects. The signal may be degraded when passing through walls or fl oors.
•Keep the machine as far as possible from digital cordless phones, microwave ovens, or other equipment that emits radio waves.
•Do not use near medical equipment. Radio waves emitted from this machine may interfere with medical equipment, which may result in malfunctions and accidents.
Power Supply
 WARNING
•Use only a power supply that meets the specifi ed voltage requirements. Failure to do so may result in a fi re or electrical shock.
•Do not use power cords other than the one provided, as this may result in a fire or electrical shock.
•The provided power cord is intended for use with this machine. Do not connect the power cord to other devices.
•Do not modify, pull, forcibly bend, or perform any other act that may damage the power cord. Do not place heavy objects on the power cord. Damaging the power cord may result in a fi re or electrical shock.
•Do not plug in or unplug the power plug with wet hands, as this may result in an electrical shock.
•Do not use extension cords or multi-plug power strips with the machine. Doing so may result in a fi re or electrical shock.
•Do not wrap the power cord or tie it in a knot, as this may result in a fi re or electrical shock.
•Insert the power plug completely into the AC power outlet. Failure to do so may result in a fi re or electrical shock.
•Remove the power plug completely from the AC power outlet during a thunder storm. Failure to do so may result in a fi re, electrical shock, or damage to the machine.
•Make sure that the power supply for the machine is safe, and has a steady voltage.
•Keep the power cord away from a heat source; failure to do this may cause the power cord coating to melt, resulting in a fi re or electrical shock.
•If excessive stress is applied to the connection part of the power cord, it may damage the power cord or the wires inside the machine may disconnect. This could result in a fi re. Avoid the following situations:
–Connecting and disconnecting the power cord frequently.
–Tripping over the power cord.
–The power cord is bent near the connection part, and continuous stress is being applied to the power outlet or the connection part.
–Applying excessive force on the power plug.
 CAUTION
Install this machine near the power outlet and leave sufficient space around the power plug so that it can be unplugged easily in an emergency.
 IMPORTANT
When connecting power
•Do not connect the power cord to an uninterruptible power source. Doing so may result in malfunction of or damage to the machine at power failure.
•If you plug this machine into an AC power outlet with multiple sockets, do not use the remaining sockets to connect other devices.
•Do not connect the power cord to the auxiliary AC power outlet on a computer.
Other precautions
Electrical noise may cause this machine to malfunction or lose data.
Handling
 WARNING
•Immediately unplug the power plug from the AC power outlet and contact an authorized Canon dealer if the machine makes an unusual noise, emits an unusual smell, or emits smoke or excessive heat. Continued use may result in a fi re or electrical shock.
18

•Do not disassemble or modify this machine. There are high-voltage and high-temperature components inside the machine. Disassembly or modifi cation may result in a fi re or electrical shock.
•Place the machine where children will not come in contact with the power cord and other cables or gears and electrical parts inside the machine. Failure to do so may result in unexpected accidents.
•Do not use fl ammable sprays near this machine. If fl ammable substances come into contact with electrical parts inside this machine, it may result in a fi re or electrical shock.
•When moving this machine, be sure to turn OFF the power of this machine, and then unplug the power plug and interface cables. Failure to do so may damage the power cord or interface cables, resulting in a fi re or electrical shock.
•When plugging or unplugging a USB cable when the power plug is plugged into an AC power outlet, do not touch the metal part of the connector, as this may result in an electrical shock.
•Use a modular cable that is shorter than 3 meters.
•Use a USB cable that is shorter than 3 meters.
If the operating noise concerns you
Depending on the use environment and operating mode, if the operating noise is of concern, it is recommended that the machine be Installed in a place other than the office.
If you are using a cardiac pacemaker
This machine generates a low level magnetic fl ux. If you use a cardiac pacemaker and feel abnormalities, please move away from this machine and consult your physician immediately.
 CAUTION
•Do not place heavy objects on this machine as they may fall, resulting in injury.
•For safety, unplug the power plug if the machine will not be used for a long period of time.
•Use caution when opening and closing covers to avoid injury to your hands.
•Keep hands and clothing away from the rollers in the output area. If the rollers catch your hands or clothing, this may result in personal injury.
•The inside of the machine and the output slot are very hot during and immediately after use. Avoid contact with these areas to prevent burns. Also, printed paper may be hot immediately after being output, so use caution when handling it. Failure to do so may result in burns.
Feeder (only for products with a feeder)
•Do not press down hard on the feeder when using the platen glass to make copies of thick books. Doing so may damage the platen glass and result in personal injury.
•Close the feeder gently to avoid catching your hands, as this may result in personal injury.
•Close the feeder gently to avoid catching your hands in the back of the feeder, as this may result in personal injury.
Finisher (only for products with a finisher)
•Do not place your hands in the part of the tray where stapling is performed (near the rollers), especially pay careful attention to the sharp staples, as this may result in personal injury.
Paper drawer (only for products with a paper drawer)
• Do not insert your hand into the machine
while the paper drawer is removed, as this may result in personal injury.
Energy Saver key (only for products with an Energy Saver key)
•Press (Energy Saver) for safety when the machine will not be used for a long period of time, such as overnight. Also, turn OFF the main power switch, and disconnect the power cord for safety when the machine will not be used for an extended period of time, such as during consecutive holidays.
Laser Safety
This product is confi rmed as a Class 1 laser product in IEC60825-1:2007 and EN60825-1:2007.
CLASS 1 LASER PRODUCT
LASER KLASSE 1
APPAREIL À LASER DE CLASSE 1
APPARECCHIO LASER DI CLASSE 1
PRODUCTO LÁSER DE CLASE 1
APARELHO A LASER DE CLASSE 1
LUOKAN 1 LASER-TUOTE
LASERPRODUKT KLASS 1
The laser beam can be harmful to human bodies. Since radiation emitted inside the product is completely confi ned within protective housings and external covers, the laser beam cannot escape from the machine during any phase of user operation. Read the following remarks and instructions for safety.
•Never open covers other than those instructed in the manuals for this machine.
•If the laser beam should escape and enter your eyes, exposure may cause damage to your eyes.
 CAUTION
Use of controls, adjustments, or performance of procedures other than those specifi ed in this manual may result in hazardous radiation exposure
Other precautions
•Follow the instructions on the caution label attached to this machine.
•Do not subject the machine to strong shocks or vibration.
•Do not forcibly open and close doors, covers, and other parts. Doing so may result in damage to the machine.
•Do not turn the main power switch OFF or open the covers while the machine is in operation. This may result in paper jams.
Maintenance and Inspections
Clean this machine periodically. If dust accumulates, the machine may not operate properly. When cleaning, be sure to observe the following. If a problem occurs during operation, see Troubleshooting. If the problem cannot be resolved or you feel the machine requires an inspection, see When a Problem Cannot Be Solved.
 WARNING
•Before cleaning, turn OFF the power and unplug the power plug from the AC power outlet. Failure to do so may result in a fi re or electrical shock.
•Unplug the power plug periodically and clean with a dry cloth to remove dust and grime. Accumulated dust may absorb humidity in the air and may result in a fi re if it comes into contact with electricity.
•Use a damp, well wrung-out cloth to clean the machine. Dampen cleaning cloths with water only. Do not use alcohol, benzenes, paint thinners, or other fl ammable substances. Do not use tissue paper or paper towels. If these substances come into contact with electrical
parts inside the machine, they may generate static electricity or result in a fi re or electrical shock.
•Check the power cord and plug periodically for rust, bent prongs, fraying, cracks, or excessive heat generation. Use of poorlymaintained power cord or plug may result in a fi re or electrical shock.
 CAUTION
•The inside of the machine has hightemperature and high-voltage components. Touching these components may result in injury or burns. Do not touch any part of the machine that is not indicated in the manual.
•When loading paper or removing jammed paper, be careful not to cut your hands with the edges of the paper.
Legal Limitations on the Usage of Your Product and the Use of Images
Using your product to scan, print or otherwise reproduce certain documents, and the use of such images as scanned, printed or otherwise reproduced by your product, may be prohibited by law and may result in criminal and/or civil liability. A non-exhaustive list of these documents is set forth below. This list is intended to be a guide only. If you are uncertain about the legality of using your product to scan, print or otherwise reproduce any particular document, and/or of the use of the images scanned, printed or otherwise reproduced, you should consult in advance with your legal advisor for guidance.
•Paper Money
•Travelers Checks
•Money Orders
•Food Stamps
•Certifi cates of Deposit
•Passports
•Postage Stamps (canceled or uncanceled)
•Immigration Papers
•Identifying Badges or Insignias
•Internal Revenue Stamps (canceled or uncanceled)
•Selective Service or Draft Papers
•Bonds or Other Certifi cates of Indebtedness
•Checks or Drafts Issued by Governmental Agencies
•Stock Certifi cates
•Motor Vehicle Licenses and Certifi cates of Title
•Copyrighted Works/Works of Art without
Permission of Copyright Owner |
En |
Safety-Related Symbols
Power switch: “ON” position
 Power switch: “OFF” position
 Power switch: “STAND-BY” position
 Push-push switch
  “ON”
“ON”  “OFF”
“OFF”
 Protective earthing terminal
Dangerous voltage inside. Do not open covers other than instructed.
 CAUTION: Hot surface. Do not touch.
 Class II equipment
Moving parts: Keep body parts away from moving parts
[NOTE]
Some of symbols shown above may not be affixed depending on the product.
v1602_00_en-GB
19
Laser Safety Label
Consumables
 WARNING
Do not dispose of used toner cartridges in open fl ames. Also, do not store toner cartridges or paper in a location exposed to open fl ames. This may cause the toner or paper to ignite, and result in burns or fi re.
Notice
Product Name
Safety regulations require the product’s name to be registered.
In some regions where this product is sold, the following name(s) in parentheses ( ) may be registered instead.
imageCLASS MF244dw (F173700) imageCLASS MF232w (F171900)
FCC (Federal Communications Commission)
Users in the U.S.A
Contains Transmitter Module FCC ID: TLZ-NM383
This device complies with Part 15 of the FCC Rules. Operation is subject to the following two conditions: (1) this device may not cause harmful interference, and (2) this device must accept any interference received, including interference that may cause undesired operation.
FCC CAUTION
Changes or modifi cations not expressly approved by the party responsible for compliance could void the user’s authority to operate the equipment.
[NOTE]
This equipment has been tested and found to comply with the limits for a Class B digital device, pursuant to part 15 of the FCC Rules. These limits
En are designed to provide reasonable protection against harmful interference in a residential installation. This equipment generates, uses and can radiate radio frequency energy and, if not installed and used in accordance with the instructions, may cause harmful interference to radio communications. However, there is no guarantee that interference will not occur in a particular installation. If this equipment does cause harmful interference to radio or television reception, which can be determined by turning the equipment off and on, the user is encouraged to try to correct the interference by one or more of the following measures:
–Reorient or relocate the receiving antenna.
–Increase the separation between the equipment and receiver.
–Connect the equipment into an outlet on a circuit different from that to which the receiver is connected.
–Consult the dealer or an experienced radio/TV technician for help.
This transmitter must not be co-located or operated in conjunction with any other antenna or transmitter.
This equipment complies with FCC radiation exposure limits set forth for an uncontrolled
environment and meets the FCC radio frequency (RF) Exposure Guidelines. This equipment should be installed and operated keeping the radiator at least 20cm or more away from person’s body.
Use of shielded cable is required to comply with class B limits in Subpart B of Part 15 of FCC Rules. Do not make any changes or modifi cations to the equipment unless otherwise specifi ed in this manual. If you make such changes or
modifi cations, you could be required to stop operation of the equipment.
CANON U.S.A., INC
One Canon Park, Melville, NY 11747, U.S.A. TEL No. 1-800-OK-CANON
Regulatory Information for Users in Canada English This device complies with Industry Canada licence-exempt RSS standard(s). Operation is subject to the following two conditions: (1) this device may not cause interference, and (2) this device must accept any interference, including interference that may cause undesired operation of the device.
This equipment complies with IC radiation exposure limits set forth for an uncontrolled environment and meets RSS-102 of the IC radio frequency (RF) Exposure rules. This equipment should be installed and operated keeping the radiator at least 20cm or more away from
person’s body.
Français [ French ] Le présent appareil est conforme aux CNR d’Industrie Canada applicables aux appareils radio exempts de licence. L’exploitation est autorisée aux deux conditions suivantes : (1) l’appareil ne doit pas produire de brouillage, et (2) l’utilisateur de l’appareil doit accepter tout brouillage radioélectrique subi, même si le brouillage est susceptible d’en compromettre le fonctionnement.
Cet équipement est conforme aux limites d’exposition aux rayonnements énoncées pour un environnement non contrôlé et respecte les règles d’exposition aux fréquences radioélectriques (RF) CNR-102 de l’IC. Cet équipement doit être installé et utilisé en gardant une distance de 20 cm ou plus entre le radiateur et le corps humain.
Regulatory Information for Users in Mexico
Módulo WLAN instalado adentro de este producto
AW-NM383 RCPAZAW13-2287 AzureWave
AW-NM383
La operación de este equipo está sujeta a las siguientes dos condiciones:
(1)es posible que este equipo o dispositivo no cause interferencia perjudicial y
(2)este equipo o dispositivo debe aceptar cualquier interferencia, incluyendo la que pueda causar su operación no deseada.
Regulatory information for users in Brazil
Este equipamento possui um módulo de radiação restrita homologado na Anatel sob o número
0070-14-1529.
MODELO: AW-NM383
0070-14-1529
( 0 1 ) 0 7 8 9 8 5 8 1 3 4 0 8 5 0
Este equipamento opera em caráter secundário,
isto é, não tem direito à proteção contra interferência prejudicial, mesmo de estações do mesmo tipo e não pode causar interferência a sistemas operando em caráter primário.
Disclaimers
•The information in this document is subject to change without notice.
•CANON INC. MAKES NO WARRANTY OF ANY KIND WITH REGARD TO THIS MATERIAL, EITHER EXPRESS OR IMPLIED, EXCEPT AS PROVIDED HEREIN, INCLUDING WITHOUT LIMITATION, THEREOF, WARRANTIES AS TO MARKETABILITY, MERCHANTABILITY, FITNESS FOR A PARTICULAR PURPOSE OF USE OR NONINFRINGEMENT. CANON INC. SHALL NOT BE LIABLE FOR ANY DIRECT, INCIDENTAL, OR CONSEQUENTIAL DAMAGES OF ANY NATURE, OR LOSSES OR EXPENSES RESULTING FROM THE USE OF THIS MATERIAL.
•The following applies in California, USA only: The battery included with your product contains Perchlorate Material and may require special handling.
See http://www.dtsc.ca.gov/hazardouswaste/ perchlorate/ for details.
About This Manual
Keys and Buttons Used in This Manual
The following symbols and key names are a few examples of how keys to be pressed are expressed in this manual.
•Operation panel keys: [Key icon] Example:
•Display: <Specify destination.>
•Buttons and items on the computer display: [Preferences]
Illustrations and Displays Used in This Manual
Illustrations and displays used in this manual are which of imageCLASS MF244dw unless
specifi ed.
Trademarks
Mac is a trademark of Apple Inc.
Microsoft, Windows, Windows Vista, Windows Server, Internet Explorer, Excel, and PowerPoint are either registered trademarks or trademarks of Microsoft Corporation in the United States and/ or other countries.
Other product and company names herein may be the trademarks of their respective owners.
Third Party Software
This Canon product (the “PRODUCT”) includes third-party software modules. Use and distribution of these software modules, including any updates of such software modules (collectively,the “SOFTWARE”) are subject to license conditions below.
(1)You agree that you will comply with any applicable export control laws, restrictions or regulations of the countries involved in the event that the PRODUCT including the SOFTWARE is shipped, transferred or exported into any country.
(2)Rights holders of the SOFTWARE retain in all respects the title, ownership and intellectual property rights in and to the SOFTWARE.
Except as expressly provided herein, no license or right, expressed or implied, is hereby conveyed or granted by rights holders of the SOFTWARE to you for any intellectual property of rights holders of the SOFTWARE.
(3)You may use the SOFTWARE solely for use with the PRODUCT.
(4)You may not assign, sublicense, market, distribute, or transfer the SOFTWARE to any
20
 Loading...